Android在地化
Android應用程式可以在許多不同地區的許多裝置上執行。為了使應用程式更具互動性,應用程式應該處理以適合應用程式將要使用的語言環境方面的文字,數位,檔案等。
在本章中,我們將解釋,如何根據不同區域等應用程式我們將在地化的應用中定位使用的字串,並以同樣的方式的其他東西可以在地化。
在地化字串
為了在你的應用程式中使用的字串進行在地化,使RES下一個新的檔案夾名稱為本地值(values-local),當地將被替換的區域。
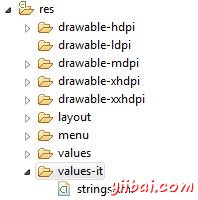
例如,在意大利的情況下,值在(values-it)檔案夾將在res下。這顯示在下面的圖片:

該檔案夾製成之後,從預設的檔案夾中的strings.xml複製到所建立的檔案夾。並更改其內容。舉例來說,已經改變參考hello world字串的值。
意大利, RES/VALUES-IT/STRINGS.XML
<;?xml version="1.0" encoding="utf-8"?>
<resources>
<string name="hello_world">Ciao mondo!</string>
</resources>
西班牙, RES/VALUES-IT/STRINGS.XML
<;?xml version="1.0" encoding="utf-8"?>
<resources>
<string name="hello_world">Hola Mundo!</string>
</resources>
法國,RES/VALUES-IT/STRINGS.XML
<;?xml version="1.0" encoding="utf-8"?>
<resources>
<string name="hello_world">Bonjour le monde !</string>
</resources>
除了這些語言,其他語言的區域碼已在表中給出:
| Sr.No | 語言和程式碼 |
|---|---|
| 1 |
Afrikanns 程式碼:af 檔案夾名稱: values-af |
| 2 |
Arabic 程式碼:ar 檔案夾名稱:values-ar |
| 3 |
Bengali 程式碼:bn檔案夾名稱: |
| 4 |
Czech 程式碼:cs檔案夾名稱:values-cs |
| 5 |
Chinese 程式碼:zh檔案夾名稱: values-zh |
| 6 |
German 程式碼:de 檔案夾名稱:values-de |
| 7 |
French 程式碼:fr 檔案夾名稱::values-fr |
| 8 |
Japanese 程式碼:ja 檔案夾名稱:values-ja |
例子
這裡有一個例子演示如何使用字串的在地化的。它建立了一個基本的應用程式,允許根據美國和意大利地區的自定義應用程式。
為了試驗這個例子,可以在實際裝置或模擬器執行此應用程式。
| Steps | 描述 |
|---|---|
| 1 | 使用Android Studio建立Android應用程式,並將其命名為: Locals。在建立這個專案,確保目標SDK編譯在Android SDK的最新版本或使用更高階別的API |
| 2 | 修改src/MainActivity.java檔案新增必要的程式碼 |
| 3 | 修改res/layout/activity_main新增相應的XML元件 |
| 4 | 修改res/values/string.xml 新增必要的字串 |
| 5 | 建立 res/values-it/string.xml新增必要的字串 |
| 6 | 執行應用程式並選擇執行Android裝置,並在其上安裝的應用和驗證結果 |
以下是修改後的主活動檔案的內容 src/com.yiibai.locals/MainActivity.java.
package com.example.locals;

import android.os.Bundle;
import android.app.Activity;
import android.view.Menu;

public class MainActivity extends Activity {

   @Override
   protected void onCreate(Bundle savedInstanceState) {
      super.onCreate(savedInstanceState);
      setContentView(R.layout.activity_main);
   }

   @Override
   public boolean onCreateOptionsMenu(Menu menu) {
      // Inflate the menu; this adds items to the action bar if it is present.
      getMenuInflater().inflate(R.menu.main, menu);
      return true;
   }

}
以下是修改 res/layout/activity_main.xml 的內容
<RelativeLayout xmlns:android="http://schemas.android.com/apk/res/android"
   xmlns:tools="http://schemas.android.com/tools"
   android:layout_width="match_parent"
   android:layout_height="match_parent"
   android:paddingBottom="@dimen/activity_vertical_margin"
   android:paddingLeft="@dimen/activity_horizontal_margin"
   android:paddingRight="@dimen/activity_horizontal_margin"
   android:paddingTop="@dimen/activity_vertical_margin"
   tools:context=".MainActivity" >

   <TextView
      android:id="@+id/textView1"
      android:layout_width="wrap_content"
      android:layout_height="wrap_content"
      android:layout_alignParentTop="true"
      android:layout_centerHorizontal="true"
      android:layout_marginTop="174dp"
      android:text="@string/hello_world"
      android:textAppearance="?android:attr/textAppearanceLarge" />

</RelativeLayout>
以下是 res/values/string.xml. 的內容
<?xml version="1.0" encoding="utf-8"?>
<resources>

   <string name="app_name">Locals</string>
   <string name="action_settings">Settings</string>
   <string name="hello_world">Hello world!</string>

</resources>
以下是 res/values-it/string.xml. 的內容
<?xml version="1.0" encoding="utf-8"?>
<resources>

   <string name="app_name">Locals</string>
   <string name="action_settings">Settings</string>
   <string name="hello_world">Ciao mondo!</string>

</resources>
以下是 AndroidManifest.xml 檔案的內容
<?xml version="1.0" encoding="utf-8"?>
<manifest xmlns:android="http://schemas.android.com/apk/res/android"
   package="com.yiibai.locals"
   android:versionCode="1"
   android:versionName="1.0" >

   <uses-sdk
      android:minSdkVersion="8"
      android:targetSdkVersion="17" />

   <application
   android:allowBackup="true"
   android:icon="@drawable/ic_launcher"
   android:label="@string/app_name"
   android:theme="@style/AppTheme" >
      <activity
         android:name="com.yiibai.locals.MainActivity"
         android:label="@string/app_name" >
         <intent-filter>
            <action android:name="android.intent.action.MAIN" />

            <category android:name="android.intent.category.LAUNCHER" />
         </intent-filter>
      </activity>
   </application>
</manifest>
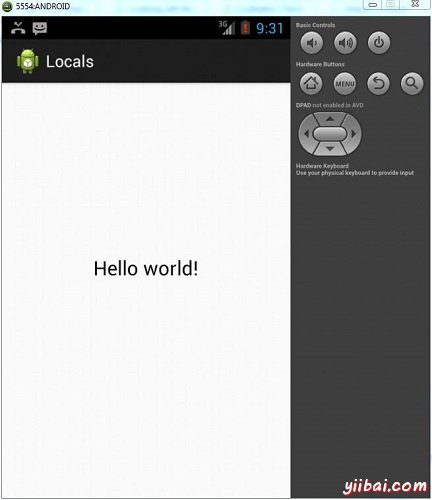
讓我們試著來執行修改在地化應用。安裝程式AVD並啟動它,如果一切設定和應用程式都沒有問題,它會顯示以下模擬器視窗:

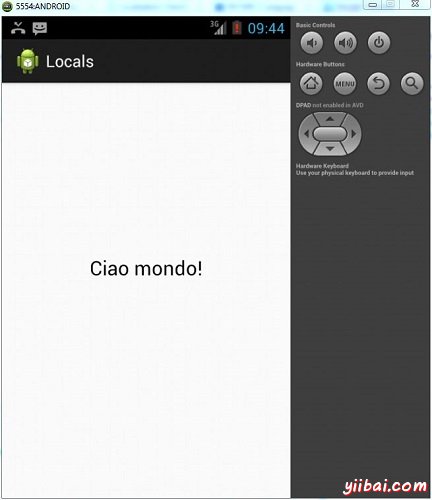
現在從選單/系統設定/語言意大利改變設定裝置的語言。
現在再次開啟應用程式,這時候會看到的Hello World在意大利語言。它已被證明下面::
