Android Bluetooth(藍芽)範例
在很多方面,藍芽是一種能夠傳送或接受兩個不同的裝置之間傳輸的資料。 Android平台包含了藍芽框架,使裝置以無線方式與其他藍芽裝置進行資料交換的支援。
Android提供藍芽API來執行這些不同的操作。
-
掃描其他藍芽裝置
-
獲取配對裝置列表
-
連線到通過服務發現其他裝置
Android提供BluetoothAdapter類藍芽通訊。通過呼叫建立的物件的靜態方法getDefaultAdapter()。其語法如下給出。
private BluetoothAdapter BA;
BA = BluetoothAdapter.getDefaultAdapter();
為了使用裝置的藍芽,呼叫下列藍芽ACTION_REQUEST_ENABLE的意圖。其語法如下:
Intent turnOn = new Intent(BluetoothAdapter.ACTION_REQUEST_ENABLE);
startActivityForResult(turnOn, 0);
除了這個常數,有提供其它的API,支援不同任務的其他常數。它們在下面列出。
| Sr.No | 常數說明 |
|---|---|
| 1 |
ACTION_REQUEST_DISCOVERABLE 此常數用於開啟藍芽的發現 |
| 2 |
ACTION_STATE_CHANGED 此常數將通知藍芽狀態已經改變 |
| 3 |
ACTION_FOUND 此常數用於接收關於所發現的每個裝置的資訊 |
啟用了藍芽功能之後,可以通過呼叫 getBondedDevices()方法來獲取配對裝置列表。它返回一組的藍芽裝置。其語法如下:
private Set<BluetoothDevice>pairedDevices;
pairedDevices = BA.getBondedDevices();
除了配對的裝置,還有API,讓更多藍芽控制權等方法。它們在下面列出。
| Sr.No | 方法及說明 |
|---|---|
| 1 |
enable() 這種方法使介面卡,如果未啟用 |
| 2 |
isEnabled() 如果介面卡已啟用此方法返回true |
| 3 |
disable() 該方法禁用介面卡 |
| 4 |
getName() 此方法返回的藍芽介面卡的名稱 |
| 5 |
setName(String name) 此方法更改藍芽名稱 |
| 6 |
getState() 此方法返回藍芽介面卡的當前狀態 |
| 7 |
startDiscovery() 此方法開始藍芽120秒的發現過程。 |
範例
這個例子提供了示範BluetoothAdapter類操縱藍芽,並顯示通過藍芽配對裝置列表。
為了試驗這個例子,需要在實際裝置上執行此程式
| 步驟 | 描述 |
|---|---|
| 1 | 使用Android Studio建立Android應用程式,並將其命名為Bluetooth,建立這個專案,確保目標SDK編譯在Android SDK的最新版本或使用更高階別的API。 |
| 2 | 修改 src/MainActivity.java 檔案中新增程式碼 |
| 3 | 如果修改所需的布局XML檔案 res/layout/activity_main.xml 新增GUI元件 |
| 4 | 修改 res/values/string.xml 檔案,並新增必要的字串常數元件 |
| 5 | 修改 AndroidManifest.xml 新增必要的許可權。 |
| 6 | 執行應用程式並選擇執行Android的裝置,並在其上安裝的應用和驗證結果。 |
以下是 src/com.yiibai.bluetooth/MainActivity.java 檔案的內容:
package com.example.bluetooth; import java.util.ArrayList; import java.util.List; import java.util.Set; import android.os.Bundle; import android.app.Activity; import android.bluetooth.BluetoothAdapter; import android.bluetooth.BluetoothDevice; import android.content.Intent; import android.view.Menu; import android.view.View; import android.widget.ArrayAdapter; import android.widget.Button; import android.widget.ListAdapter; import android.widget.ListView; import android.widget.Toast; public class MainActivity extends Activity { private Button On,Off,Visible,list; private BluetoothAdapter BA; private Set<BluetoothDevice>pairedDevices; private ListView lv; @Override protected void onCreate(Bundle savedInstanceState) { super.onCreate(savedInstanceState); setContentView(R.layout.activity_main); On = (Button)findViewById(R.id.button1); Off = (Button)findViewById(R.id.button2); Visible = (Button)findViewById(R.id.button3); list = (Button)findViewById(R.id.button4); lv = (ListView)findViewById(R.id.listView1); BA = BluetoothAdapter.getDefaultAdapter(); } public void on(View view){ if (!BA.isEnabled()) { Intent turnOn = new Intent(BluetoothAdapter.ACTION_REQUEST_ENABLE); startActivityForResult(turnOn, 0); Toast.makeText(getApplicationContext(),"Turned on" ,Toast.LENGTH_LONG).show(); } else{ Toast.makeText(getApplicationContext(),"Already on", Toast.LENGTH_LONG).show(); } } public void list(View view){ pairedDevices = BA.getBondedDevices(); ArrayListlist = new ArrayList (); for(BluetoothDevice bt : pairedDevices) list.add(bt.getName()); Toast.makeText(getApplicationContext(),"Showing Paired Devices", Toast.LENGTH_SHORT).show(); final ArrayAdapter adapter = new ArrayAdapter (this,android.R.layout.simple_list_item_1, list); lv.setAdapter(adapter); } public void off(View view){ BA.disable(); Toast.makeText(getApplicationContext(),"Turned off" , Toast.LENGTH_LONG).show(); } public void visible(View view){ Intent getVisible = new Intent(BluetoothAdapter. ACTION_REQUEST_DISCOVERABLE); startActivityForResult(getVisible, 0); } @Override public boolean onCreateOptionsMenu(Menu menu) { // Inflate the menu; this adds items to the action bar if it is present. getMenuInflater().inflate(R.menu.main, menu); return true; } }
這裡是 activity_main.xml 檔案的內容:
<RelativeLayout xmlns:android="http://schemas.android.com/apk/res/android"
   xmlns:tools="http://schemas.android.com/tools"
   android:layout_width="match_parent"
   android:layout_height="match_parent"
   android:paddingBottom="@dimen/activity_vertical_margin"
   android:paddingLeft="@dimen/activity_horizontal_margin"
   android:paddingRight="@dimen/activity_horizontal_margin"
   android:paddingTop="@dimen/activity_vertical_margin"
   tools:context=".MainActivity" >

   <ScrollView
      android:id="@+id/scrollView1"
      android:layout_width="wrap_content"
      android:layout_height="wrap_content"
      android:layout_alignParentBottom="true"
      android:layout_alignParentLeft="true"
      android:layout_alignParentRight="true"
      android:layout_alignParentTop="true" >

   <LinearLayout
      android:layout_width="match_parent"
      android:layout_height="match_parent"
      android:orientation="vertical" >

   <TextView
      android:id="@+id/textView1"
      android:layout_width="wrap_content"
      android:layout_height="wrap_content"
      android:text="@string/app_name"
      android:textAppearance="?android:attr/textAppearanceLarge" />

   <Button
      android:id="@+id/button1"
      android:layout_width="wrap_content"
      android:layout_height="wrap_content"
      android:onClick="on"
      android:text="@string/on" />

   <Button
      android:id="@+id/button2"
      android:layout_width="wrap_content"
      android:layout_height="wrap_content"
      android:onClick="visible"
      android:text="@string/Visible" />

   <Button
      android:id="@+id/button3"
      android:layout_width="wrap_content"
      android:layout_height="wrap_content"
      android:onClick="list"
      android:text="@string/List" />

   <Button
      android:id="@+id/button4"
      android:layout_width="wrap_content"
      android:layout_height="wrap_content"
      android:onClick="off"
      android:text="@string/off" />

   <ListView
      android:id="@+id/listView1"
      android:layout_width="match_parent"
      android:layout_height="wrap_content"
      android:visibility="visible" >

   </ListView>

   </LinearLayout>
</ScrollView>

</RelativeLayout>
這裡是 Strings.xml 檔案的內容:
<?xml version="1.0" encoding="utf-8"?>
<resources>

   <string name="app_name">Bluetooth</string>
   <string name="action_settings">Settings</string>
   <string name="hello_world">Hello world!</string>
   <string name="on">Turn On</string>
   <string name="off">Turn Off</string>
   <string name="Visible">Get Visible</string>
   <string name="List">List Devices</string>

</resources>
這裡是 AndroidManifest.xml 檔案的內容:
<?xml version="1.0" encoding="utf-8"?>
<manifest xmlns:android="http://schemas.android.com/apk/res/android"
   package="com.yiibai.bluetooth"
   android:versionCode="1"
   android:versionName="1.0" >

   <uses-sdk
      android:minSdkVersion="8"
      android:targetSdkVersion="17" />
   <uses-permission android:name="android.permission.BLUETOOTH"/>
   <uses-permission android:name="android.permission.BLUETOOTH_ADMIN"/>

   <application
      android:allowBackup="true"
      android:icon="@drawable/ic_launcher"
      android:label="@string/app_name"
      android:theme="@style/AppTheme" >
      <activity
         android:name="com.yiibai.bluetooth.MainActivity"
         android:label="@string/app_name" >
         <intent-filter>
            <action android:name="android.intent.action.MAIN" />

            <category android:name="android.intent.category.LAUNCHER" />
         </intent-filter>
      </activity>
   </application>

</manifest>
讓我們試著執行AndroidCapture應用程式。假設你已經連線實際的Android移動裝置到計算機。啟動應用程式之前,Eclipse會顯示如下視窗,選擇要執行的Android應用程式的選項。

選擇移動裝置作為一個選項,然後檢查移動裝置將顯示如下介面:
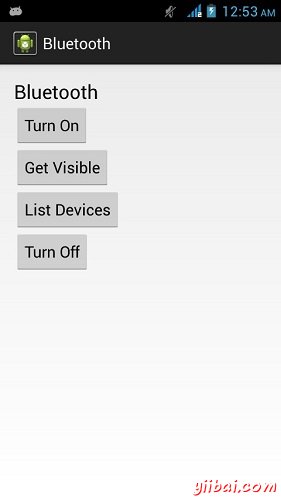
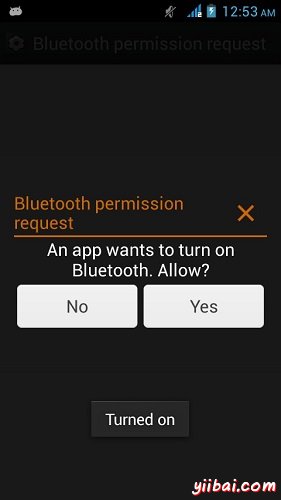
現在選擇開啟開啟藍芽。但是當選擇它,藍芽將不會被開啟。事實上它會詢問許可,以啟用藍芽。
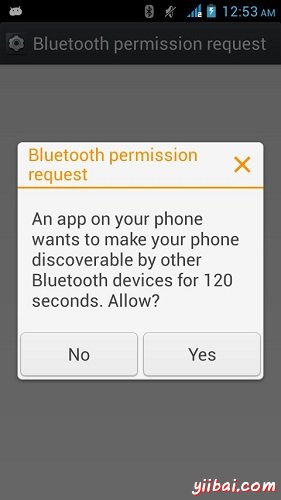
現在,只需要選擇設定可見按鈕來開啟檢視。下面的螢幕會出現要求許可才能開啟發現120秒。
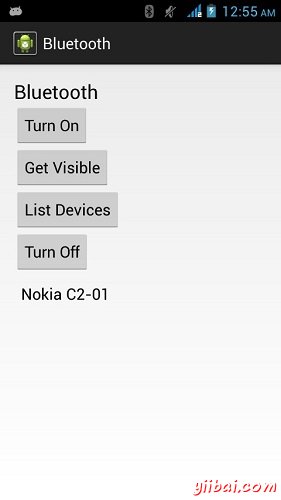
現在,只要選擇列表中的裝置選項。它會列出倒在列表檢視中的配對裝置。就我而言,只有一個配對裝置。它如下所示。
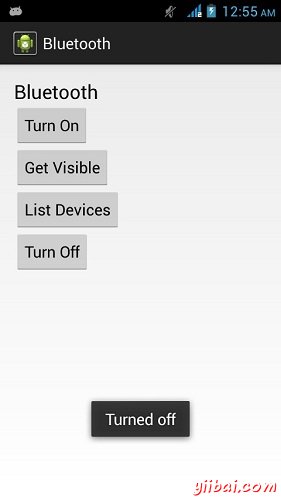
現在,只需選擇關閉按鈕來關閉藍芽。當關掉藍芽指示成功切換關閉藍芽會出現以下訊息。
以下程式碼下載:http://pan.baidu.com/s/1o69hnaa