Android內部儲存
Android提供多種儲存的應用程式儲存自己的資料。儲存的地點是共用的,內部和外部儲存,SQLite儲存,並通過網路連線儲存。
在本章中,我們要看看在內部儲存。內部儲存是裝置儲存器上的專用資料的儲存。
預設情況下,這些檔案是私有並由唯一應用程式存取和刪除,當使用者刪除應用程式。
寫入檔案
為了使用內部儲存寫入某些資料到檔案中,呼叫openFileOutput()方法用的檔案和模式的名稱。該模式可以是 private , public,它的語法如下:
FileOutputStream fOut = openFileOutput("file name here",MODE_WORLD_READABLE);
該方法openFileOutput()返回FileOutputStream的一個範例。因此收到FileInputStream物件。之後可以呼叫write方法寫入檔案資料。它的語法如下:
String str = "data";
fOut.write(str.getBytes());
fOut.close();
讀取檔案
為了從剛才建立的檔案中讀取資料,openFileOutput()方法使用檔案的名稱。它返回FileInputStream的一個範例。它的語法如下:
FileInputStream fin = openFileInput(file);
在此之後,可以呼叫read方法來一次從檔案讀取一個字元,然後列印出來。它的語法如下:
int c;
String temp="";
while( (c = fin.read()) != -1){
   temp = temp + Character.toString((char)c);
}
//string temp contains all the data of the file.
fin.close();
除了寫入(write)和關閉(close)方法,對於更好寫入檔案所提供FileOutputStream類的其他方法。這些方法如下:
| Sr.No | 方法及說明 |
|---|---|
| 1 |
FileOutputStream(File file, boolean append) 這個方法構造一個新的FileOutputStream寫入到檔案。 |
| 2 |
getChannel() 此方法返回分享與當前流的位置上只寫FileChannel |
| 3 |
getFD() 這個方法返回底層檔案描述符 |
| 4 |
write(byte[] buffer, int byteOffset, int byteCount) 這個方法從位元組陣列緩衝區寫入位元組計數開始位置偏移此流 |
除了用於良好的讀取檔案所提供的FileInputStreamclass讀取和關閉,還有其它方法的方法。這些方法如下:
| Sr.No | 方法及說明 |
|---|---|
| 1 |
available() 此方法返回可以讀取或跳過沒有阻止更多的輸入位元組的估計數目 |
| 2 |
getChannel() 此方法返回分享與當前流的位置唯讀FileChannel |
| 3 |
getFD() 這個方法返回底層檔案描述符 |
| 4 |
read(byte[] buffer, int byteOffset, int byteCount) 此方法最多讀取length位元組,並將它們儲存位元組陣列b中開始的偏移offset |
例子
這裡有一個例子演示如何使用內部儲存來儲存和讀取檔案。它建立了一個基本的儲存應用程式,它可以從內部儲存讀取並寫入。
為了試驗這個例子,可以在實際裝置或模擬器執行此。
| 步驟 | 描述 |
|---|---|
| 1 | 使用Android Studio建立Android應用程式,並將其命名為: Storage 。在建立這個專案,確保目標SDK編譯在Android SDK的最新版本或使用更高階別的API |
| 2 | 修改src/MainActivity.java檔案中新增必要的程式碼 |
| 3 | 修改res/layout/activity_main 新增相應XML元件 |
| 4 | 修改res/values/string.xml 新增必要的字串 |
| 5 | 執行應用程式並選擇執行Android的裝置,並在其上安裝的應用和驗證結果 |
以下是修改的主活動檔案的內容 src/com.yiibai.storage/MainActivity.java.
package com.example.storage;

import java.io.FileInputStream;
import java.io.FileOutputStream;
import java.io.InputStreamReader;

import android.app.Activity;
import android.os.Bundle;
import android.view.Menu;
import android.view.View;
import android.widget.EditText;
import android.widget.Toast;

public class MainActivity extends Activity {

   private EditText et;
   private String data;
   private String file = "mydata";
   @Override
   protected void onCreate(Bundle savedInstanceState) {
      super.onCreate(savedInstanceState);
      setContentView(R.layout.activity_main);
      et = (EditText)(findViewById(R.id.editText1));

   }

   public void save(View view){
      data = et.getText().toString();
      try {
         FileOutputStream fOut = openFileOutput(file,MODE_WORLD_READABLE);
         fOut.write(data.getBytes());
         fOut.close();
         Toast.makeText(getBaseContext(),"file saved",
         Toast.LENGTH_SHORT).show();
      } catch (Exception e) {
         // TODO Auto-generated catch block
         e.printStackTrace();
      }
   }
   public void read(View view){
      try{
         FileInputStream fin = openFileInput(file);
         int c;
         String temp="";
         while( (c = fin.read()) != -1){
            temp = temp + Character.toString((char)c);
         }
         et.setText(temp);
         Toast.makeText(getBaseContext(),"file read",
         Toast.LENGTH_SHORT).show();

      }catch(Exception e){

      }
   }
   @Override
   public boolean onCreateOptionsMenu(Menu menu) {
      // Inflate the menu; this adds items to the action bar if it is present.
      getMenuInflater().inflate(R.menu.main, menu);
      return true;
   }

}
以下是XML修改res/layout/activity_main.xml. 的內容
<RelativeLayout xmlns:android="http://schemas.android.com/apk/res/android"
   xmlns:tools="http://schemas.android.com/tools"
   android:layout_width="match_parent"
   android:layout_height="match_parent"
   android:paddingBottom="@dimen/activity_vertical_margin"
   android:paddingLeft="@dimen/activity_horizontal_margin"
   android:paddingRight="@dimen/activity_horizontal_margin"
   android:paddingTop="@dimen/activity_vertical_margin"
   tools:context=".MainActivity" >

   <Button
      android:id="@+id/button1"
      android:layout_width="wrap_content"
      android:layout_height="wrap_content"
      android:layout_alignParentTop="true"
      android:layout_centerHorizontal="true"
      android:layout_marginTop="182dp"
      android:onClick="save"
      android:text="@string/save" />

   <Button
      android:id="@+id/button2"
      android:layout_width="wrap_content"
      android:layout_height="wrap_content"
      android:layout_alignLeft="@+id/button1"
      android:layout_alignRight="@+id/button1"
      android:layout_below="@+id/button1"
      android:layout_marginTop="46dp"
      android:onClick="read"
      android:text="@string/read" />

   <EditText
      android:id="@+id/editText1"
      android:layout_width="wrap_content"
      android:layout_height="wrap_content"
      android:layout_alignLeft="@+id/button1"
      android:layout_alignParentTop="true"
      android:layout_marginTop="23dp"
      android:ems="10"
      android:inputType="textMultiLine" >

      <requestFocus />
   </EditText>

</RelativeLayout>
以下是 res/values/string.xml. 的內容
<?xml version="1.0" encoding="utf-8"?>
<resources>

   <string name="app_name">Storage</string>
   <string name="action_settings">Settings</string>
   <string name="hello_world">Hello world!</string>
   <string name="save">save to intenal storage</string>
   <string name="read">load from intenal storag</string>

</resources>
以下是 AndroidManifest.xml 的內容
<?xml version="1.0" encoding="utf-8"?>
<manifest xmlns:android="http://schemas.android.com/apk/res/android"
   package="com.yiibai.storage"
   android:versionCode="1"
   android:versionName="1.0" >

   <uses-sdk
      android:minSdkVersion="8"
      android:targetSdkVersion="17" />

   <application
      android:allowBackup="true"
      android:icon="@drawable/ic_launcher"
      android:label="@string/app_name"
      android:theme="@style/AppTheme" >
      <activity
         android:name="com.yiibai.storage.MainActivity"
         android:label="@string/app_name" >
         <intent-filter>
            <action android:name="android.intent.action.MAIN" />

            <category android:name="android.intent.category.LAUNCHER" />
         </intent-filter>
      </activity>
   </application>

</manifest>
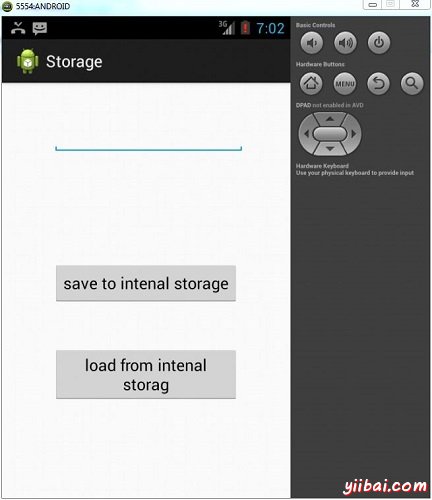
讓我們試著來執行剛剛修改的儲存應用程式。安裝程式在AVD並啟動它,如果一切設定和應用程式都沒有問題,它會顯示以下模擬器視窗:

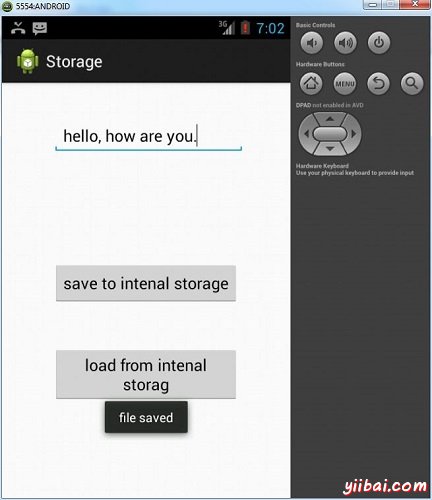
現在,需要做的是在欄位中輸入文字。舉例來說:這裡已經進入SOEM文字。按儲存“save”按鈕。以下通報會出現在AVD如下:

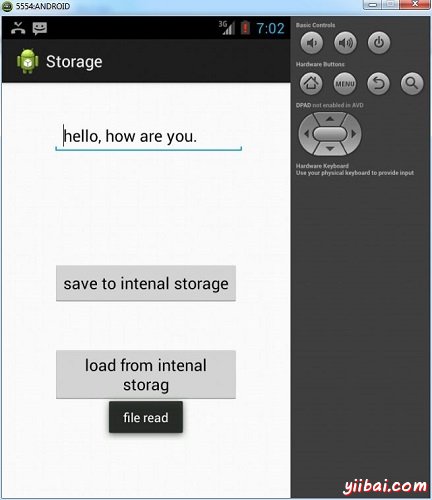
現在,當按下Load按鈕,應用程式將讀取該檔案,並顯示資料。如下面的資料將返回:

注意:可以通過切換到DDMS標籤檢視此檔案。在DDMS選擇檔案瀏覽器和瀏覽這個路徑。
data>data>com.example.storage>files>mydata
這也顯示在下面圖中:
