Android碎片/片段
片段(Fragments)是一個應用程式的使用者介面或行為活動,使活動更加模組化設計,可以放置在一塊。一個片段是一種子活動。以下要點有關片段:
-
片段都有自己的布局和規範自己的行為與生命週期回撥。
-
可以新增或刪除片段在活動而活動執行。
-
可以將多個片段在一個單一的活動,建立一個多窗格UI。
-
片段可用於多種活動。
-
片段的生命週期是密切相關,其主機活動的生命週期,表示當活動暫停時,所有的片段也將停止活動。
-
片段可以實現的行為當沒有使用者介面元件。
-
片段加入被加入到 Android API 在Honeycomb版本的Android(API版本11)。
建立片段可以擴充套件Fragment 類並在活動的布局檔案中宣告片段,可以插入到活動布局的一個片段到<fragment>元素。
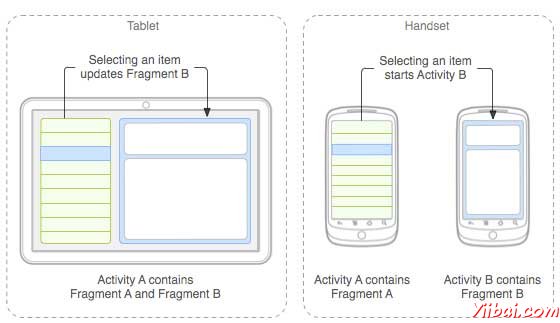
介紹片段之前,有一個限制,因為可以在一個特定的時間點,螢幕上只顯示單個活動。所以不能夠分割裝置螢幕來分別控制不同部位。但隨著引進片段得到了更多的靈活性,並在螢幕上同一時時間可以將一個單一的活動取消限制。現在有一個單一的acitivity ,但每個acitivity 可以包括多個片段,它們有自己的布局,活動和完整的生命週期。
下面是一個典型的例子,兩個UI模組定義的片段可以組合成平板電腦的設計的一個活動,這裡在手機中設計分離。

應用程式嵌入活動A中兩個片段,在一個平板大小的裝置上執行。然而在手機大小的螢幕上,有兩個片段有足夠的空間,所以Activity A包括片段物品的清單,當使用者選擇一篇文章時,它開始使用Activity B,包括閱讀第二片段的文章。
片段生命週期
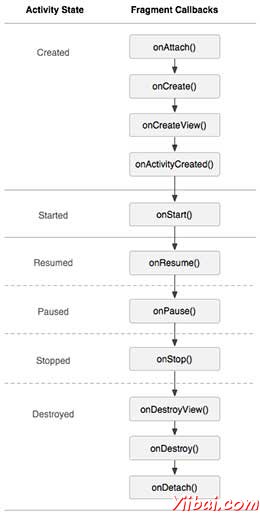
Android 的碎片有自己的生命週期,非常相似 Android 中的 Activity 。本節主要闡述其生命週期在不同階段。
|
階段 I: 當被建立了一個片段,它通過以下狀態:
階段 II: 當片段變得可見,它通過這些狀態:
階段 III: 當碎片進入後台模式,它通過這些狀態:
階段 IV: 當片段被破壞,它通過以下狀態:
|
 |
如何使用碎片?
這裡演示簡單的步驟來建立碎片:
-
首先,要決定有多少碎片要在活動中要使用。例如,要使用兩個片段處理裝置的橫向和縱向模式。
-
在下一頁的碎片數量的基礎上,建立類將擴充套件 Fragment 類。上述片段類的回撥函式。可以根據要求覆蓋所有的功能。
-
對應每一個片段,需要在XML檔案中建立佈局。這些檔案將根據布局來定義碎片。
-
最後修改活動檔案替換片段,根據需要來定義實際的邏輯。
這裡是重要的 覆蓋在Fragment 類的方法,如下列表:
-
onCreate() 系統呼叫時建立片段。初始化片段要保留暫停或停止時的片段,然後恢復其它組成部分。
-
onCreateView() 當片段第一次繪製使用者介面時,系統呼叫這個回撥。要繪製一個UI為片段,必須返回一個 View 元件,此方法是片段的根布局。返回空片段不提供一個UI。
-
onPause() 系統呼叫此方法,作為第一次指示使用者離開此片段。這通常是提交更改操作,持久化時間超過當前使用者對談時間。
例子
下面的這個例子將解釋如何建立片段 - Fragments。在這裡將建立兩個片段並且當其中一個使用的裝置是在橫向模式下,另一個片段將被用在縱向模式下。按照下面的步驟類似於在前面建立的Hello World範例:
| 步驟 | 描述 |
|---|---|
| 1 | 使用Eclipse IDE建立Android應用程式,並將其命名為MyFragments在一個包com.example.myfragments下 ,使用空活動。 |
| 2 | 主要活動檔案MainActivity.java的程式碼修改為如下。在這裡將檢查裝置的方向並在不同的片段之間進行切換。 |
| 3 | 在 com.example.myfragments包下建立兩個java檔案PM_Fragment.java和LM_Fragement.java來定義片段以及相關方法。 |
| 4 | 建立佈局檔案 res/layout/lm_fragment.xml 並布局定義這兩個片段。 |
| 5 | 修改 res/layout/activity_main.xml 檔案的預設內容,以包括兩個片段。 |
| 6 | 在 res/values/strings.xml檔案中定義所需的常數 |
| 7 | 執行該應用程式啟動 Android 模擬器來驗證應用程式所做的修改結果。 |
以下是主要活動檔案的內容 src/com.example.mycontentprovider/MainActivity.java 修改
package com.example.myfragments;

import android.os.Bundle;
import android.app.Activity;
import android.app.FragmentManager;
import android.app.FragmentTransaction;
import android.content.res.Configuration;
import android.view.WindowManager;

public class MainActivity extends Activity {

   @Override
   protected void onCreate(Bundle savedInstanceState) {
      super.onCreate(savedInstanceState);

      Configuration config = getResources().getConfiguration();

      FragmentManager fragmentManager = getFragmentManager();
      FragmentTransaction fragmentTransaction =
      fragmentManager.beginTransaction();

      /**
      * Check the device orientation and act accordingly
      */
      if (config.orientation == Configuration.ORIENTATION_LANDSCAPE) {
         /**
         * Landscape mode of the device
         */
         LM_Fragment ls_fragment = new LM_Fragment();
         fragmentTransaction.replace(android.R.id.content, ls_fragment);
      }else{
         /**
         * Portrait mode of the device
         */
         PM_Fragment pm_fragment = new PM_Fragment();
         fragmentTransaction.replace(android.R.id.content, pm_fragment);
      }
      fragmentTransaction.commit();
   }

}
建立兩個的片段檔案LM_Fragement.java 和 PM_Fragment.java在com.example.mycontentprovider 包下。
以下是LM_Fragement.java檔案的內容 :
package com.example.myfragments;

import android.app.Fragment;
import android.os.Bundle;
import android.view.LayoutInflater;
import android.view.View;
import android.view.ViewGroup;


public class LM_Fragment extends Fragment{
   @Override
   public View onCreateView(LayoutInflater inflater,
      ViewGroup container, Bundle savedInstanceState) {
      /**
       * Inflate the layout for this fragment
       */
      return inflater.inflate(
      R.layout.lm_fragment, container, false);
   }
}
下面是 PM_Fragement.java 檔案的內容:
package com.example.myfragments;

import android.app.Fragment;
import android.os.Bundle;
import android.view.LayoutInflater;
import android.view.View;
import android.view.ViewGroup;


public class PM_Fragment extends Fragment{
   @Override
   public View onCreateView(LayoutInflater inflater,
      ViewGroup container, Bundle savedInstanceState) {
      /**
       * Inflate the layout for this fragment
       */
      return inflater.inflate(
      R.layout.pm_fragment, container, false);
   }
}
建立兩個布局檔案 lm_fragement.xml 和 pm_fragment.xml 在目錄 res/layout 下。
以下是 lm_fragement.xml 檔案的內容:
<?xml version="1.0" encoding="utf-8"?>
   <LinearLayout
   xmlns:android="http://schemas.android.com/apk/res/android"
   android:orientation="vertical"
   android:layout_width="fill_parent"
   android:layout_height="fill_parent"
   android:background="#7bae16">

   <TextView
   android:layout_width="fill_parent"
   android:layout_height="wrap_content"
   android:text="@string/landscape_message"
   android:textColor="#000000"
   android:textSize="20px" />

<!-- More GUI components go here  -->

</LinearLayout>
以下是 pm_fragment.xml 檔案的內容:
<?xml version="1.0" encoding="utf-8"?>
   <LinearLayout
   xmlns:android="http://schemas.android.com/apk/res/android"
   android:orientation="horizontal"
   android:layout_width="fill_parent"
   android:layout_height="fill_parent"
   android:background="#666666">

   <TextView
   android:layout_width="fill_parent"
   android:layout_height="wrap_content"
   android:text="@string/portrait_message"
   android:textColor="#000000"
   android:textSize="20px" />

<!-- More GUI components go here  -->

</LinearLayout>
下面 res/layout/activity_main.xml 檔案的內容,其中包括片段:
<?xml version="1.0" encoding="utf-8"?>
<LinearLayout xmlns:android="http://schemas.android.com/apk/res/android"
    xmlns:tools="http://schemas.android.com/tools"
    android:layout_width="fill_parent"
    android:layout_height="fill_parent"
    android:orientation="horizontal">

   <fragment
   android:name="com.example.fragments"
   android:id="@+id/lm_fragment"
   android:layout_weight="1"
   android:layout_width="0dp"
   android:layout_height="match_parent" />

   <fragment
   android:name="com.example.fragments"
   android:id="@+id/pm_fragment"
   android:layout_weight="2"
   android:layout_width="0dp"
   android:layout_height="match_parent" />

</LinearLayout>
確保 res/values/strings.xml 檔案有以下內容:
<?xml version="1.0" encoding="utf-8"?>
<resources>

    <string name="app_name">MyFragments</string>
    <string name="action_settings">Settings</string>
    <string name="hello_world">Hello world!</string>
    <string name="landscape_message">This is Landscape mode fragment
    </string>
    <string name="portrait_message">This is Portrait mode fragment
    </string>

</resources>
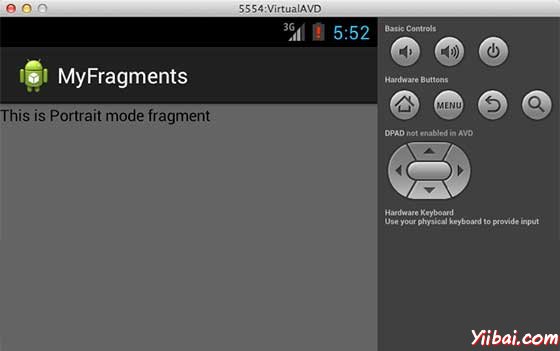
現在試著來執行 MyFragments 剛剛建立的應用程式。假設建立AVD,同時做好了環境設定。要從Eclipse執行應用程式,首先開啟一個專案的活動檔案,從工具列上單擊“Run”  圖示。 Eclipse AVD 安裝應用程式,並啟動它,如果設定和應用都沒有問題,它會顯示模擬器視窗,看到如下視窗,點選"MENU" 按鈕。可能需要點耐心,因為它可能需要一段時間(易百教學提示:取決於你的電腦速度了):

要改變模式,模擬器的螢幕,可以做以下操作:
-
fn+control+F11 Mac上改變的風景,影象,反之亦然。
-
ctrl+F11 在Windows.
-
ctrl+F11 在 Linux.
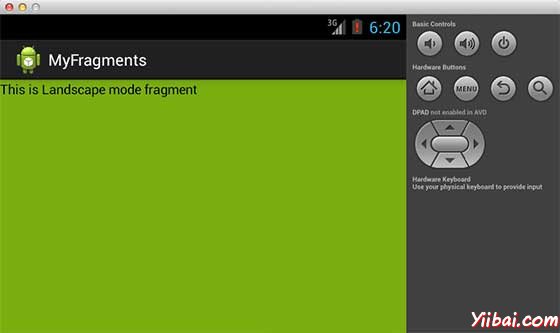
改變了模式以後,能夠看到的圖形化使用者介面,如下已經實現了橫向模式:

這樣就可以使用相同的活動,但不同的GUI要通過不同的片段。根據要求可以使用不同型別的GUI元件來建立不同的GUI。