Struts2注解範例
在這個教學,我們重複使用以前 STRUST2 Hello World(XML版本)的例子,並將其轉換成註解版本。
Struts2 註解概念
Struts2注解是由Struts 2的約定外掛的支援,所以,必須要了解其背後的「掃描方法」和「命名轉換」機制的魔力。
1. 掃描方法
許多Struts 2的文章或書籍說,可以組態過濾器的「init-param」或「struts.convention.action.packages」告訴Struts2,其中掃描註解的類。 例如,
web.xml
<filter>
  <filter-name>struts2</filter-name>
  <filter-class>org.apache.struts2.dispatcher.FilterDispatcher</filter-class>
  <init-param>
	<param-name>actionPackages</param-name>
	<param-value>com.tw511.common</param-value>
  </init-param>
</filter>
從測試(Struts22.1.6和2.1.8版本),這是不正確的,不管你把在「param-value」還是 「struts.convention.action.packages「, 在Struts 2會忽略它,並只掃描指定的檔案夾命名:struts, struts2, action 或 actions 。
下面是掃描工作
- 掃描其位於包的命名註解的類 「struts, struts2, action 或 actions「.
-
接著,掃描相匹配下列任一條件的檔案:
- 範例了 com.opensymphony.xwork2.Action 介面。
- 擴充套件了 com.opensymphony.xwork2.ActionSupport 類
-
檔案名用動作(例如:UserAction,LoginAction)結束
詳細請檢視這裡Struts 2 約定外掛檔案
2. 命名轉換器
Struts 2的約定外掛將所有的註解操作檔案名轉換為指定的格式。
例如 : LoginAction.java
-
首先,去掉「Action」字元在檔案名的末尾,如果存在的話。
-
其次,轉換檔案名的第一個字母為小寫。
因此,去除結束並轉換第一個字母為小寫後,LoginAction.action 將變為 login.action。
Struts2約定外掛的「掃描方法」和「命名轉換」特性真正帶來了很多的便利和好處,只有當你的Struts2專案正確下面的命名約定才會帶來好處; 否則,這將是一場災難。
Struts 2 註解例子
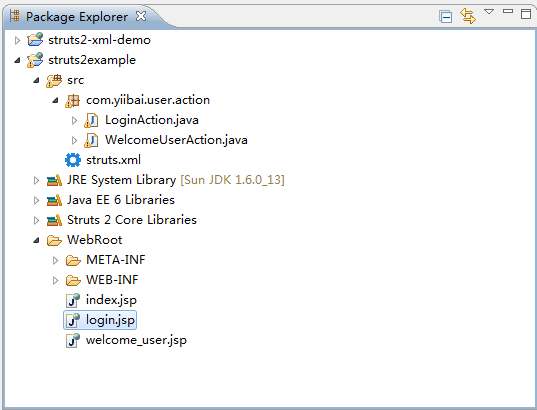
現在是時候開始轉換過程了,我們使用MyEclipse 10 建立一個工程為:struts2example。
最終的專案結構
2. LoginAction
擴充套件ActionSupport並建立了LoginAction,什麼也不做,ActionSupport 預設返回 「success」 字串,這將匹配 @Result 並重定位到 「pages/login.jsp「.
註解版本
package com.yiibai.user.action;

import org.apache.struts2.convention.annotation.Namespace;
import org.apache.struts2.convention.annotation.Result;
import org.apache.struts2.convention.annotation.ResultPath;

import com.opensymphony.xwork2.ActionSupport;

@Namespace("/User")
@ResultPath(value="/")
@Result(name="success",location="/login.jsp")
public class LoginAction extends ActionSupport{

}
XML 實現版本
<package name="user" namespace="/User" extends="struts-default">
	<action name="Login">
		<result>/login.jsp</result>
	</action>
</package>
3. WelcomeUserAction
重寫execute()方法並指定 @Action 和 @Result 註解。
註解版本
package com.yiibai.user.action;

import org.apache.struts2.convention.annotation.Action;
import org.apache.struts2.convention.annotation.Namespace;
import org.apache.struts2.convention.annotation.Result;
import org.apache.struts2.convention.annotation.ResultPath;

import com.opensymphony.xwork2.ActionSupport;

@Namespace("/User")
@ResultPath(value="/")
public class WelcomeUserAction extends ActionSupport{

	private String username;

	public String getUsername() {
		return username;
	}

	public void setUsername(String username) {
		this.username = username;
	}

	@Action(value="Welcome", results={
		@Result(name="success",location="welcome_user.jsp")
	})
	public String execute() {

		return SUCCESS;

	}
}
XML 實現版本
<package name="user" namespace="/User" extends="struts-default">
   <action name="Welcome" class="com.yiibai.user.action.WelcomeUserAction">
	<result name="SUCCESS">/welcome_user.jsp</result>
   </action>
</package>
Struts 2 註解 – @Action, @Result 和 @Namespace 不言自明,可以將它與XML比較。@ResultPath 可能需要一點點的解釋,請參閱本 @ResultPath範例
4. JSP檢視頁面
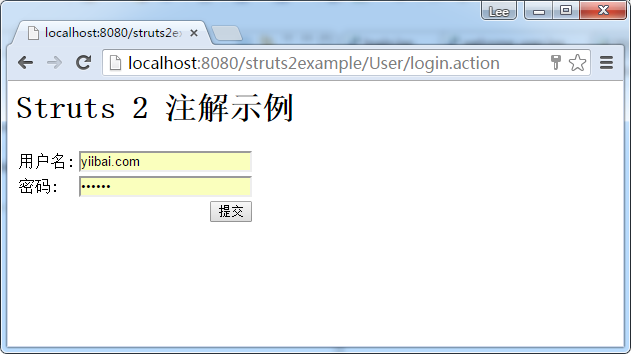
普通JSP檢視頁面來接受使用者名和密碼後點選提交按鈕,並重定向到一個歡迎頁面。
login.jsp
<%@ page contentType="text/html; charset=UTF-8"%>
<%@ taglib prefix="s" uri="/struts-tags"%>
<html>
<head></head>
<body>
	<h1>Struts 2 註解範例</h1>

	<s:form action="Welcome">
		<s:textfield name="username" label="使用者名" />
		<s:password name="password" label="密碼" />
		<s:submit value="提交"/>
	</s:form>

</body>
</html>
welcome_user.jsp
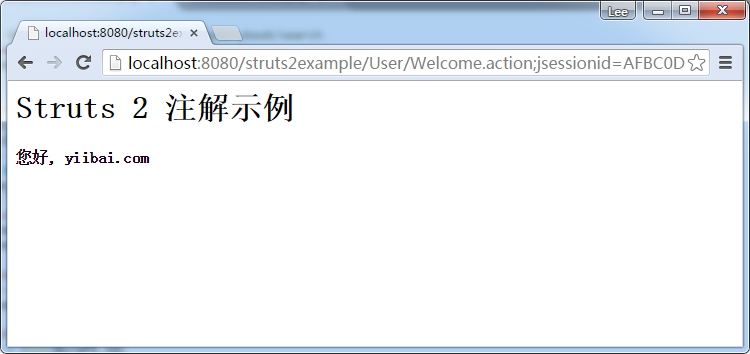
<%@ page contentType="text/html; charset=UTF-8" %>
<%@ taglib prefix="s" uri="/struts-tags" %>
<html>
<head></head>
<body>
<h1>Struts 2 註解範例</h1>

<h4>您好, <s:property value="username"/></h4>

</body>
</html>
5. struts.xml
所有類註解無需建立 struts.xml 檔案。
6. web.xml
只要建立一個典型的web.xml檔案,並宣告FilterDispatcher過濾器標準。
<!DOCTYPE web-app PUBLIC
 "-//Sun Microsystems, Inc.//DTD Web Application 2.3//EN"
 "http://java.sun.com/dtd/web-app_2_3.dtd" >

<web-app>
  <display-name>Struts 2 Web Application</display-name>

  <filter>
	<filter-name>struts2</filter-name>
	<filter-class>org.apache.struts2.dispatcher.FilterDispatcher</filter-class>
  </filter>

  <filter-mapping>
	<filter-name>struts2</filter-name>
	<url-pattern>/*</url-pattern>
  </filter-mapping>

</web-app>
7. 執行測試
LoginAction.action 改為 login.action,請參閱上面的「命名轉換器」。
http://localhost:8080/struts2example/User/login.action
提交到 http://localhost:8080/Struts2Example/User/Welcome.action 後顯示: