Struts 2 hello world (XML版本)
在這個例子中,我們將學習如何在Struts 2中建立一個Hello World例子。
使用以下庫或工具:
- MyEclipse 10
- Struts 2.1
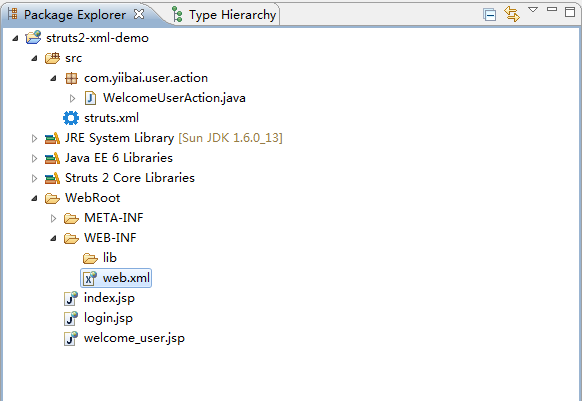
整個工程結構如下圖所示:
1. 建立一個Web專案工程
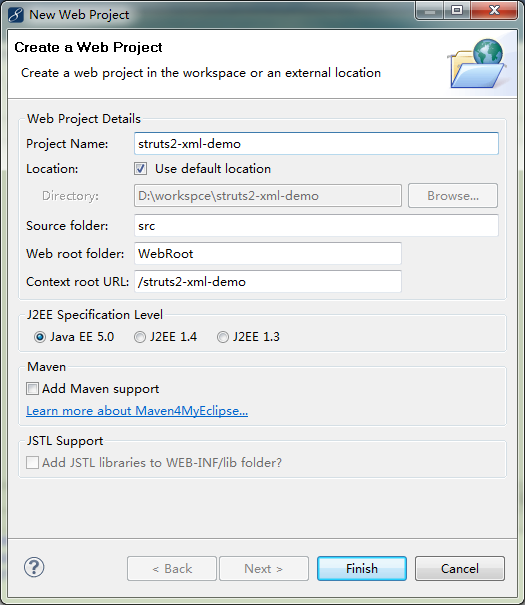
啟動開啟 MyEclipse,建立一個Web工程名稱為:struts2-xml-demo,選擇 File -> New -> Web Project ,如下圖所示:
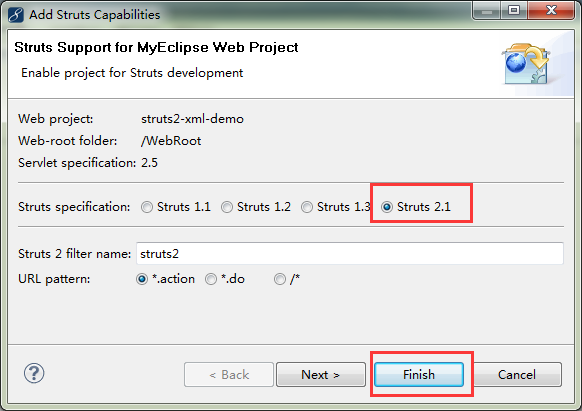
在這個專案上新增 struts2 的支援,右鍵點選 struts2-xml-demo 工程,選擇 MyEclipse -> Add Struts Capabilities,在彈出的對話方塊中選擇 Strut 2.1,如下圖所示:
2. JSP檢視檔案
這是一個JSP登入頁面,它使用Struts2標籤來顯示使用者名,密碼輸入框和提交按鈕。
Fie : login.jsp
<%@ page contentType="text/html; charset=UTF-8"%>
<%@ taglib prefix="s" uri="/struts-tags"%>
<html>
<head></head>
<body>
	<h1>Struts 2 Hello World Example</h1>

	<s:form action="Welcome">
		<s:textfield name="username" label="Username" />
		<s:password name="password" label="Password" />
		<s:submit />
	</s:form>

</body>
</html>
檔案: welcome_user.jsp – 一個JSP檢視用來頁面顯示歡迎資訊給使用者。
<%@ page contentType="text/html; charset=UTF-8"%>
<%@ taglib prefix="s" uri="/struts-tags"%>
<html>
<head></head>
<body>
	<h1>Struts 2 Hello World 範例</h1>

	<h2>
		Hello
		<s:property value="username" />
	</h2>

</body>
</html>
對 Struts1 和 Struts2 有非常相似的UI標籤語法,只是在命名HTML元素,例如,術語有一點不同:
Struts 1
<%@taglib uri="http://struts.apache.org/tags-html" prefix="html"%>
<html:form action="Welcome">
   <html:text property="username"/>
</html:form>
Struts 2
<%@ taglib prefix="s" uri="/struts-tags" %>
<s:form action="Welcome">
	<s:textfield name="username" label="Username"/>
</s:form>
5. 動作,所有的業務邏輯放在這裡
一個簡單的 Struts2 的 Action 類,它裡面宣告的所有業務邏輯。
File : WelcomeUserAction.java
package com.yiibai.user.action;

/**
 *
 * @author tw511.com
 *
 */
public class WelcomeUserAction {

	private String username;

	public String getUsername() {
		return username;
	}

	public void setUsername(String username) {
		this.username = username;
	}

	// all struts logic here
	public String execute() {

		return "SUCCESS";

	}
}
在Struts2中,Action類實現任何介面或擴充套件任何類不是必需的,但它需要建立一個execute()方法來實現所有的業務邏輯,並返回一個字串值,告訴使用者重定向到哪裡。
您可能會看到一些使用者實現 com.opensymphony.xwork2.Action 類, 但它是完全可選的(不是必須的),因為com.opensymphony.xwork2.Action只是提供一些方便的常數。
5. Struts組態檔案
Strut組態檔案是用來連線所有的東西在一起。 XML檔案名必須是 「struts.xml」。在這個範例中,它位於
File : struts.xml
<?xml version="1.0" encoding="UTF-8" ?>
<!DOCTYPE struts PUBLIC "-//Apache Software Foundation//DTD Struts Configuration 2.1//EN" "http://struts.apache.org/dtds/struts-2.1.dtd">
<struts>
	<package name="user" namespace="/User" extends="struts-default">
		<action name="Login">
			<result>/login.jsp</result>
		</action>
		<action name="Welcome" class="com.yiibai.user.action.WelcomeUserAction">
			<result name="SUCCESS">/welcome_user.jsp</result>
		</action>
	</package>
</struts>
宣告包和包含動作類,動作類是不言自明的,但你仍可能會感興趣下面的新標籤:
1. package name=」user」
就在包名,並不真正去關心它。
2. namespace=」/User」
它用於匹配「/User」URL模式。
實際上,Struts2的名稱空間相當於Struts的1多個功能模組
3. extends=」struts-default」
這意味著該包是擴充套件了struts-default 包元件和攔截器,這是在struts-default.xml中檔案中宣告的,位於struts2-core.jar 檔案的根目錄。
6. web.xml
組態Web應用程式部署描述符(web.xml)檔案Struts2的整合到Web專案。
File web.xml
<?xml version="1.0" encoding="UTF-8"?>
<web-app version="3.0"
	xmlns="http://java.sun.com/xml/ns/javaee"
	xmlns:xsi="http://www.w3.org/2001/XMLSchema-instance"
	xsi:schemaLocation="http://java.sun.com/xml/ns/javaee
	http://java.sun.com/xml/ns/javaee/web-app_3_0.xsd">
  <display-name></display-name>
  <welcome-file-list>
    <welcome-file>index.jsp</welcome-file>
  </welcome-file-list>
  <filter>
  	<filter-name>struts2</filter-name>
  	<filter-class>
  		org.apache.struts2.dispatcher.ng.filter.StrutsPrepareAndExecuteFilter
  	</filter-class>
  </filter>
  <filter-mapping>
  	<filter-name>struts2</filter-name>
  	<url-pattern>*.action</url-pattern>
  </filter-mapping></web-app>
7. 執行測試結果
在Struts2中,可以直接使用.action字尾存取操作類。如下URL:
http://localhost:8080/struts2-xml-demo/User/Login.action
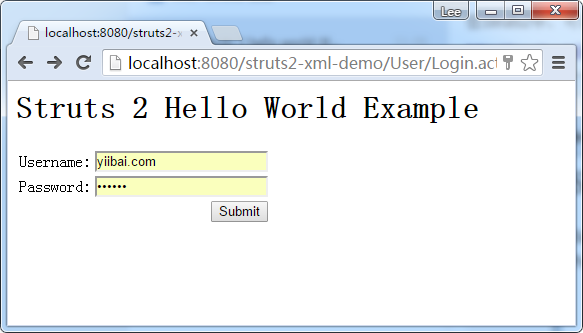
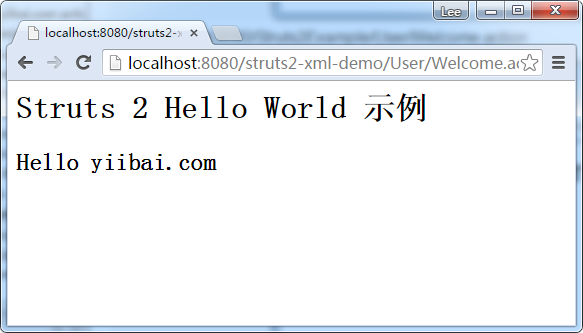
提交後到 http://localhost:8080/Struts2Example/User/Welcome.action 顯示如下:
