Yii欄位
通過覆蓋 fields() 和 extraFields() 方法,可以定義一些資料放入回應中。這兩種方法之間的差別在於,前者定義了預設設定的欄位,包函在響應中;而後者如果終端使用者的請求通過擴充套件查詢引數,之後可以在響應包函附加欄位。
第1步 - 修改 models/MyUser.php 並使用以下程式碼:
<?php
   namespace app\models;
   use app\components\UppercaseBehavior;
   use Yii;
   /**
   * This is the model class for table "user".
   *@property integer $id
   * @property string $name
   * @property string $email
   */
   class MyUser extends \yii\db\ActiveRecord {
      public function fields() {
         return [
            'id',
            'name',
            //PHP callback
            'datetime' => function($model) {
               return date("Y-m-d H:i:s");
            }
         ];
      }
      /**
      * @inheritdoc
      */
      public static function tableName() {
         return 'user';
      }
      /**
      * @inheritdoc
      */
      public function rules() {
         return [
            [['name', 'email'], 'string', 'max' => 255]
         ];
      }
      /**
      * @inheritdoc
      */
      public function attributeLabels() {
         return [
            'id' => 'ID',
            'name' => 'Name',
            'email' => 'Email',
         ];
      }
   }
?>
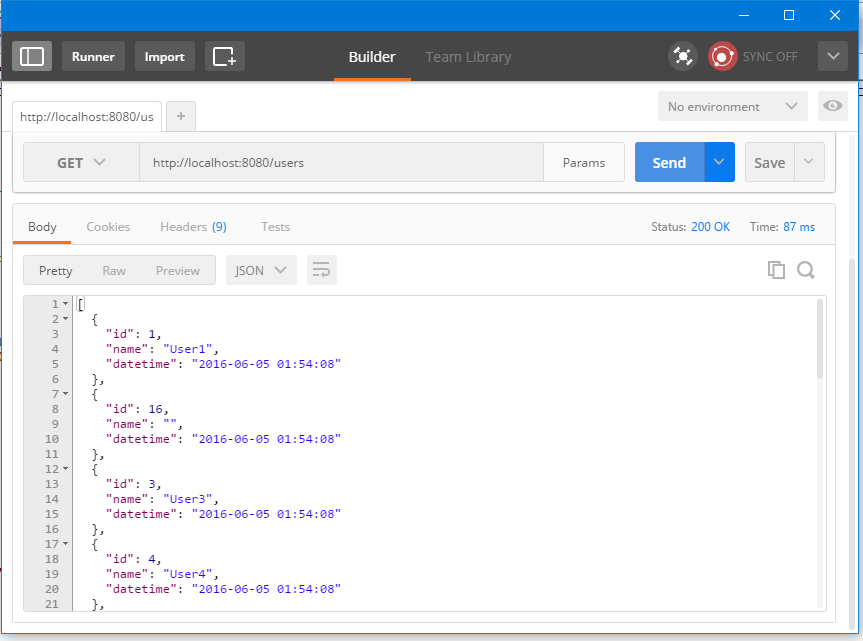
除了預設的欄位:id 和 name,這增加了一個自定義欄位 - datetime。
第2步 - 在 Postman,執行通過URL :http://localhost:8080/users

第3步 - 現在,修改使用者模型:models/MyUser.php 並使用以下程式碼:
<?php
   namespace app\models;
   use app\components\UppercaseBehavior;
   use Yii;
   /**
   * This is the model class for table "user".
   *
   * @property integer $id
   * @property string $name
   * @property string $email
   */
   class MyUser extends \yii\db\ActiveRecord {
      public function fields() {
         return [
            'id',
            'name',
         ];
      }
      public function extraFields() {
         return ['email'];
      }
      /**
      * @inheritdoc
      */
      public static function tableName() {
         return 'user';
      }
      /**
      * @inheritdoc
      */
      public function rules() {
         return [
            [['name', 'email'], 'string', 'max' => 255]
         ];
      }
      /**
      * @inheritdoc
      */
      public function attributeLabels() {
         return [
            'id' => 'ID',
            'name' => 'Name',
            'email' => 'Email',
         ];
      }
   }
?>
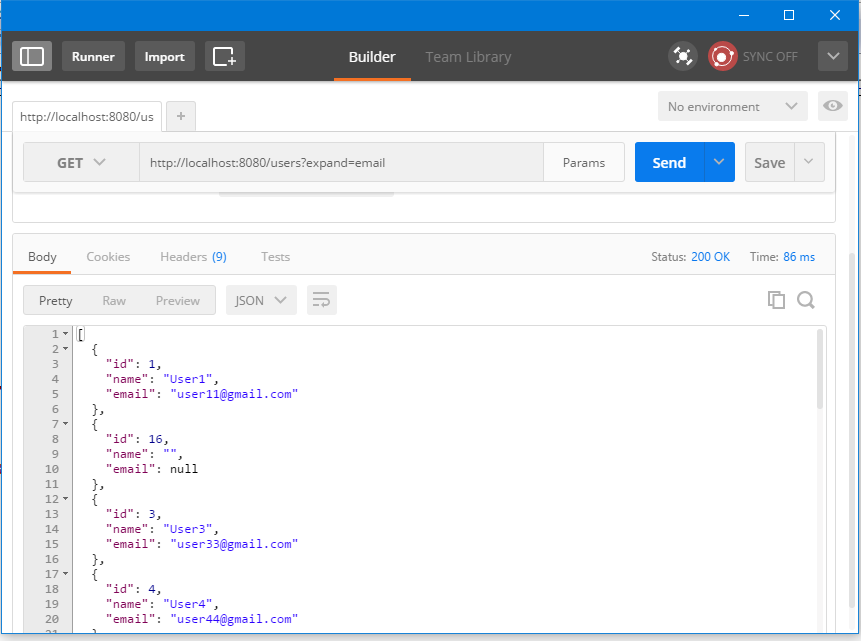
請注意,email 欄位是由 extraFields()方法返回。
第4步 - 要獲取此欄位的資料,執行:http://localhost:8080/users?expand=email 如下結果:

自定義操作
yii\rest\ActiveController 類提供了以下操作(動作) -
-
Index ? 逐頁列出資源
-
View ? 返回指定資源的詳細資訊
-
Create ? 建立一個新的資源
-
Update ? 更新一個已存在的資源
-
Delete ? 刪除指定的資源
-
Options ? 返回支援的HTTP方法
以上所有動作在 method() 方法中宣告。
要禁用 「delete」 和 「create」 的動作,修改 UserController.php 並使用以下程式碼 -
<?php
   namespace app\controllers;
   use yii\rest\ActiveController;
   class UserController extends ActiveController {
      public $modelClass = 'app\models\MyUser';
      public function actions() {
         $actions = parent::actions();
         // disable the "delete" and "create" actions
         unset($actions['delete'], $actions['create']);
         return $actions;
      }
   }
?>
錯誤處理
當獲得一個RESTful API請求,如果該請求錯誤或出現一些意想不到的東西在伺服器上發生,可以簡單地丟擲一個異常。
如果能找出錯誤的原因,應該使用一個適當的 HTTP 狀態碼來丟擲異常。
Yii REST 使用以下狀態 -
-
200 ? OK/正常完成
-
201 ? 一個資源成功建立用來響應POST請求。 Location頭包含一個指向新建立資源的URL。
-
204 ? 請求被成功處理並響應但不包含內容
-
304 ? 資源沒有被修改
-
400 ? 錯誤的請求
-
401 ? 驗證失敗
-
403 ? 通過身份驗證的使用者不允許存取指定的API端點
-
404 ? 資源不存在
-
405 ? 不被允許的方法
-
415 ? 不支援的媒體型別
-
422 ? 資料驗證失敗
-
429 ? 過多的請求
-
500 ? 內部伺服器錯誤