AngularJS快速入門
AngularJS是什麼?
AngularJS是一個開源Web應用程式框架。它最初是由MISKO Hevery和Adam Abrons於2009年開發。現在是由谷歌維護。它的最新版本是1.3.14。
AngularJS在它的官方文件 中定義如下:
AngularJS is a structural framework for dynamic web apps. It lets you use HTML as your template language and lets you extend HTML's syntax to express your application's components clearly and succinctly. Angular's data binding and dependency injection eliminate much of the code you currently have to write. And it all happens within the browser, making it an ideal partner with any server technology.
特性
-
AngularJS是一個功能強大的基於JavaScript開發框架用於建立富網際網路應用(RIA)。
-
AngulajJS為開發者提供的選項(使用JavaScript)在一個乾淨的MVC(模型 - 檢視 - 控制器)的方式來編寫用戶端應用程式。
-
AngularJS寫的應用都是跨瀏覽器相容。AngularJS使用JavaScript程式碼自動處理適應每種瀏覽器。
-
AngularJS是開源的,完全免費的,並且由數千名世界各地的開發者開發維護。它是根據Apache許可證2.0版許可發布。
總體來說,AngularJS是一個用來構建大型應用,高效能的Web應用程式的框架,同時使它們易於維護。
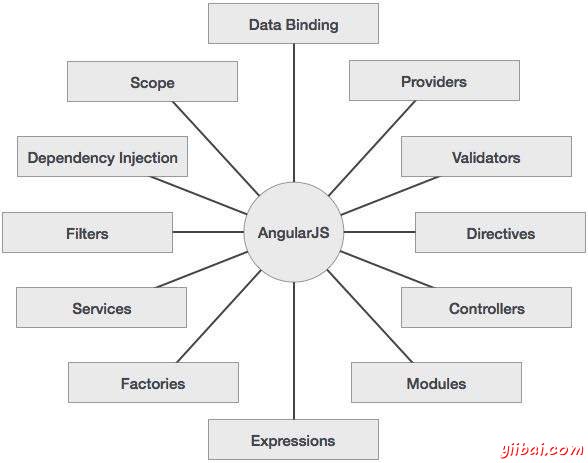
核心特徵
以下是AngularJS中最重要的核心功能:
-
資料系結: 模型和檢視元件之間的資料自動同步。
-
適用範圍: 這些物件參考模型。它們充當控制器和檢視之間的膠水。
-
控制器: 這些Javascript函式係結到特定的範圍。
-
服務: AngularJS配有多個內建服務,例如 $http 可作為一個XMLHttpRequest請求。這些單一物件在應用程式只範例化一次。
-
過濾器: 從一個陣列的條目中選擇一個子集,並返回一個新的陣列。
-
指令: 指令是關於DOM元素標記(如元素,屬性,CSS等等)。這些可以被用來建立作為新的,自定義部件的自定義HTML標籤。AngularJS設有內建指令(如:ngBind,ngModel...)
-
模板:這些符合從控制器和模型資訊的呈現的檢視。這些可以是單個檔案(如index.html),或使用“諧音”在一個頁面多個檢視。
-
路由: 它是切換檢視的概念。
-
模型檢視: MVC是一個設計模式將應用劃分為不同的部分(稱為模型,檢視和控制器),每個都有不同的職責。 AngularJS並沒有傳統意義上的實現MVC,而是更接近於MVVM(模型 - 檢視 - 檢視模型)。 AngularJS團隊將它作為模型檢視。
-
深層連結: 深層連結,可以使應用程式狀態進行編碼在URL中而能夠新增到書籤。應用程式可從URL恢復到相同的狀態。
-
依賴注入: AngularJS有一個內建的依賴注入子系統,開發人員通過使應用程式從而更易於開發,理解和測試。
概念
下圖描述了AngularJS,我們將詳細的後續章節討論一些重要的部分。

AngularJS的優點
-
AngularJS提供一個非常乾淨和維護的方式來創造單頁的應用。
-
AngularJS提供資料系結功能在HTML中,從而給使用者提供豐富和響應的體驗
-
AngularJS程式碼可進行單元測試。
-
AngularJS使用依賴注入和利用關注點分離。
-
AngularJS提供了可重用的元件。
-
使用AngularJS,開發人員編寫更少的程式碼,並獲得更多的功能。
-
在AngularJS中,檢視都是純HTML頁面,並用JavaScript編寫控制器做業務處理。
AngularJS應用程式可以在所有主要的瀏覽器和智慧手機,包括Android和iOS系統的手機/平板電腦上執行。
AngulaJS的缺點
雖然AngularJS自帶很多優點,但我們應該考慮以下幾點(缺點):
-
不安全:因為只是JavaScript一種框架,由AngularJS編寫的應用程式是不安全的。伺服器端身份驗證和授權是必須用來保證應用程式的安全。
-
不可降解:如果應用程式的使用者禁用JavaScript,那最後使用者看到的只是基本頁面,僅此而已。
AngularJS元件
AngularJS框架可分為以下三個主要部分組成:
-
ng-app : 指令定義和連結AngularJS應用程式到HTML。
-
ng-model : 指令系結AngularJS應用資料的值到HTML輸入控制元件。
-
ng-bind : 該指令系結AngularJS應用程式資料到HTML標籤。
AngularJS環境設定
在本章中,我們將討論如何建立AngularJS庫在Web應用程式開發中使用。我們還將簡要地學習目錄結構和它的內容。
開啟連結https://angularjs.org/(打不開可能需要翻牆),會看到有兩個下載AngularJS庫的選項:

-
View on GitHub- 單擊此按鈕跳到GitHub,並獲得所有最新的指令碼。
-
Download- 或者點選此按鈕,會看到螢幕如下:
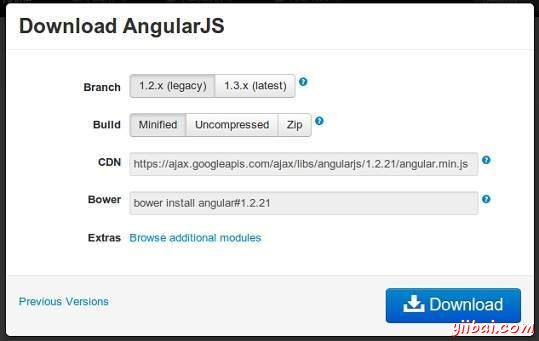

此螢幕給出了使用AngularJS如下多種選擇:
-
Downloading and hosting files locally
-
有兩種不同的選擇:舊版和最新版。舊版是版本低於1.2.x版本,最新是1.3.x版本。
-
我們也可以使用縮小,非壓縮或壓縮版本。
-
-
CDN access: 也可以使用一個CDN。CDN全世界可存取,它放在谷歌主機區域性資料中心。 這也提供了一個優點,即如果存取者的網頁已經從相同的CDN 下載了AngularJS的副本,它不必再重新下載。
-
在本教學中我們使用的是CDN版本庫
範例
現在讓我們使用AngularJS庫編寫一個簡單的例子。讓我們建立一個HTML檔案 first-angular.html 如下:
<!doctype html>
<html>
   <head>
      <script src="https://ajax.googleapis.com/ajax/libs/angularjs/1.3.0-beta.17/angular.min.js"></script>
   <title>第一個AngularJS程式</title>
   </head>
   <body ng-app="myapp">
      <div ng-controller="HelloController" >
         <h2>你好 !第一個{{helloTo.title}}程式範例</h2>
      </div>
      <script>
         angular.module("myapp", [])
         .controller("HelloController", function($scope) {
            $scope.helloTo = {};
            $scope.helloTo.title = "AngularJS";
         });
      </script>
   </body>
</html>
下面的章節詳細描述上面的程式碼:
包括AngularJS
我們已經包括了AngularJS的JavaScript檔案到HTML頁面中,所以我們可以用AngularJS:
<head>
   <script src="http://ajax.googleapis.com/ajax/libs/angularjs/1.3.14/angular.min.js"></script>
</head>
在其官方網站檢查AngularJS的最新版本。
指向AngularJS應用程式
接下來我們指示HTML的哪一部分包含了AngularJS應用程式。這可以通過ng-app屬性到AngularJS應用程式的根HTML元素。可以把它新增到HTML元素或body元素,如下所示:
<body ng-app="myapp">
</body>
檢視
這是檢視的一部分:
<div ng-controller="HelloController" >
   <h2>Welcome {{helloTo.title}} to the world of Yiibai tutorials!</h2>
</div>
ng-controller 告訴AngularJS什麼控制器使用在檢視中。helloTo.title告訴AngularJS將命名helloTo.title的值寫入到HTML的“model”中。
控制器
這裡是控制器部分:
<script>
   angular.module("myapp", [])
   .controller("HelloController", function($scope) {
      $scope.helloTo = {};
      $scope.helloTo.title = "AngularJS";
    });
</script>
此程式碼註冊一個名為HelloController的控制器功能,在myapp模組。 我們將學習更多關於它們在各自的模組和控制器章節。控制器函式註冊在Angular中,通過angular.module(...).controller(...) 的函式來呼叫。
傳遞給控制器函式的$scope引數是模型。控制器函式增加了helloTo的 JavaScript物件,並在該物件它增加了一個標題欄位。
執行
將以上程式碼儲存為 first-angular.html ,並在瀏覽器中開啟它。會看到如下的輸出:
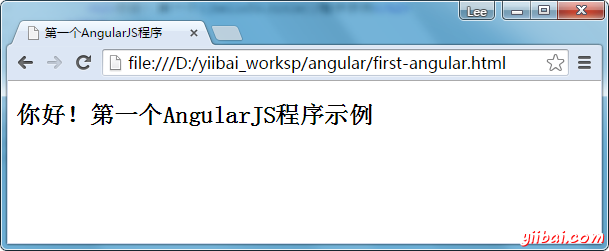

當頁面在瀏覽器中載入,輸出下面的結果:
-
HTML文件載入到瀏覽器,並且由瀏覽器進行評估計算。AngularJS JavaScript檔案被載入,Angular 全域性物件被建立。接下來,JavaScript一個註冊控制器的函式被執行。
-
接下來AngularJS通過HTML掃描,以尋找AngularJS應用程式和檢視。當檢視的定位後,它連線檢視到對應的控制器函式。
-
接下來,AngularJS執行控制器函式。然後,它呈現通過控制器模型資料來自填充的檢視。此時網頁已準備就緒。
AngularJS MVC 架構
模型檢視控制器(Model View Controller)或MVC,因為它是俗稱,是一種Web應用程式開發設計模式。模型-檢視-控制器模式由以下三部分組成:
-
Model - 是一個最低水平負責維護資料的模式。
-
View - 這是負責顯示所有或一部分的資料到使用者。
-
Controller - 軟體程式碼控制模型和檢視之間的相互作用。
MVC是很流行的,因為它從使用者介面層和支援分離關注隔離了應用邏輯。在這裡,控制器接收應用程式的所有請求,然後使用Model,以準備檢視需要的資料。然後檢視使用控制器準備的資料,以產生一個最終的像樣響應的資料輸出。 MVC的抽象圖形可以表示如下。
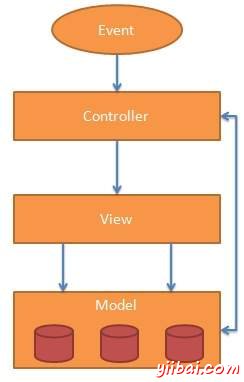

模型
模型負責管理應用程式的資料。它響應從檢視請求,同時也從控制器響應指令到自我更新。
檢視
在一個特定的格式的呈現資料,由控制器決定呈現資料觸發。 它們都是基於指令碼的模板系統,如JSP,ASP,PHP也很容易使用AJAX技術來整合。
控制器
控制器負責響應於使用者輸入並執行互動資料模型物件。控制器接收輸入,並驗證輸入,然後執行修改資料模型的業務操作的狀態。
AngularJS是一個基於MVC的框架。在接下來的章節中,讓我們看看AngularJS如何使用MVC方法論。
AngularJS 表示式
表示式用於應用程式係結資料到HTML。表示式編寫在雙括號就如:{{ expression}}. 表示式中的行為方式與 ng-bind 指令相同。AngularJS應用表示式是純JavaScript表示式和輸出正在使用的資料。
使用數位
<p>Expense on Books : {{cost * quantity}} Rs</p>
使用字串
<p>Hello {{student.firstname + " " + student.lastname}}!</p>
使用物件
<p>Roll No: {{student.rollno}}</p>
使用陣列
<p>Marks(Math): {{marks[3]}}</p>
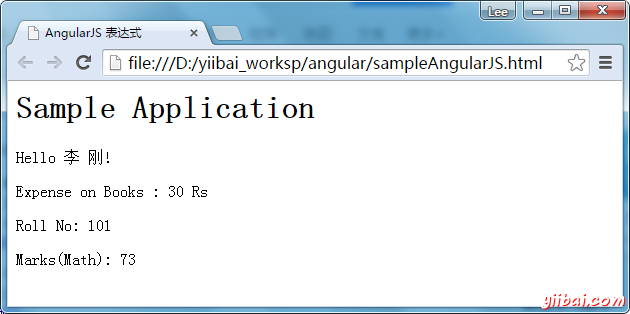
範例
下面的例子將展示上述所有表示式。
sampleAngularJS.html
<html>
<title>AngularJS 表示式</title>
<body>
<h1>Sample Application</h1>
<div ng-app="" ng-init="quantity=1;cost=30; student={firstname:'李',lastname:'剛',rollno:101};marks=[82,91,78,77,64]">
   <p>Hello {{student.firstname + " " + student.lastname}}!</p>
   <p>Expense on Books : {{cost * quantity}} Rs</p>
   <p>Roll No: {{student.rollno}}</p>
   <p>Marks(Math): {{marks[3]}}</p>
</div>
<script src="/"></script>
</body>
</html>
輸出結果
在瀏覽器中開啟:sampleAngularJS.html, 看到結果如下:

AngularJS 控制器
AngularJS應用主要依賴於控制器來控制資料流在應用程式中.控制器使用 ng-controller 指令定義。控制器是一個包含屬性/屬性和函式的JavaScript物件。每個控制器接受$scope作為引數參照到應用程式/模組,由控制器來控制。
<div ng-app="" ng-controller="studentController">
...
</div>
在這裡,我們採用 ng-controller 指令宣告控制器studentController。作為下一個步驟,我們將定義 studentController 如下:
<script>
function studentController($scope) {
   $scope.student = {
      firstName: "李",
      lastName: "四",
      fullName: function() {
         var studentObject;
         studentObject = $scope.student;
         return studentObject.firstName + " " + studentObject.lastName;
      }
   };
}
</script>
-
studentController定義一個以 $scope 作為引數的JavaScript物件。
-
$scope表示應用程式,它使用studentController物件。
-
$ scope.student是studentController物件的屬性。
-
firstName 和 lastName 是 $scope.student 物件的兩個屬性。我們已經為它們設定了預設值。
-
fullName是 $scope.student 物件的函式,其任務是返回合併後的名字。
-
在fullName函式中我們得到了 student 物件,然後返回合併後的名字。
-
我們還可以定義控制器物件在單獨的JS檔案,並參考(引入)該檔案在HTML頁面。
現在,我們可以在studentController使用ng-model或表示式來獲取學生的屬性。
Enter first name: <input type="text" ng-model="student.firstName"><br>
Enter last name: <input type="text" ng-model="student.lastName"><br>
<br>
You are entering: {{student.fullName()}}
-
係結 student.firstName 和 student.lastname 兩個輸入框。
-
係結student.fileName()到HTML。
-
現在,只要輸入名字和姓氏在輸入框中,可以看到全名(fullname)自動更新。
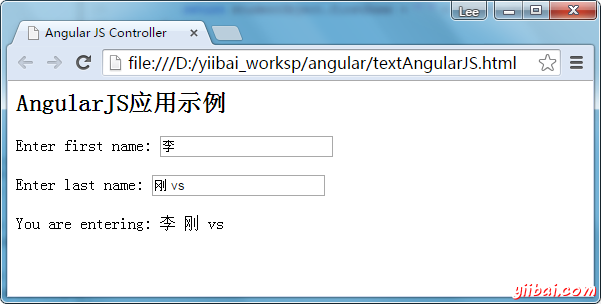
範例
下面的例子將展示控制器的使用。
testAngularJS.html
<html>
<head>
<title>Angular JS Controller</title>
<script src="/"></script>
</head>
<body>
<h2>AngularJS應用範例</h2>
<div ng-app="mainApp" ng-controller="studentController">

Enter first name: <input type="text" ng-model="student.firstName"><br><br>
Enter last name: <input type="text" ng-model="student.lastName"><br>
<br>
您輸入的名字是: {{student.fullName()}}
</div>
<script>
var mainApp = angular.module("mainApp", []);

mainApp.controller('studentController', function($scope) {
   $scope.student = {
      firstName: "李",
      lastName: "剛",
      fullName: function() {
         var studentObject;
         studentObject = $scope.student;
         return studentObject.firstName + " " + studentObject.lastName;
      }
   };
});
</script>
</body>
</html>
輸出
在瀏覽器中開啟:textAngularJS.html ,將看以下的結果:

AngularJS 過濾器
過濾器用來改變修改的資料,並可以在表示式或使用管道字元指令來過濾。以下是常用的過濾器的列表。
| S.No. | 名稱 | 描述 |
|---|---|---|
| 1 | uppercase | 轉換文字為大寫文字。 |
| 2 | lowercase | 轉換文字為小寫文字。 |
| 3 | currency | 以貨幣格式格式化文字。 |
| 4 | filter | 過濾陣列到根據提供標準的一個子集。 |
| 5 | orderby | 排序基於提供標準的陣列。 |
大寫過濾器
新增大寫字母過濾器使用管道符表示式。在這裡,我們新增大寫過濾器中的所有字母為大寫,並列印學生的名字。
Enter first name:<input type="text" ng-model="student.firstName">
Enter last name: <input type="text" ng-model="student.lastName">
Name in Upper Case: {{student.fullName() | uppercase}}
小寫過濾器
新增小寫過濾器使用管道符表示式。在這裡,我們新增小寫過濾器全部以小寫字母列印學生的名字。
Enter first name:<input type="text" ng-model="student.firstName">
Enter last name: <input type="text" ng-model="student.lastName">
Name in Upper Case: {{student.fullName() | lowercase}}
貨幣過濾器
新增貨幣過濾器使用管道符返回數的表示式。在這裡,我們新增貨幣過濾器使用貨幣格式的列印費用。
Enter fees: <input type="text" ng-model="student.fees">
fees: {{student.fees | currency}}
過濾過濾器
若要僅顯示必修科目,我們使用subjectName作為過濾器。
Enter subject: <input type="text" ng-model="subjectName">
Subject:
<ul>
  <li ng-repeat="subject in student.subjects | filter: subjectName">
    {{ subject.name + ', marks:' + subject.marks }}
  </li>
</ul>
排序過濾器
由標記來排序科目,我們使用的OrderBy標記。
Subject:
<ul>
  <li ng-repeat="subject in student.subjects | orderBy:'marks'">
    {{ subject.name + ', marks:' + subject.marks }}
  </li>
</ul>
範例
下面的例子將展示上述所有過濾器。
testAngularJS.html
<html>
<head>
<title>Angular JS Filters</title>
<script src="/"></script>
</head>
<body>
<h2>AngularJS過濾器應用範例</h2>
<div ng-app="mainApp" ng-controller="studentController">
<table border="0">
<tr><td>Enter first name:</td><td><input type="text" ng-model="student.firstName"></td></tr>
<tr><td>Enter last name: </td><td><input type="text" ng-model="student.lastName"></td></tr>
<tr><td>Enter fees: </td><td><input type="text" ng-model="student.fees"></td></tr>
<tr><td>Enter subject: </td><td><input type="text" ng-model="subjectName"></td></tr>
</table>
<br/>
<table border="0">
<tr><td>Name in Upper Case: </td><td>{{student.fullName() | uppercase}}</td></tr>
<tr><td>Name in Lower Case: </td><td>{{student.fullName() | lowercase}}</td></tr>
<tr><td>fees: </td><td>{{student.fees | currency}}</td></tr>
<tr><td>Subject:</td><td>
<ul>
   <li ng-repeat="subject in student.subjects | filter: subjectName |orderBy:'marks'">
      {{ subject.name + ', marks:' + subject.marks }}
   </li>
</ul>
</td></tr>
</table>
</div>
<script>
var mainApp = angular.module("mainApp", []);

mainApp.controller('studentController', function($scope) {
   $scope.student = {
      firstName: "李",
      lastName: "Gang",
      fees:500,
      subjects:[
         {name:'物理',marks:70},
         {name:'化學',marks:80},
         {name:'數學',marks:65},
         {name:'外語', marks:87}
      ],
      fullName: function() {
         var studentObject;
         studentObject = $scope.student;
         return studentObject.firstName + " " + studentObject.lastName;
      }
   };
});
</script>
</body>
</html>
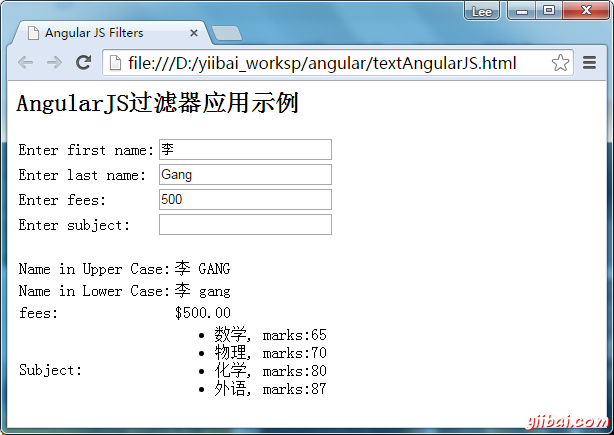
輸出結果
在瀏覽器中開啟:textAngularJS.html,看到結果如下:

AngularJS 表格
表中的資料本質上是通常可重複。 ng-repeat 指令可輕鬆用於繪製表格。下面的例子是使用 ng-repeat 指令來繪製表格。
<table>
   <tr>
      <th>Name</th>
      <th>Marks</th>
   </tr>
   <tr ng-repeat="subject in student.subjects">
      <td>{{ subject.name }}</td>
      <td>{{ subject.marks }}</td>
   </tr>
</table>
表可以使用CSS樣式設定樣式。
<style>
table, th , td {
   border: 1px solid grey;
   border-collapse: collapse;
   padding: 5px;
}
table tr:nth-child(odd) {
   background-color: #f2f2f2;
}
table tr:nth-child(even) {
   background-color: #ffffff;
}
</style>
範例
下面的例子將展示上述所有指令。
testAngularJS.html 檔案內容:
<html>
<head>
<title>AngularJS表格範例</title>
<script src="/"></script>
<style>
table, th , td {
  border: 1px solid grey;
  border-collapse: collapse;
  padding: 5px;
}
table tr:nth-child(odd) {
  background-color: #f2f2f2;
}
table tr:nth-child(even) {
  background-color: #ffffff;
}
</style>
</head>
<body>
<h2>AngularJS 表格應用範例</h2>
<div ng-app="mainApp" ng-controller="studentController">
<table border="0">
<tr><td>姓:</td><td><input type="text" ng-model="student.firstName"></td></tr>
<tr><td>名: </td><td><input type="text" ng-model="student.lastName"></td></tr>
<tr><td>名字: </td><td>{{student.fullName()}}</td></tr>
<tr><td>科目:</td><td>
<table>
   <tr>
      <th>名字</th>
      <th>標記</th>
   </tr>
   <tr ng-repeat="subject in student.subjects">
      <td>{{ subject.name }}</td>
      <td>{{ subject.marks }}</td>
   </tr>
</table>
</td></tr>
</table>
</div>
<script>
var mainApp = angular.module("mainApp", []);

mainApp.controller('studentController', function($scope) {
   $scope.student = {
      firstName: "周",
      lastName: "杰倫",
      fees:500,
      subjects:[
         {name:'物理',marks:73},
         {name:'化學',marks:90},
         {name:'數學',marks:68},
		 {name:'英文',marks:85},
		 {name:'生物',marks:77}
      ],
      fullName: function() {
         var studentObject;
         studentObject = $scope.student;
         return studentObject.firstName + " " + studentObject.lastName;
      }
   };
});
</script>
</body>
</html>
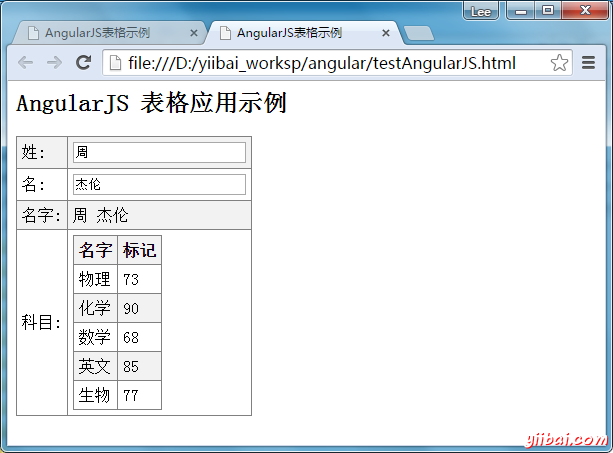
輸出結果
在瀏覽器中開啟:textAngularJS.html ,看到結果如下:

AngularJS HTML DOM
下面的指令可用於系結應用程式資料到HTML DOM元素的屬性。
| S.No. | 名稱 | 描述 |
|---|---|---|
| 1 | ng-disabled | 禁用給定的控制 |
| 2 | ng-show | 顯示了一個給定的控制 |
| 3 | ng-hide | 隱藏一個給定的控制 |
| 4 | ng-click | 表示一個AngularJS click事件 |
ng-disabled 指令
新增ng-disabled屬性到一個HTML按鈕,並把它傳遞模型。系結模型到核取方塊,來看看變化。
<input type="checkbox" ng-model="enableDisableButton">Disable Button
<button ng-disabled="enableDisableButton">Click Me!</button>
ng-show 指令
新增 ng-show 屬性到HTML按鈕,並把它傳遞到模型。該模型系結核取方塊。
<input type="checkbox" ng-model="showHide1">Show Button
<button ng-show="showHide1">Click Me!</button>
ng-hide 指令
新增 ng-hide 屬性到HTML按鈕,並把它傳遞模型。該模型系結核取方塊。
<input type="checkbox" ng-model="showHide2">Hide Button
<button ng-hide="showHide2">Click Me!</button>
ng-click 指令
新增ng-click屬性到一個HTML按鈕,更新模型。系結模型到HTML如下所示。
<p>Total click: {{ clickCounter }}</p></td>
<button ng-click="clickCounter = clickCounter + 1">Click Me!</button>
範例
下面的例子將展示上述所有指令。
testAngularJS.html
<html>
<head>
<title>AngularJS HTML DOM 範例</title>
</head>
<body>
<h2>AngularJS HTML DOM 應用範例</h2>
<div ng-app="">
<table border="0">
<tr>
   <td><input type="checkbox" ng-model="enableDisableButton">Disable Button</td>
   <td><button ng-disabled="enableDisableButton">點選我!</button></td>
</tr>
<tr>
   <td><input type="checkbox" ng-model="showHide1">顯示按鈕</td>
   <td><button ng-show="showHide1">Click Me!</button></td>
</tr>
<tr>
   <td><input type="checkbox" ng-model="showHide2">隱藏按鈕</td>
   <td><button ng-hide="showHide2">Click Me!</button></td>
</tr>
<tr>
   <td><p>Total click: {{ clickCounter }}</p></td>
   <td><button ng-click="clickCounter = clickCounter + 1">點選我!</button></td>
</tr>
</table>
</div>
<script src="/"></script>
</body>
</html>
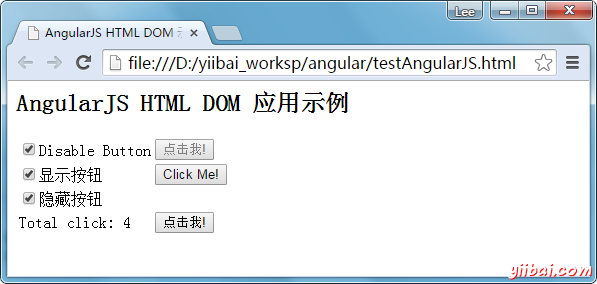
輸出結果
在瀏覽器中開啟:textAngularJS.html ,看到結果如下:

AngularJS 模組
AngularJS支援模組化方法。模組用於單獨的邏輯表示服務,控制器,應用程式等。為保持程式碼簡潔,我們在單獨的 js 檔案中定義模組,並將其命名為 module.js檔案。 在這個例子中,我們要建立兩個模組。
-
應用模組 - 控制器用於初始化應用程式。
-
控制器模組 - 用於定義控制器。
應用模組
mainApp.jsvar mainApp = angular.module("mainApp", []);
在這裡,我們宣告了使用 angular.module 函式的應用程式mainApp模組。我們已經傳遞一個空陣列給它。這個陣列通常包含依賴模組。
控制器模組
studentController.js
mainApp.controller("studentController", function($scope) {
   $scope.student = {
      firstName: "Mahesh",
      lastName: "Parashar",
      fees:500,
      subjects:[
         {name:'Physics',marks:70},
         {name:'Chemistry',marks:80},
         {name:'Math',marks:65},
         {name:'English',marks:75},
         {name:'Hindi',marks:67}
      ],
      fullName: function() {
         var studentObject;
         studentObject = $scope.student;
         return studentObject.firstName + " " + studentObject.lastName;
      }
   };
});
在這裡,我們宣告了使用 mainApp.controller 函式的一個控制器 studentController 模組。
使用模組
<div ng-app="mainApp" ng-controller="studentController">
..
<script src="mainApp.js"></script>
<script src="studentController.js"></script>
這裡我們使用 ng-app 指令和控制器使用 ng-controller 指令的應用模組。我們已經在主HTML頁面匯入 mainApp.js 和 studentController.js。
範例
下面的例子將展示上述所有模組。
testAngularJS.html
<html>
<head>
<title>Angular JS 模組範例</title>
<script src="/"></script>
<script src="mainApp.js"></script>
<script src="studentController.js"></script>
<style>
table, th , td {
  border: 1px solid grey;
  border-collapse: collapse;
  padding: 5px;
}
table tr:nth-child(odd) {
  background-color: #f2f2f2;
}
table tr:nth-child(even) {
  background-color: #ffffff;
}
</style>
</head>
<body>
<h2>AngularJS 模組應用範例</h2>
<div ng-app="mainApp" ng-controller="studentController">
<table border="0">
<tr><td>姓:</td><td><input type="text" ng-model="student.firstName"></td></tr>
<tr><td>名: </td><td><input type="text" ng-model="student.lastName"></td></tr>
<tr><td>姓名: </td><td>{{student.fullName()}}</td></tr>
<tr><td>科目:</td><td>
<table>
   <tr>
      <th>名字</th>
      <th>標記</th>
   </tr>
   <tr ng-repeat="subject in student.subjects">
      <td>{{ subject.name }}</td>
      <td>{{ subject.marks }}</td>
   </tr>
</table>
</td></tr>
</table>
</div>
</body>
</html>
mainApp.js
var mainApp = angular.module("mainApp", []);studentController.js
mainApp.controller("studentController", function($scope) {
   $scope.student = {
      firstName: "周",
      lastName: "杰倫",
      fees:500,
      subjects:[
         {name:'物理',marks:78},
         {name:'化學',marks:82},
         {name:'語文',marks:68},
         {name:'外語',marks:79},
         {name:'Java',marks:87}
      ],
      fullName: function() {
         var studentObject;
         studentObject = $scope.student;
         return studentObject.firstName + " " + studentObject.lastName;
      }
   };
});
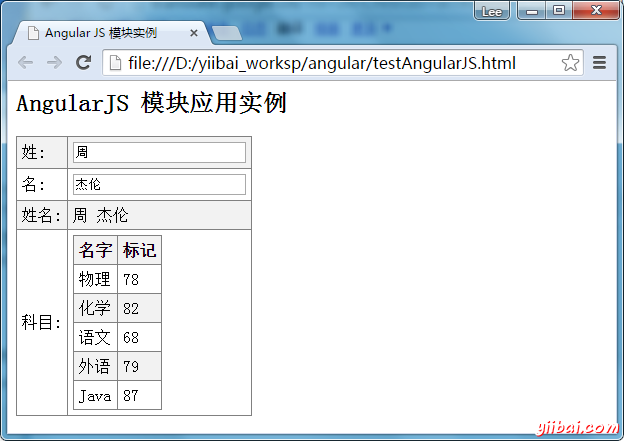
輸出結果
在瀏覽器中開啟 textAngularJS.html; 看到的結果如下所示:

AngularJS表單
AngularJS豐富表格填寫和驗證。 我們可以用ng-click來處理AngularJS點選按鈕,使用$dirty和$invalid 來做驗證。使用 novalidate 以及表單來宣告禁止瀏覽器做特定的驗證。表單控制元件大量使用Angular事件。讓我們首先快速瀏覽一下事件。
事件
AngularJS提供可與HTML控制元件相關聯的多個事件。例如ng-click通常與按鈕相關聯。下面是支援Angular JS事件。
-
ng-click
-
ng-dbl-click
-
ng-mousedown
-
ng-mouseup
-
ng-mouseenter
-
ng-mouseleave
-
ng-mousemove
-
ng-mouseover
-
ng-keydown
-
ng-keyup
-
ng-keypress
-
ng-change
ng-click
表格的復位資料上使用 on-click 指令。
<input name="firstname" type="text" ng-model="firstName" required>
<input name="lastname" type="text" ng-model="lastName" required>
<input name="email" type="email" ng-model="email" required>
<button ng-click="reset()">Reset</button>
<script>
   function studentController($scope) {
      $scope.reset = function(){
         $scope.firstName = "Mahesh";
         $scope.lastName = "Parashar";
         $scope.email = "[email protected]";
  }
   $scope.reset();
}
</script>
驗證資料
以下可用於跟蹤錯誤。
-
$dirty - 狀態指示值已被改變
-
$invalid- 指示值的狀態是無效的
-
$error- 指出確切的錯誤
範例
下面的例子將展示上述所有指令。
testAngularJS.html
<html>
<head>
<title>AngularJS 表單</title>
<script src="/"></script>
<style>
table, th , td {
  border: 1px solid grey;
  border-collapse: collapse;
  padding: 5px;
}
table tr:nth-child(odd) {
  background-color: #f2f2f2;
}
table tr:nth-child(even) {
  background-color: #ffffff;
}
</style>
</head>
<body>
<h2>AngularJS 表單應用範例</h2>
<div ng-app="mainApp" ng-controller="studentController">
<form name="studentForm" novalidate>
<table border="0">
<tr><td>姓氏:</td><td><input name="firstname" type="text" ng-model="firstName" required>
   <span style="color:red" ng-show="studentForm.firstname.$dirty && studentForm.firstname.$invalid">
      <span ng-show="studentForm.firstname.$error.required">姓氏不可為空.</span>
   </span>
</td></tr>
<tr><td>名字: </td><td><input name="lastname"  type="text" ng-model="lastName" required>
   <span style="color:red" ng-show="studentForm.lastname.$dirty && studentForm.lastname.$invalid">
      <span ng-show="studentForm.lastname.$error.required">名字必填.</span>
   </span>
</td></tr>
<tr><td>Email: </td><td><input name="email" type="email" ng-model="email" length="100" required>
<span style="color:red" ng-show="studentForm.email.$dirty && studentForm.email.$invalid">
      <span ng-show="studentForm.email.$error.required">Email 必填.</span>
	  <span ng-show="studentForm.email.$error.email">無效的Email地址.</span>
   </span>
</td></tr>
<tr><td><button ng-click="reset()">重置</button></td><td><button
	ng-disabled="studentForm.firstname.$dirty && studentForm.firstname.$invalid ||
			  studentForm.lastname.$dirty && studentForm.lastname.$invalid ||
			  studentForm.email.$dirty && studentForm.email.$invalid"
	ng-click="submit()">提交</button></td></tr>
</table>
</form>
</div>
<script>
var mainApp = angular.module("mainApp", []);

mainApp.controller('studentController', function($scope) {
   $scope.reset = function(){
		$scope.firstName = "Zhuo";
		$scope.lastName = "Jar";
		$scope.email = "[email protected]";
   }
   $scope.reset();
});
</script>
</body>
</html>
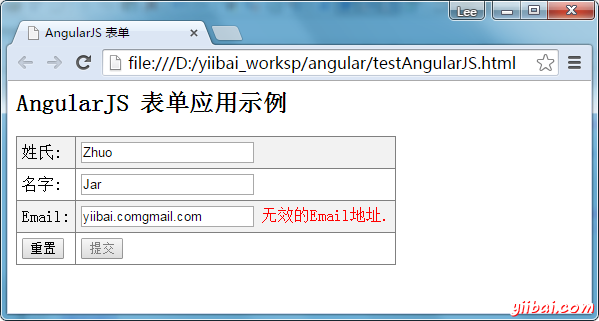
輸出結果
在瀏覽器中開啟 textAngularJS.html。看到結果結果如下:

AngularJS Includes
HTML不支援HTML頁面嵌入到HTML頁面。為了實現這一函式通過以下方式被使用:
-
使用Ajax - 使伺服器呼叫來獲取相應的HTML頁面,並將其設定在HTML控制的innerHTML。
-
使用伺服器端包含 - JSP,PHP和其他Web端伺服器技術可以包括HTML頁面在動態頁面內。
使用AngularJS,我們可以用ng-include 指令使嵌入一個HTML頁面在HTML頁面中。
<div ng-app="" ng-controller="studentController">
   <div ng-include="'main.htm'"></div>
   <div ng-include="'subjects.htm'"></div>
</div>
範例
tryAngularJS.html
<html>
<head>
<title>Angular JS Includes 範例</title>
<script src="/"></script>
<style>
table, th , td {
   border: 1px solid grey;
   border-collapse: collapse;
   padding: 5px;
}
table tr:nth-child(odd) {
   background-color: #f2f2f2;
}
table tr:nth-child(even) {
   background-color: #ffffff;
}
</style>
</head>
<body>
<h2>AngularJS Include範例</h2>
<div ng-app="mainApp" ng-controller="studentController">
<div ng-include="'main.html'"></div>
<div ng-include="'subjects.html'"></div>
</div>
<script>
var mainApp = angular.module("mainApp", []);

mainApp.controller('studentController', function($scope) {
   $scope.student = {
      firstName: "周",
      lastName: "杰倫",
      fees:500,
      subjects:[
         {name:'物理',marks:78},
         {name:'化學',marks:82},
         {name:'語文',marks:68},
         {name:'外語',marks:79},
          {name:'Java',marks:87}
      ],
      fullName: function() {
         var studentObject;
         studentObject = $scope.student;
         return studentObject.firstName + " " + studentObject.lastName;
      }
   };
});
</script>
</body>
</html>
main.html
<table border="0">
   <tr><td>姓氏:</td><td><input type="text" ng-model="student.firstName"></td></tr>
   <tr><td>名字: </td><td><input type="text" ng-model="student.lastName"></td></tr>
   <tr><td>全名: </td><td>{{student.fullName()}}</td></tr>
</table>
subjects.html
<p>科目:</p>
<table>
   <tr>
      <th>名字</th>
      <th>標記</th>
   </tr>
   <tr ng-repeat="subject in student.subjects">
      <td>{{ subject.name }}</td>
      <td>{{ subject.marks }}</td>
   </tr>
</table>
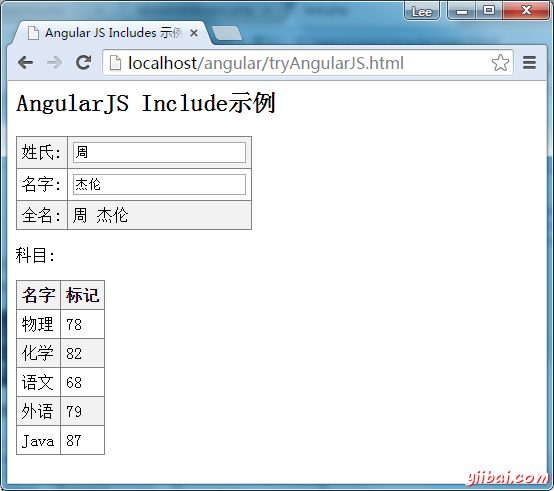
輸出結果
要執行這個例子,需要部署textAngularJS.html,main.html 和 subjects.html 到Web伺服器。使用 URL 存取伺服器並在 Web 瀏覽器中開啟 textAngularJS.html。看到結果如下:

AngularJS Ajax
AngularJS提供 $http 控制,可以作為一種服務從伺服器讀取資料。伺服器可以建立資料庫呼叫來獲取記錄。AngularJS需要JSON格式的資料。一旦資料準備好,$http可以用以下面的方式從伺服器得到資料。
function studentController($scope,$http) {
var url="data.txt";
   $http.get(url).success( function(response) {
                           $scope.students = response;
                        });
}
在這裡,data.txt中包含了學生記錄。$http服務使 Ajax 呼叫並設定響應到學生的屬性。 "students" 模型可以用於繪製 HTML 表格。
範例
data.txt
[
{
"Name" : "周杰倫",
"RollNo" : 104,
"Percentage" : "80%"
},
{
"Name" : "陳小春",
"RollNo" : 231,
"Percentage" : "71%"
},
{
"Name" : "張學友",
"RollNo" : 391,
"Percentage" : "75%"
},
{
"Name" : "鄧紫祺",
"RollNo" : 451,
"Percentage" : "77%"
}
]
testAngularJS.html
<html>
<head>
<meta http-equiv="Content-Type" content="text/html; charset=utf-8" />
<title>Angular JS Includes範例</title>
<script src="/"></script>
<style>
table, th , td {
  border: 1px solid grey;
  border-collapse: collapse;
  padding: 5px;
}
table tr:nth-child(odd) {
  background-color: #f2f2f2;
}
table tr:nth-child(even) {
  background-color: #ffffff;
}
</style>
</head>
<body>
<h2>AngularJS 應用範例</h2>
<div ng-app="mainApp" ng-controller="studentController">
<table>
   <tr>
      <th>名字</th>
      <th>號碼</th>
	  <th>百分比</th>
   </tr>
   <tr ng-repeat="student in students">
      <td>{{ student.Name }}</td>
      <td>{{ student.RollNo }}</td>
	  <td>{{ student.Percentage }}</td>
   </tr>
</table>
</div>
<script>
var mainApp = angular.module("mainApp", []);

mainApp.controller('studentController', function($scope, $http) {
   var url="data.txt";
   $http.get(url).success( function(response) {
      $scope.students = response;
   });
});
</script>
</body>
</html>
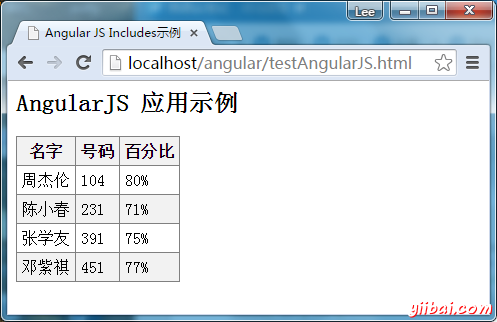
輸出結果
要執行這個例子,需要部署 textAngularJS.html,data.txt 到 Web 伺服器。在伺服器使用 URL 在Web瀏覽器中開啟textAngularJS.html。看到結果如下:

AngularJS 檢視
AngularJS支援通過單個頁面上的多個檢視單頁應用。要做到這一點AngularJS提供了ng-view 、 ng-template 指令和 $routeProvider 服務。
ng-view
NG-view標記簡單地建立一個預留位置,其中一個相應的檢視(HTML或ng-template檢視),可以根據組態來放置。
使用
定義主模組使用一個 div 及ng-view。
<div ng-app="mainApp">
...
   <div ng-view></div>

</div>
ng-template
ng-template指令用於建立使用指令碼標記的HTML檢視。它包含一個“id”屬性用於由 $routeProvider 對映帶有控制器的檢視。
使用
定義指令碼塊型別為 ng-template 的主模組 。
<div ng-app="mainApp">
...
   <script type="text/ng-template" id="addStudent.htm">
      <h2> Add Student </h2>
         {{message}}
   </script>

</div>
$routeProvider
$routeProvider是用來設定URL組態的關鍵服務,對映與對應的HTML頁面或ng-template,並附加相同的控制器。
使用
定義指令碼塊型別為 ng-template 的主模組 。
<div ng-app="mainApp">
...
   <script type="text/ng-template" id="addStudent.htm">
      <h2> Add Student </h2>
         {{message}}
   </script>

</div>
使用
定義指令碼塊及主模組,並設定路由組態。
 var mainApp = angular.module("mainApp", ['ngRoute']);

      mainApp.config(['$routeProvider',
         function($routeProvider) {
            $routeProvider.
               when('/addStudent', {
                  templateUrl: 'addStudent.htm',
                  controller: 'AddStudentController'
               }).
               when('/viewStudents', {
                  templateUrl: 'viewStudents.htm',
                  controller: 'ViewStudentsController'
               }).
               otherwise({
                  redirectTo: '/addStudent'
               });
         }]);
以下是在上面的例子中要考慮的重點。
-
$ routeProvider定義作為一個函式在mainApp模組的組態下,使用鍵 '$routeProvider'.
-
$routeProvider定義URL “/addStudent”,然後對映到“addStudent.htm”。addStudent.htm 存在於相同的路徑的主html頁面。如果HTM網頁沒有定義,那麼NG-模板使用id="addStudent.htm"。我們使用ng-template。
-
"otherwise" 用於設定的預設檢視。
-
"controller" 用於為檢視設定相應的控制器。
範例
下面的例子將展示上述所有指令。
testAngularJS.html<html> <head> <meta http-equiv="Content-Type" content="text/html; charset=UTF-8"/> <title>Angular JS 檢視</title> <script src="http://ajax.googleapis.com/ajax/libs/angularjs/1.3.14/angular.min.js"></script> <script src="http://ajax.googleapis.com/ajax/libs/angularjs/1.3.14/angular-route.min.js"></script> </head> <body> <h2>AngularJS 檢視應用範例</h2> <div ng-app="mainApp"> <p><a href="#addStudent">新增學生</a></p> <p><a href="#viewStudents">檢視學生</a></p> <div ng-view></div> <script type="text/ng-template" id="addStudent.html"> <h2> 新增學生 </h2> {{message}} </script> <script type="text/ng-template" id="viewStudents.html"> <h2> 檢視學生 </h2> {{message}} </script> </div> <script> var mainApp = angular.module("mainApp", ['ngRoute']); mainApp.config(['$routeProvider', function($routeProvider) { $routeProvider. when('/addStudent', { templateUrl: 'addStudent.html', controller: 'AddStudentController' }). when('/viewStudents', { templateUrl: 'viewStudents.html', controller: 'ViewStudentsController' }). otherwise({ redirectTo: '/addStudent' }); }]); mainApp.controller('AddStudentController', function($scope) { $scope.message = "這個頁面是用於顯示學生資訊的輸入表單"; }); mainApp.controller('ViewStudentsController', function($scope) { $scope.message = "這個頁面是用於顯示所有學生資訊"; }); </script> </body> </html>
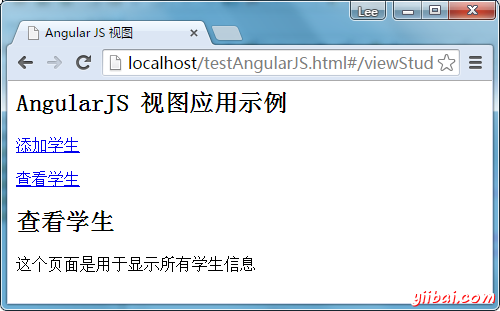
結果
在瀏覽器中開啟 textAngularJS.html 看到結果如下:

AngularJS 作用域
作用域是檢視連線控制器起特殊作用的JavaScript物件。作用域包含模型資料。在控制器,模型資料通過$ scope物件存取。
<script>
      var mainApp = angular.module("mainApp", []);

      mainApp.controller("shapeController", function($scope) {
         $scope.message = "In shape controller";
         $scope.type = "Shape";
      });
</script>
以下是在上面的例子中要考慮的重點。
-
$scope被作為第一個引數在其構造器確定指示控制器。
-
$scope.message 和 $scope.type 在HTML頁面中使用模型。
-
我們已經設定了模型的值,這將反映在應用模組,其控制器shapeController中。
-
也可以在 $scope 內定義函式。
繼承作用域
作用域由控制器指定。如果我們定義巢狀控制器,那麼子控制器將繼承其父控制器的作用域範圍。
<script>
      var mainApp = angular.module("mainApp", []);

      mainApp.controller("shapeController", function($scope) {
         $scope.message = "In shape controller";
         $scope.type = "Shape";
      });

      mainApp.controller("circleController", function($scope) {
         $scope.message = "In circle controller";
      });
</script>
以下是在上面的例子中要考慮的重點。
-
我們在shapeController設定模型的值。
-
我們過載子控制器 circleController 的訊息。當模組的控制器 circleController 中的 “message” 一起使用,將重寫訊息。
範例
下面的例子將展示上述所有指令。
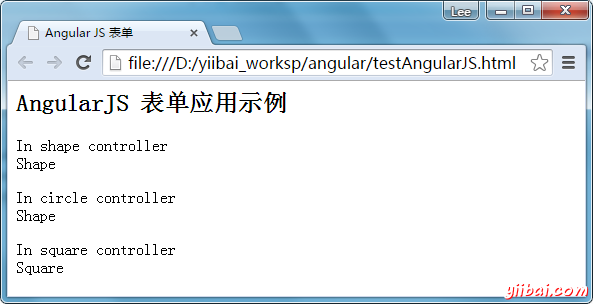
testAngularJS.html
<html>
<head>
   <meta http-equiv="Content-Type" content="text/html; charset=UTF-8"/>
   <title>Angular JS 表單</title>
</head>
<body>
   <h2>AngularJS 表單應用範例</h2>
   <div ng-app="mainApp" ng-controller="shapeController">
      <p>{{message}} <br/> {{type}} </p>
      <div ng-controller="circleController">
         <p>{{message}} <br/> {{type}} </p>
      </div>
      <div ng-controller="squareController">
         <p>{{message}} <br/> {{type}} </p>
      </div>
   </div>
   <script src="/"></script>
   <script>
      var mainApp = angular.module("mainApp", []);

      mainApp.controller("shapeController", function($scope) {
         $scope.message = "In shape controller";
         $scope.type = "Shape";
      });

      mainApp.controller("circleController", function($scope) {
         $scope.message = "In circle controller";
      });

      mainApp.controller("squareController", function($scope) {
         $scope.message = "In square controller";
         $scope.type = "Square";
      });

   </script>
</body>
</html>
輸出結果
在瀏覽器中開啟 textAngularJS.html 看到結果如下:

AngularJS Services
AngularJS使用服務架構支援“分離 - 關注”的概念。服務(Services)是JavaScript函式,並負責只做一個特定的任務。這使得它們維護和測試單個的實體。控制器,過濾器可以基於請求呼叫它們。服務注入正常使用AngularJS的依賴注入機制。
AngularJS提供例如,$http, $route, $window, $location等許多內建服務,每個服務負責例如一個特定的任務,$http是用來做AJAX呼叫來從伺服器獲取資料。 $route用來定義路由資訊等。內建的服務總是以$符號為字首。
有兩種方法來建立服務。
-
factory
-
service
使用工廠方法
使用工廠方法,我們首先定義一個工廠,然後分配方法給它。
      var mainApp = angular.module("mainApp", []);
      mainApp.factory('MathService', function() {
         var factory = {};
         factory.multiply = function(a, b) {
            return a * b
         }
         return factory;
      });
使用服務方法
使用服務的方法,我們定義了一個服務,然後分配方法給它。 也可以注入已可用的服務給它。
mainApp.service('CalcService', function(MathService){
    this.square = function(a) {
		return MathService.multiply(a,a);
	}
});
範例
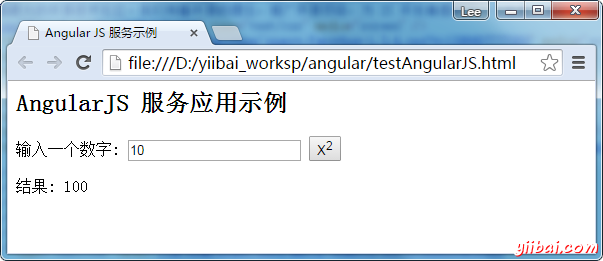
下面的例子將展示上述所有指令。
testAngularJS.html<html> <head> <meta http-equiv="Content-Type" content="text/html; charset=UTF-8"/> <title>Angular JS 服務範例</title> <script src="/"></script> </head> <body> <h2>AngularJS 服務應用範例</h2> <div ng-app="mainApp" ng-controller="CalcController"> <p>輸入一個數位: <input type="number" ng-model="number" /> <button ng-click="square()">X<sup>2</sup></button> <p>結果: {{result}}</p> </div> <script> var mainApp = angular.module("mainApp", []); mainApp.factory('MathService', function() { var factory = {}; factory.multiply = function(a, b) { return a * b } return factory; }); mainApp.service('CalcService', function(MathService){ this.square = function(a) { return MathService.multiply(a,a); } }); mainApp.controller('CalcController', function($scope, CalcService) { $scope.square = function() { $scope.result = CalcService.square($scope.number); } }); </script> </body> </html>
結果
在瀏覽器中開啟 textAngularJS.html 看到結果如下:

AngularJS依賴注入
依賴注入是部件賦予的,不是硬元件內的編碼的依賴設計模式。這從定位減輕元件的依賴,使依賴可組態。這有助於使元件可重複使用,維護和測試。
AngularJS提供了一個至高無上的依賴注入機制。它提供了一種可被注入彼此作為依賴以下核心元件。
-
值 - value
-
工廠 - factory
-
服務 - service
-
提供者 - provider
-
常數 - constant
值
值是簡單的JavaScript物件,並用它在組態階段傳遞值到控制器。
//define a module
var mainApp = angular.module("mainApp", []);
//create a value object as "defaultInput" and pass it a data.
mainApp.value("defaultInput", 5);
...
//inject the value in the controller using its name "defaultInput"
mainApp.controller('CalcController', function($scope, CalcService, defaultInput) {
      $scope.number = defaultInput;
      $scope.result = CalcService.square($scope.number);

      $scope.square = function() {
      $scope.result = CalcService.square($scope.number);
   }
});
工廠
工廠是一個函式用於返回結果值。它根據需要建立一個值,當一個服務或控制器需要時。它通常使用一個工廠函式來計算和返回結果值
//define a module
var mainApp = angular.module("mainApp", []);
//create a factory "MathService" which provides a method multiply to return multiplication of two numbers
mainApp.factory('MathService', function() {
   var factory = {};
   factory.multiply = function(a, b) {
      return a * b
   }
   return factory;
});

//inject the factory "MathService" in a service to utilize the multiply method of factory.
mainApp.service('CalcService', function(MathService){
      this.square = function(a) {
      return MathService.multiply(a,a);
   }
});
...
服務
服務是一個單獨的JavaScript包含了一組函式物件來執行某些任務。服務正在使用 service() 函式,然後注射到控制器中。
//define a module
var mainApp = angular.module("mainApp", []);
...
//create a service which defines a method square to return square of a number.
mainApp.service('CalcService', function(MathService){
      this.square = function(a) {
      return MathService.multiply(a,a);
   }
});
//inject the service "CalcService" into the controller
mainApp.controller('CalcController', function($scope, CalcService, defaultInput) {
      $scope.number = defaultInput;
      $scope.result = CalcService.square($scope.number);

      $scope.square = function() {
      $scope.result = CalcService.square($scope.number);
   }
});
提供者
提供者使用AngularJS內部建立的服務,工廠等。在組態階段(第一階段AngularJS引導自身期間)。下面提及的指令碼可以被用來建立,我們已經在前面建立了MathService。提供者是一個特殊的工廠方法使用get()方法來返回值/服務/工廠。
//define a module
var mainApp = angular.module("mainApp", []);
...
//create a service using provider which defines a method square to return square of a number.
mainApp.config(function($provide) {
   $provide.provider('MathService', function() {
      this.$get = function() {
         var factory = {};
         factory.multiply = function(a, b) {
            return a * b;
         }
         return factory;
      };
   });
});
常數
常數用於通過組態的相應值,考慮到值不能在組態階段傳遞使用。
mainApp.constant("configParam", "constant value");
範例
下面的例子將展示上述所有指令的使用。
testAngularJS.html
<html>
<head>
   <meta http-equiv="Content-Type" content="text/html; charset=UTF-8"/>
   <title>AngularJS 依賴注入</title>
</head>
<body>
   <h2>AngularJS 依賴注入應用範例</h2>
   <div ng-app="mainApp" ng-controller="CalcController">
      <p>輸入一個整數: <input type="number" ng-model="number" />
      <button ng-click="square()">X<sup>2</sup></button>
      <p>結果值: {{result}}</p>
   </div>
   <script src="/"></script>
   <script>
      var mainApp = angular.module("mainApp", []);

      mainApp.config(function($provide) {
         $provide.provider('MathService', function() {
            this.$get = function() {
               var factory = {};
               factory.multiply = function(a, b) {
                  return a * b;
               }
               return factory;
            };
         });
      });

      mainApp.value("defaultInput", 5);

      mainApp.factory('MathService', function() {
         var factory = {};
         factory.multiply = function(a, b) {
            return a * b;
         }
         return factory;
      });

      mainApp.service('CalcService', function(MathService){
            this.square = function(a) {
            return MathService.multiply(a,a);
         }
      });

      mainApp.controller('CalcController', function($scope, CalcService, defaultInput) {
            $scope.number = defaultInput;
            $scope.result = CalcService.square($scope.number);

            $scope.square = function() {
            $scope.result = CalcService.square($scope.number);
         }
      });
   </script>
</body>
</html>
結果
在瀏覽器中開啟 textAngularJS.html 看到結果如下:

AngularJS自定義指令
自定義指令用於在AngularJS中來擴充套件HTML的功能。自定義指令使用“指令”函式定義。自定義指令只是替換了被啟用的元素。AngularJS應用程式引導過程中找到匹配的元素,並使用自定義指令compile() 方法,一次使用基於指令的範圍自定義指令link() 方法處理元素。AngularJS 為下面的元素型別建立自定義的指令提供支援。
-
元素指令 - 當遇到指令啟用匹配的元素。
-
屬性 - - 當遇到指令啟用屬性時匹配。
-
CSS - - 當遇到指令啟用匹配CSS樣式。
-
注釋 - - 當遇到指令啟用匹配的注釋。
理解自定義指令
定義自定義HTML標籤。
<student name="Mahesh"></student><br/>
<student name="Piyush"></student>
定義自定義指令來處理上面的自定義HTML標籤。
var mainApp = angular.module("mainApp", []);

//Create a directive, first parameter is the html element to be attached.
//We are attaching student html tag.
//This directive will be activated as soon as any student element is encountered in html
mainApp.directive('student', function() {
   //define the directive object
   var directive = {};
   //restrict = E, signifies that directive is Element directive
   directive.restrict = 'E';
   //template replaces the complete element with its text.
   directive.template = "Student: <b>{{student.name}}</b> , Roll No: <b>{{student.rollno}}</b>";
   //scope is used to distinguish each student element based on criteria.
   directive.scope = {
       student : "=name"
   }
   //compile is called during application initialization. AngularJS calls it once when html page is loaded.
   directive.compile = function(element, attributes) {
      element.css("border", "1px solid #cccccc");
	  //linkFunction is linked with each element with scope to get the element specific data.
      var linkFunction = function($scope, element, attributes) {
          element.html("Student: <b>"+$scope.student.name +"</b> , Roll No: <b>"+$scope.student.rollno+"</b><br/>");
          element.css("background-color", "#ff00ff");
      }
      return linkFunction;
   }
   return directive;
});
定義控制器以更新指令的作用域。這裡我們使用名稱屬性的值作為子的作用域。
mainApp.controller('StudentController', function($scope) {
      $scope.Mahesh = {};
      $scope.Mahesh.name = "Mahesh Parashar";
      $scope.Mahesh.rollno  = 1;

      $scope.Piyush = {};
      $scope.Piyush.name = "Piyush Parashar";
      $scope.Piyush.rollno  = 2;
});
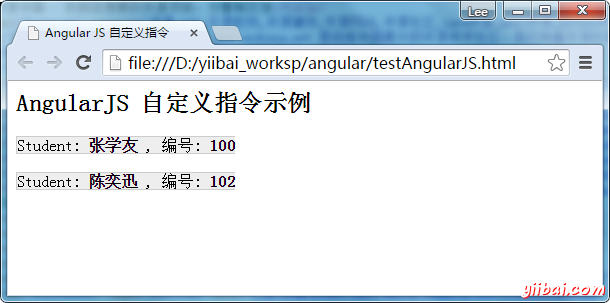
範例
<html>
<head>
   <meta http-equiv="Content-Type" content="text/html; charset=UTF-8"/>
   <title>Angular JS 自定義指令</title>
</head>
<body>
   <h2>AngularJS 自定義指令範例</h2>
   <div ng-app="mainApp" ng-controller="StudentController">
		<student name="Mahesh"></student><br/>
		<student name="Piyush"></student>
   </div>
   <script src="/"></script>
   <script>
      var mainApp = angular.module("mainApp", []);

      mainApp.directive('student', function() {
         var directive = {};
         directive.restrict = 'E';
         directive.template = "Student: <b>{{student.name}}</b> , 編號: <b>{{student.rollno}}</b>";

         directive.scope = {
            student : "=name"
         }

         directive.compile = function(element, attributes) {
            element.css("border", "1px solid #cccccc");

            var linkFunction = function($scope, element, attributes) {
               element.html("Student: <b>"+$scope.student.name +"</b> , 編號: <b>"+$scope.student.rollno+"</b><br/>");
               element.css("background-color", "#eee");
            }

            return linkFunction;
         }

         return directive;
      });

      mainApp.controller('StudentController', function($scope) {
            $scope.Mahesh = {};
            $scope.Mahesh.name = "張學友";
            $scope.Mahesh.rollno  = 100;

            $scope.Piyush = {};
            $scope.Piyush.name = "陳奕迅";
            $scope.Piyush.rollno  = 102;
      });

   </script>
</body>
</html>
結果
在Web瀏覽器中開啟textAngularJS.htm。看到結果如下:

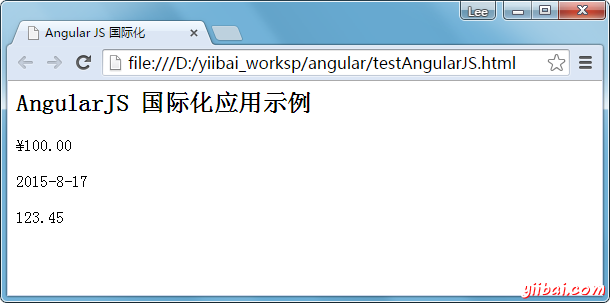
AngularJS國際化
AngularJS支援內建國際化三種型別的過濾器:貨幣,日期和數位。我們只需要根據國家的區域合併相應的JS。預設情況下它處理瀏覽器的語言環境。例如,使用丹麥語區域設定,使用下面的指令碼:
<script src="https://code.angularjs.org/1.2.5/i18n/angular-locale_da-dk.js"></script>
使用中文區域設定範例
testAngularJS.html
<html>
<head><meta http-equiv="Content-Type" content="text/html; charset=UTF-8"/>
   <title>Angular JS 國際化</title>
</head>
<body>
   <h2>AngularJS 國際化應用範例</h2>
   <div ng-app="mainApp" ng-controller="StudentController">
      {{fees | currency }}  <br/><br/>
      {{admissiondate | date }}   <br/><br/>
      {{rollno | number }}
   </div>
   <script src="http://ajax.googleapis.com/ajax/libs/angularjs/1.3.14/angular.min.js"></script>
   <script src="http://cdnjscn.b0.upaiyun.com/libs/angular-i18n/1.2.0/angular-locale_zh-cn.js"></script>
   <script>
      var mainApp = angular.module("mainApp", []);

      mainApp.controller('StudentController', function($scope) {
            $scope.fees = 100;
			$scope.admissiondate  = new Date();
            $scope.rollno = 123.45;
      });

   </script>
</body>
</html>
結果
在Web瀏覽器中開啟textAngularJS.htm。看到結果如下:

使用瀏覽器的語言環境範例
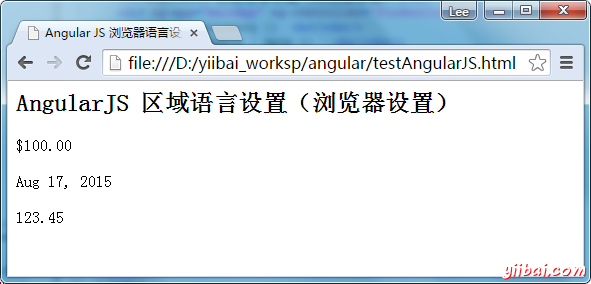
testAngularJS.html
<html>
<head><meta http-equiv="Content-Type" content="text/html; charset=UTF-8"/>
   <title>Angular JS 瀏覽器語言設定範例</title>
</head>
<body>
   <h2>AngularJS 區域語言設定(瀏覽器設定)</h2>
   <div ng-app="mainApp" ng-controller="StudentController">
      {{fees | currency }}  <br/><br/>
      {{admissiondate | date }}   <br/><br/>
      {{rollno | number }}
   </div>
   <script src="http://ajax.googleapis.com/ajax/libs/angularjs/1.3.14/angular.min.js"></script>
   <!-- <script src="http://cdnjscn.b0.upaiyun.com/libs/angular-i18n/1.2.0/angular-locale_zh-hk.js"></script> -->
   <script>
      var mainApp = angular.module("mainApp", []);

      mainApp.controller('StudentController', function($scope) {
            $scope.fees = 100;
			$scope.admissiondate  = new Date();
            $scope.rollno = 123.45;
      });

   </script>
</body>
</html>
結果
在Web瀏覽器中開啟textAngularJS.html。看到結果如下: