JSF JDBC連線
我們可以將JSF應用程式整合到jdbc。 JDBC可將資料儲存到資料庫表中。在本教學中,我們建立一個應用程式並建立jdbc連線來儲存使用者輸入的資料。
JSF + MySQL JDBC範例
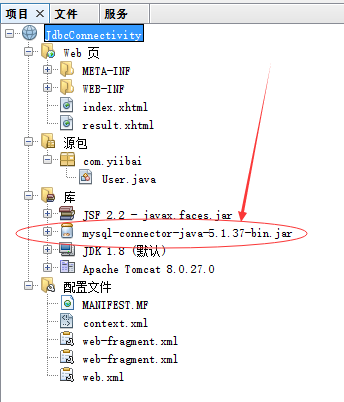
開啟 NetBeans IDE,建立一個名稱為:JdbcConnectivity 的 Web 工程,其目錄結構如下所示 -

提示: 需要加入
mysql-connector-javaJar包。
此應用程式包含使用者輸入表單,委託bean和響應頁面,如以下步驟。
建立資料庫和表
我們使用mysql資料庫建立資料庫和表。
建立資料庫
使用以下SQL命令,建立一個資料庫:test ;
create database test;
在這個資料中,建立一個表: user -
create table user(
    id int not null auto_increment primary key,
    name varchar(100) not null,
    email varchar(50) not null
);
建立資料庫和表後,現在建立一個使用者表單來獲取輸入的使用者資訊。
建立使用者表單
建立一個名稱為:index.xhtml 的檔案,其程式碼如下所示 -
<!DOCTYPE html PUBLIC "-//W3C//DTD XHTML 1.0 Transitional//EN" "http://www.w3.org/TR/xhtml1/DTD/xhtml1-transitional.dtd">
<html xmlns="http://www.w3.org/1999/xhtml"
      xmlns:h="http://xmlns.jcp.org/jsf/html">
    <h:head>
        <title>User Form</title>
    </h:head>
    <h:body>
        <h:form>
            <h:outputLabel for="username" value="User Name "/>
            <h:inputText id="username" value="#{user.userName}">
            </h:inputText><br/>
            <h:outputLabel for="email" value="Email ID "/>
            <h:inputText id="email" value="#{user.email}">
            </h:inputText><br/><br/>
            <h:commandButton action="#{user.submit()}" value="submit"/>
        </h:form>
    </h:body>
</html>
建立一個委託Bean
此檔案還包含屬性,資料庫連線和頁面導航。建立一個名稱為:User.java 的檔案,其程式碼如下所示 -
/*
 * To change this license header, choose License Headers in Project Properties.
 * To change this template file, choose Tools | Templates
 * and open the template in the editor.
 */
package com.yiibai;

/**
 *
 * @author Maxsu
 */
import java.sql.Connection;
import java.sql.DriverManager;
import java.sql.PreparedStatement;
import javax.faces.bean.ManagedBean;
import javax.faces.bean.ReferencedBean;

@ManagedBean
@ReferencedBean
public class User {

    String userName;
    String email;

    public String getUserName() {
        return userName;
    }

    public void setUserName(String userName) {
        this.userName = userName;
    }

    public String getEmail() {
        return email;
    }

    public void setEmail(String email) {
        this.email = email;
    }

    public boolean save() {
        int result = 0;
        try {
            Class.forName("com.mysql.jdbc.Driver");
            Connection con = DriverManager.getConnection("jdbc:mysql://localhost:3306/test", "root", "123456");
            PreparedStatement stmt = con.prepareStatement("insert into user(name,email) values(?,?)");
            stmt.setString(1, this.getUserName());
            stmt.setString(2, this.getEmail());
            result = stmt.executeUpdate();
        } catch (Exception e) {
            System.out.println(e);
        }
        if (result == 1) {
            return true;
        } else {
            return false;
        }
    }

    public String submit() {
        if (this.save()) {
            return "result.xhtml";
        } else {
            return "index.xhtml";
        }
    }
}
建立響應結果頁面
建立一個名稱為:result.xhtml 的檔案,其程式碼如下所示 -
<?xml version='1.0' encoding='UTF-8' ?>
<!DOCTYPE html PUBLIC "-//W3C//DTD XHTML 1.0 Transitional//EN" "http://www.w3.org/TR/xhtml1/DTD/xhtml1-transitional.dtd">
<html xmlns="http://www.w3.org/1999/xhtml"
      xmlns:h="http://xmlns.jcp.org/jsf/html">
    <h:head>
        <title>Response Page</title>
    </h:head>
    <h:body>
        <h1><h:outputText value="Hello #{user.userName}"/></h1>
        <h:outputText value="Your Record has been Saved Successfully!"/>
    </h:body>
</html>
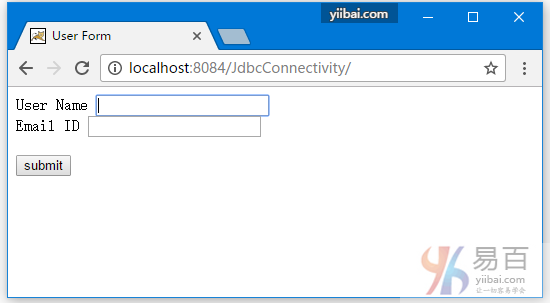
執行上面專案,開啟瀏覽器存取:http://localhost:8084/JdbcConnectivity/,並提交表單,向資料庫表中寫入資料 -

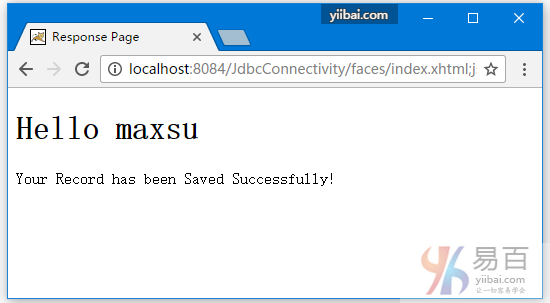
向上面表單中,寫入一個範例資料,提示得到以下結果 -

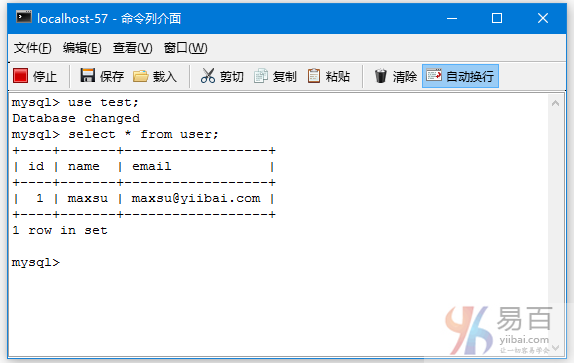
現在,您可以看到表:user 中的資料,應該會看到上面表單提交的資料了 -
