AWT FlowLayout
介紹
FlowLayout類元件排列為左到右的流動。
類的宣告
以下是宣告的java.awt.FlowLayout類:
public class FlowLayout
   extends Object
      implements LayoutManager, Serializable
欄位域
下面的java.awt.BorderLayout類的欄位:
-
static int CENTER -- 該值指示每一行元件都應該為中心。
-
static int LEADING -- 此值指示每一行元件都應該是合理的容器的方向的前緣,例如,在左到右的方向的左側。
-
static int LEFT -- 此值表示每行元件都應該是左對齊。
-
static int RIGHT -- 此值表示每行元件都應該是右對齊。
-
static int TRAILING -- 此值指示每一行元件都應該是合理的容器的方向的後邊緣,例如,在左到右的方向的右側。
類別建構函式
| S.N. | 建構函式與說明 |
|---|---|
| 1 |
FlowLayout() Constructs a new FlowLayout with a centered alignment and a default 5-unit horizontal and vertical gap. |
| 2 |
FlowLayout(int align) Constructs a new FlowLayout with the specified alignment and a default 5-unit horizontal and vertical gap. |
| 3 |
FlowLayout(int align, int hgap, int vgap) Creates a new flow layout manager with the indicated alignment and the indicated horizontal and vertical gaps. |
類方法
| S.N. | 方法和說明 |
|---|---|
| 1 |
void addLayoutComponent(String name, Component comp) Adds the specified component to the layout. |
| 2 |
int getAlignment() Gets the alignment for this layout. |
| 3 |
int getHgap() Gets the horizontal gap between components. |
| 4 |
int getVgap() Gets the vertical gap between components. |
| 5 |
void layoutContainer(Container target) Lays out the container. |
| 6 |
Dimension minimumLayoutSize(Container target) Returns the minimum dimensions needed to layout the visible components contained in the specified target container. |
| 7 |
Dimension preferredLayoutSize(Container target) Returns the preferred dimensions for this layout given the visible components in the specified target container. |
| 8 |
void removeLayoutComponent(Component comp) Removes the specified component from the layout. |
| 9 |
void setAlignment(int align) Sets the alignment for this layout. |
| 10 |
void setHgap(int hgap) Sets the horizontal gap between components. |
| 11 |
void setVgap(int vgap) Sets the vertical gap between components. |
| 12 |
String toString() Returns a string representation of this FlowLayout object and its values. |
繼承的方法
這個類繼承的方法從以下類:
-
java.lang.Object
FlowLayout 範例
選擇使用任何編輯器建立以下java程式D:/ > AWT > com > yiibai > gui >
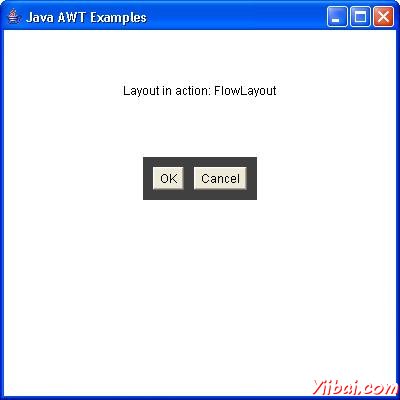
AwtLayoutDemopackage com.yiibai.gui; import java.awt.*; import java.awt.event.*; public class AwtLayoutDemo { private Frame mainFrame; private Label headerLabel; private Label statusLabel; private Panel controlPanel; private Label msglabel; public AwtLayoutDemo(){ prepareGUI(); } public static void main(String[] args){ AwtLayoutDemo awtLayoutDemo = new AwtLayoutDemo(); awtLayoutDemo.showFlowLayoutDemo(); } private void prepareGUI(){ mainFrame = new Frame("Java AWT Examples"); mainFrame.setSize(400,400); mainFrame.setLayout(new GridLayout(3, 1)); mainFrame.addWindowListener(new WindowAdapter() { public void windowClosing(WindowEvent windowEvent){ System.exit(0); } }); headerLabel = new Label(); headerLabel.setAlignment(Label.CENTER); statusLabel = new Label(); statusLabel.setAlignment(Label.CENTER); statusLabel.setSize(350,100); msglabel = new Label(); msglabel.setAlignment(Label.CENTER); msglabel.setText("Welcome to TutorialsPoint AWT Tutorial."); controlPanel = new Panel(); controlPanel.setLayout(new FlowLayout()); mainFrame.add(headerLabel); mainFrame.add(controlPanel); mainFrame.add(statusLabel); mainFrame.setVisible(true); } private void showFlowLayoutDemo(){ headerLabel.setText("Layout in action: FlowLayout"); Panel panel = new Panel(); panel.setBackground(Color.darkGray); panel.setSize(200,200); FlowLayout layout = new FlowLayout(); layout.setHgap(10); layout.setVgap(10); panel.setLayout(layout); panel.add(new Button("OK")); panel.add(new Button("Cancel")); controlPanel.add(panel); mainFrame.setVisible(true); } }
編譯程式,使用命令提示字元。進入到D:/> AWT,然後鍵入以下命令。
D:AWT>javac comyiibaiguiAwtlayoutDemo.java
如果沒有錯誤出現,這意味著編譯成功。使用下面的命令來執行程式。
D:AWT>java com.yiibai.gui.AwtlayoutDemo
驗證下面的輸出
