Spring4 MVC REST服務使用@RestController範例
- Spring 4.0.6.RELEASE
- jackson-mapper-asl 1.9.13
- Maven 3
- JDK 1.6
- Tomcat 7.0.54
- Eclipse JUNO Service Release 2
讓我們現在開始!
第1步:建立目錄結構
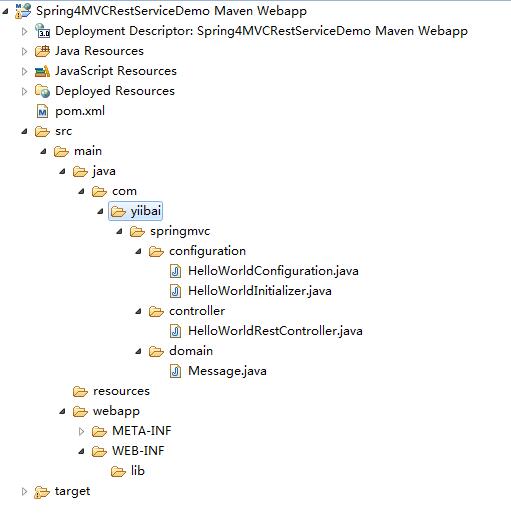
第2步:使用 pom.xml 更新所需的依賴
<?xml version="1.0"?>
<project
	xsi:schemaLocation="http://maven.apache.org/POM/4.0.0 http://maven.apache.org/xsd/maven-4.0.0.xsd"
	xmlns="http://maven.apache.org/POM/4.0.0" xmlns:xsi="http://www.w3.org/2001/XMLSchema-instance">

	<modelVersion>4.0.0</modelVersion>
	<groupId>com.yiibai.springmvc</groupId>
	<artifactId>Spring4MVCRestServiceDemo</artifactId>
	<packaging>war</packaging>
	<version>1.0.0</version>
	<name>Spring4MVCRestServiceDemo Maven Webapp</name>

	<properties>
		<springframework.version>4.0.6.RELEASE</springframework.version>
	</properties>

	<dependencies>
		<dependency>
			<groupId>org.springframework</groupId>
			<artifactId>spring-core</artifactId>
			<version>${springframework.version}</version>
		</dependency>
		<dependency>
			<groupId>org.springframework</groupId>
			<artifactId>spring-web</artifactId>
			<version>${springframework.version}</version>
		</dependency>
		<dependency>
			<groupId>org.springframework</groupId>
			<artifactId>spring-webmvc</artifactId>
			<version>${springframework.version}</version>
		</dependency>

		<dependency>
			<groupId>javax.servlet</groupId>
			<artifactId>javax.servlet-api</artifactId>
			<version>3.1.0</version>
		</dependency>
		<dependency>
			<groupId>javax.servlet.jsp.jstl</groupId>
			<artifactId>jstl-api</artifactId>
			<version>1.2</version>
		</dependency>
		<dependency>
			<groupId>javax.servlet.jsp</groupId>
			<artifactId>javax.servlet.jsp-api</artifactId>
			<version>2.3.1</version>
		</dependency>

		<dependency>
			<groupId>org.codehaus.jackson</groupId>
			<artifactId>jackson-mapper-asl</artifactId>
			<version>1.9.13</version>
		</dependency>
	</dependencies>
	<build>
		<pluginManagement>
			<plugins>
				<plugin>
					<groupId>org.apache.maven.plugins</groupId>
					<artifactId>maven-war-plugin</artifactId>
					<version>2.4</version>
					<configuration>
						<warSourceDirectory>src/main/webapp</warSourceDirectory>
						<warName>Spring4MVCRestServiceDemo</warName>
						<failOnMissingWebXml>false</failOnMissingWebXml>
					</configuration>
				</plugin>
			</plugins>
		</pluginManagement>
		<finalName>Spring4MVCRestServiceDemo</finalName>
	</build>
</project>
上面的 pom.xml 與以前的教學中定義的相同。有一個顯著的區別: 我們已經包括一個依賴於Jackson 庫(jackson-mapper-asl),其將用於所述響應資料轉換成JSON字串。
對於Spring 4.1.x 和以上, jackson-databind 2.3或以上是推薦使用的,以避免轉換問題。
    <dependency>
        <groupId>com.fasterxml.jackson.core</groupId>
        <artifactId>jackson-databind</artifactId>
        <version>2.5.3</version>
    </dependency>
第3步:新增一個POJO/域物件
package com.yiibai.springmvc.domain;

public class Message {

	String name;
	String text;

	public Message(String name, String text) {
		this.name = name;
		this.text = text;
	}

	public String getName() {
		return name;
	}

	public String getText() {
		return text;
	}

}
第4步:新增控制器
package com.yiibai.springmvc.controller;

import org.springframework.web.bind.annotation.PathVariable;
import org.springframework.web.bind.annotation.RequestMapping;
import org.springframework.web.bind.annotation.RestController;

import com.yiibai.springmvc.domain.Message;

@RestController
public class HelloWorldRestController {

	@RequestMapping("/hello/{player}")
	public Message message(@PathVariable String player) {

		Message msg = new Message(player, "Hello " + player);
		return msg;
	}

}
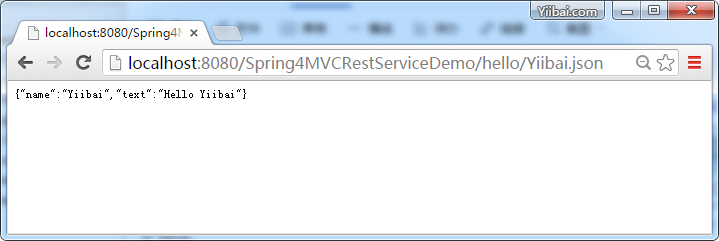
@PathVariable表示引數將被系結到變數 URI 模板。更有趣的事情,這裡要注意的是,這裡我們使用的是 @RestController 註解,這標誌著這個類作為控制器,每一個方法返回域物件/pojo代替一個檢視。這意味著我們不再使用檢視解析器,我們不再直接傳送響應的HTML,我們只傳送的域物件轉換成格式。在我們的例子中,由於 jackson 包含在類路徑中,訊息物件將轉換成JSON格式。
第5步:新增組態類
package com.yiibai.springmvc.configuration;

import org.springframework.context.annotation.ComponentScan;
import org.springframework.context.annotation.Configuration;
import org.springframework.web.servlet.config.annotation.EnableWebMvc;

@Configuration
@EnableWebMvc
@ComponentScan(basePackages = "com.yiibai.springmvc")
public class HelloWorldConfiguration {

}
在這裡,這個類是主要提供元件,掃描和注釋支援。需要注意的是,我們沒有任何檢視解析器組態,因為我們在Rest案例並不需要。
第6步:新增初始化類
新增一個初始化類實現WebApplicationInitializer在src/main/java,使用如下圖所示指定包(在這種情況下,替代在web.xml中定義的任何spring的組態)。在Servlet 3.0容器啟動時,這個類會被載入併範例,它是在啟動時方法將通過servlet容器呼叫。
package com.yiibai.springmvc.configuration;

import javax.servlet.ServletContext;
import javax.servlet.ServletException;
import javax.servlet.ServletRegistration;

import org.springframework.web.WebApplicationInitializer;
import org.springframework.web.context.support.AnnotationConfigWebApplicationContext;
import org.springframework.web.servlet.DispatcherServlet;

public class HelloWorldInitializer implements WebApplicationInitializer {

	public void onStartup(ServletContext container) throws ServletException {

		AnnotationConfigWebApplicationContext ctx = new AnnotationConfigWebApplicationContext();
		ctx.register(HelloWorldConfiguration.class);
		ctx.setServletContext(container);

		ServletRegistration.Dynamic servlet = container.addServlet(
				"dispatcher", new DispatcherServlet(ctx));

		servlet.setLoadOnStartup(1);
		servlet.addMapping("/");
	}

}
更新:請注意,上面的類可以寫成更加簡潔[和它的首選方式],通過擴充套件 AbstractAnnotationConfigDispatcherServletInitializer 基礎類別,如下所示:
package com.yiibai.springmvc.configuration;

import org.springframework.web.servlet.support.AbstractAnnotationConfigDispatcherServletInitializer;

public class HelloWorldInitializer extends AbstractAnnotationConfigDispatcherServletInitializer {

	@Override
	protected Class<?>[] getRootConfigClasses() {
		return new Class[] { HelloWorldConfiguration.class };
	}

	@Override
	protected Class<?>[] getServletConfigClasses() {
		return null;
	}

	@Override
	protected String[] getServletMappings() {
		return new String[] { "/" };
	}

}
第7步:構建和部署應用程式
現在構建 war(在 Eclipse中)或通過 Maven 命令列( mvn clean install)。 部署 war 檔案到Servlet3.0容器。
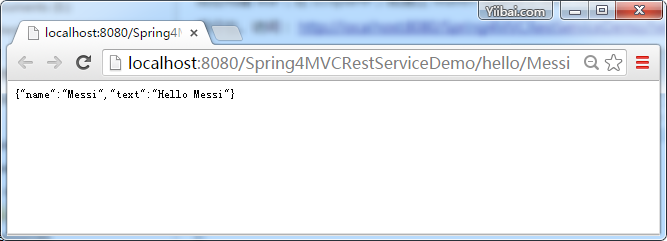
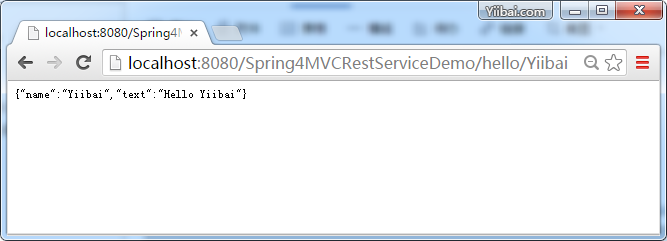
就這樣,所有輸出如上所示。
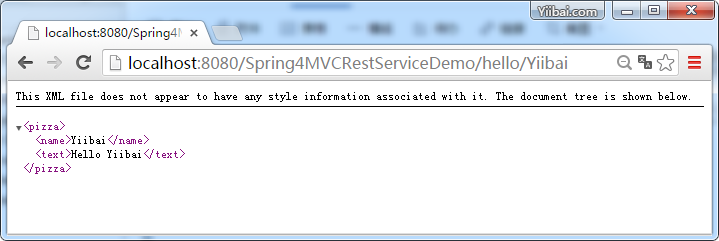
現在,如上面提到的,只是通過增加模型類(Message)JAXB註釋,我們可以讓XML輸出支援以及JSON輸出。下面是相同的演示:
package com.yiibai.springmvc.domain;

import javax.xml.bind.annotation.XmlElement;
import javax.xml.bind.annotation.XmlRootElement;

@XmlRootElement(name = "pizza")
public class Message {

	String name;
	String text;

	public Message(){

	}

	public Message(String name, String text) {
		this.name = name;
		this.text = text;
	}

	@XmlElement
	public String getName() {
		return name;
	}

	@XmlElement
	public String getText() {
		return text;
	}

}
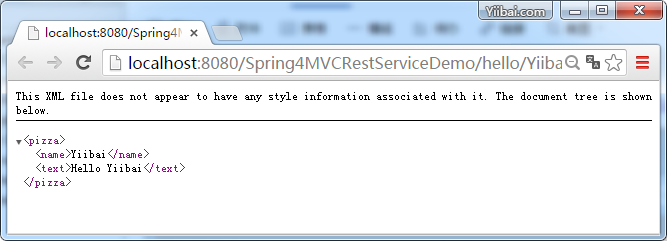
再次存取:http://localhost:8080/Spring4MVCRestServiceDemo/hello/Yiibai.json
到這裡,全部完成!
程式碼下載:http://pan.baidu.com/s/1pK1K2BD