Spring MVC多解析器對映
如果想在spring mvc應用程式中使用多個檢視解析器,那麼可以使用order屬性設定優先順序順序。 以下範例顯示如何在Spring Web MVC框架中使用ResourceBundleViewResolver和InternalResourceViewResolver。
MultipleResolver-servlet.xml 組態如下所示 -
<bean class="org.springframework.web.servlet.view.ResourceBundleViewResolver">
   <property name="basename" value="views" />
   <property name="order" value="0" />
</bean>
<bean class="org.springframework.web.servlet.view.InternalResourceViewResolver">
   <property name="prefix" value="/WEB-INF/jsp/" />
   <property name="suffix" value=".jsp" />
   <property name="order" value="1" />
</bean>
這裡order屬性定義了檢視解析器的排序。0作為第一解析器,1作為下一解析器,等等。
views.properties 組態如下所示 -
hello.(class)=org.springframework.web.servlet.view.JstlView
hello.url=/WEB-INF/jsp/hello.jsp
例如,使用上面的組態,如果URI:
- 對於
/hello請求,DispatcherServlet會將請求轉發到由views.properties中定義的hello對應的hello.jsp。 - 這裡「
hello」是要匹配的檢視名稱。class指定檢視型別,url是檢視的位置。
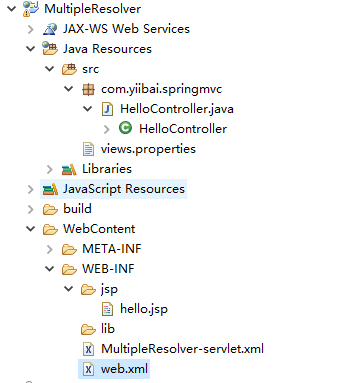
首先,使用Eclipse IDE,並按照以下步驟使用Spring Web Framework開發基於動態表單的Web應用程式:
- 建立一個名稱為 MultipleResolver 的動態WEB專案。
- 在
com.yiibai.springmvc包下建立一個Java類HelloController。 - 在
jsp子檔案夾下建立一個檢視檔案:hello.jsp。 - 在
src檔案夾下建立屬性檔案views.properties。 - 下載JSTL庫jstl.jar。 把它放在
CLASSPATH中。 - 最後一步是建立所有源和組態檔案的內容並執行應用程式,詳細如下所述。
完整的專案檔案目錄結構如下所示 -

HelloController.java 的程式碼如下所示 -
package com.yiibai.springmvc;
import org.springframework.stereotype.Controller;
import org.springframework.web.bind.annotation.RequestMapping;
import org.springframework.web.bind.annotation.RequestMethod;
import org.springframework.ui.ModelMap;

@Controller
@RequestMapping("/hello")
public class HelloController{

   @RequestMapping(method = RequestMethod.GET)
   public String printHello(ModelMap model) {
      model.addAttribute("message", "Hello,Spring MVC資源系結檢視解析器!");

      return "hello";
   }

}
MultipleResolver-servlet.xml 組態如下所示 -
<beans xmlns="http://www.springframework.org/schema/beans"
   xmlns:context="http://www.springframework.org/schema/context"
   xmlns:xsi="http://www.w3.org/2001/XMLSchema-instance"
   xsi:schemaLocation="
   http://www.springframework.org/schema/beans
   http://www.springframework.org/schema/beans/spring-beans-3.0.xsd
   http://www.springframework.org/schema/context
   http://www.springframework.org/schema/context/spring-context-3.0.xsd">

   <context:component-scan base-package="com.yiibai" />

   <bean class="org.springframework.web.servlet.view.ResourceBundleViewResolver">
      <property name="basename" value="views" />
      <property name="order" value="0" />
   </bean>
   <bean class="org.springframework.web.servlet.view.InternalResourceViewResolver">
      <property name="prefix" value="/WEB-INF/jsp/" />
      <property name="suffix" value=".jsp" />
      <property name="order" value="1" />
   </bean>
</beans>
views.properties 組態如下所示 -
hello.(class)=org.springframework.web.servlet.view.JstlView
hello.url=/WEB-INF/jsp/hello.jsp
hello.jsp 的程式碼如下所示 -
<%@ page contentType="text/html; charset=UTF-8" %>
<html>
<head>
<title>Hello World</title>
</head>
<body>
   <h2>${message}</h2>
</body>
</html>
完成建立源和組態檔案後,發布應用程式到Tomcat伺服器。
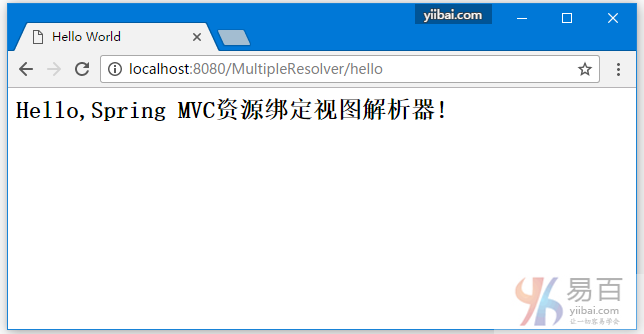
現在啟動Tomcat伺服器,當存取URL => http://localhost:8080/MultipleResolver/hello , 如果Spring Web應用程式沒有問題,應該看到以下結果:
