Spring MVC Hibernate驗證器
下面的範例演示如何使用Spring Web MVC框架在表單中使用錯誤處理和驗證器。 首先使用Eclipse IDE,並按照以下步驟使用Spring Web Framework開發基於動態表單的Web應用程式:
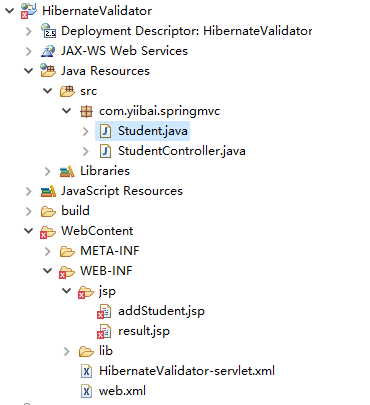
- 建立一個名稱為 HibernateValidator 的動態WEB專案。
- 在
com.yiibai.springmvc包下建立三個Java類:Student和StudentController。 - 在
jsp子檔案夾下建立兩個檢視檔案:addStudent.jsp,result.jsp。 - 下載Hibernate Validator庫 - Hibernate Validator。解壓縮
hibernate-validator-5.3.4.Final.jar和所需的依賴關係存並將它們放在CLASSPATH中。 - 在
src檔案夾下建立屬性檔案messages.properties。 - 最後一步是建立所有源和組態檔案的內容並執行應用程式,詳細如下所述。
完整的專案檔案目錄結構如下所示 -
Student.java 的程式碼如下所示 -
package com.yiibai.springmvc;
import org.hibernate.validator.constraints.NotEmpty;
import org.hibernate.validator.constraints.Range;

public class Student {

   @Range(min = 1, max = 150)
   private Integer age;
   @NotEmpty
   private String name;
   private Integer id;

   public void setAge(Integer age) {
      this.age = age;
   }
   public Integer getAge() {
      return age;
   }

   public void setName(String name) {
      this.name = name;
   }
   public String getName() {
      return name;
   }

   public void setId(Integer id) {
      this.id = id;
   }
   public Integer getId() {
      return id;
   }
}
StudentController.java 的程式碼如下所示 -
package com.yiibai.springmvc;
import org.springframework.stereotype.Controller;
import org.springframework.ui.Model;
import org.springframework.validation.BindingResult;
import org.springframework.validation.annotation.Validated;
import org.springframework.web.bind.annotation.ModelAttribute;
import org.springframework.web.bind.annotation.RequestMapping;
import org.springframework.web.bind.annotation.RequestMethod;
import org.springframework.web.servlet.ModelAndView;

@Controller
public class StudentController {

   @RequestMapping(value = "/addStudent", method = RequestMethod.GET)
   public ModelAndView student() {
      return new ModelAndView("addStudent", "command", new Student());
   }

   @ModelAttribute("student")
   public Student createStudentModel() {
      return new Student();
   }

   @RequestMapping(value = "/addStudent", method = RequestMethod.POST)
   public String addStudent(@ModelAttribute("student") @Validated Student student,
      BindingResult bindingResult, Model model) {
      if (bindingResult.hasErrors()) {
         return "addStudent";
      }
      model.addAttribute("name", student.getName());
      model.addAttribute("age", student.getAge());
      model.addAttribute("id", student.getId());

      return "result";
   }
}
message.properties 組態如下所示 -
NotEmpty.student.name = Name is required!
Range.student.age = Age value must be between 1 and 150!
這裡的鍵可以是<Annotation>.<object-name>.<attribute>。Value是要顯示的訊息。
HibernateValidator-servlet.xml 組態如下所示 -
<beans xmlns="http://www.springframework.org/schema/beans"
   xmlns:context="http://www.springframework.org/schema/context"
   xmlns:mvc="http://www.springframework.org/schema/mvc"
   xmlns:xsi="http://www.w3.org/2001/XMLSchema-instance"
   xsi:schemaLocation="
   http://www.springframework.org/schema/beans
   http://www.springframework.org/schema/beans/spring-beans-3.0.xsd
   http://www.springframework.org/schema/context
   http://www.springframework.org/schema/context/spring-context-3.0.xsd
   http://www.springframework.org/schema/mvc
   http://www.springframework.org/schema/mvc/spring-mvc-3.0.xsd">

   <context:component-scan base-package="com.yiibai.springmvc" />
   <mvc:annotation-driven />
   <bean class="org.springframework.context.support.ResourceBundleMessageSource"
      id="messageSource">
      <property name="basename" value="messages" />
   </bean>
   <bean class="org.springframework.web.servlet.view.InternalResourceViewResolver">
      <property name="prefix" value="/WEB-INF/jsp/" />
      <property name="suffix" value=".jsp" />
   </bean>
</beans>
這裡的第一個服務方法student(),已經在ModelAndView物件中傳遞了一個名稱為「command」的空物件,因為如果在JSP檔案中使用<form:form>標籤,spring框架需要一個名稱為「command」的物件。 所以當呼叫student()方法時,返回addStudent.jsp檢視。
第二個服務方法addStudent()將在URL: HibernateValidator/addStudent 上的POST方法被呼叫。將根據提交的資訊準備模型物件。 最後從服務方法返回「result」檢視,這將渲染result.jsp。 如果使用validator生成錯誤,則返回相同的檢視「addStudent」,則Spring自動從檢視中的BindingResult注入錯誤訊息並顯示出來。
addStudent.jsp 的程式碼如下所示 -
<%@ page contentType="text/html; charset=UTF-8" %>
<%@taglib uri="http://www.springframework.org/tags/form" prefix="form"%>
<html>
<head>
    <title>Spring MVC Form Handling</title>
</head>
<style>
.error {
   color: #ff0000;
}

.errorblock {
   color: #000;
   background-color: #ffEEEE;
   border: 3px solid #ff0000;
   padding: 8px;
   margin: 16px;
}
</style>
<body>

<h2>學生資訊</h2>
<form:form method="POST" action="/HibernateValidator/addStudent" commandName="student">
   <form:errors path="*" cssClass="errorblock" element="div" />
   <table>
    <tr>
        <td><form:label path="name">姓名:</form:label></td>
        <td><form:input path="name" /></td>
        <td><form:errors path="name" cssClass="error" /></td>
    </tr>
    <tr>
        <td><form:label path="age">年齡:</form:label></td>
        <td><form:input path="age" /></td>
        <td><form:errors path="age" cssClass="error" /></td>
    </tr>
    <tr>
        <td><form:label path="id">編號:</form:label></td>
        <td><form:input path="id" /></td>
    </tr>
    <tr>
        <td colspan="2">
            <input type="submit" value="提交"/>
        </td>
    </tr>
</table>
</form:form>
</body>
</html>
上面的程式碼中使用了<form:errors />標記,其中path =「*」來呈現錯誤訊息。例如-
<form:errors path="*" cssClass="errorblock" element="div" />
它將呈現所有輸入驗證的錯誤訊息。
使用帶有path =「name」的<form:errors />標記來渲染name欄位的錯誤訊息。例如 -
<form:errors path="name" cssClass="error" />
<form:errors path="age" cssClass="error" />
它將呈現姓名(name)和年齡(age)欄位驗證的錯誤訊息。
result.jsp 的程式碼如下所示 -
<%@ page contentType="text/html; charset=UTF-8" %>
<%@taglib uri="http://www.springframework.org/tags/form" prefix="form"%>
<html>
<head>
    <title>Spring MVC Form Handling</title>
</head>
<body>

<h2>提交的學生資訊如下 -</h2>
   <table>
    <tr>
        <td>姓名:</td>
        <td>${name}</td>
    </tr>
    <tr>
        <td>年齡:</td>
        <td>${age}</td>
    </tr>
    <tr>
        <td>編號:</td>
        <td>${id}</td>
    </tr>
</table>
</body>
</html>
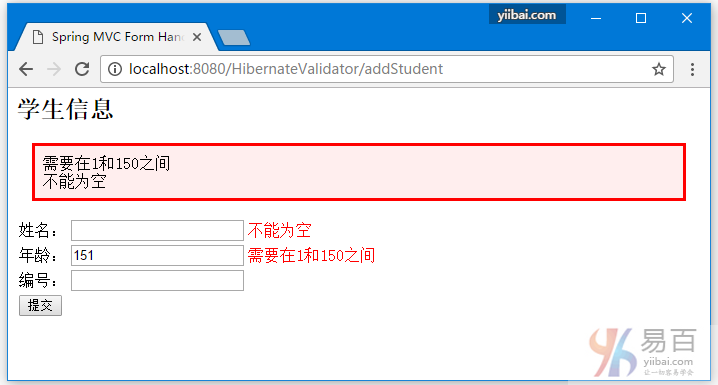
完成建立源和組態檔案後,發布應用程式到Tomcat伺服器。
現在啟動Tomcat伺服器,當存取URL => http://localhost:8080/HibernateValidator/addStudent , 如果Spring Web應用程式沒有問題,應該看到以下結果: