Spring Boot Web Socket
在本章中,將了解和學習如何使用Spring Boot with Web通訊端構建互動式Web應用程式。
要使用Web通訊端在Spring Boot中構建互動式Web應用程式,需要新增以下依賴項。
Maven使用者應在pom.xml 檔案中新增以下依賴項。
<dependency>
   <groupId>org.springframework.boot</groupId>
   <artifactId>spring-boot-starter-websocket</artifactId>
</dependency>
<dependency>
   <groupId>org.webjars</groupId>
   <artifactId>webjars-locator</artifactId>
</dependency>
<dependency>
   <groupId>org.webjars</groupId>
   <artifactId>sockjs-client</artifactId>
   <version>1.0.2</version>
</dependency>

<dependency>
   <groupId>org.webjars</groupId>
   <artifactId>stomp-websocket</artifactId>
   <version>2.3.3</version>
</dependency>
<dependency>
   <groupId>org.webjars</groupId>
   <artifactId>bootstrap</artifactId>
   <version>3.3.7</version>        </dependency>
<dependency>
   <groupId>org.webjars</groupId>
   <artifactId>jquery</artifactId>
   <version>3.1.0</version>
</dependency>
Gradle使用者可以在build.gradle 檔案中新增以下依賴項 -
compile("org.springframework.boot:spring-boot-starter-websocket")
compile("org.webjars:webjars-locator")
compile("org.webjars:sockjs-client:1.0.2")
compile("org.webjars:stomp-websocket:2.3.3")
compile("org.webjars:bootstrap:3.3.7")
compile("org.webjars:jquery:3.1.0")
建立一個訊息處理控制器來處理STOMP訊息傳遞。STOMP訊息可以路由到@Controller類檔案。 例如,GreetingController被對映為處理到目標URL => /hello 的訊息。
package com.yiibai.websocketapp;

import org.springframework.messaging.handler.annotation.MessageMapping;
import org.springframework.messaging.handler.annotation.SendTo;
import org.springframework.stereotype.Controller;

@Controller
public class GreetingController {
   @MessageMapping("/hello")
   @SendTo("/topic/greetings")
   public Greeting greeting(HelloMessage message) throws Exception {
      Thread.sleep(1000); // simulated delay
      return new Greeting("Hello, " + message.getName() + "!");
   }
}
現在,為STOMP訊息傳遞組態Spring。 編寫一個擴充套件AbstractWebSocketMessageBrokerConfigurer類的WebSocketConfig類檔案,程式碼如下所示。
package com.yiibai.websocketapp;

import org.springframework.context.annotation.Configuration;
import org.springframework.messaging.simp.config.MessageBrokerRegistry;
import org.springframework.web.socket.config.annotation.AbstractWebSocketMessageBrokerConfigurer;
import org.springframework.web.socket.config.annotation.EnableWebSocketMessageBroker;
import org.springframework.web.socket.config.annotation.StompEndpointRegistry;

@Configuration
@EnableWebSocketMessageBroker
public class WebSocketConfig extends AbstractWebSocketMessageBrokerConfigurer {
   @Override
   public void configureMessageBroker(MessageBrokerRegistry config) {
      config.enableSimpleBroker("/topic");
      config.setApplicationDestinationPrefixes("/app");
   }
   @Override
   public void registerStompEndpoints(StompEndpointRegistry registry) {
      registry.addEndpoint("/yiibai-websocket").withSockJS();
   }
}
@EnableWebSocketMessageBroker注釋用於組態Web通訊端訊息代理以建立STOMP端點。
可以在src/main/resources/static/index.html下建立一個瀏覽器用戶端檔案,如下所示 -
<!DOCTYPE html>
<html>
   <head>
      <title>Hello WebSocket</title>
      <link href = "/webjars/bootstrap/css/bootstrap.min.css" rel = "stylesheet">
      <link href = "/main.css" rel = "stylesheet">
      <script src = "/webjars/jquery/jquery.min.js"></script>
      <script src = "/webjars/sockjs-client/sockjs.min.js"></script>
      <script src = "/webjars/stomp-websocket/stomp.min.js"></script>
      <script src = "/app.js"></script>
   </head>

   <body>
      <noscript>
         <h2 style = "color: #ff0000">
            Seems your browser doesn't support Javascript! Websocket relies on Javascript being
            enabled. Please enable Javascript and reload this page!
         </h2>
      </noscript>
      <div id = "main-content" class = "container">
         <div class = "row">
            <div class = "col-md-6">
               <form class = "form-inline">
                  <div class = "form-group">
                     <label for = "connect">WebSocket connection:</label>
                     <button id = "connect" class = "btn btn-default" type = "submit">Connect</button>
                     <button id = "disconnect" class = "btn btn-default" type = "submit" disabled = "disabled">Disconnect
                     </button>
                  </div>
               </form>
            </div>

            <div class = "col-md-6">
               <form class = "form-inline">
                  <div class = "form-group">
                     <label for = "name">What is your name?</label>
                     <input type = "text" id = "name" class = "form-control" placeholder = "Your name here...">
                  </div>
                  <button id = "send" class = "btn btn-default" type = "submit">Send</button>
               </form>
            </div>
         </div>

         <div class  =  "row">
            <div class  =  "col-md-12">
               <table id  =  "conversation" class = "table table-striped">
                  <thead>
                     <tr>
                        <th>Greetings</th>
                     </tr>
                  </thead>
                  <tbody id  =  "greetings"></tbody>
               </table>
            </div>
         </div>
      </div>
   </body>
</html>
建立一個app.js 檔案來使用STOMP來消費和生成訊息。
var stompClient = null;

function setConnected(connected) {
   $("#connect").prop("disabled", connected);
   $("#disconnect").prop("disabled", !connected);

   if (connected) {
      $("#conversation").show();
   } else {
      $("#conversation").hide();
   }
   $("#greetings").html("");
}

function connect() {
   var socket = new SockJS('/yiibai-websocket');
   stompClient = Stomp.over(socket);
   stompClient.connect({}, function (frame) {
      setConnected(true);
      console.log('Connected: ' + frame);
      stompClient.subscribe('/topic/greetings', function (greeting) {
         showGreeting(JSON.parse(greeting.body).content);
      });
   });
}
function disconnect() {
   if (stompClient !== null) {
      stompClient.disconnect();
   }
   setConnected(false);
   console.log("Disconnected");
}
function sendName() {
   stompClient.send("/app/hello", {}, JSON.stringify({'name': $("#name").val()}));
}
function showGreeting(message) {
   $("#greetings").append("<tr><td>" + message + "</td></tr>");
}
$(function () {
   $( "form" ).on('submit', function (e) {e.preventDefault();});
   $( "#connect" ).click(function() { connect(); });
   $( "#disconnect" ).click(function() { disconnect(); });
   $( "#send" ).click(function() { sendName(); });
});
主Spring Boot應用程式的程式碼如下所示。
package com.yiibai.websocketapp;

import org.springframework.boot.SpringApplication;
import org.springframework.boot.autoconfigure.SpringBootApplication;

@SpringBootApplication
public class WebsocketappApplication {
   public static void main(String[] args) {
      SpringApplication.run(WebsocketappApplication.class, args);
   }
}
完整的構建組態檔案如下所示。
Maven構建檔案 - pom.xml
<?xml version = "1.0" encoding = "UTF-8"?>
<project xmlns = "http://maven.apache.org/POM/4.0.0"
   xmlns:xsi = "http://www.w3.org/2001/XMLSchema-instance"
   xsi:schemaLocation = "http://maven.apache.org/POM/4.0.0
   http://maven.apache.org/xsd/maven-4.0.0.xsd">

   <modelVersion>4.0.0</modelVersion>
   <groupId>com.yiibai</groupId>
   <artifactId>websocketapp</artifactId>
   <version>0.0.1-SNAPSHOT</version>
   <packaging>jar</packaging>
   <name>websocketapp</name>
   <description>Demo project for Spring Boot</description>

   <parent>
      <groupId>org.springframework.boot</groupId>
      <artifactId>spring-boot-starter-parent</artifactId>
      <version>1.5.9.RELEASE</version>
   </parent>

   <dependencies>
      <dependency>
         <groupId>org.springframework.boot</groupId>
         <artifactId>spring-boot-starter-websocket</artifactId>
      </dependency>
      <dependency>
         <groupId>org.webjars</groupId>
         <artifactId>webjars-locator</artifactId>
      </dependency>
      <dependency>
         <groupId>org.webjars</groupId>
         <artifactId>sockjs-client</artifactId>
         <version>1.0.2</version>
      </dependency>

      <dependency>
         <groupId>org.webjars</groupId>
         <artifactId>stomp-websocket</artifactId>
         <version>2.3.3</version>
      </dependency>
      <dependency>
         <groupId>org.webjars</groupId>
         <artifactId>bootstrap</artifactId>
         <version>3.3.7</version>
      </dependency>

      <dependency>
         <groupId>org.webjars</groupId>
         <artifactId>jquery</artifactId>
         <version>3.1.0</version>
      </dependency>
      <dependency>
         <groupId>org.springframework.boot</groupId>
         <artifactId>spring-boot-starter-test</artifactId>
         <scope>test</scope>
      </dependency>
   </dependencies>

   <properties>
      <java.version>1.8</java.version>
   </properties>

   <build>
      <plugins>
         <plugin>
            <groupId>org.springframework.boot</groupId>
            <artifactId>spring-boot-maven-plugin</artifactId>
         </plugin>
      </plugins>
   </build>

</project>
Gradle構建檔案 - build.gradle
buildscript {
   repositories {
      mavenCentral()
   }
   dependencies {
      classpath("org.springframework.boot:spring-boot-gradle-plugin:1.5.9.RELEASE")
   }
}
apply plugin: 'java'
apply plugin: 'eclipse'
apply plugin: 'org.springframework.boot'

jar {
   baseName = 'websocketapp'
   version =  '0.1.0'
}
sourceCompatibility = 1.8
targetCompatibility = 1.8

repositories {
   mavenCentral()
}
dependencies {
   compile("org.springframework.boot:spring-boot-starter-websocket")
   compile("org.webjars:webjars-locator")
   compile("org.webjars:sockjs-client:1.0.2")
   compile("org.webjars:stomp-websocket:2.3.3")
   compile("org.webjars:bootstrap:3.3.7")
   compile("org.webjars:jquery:3.1.0")

   testCompile("org.springframework.boot:spring-boot-starter-test")
}
可以建立可執行的JAR檔案,並使用以下Maven或Gradle命令執行spring boot應用程式 -
對於Maven,使用如下所示的命令 -
mvn clean install
在「BUILD SUCCESS」之後,可以在target目錄下找到JAR檔案。
使用下面給出的命令執行JAR檔案 -
java –jar <JARFILE>
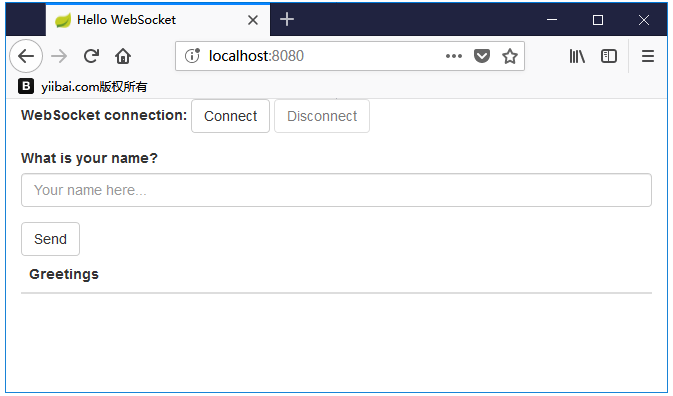
在瀏覽器開啟URL => http://localhost:8080/ ,得到輸出結果如下圖所示 -
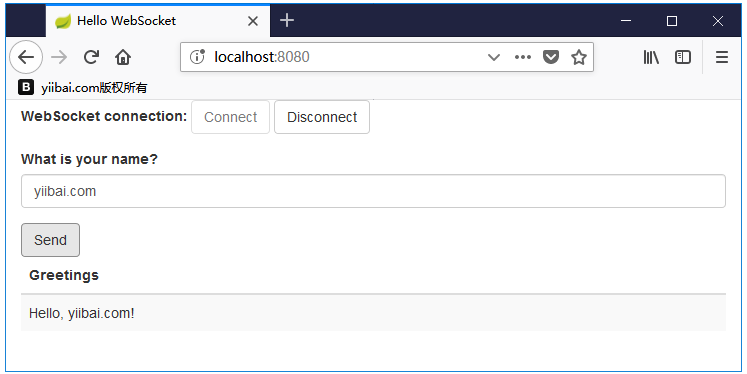
執行傳送和接收訊息,如下圖所示: