Spring Boot攔截器
在Spring Boot中使用攔截器,可在以下情況下執行操作 -
- 在將請求傳送到控制器之前
- 在將響應傳送給用戶端之前
例如,使用攔截器在將請求傳送到控制器之前新增請求檔頭,並在將響應傳送到用戶端之前新增響應檔頭。
要使用攔截器,需要建立支援它的@Component類,它應該實現HandlerInterceptor介面。
以下是在攔截器上工作時應該了解的三種方法 -
preHandle()方法 - 用於在將請求傳送到控制器之前執行操作。此方法應返回true,以將響應返回給用戶端。postHandle()方法 - 用於在將響應傳送到用戶端之前執行操作。afterCompletion()方法 - 用於在完成請求和響應後執行操作。
請注意以下程式碼以便更好地理解 -
@Component
public class ProductServiceInterceptor implements HandlerInterceptor {
   @Override
   public boolean preHandle(
      HttpServletRequest request, HttpServletResponse response, Object handler) throws Exception {

      return true;
   }
   @Override
   public void postHandle(
      HttpServletRequest request, HttpServletResponse response, Object handler,
      ModelAndView modelAndView) throws Exception {}

   @Override
   public void afterCompletion(HttpServletRequest request, HttpServletResponse response,
      Object handler, Exception exception) throws Exception {}
}
必須使用WebMvcConfigurerAdapter向InterceptorRegistry註冊此Interceptor,如下所示 -
@Component
public class ProductServiceInterceptorAppConfig extends WebMvcConfigurerAdapter {
   @Autowired
   ProductServiceInterceptor productServiceInterceptor;

   @Override
   public void addInterceptors(InterceptorRegistry registry) {
      registry.addInterceptor(productServiceInterceptor);
   }
}
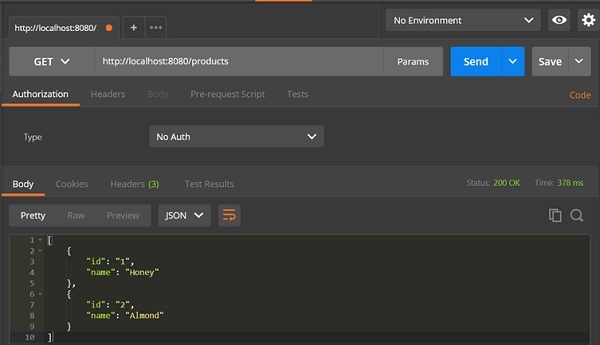
在下面給出的範例中,將使用GET產品API,該API提供的輸出如下 -Interceptor類ProductServiceInterceptor.java的程式碼如下 -
package com.yiibai.demo.interceptor;

import javax.servlet.http.HttpServletRequest;
import javax.servlet.http.HttpServletResponse;

import org.springframework.stereotype.Component;
import org.springframework.web.servlet.HandlerInterceptor;
import org.springframework.web.servlet.ModelAndView;

@Component
public class ProductServiceInterceptor implements HandlerInterceptor {
   @Override
   public boolean preHandle
      (HttpServletRequest request, HttpServletResponse response, Object handler)
      throws Exception {

      System.out.println("Pre Handle method is Calling");
      return true;
   }
   @Override
   public void postHandle(HttpServletRequest request, HttpServletResponse response,
      Object handler, ModelAndView modelAndView) throws Exception {

      System.out.println("Post Handle method is Calling");
   }
   @Override
   public void afterCompletion
      (HttpServletRequest request, HttpServletResponse response, Object
      handler, Exception exception) throws Exception {

      System.out.println("Request and Response is completed");
   }
}
應用程式組態類檔案的程式碼將攔截器註冊到攔截器登錄檔,ProductServiceInterceptorAppConfig.java如下 -
package com.yiibai.demo.interceptor;

import org.springframework.beans.factory.annotation.Autowired;
import org.springframework.stereotype.Component;
import org.springframework.web.servlet.config.annotation.InterceptorRegistry;
import org.springframework.web.servlet.config.annotation.WebMvcConfigurerAdapter;

@Component
public class ProductServiceInterceptorAppConfig extends WebMvcConfigurerAdapter {
   @Autowired
   ProductServiceInterceptor productServiceInterceptor;

   @Override
   public void addInterceptors(InterceptorRegistry registry) {
      registry.addInterceptor(productServiceInterceptor);
   }
}
控制器類檔案ProductServiceController.java的程式碼如下 -
package com.yiibai.demo.controller;

import java.util.HashMap;
import java.util.Map;

import org.springframework.http.HttpStatus;
import org.springframework.http.ResponseEntity;
import org.springframework.web.bind.annotation.PathVariable;
import org.springframework.web.bind.annotation.RequestBody;
import org.springframework.web.bind.annotation.RequestMapping;
import org.springframework.web.bind.annotation.RequestMethod;
import org.springframework.web.bind.annotation.RestController;
import com.yiibai.demo.exception.ProductNotfoundException;
import com.yiibai.demo.model.Product;

@RestController
public class ProductServiceController {
   private static Map<String, Product> productRepo = new HashMap<>();
   static {
      Product honey = new Product();
      honey.setId("1");
      honey.setName("Honey");
      productRepo.put(honey.getId(), honey);
      Product almond = new Product();
      almond.setId("2");
      almond.setName("Almond");
      productRepo.put(almond.getId(), almond);
   }
   @RequestMapping(value = "/products")
   public ResponseEntity<Object> getProduct() {
      return new ResponseEntity<>(productRepo.values(), HttpStatus.OK);
   }
}
POJO類Product.java 程式碼如下 -
package com.yiibai.demo.model;

public class Product {
   private String id;
   private String name;

   public String getId() {
      return id;
   }
   public void setId(String id) {
      this.id = id;
   }
   public String getName() {
      return name;
   }
   public void setName(String name) {
      this.name = name;
   }
}
Spring Boot應用程式類主要的檔案DemoApplication.java 的程式碼如下 -
package com.yiibai.demo;

import org.springframework.boot.SpringApplication;
import org.springframework.boot.autoconfigure.SpringBootApplication;

@SpringBootApplication
public class DemoApplication {
   public static void main(String[] args) {
      SpringApplication.run(DemoApplication.class, args);
   }
}
Maven build的程式碼 - pom.xml 如下所示 -
<?xml version = "1.0" encoding = "UTF-8"?>
<project xmlns = "http://maven.apache.org/POM/4.0.0" xmlns:xsi = "
   http://www.w3.org/2001/XMLSchema-instance"
   xsi:schemaLocation = "http://maven.apache.org/POM/4.0.0
   http://maven.apache.org/xsd/maven-4.0.0.xsd">

   <modelVersion>4.0.0</modelVersion>
   <groupId>com.yiibai</groupId>
   <artifactId>demo</artifactId>
   <version>0.0.1-SNAPSHOT</version>
   <packaging>jar</packaging>
   <name>demo</name>
   <description>Demo project for Spring Boot</description>

   <parent>
      <groupId>org.springframework.boot</groupId>
      <artifactId>spring-boot-starter-parent</artifactId>
      <version>1.5.8.RELEASE</version>
      <relativePath/>
   </parent>

   <properties>
      <project.build.sourceEncoding>UTF-8</project.build.sourceEncoding>
      <project.reporting.outputEncoding>UTF-8</project.reporting.outputEncoding>
      <java.version>1.8</java.version>
   </properties>

   <dependencies>
      <dependency>
         <groupId>org.springframework.boot</groupId>
         <artifactId>spring-boot-starter-web</artifactId>
      </dependency>

      <dependency>
         <groupId>org.springframework.boot</groupId>
         <artifactId>spring-boot-starter-test</artifactId>
         <scope>test</scope>
      </dependency>
   </dependencies>

   <build>
      <plugins>
         <plugin>
            <groupId>org.springframework.boot</groupId>
            <artifactId>spring-boot-maven-plugin</artifactId>
         </plugin>
      </plugins>
   </build>

</project>
這裡顯示了Gradle構建檔案:build.gradle 的程式碼 -
buildscript {
   ext {
      springBootVersion = '1.5.8.RELEASE'
   }
   repositories {
      mavenCentral()
   }
   dependencies {
      classpath("org.springframework.boot:spring-boot-gradle-plugin:${springBootVersion}")
   }
}
apply plugin: 'java'
apply plugin: 'eclipse'
apply plugin: 'org.springframework.boot'
group = 'com.yiibai'
version = '0.0.1-SNAPSHOT'
sourceCompatibility = 1.8

repositories {
   mavenCentral()
}
dependencies {
   compile('org.springframework.boot:spring-boot-starter-web')
   testCompile('org.springframework.boot:spring-boot-starter-test')
}
建立可執行的JAR檔案,並使用以下Maven或Gradle命令執行Spring Boot應用程式。
對於Maven,使用如下所示的命令 -
mvn clean install
在控制台上看到"BUILD SUCCESS"輸出之後,在target目錄下找到JAR檔案。對於Gradle,使用如下所示的命令 -
gradle clean build
在控制台上看到"BUILD SUCCESSFUL"之後,在build/libs目錄下找到JAR檔案。使用以下命令執行JAR檔案 -
java –jar <JARFILE>
現在,應用程式已在Tomcat埠8080上啟動,如下所示 -

開啟 POSTMAN 應用程式中的URL,並輸入:http://localhost:8080/products,看到輸出如下 -
在控制台視窗中,看到在攔截器中新增的System.out.println語句,如下面給出的螢幕截圖所示 -
