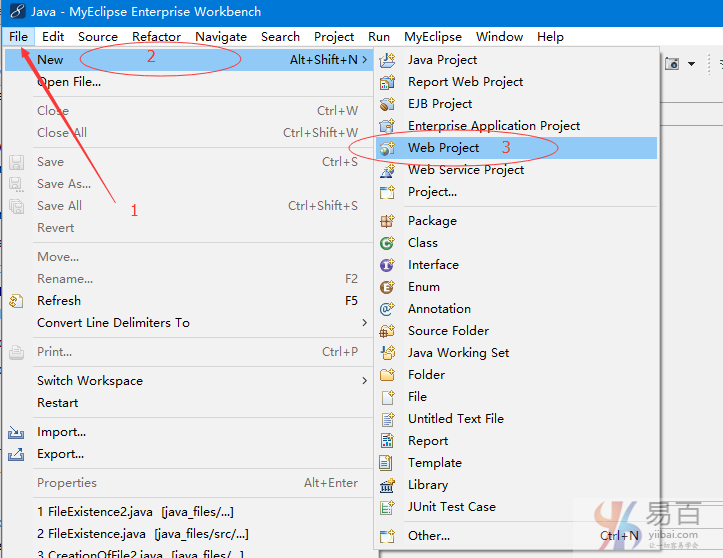
使用MyEclipse建立Servlet
如何在myeclipse IDE中建立Servlet?
要在myeclipse IDE中建立Servlet,可參考以下幾個步驟 -
- 建立一個Web專案
- 建立一個html檔案
- 建立一個servlet
- 啟動MyEclipse tomcat伺服器並部署專案
請依次按照以下步驟在MyEclipse IDE中建立servlet。步驟如下:
1.建立Web專案:
要建立一個Web專案,首先開啟MyEclipse,單擊檔案選單 -> 新建 - > Web專案 ->填寫專案名稱,例如,要建立一個專案的名稱為:MyeclipseServlet 。
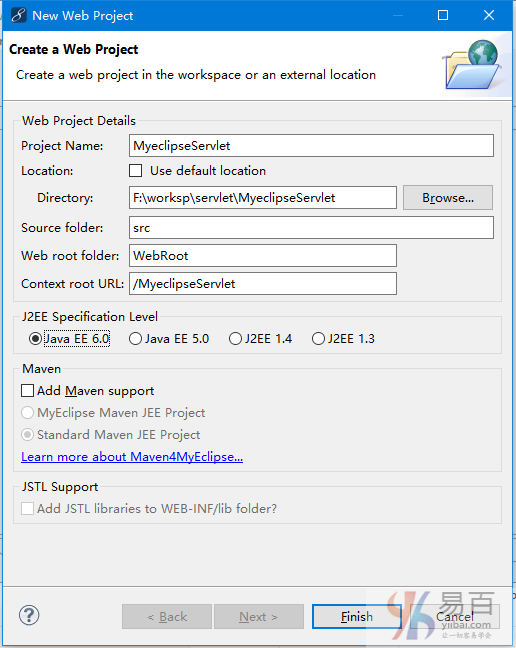
在開啟的對話方塊中,填寫相關專案的資訊,如下圖所示 -
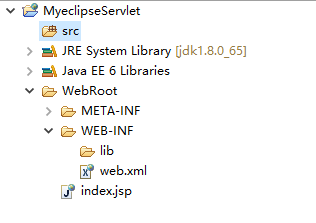
點選完成(Finish),完整的專案結構如下圖所示 -
2.建立html檔案
可以看到有一個名稱為:MyeclipseServlet專案被建立成功了,現在來瀏覽這個專案。
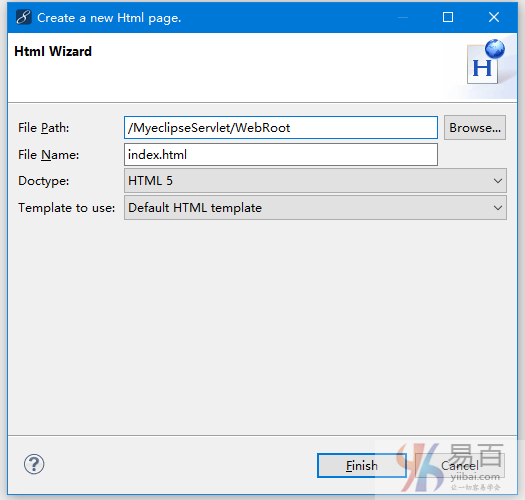
要建立一個html檔案,請右鍵單擊WebRoot -> New - > HTML(Advanceed Templates) -> 填寫html檔案名,例如:index.html -> 完成。

在彈出對話方塊中,填寫HTML檔案的名稱:index.html,如下所示 -
下面對這個index.html檔案中的程式碼進行簡單的修改,修改的結果如下所示 -
<!DOCTYPE html>
<html>
  <head>
    <title>index.html</title>
    <meta http-equiv="keywords" content="keyword1,keyword2,keyword3">
    <meta http-equiv="description" content="this is my page">
    <meta http-equiv="content-type" content="text/html; charset=UTF-8">
    <!--<link rel="stylesheet" type="text/css" href="./styles.css">-->
  </head>

  <body>
    <div style="text-align:center;">
        <form action="/MyeclipseServlet/SayHello" method="POST">
            輸入名字:<input type="text" name="name"/>
            <input type="submit" value="提交">
        </form>
    </div>
  </body>
</html>
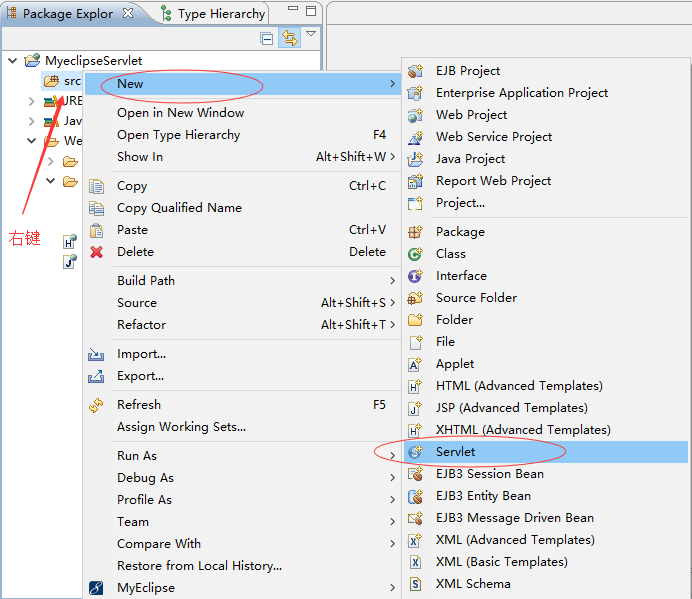
3.建立servlet
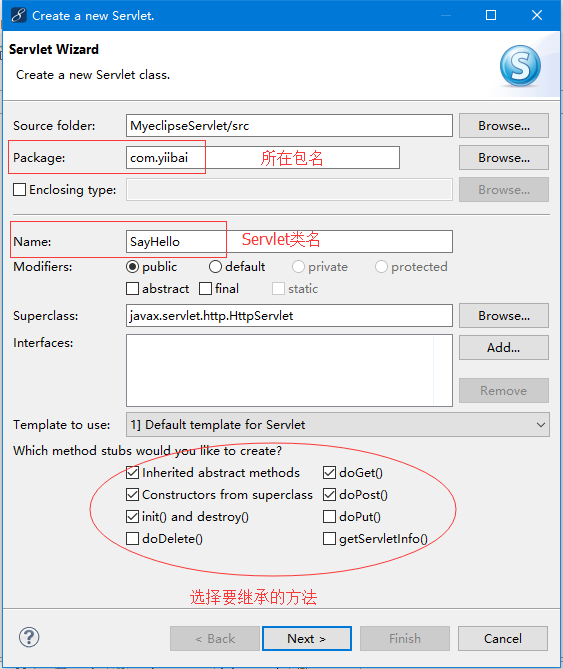
要建立Servlet,請單擊選單檔案(File) -> 新建(New) -> Servlet -> 填寫servlet名稱,例如: SayHello -> 選中doGet()方法核取方塊 -> 下一步(Next>) -> 完成。
填寫要建立Servlet的資訊,這裡要在com.yiibai包中,建立一個名稱為SayHello的Servlet,如下所示 -
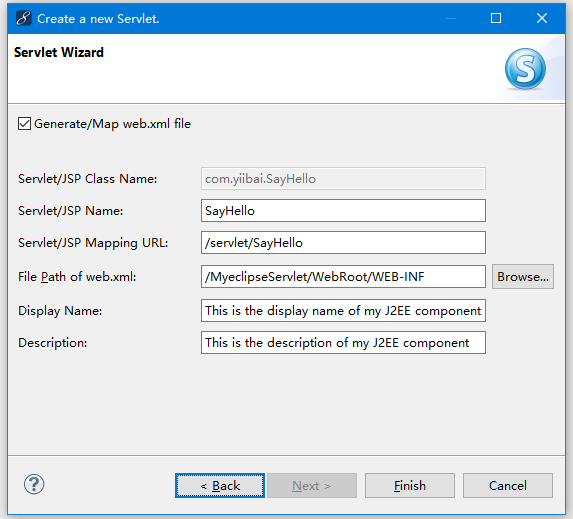
Servlet組態的相關資訊 -
可以看到一個名為SayHello.java的servlet檔案被建立。接下來將在這個檔案裡編寫servlet程式碼。刪除SayHello.java類中其它的方法,只保留doPost()並重寫此方法的功能,如下所示 -
package com.yiibai;

import java.io.IOException;
import java.io.PrintWriter;

import javax.servlet.ServletException;
import javax.servlet.http.HttpServlet;
import javax.servlet.http.HttpServletRequest;
import javax.servlet.http.HttpServletResponse;

public class SayHello extends HttpServlet {
    /**
     * The doPost method of the servlet. <br>
     *
     * This method is called when a form has its tag value method equals to post.
     *
     * @param request the request send by the client to the server
     * @param response the response send by the server to the client
     * @throws ServletException if an error occurred
     * @throws IOException if an error occurred
     */
    public void doPost(HttpServletRequest request, HttpServletResponse response)
            throws ServletException, IOException {

        response.setContentType("text/html");
        PrintWriter out = response.getWriter();
        String name = null;
        // 獲取表單Post過來的資料
        name = request.getParameter("name");
        if(name==null){
            name = "";
        }
        out.println("<!DOCTYPE HTML PUBLIC \"-//W3C//DTD HTML 4.01 Transitional//EN\">");
        out.println("<HTML>");
        out.println("  <HEAD><TITLE>SayHello Servlet</TITLE></HEAD>");
        out.println("  <BODY>");
        out.print("    This is "+this.getClass()+", using the POST method");
        out.println("<hr/>");
        out.println("Hello, "+name);
        out.println("  </BODY>");
        out.println("</HTML>");
        out.flush();
        out.close();
    }
}
現在刪除專案中的index.jsp檔案,並將index.html檔案設定為專案的預設頁面。開啟web.xml檔案,並將歡迎檔案(<welcome-file>標籤)名稱更改為index.html。同時修改SayHello的對映url為/SayHello,現在完整的web.xml組態程式碼如下 -
<?xml version="1.0" encoding="UTF-8"?>
<web-app version="3.0" xmlns="http://java.sun.com/xml/ns/javaee"
    xmlns:xsi="http://www.w3.org/2001/XMLSchema-instance"
    xsi:schemaLocation="http://java.sun.com/xml/ns/javaee
    http://java.sun.com/xml/ns/javaee/web-app_3_0.xsd">
    <display-name>SayHello Servlet</display-name>
    <servlet>
        <description>This is the description of my J2EE component</description>
        <display-name>This is the display name of my J2EE component</display-name>
        <servlet-name>SayHello</servlet-name>
        <servlet-class>com.yiibai.SayHello</servlet-class>
    </servlet>

    <servlet-mapping>
        <servlet-name>SayHello</servlet-name>
        <url-pattern>/SayHello</url-pattern>
    </servlet-mapping>
    <welcome-file-list>
        <welcome-file>index.html</welcome-file>
    </welcome-file-list>
</web-app>
到這裡,專案的建立和組態就完成了,接下來來看看如何部署和執行專案。
4.啟動伺服器並部署專案
要啟動伺服器並部署專案。右鍵單擊專案 -> 執行方式(Run As…) - > MyEclipse伺服器應用程式。
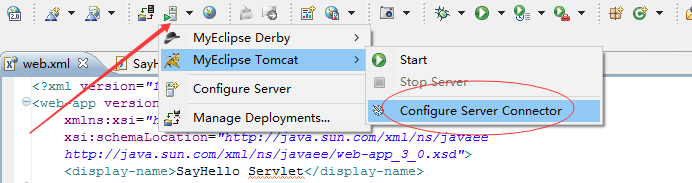
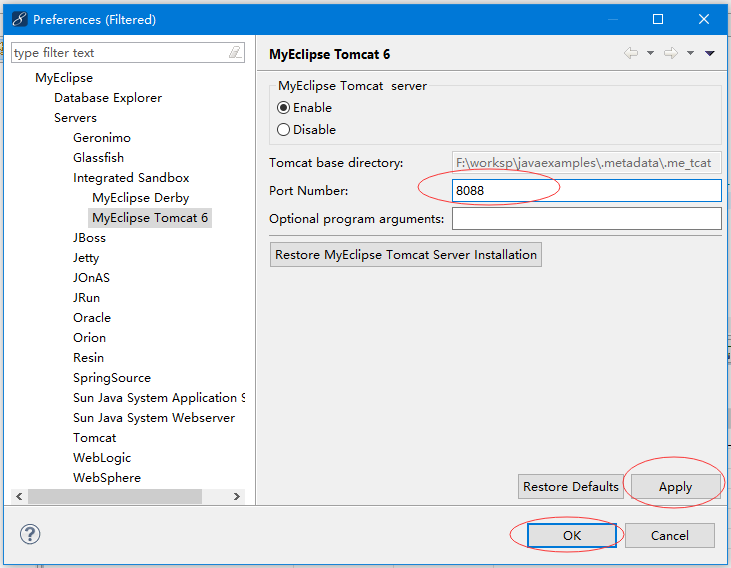
MyEclipse Tomcat的預設埠是8080,如果您在系統上安裝了Oracle,則埠號可能會衝突而無法正常啟動,可以先改變MyEclipse Tomcat伺服器的埠號。要更改埠號,請單擊瀏覽器圖示左側的啟動伺服器圖示 -> myeclipse tomcat -> 組態伺服器連線器 -> 將埠號更改為您想要的埠號,如:8088 -> 應用(Apply) -> 完成。
在彈出的對話方塊中,填寫新的埠號,然後點選應用(Apply)-> OK , 如下圖所示 -
現在埠號已更改了。啟動伺服器右鍵單擊專案 -> Run As -> MyEclipse Server Application。

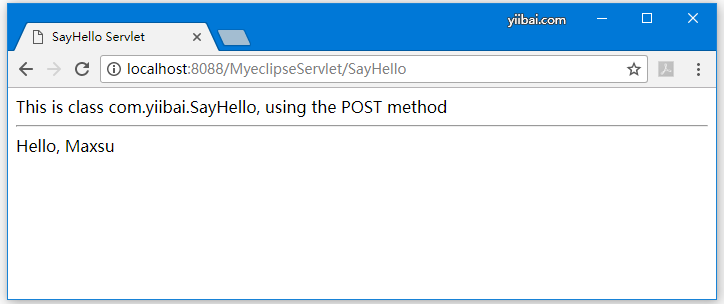
可以看到專案的預設頁面是開啟的,填寫一個名字,然後提交。如果程式沒有問題,開啟瀏覽器,存取這個專案的URL:http://localhost:8088/MyeclipseServlet/ ,應該會看到下面介面 -

在上面輸入框中,輸入一個字串(名字):Maxsu ,然後提交,則應該會看到以下結果 -
到此,使用MyEclipse建立Servlet的介紹就結束了。