VB.Net Excel工作表
VB.Net支援Microsoft Excel 2010的COM物件模型和應用程式之間的互操作性。
要應用程式中使用這種互操作性,需要在Windows表單應用程式中匯入名稱空間Microsoft.Office.Interop.Excel。
VB.Net建立一個Excel檔案的應用程式
讓我們開始建立一個表單表單應用程式按照以下步驟在Microsoft Visual Studio中:檔案 -> 新建專案 -> Windows表單應用程式。
最後,選擇確定,Microsoft Visual Studio建立一個專案(ExcelSheet)並顯示以下Form1 。
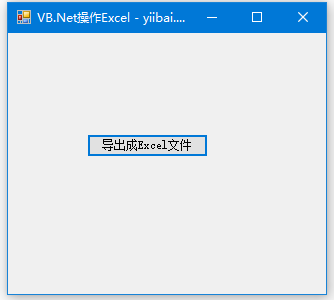
在表單中插入一個Button控制元件Button1。
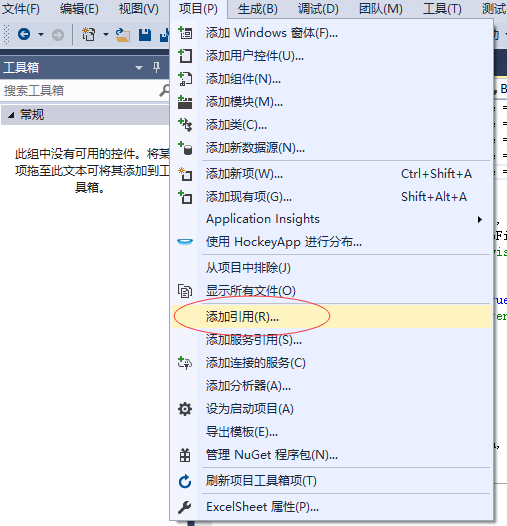
將Microsoft Excel物件庫的參照新增到專案。參考以下步驟:
- 從專案選單中選擇新增參照。如下圖所示 -
- 在COM索引標籤上找到Microsoft Excel物件庫,然後單擊選擇。如下圖所示 -
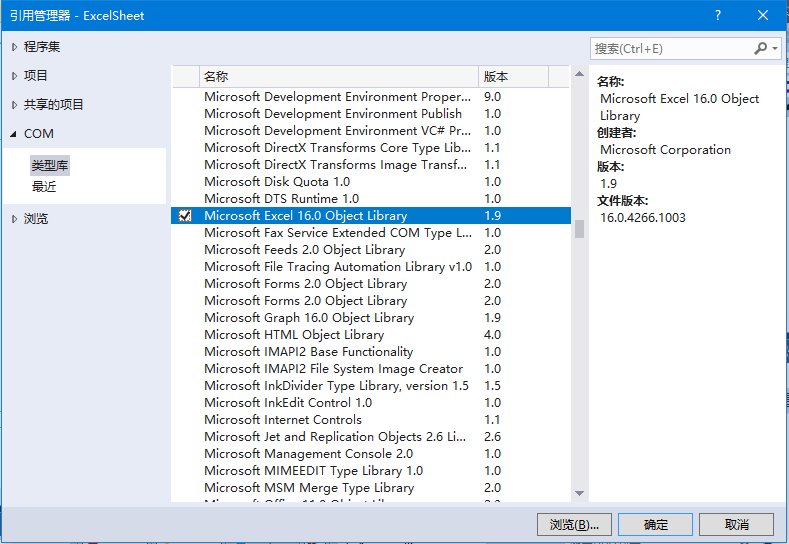
- 最後點選確定。
雙擊程式碼視窗並填充Button1的Click事件,如下所示。參考以下實現程式碼 -
'  Add the following code snippet on top of Form1.vb

Imports Excel = Microsoft.Office.Interop.Excel

Public Class Form1
    Private Sub Button1_Click(sender As Object, e As EventArgs) Handles Button1.Click
        Dim appXL As Excel.Application
        Dim wbXl As Excel.Workbook
        Dim shXL As Excel.Worksheet
        Dim raXL As Excel.Range
        ' Start Excel and get Application object.
        appXL = CreateObject("Excel.Application")
        appXL.Visible = True
        ' Add a new workbook.
        wbXl = appXL.Workbooks.Add
        shXL = wbXl.ActiveSheet
        ' Add table headers going cell by cell.
        shXL.Cells(1, 1).Value = "姓氏"
        shXL.Cells(1, 2).Value = "名字"
        shXL.Cells(1, 3).Value = "姓名"
        shXL.Cells(1, 4).Value = "專業"
        ' Format A1:D1 as bold, vertical alignment = center.
        With shXL.Range("A1", "D1")
            .Font.Bold = True
            .VerticalAlignment = Excel.XlVAlign.xlVAlignCenter
        End With
        ' Create an array to set multiple values at once.
        Dim students(5, 2) As String
        students(0, 0) = "張"
        students(0, 1) = "雨寒"
        students(1, 0) = "牛"
        students(1, 1) = "樂蕊"
        students(2, 0) = "李"
        students(2, 1) = "采夢"
        students(3, 0) = "王"
        students(3, 1) = "妙晴"
        students(4, 0) = "楊"
        students(4, 1) = "思鬆"
        ' Fill A2:B6 with an array of values (First and Last Names).
        shXL.Range("A2", "B6").Value = students
        ' Fill C2:C6 with a relative formula (=A2 & " " & B2).
        raXL = shXL.Range("C2", "C6")
        raXL.Formula = "=A2 & """"& B2"
        ' Fill D2:D6 values.
        With shXL
            .Cells(2, 4).Value = "生物學"
            .Cells(3, 4).Value = "數學"
            .Cells(4, 4).Value = "物理"
            .Cells(5, 4).Value = "化學"
            .Cells(6, 4).Value = "地理"
        End With
        ' AutoFit columns A:D.
        raXL = shXL.Range("A1", "D1")
        raXL.EntireColumn.AutoFit()
        ' Make sure Excel is visible and give the user control
        ' of Excel's lifetime.
        appXL.Visible = True
        appXL.UserControl = True
        ' Release object references.
        raXL = Nothing
        shXL = Nothing
        wbXl = Nothing
        appXL.Quit()
        appXL = Nothing
        Exit Sub
Err_Handler:
        MsgBox(Err.Description, vbCritical, "Error: " & Err.Number)
    End Sub
End Class
當上面的程式碼執行並使用Microsoft Visual Studio工具列上的「開始」按鈕執行時,它將顯示以下視窗:
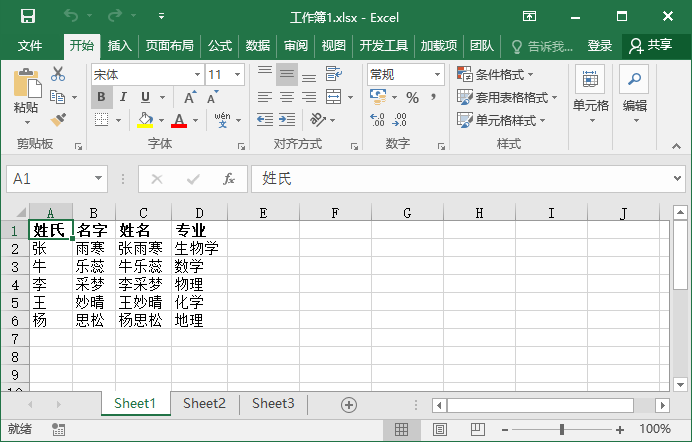
點選匯出成Excel檔案 按鈕應用程式將要求儲存Excel工作簿,Excel表格內容如下 -