ReactJS元件生命週期
在本章中,我們來了解元件生命周期方法。
生命周期方法
- componentWillMount - 在渲染之前在伺服器端和用戶端執行。
- componentDidMount - 僅在用戶端的第一次渲染之後執行。 這是AJAX請求和DOM或狀態更新應該發生的地方。此方法也用於與其他JavaScript框架以及任何延遲執行的函式(如
setTimeout或setInterval)進行整合,在這裡使用它來更新狀態,以便我們可以觸發其他生命周期方法。 - componentWillReceiveProps - 只要在另一個渲染被呼叫之前更新
props就被呼叫。 當我們更新狀態時,從setNewNumber觸發它。 - shouldComponentUpdate - 應該返回
true或false值。 這將決定元件是否將被更新。 預設設定為true。 如果確定元件在state或props更新後不需要渲染,則可以返回false值。 - componentWillUpdate - 在渲染之前被呼叫。
- componentDidUpdate - 在渲染之後被呼叫。
- componentWillUnmount - 在從dom解除安裝元件後被呼叫,也就是解除安裝
main.js中的元件。
在下面的例子中,將在建構函式中設定初始狀態。 setNewnumber用於更新狀態。 所有生命周期方法都在內容元件中。
檔案:App.jsx -
import React from 'react';

class App extends React.Component {
   constructor(props) {
      super(props);

      this.state = {
         data: 0
      }
      this.setNewNumber = this.setNewNumber.bind(this)
   };
   setNewNumber() {
      this.setState({data: this.state.data + 1})
   }
   render() {
      return (
         <div>
            <button onClick = {this.setNewNumber}>INCREMENT</button>
            <Content myNumber = {this.state.data}></Content>
         </div>
      );
   }
}
class Content extends React.Component {
   componentWillMount() {
      console.log('Component WILL MOUNT!')
   }
   componentDidMount() {
      console.log('Component DID MOUNT!')
   }
   componentWillReceiveProps(newProps) {
      console.log('Component WILL RECIEVE PROPS!')
   }
   shouldComponentUpdate(newProps, newState) {
      return true;
   }
   componentWillUpdate(nextProps, nextState) {
      console.log('Component WILL UPDATE!');
   }
   componentDidUpdate(prevProps, prevState) {
      console.log('Component DID UPDATE!')
   }
   componentWillUnmount() {
      console.log('Component WILL UNMOUNT!')
   }
   render() {
      return (
         <div>
            <h3>{this.props.myNumber}</h3>
         </div>
      );
   }
}
export default App;
檔案:main.js -
import React from 'react';
import ReactDOM from 'react-dom';
import App from './App.jsx';

ReactDOM.render(<App/>, document.getElementById('app'));

setTimeout(() => {
   ReactDOM.unmountComponentAtNode(document.getElementById('app'));}, 10000);
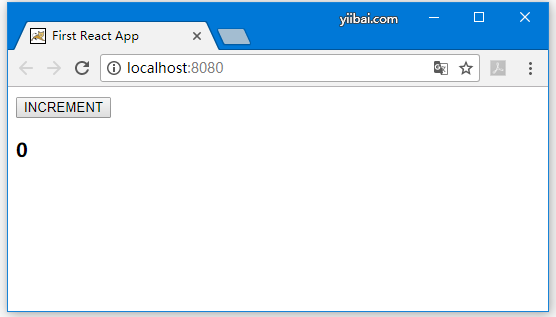
初始渲染之後,應該會得到如下演示效果 -
只有componentWillMount和componentDidMount將被記錄在控制台中,因為還沒有更新任何東西。
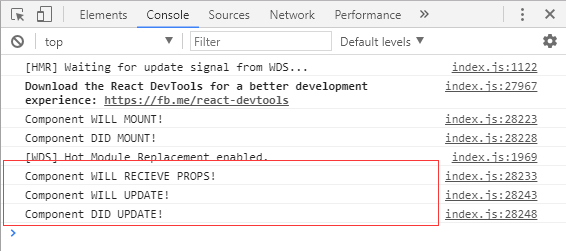
當點選INCREMENT按鈕時,將發生更新,並觸發其他生命周期方法。
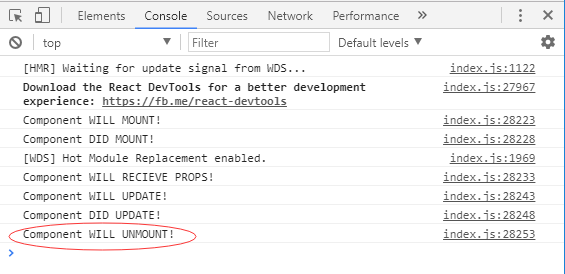
十秒鐘後,元件將被解除安裝,最後一個事件將被記錄在控制台中。
註 - 生命周期方法將始終以相同的順序呼叫,因此按照範例中所示的正確順序編寫生命周期方法是一種很好的做法。