壓力感測器BMP180和Arduino裝置進行溫度,壓力和高度測量
這是一個使用壓力感測器BMP180和Arduino裝置進行溫度,壓力和高度測量的物聯網(物聯網)專案。
在這個專案中,我們將建立一個溫度,壓力和高度測量系統。使用氣壓感測器模型BM 180來檢測溫度,大氣壓力和海拔高度,Arduino裝置和16 X 4字元LCD顯示計算的溫度,壓力和海拔高度。
硬體要求
- Arduino UNO主機板
- 用於Arduino裝置的USB電纜連線器
- 壓力感測器BMP180
- 16 X 4字元LCD顯示屏
- 專案主機板
- 跳線(公線對公線,公線對母線)
軟體要求
- Arduino軟體IDE
壓力感測器BMP180的工作原理
壓力感測器BMP180由壓阻式感測器,模擬和數位轉換器,帶E2PROM的控制單元和序列I2C介面組成。它提供溫度,大氣壓力和海拔高度的貢獻值。感測器裝置的微控制器傳送啟動序列以測量溫度,壓力和高度。溫度,壓力和高度的值通過16X4字元LCD讀取。
計算的溫度,壓力和高度分別以℃(攝氏度),hPa(hector Pascal)和英尺為單位測量。在這種情況下,測量溫度,大氣壓力和高度的速率是每秒一次。
高度和壓力彼此成反比。當海拔升高時,壓力下降,當海拔降低時,導致大氣壓力增加。

使用壓力感測器BMP180,Arduino和字元LCD編寫Arduino程式來測量溫度,壓力和高度。
#include <LiquidCrystal.h>
LiquidCrystal lcd(13, 12, 11, 10, 9, 8);//RS,EN,D4,D5,D6,D7
#include <SFE_BMP180.h>
#include <Wire.h>
//create an SFE_BMP180 object, here called "pressure":
SFE_BMP180 pressure;
#define ALTITUDE 222.0 // altitude of Delhi in meters
void setup(){
  Serial.begin(9600);
  Serial.println("BMP180 Measurements");
  lcd.begin(20, 4);
  lcd.setCursor(0, 0);
  lcd.print("BMP180 Measurements");
  lcd.setCursor(0, 1);
  lcd.print(" 1. Temperature");
  lcd.setCursor(0, 2);
  lcd.print(" 2. Pressure");
  lcd.setCursor(0, 3);
  lcd.print(" 3. Altitude");
  delay (5000);
  lcd.clear();//clear display
  // initialize the sensor (it is important to get calibration values stored on the device).
  if (pressure.begin())
  Serial.println("BMP180 init success");
  else{
    // oops, something went wrong, this is usually a connection problem,
      // see the comments at the top of this sketch for the proper connections.
    Serial.println("BMP180 init fail\n\n");
    while(1); // pause forever.
  }
}
void loop(){
  char status;
  double T,P,p0,a;
  // loop here getting pressure readings every 10 seconds.
    // if you want sea-level-compensated pressure, as used in weather reports,
    // you need to find dinamically altitude of place.
    // here, we are using constant called ALTITUDE in this sketch:
  Serial.println();
  Serial.print("provided altitude: ");
  lcd.setCursor(0, 0);
  lcd.print("Altitude: ");
  Serial.print(ALTITUDE,0);
  Serial.print(" meters, ");
  Serial.print(ALTITUDE*3.28084,0);
  lcd.print(ALTITUDE*3.28084,0);
  Serial.println(" feet");
  lcd.print(" ft");
  // start a temperature measurement:
    // if request is successful, the number of ms to wait is returned.
    // if request is unsuccessful, 0 is returned.
  status = pressure.startTemperature();
  if (status != 0){
    // wait for the measurement to complete:
    delay(status);
    // retrieve the completed temperature measurement:
      // note that the measurement is stored in the variable T.
      // function returns 1 if successful, 0 if failure.
    status = pressure.getTemperature(T);
    if (status != 0){
      // Print out the measurement:
      Serial.print("temperature: ");
      Serial.print(T,2);
      Serial.print(" deg C, ");
      Serial.print((9.0/5.0)*T+32.0,2);
      Serial.println(" deg F");
      lcd.setCursor(0, 1);
      lcd.print("Temperature: ");
      lcd.print(T,2);
      lcd.print(" C ");
      // start a pressure measurement:
          // the parameter is the oversampling setting, from 0 to 3 (highest res, longest wait).
          // if request is successful, the number of ms to wait is returned.
          // if request is unsuccessful, 0 is returned.
      status = pressure.startPressure(3);
      if (status != 0){
        // wait for the measurement to complete:
        delay(status);
            // Retrieve the completed pressure measurement:
            // Note that the measurement is stored in the variable P.
            // Note also that the function requires the previous temperature measurement (T).
            // (If temperature is stable, you can do one temperature measurement for a number of pressure measurements.)
            // Function returns 1 if successful, 0 if failure.
        status = pressure.getPressure(P,T);
        if (status != 0){
          // print out the measurement:
          Serial.print("absolute pressure: ");
          Serial.print(P,2);
          Serial.print(" mb, ");
          Serial.print(P*0.0295333727,2);
          Serial.println(" inHg");
          lcd.setCursor(0, 2);
          lcd.print("Abs. Pr.: ");
          lcd.print(P*0.0295333727,2);
          lcd.print(" inHg");
            // The pressure sensor returns absolute pressure, which varies with altitude.
                // To remove the effects of altitude, use the sea level function and your current altitude.
                // This number is commonly used in weather reports.
                // Parameters: P = absolute pressure in mb, ALTITUDE = current altitude in m.
                // Result: p0 = sea-level compensated pressure in mb
          p0 = pressure.sealevel(P,ALTITUDE); // we are at 222 meters (Delhi)
          Serial.print("relative (sea-level) pressure: ");
          Serial.print(p0,2);
          Serial.print(" mb, ");
          Serial.print(p0*0.0295333727,2);
          Serial.println(" inHg");
          lcd.setCursor(0, 3);
          lcd.print("Rel. Pr.: ");
          lcd.print(p0*0.0295333727,2);
          lcd.print(" inHg");
          // On the other hand, if you want to determine your altitude from the pressure reading,
          // use the altitude function along with a baseline pressure (sea-level or other).
          // Parameters: P = absolute pressure in mb, p0 = baseline pressure in mb.
          // Result: a = altitude in m.
          a = pressure.altitude(P,p0);
          Serial.print("computed altitude: ");
          Serial.print(a,0);
          Serial.print(" meters, ");
          Serial.print(a*3.28084,0);
          Serial.println(" feet");
        }
        else
          Serial.println("error retrieving pressure measurement\n");
      }
      else
        Serial.println("error starting pressure measurement\n");
    }
    else
      Serial.println("error retrieving temperature measurement\n");
  }
  else
    Serial.println("error starting temperature measurement\n");
  delay(5000); // Pause for 5 seconds.
}
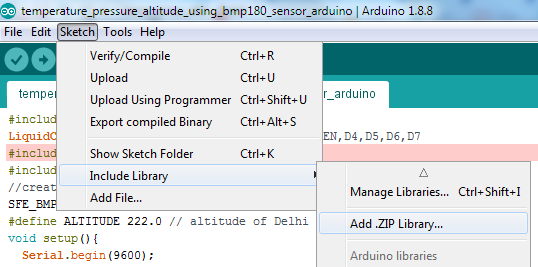
從 https://github.com/LowPowerLab/SFE_BMP180 下載SFE_BMP180-master.zip檔案
在編譯上面的程式碼之前新增SFE_BMP180-master zip檔案,否則會生成錯誤SFE_BMP180.h:沒有這樣的檔案或目錄。
要新增zip檔案,請單擊:Sketch -> Include Library -> Add .ZIP Library… 並新增下載的SFE_BMP180-master zip。

編譯並將程式碼上傳到Arduino裝置。然後,相應地連線所有裝置。Arduino,BMP180和16 X 4字元LED的數位電路如下:

執行後,得到以下結果:
