Hibernate入門程式
在第一個Hibernate入門範例程式中,我們將使用eclipse IDE建立一個簡單的hibernate應用程式範例。要在Eclipse IDE中建立第一個hibernate應用程式,需要遵循以下步驟:
重要提示:
按照慣例,易百教學的每個入門教學程式都會詳細介紹對應環境的安裝,組態和執行步驟,以幫助讀者/學習者快速入門。往後的系列教學中沒有特別說明,都會以入門教學程式組態為參考。所以,在您閱讀每一篇文章遇到組態或執行環境不清楚,請參考入門教學程式組態。
- 建立java專案
- 為hibernate新增jar檔案
- 建立持久類
- 建立持久類的對映檔案
- 建立組態檔案
- 建立檢索或儲存持久物件的類
- 執行應用程式
前提工作:
- 安裝好 MySQL 並啟動。參考: /18/142/4124.html
- Eclipse Neon.2 Release (4.6.2)。 參考:/12/118/3522.html
- 下載 Hibernate 相關類庫(Jar檔案)
- 建立一個資料庫表:tb_employee
1. 建立java專案
開啟Eclipse,通過 File -> New -> project -> java project 建立java專案。 現在指定專案名稱: first-hibernate, 然後 next-> 完成。
2. 為hibernate新增jar檔案
新增jar檔案右鍵單擊您的專案(first-hibernate) -> Build Path -> 新增外部存檔。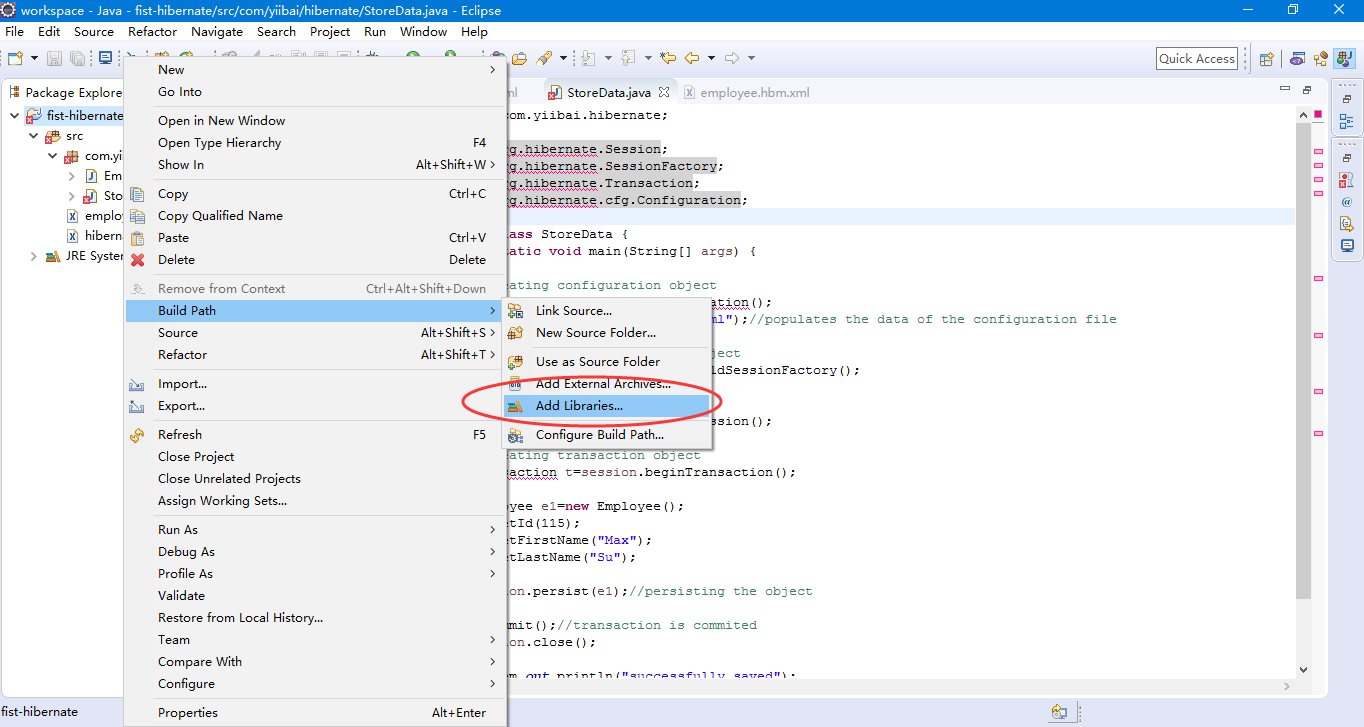
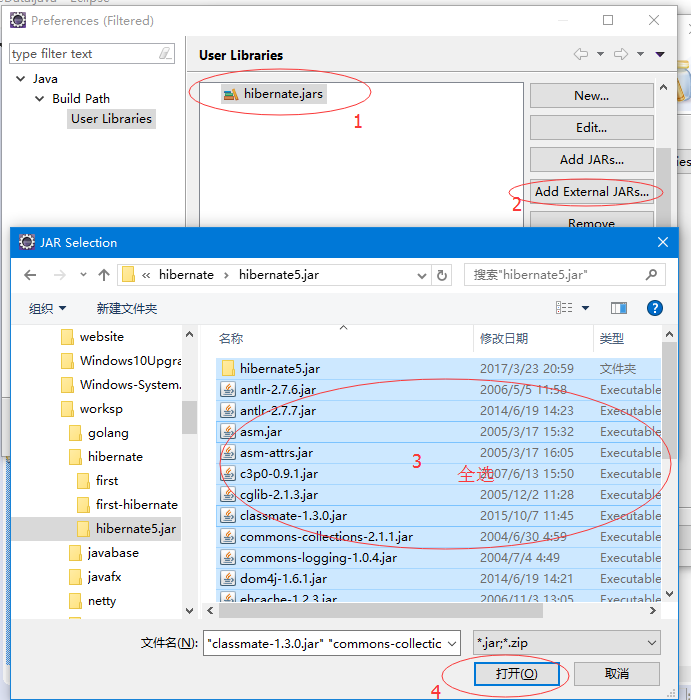
現在選擇所有的jar檔案,如下圖所示 -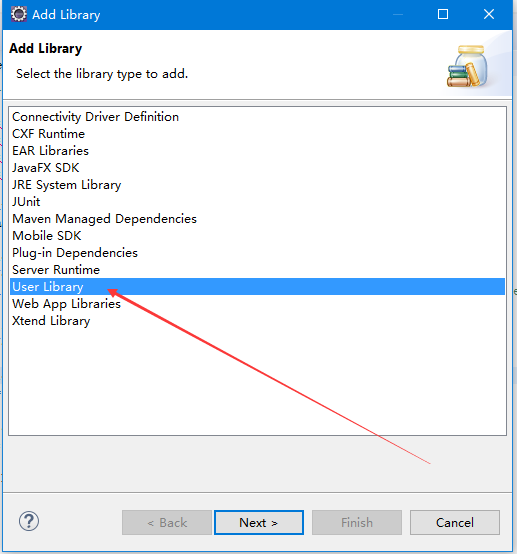
建立一個使用者自定義庫,為這個自定義庫起個名字:hibernate-jars,並選擇 hibernate 相關jar包。
完成後加入效果如下所示 -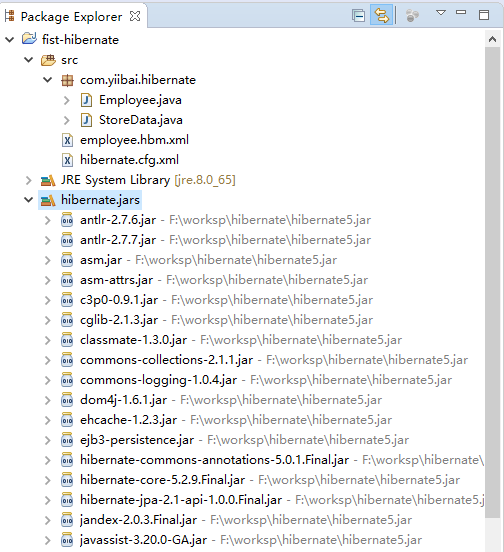
下載所需的 Hibernate-jars檔案:
在這個例子中,我們將應用程式與MySQL資料庫連線。 所以你必須新增mysql-connect.jar檔案。
3. 建立持久化類
在這裡,要建立持久化類,右鍵單擊src -> New -> Class - 使用包名指定類(例如:com.yiibai.mypackage) -> finish。
Employee.java
package com.yiibai.mypackage;

public class Employee {
    private int id;
    private String firstName,lastName;

    public int getId() {
        return id;
    }
    public void setId(int id) {
        this.id = id;
    }
    public String getFirstName() {
        return firstName;
    }
    public void setFirstName(String firstName) {
        this.firstName = firstName;
    }
    public String getLastName() {
        return lastName;
    }
    public void setLastName(String lastName) {
        this.lastName = lastName;
    }

}
4. 建立持久化類的對映檔案
在這裡,我們正在建立與上一主題中建立的相同的對映檔案。 要建立對映檔案,右鍵單擊src -> new -> file -> 指定檔案名(例如employee.hbm.xml) , 它必須在包外部。
employee.hbm.xml
<?xml version='1.0' encoding='UTF-8'?>
<!DOCTYPE hibernate-mapping PUBLIC
 "-//Hibernate/Hibernate Mapping DTD 3.0//EN"
 "http://hibernate.sourceforge.net/hibernate-mapping-3.0.dtd">

 <hibernate-mapping>
  <class name="com.yiibai.mypackage.Employee" table="emp1000">
    <id name="id">
     <generator class="assigned"></generator>
    </id>

    <property name="firstName"></property>
    <property name="lastName"></property>

  </class>

 </hibernate-mapping>
5. 建立組態檔案
組態檔案包含資料庫的所有資訊,如:connection_url,driver_class,username,password等。hbm2ddl.auto屬性用於自動在資料庫中建立表。 我們將在下一個主題中深入學習Dialect類。 要建立組態檔案,請右鍵單擊src -> new -> file。 現在指定組態檔案名,例如: hibernate.cfg.xml。
hibernate.cfg.xml
<?xml version='1.0' encoding='UTF-8'?>
<!DOCTYPE hibernate-configuration PUBLIC
          "-//Hibernate/Hibernate Configuration DTD 3.0//EN"
          "http://hibernate.sourceforge.net/hibernate-configuration-3.0.dtd">

<!-- Generated by MyEclipse Hibernate Tools. -->
<hibernate-configuration>

    <session-factory>

        <property name="connection.driver_class">com.mysql.jdbc.Driver</property>
        <property name="connection.url">jdbc:mysql://localhost:3306/test</property>
        <property name="connection.username">root</property>
        <property name="connection.password">123456</property>
        <property name="dialect">org.hibernate.dialect.MySQL5InnoDBDialect</property>
        <property name="show_sql">true</property>
        <mapping resource="employee.hbm.xml"/>
    </session-factory>

</hibernate-configuration>
6. 建立檢索或儲存持久物件的類
在這個類中,我們只是將employee物件儲存到資料庫中。
package com.yiibai.mypackage;

import org.hibernate.Session;
import org.hibernate.SessionFactory;
import org.hibernate.Transaction;
import org.hibernate.cfg.Configuration;

public class StoreData {
    public static void main(String[] args) {

        //creating configuration object
        Configuration cfg=new Configuration();
        cfg.configure("hibernate.cfg.xml");//populates the data of the configuration file

        //creating seession factory object
        SessionFactory factory=cfg.buildSessionFactory();

        //creating session object
        Session session=factory.openSession();

        //creating transaction object
        Transaction t=session.beginTransaction();

        Employee e1=new Employee();
        e1.setId(100);
        e1.setFirstName("Max");
        e1.setLastName("Su");

        session.persist(e1);//persisting the object

        t.commit();//transaction is committed
        session.close();

        System.out.println("successfully saved");

    }
}
7. 執行應用程式
在執行應用程式之前,確定目錄結構如下圖所示 -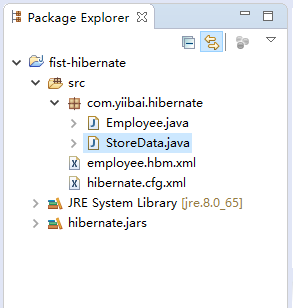
在執行這個範例之前,還差關鍵的一個步驟,那就是建立物件對應的表:tb_employee,其結構及建立語句語句如下-
CREATE TABLE `tb_employee` (
  `id` int(10) unsigned NOT NULL AUTO_INCREMENT,
  `firstName` varchar(32) NOT NULL DEFAULT '',
  `lastName` varchar(32) NOT NULL DEFAULT '',
  PRIMARY KEY (`id`)
) ENGINE=InnoDB AUTO_INCREMENT=101 DEFAULT CHARSET=utf8;
接下來,就是執行hibernate應用程式,請右鍵單擊StoreData類 -Run As - Java應用程式。
輸入結果如下 -
INFO: HHH000400: Using dialect: org.hibernate.dialect.MySQLDialect
Hibernate: insert into tb_employee (firstName, lastName, id) values (?, ?, ?)
successfully saved
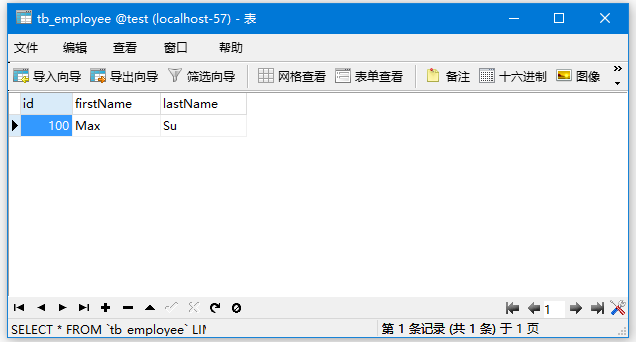
檢視 tb_employee 表中的資料,如下 -
