Django快速入門-資料庫模型
資料庫組態
預設情況下,組態使用SQLite。如果你是資料庫新手,或者想嘗試學習Django,這是最簡單的選擇。SQLite包含在Python,所以不需要安裝任何東西來支援你的資料庫。當開始你的第一個真正的專案,可能需要使用更強大的資料庫如:PostgreSQL,MySQL等,可以組態資料庫切換就可以了。
- ENGINE – 輸入'django.db.backends.sqlite3', 'django.db.backends.postgresql','django.db.backends.mysql',或'django.db.backends.oracle'
- NAME – 資料庫的名稱。如果使用SQLite,資料庫會在您的計算機上建立檔案;在這種情況下,名稱應該是完整的絕對路徑的檔案,包括檔案名。預設值為 os.path.join(BASE_DIR,「db.sqlite3」),將儲存在您的專案目錄中的檔案。
如果你不使用SQLite作為資料庫,而使用其他設定,如USER, PASSWORD, 和 HOST 必須加入。欲瞭解更多詳細資訊,請參閱用於資料庫的參考文件。
此外,請注意,在該檔案的頂部的 INSTALLED_APPS 設定。它包含了很多在本Django範例中啟用的所有 Django 的應用程式的名稱。 應用程式可以在多個專案中使用,你可以打包給別人並在他們的專案分發使用。
- django.contrib.admin – 管理站點,這裡會很快使用它
- django.contrib.auth – 認證系統
- django.contrib.contenttypes – 一個框架,內容型別
- django.contrib.sessions – 對談框架
- django.contrib.messages – 訊息傳遞框架
- django.contrib.staticfiles – 一個框架用來管理靜態檔案
其中的一些應用程式使用至少一個資料庫表,所以我們需要在資料庫中建立的表才可以使用它們。要做到這一點,執行以下命令:
C:\Python27\mysite>python manage.py migrate
Operations to perform:
  Apply all migrations: admin, contenttypes, auth, sessions
Running migrations:
  Rendering model states... DONE
  Applying contenttypes.0001_initial... OK
  Applying auth.0001_initial... OK
  Applying admin.0001_initial... OK
  Applying admin.0002_logentry_remove_auto_add... OK
  Applying contenttypes.0002_remove_content_type_name... OK
  Applying auth.0002_alter_permission_name_max_length... OK
  Applying auth.0003_alter_user_email_max_length... OK
  Applying auth.0004_alter_user_username_opts... OK
  Applying auth.0005_alter_user_last_login_null... OK
  Applying auth.0006_require_contenttypes_0002... OK
  Applying auth.0007_alter_validators_add_error_messages... OK
  Applying sessions.0001_initial... OK

C:\Python27\mysite>
migrate 命令著眼於INSTALLED_APPS設定並建立根據您的 mysite/settings.py 檔案資料庫設定,並隨應用程式資料庫遷移任何資料庫表(我們將在以後的教學討論)。你會看到每個適用移植的訊息。 如果有興趣,執行命令列在你的資料庫用戶端,列如型別\dt (PostgreSQL), SHOW TABLES; (MySQL), .schema (SQLite), 或 SELECT TABLE_NAME FROMUSER_TABLES; (Oracle) 以顯示Django所建立的表。
建立模型
在我們的簡單調查的應用程式,我們將建立兩個模型:Question 和 Choice。Question有一個問題標題和發佈日期。Choice有兩個欄位:選擇文字和票數。每個選項都與一個問題關聯。
from django.db import models

class Question(models.Model):
    question_text = models.CharField(max_length=200)
    pub_date = models.DateTimeField('date published')

class Choice(models.Model):
    question = models.ForeignKey(Question, on_delete=models.CASCADE)
    choice_text = models.CharField(max_length=200)
    votes = models.IntegerField(default=0)
該程式碼是直接的。每個模型是django.db.models.Model類的子類。 每個模型具有許多類變數,每一個在模型變數與資料庫表的欄位關聯。
每個欄位由 Field 類範例表示 – 例如,CharField表示字元型欄位,DateTimeField表示日期時間欄位。這告訴Django 每個欄位儲存的資料型別。
每個Field範例(例如,question_text或pub_date)的名稱是欄位的名稱,這是機器友好的格式。在Python程式碼中使用這個值,資料庫將使用它作為列名。
最後,需要注意的是關係的定義,這裡使用了外來鍵。這告訴 Django 每個選項關聯一個問題。 Django支援所有常見的資料庫關係:多對一,多對多以及一對之一。
啟用模型
-
為這個應用程式建立資料庫(CREATE TABLE語句)
- 建立存取 Question 和 Choice物件的Python資料庫存取API
INSTALLED_APPS = [
    'polls.apps.PollsConfig',
    'django.contrib.admin',
    'django.contrib.auth',
    'django.contrib.contenttypes',
    'django.contrib.sessions',
    'django.contrib.messages',
    'django.contrib.staticfiles',
]
C:\Python27\mysite>python manage.py makemigrations polls
Migrations for 'polls':
  0001_initial.py:
    - Create model Choice
    - Create model Question
    - Add field question to choice

C:\Python27\mysite>
遷移是Django怎麼儲存您更改的模型(由你的資料庫架構決定)- 它們只是在磁碟上的檔案。您如果喜歡可以讀取移植新的模型,它在檔案 polls/migrations/0001_initial.py。你不會希望Django每一次都讀取它們,不過將它們設計成人可編輯的,你要知道Django是如何變化的併手動調整。
還有將執行migrations,自動管理資料庫模式(表)命令 - 這就是所謂的遷移,讓我們看看SQL了解移植執行。 sqlmigrate 命令將移植名稱返回SQL顯示:
$ python manage.py sqlmigrate polls 0001
C:\Python27\mysite>python manage.py sqlmigrate polls 0001
BEGIN;
--
-- Create model Choice
--
CREATE TABLE "polls_choice" ("id" integer NOT NULL PRIMARY KEY AUTOINCREMENT, "c
hoice_text" varchar(200) NOT NULL, "votes" integer NOT NULL);
--
-- Create model Question
--
CREATE TABLE "polls_question" ("id" integer NOT NULL PRIMARY KEY AUTOINCREMENT,
"question_text" varchar(200) NOT NULL, "pub_date" datetime NOT NULL);
--
-- Add field question to choice
--
ALTER TABLE "polls_choice" RENAME TO "polls_choice__old";
CREATE TABLE "polls_choice" ("id" integer NOT NULL PRIMARY KEY AUTOINCREMENT, "c
hoice_text" varchar(200) NOT NULL, "votes" integer NOT NULL, "question_id" integ
er NOT NULL REFERENCES "polls_question" ("id"));
INSERT INTO "polls_choice" ("choice_text", "votes", "id", "question_id") SELECT
"choice_text", "votes", "id", NULL FROM "polls_choice__old";
DROP TABLE "polls_choice__old";
CREATE INDEX "polls_choice_7aa0f6ee" ON "polls_choice" ("question_id");

COMMIT;

C:\Python27\mysite>
遷移命令將所有還沒有被應用的遷移(Django跟蹤哪些是使用資料庫中的一個特殊的表名為django_migrations應用)執行它們在資料庫中 - 基本上是,將使用模型在資料庫模式的變化同步。
使用API
C:\Python27\mysite>python manage.py shell
Python 2.7.10 (default, May 23 2015, 09:44:00) [MSC v.1500 64 bit (AMD64)] on wi
n32
Type "help", "copyright", "credits" or "license" for more information.
(InteractiveConsole)
>>>
只需鍵入「python」 來代替,因為manage.py設定DJANGO_SETTINGS_MODULE環境變數,這給Django Python 匯入路徑到 mysite/settings.py檔案。
>>> import django
>>> django.setup()
>>> from polls.models import Question, Choice   # Import the model classes we just wrote.

# No questions are in the system yet.
>>> Question.objects.all()
[]

# Create a new Question.
# Support for time zones is enabled in the default settings file, so
# Django expects a datetime with tzinfo for pub_date. Use timezone.now()
# instead of datetime.datetime.now() and it will do the right thing.
>>> from django.utils import timezone
>>> q = Question(question_text="What's new?", pub_date=timezone.now())

# Save the object into the database. You have to call save() explicitly.
>>> q.save()

# Now it has an ID. Note that this might say "1L" instead of "1", depending
# on which database you're using. That's no biggie; it just means your
# database backend prefers to return integers as Python long integer
# objects.
>>> q.id
1

# Access model field values via Python attributes.
>>> q.question_text
"What's new?"
>>> q.pub_date
datetime.datetime(2012, 2, 26, 13, 0, 0, 775217, tzinfo=<UTC>)

# Change values by changing the attributes, then calling save().
>>> q.question_text = "What's up?"
>>> q.save()

# objects.all() displays all the questions in the database.
>>> Question.objects.all()
[<Question: Question object>]
這裡需要等待一會兒. <Question: Question object>完全是這個物件的無用表示。讓我們來解決這個問題:通過編輯Question模型(在polls/models.py 檔案),並新增一個__str__() 方法到這兩個Question 和 Choice 模型:polls/models.py檔案內容如下:
from django.db import models
from django.utils.encoding import python_2_unicode_compatible

@python_2_unicode_compatible  # only if you need to support Python 2
class Question(models.Model):
    # ...
    def __str__(self):
        return self.question_text

@python_2_unicode_compatible  # only if you need to support Python 2
class Choice(models.Model):
    # ...
    def __str__(self):
        return self.choice_text
注意,這些都是正常的Python方法。讓我們新增一個自定義的方法,這裡只是為了演示:polls/models.py
import datetime

from django.db import models
from django.utils import timezone


class Question(models.Model):
    # ...
    def was_published_recently(self):
        return self.pub_date >= timezone.now() - datetime.timedelta(days=1)
注意這裡增加 import datetime 和from django.utils import timezon,參照Python的標準的datetime模組和Django的時區相關的實用程式在django.utils.timezone,如果不熟悉在Python的時區處理,可以閱讀時區支援文件。
>>> from polls.models import Question, Choice

# Make sure our __str__() addition worked.
>>> Question.objects.all()
[<Question: What's up?>]

# Django provides a rich database lookup API that's entirely driven by
# keyword arguments.
>>> Question.objects.filter(id=1)
[<Question: What's up?>]
>>> Question.objects.filter(question_text__startswith='What')
[<Question: What's up?>]

# Get the question that was published this year.
>>> from django.utils import timezone
>>> current_year = timezone.now().year
>>> Question.objects.get(pub_date__year=current_year)
<Question: What's up?>

# Request an ID that doesn't exist, this will raise an exception.
>>> Question.objects.get(id=2)
Traceback (most recent call last):
    ...
DoesNotExist: Question matching query does not exist.

# Lookup by a primary key is the most common case, so Django provides a
# shortcut for primary-key exact lookups.
# The following is identical to Question.objects.get(id=1).
>>> Question.objects.get(pk=1)
<Question: What's up?>

# Make sure our custom method worked.
>>> q = Question.objects.get(pk=1)
>>> q.was_published_recently()
True

# Give the Question a couple of Choices. The create call constructs a new
# Choice object, does the INSERT statement, adds the choice to the set
# of available choices and returns the new Choice object. Django creates
# a set to hold the "other side" of a ForeignKey relation
# (e.g. a question's choice) which can be accessed via the API.
>>> q = Question.objects.get(pk=1)

# Display any choices from the related object set -- none so far.
>>> q.choice_set.all()
[]

# Create three choices.
>>> q.choice_set.create(choice_text='Not much', votes=0)
<Choice: Not much>
>>> q.choice_set.create(choice_text='The sky', votes=0)
<Choice: The sky>
>>> c = q.choice_set.create(choice_text='Just hacking again', votes=0)

# Choice objects have API access to their related Question objects.
>>> c.question
<Question: What's up?>

# And vice versa: Question objects get access to Choice objects.
>>> q.choice_set.all()
[<Choice: Not much>, <Choice: The sky>, <Choice: Just hacking again>]
>>> q.choice_set.count()
3

# The API automatically follows relationships as far as you need.
# Use double underscores to separate relationships.
# This works as many levels deep as you want; there's no limit.
# Find all Choices for any question whose pub_date is in this year
# (reusing the 'current_year' variable we created above).
>>> Choice.objects.filter(question__pub_date__year=current_year)
[<Choice: Not much>, <Choice: The sky>, <Choice: Just hacking again>]

# Let's delete one of the choices. Use delete() for that.
>>> c = q.choice_set.filter(choice_text__startswith='Just hacking')
>>> c.delete()
介紹 Django管理
建立一個管理員使用者
c:\python27\mysite> python manage.py createsuperuser
Username: admin
Email address: [email protected]
Password: **********
Password (again): *********
Superuser created successfully.
啟動開發伺服器
c:\python27\mysite>python manage.py runserver
現在,開啟Web瀏覽器,進入「/admin/」 本地域名- 例如, http://127.0.0.1:8000/admin/ 應該看到管理員登入介面:
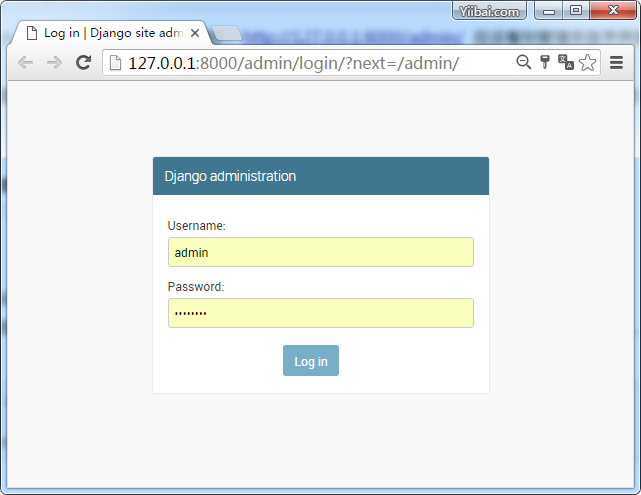
由於移在預設情況下開啟,登入螢幕可能會顯示在你自己的語言, 由於翻譯在預設情況下開啟,登入螢幕可能會顯示在你自己的語言,
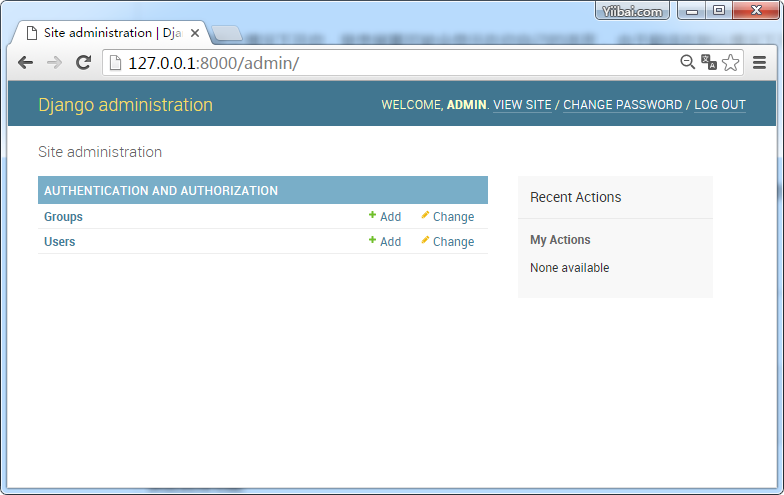
輸入管理員網站
修改poll 管理程式
只有一件事要做:我們需要告訴管理員這個Question物件有一個管理介面。要做到這一點,開啟 polls/admin.py檔案,並修改它如下:
from django.contrib import admin

from .models import Question

admin.site.register(Question)
瀏覽管理功能
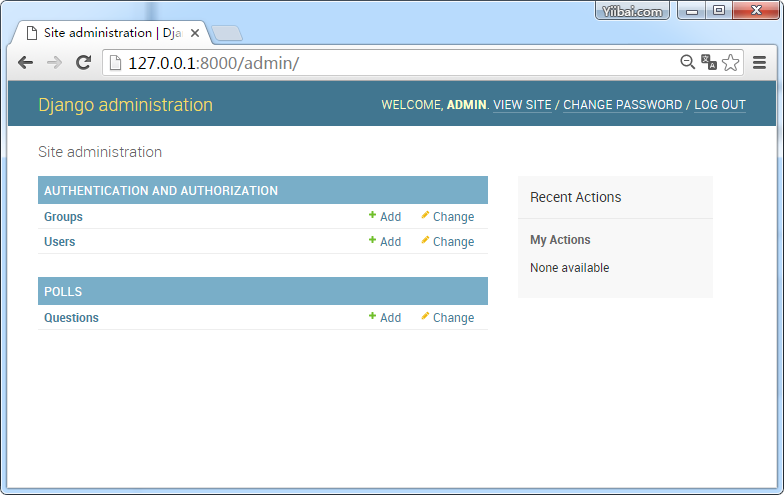
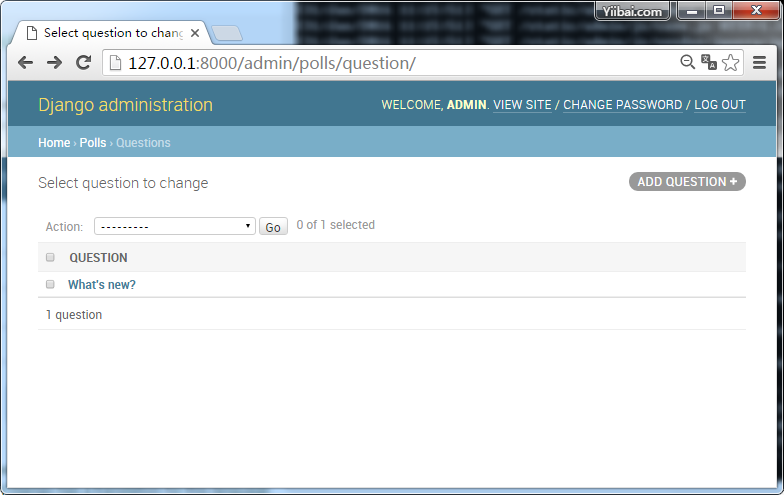
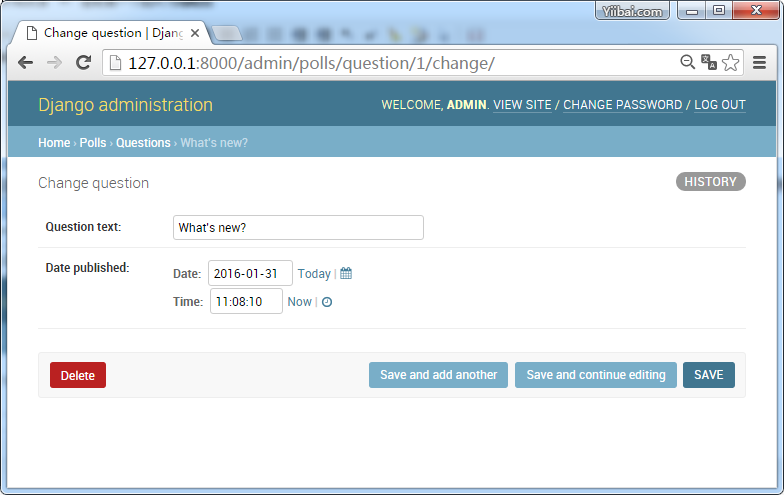
點選「Questions」。現在,在「change list」頁面檢視問題。該頁面顯示資料庫中的所有問題,並允許您選擇其中一個進行更改。還有我們先前建立的問題:
-
表單是從問題(Question)模型自動產生。
-
不同型號的欄位型別(DateTimeField,CharField)對應相應的HTML輸入部件。每個欄位型別知道自己在Django管理中如何顯示。
- 每個DateTimeField欄位得到 JavaScript 快捷方式。日期得到一個「Today」的快捷方式並且彈出日曆,並多次獲得了「Now」快捷方式並彈出視窗,列出了常用的輸入時間。
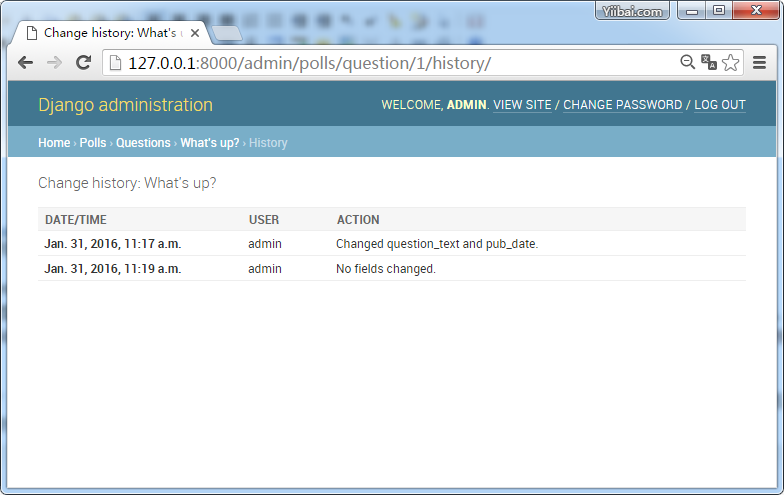
修改「Date published」點選「Today」和「Now」快捷方式。然後點選「Save and continue editing.」,然後點選「History」在右上角。你會看到一個頁面,列出通過Django管理到這個物件的所有變化,修改人使用者名和時間戳:
程式碼下載:http://pan.baidu.com/s/1jGR3wDg