spring cloud alibaba
本文部落格內容均來自:木魚水心-
視訊教學來自 b 站:尚硅谷SpringCloud第2季
文章目錄
- SpringCloud Bus訊息匯流排
- SpringCloud Stream訊息驅動概述
- SpringCloud Sleuth分佈式請求鏈路跟蹤
- 初識 SpringCloud Alibaba
- Nacos
- Sentinel
- 介紹
- 安裝步驟:
- Sentinel 初始化監控
- Sentinel 流控
- sentinel 熔斷降級
- Sentinel熱點key
- 系統規則
- @SentinelResource設定
- Sentinel服務熔斷Ribbon環境
- 1. Sentinel服務熔斷只設定fallback
- 2. Sentinel服務熔斷只設定blockHandler
- 3. Sentinel服務熔斷fallback和blockHandler都設定
- 4. Sentinel服務熔斷exceptionsToIgnore(忽略屬性)
- 5. Sentinel服務熔斷OpenFeign
- Sentinel持久化規則
- Seata
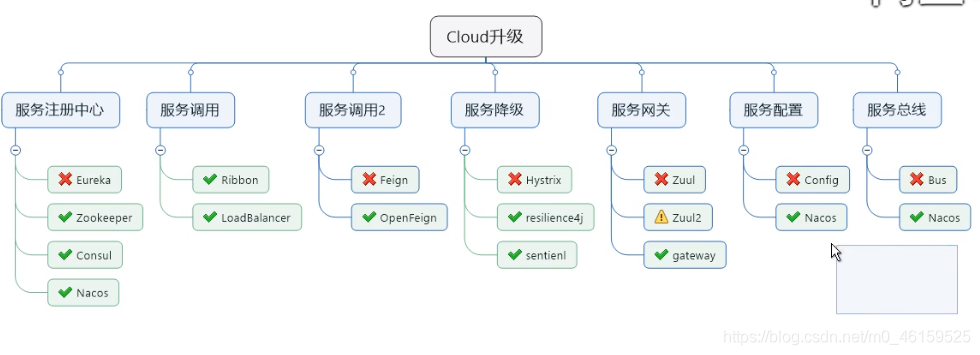
SpringCloud Bus訊息匯流排
簡介:
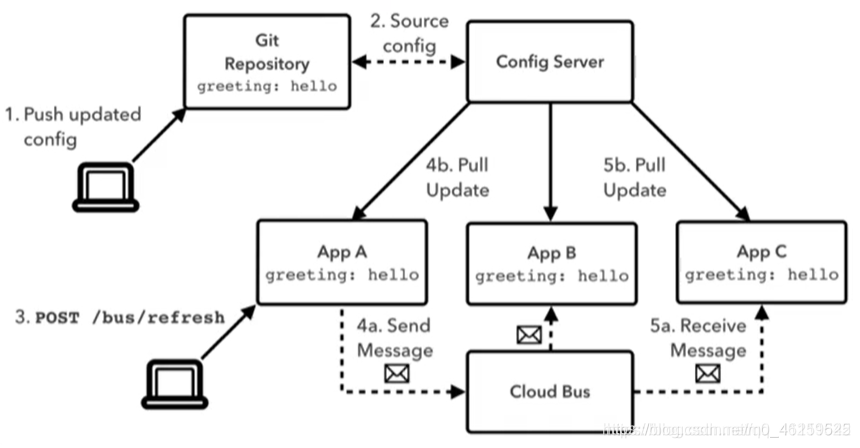
SpringCloud Bus配合SpringCloud Config使用可以實現設定的動態重新整理
SpringCloud Bus是用來將分佈式系統的節點與輕量級訊息系統鏈接起來的框架,它整合了Java的事件處理機制 機製和訊息中介軟體的功能。
SpringCloud Bus目前支援 RabbitMQ 和 Kafka。
功能
SpringCloud Bus能管理和傳播分佈式系統間的訊息,就像一個分佈式執行器,可用於廣播狀態更改、事件推播,也可以當作微服務間的通訊通道
什麼是匯流排?
在微服務架構的系統中,通常會使用輕量級的訊息代理來構建一個共用的訊息主題,並讓系統中所有微服務範例都連線上來。由於該主題中產生的訊息會被所有範例監聽和消費,所以稱它爲訊息匯流排。在總線上的各個範例,都可以方便的廣播一些需要讓其他連線在該主題上的範例都知道的訊息。
基本原理
ConfigClient 範例都監聽MQ中同一個topic(預設是springcloubus),當一個服務重新整理數據的時候,它會把這個資訊放入到Topic中,這樣其他監聽統一topic的服務就能得到通知,然後去更新自身的設定。
SpringCloud Bus 動態重新整理全域性廣播和定點通知

SpringCloud Stream訊息驅動概述
簡介
如果系統裡同時存在多種MQ,可以使用使用Cloud Stream,只需要和Stream互動就可以進行管理。
一句話,遮蔽底層訊息中介軟體的差異,降低切換成本,統一訊息的程式設計模型
官網:https://spring.io/projects/spring-cloud-stream
官方定義SpringCloud Stream是一個構建訊息驅動微服務的框架
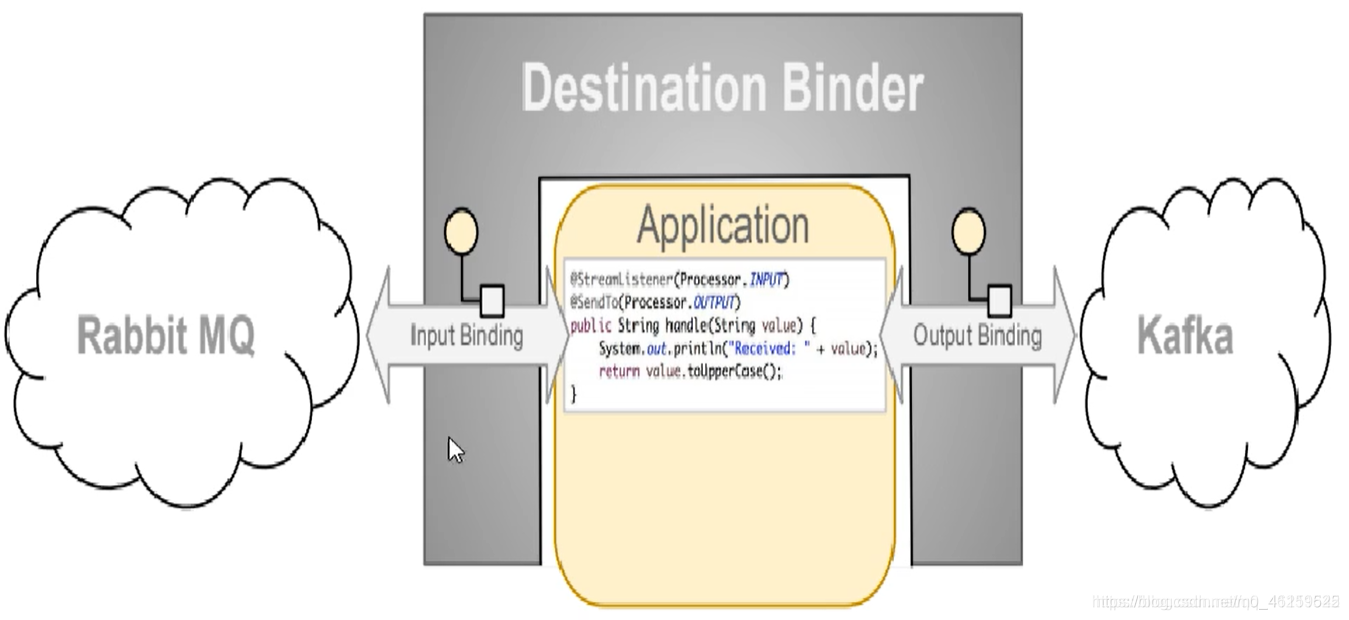
應用程式通過inputs 或者 outputs 來與SpringCloud Stream中binder物件互動。通過我們設定來binding(系結),而SpringCloud Stream的binder物件負責與訊息中介軟體互動,所以,我們只需要搞清楚如何與SpringCloud Stream互動就可以方便使用訊息驅動的方式。
通過使用Spring Integration來連線訊息代理中介軟體以實現訊息時間驅動
SpringCloud Stream 爲一些供應商的訊息中介軟體產品提供了個性化的自動化設定實現,參照了發佈-訂閱、消費組、分割區的三個核心概念。
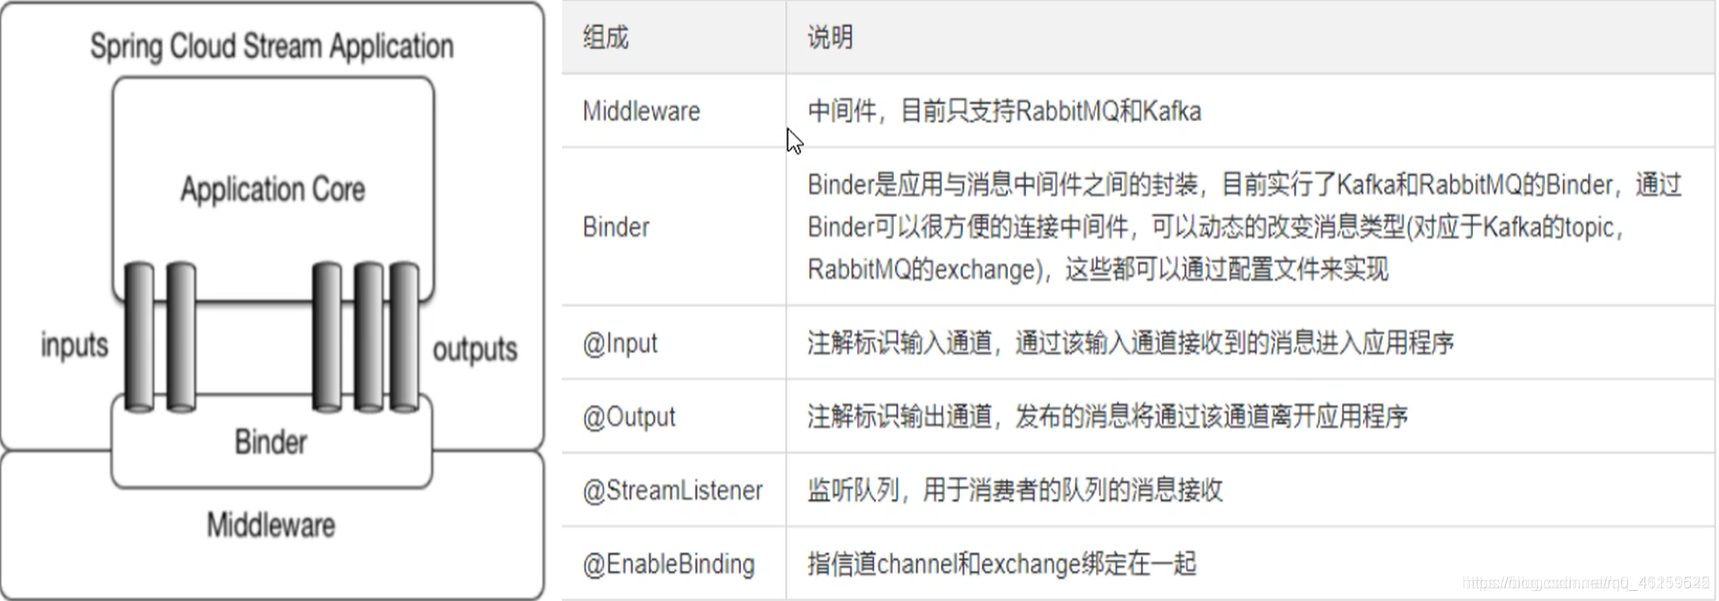
目前只支援RabbitMQ、Kafka
設計思想介紹
標準的MQ:
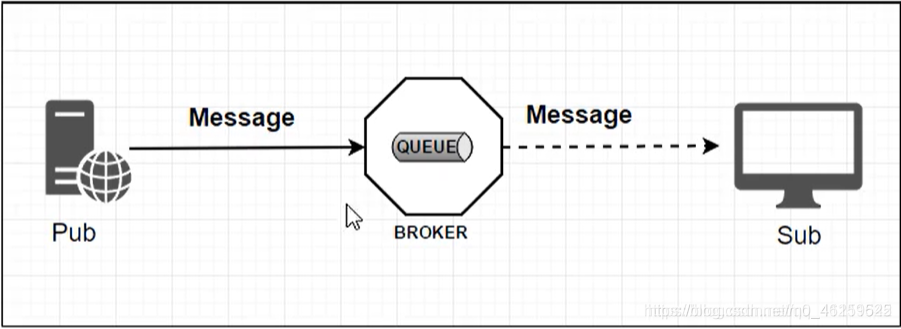
- 生產者/消費者之間靠訊息媒介傳遞資訊內容——Message
- 訊息必須走特定的通道——訊息通道MessageChannel
- 訊息通道裡的訊息如何被消費呢,誰負責收發處理——訊息通道MessageChannel的子介面SubscribableChannel,由MessageHandler訊息處理器所訂閱
**問題:**比方說我們用到了RabbitMQ和Kafka,由於這兩個訊息中介軟體的架構上的不同,像RabbitMQ有exchange,Kafka有Topic和Partition分割區
這些訊息中介軟體的差異性導致我們實際專案開發給我們造成了一定的困擾,我們如果用了兩個訊息佇列中的一種,後面的業務需求,我們想往另一種訊息佇列進行遷移,這時候無疑就是災難性的,一大堆東西都要重新推倒重新做,因爲它跟我們的系統耦合了,這時候SpringCloud Stream給我們提供了一種解耦合的方式。
如何實現?
在沒有系結器這個概唸的情況下,我們的SpringBoot應用要直接與訊息中介軟體進行資訊互動的時候,由於各訊息中介軟體構建的初衷不同,它們的實現細節上會有較大的差異性,通過定義系結器作爲中間層,完美的實現了應用程式與訊息中介軟體細節之間的隔離。通過嚮應用程式暴露統一的channel通道,使得應用程式不需要再考慮各種不同的訊息中介軟體實現。
通過定義系結器Binder作爲中間層,實現了應用程式與訊息中介軟體細節之間的隔離。
Binder:INPUT對應於消費者,OUTPUT對應於生產者

Stream中的訊息通訊方式遵循了發佈-訂閱模式,Topic主題進行廣播(在RabbitMQ就是Exchange,在Kafka是Topic)
Stream標準流程套路
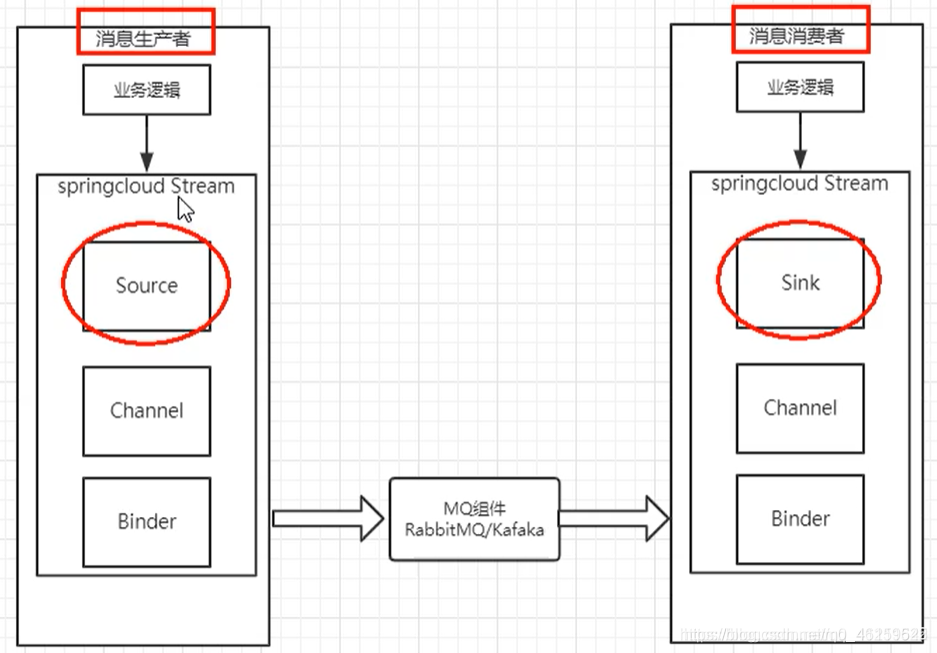
- Binder:很方便的連線中介軟體,遮蔽差異
- Channel:通道,是佇列Queue的一種抽象,在訊息通訊系統中就是實現儲存和轉發的媒介,通過Channel對佇列進行設定
- Source和Sink:簡單的可以理解爲參照物件是SpringCloud Stream自身,從Stream發佈訊息就是輸出,接收訊息就是輸入
編碼API和常用註解
SpringCloud Stream入門案例
案例說明
工程中新建三個子模組
cloud-stream-rabbitmq-provider8801,作爲生產者進行發訊息模組
cloud-stream-rabbitmq-consumer8802,作爲訊息接收模組
cloud-stream-rabbitmq-consumer8803,作爲訊息接收模組
Stream訊息驅動之生產者
1.新建module cloud-stream-rabbitmq-provider8801
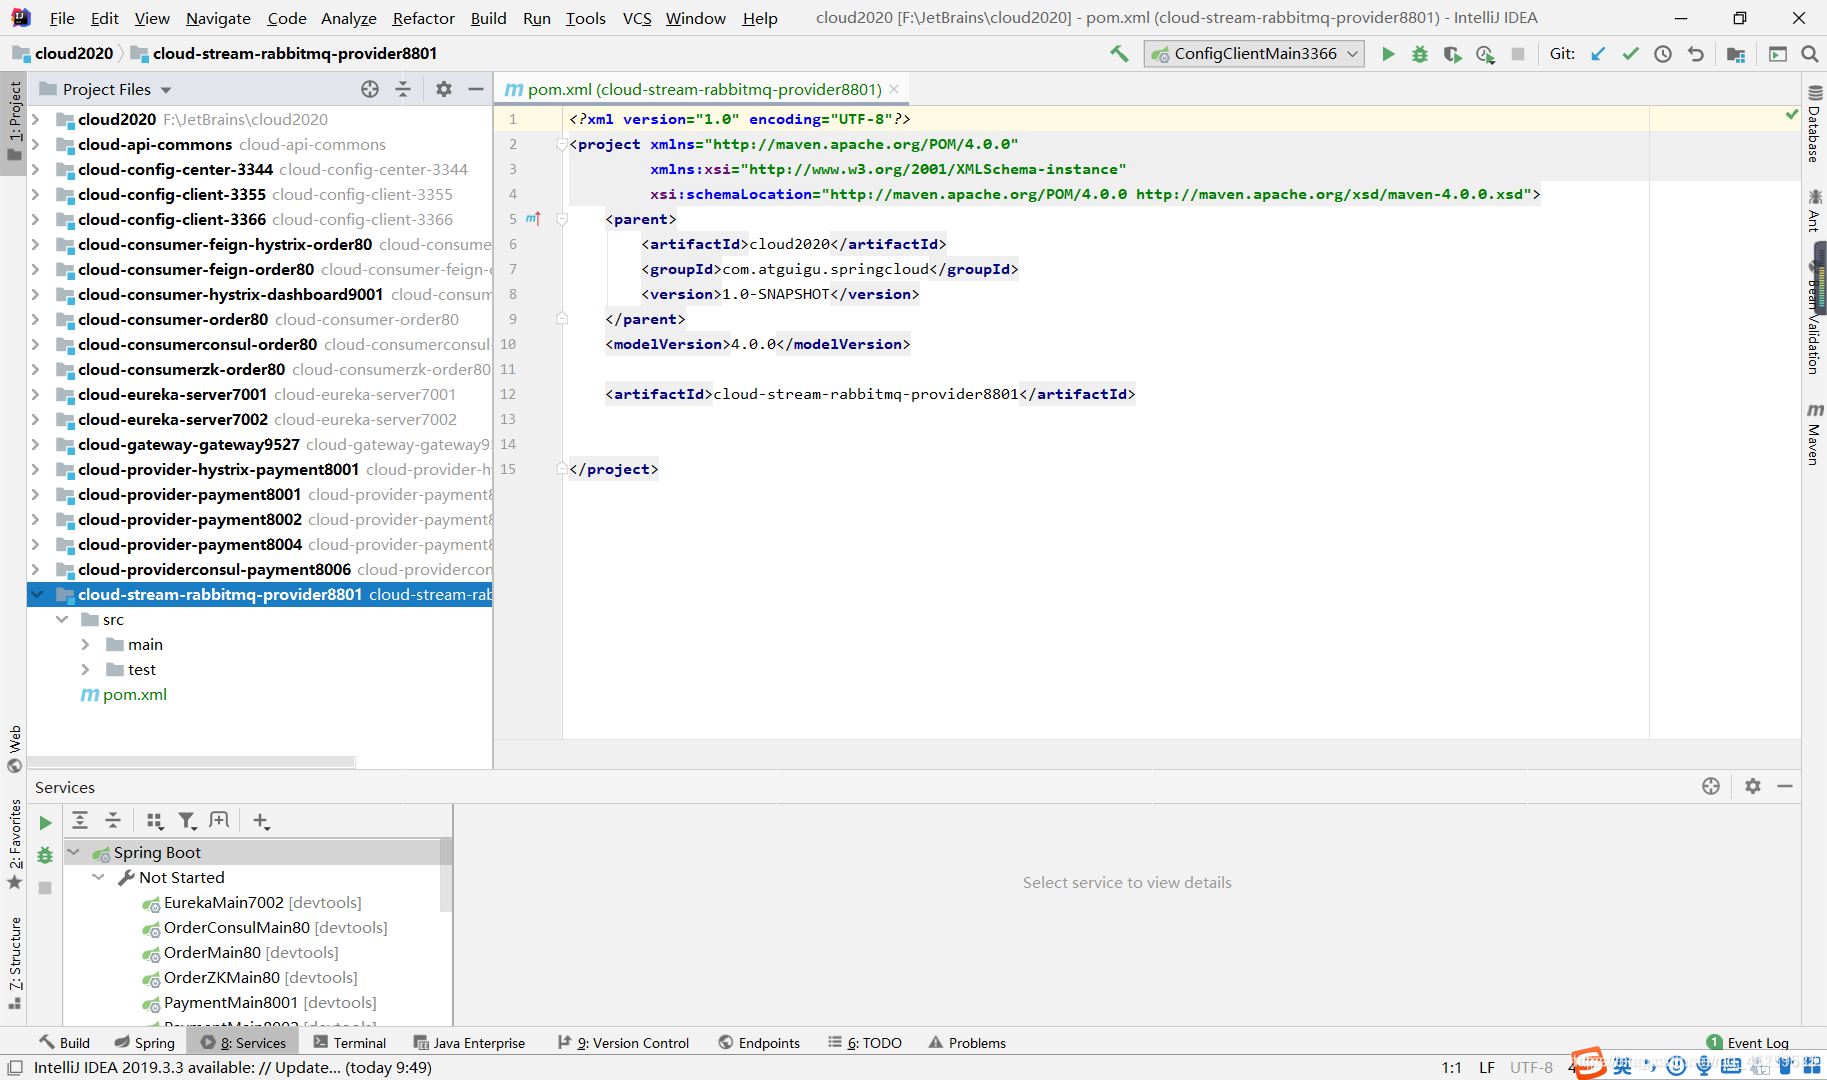
2. pom.xml
<?xml version="1.0" encoding="UTF-8"?>
<project xmlns="http://maven.apache.org/POM/4.0.0" xmlns:xsi="http://www.w3.org/2001/XMLSchema-instance"
xsi:schemaLocation="http://maven.apache.org/POM/4.0.0 http://maven.apache.org/xsd/maven-4.0.0.xsd">
<modelVersion>4.0.0</modelVersion>
<groupId>com.atguigu.springcloud</groupId>
<artifactId>cloud2020</artifactId>
<version>1.0-SNAPSHOT</version>
<packaging>pom</packaging>
<name>Maven</name>
<!-- FIXME change it to the project's website -->
<url>http://maven.apache.org/</url>
<inceptionYear>2001</inceptionYear>
<distributionManagement>
<site>
<id>website</id>
<url>scp://webhost.company.com/www/website</url>
</site>
</distributionManagement>
<!--統一管理jar包版本-->
<properties>
<project.build.sourceEncoding>UTF-8</project.build.sourceEncoding>
<maven.compiler.source>1.8</maven.compiler.source>
<maven.compiler.target>1.8</maven.compiler.target>
<junit.version>4.12</junit.version>
<log4j.version>1.2.17</log4j.version>
<lombok.version>1.16.18</lombok.version>
<mysql.version>5.1.47</mysql.version>
<druid.version>1.1.16</druid.version>
<mybatis.spring.boot.version>1.3.0</mybatis.spring.boot.version>
</properties>
<!--子模組繼承之後,提供作用:鎖定版本+子module不用groupId和version-->
<dependencyManagement>
<dependencies>
<!--spring boot 2.2.2-->
<dependency>
<groupId>org.springframework.boot</groupId>
<artifactId>spring-boot-dependencies</artifactId>
<version>2.2.2.RELEASE</version>
<type>pom</type>
<scope>import</scope>
</dependency>
<!--spring cloud Hoxton.SR1-->
<dependency>
<groupId>org.springframework.cloud</groupId>
<artifactId>spring-cloud-dependencies</artifactId>
<version>Hoxton.SR1</version>
<type>pom</type>
<scope>import</scope>
</dependency>
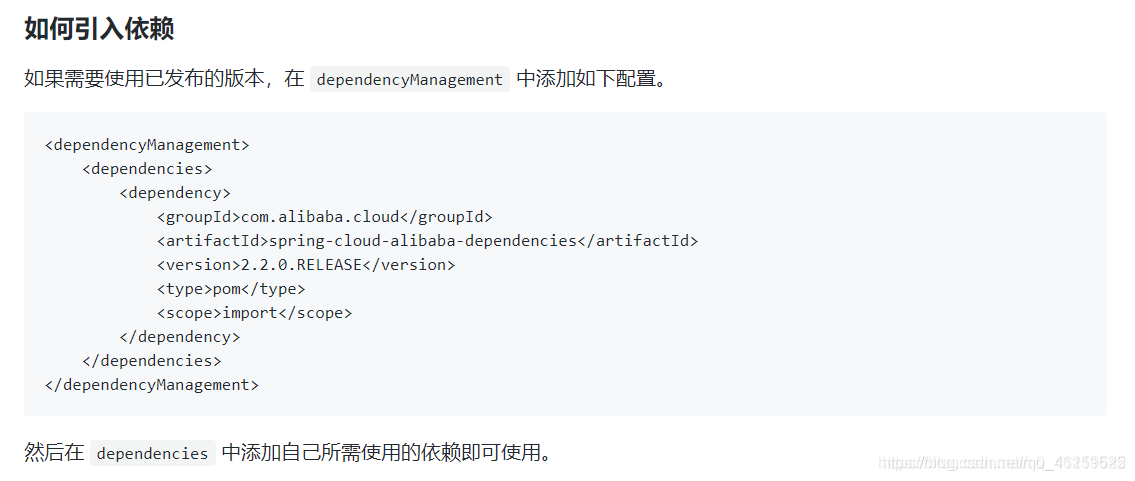
<!--spring cloud alibaba 2.1.0.RELEASE-->
<dependency>
<groupId>com.alibaba.cloud</groupId>
<artifactId>spring-cloud-alibaba-dependencies</artifactId>
<version>2.1.0.RELEASE</version>
<type>pom</type>
<scope>import</scope>
</dependency>
<dependency>
<groupId>mysql</groupId>
<artifactId>mysql-connector-java</artifactId>
<version>${mysql.version}</version>
</dependency>
<dependency>
<groupId>com.alibaba</groupId>
<artifactId>druid</artifactId>
<version>${druid.version}</version>
</dependency>
<dependency>
<groupId>org.mybatis.spring.boot</groupId>
<artifactId>mybatis-spring-boot-starter</artifactId>
<version>${mybatis.spring.boot.version}</version>
</dependency>
<dependency>
<groupId>junit</groupId>
<artifactId>junit</artifactId>
<version>${junit.version}</version>
</dependency>
<dependency>
<groupId>org.projectlombok</groupId>
<artifactId>lombok</artifactId>
<version>${lombok.version}</version>
<optional>true</optional>
</dependency>
</dependencies>
</dependencyManagement>
<build>
<plugins>
<plugin>
<groupId>org.springframework.boot</groupId>
<artifactId>spring-boot-maven-plugin</artifactId>
<configuration>
<fork>true</fork>
<addResources>true</addResources>
</configuration>
</plugin>
</plugins>
</build>
</project>
- application.yml
server:
  port: 8801

spring:
  application:
    name: cloud-stream-provider
  cloud:
    stream:
      binders:  #在此設定要系結的rabbitmq的服務資訊
      defaultRabbit:  #表示定義的名稱,用於binding的整合
          type: rabbit  #訊息元件型別
          environment:  #設定rabbitmq的相關環境設定
            spring:
              rabbitmq:
                host: localhost
                port: 5672
                username: guest
                password: guest
      bindings: #服務的整合處理
        output: #這個名字是一個通道的名稱
          destination: studyExchange  #表示要使用的Exchange名稱定義
          content-type: application/json  #設定訊息型別,本次爲json,文字則設定「text/plain」
            binder: defaultRabbit #設定要系結的訊息服務的具體設定

eureka:
  client: #用戶端進行eureka註冊的設定
    service-url:
      defaultZone: http://localhost:7001/eureka
  instance:
    lease-renewal-interval-in-seconds: 2  #設定心跳的時間間隔(預設是30秒)
    lease-expiration-duration-in-seconds: 5 #如果現在超過了5秒的間隔(預設是90秒)
    instance-id: send-8801.com  #在資訊列表時顯示主機名稱
    prefer-ip-address: true     #存取的路徑變爲IP地址
- 主啓動類
package com.atguigu.springcloud;
import org.springframework.boot.SpringApplication;
import org.springframework.boot.autoconfigure.SpringBootApplication;
@SpringBootApplication
public class StreamMQMain8801 {
    public static void main(String[] args) {
        SpringApplication.run(StreamMQMain8801.class,args);
    }
}
- 業務類
//發送訊息介面
package com.atguigu.springcloud.service;
public interface IMessageProvider {
    public String send();
}
//發送訊息介面實現
package com.atguigu.springcloud.service.impl;
import com.atguigu.springcloud.service.IMessageProvider;
import org.springframework.cloud.stream.annotation.EnableBinding;
import org.springframework.messaging.MessageChannel;
import org.springframework.messaging.support.MessageBuilder;
import javax.annotation.Resource;
import org.springframework.cloud.stream.messaging.Source;
import java.util.UUID;
//這不是傳統的service,這是和rabbitmq打交道的,不需要加註 加注解@Service
//這裏不掉dao,掉訊息中介軟體的service
//通道channel和exchange系結在一起
@EnableBinding(Source.class)    //定義訊息的推播管道
public class MessageProviderImpl implements IMessageProvider {
    @Resource
    private MessageChannel output;
    //官網就是這麼寫的,可以去官網看案例
    @Override
    public String send() {
        String serial = UUID.randomUUID().toString();
        output.send(MessageBuilder.withPayload(serial).build());
        System.out.println("*****serial: " +serial);
        return null;
    }
}
//Controller
package com.atguigu.springcloud.controller;
import com.atguigu.springcloud.service.IMessageProvider;
import org.springframework.web.bind.annotation.GetMapping;
import org.springframework.web.bind.annotation.RestController;
import javax.annotation.Resource;
@RestController
public class SendMessageController {
    @Resource
    private IMessageProvider messageProvider;

    @GetMapping("/sendMessage")
    public String sendMessage(){
        return messageProvider.send();
    }
}
- 啓動7001eureka,rabbitmq,8801,測試
登錄rabbitmq監控,多次重新整理發送Message
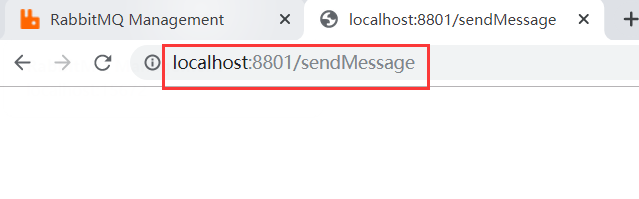
會發現監控介面出現波峯,說明流水號發送成功
訊息驅動之消費者
新建cloud-stream-rabbitmq-consumer8802模組
pom.xml
<?xml version="1.0" encoding="UTF-8"?>
<project xmlns="http://maven.apache.org/POM/4.0.0"
         xmlns:xsi="http://www.w3.org/2001/XMLSchema-instance"
         xsi:schemaLocation="http://maven.apache.org/POM/4.0.0 http://maven.apache.org/xsd/maven-4.0.0.xsd">
    <parent>
        <artifactId>cloud2020</artifactId>
        <groupId>com.atguigu.springcloud</groupId>
        <version>1.0-SNAPSHOT</version>
    </parent>
    <modelVersion>4.0.0</modelVersion>

    <artifactId>cloud-stream-rabbitmq-consumer8802</artifactId>

    <dependencies>
        <dependency>
            <groupId>org.springframework.boot</groupId>
            <artifactId>spring-boot-starter-web</artifactId>
        </dependency>
        <dependency>
            <groupId>org.springframework.boot</groupId>
            <artifactId>spring-boot-starter-actuator</artifactId>
        </dependency>

        <dependency>
            <groupId>org.springframework.cloud</groupId>
            <artifactId>spring-cloud-starter-netflix-eureka-client</artifactId>
        </dependency>

        <dependency>
            <groupId>org.springframework.cloud</groupId>
            <artifactId>spring-cloud-starter-stream-rabbit</artifactId>
        </dependency>

        <dependency>
            <groupId>org.projectlombok</groupId>
            <artifactId>lombok</artifactId>
            <optional>true</optional>
        </dependency>
        <dependency>
            <groupId>org.springframework.boot</groupId>
            <artifactId>spring-boot-starter-test</artifactId>
            <scope>test</scope>
        </dependency>
    </dependencies>
</project>
- application.yml
server:
  port: 8802

spring:
  application:
    name: cloud-stream-consumer
  cloud:
    stream:
      binders: # 在此處設定要系結的rabbitMQ的服務資訊
        defaultRabbit: # 表示定義的名稱,用於binding的整合
          type: rabbit # 訊息中介軟體型別
          environment: # 設定rabbitMQ的相關環境設定
            spring:
              rabbitmq:
                host: localhost
                port: 5672
                username: guest
                password: guest
      bindings: # 服務的整合處理
        input: # 這個名字是一個通道的名稱
          destination: studyExchange # 表示要使用的exchange名稱定義
          content-type: application/json # 設定訊息型別,本次爲json,文字則設爲text/plain
          binder: defaultRabbit # 設定要系結的訊息服務的具體設定

eureka:
  client:
    service-url:
      defaultZone: http://eureka7001.com:7001/eureka
  instance:
    lease-renewal-interval-in-seconds: 2 # 設定心跳的間隔時間,預設30
    lease-expiration-duration-in-seconds: 5 # 超過5秒間隔,預設90
    instance-id: receive-8802.com #主機名
    prefer-ip-address: true # 顯示ip
- 主啓動
package com.atguigu.springcloud;
import org.springframework.boot.SpringApplication;
import org.springframework.boot.autoconfigure.SpringBootApplication;
@SpringBootApplication
public class StreamMQmMain8802 {
    public static void main(String[] args) {
        SpringApplication.run(StreamMQmMain8802.class,args);
    }
}
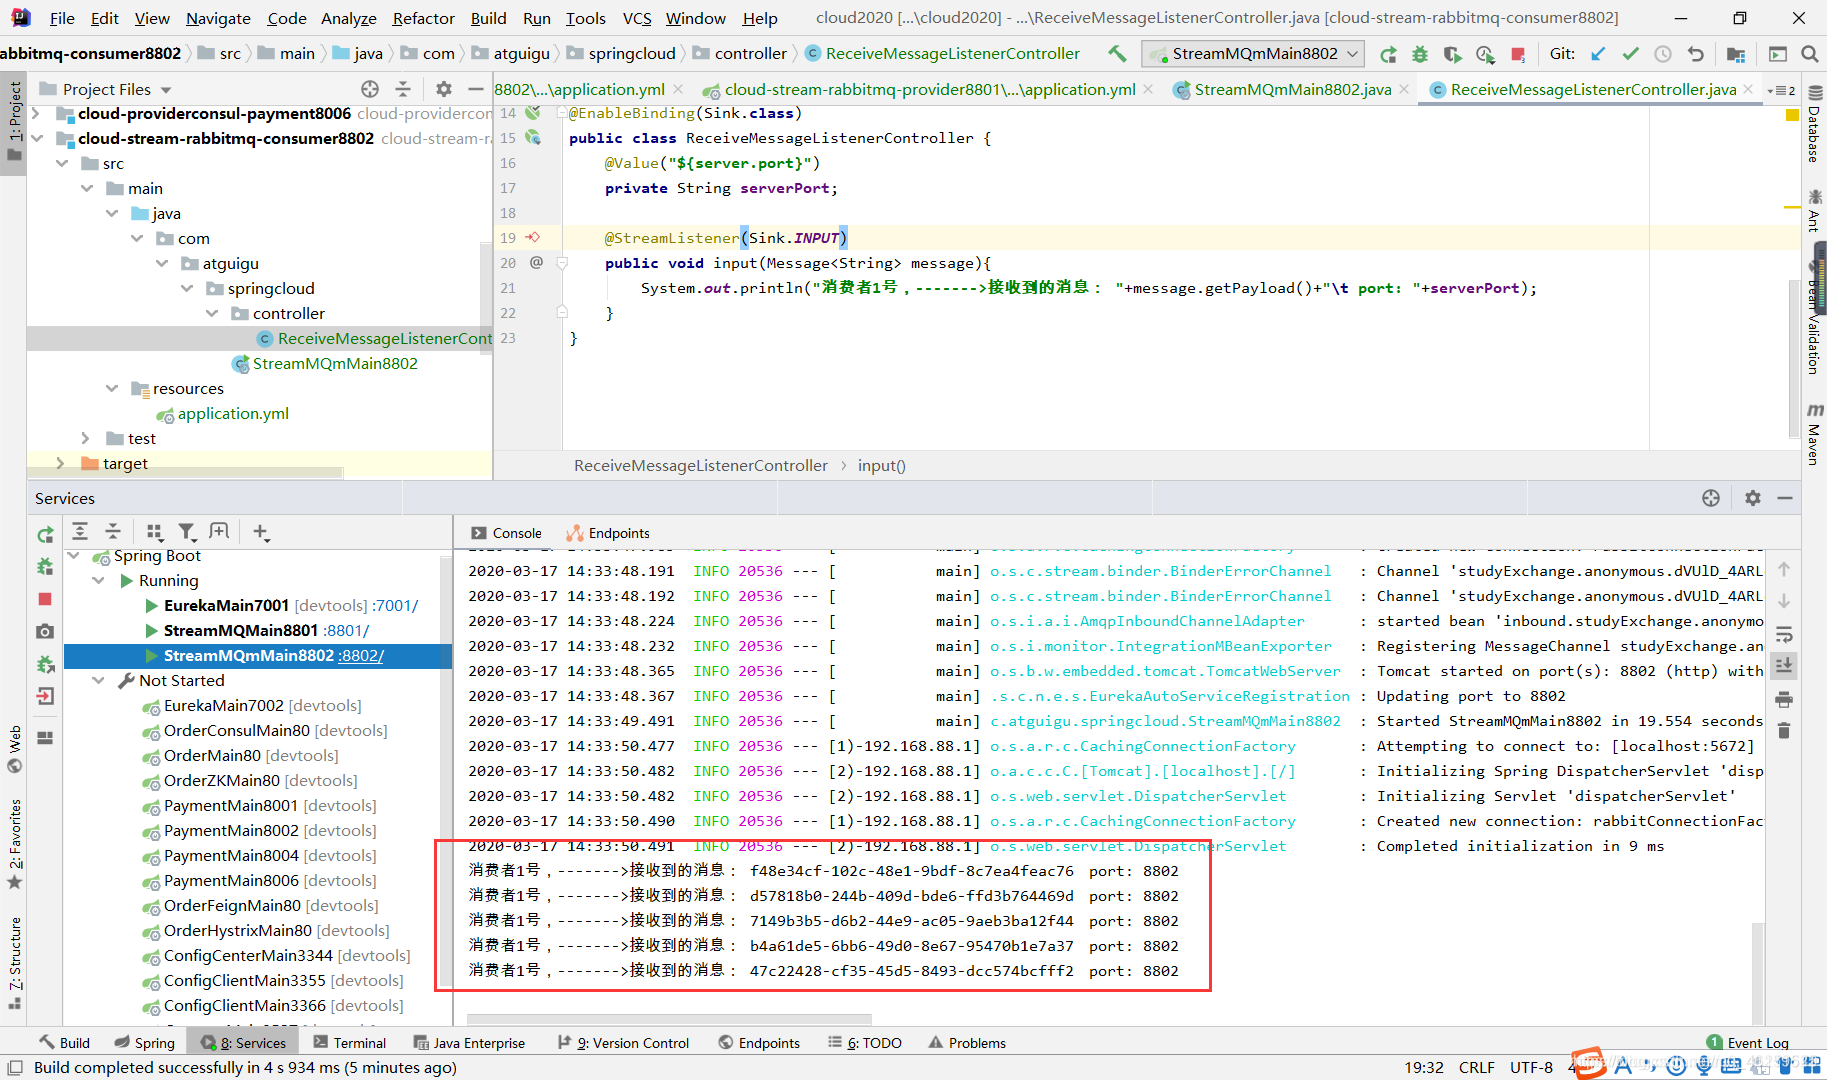
- 業務類
package com.atguigu.springcloud.controller;
import org.springframework.beans.factory.annotation.Value;
import org.springframework.cloud.stream.annotation.EnableBinding;
import org.springframework.cloud.stream.annotation.StreamListener;
import org.springframework.cloud.stream.messaging.Sink;
import org.springframework.messaging.Message;
import org.springframework.stereotype.Component;
import org.springframework.web.bind.annotation.RestController;
@Component
@EnableBinding(Sink.class)
public class ReceiveMessageListenerController {
    @Value("${server.port}")
    private String serverPort;

    @StreamListener(Sink.INPUT)
    public void input(Message<String> message){
        System.out.println("消費者1號,------->接收到的訊息: "+message.getPayload()+"\t port: "+serverPort);
    }
}
- 啓動,測試8801發送,8802接收訊息
正常情況下,8801控制檯打出發送流水號,8802控制檯接收到流水號
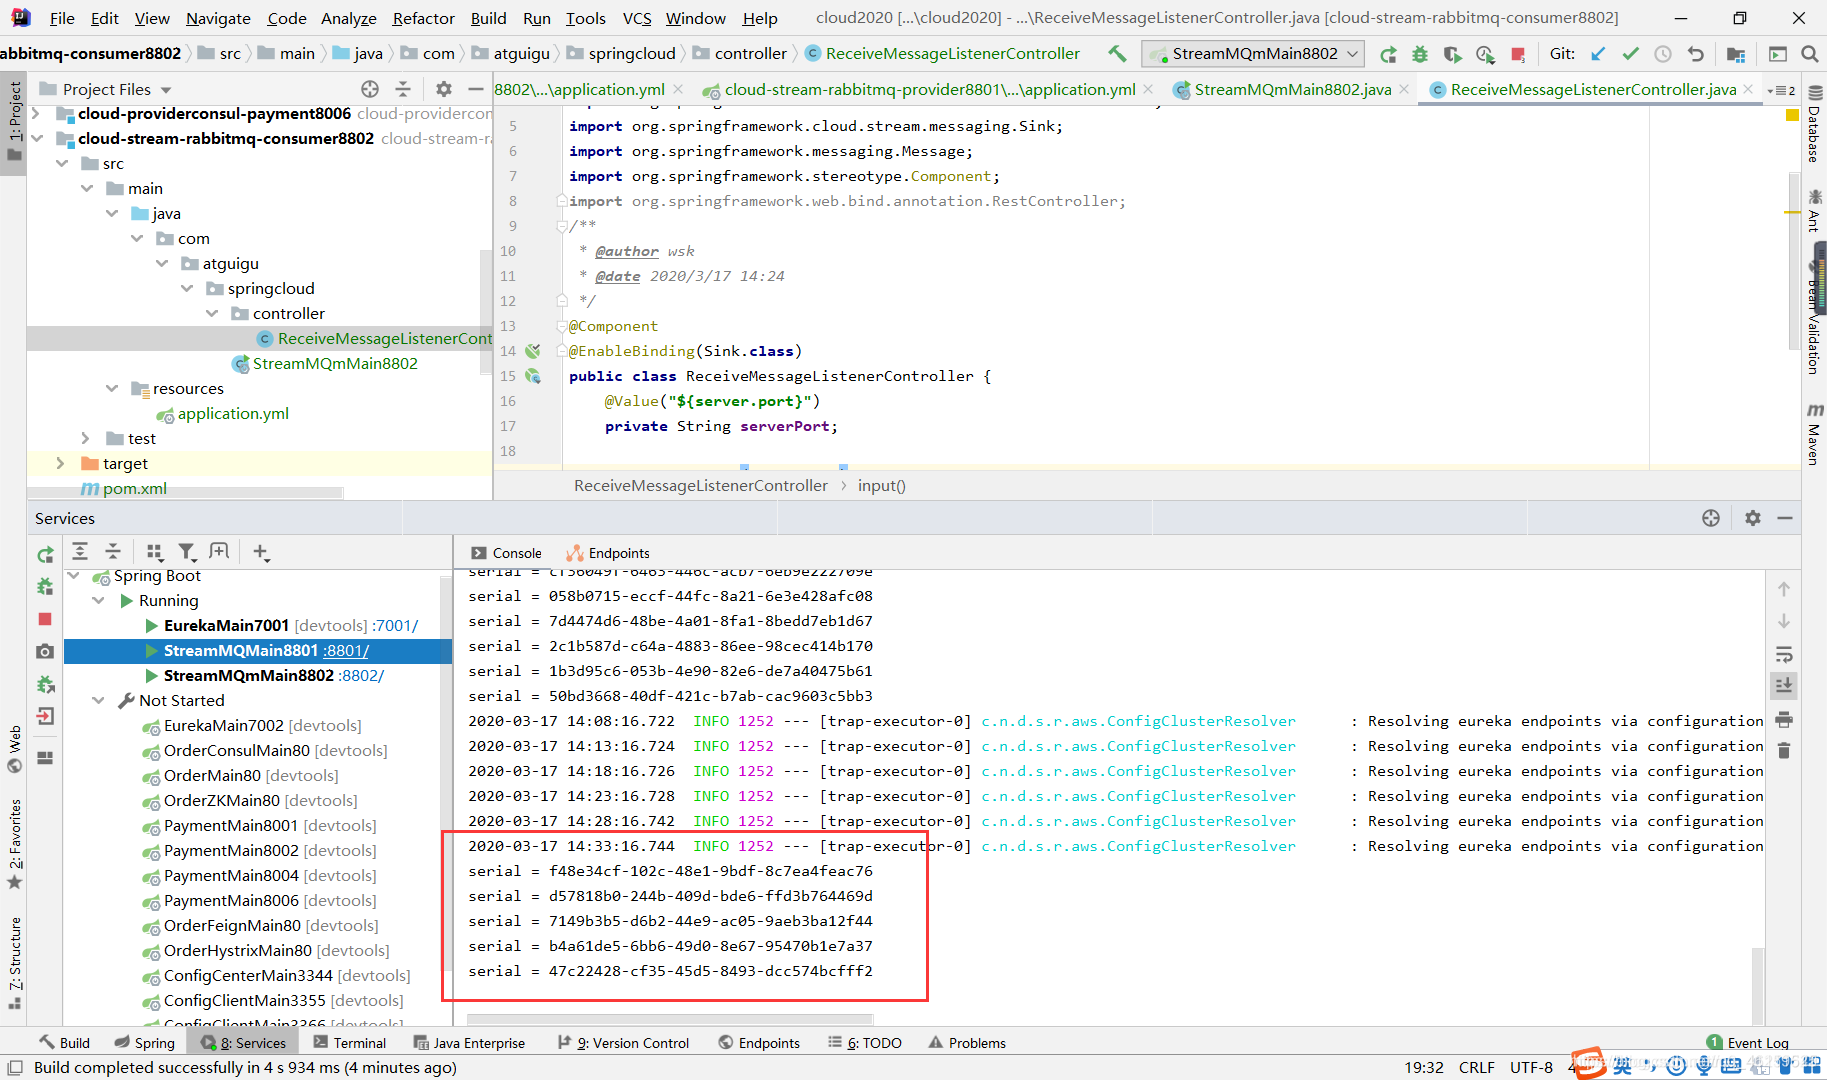
這樣就讀到了訊息,rabbitmq監控平臺也有了流量波峯,系結了一個匿名,就是說已經有人關注了/。
Stream 分組消費與持久化
比如在如下場景中,訂單系統我們做叢集部署,都會從RabbitMQ中獲取訂單資訊,那如果一個訂單同時被兩個服務獲取到,那麼就會造成數據錯誤,我們得避免這種情況,這時我們就可以使用Stream中的訊息分組來解決。
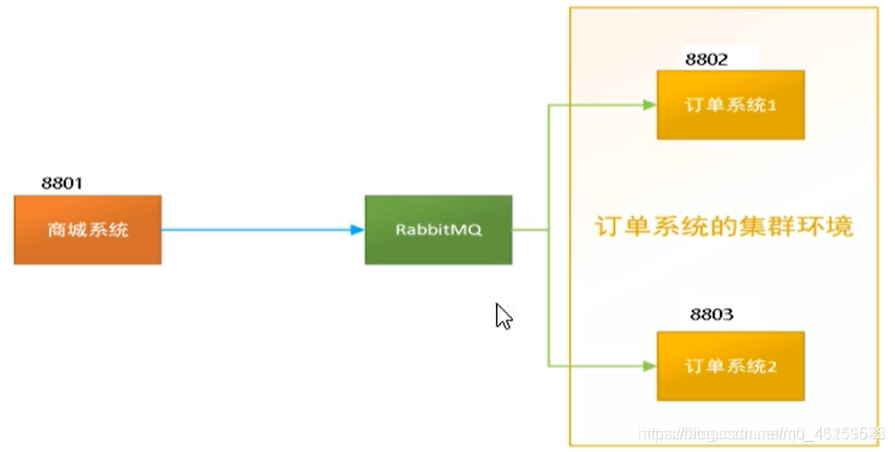
注意在Stream中處於同一個group中的多個消費者是競爭關係,就能夠保證訊息只會被其中一個應用消費一次。
不同組是可以全面消費的(重複消費),同一組內會發送競爭關係,只有其中一個可以消費。
同一個組會競爭資源,輪詢。不同組會重複消費。
持久化
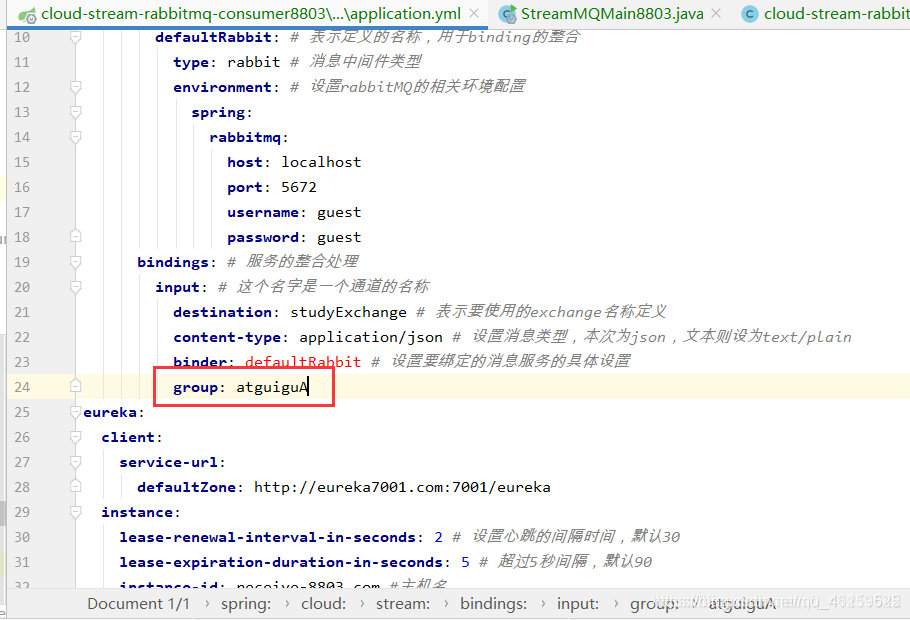
關於自定義分組
如果8802去掉分組,而8803不去掉,當8802/8803都關閉服務,8801這時候發送訊息,8802再啓動的時候不會重新獲得未曾獲得的訊息並消費,而8803重新啓動後會獲得8801之前發送的訊息並消費。
所以group分組屬性在訊息重複消費和訊息持久化消費 避免訊息丟失是非常重要的屬性
就是預設的分組不會保留未曾獲得的訊息,自定義的分組會保留。

SpringCloud Sleuth分佈式請求鏈路跟蹤
簡介
問題: 在微服務架構中,一個由用戶端發起的請求在後端系統中會經過多個不同的服務節點呼叫來協調產生最後的請求結果,每一個前段請求都會形成一條複雜的分佈式服務呼叫鏈路,鏈路中的任何一環出現高延遲或錯誤都會引起整個請求最後的失敗。
SpringCloud Sleuth提供了一套完整的服務跟蹤的解決方案
在分佈式系統中提供追蹤解決方案並且相容支援了zipkin
官網:https://cloud.spring.io/spring-cloud-sleuth/reference/html/
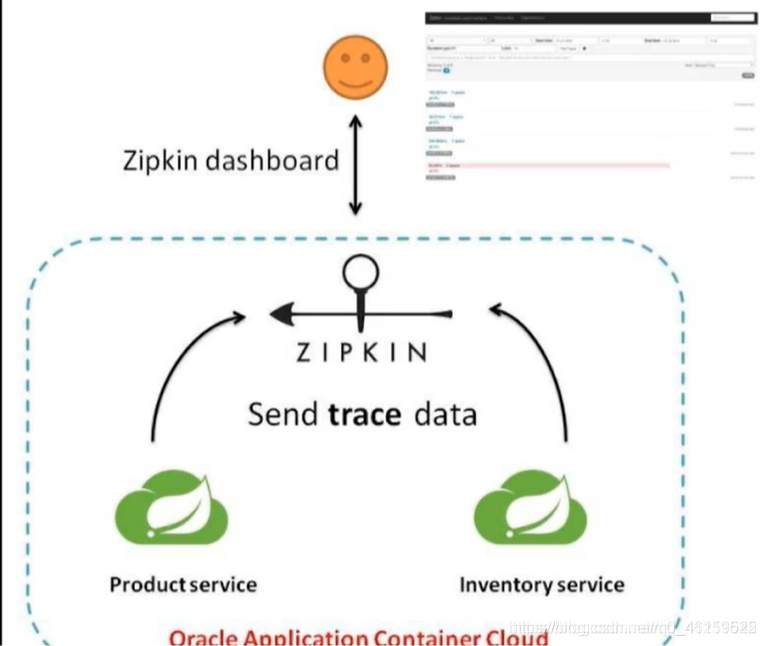
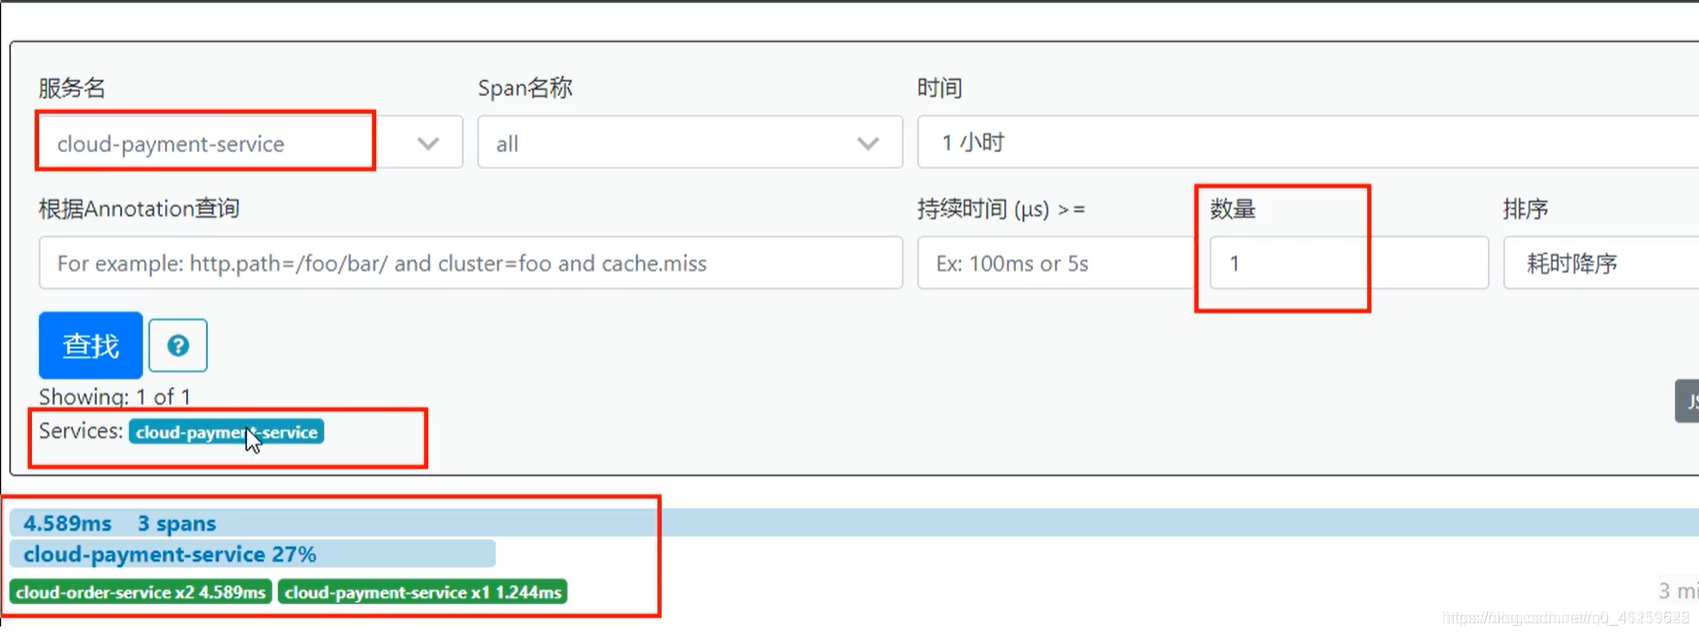
Sleuth 負責收集整理,Zipkin負責展現。
Sleuth 搭建鏈路監控步驟
1. zipkin
下載地址:
https://dl.bintray.com/openzipkin/maven/io/zipkin/java/zipkin-server/
SpringCloud從F版起已不需要自己構建Zipkin Server了,只需呼叫jar包
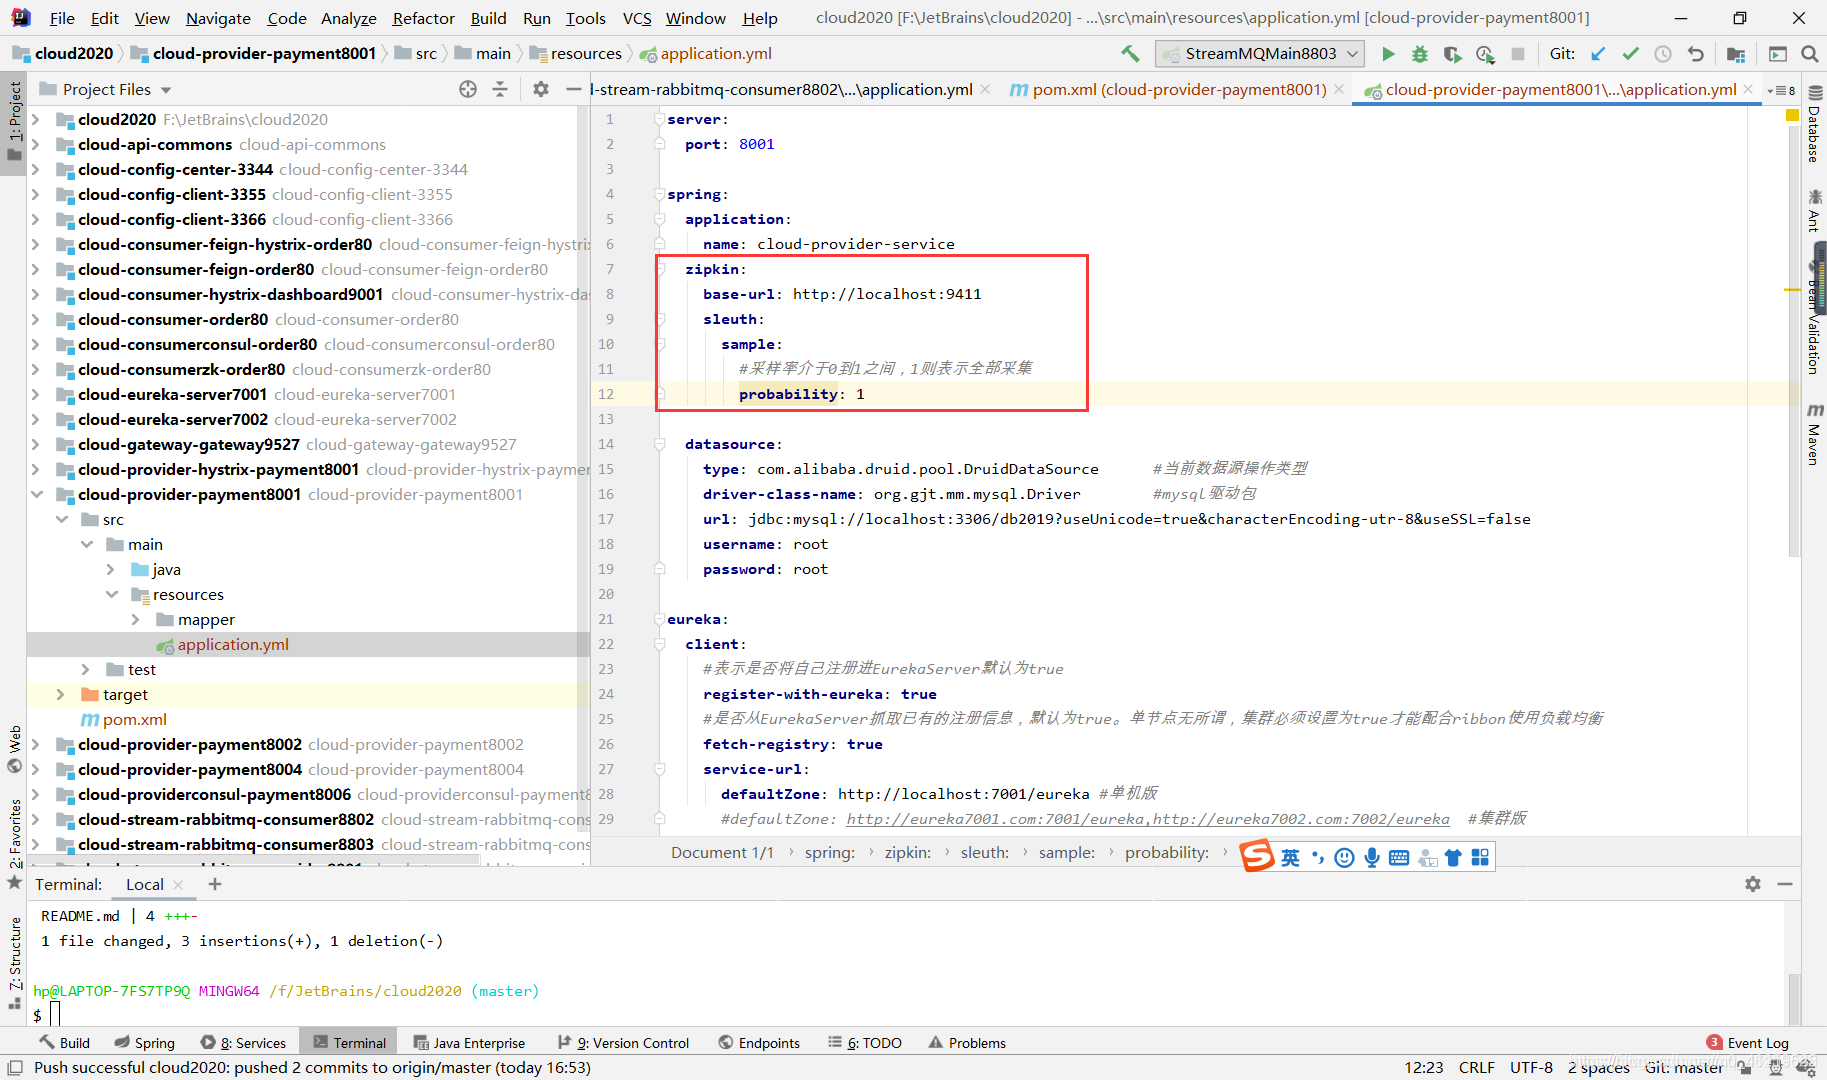
2. 服務提供者8001
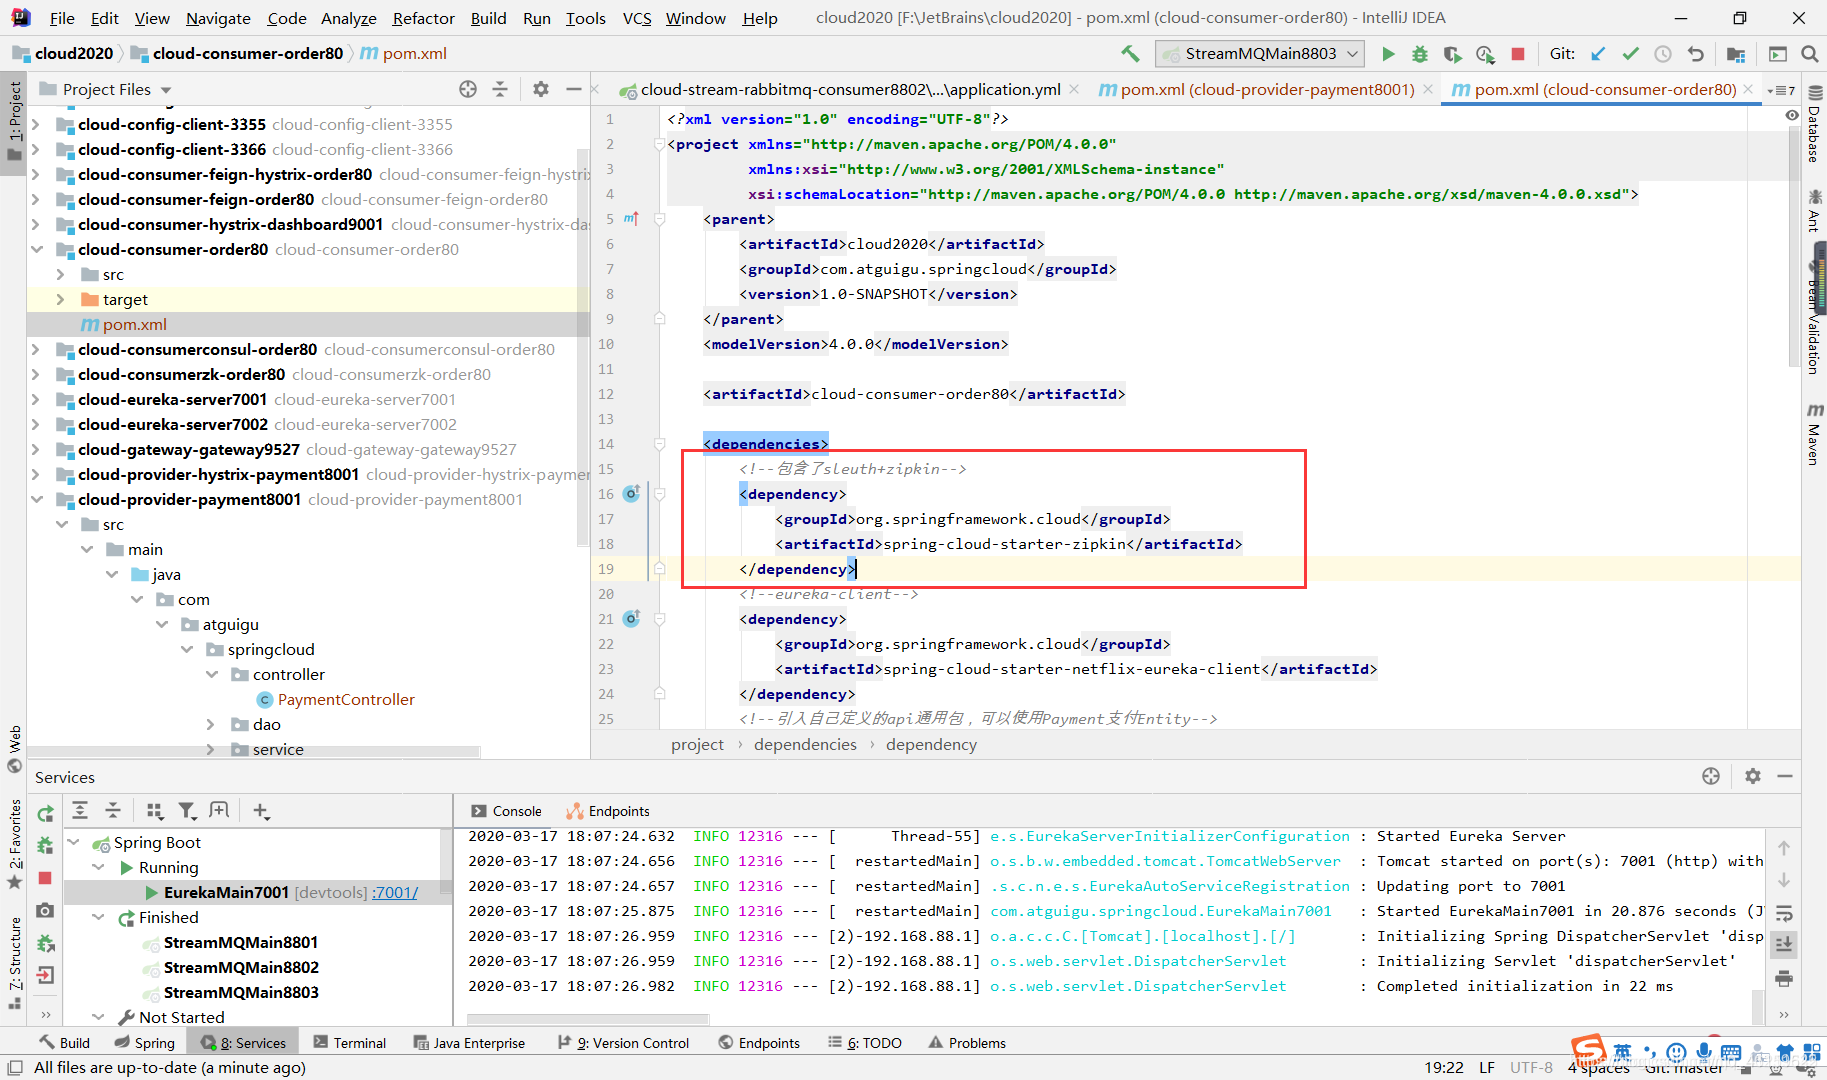
<!--包含了sleuth+zipkin-->
<dependency>
    <groupId>org.springframework.cloud</groupId>
	<artifactId>spring-cloud-starter-zipkin</artifactId>
</dependency>

3. 服務消費者80(呼叫方)
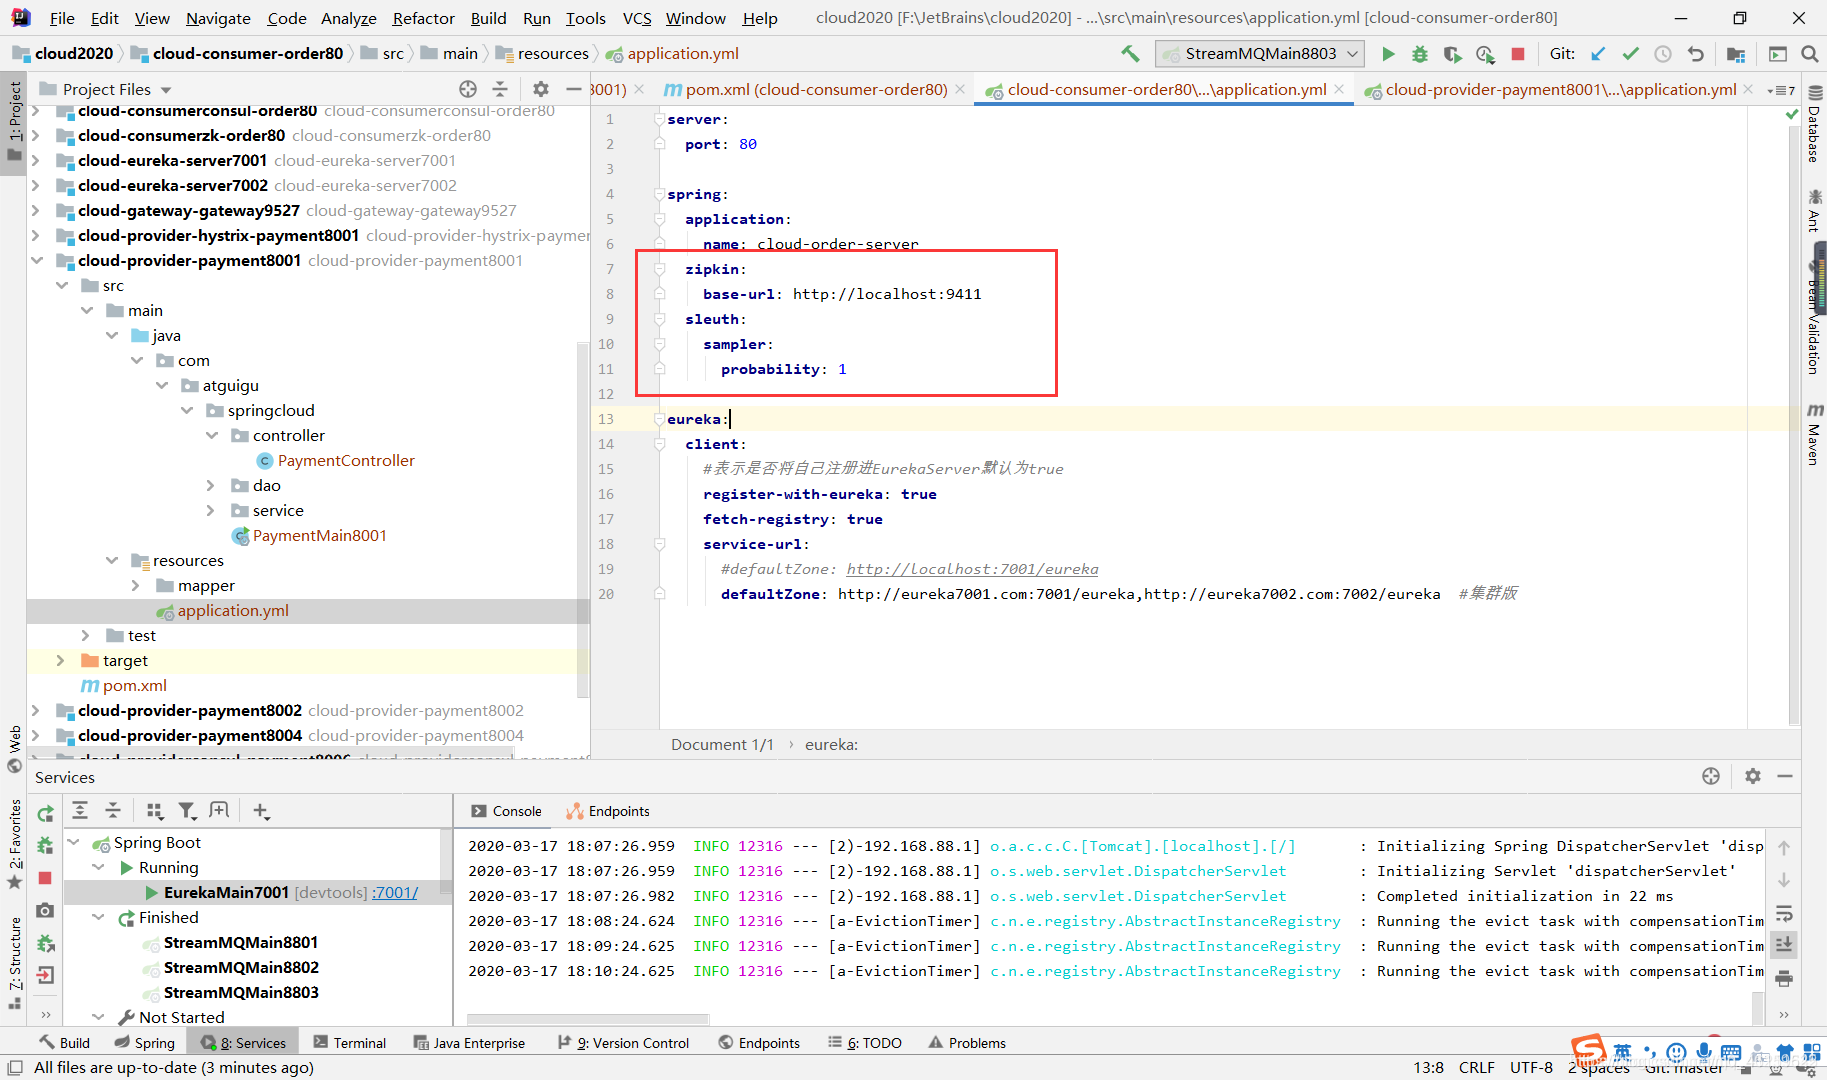
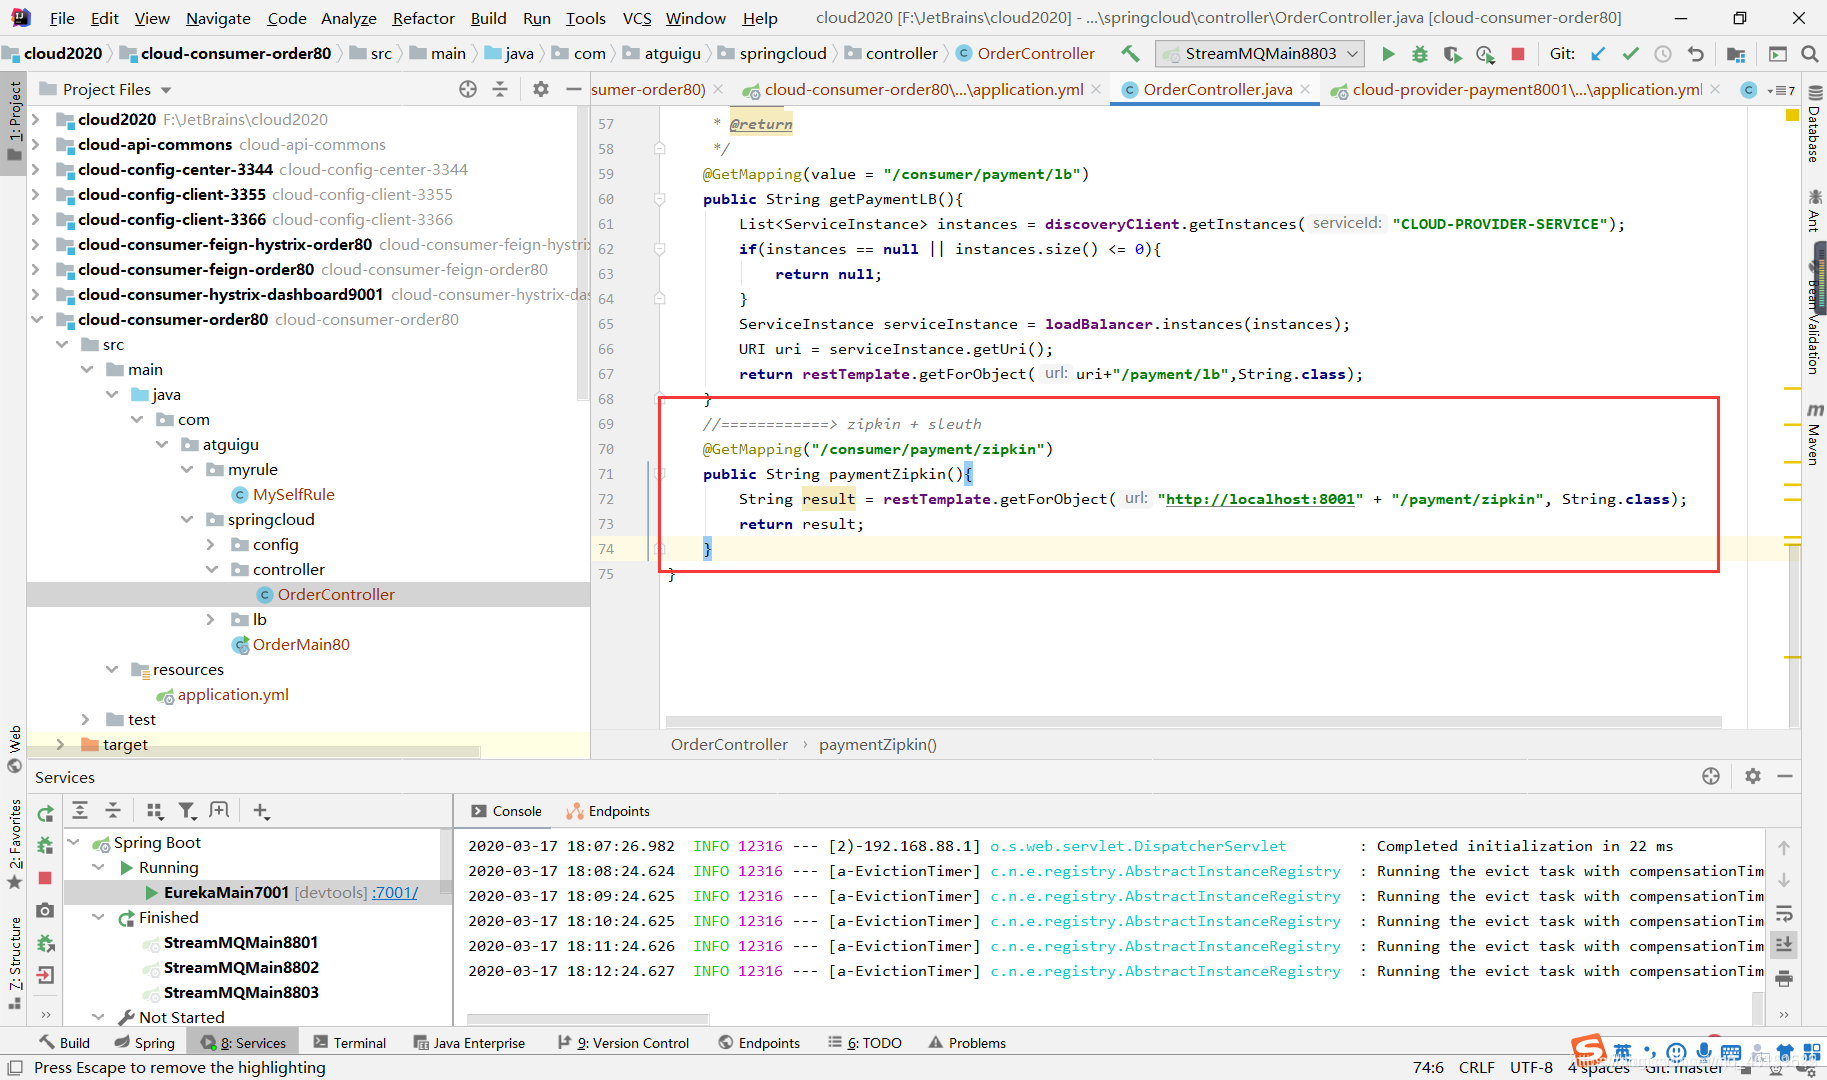
4. 一次啓動eureka 7001/8001/80
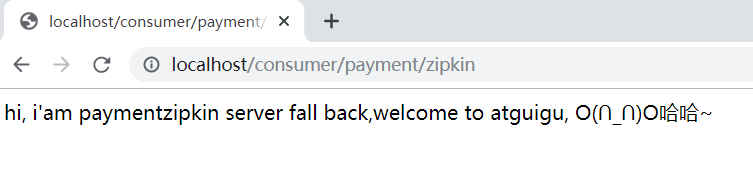
5. 開啓瀏覽器
localhost:9411/zipkin

初識 SpringCloud Alibaba
介紹
官網地址:https://github.com/alibaba/spring-cloud-alibaba/blob/master/README-zh.md
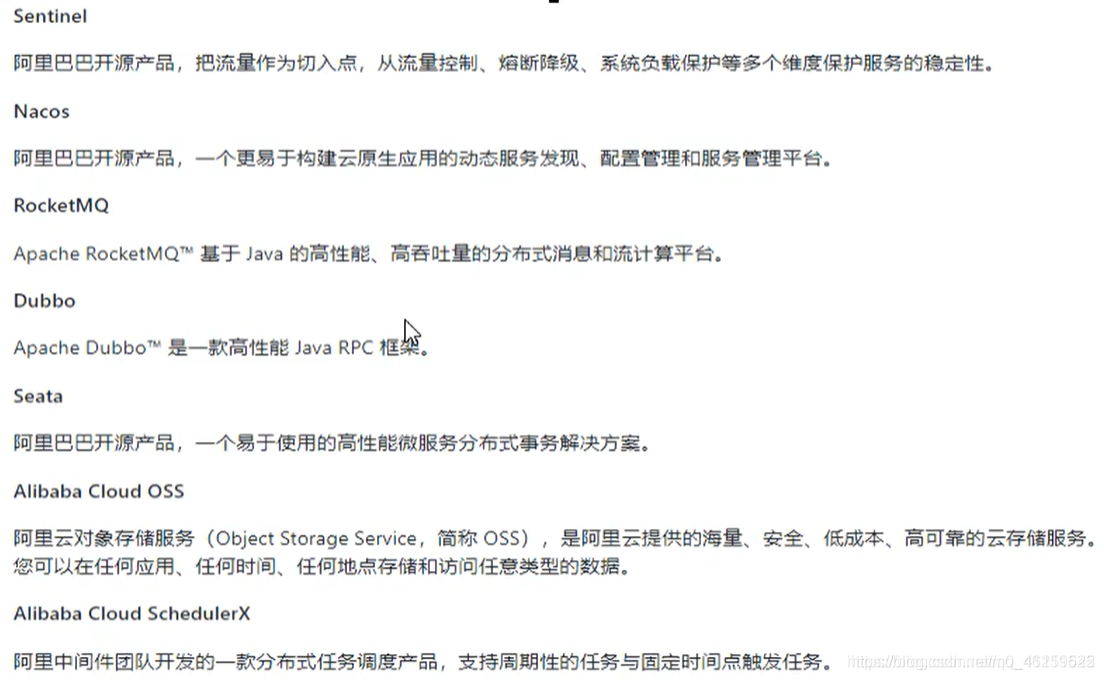
功能:
服務限流降級:預設支援Servlet、Feign、RestTemplate、Dubbo和RocketMQ限流降級功能的接入,可以在執行時通過控制檯實時修改限流降級規則,還支援檢視限流降級Metrics監控。
服務註冊與發現:適配SpringCloud服務註冊與發現標準,預設整合了Ribbon的支援。
分佈式設定管理:支援分佈式系統中的外部化設定,設定更改時自動重新整理。
訊息驅動能力:基於SpringCloud Stream爲微服務應用構建訊息驅動能力。
阿裡雲物件儲存:阿裡雲提供的海量、安全、低成本、高可靠的雲端儲存服務。支援在任何應用、任何時間、任何地點儲存和存取任意型別的數據。
分佈式任務排程:提供秒級、精準、高可靠、高可用的定時(基於Cron表達式)任務排程任務。同時提供分佈式的任務執行模型,如網格任務。網格任務支援海量子任務均勻分配到所有Worker(schedulerx-client)上執行。
在官網引入依賴即可使用:
學習資料:
官網:https://spring.io/projects/spring-cloud-alibaba
英文:https://github.com/alibaba/spring-cloud-alibaba
https://spring-cloud-alibaba-group.github.io/github-pages/greenwich/spring-cloud-alibaba.html
中文:https://github.com/alibaba/spring-cloud-alibaba/blob/master/README-zh.md

Nacos
簡介:
名字的由來:
前四個字母分別爲Naming和Configuration的前兩個字母,最後的s爲Service。
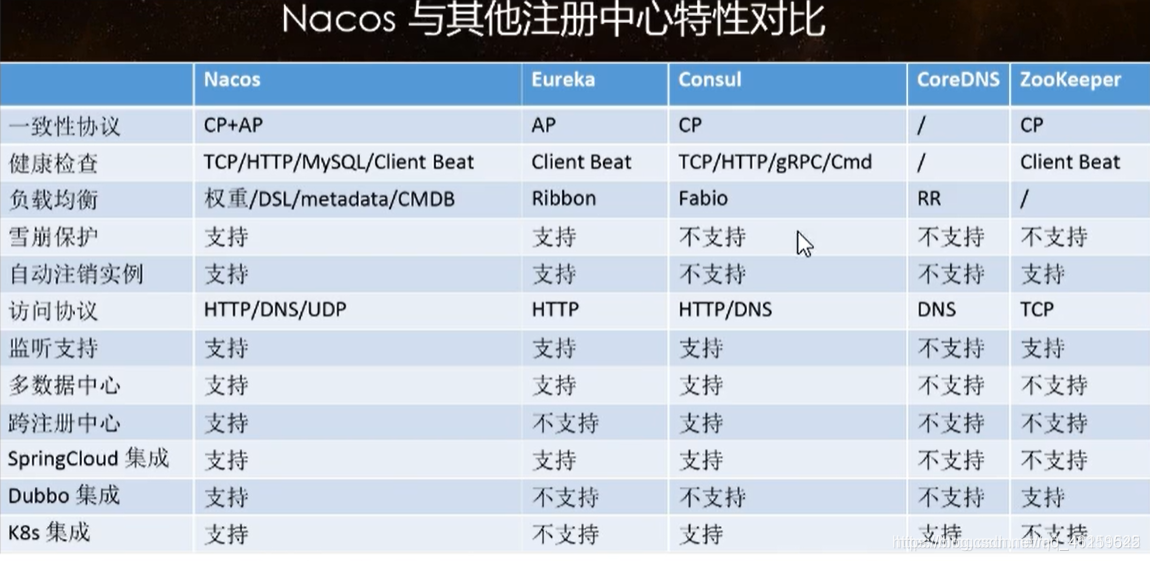
Nacos介紹:
- 一個更易於構建雲原生應用的動態服務發現、設定管理和服務管理平臺。
- Nacos:Dynamic Naming and Configuration Service
- Nacos就是 註冊中心 + 設定中心的組合
- Nacos = Eureka + Config + Bus
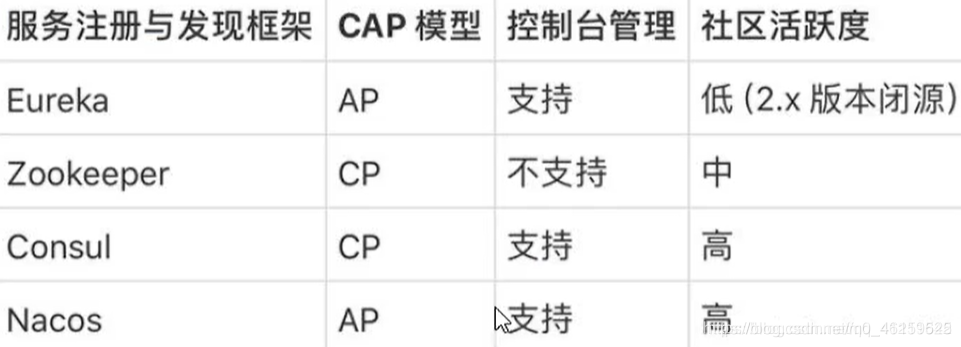
功能:
- 替代Eureka做服務註冊中心
- 替代Config做服務設定中心
下載地址:
github:https://github.com/alibaba/Nacos
官方文件:https://nacos.io/zh-cn/index.html
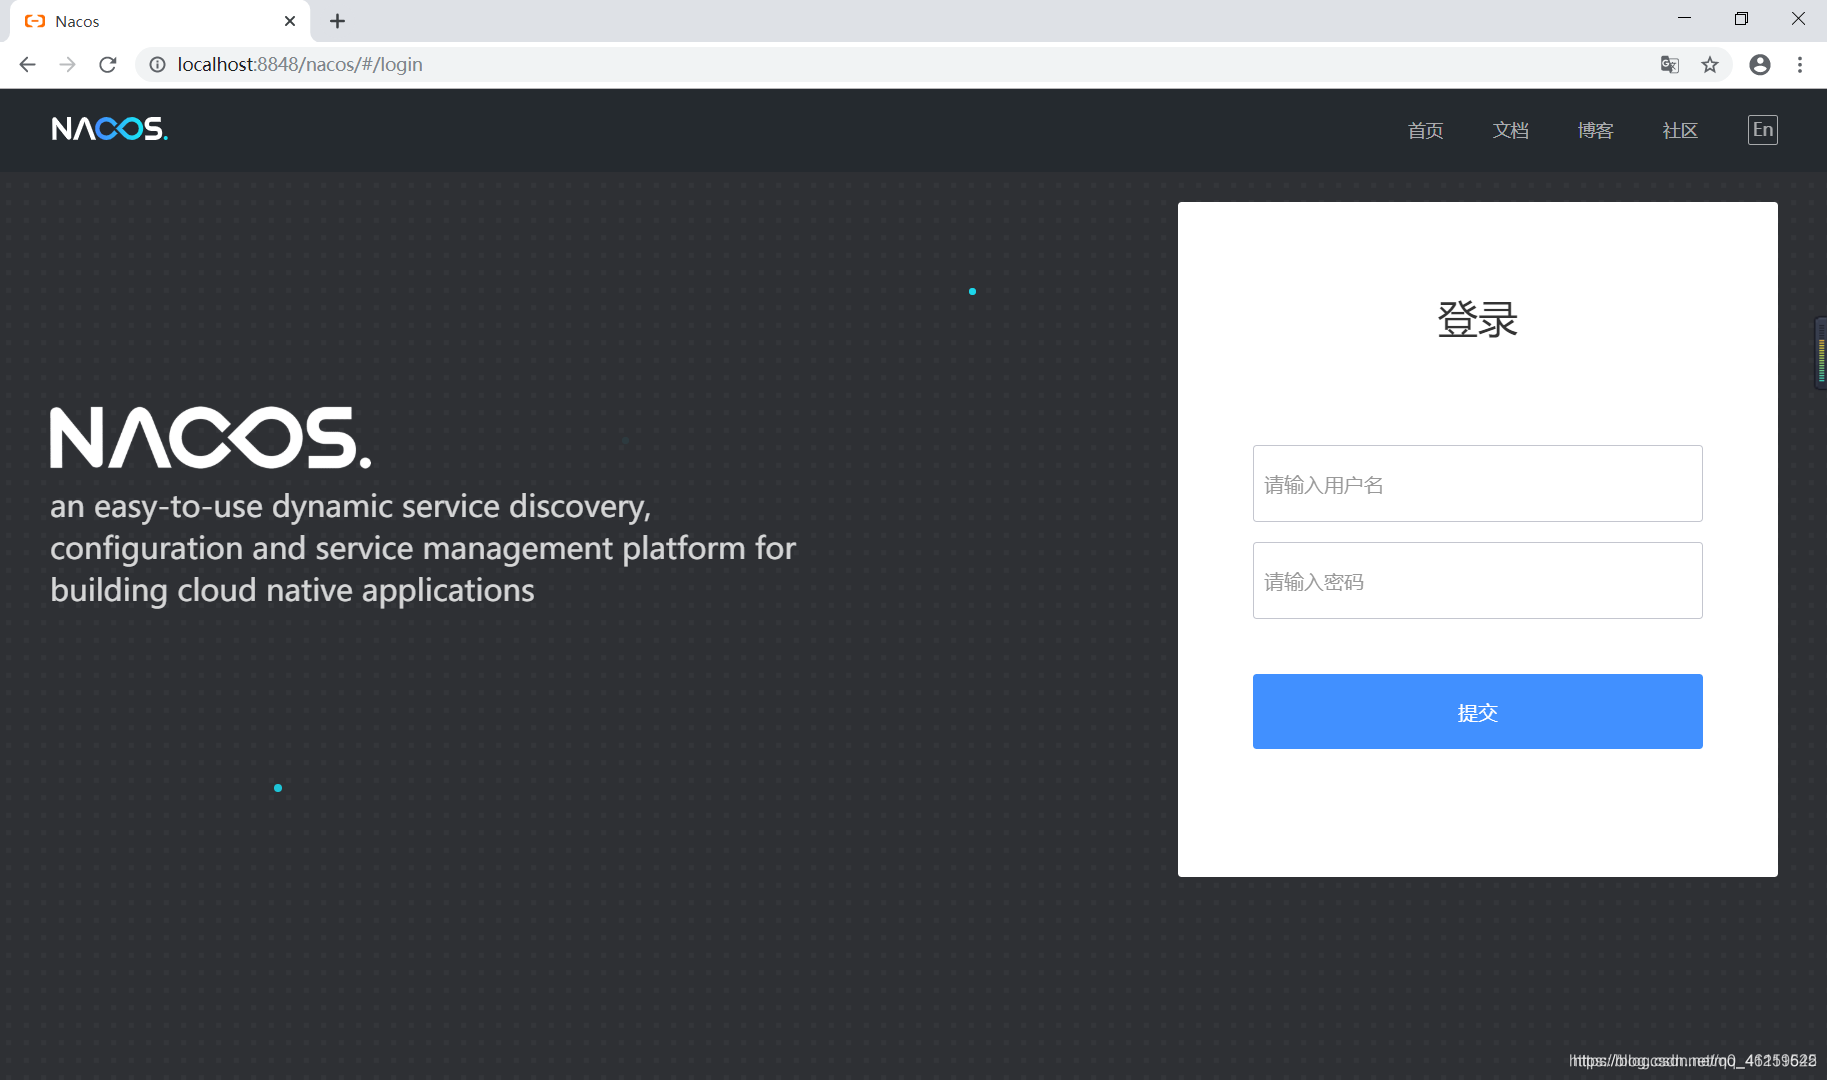
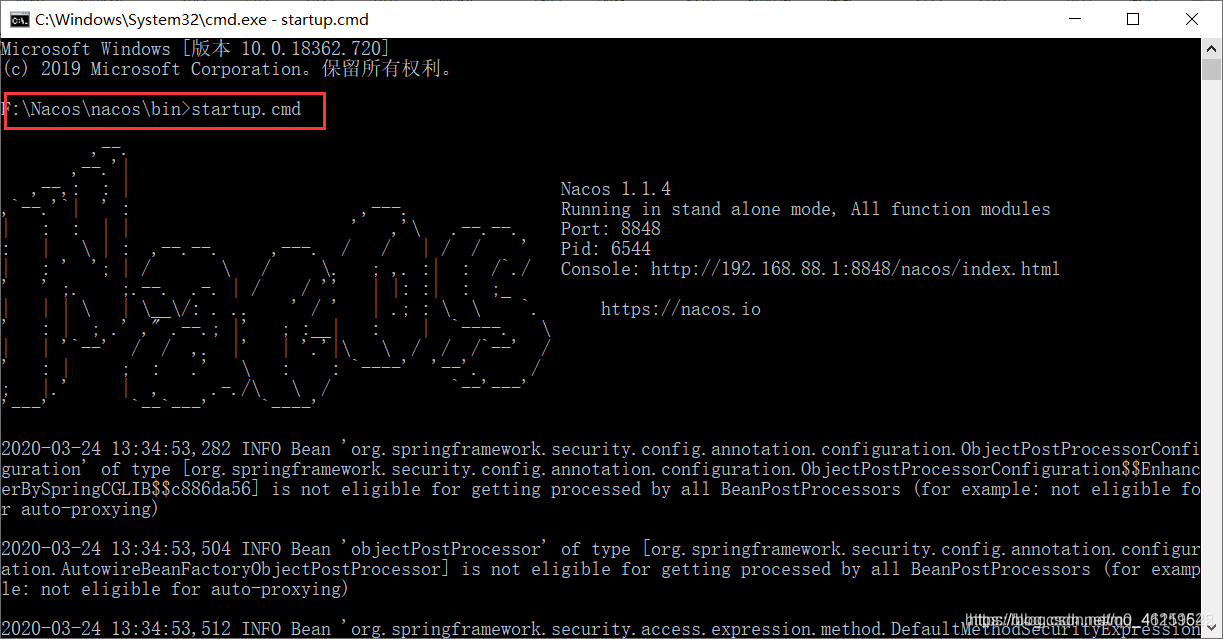
安裝並執行Nacos
- 本地Java8 + Maven環境已經OK
- 先從官網下載Nacos
- 解壓安裝包,直接執行bin目錄下的startup.cmd

- 執行成功後直接存取http://localhost:8848/nacos預設賬號密碼都是nacos
Nacos 服務註冊與設定中心
1. 服務註冊
官方文件:https://spring-cloud-alibaba-group.github.io/github-pages/greenwich/spring-cloud-alibaba.html
基於Nacos的服務提供者
- 新建module cloudalibaba-provider-payment9001
- pom.xml
<!--父工程引入spring cloud alibaba 2.1.0.RELEASE-->
<dependency>
	<groupId>com.alibaba.cloud</groupId>
    <artifactId>spring-cloud-alibaba-dependencies</artifactId>
    <version>2.1.0.RELEASE</version>
    <type>pom</type>
    <scope>import</scope>
</dependency>
<!--本pom.xml引入nacos-->
<dependencies>
	<!--springcloud alibaba nacos-->
    <dependency>
    	<groupId>com.alibaba.cloud</groupId>
        <artifactId>spring-cloud-starter-alibaba-nacos-discovery</artifactId>
    </dependency>
    <dependency>
    	<groupId>org.springframework.boot</groupId>
        <artifactId>spring-boot-starter-web</artifactId>
    </dependency>
    <dependency>
    	<groupId>org.springframework.boot</groupId>
        <artifactId>spring-boot-starter-actuator</artifactId>
    </dependency>
    <dependency>
    	<groupId>org.projectlombok</groupId>
        <artifactId>lombok</artifactId>
        <optional>true</optional>
    </dependency>
    <dependency>
    	<groupId>org.springframework.boot</groupId>
        <artifactId>spring-boot-devtools</artifactId>
        <scope>runtime</scope>
        <optional>true</optional>
    </dependency>
    <dependency>
    	<groupId>org.springframework.boot</groupId>
        <artifactId>spring-boot-starter-test</artifactId>
        <scope>test</scope>
    </dependency>
</dependencies>
- application.yml
server:
  port: 9001

spring:
  application:
    name: nacos-payment-provider
  cloud:
    nacos:
      discovery:
        server-addr: localhost:8848 #設定Nacos地址

management:
  endpoints:
    web:
      exposure:
        include: '*'  #監控
- 主啓動
package com.atguigu.springcloud.alibaba;
import org.springframework.boot.SpringApplication;
import org.springframework.boot.autoconfigure.SpringBootApplication;
import org.springframework.cloud.client.discovery.EnableDiscoveryClient;
@SpringBootApplication
@EnableDiscoveryClient
public class PaymentMain9001 {
    public static void main(String[] args) {
        SpringApplication.run(PaymentMain9001.class,args);
    }
}
- 業務類
package com.atguigu.springcloud.alibaba.controller;
import org.springframework.beans.factory.annotation.Value;
import org.springframework.web.bind.annotation.GetMapping;
import org.springframework.web.bind.annotation.PathVariable;
import org.springframework.web.bind.annotation.RestController;
@RestController
public class PaymentController {
@Value("${server.port}")
private String serverPort;
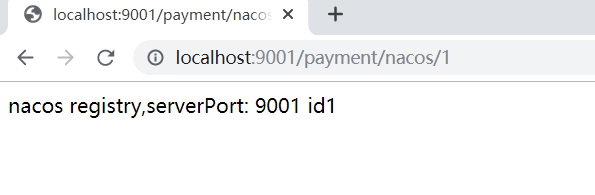
@GetMapping("/payment/nacos/{id}")
public String getPayment(@PathVariable("id") Integer id){
return "nacos registry,serverPort: "+ serverPort+"\t id"+id;
}
}
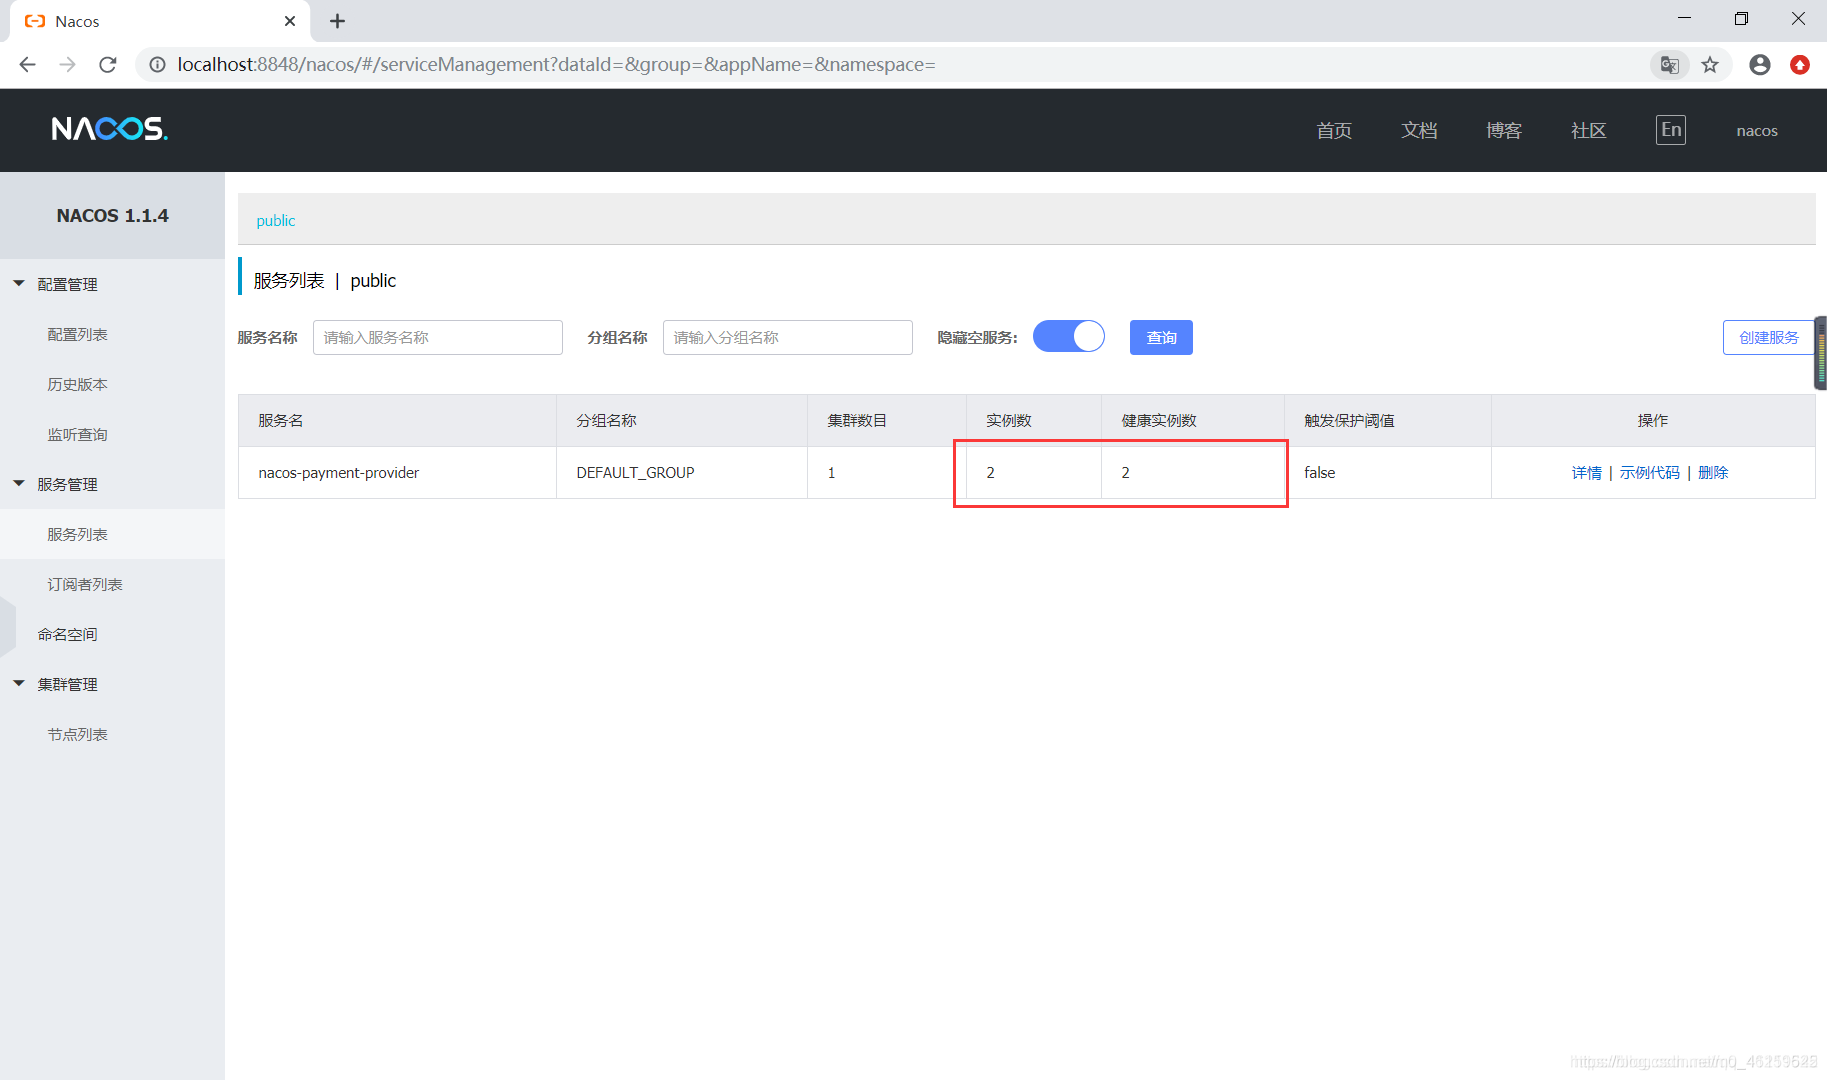
- 測試
啓動Nacos,啓動9001
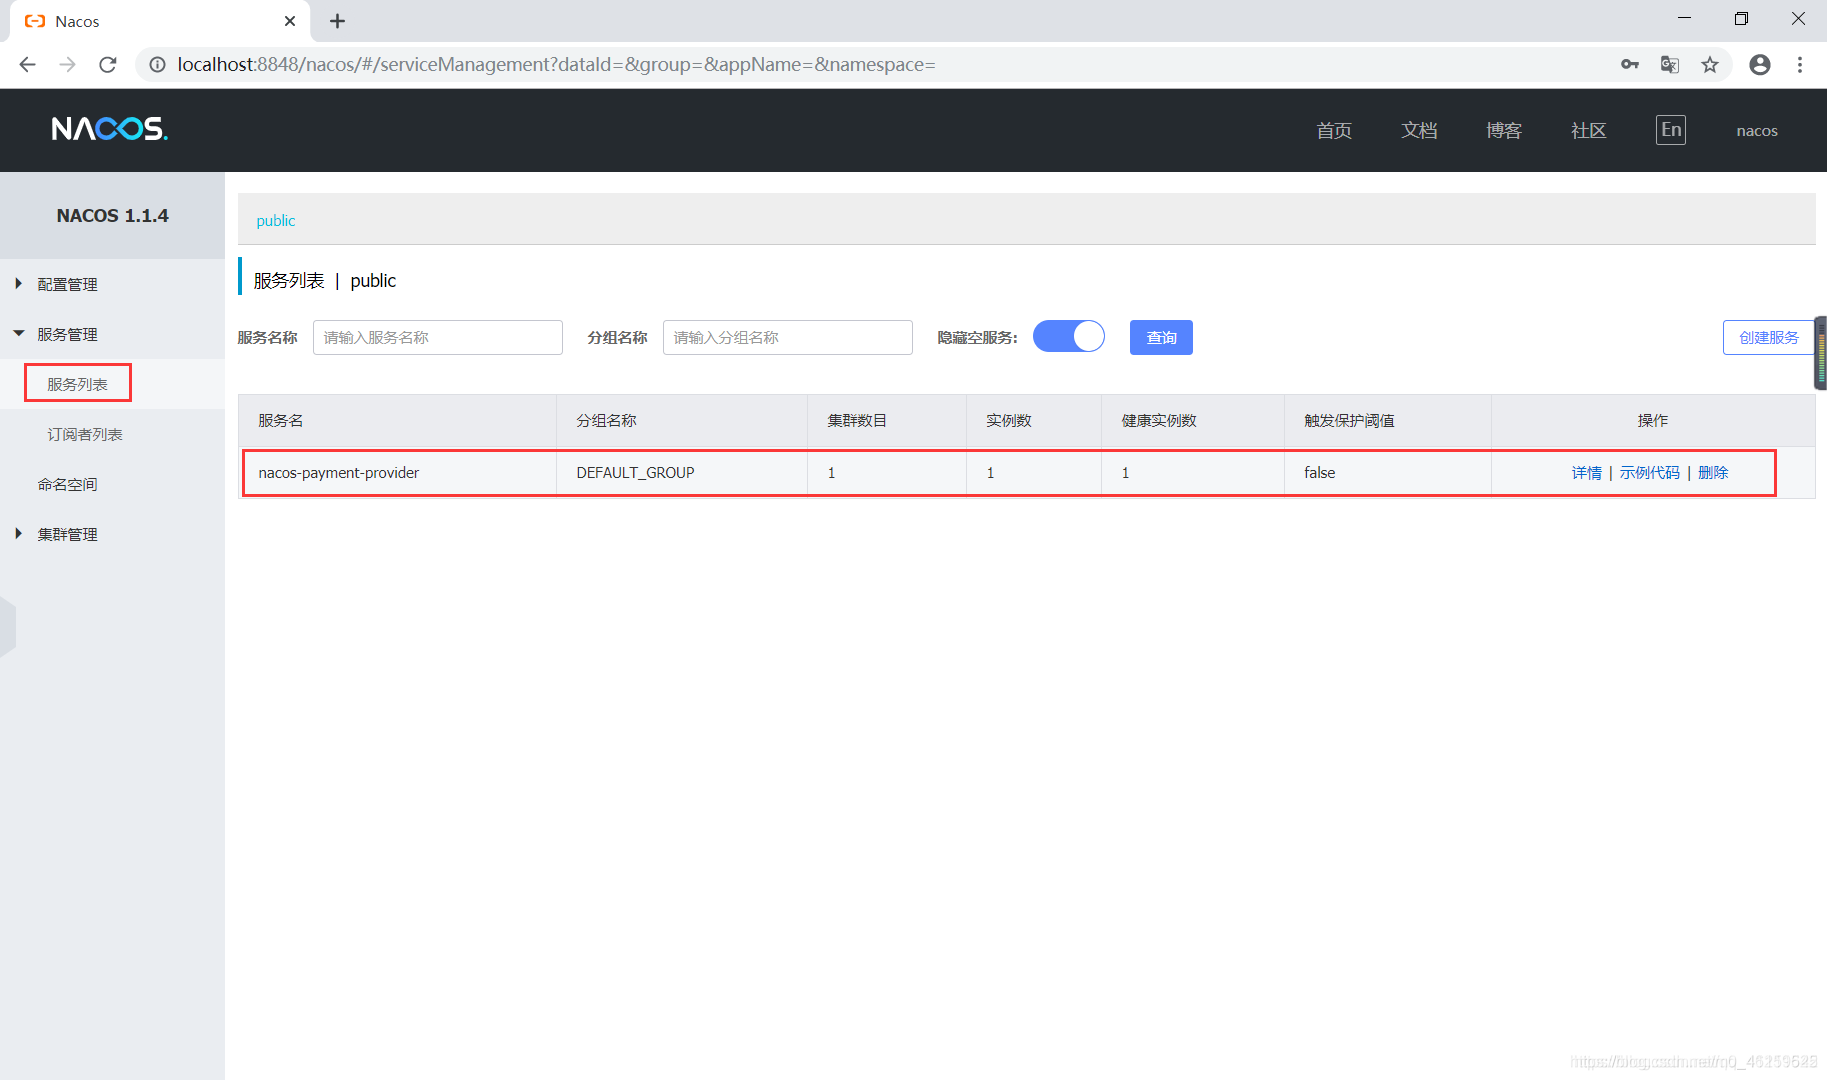
這樣就表示9001註冊進Nacos了,爲了演示Nacos的負載均衡,參照9001新建9002,啓動後微服務下有兩個範例:
基於Nacos的服務消費者
- 新建module cloudalibaba-consumer-nacos-order83
- pom.xml
在這裏插入程式碼片<dependencies>
    <dependency>
        <groupId>com.alibaba.cloud</groupId>
    	<artifactId>spring-cloud-starter-alibaba-nacos-discovery</artifactId>
    </dependency>
    <dependency>
        <groupId>com.atguigu.springcloud</groupId>
        <artifactId>cloud-api-commons</artifactId>
    	<version>${project.version}</version>
    </dependency>
    <dependency>
        <groupId>org.springframework.boot</groupId>
    	<artifactId>spring-boot-starter-web</artifactId>
    </dependency>
    <dependency>
        <groupId>org.springframework.boot</groupId>
    	<artifactId>spring-boot-starter-actuator</artifactId>
    </dependency>
    <dependency>
        <groupId>org.projectlombok</groupId>
        <artifactId>lombok</artifactId>
    	<optional>true</optional>
    </dependency>
    <dependency>
        <groupId>org.springframework.boot</groupId>
        <artifactId>spring-boot-starter-test</artifactId>
    	<scope>test</scope>
	</dependency>
</dependencies>
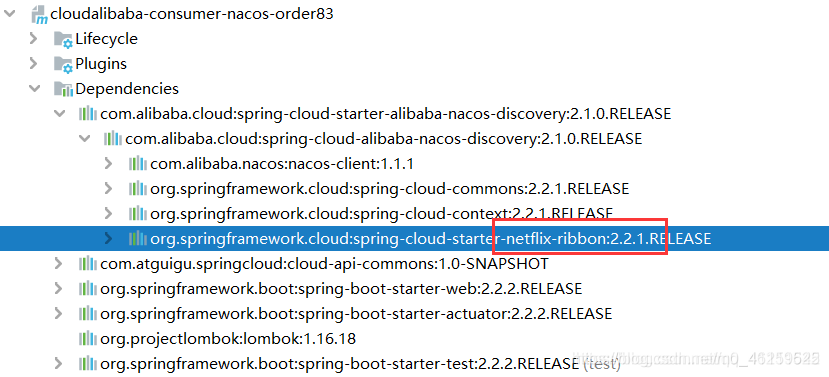
- Nacos自帶負載均衡:
- application.yml
server:
  port: 83

spring:
  application:
    name: nacos-order-consumer
  cloud:
    nacos:
      discovery:
        server-addr: localhost:8848

#消費者將要去存取的微服務名稱(成功註冊進nacos的微服務提供者),在這設定了存取的服務,業務類就不用在定義常數了
service-url:
  nacos-user-service: http://nacos-payment-provider
- 主啓動
package com.atguigu.springcloud.alibaba;
import org.springframework.boot.SpringApplication;
import org.springframework.boot.autoconfigure.SpringBootApplication;
import org.springframework.cloud.client.discovery.EnableDiscoveryClient;
@SpringBootApplication
@EnableDiscoveryClient
public class OrderNacosMain83 {
    public static void main(String[] args) {
        SpringApplication.run(OrderNacosMain83.class,args);
    }
}
- 業務類
//Nacos自帶Ribbon,引入RestTemplate
package com.atguigu.springcloud.alibaba.config;
import org.springframework.context.annotation.Bean;
import org.springframework.context.annotation.Configuration;
import org.springframework.web.client.RestTemplate;
@Configuration
public class ApplicationContextConfig {
    @Bean
    @LoadBalanced //RestTemplate結合Ribbon做負載均衡一定要加@LoadBalanced
    public RestTemplate getRestTemplate(){
        return new RestTemplate();
    }
}
package com.atguigu.springcloud.alibaba.controller;
import org.springframework.beans.factory.annotation.Value;
import org.springframework.web.bind.annotation.GetMapping;
import org.springframework.web.bind.annotation.PathVariable;
import org.springframework.web.bind.annotation.RestController;
import org.springframework.web.client.RestTemplate;
import javax.annotation.Resource;
@RestController
public class OrderNacosController {
    /*
    因爲在yml中設定了service-url.nacos-user-service,
    這裏不需要再定義要存取微服務名常數,而是通過boot直接讀出來
     */
    @Value("${service-url.nacos-user-service}")
    private String serverURL;

    @Resource
    private RestTemplate restTemplate;

    @GetMapping("/consumer/payment/nacos/{id}")
    public String paymentInfo(@PathVariable("id") Long id){
        return restTemplate.getForObject(serverURL+"/payment/nacos/"+id,String.class);
    }
}
- 啓動83 ,測試
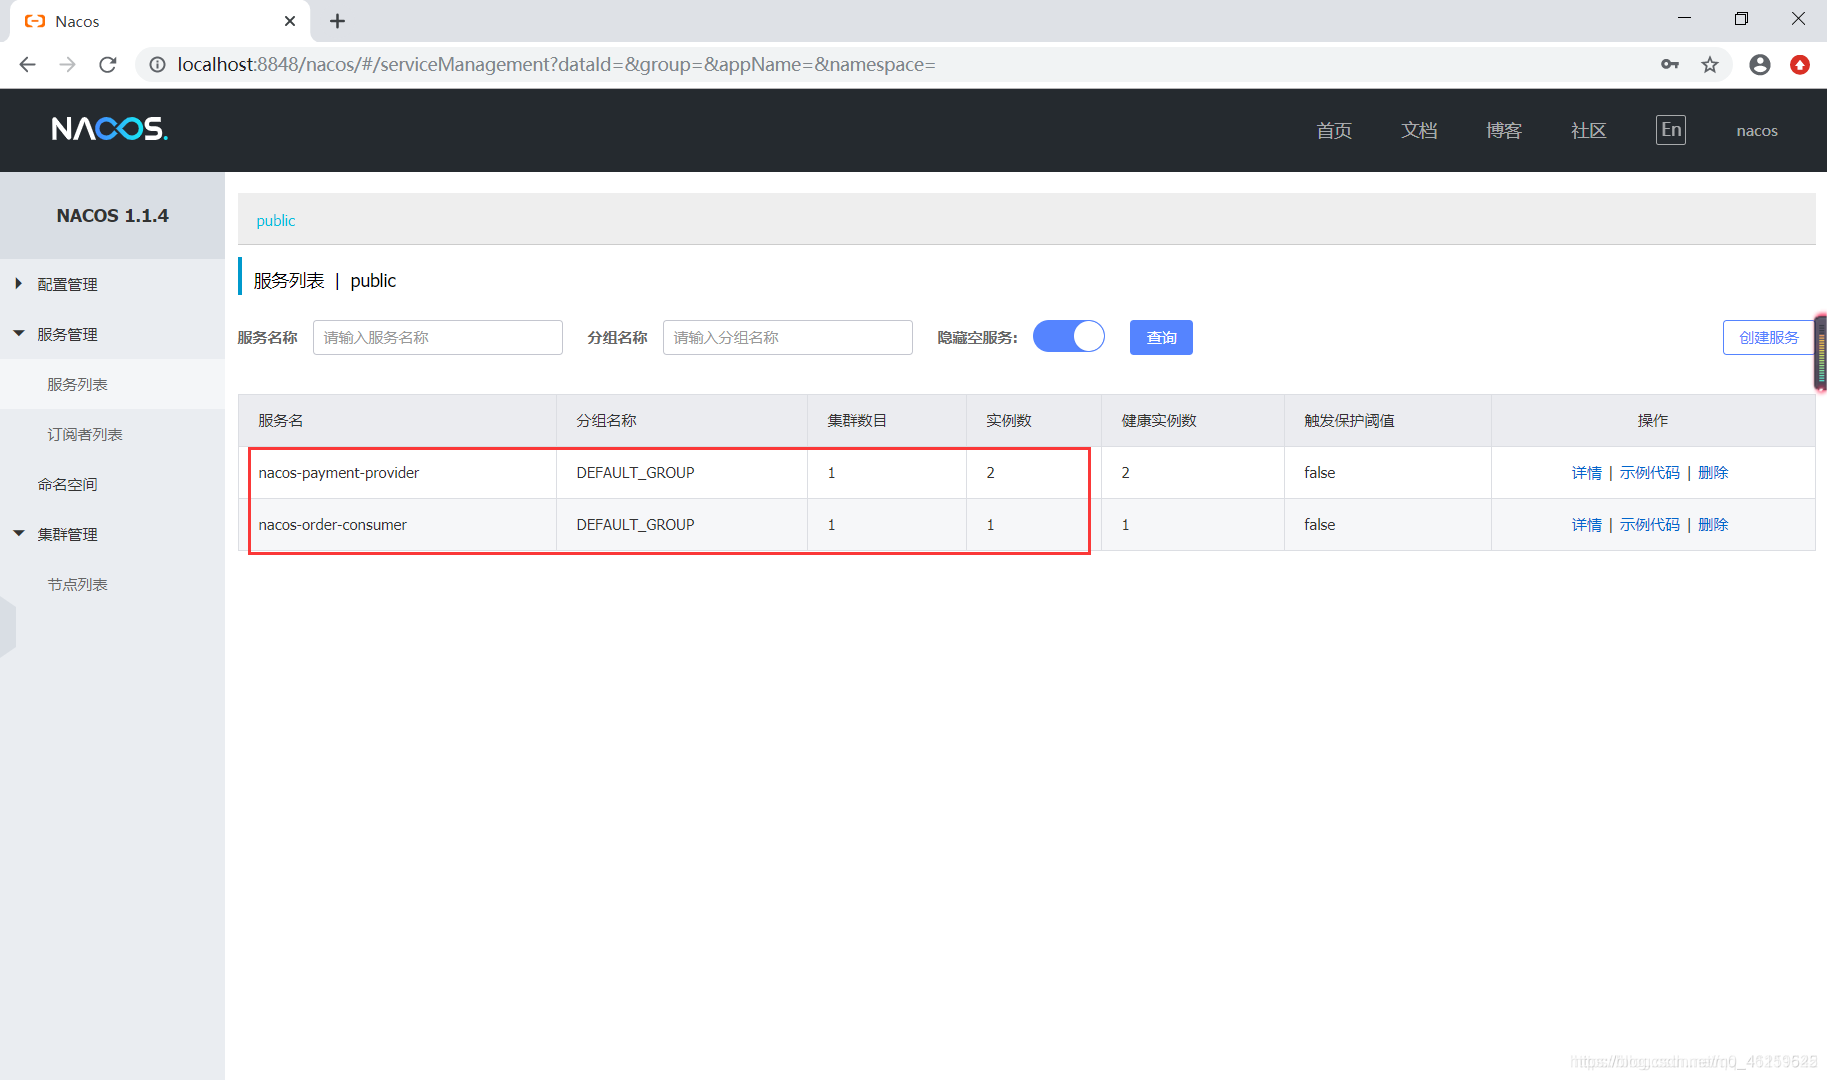
現在服務提供者有兩個,服務消費者有一個
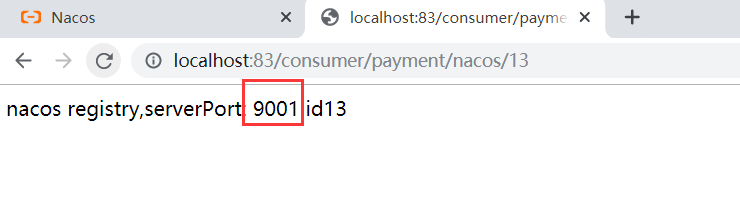
多次重新整理,9001、9002交替出現,這樣消費者83存取服務提供者9001/9002,輪詢負載OK。
擴充套件:
Nacos 支援AP 和 CP模式的轉換
C是所有節點在同一時間看到的數據是一致的;而A的定義是所有的請求都會受到響應。
何時選擇使用何種模式?
一般來說,如果不需要儲存服務級別的資訊且服務範例是通過nacos-client註冊,並能夠保持心跳上報,那麼就可以選擇AP模式。當前主流的服務如SpringCloud和Dubbo服務,都適用與AP模式,AP模式爲了服務的可能性而減弱了一致性,因此AP模式下只支援註冊臨時範例。
如果需要在服務級別編輯或儲存設定資訊,那麼CP是必須,K8S服務和DNS服務則適用於CP模式。CP模式下則支援註冊持久化範例,此時則是以Raft協定爲叢集執行模式,該模式下註冊範例之前必須先註冊服務,如果服務不出存在,則會返回錯誤。
用下面 下麪命令切換
curl -X PUT ‘$NACOS_SERVER:8848/nacos/v1/ns/operator/switches?entry=serverMode&value=CP’
2. Nacos作爲服務設定中心
Nacos作爲設定中心-基礎設定 介紹
- 新建module cloudalibaba-config-nacos-client3377
- pomx.ml
<dependencies>
    <dependency>
        <groupId>com.alibaba.cloud</groupId>
    	<artifactId>spring-cloud-starter-alibaba-nacos-config</artifactId>
    </dependency>
    <dependency>
        <groupId>com.alibaba.cloud</groupId>
    	<artifactId>spring-cloud-starter-alibaba-nacos-discovery</artifactId>
    </dependency>
    <dependency>
        <groupId>org.springframework.boot</groupId>
    	<artifactId>spring-boot-starter-web</artifactId>
    </dependency>
    <dependency>
        <groupId>org.springframework.boot</groupId>
    	<artifactId>spring-boot-starter-actuator</artifactId>
    </dependency>
    <dependency>
        <groupId>org.projectlombok</groupId>
        <artifactId>lombok</artifactId>
    	<optional>true</optional>
    </dependency>
    <dependency>
        <groupId>org.springframework.boot</groupId>
        <artifactId>spring-boot-starter-test</artifactId>
    	<scope>test</scope>
	</dependency>
</dependencies>
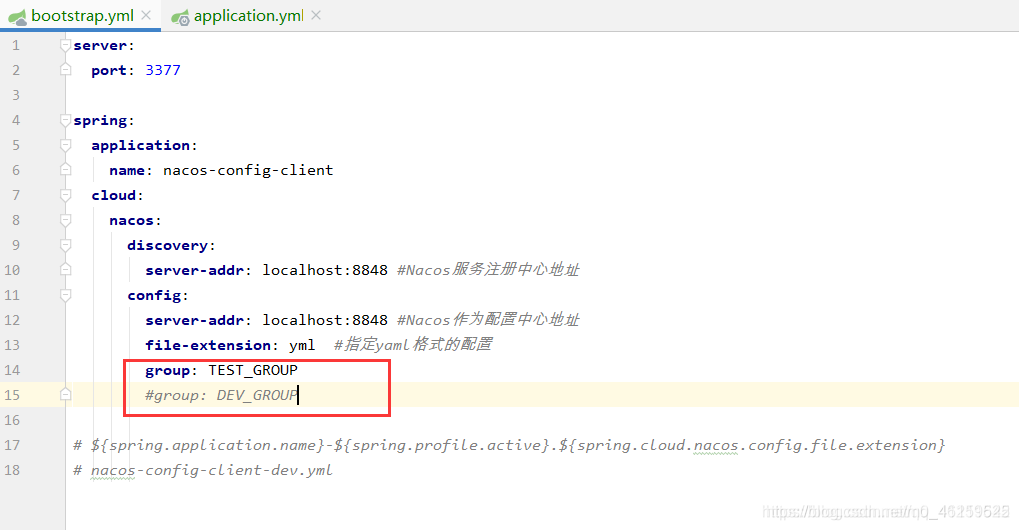
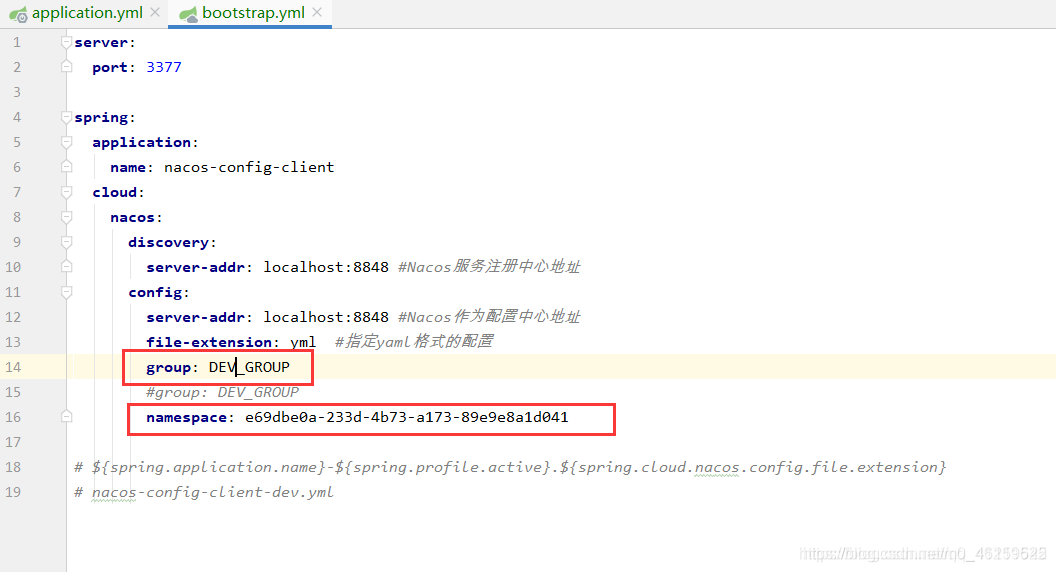
- bootstrap.yml 和 application.yml
Nacos同springcloud-config一樣,在專案初始化時,要保證先從設定中心進行設定拉取,拉取設定後,才能 纔能保證專案的正常啓動。
#bootstrap.xml
server:
  port: 3377

spring:
  application:
    name: nacos-config-client
  cloud:
    nacos:
      discovery:
        server-addr: localhost:8848 #Nacos服務註冊中心地址
      config:
        server-addr: localhost:8848 #Nacos作爲設定中心地址
        file-extension: yml  #指定yaml格式的設定

# ${spring.application.name}-${spring.profile.active}.${spring.cloud.nacos.config.file.extension}
# nacos-config-client-dev.yml
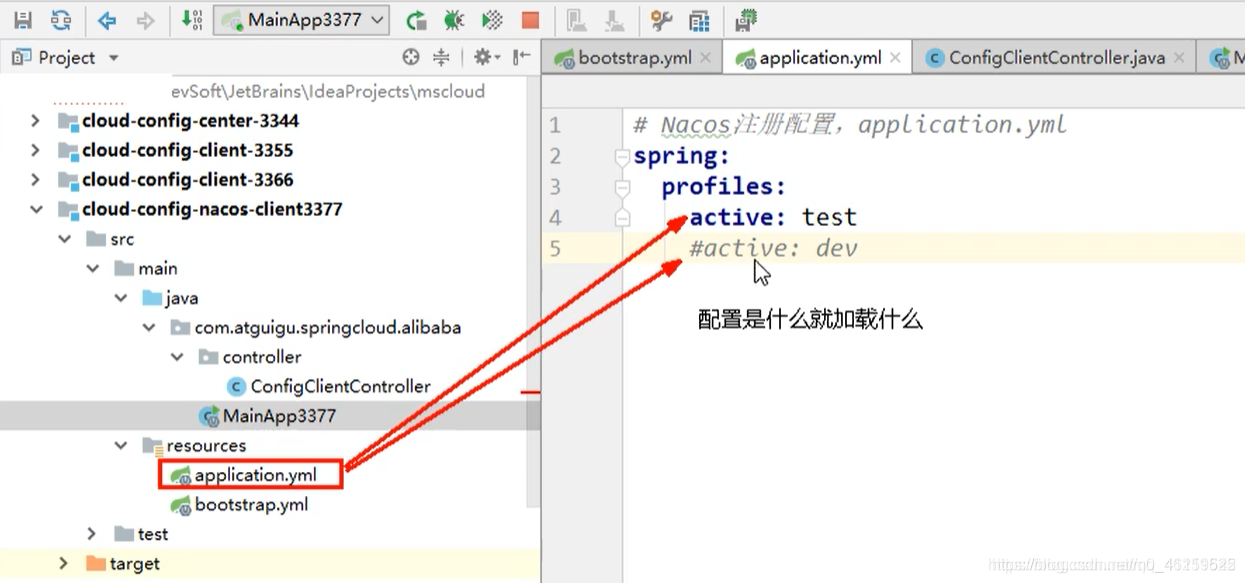
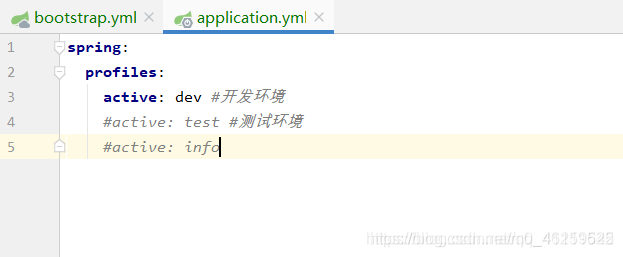
#application.yml
spring:
  profiles:
    active: dev #開發環境
- 主啓動類
package com.atguigu.springcloud.alibaba;
import org.springframework.boot.SpringApplication;
import org.springframework.boot.autoconfigure.SpringBootApplication;
import org.springframework.cloud.client.discovery.EnableDiscoveryClient;
@SpringBootApplication
@EnableDiscoveryClient
public class NacosConfigClientMain3377 {
    public static void main(String[] args) {
        SpringApplication.run(NacosConfigClientMain3377.class,args);
    }
}
- 業務類
package com.atguigu.springcloud.alibaba.controller;
import org.springframework.beans.factory.annotation.Value;
import org.springframework.cloud.context.config.annotation.RefreshScope;
import org.springframework.web.bind.annotation.GetMapping;
import org.springframework.web.bind.annotation.RestController;
@RestController
@RefreshScope //SpringCloud原生註解 支援Nacos的動態重新整理功能
public class ConfigClientController {
@Value("${config.info}")
private String configInfo;
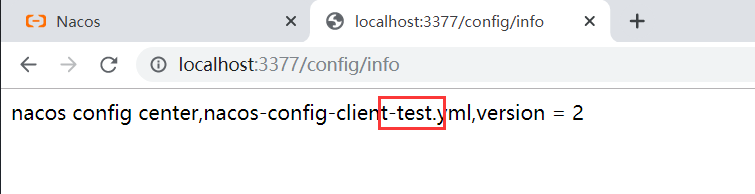
@GetMapping("/config/info")
public String getConfigInfo(){
return configInfo;
}
}
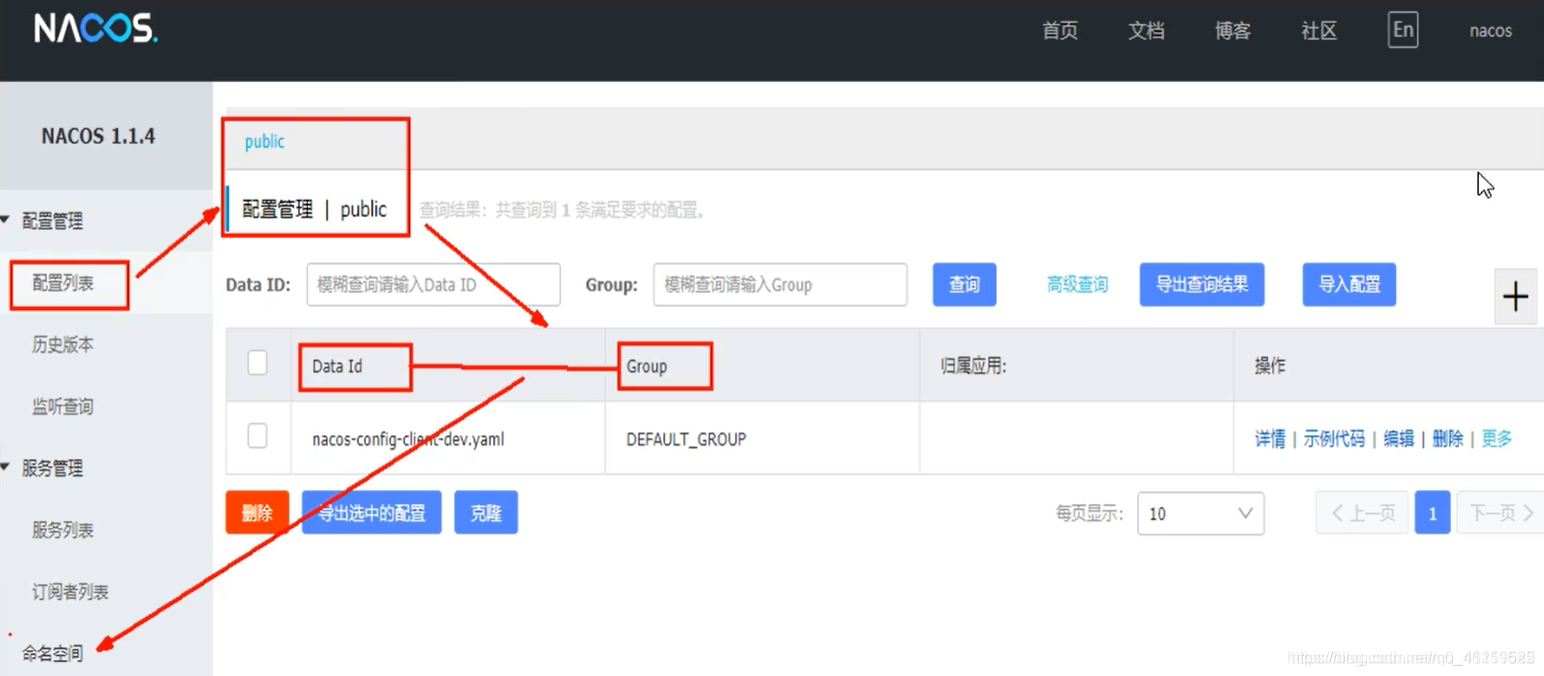
- 在Nacos中新增設定資訊
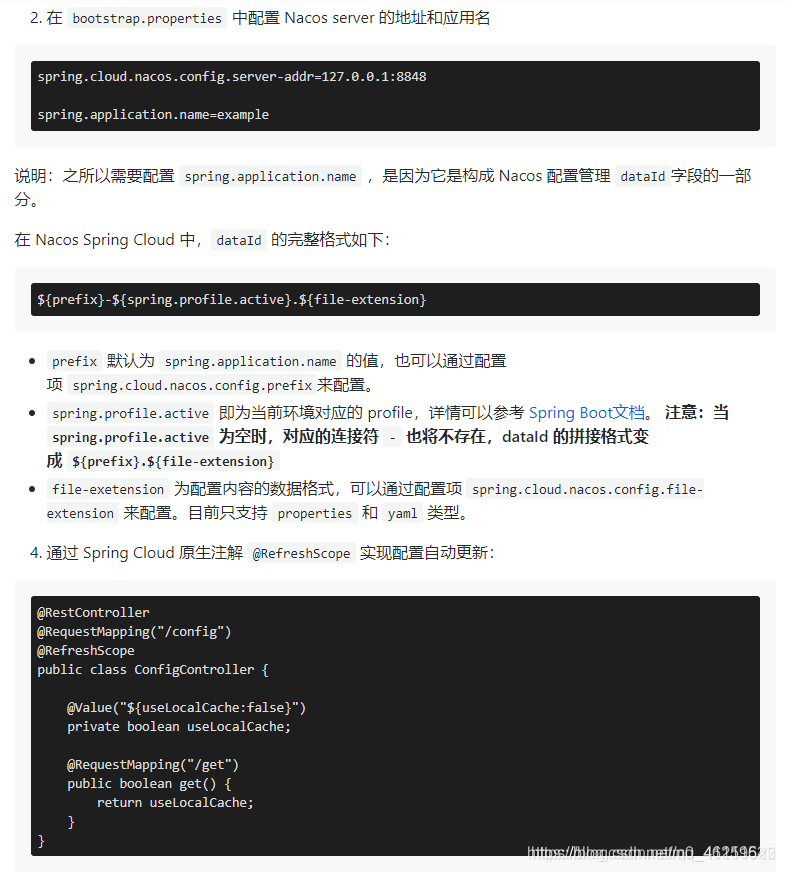
理論:Nacos中的匹配規則
Nacos中的dataid的組成格式及與SpringBoot組態檔中的匹配規則
官網:https://nacos.io/zh-cn/docs/quick-start-spring-cloud.html
- 設定新增
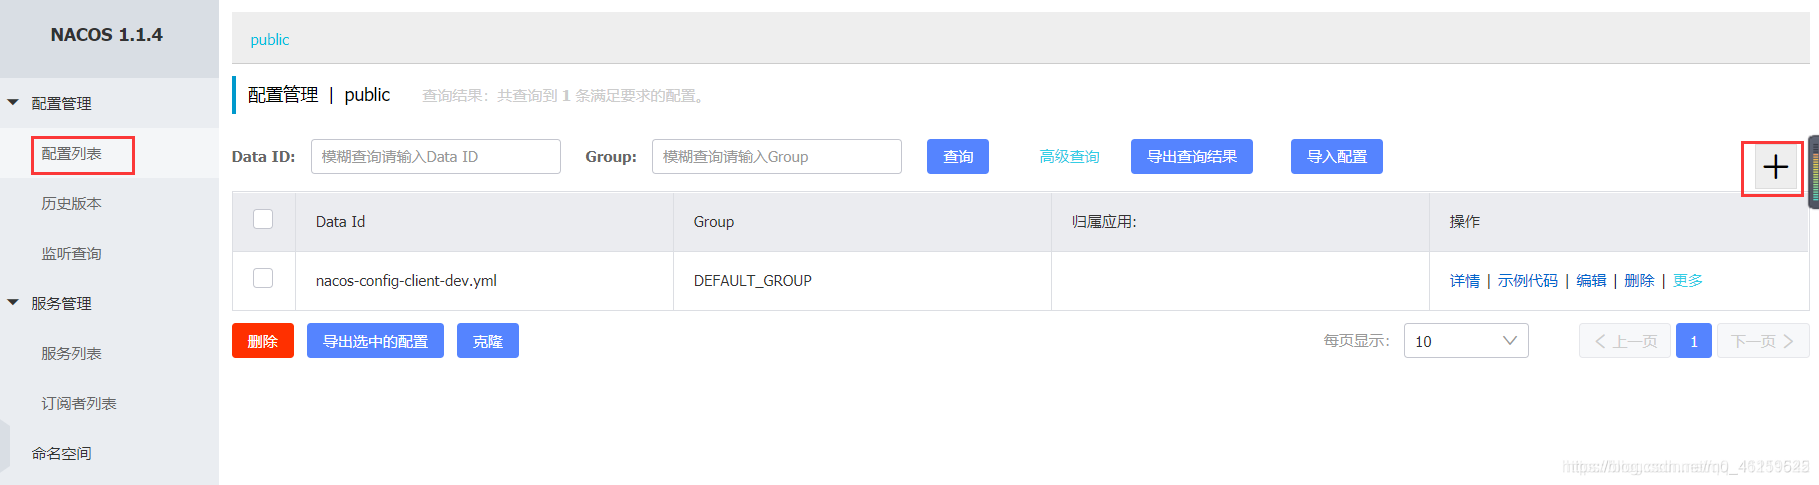
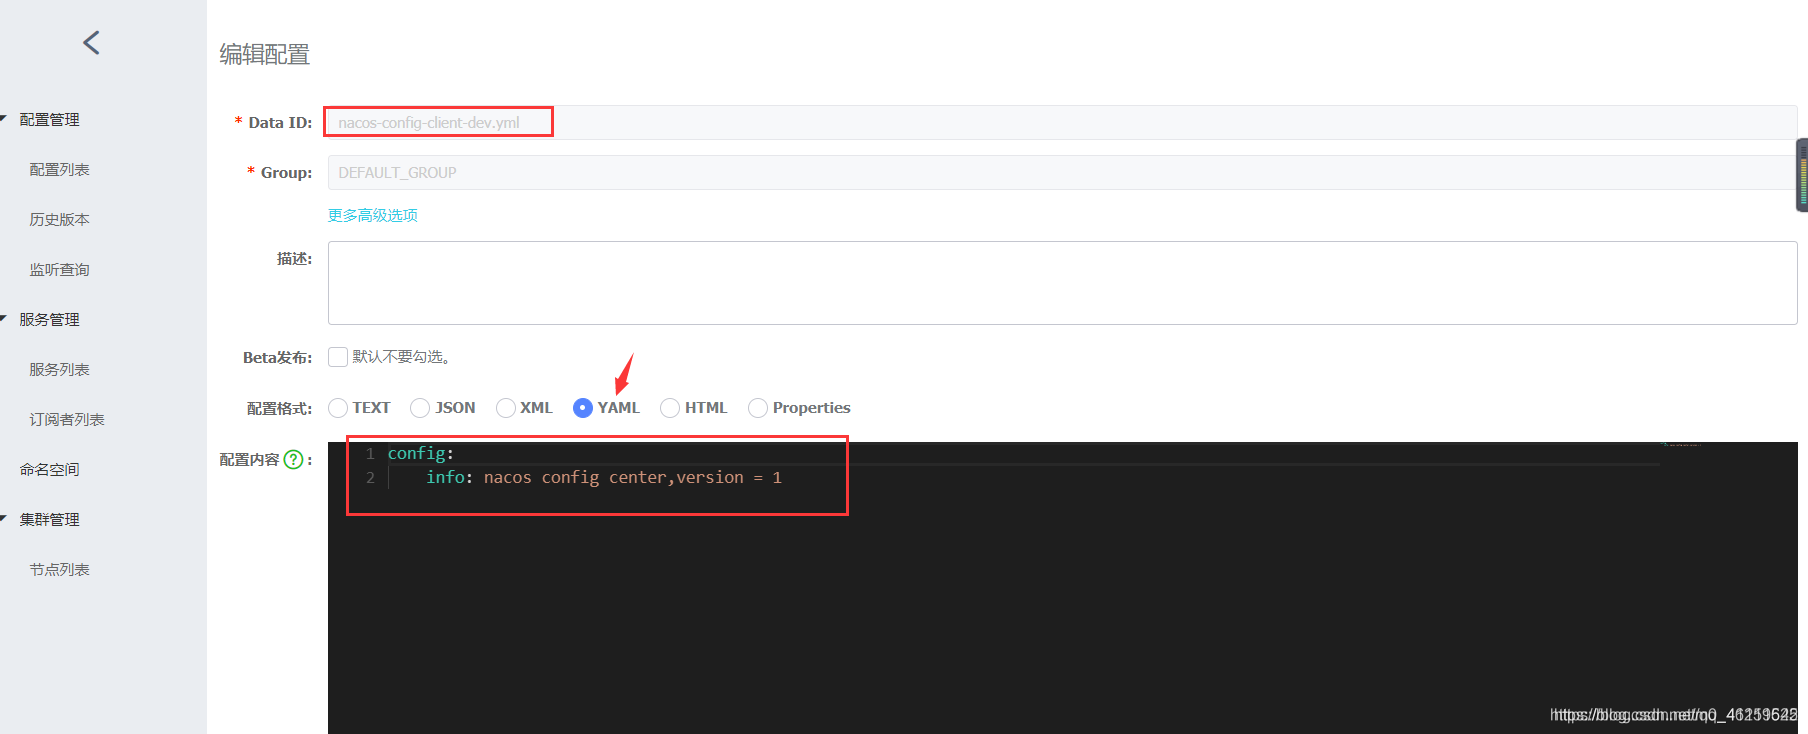
Nacos介面設定對應:

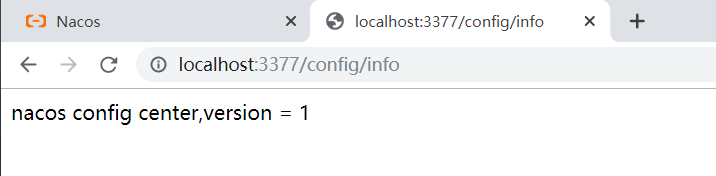
- 測試
啓動前需要在Nacos用戶端-設定管理-設定管理欄目下有對應的yml檔案
執行cloud-config-nacos-client3377的主啓動類
呼叫介面檢視設定資訊:http://localhost:3377/config/info
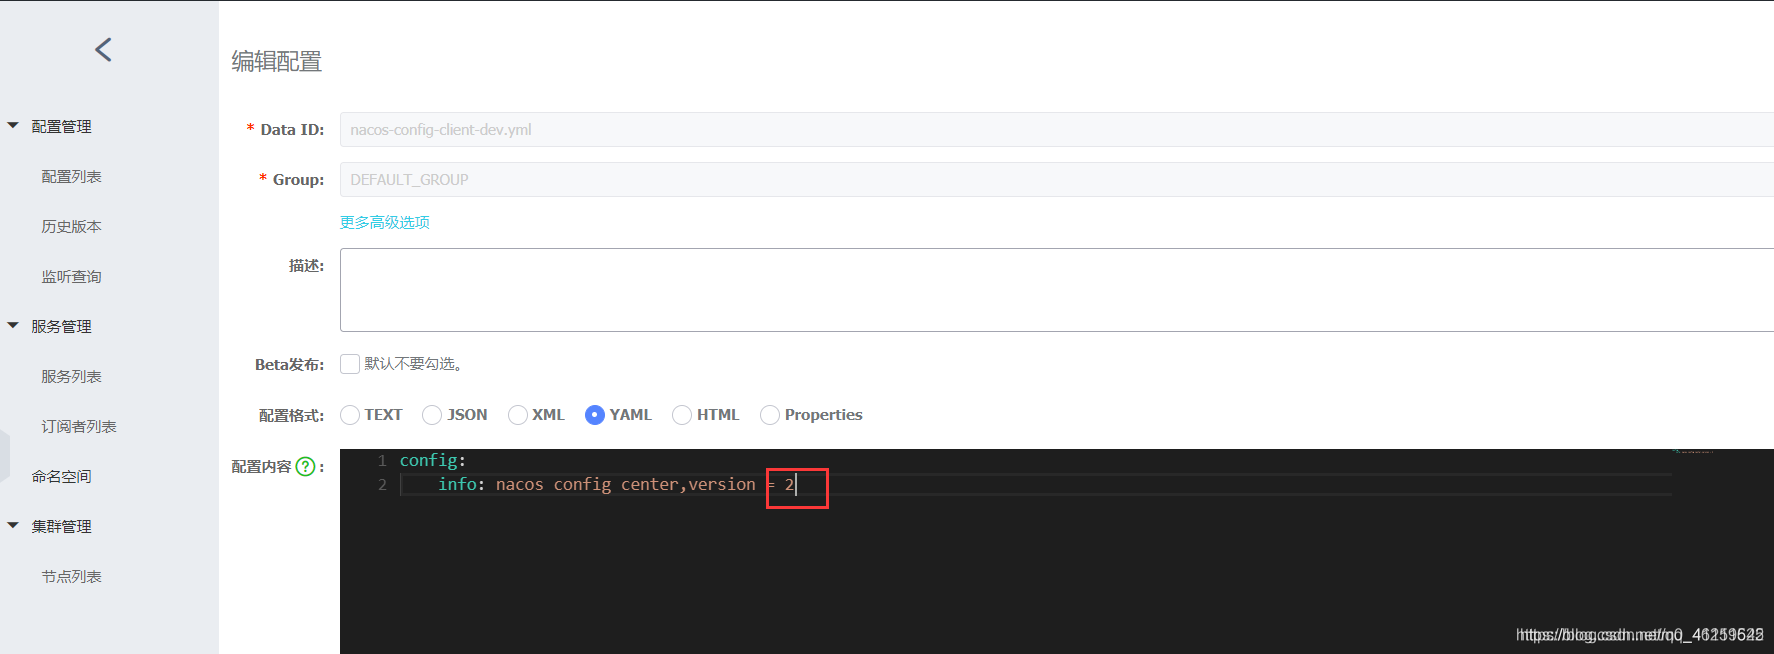
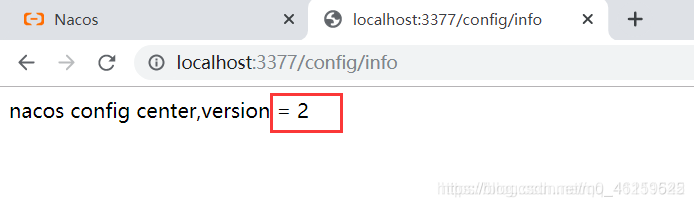
- 自帶動態重新整理
修改下Nacos中的yml檔案,再次呼叫檢視設定的介面,就會發現設定以及重新整理
問題1:
實際開發中,通常一個系統會準備dev開發環境、test測試環境、prod生產環境,如何保證指定環境啓動時服務能正確讀取到Nacos上相應環境的組態檔呢?
問題2:
一個大型分佈式微服務系統會有很多微服務子專案,每個微服務專案又會有相應的開發環境、測試環境、預發環境、正式環境…那怎麼對這些微服務設定進行管理呢?
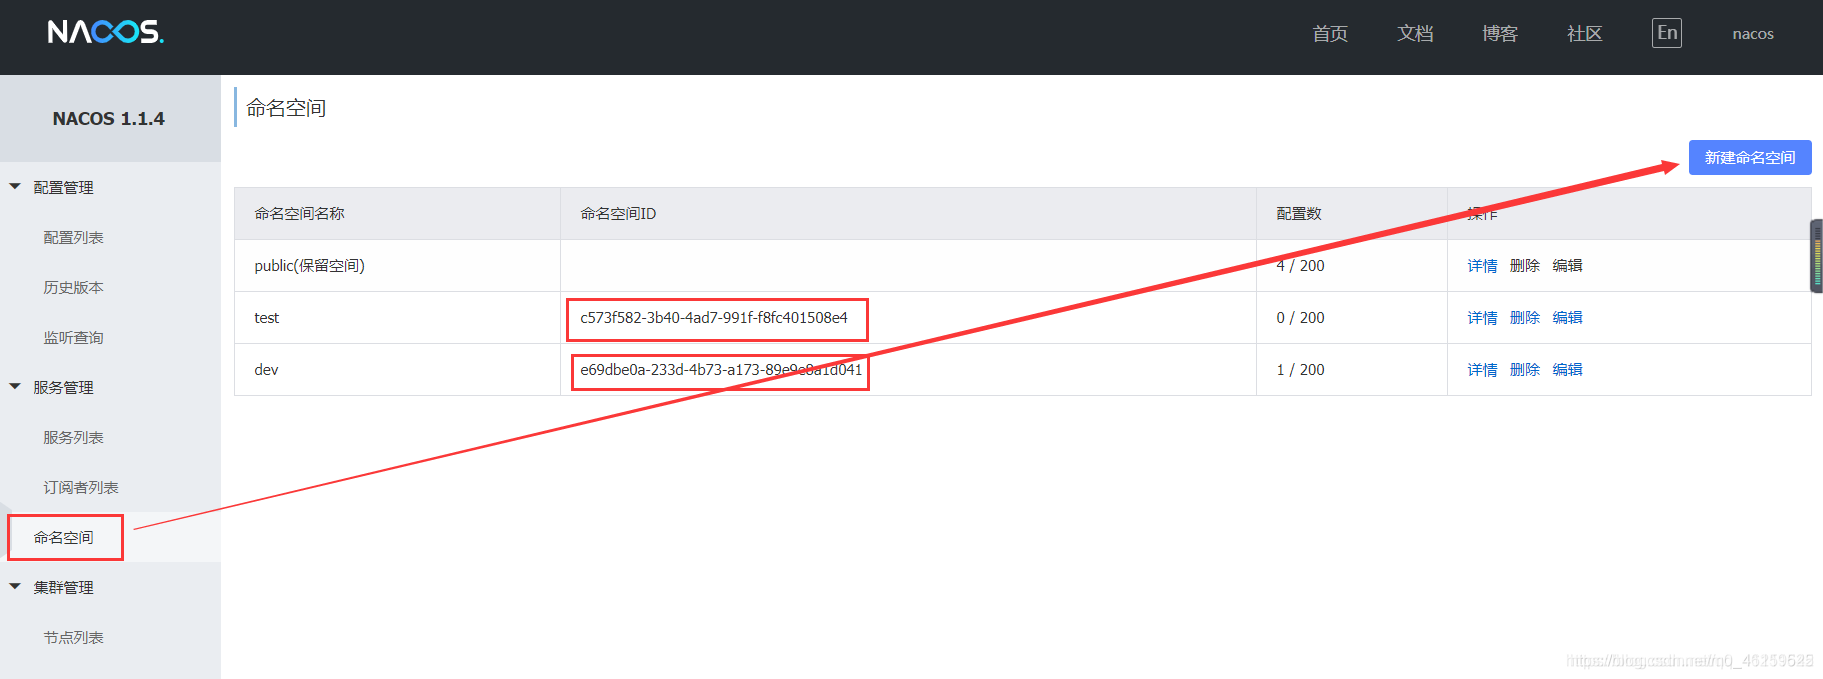
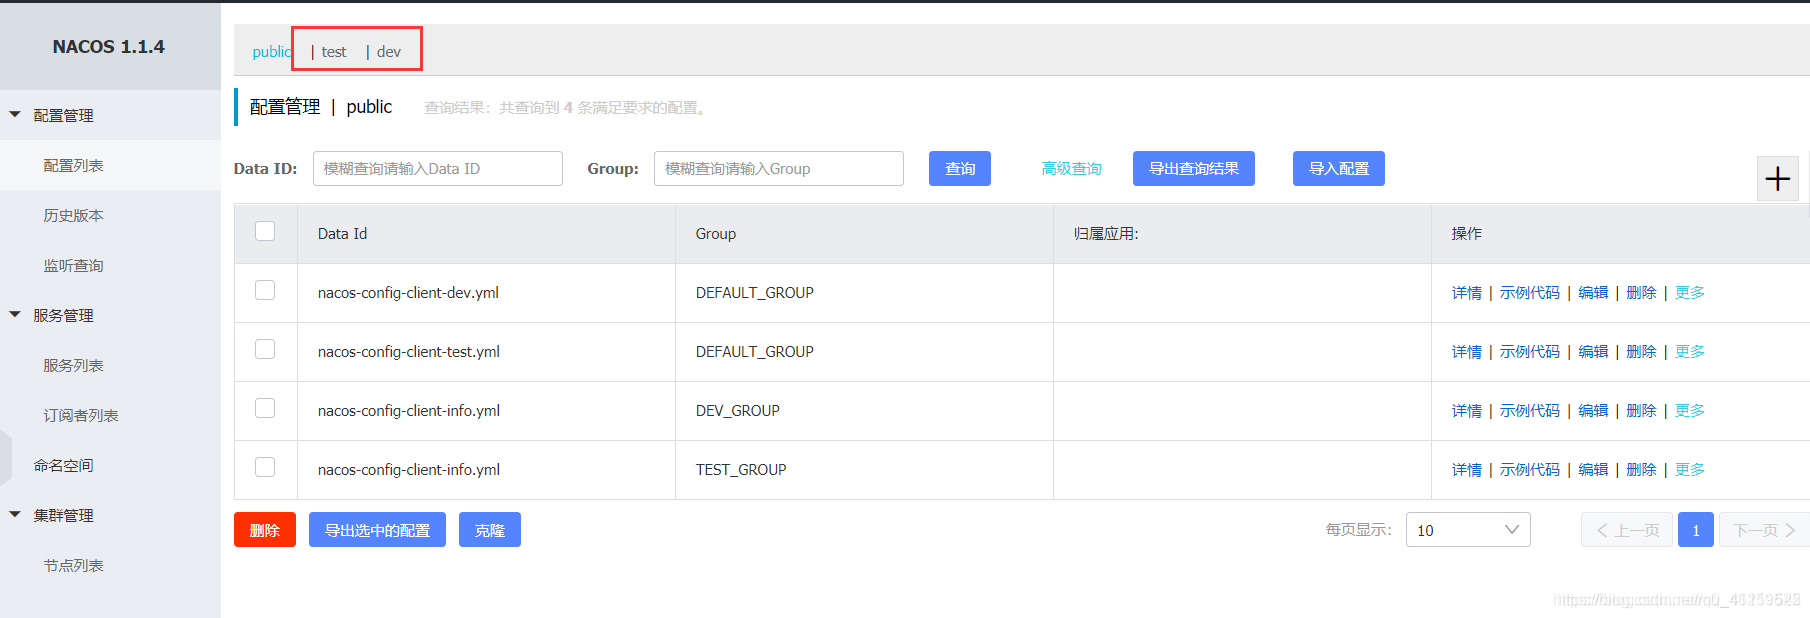
3. Nacos作爲設定中心-分類設定 介紹
Nacos的圖形化管理介面
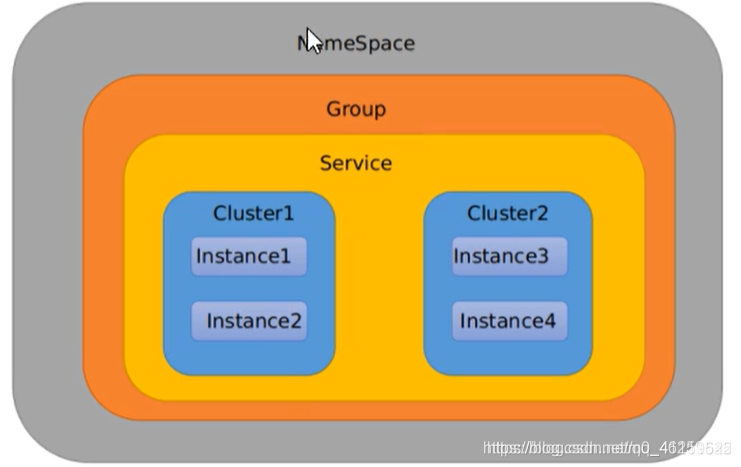
Namespace + Group + Data ID三者關係?爲什麼這麼設計?
是什麼?
類似Java中的package名和類名
最外層的namespace是可以用於區分部署環境的,Group和DataID邏輯上區分兩個目標物件
三者情況
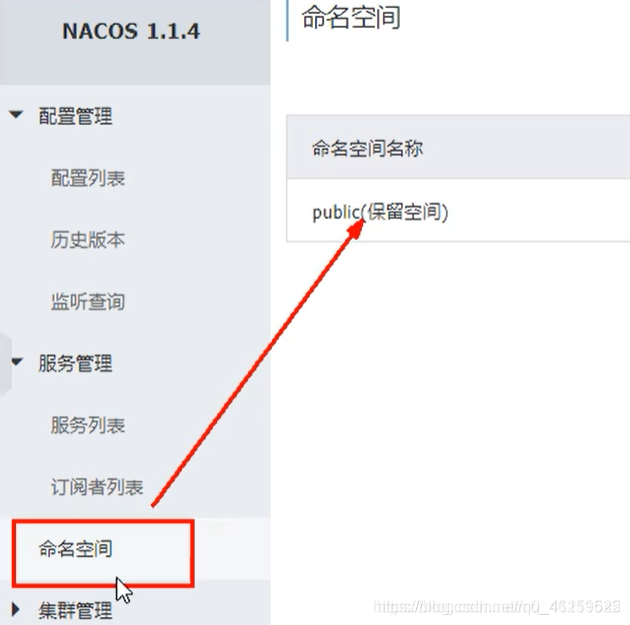
預設情況:
Namespace=public,Group=DEFAULT_GROUP,預設Cluster是DEFAULT
Nacos預設的名稱空間是public,Namespace主要用來實現隔離
比方說我們現在有三個環境:開發、測試、生產環境,我們就可以建立三個Namespace,不同的Namespace之間是隔離的。
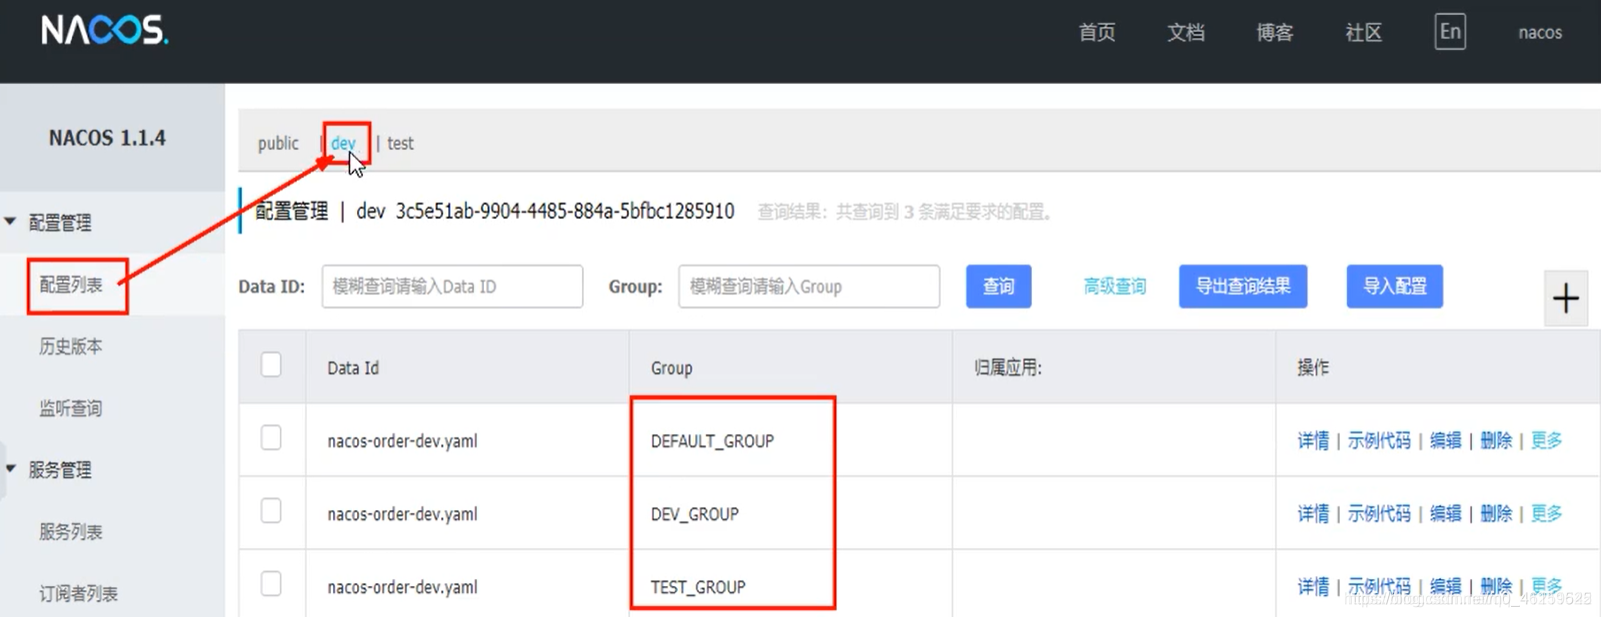
Group預設是DEFAULT_GROUP,Group可以把不同的微服務劃分到同一個分組裏面去
Service就是微服務,一個Service可以包含多個Cluster(叢集),Nacos預設Cluster是DEFAULT,Cluster是對指定微服務的一個虛擬劃分
比方說爲了容災,將Service微服務分別部署在了杭州機房和廣州機房,這時就可以給杭州機房的Service微服務起一個叢集名稱(HZ)給廣州機房的Service微服務起一個叢集名稱(GZ),還可以儘量讓同一個機房的微服務互相呼叫,以提升效能。
最後是Instance,就是微服務的範例。
三種方案載入設定
- DataID方案設定:指定spring.profile.active和組態檔的DataID來使不同環境下讀取不同的設定
預設空間 + 預設分組 + 新建dev和test兩個DataID
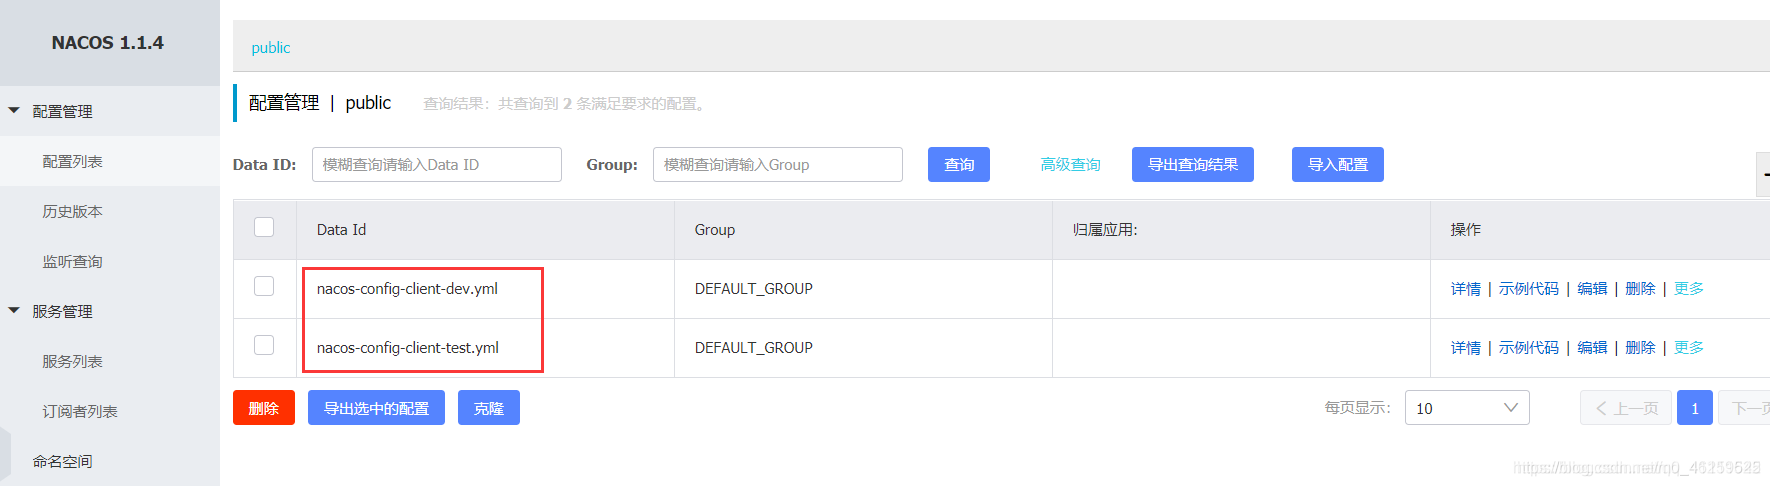
通過spring.profile.active屬性就能進行多環境下組態檔的讀取
存取測試成功,也是支援動態重新整理的
- Group方案:通過Group實現環境區分
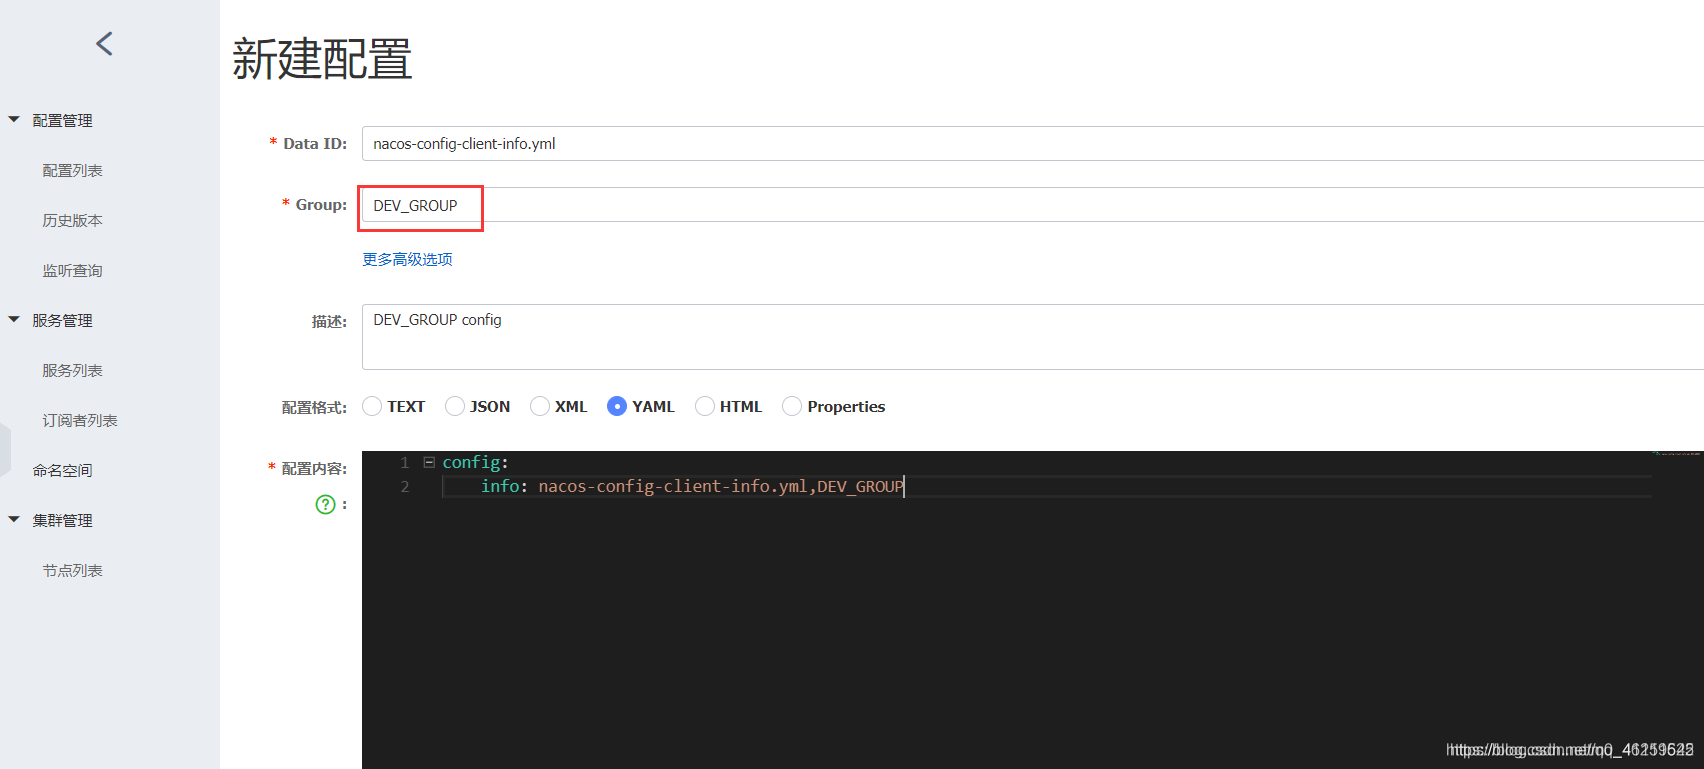
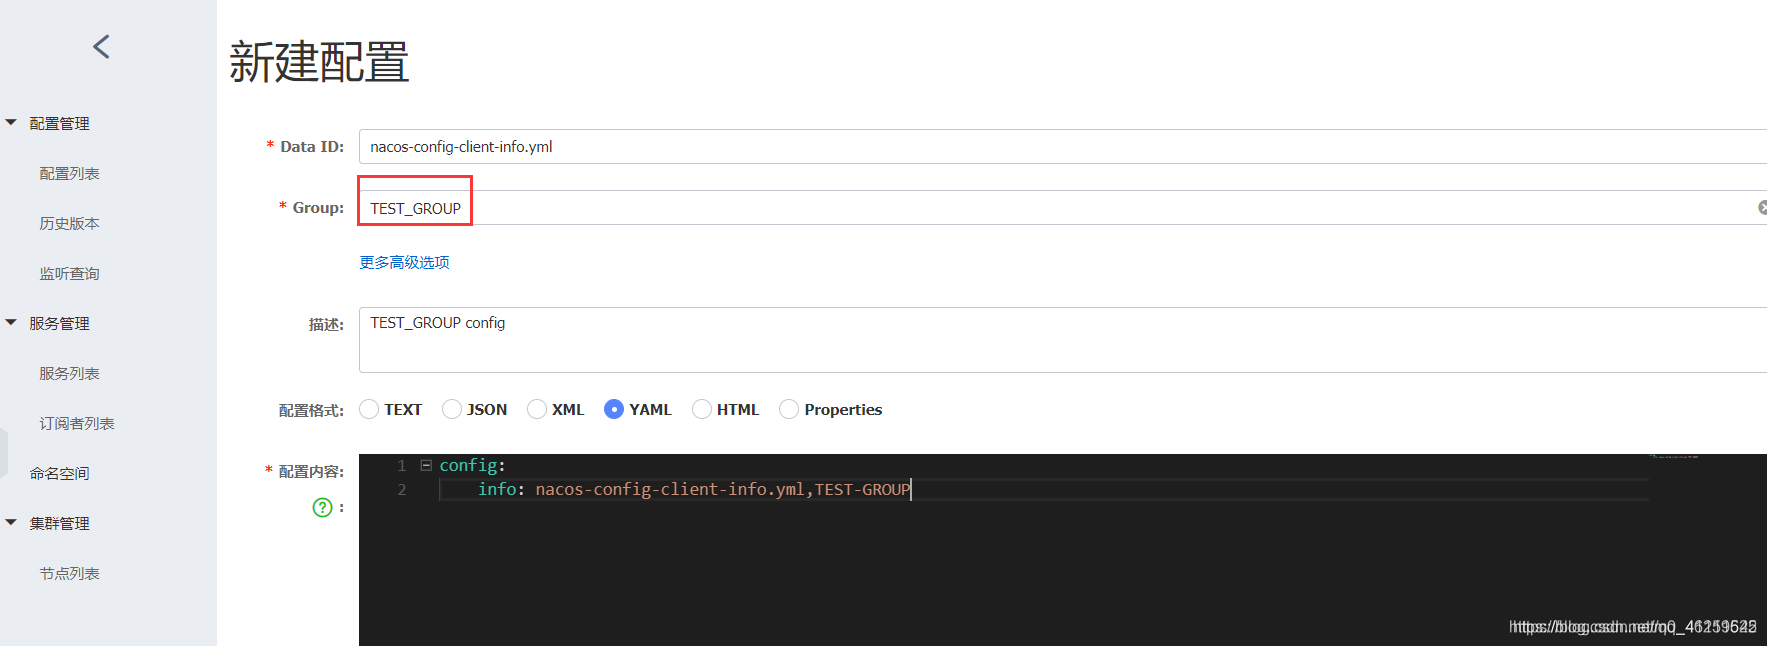
bootstrap 和 application設定修改

測試:

3.Namespace方案:
新建dev/test的Namespace
回到設定管理-設定列表檢視
按照域名設定填寫
bootstrap.yml
測試:

Nacos 叢集和持久化
叢集
官網:https://nacos.io/zh-cn/docs/cluster-mode-quick-start.html
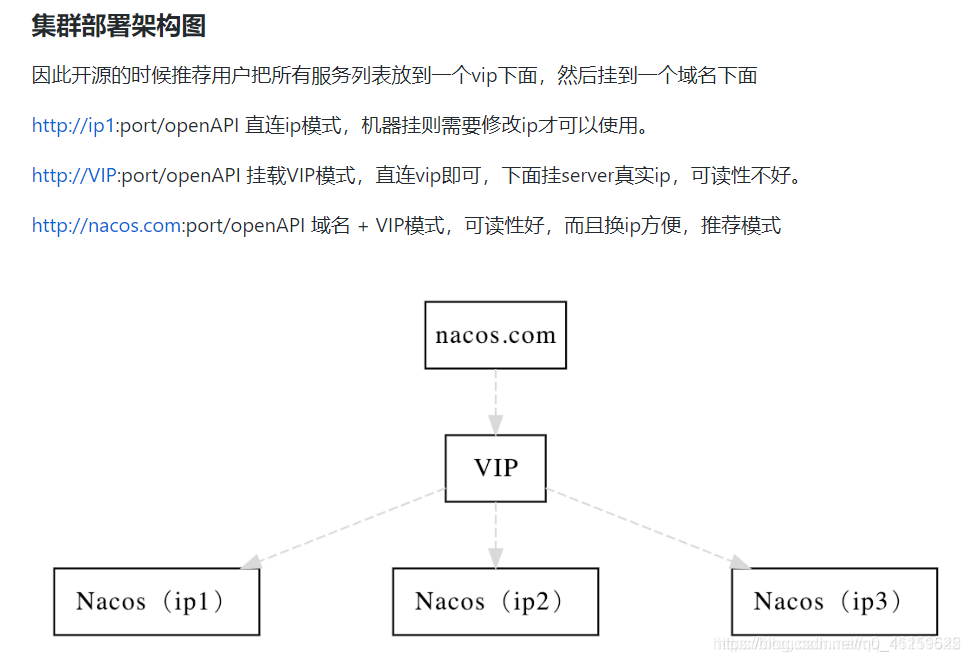
上圖翻譯一下:
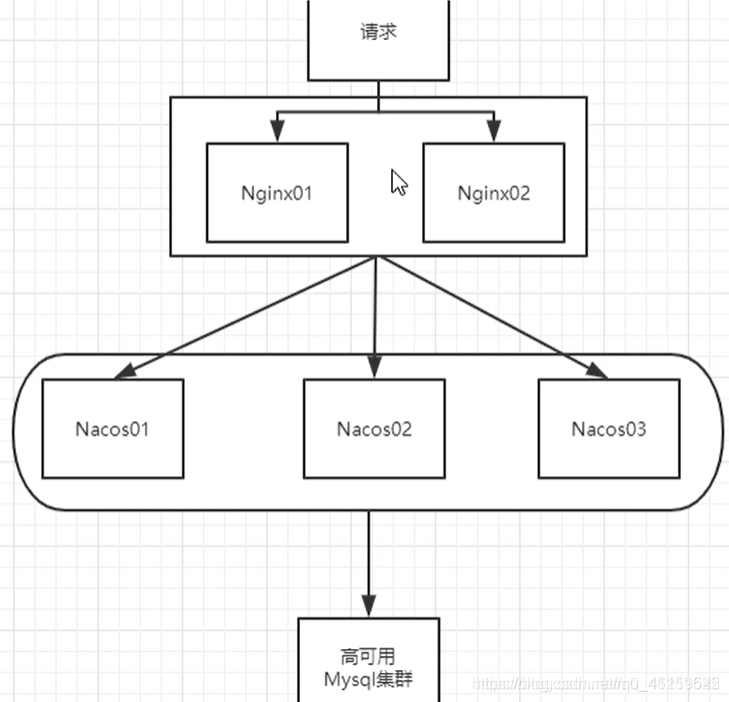
預設Nacos使用嵌入式數據庫(derby)實現數據的儲存。所以,如果啓動多個預設設定下的Nacos節點,數據儲存是存在一致性問題的。
爲了解決這個問題,Nacos採用了集中式儲存的方式來支援叢集化部署,目前只支援Mysql的儲存。
Nacos支援三種部署模式
https://nacos.io/zh-cn/docs/deployment.html
- 單機模式:用於測試和單機試用
- 叢集模式:用於生產環境,確保高可用
- 多叢集模式:用於多數據中心場景
持久化
Nacos預設自帶的是嵌入式數據庫derby
derby到mysql切換設定步驟:
- nacos-server-1.1.4\nacos\conf 目錄下執行sql指令碼 nacos-mysql.sql
- nacos-server-1.1.4\nacos\conf 目錄下找到application.properties,新增設定:
spring.datasource.platform=mysql
db.num=1
db.url.0=jdbc:mysql://127.0.0.1:3306/nacos_config?characterEncoding=utf8&connectTimeout=1000&socketTimeout=3000&autoReconnect=true
db.user=xxx
db.password=xxx

Sentinel
介紹
代替了Hystrix
官網:https://github.com/alibaba/Sentinel
下載地址:https://github.com/alibaba/Sentinel/releases
Sentinel分爲兩個部分:
核心庫(Java用戶端)不依賴任何框架/庫,能夠執行於所有Java執行時環境,同時對Dubbo/Spring Cloud等框架也有較好的支援。
控制檯(Dashboard)基於SpringBoot開發,打包後可以直接執行,不需要額外的Tomcat等應用容器。
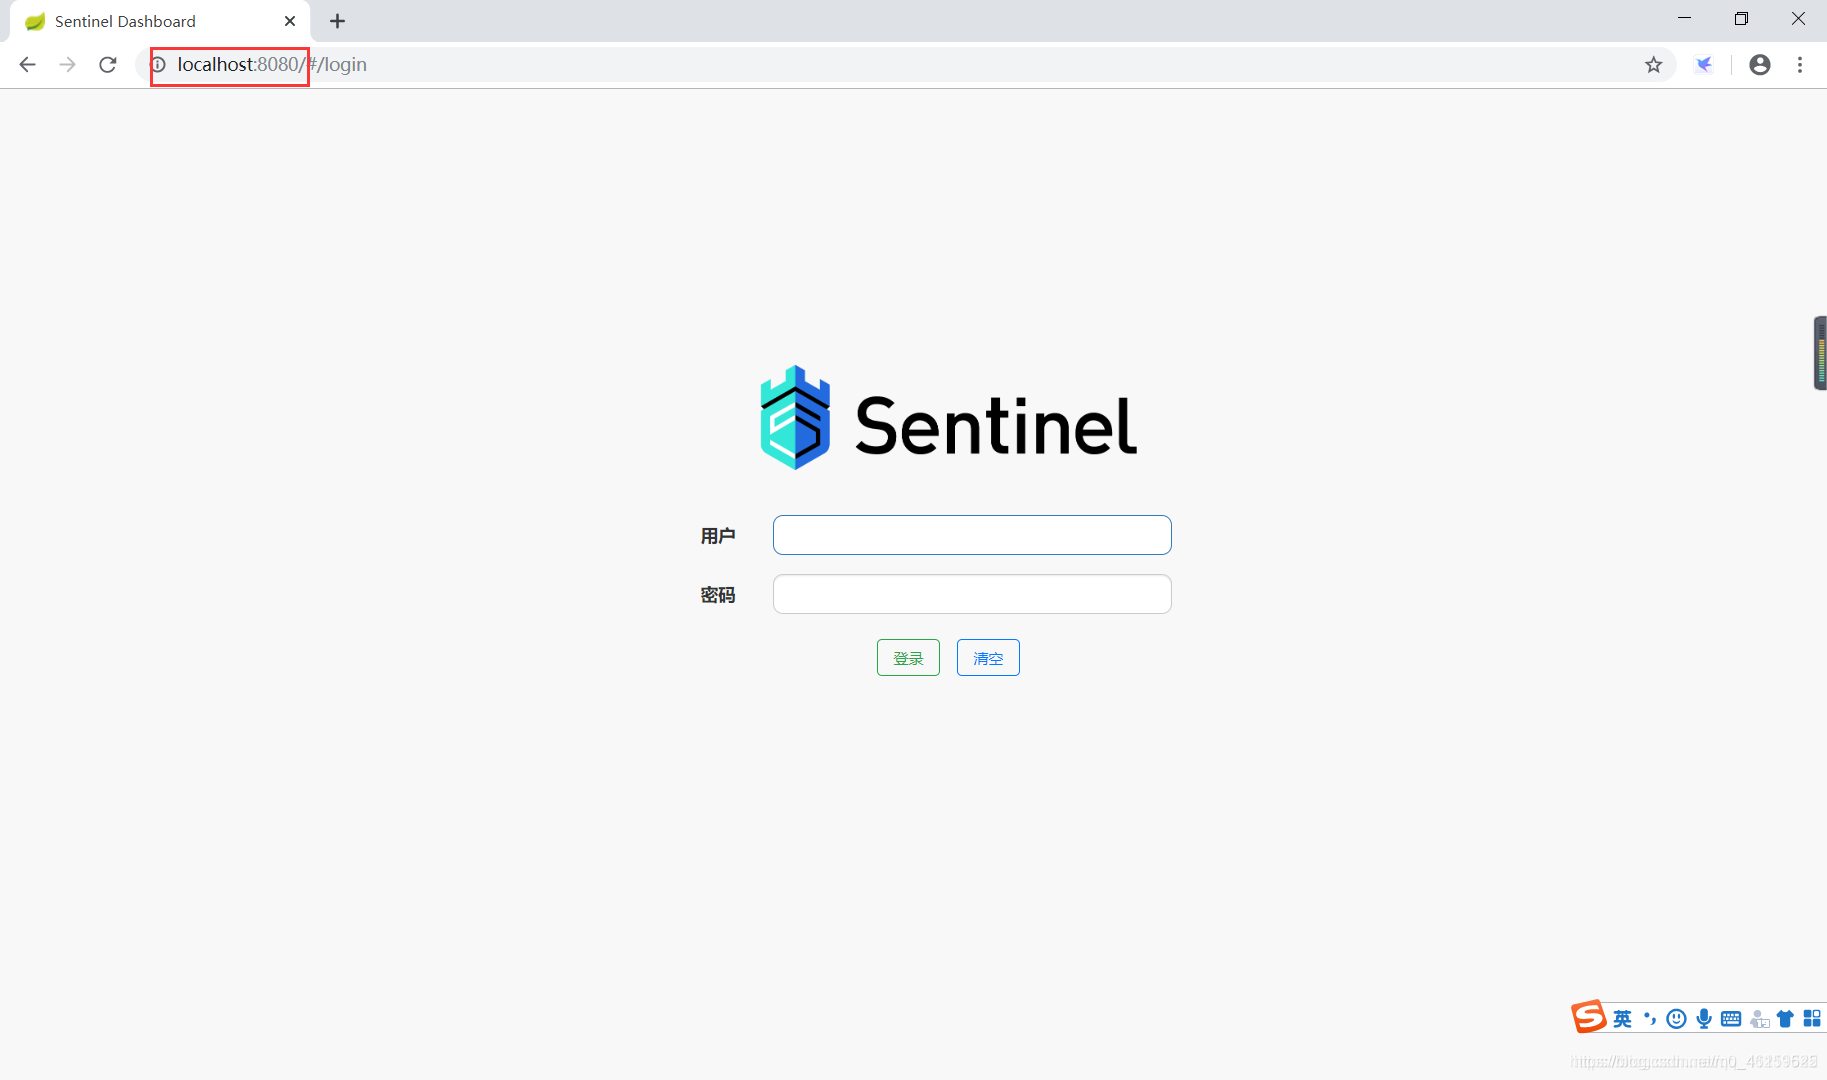
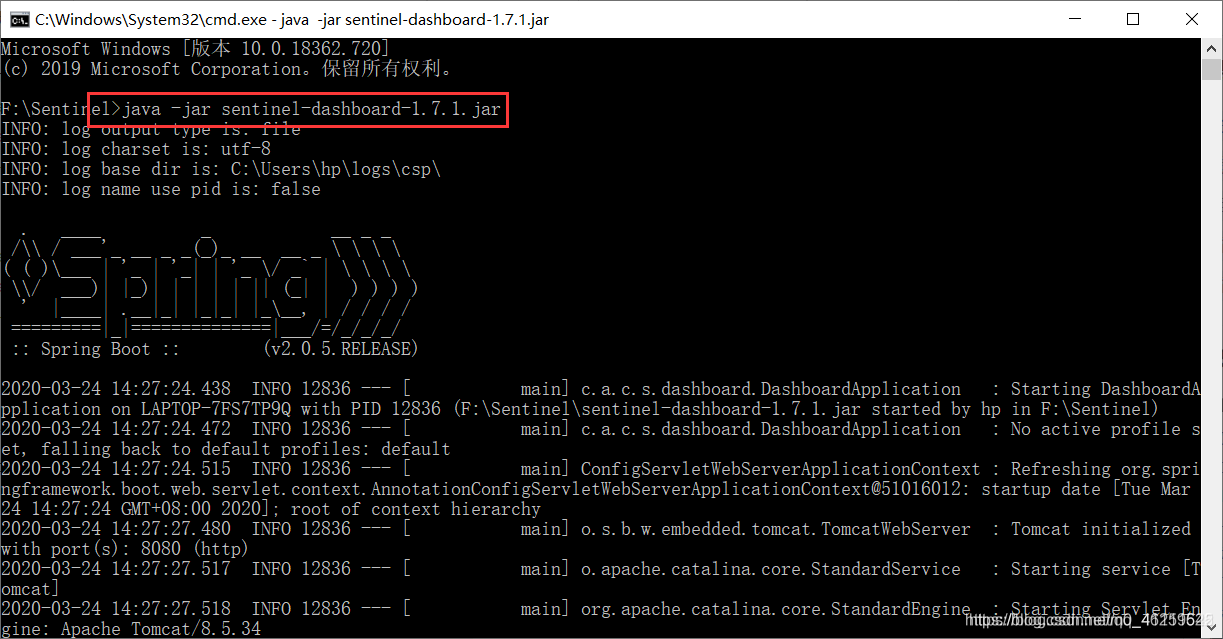
安裝步驟:
- 下載到本地sentinel-dashboard-1.7.0.jar
- 執行命令:java -jar sentinel-dashboard-1.7.0.jar
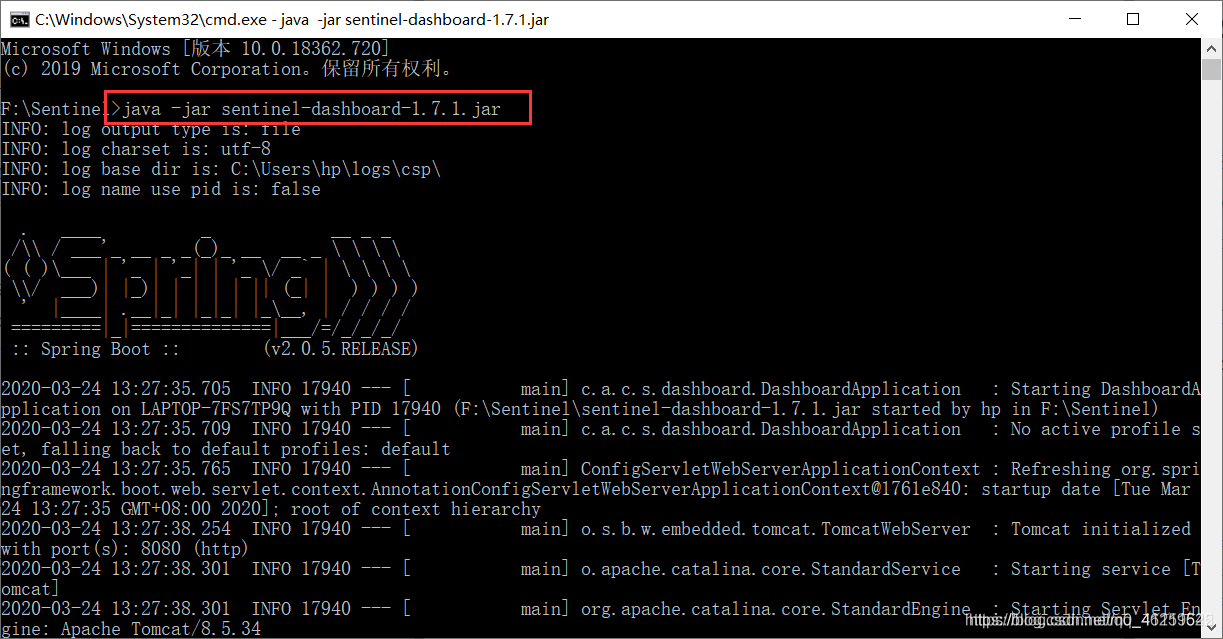
- 存取sentinel管理介面,登錄名密碼都爲 sentinel
Sentinel 初始化監控
1.啓動服務註冊中心 Nacos8848
2.新建module cloudalibaba-sentinel-service8401
- 注入依賴
<!--pom.xml依賴-->
<dependencies>
    <!--springcloud alibaba nacos-->
    <dependency>
    	<groupId>com.alibaba.cloud</groupId>
    	<artifactId>spring-cloud-starter-alibaba-nacos-discovery</artifactId>
    </dependency>
    <!--springcloud alibaba sentinel-datasource-nacos 後續做持久化用到-->
    <dependency>
        <groupId>com.alibaba.csp</groupId>
    	<artifactId>sentinel-datasource-nacos</artifactId>
    </dependency>
    <!--springcloud alibaba sentinel-->
    <dependency>
        <groupId>com.alibaba.cloud</groupId>
    	<artifactId>spring-cloud-starter-alibaba-sentinel</artifactId>
    </dependency>
    <dependency>
        <groupId>org.springframework.cloud</groupId>
    	<artifactId>spring-cloud-starter-openfeign</artifactId>
    </dependency>
    <dependency>
        <groupId>org.springframework.boot</groupId>
    	<artifactId>spring-boot-starter-web</artifactId>
    </dependency>
    <dependency>
        <groupId>org.springframework.boot</groupId>
    	<artifactId>spring-boot-starter-actuator</artifactId>
    </dependency>
    <dependency>
        <groupId>org.projectlombok</groupId>
        <artifactId>lombok</artifactId>
    	<optional>true</optional>
    </dependency>
    <dependency>
        <groupId>org.springframework.boot</groupId>
        <artifactId>spring-boot-starter-test</artifactId>
    	<scope>test</scope>
    </dependency>
    <dependency>
        <groupId>com.atguigu.springcloud</groupId>
        <artifactId>cloud-api-commons</artifactId>
    	<version>${project.version}</version>
	</dependency>
</dependencies>
- 設定 ymal 檔案
#yml設定
server:
  port: 8401

spring:
  application:
    name: cloudalibaba-sentinel-service
  cloud:
    nacos:
      discovery:
        #Nacos服務註冊中心地址
        server-addr: localhost:8848
    sentinel:
      transport:
        #設定sentinel dashboard地址
        dashboard: localhost:8080
        #預設8719埠,假如被佔用會自動從8719開始依次+1掃描,直至找到未被佔用的埠
        port: 8719

management:
  endpoints:
    web:
      exposure:
        include: '*'
- 主啓動類
//主啓動
package com.atguigu.springcloud.alibaba;
import org.springframework.boot.SpringApplication;
import org.springframework.boot.autoconfigure.SpringBootApplication;
import org.springframework.cloud.client.discovery.EnableDiscoveryClient;
@SpringBootApplication
@EnableDiscoveryClient
public class MainApp8401 {
    public static void main(String[] args) {
        SpringApplication.run(MainApp8401.class,args);
    }
}
- 業務程式碼
//業務類controller
package com.atguigu.springcloud.alibaba.controller;
import org.springframework.web.bind.annotation.GetMapping;
import org.springframework.web.bind.annotation.RestController;
@RestController
public class FlowLimitController {
    @GetMapping("/testA")
    public String testA(){
        return "--------testA";
    }

    @GetMapping("/testB")
    public String testB(){
        return "--------testB";
    }
}
3.啓動sentinel8080
java -jar sentinel-dashboard-1.7.x.jar
4.啓動8401微服務檢視sentinel控制檯
先執行一次請求
然後開啓sentinel監控:
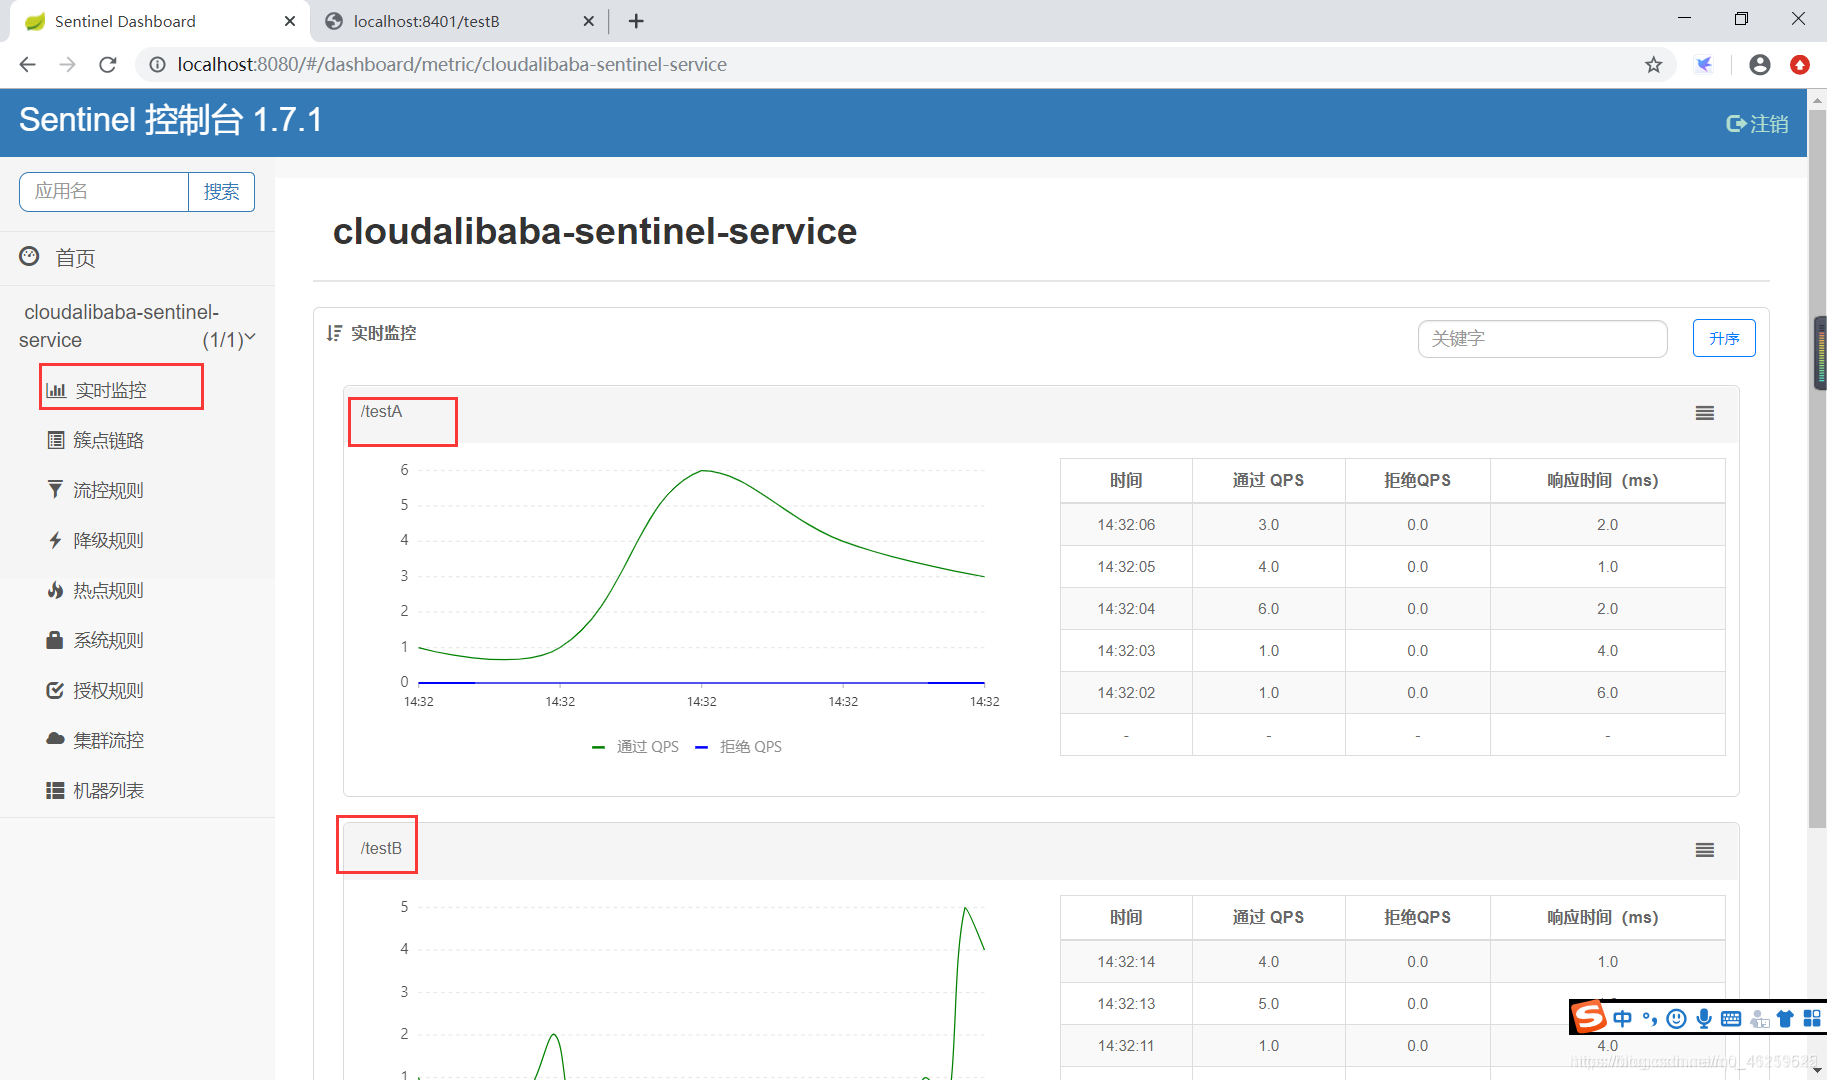
這樣sentinel8080就在監控微服務8401了。
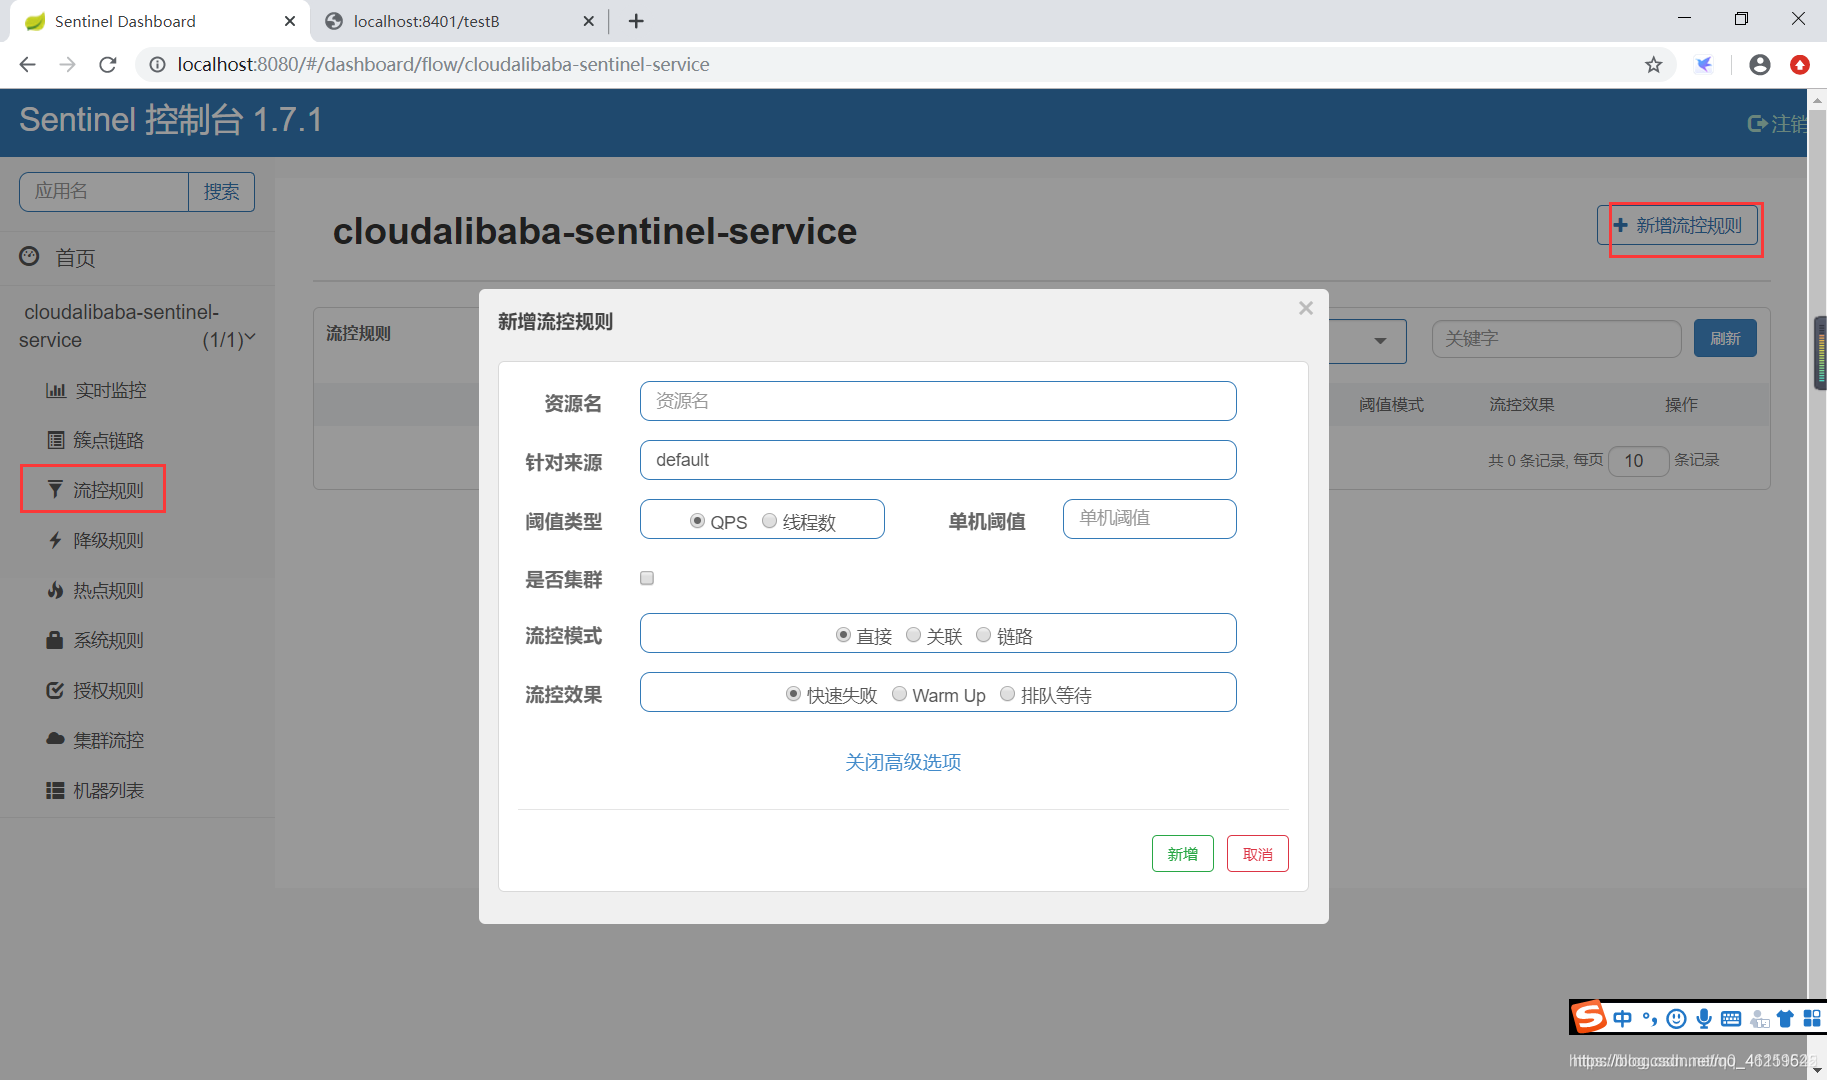
Sentinel 流控
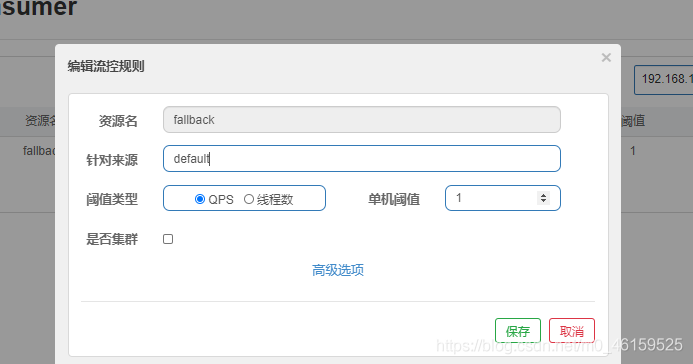
流控規則基本介紹:
-
資源名:唯一名稱,預設請求路徑
-
針對來源:Sentinel可以針對呼叫者進行限流,填寫微服務名,預設default(不區分來源)
-
閾值型別/單機閾值:
- QPS(每秒鐘的請求數量):當呼叫該api的QPS達到閾值的時候,進行限流
- 執行緒數:當呼叫該api的執行緒數達到閾值的時候,進行限流
-
是否叢集:(不)需要叢集
-
流控模式:
- 直接:api達到限流條件時,直接限流
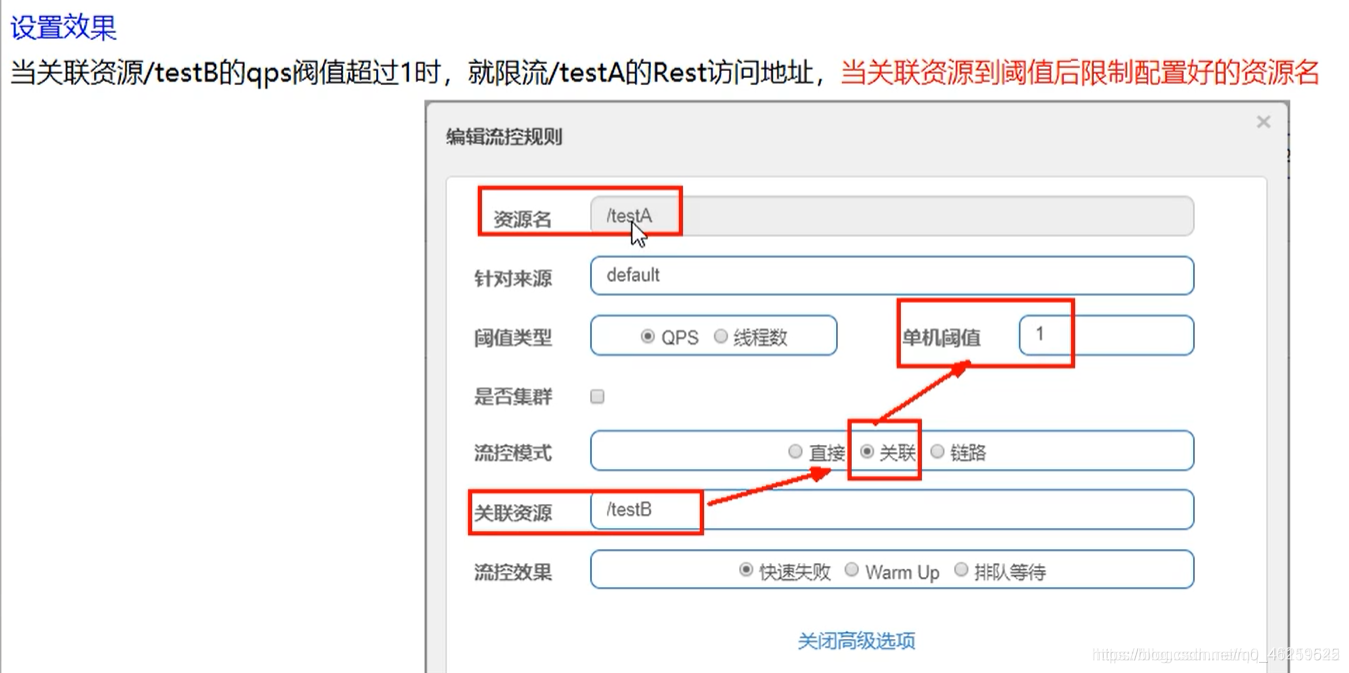
- 關聯:當關聯的資源達到閾值時,就限流自己
- 鏈路:只記錄指定鏈路上的流量(指定資源從入口資源進來的流量,如果達到閾值,就進行限流)
-
流控效果:
- 快速失敗:直接失敗,拋異常
- Warm Up:根據codeFactor(冷載入因子,預設3)的值,從閾值/codeFactor,經過預熱時長,才達到設定的QPS閾值。
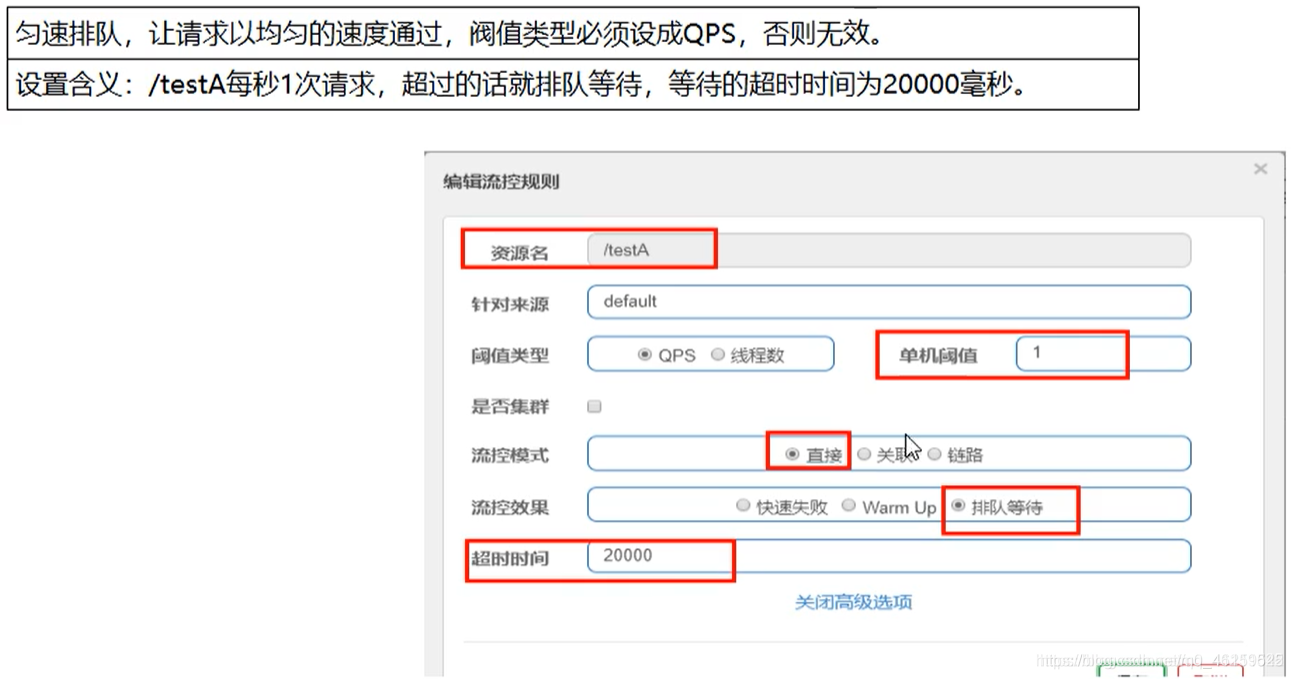
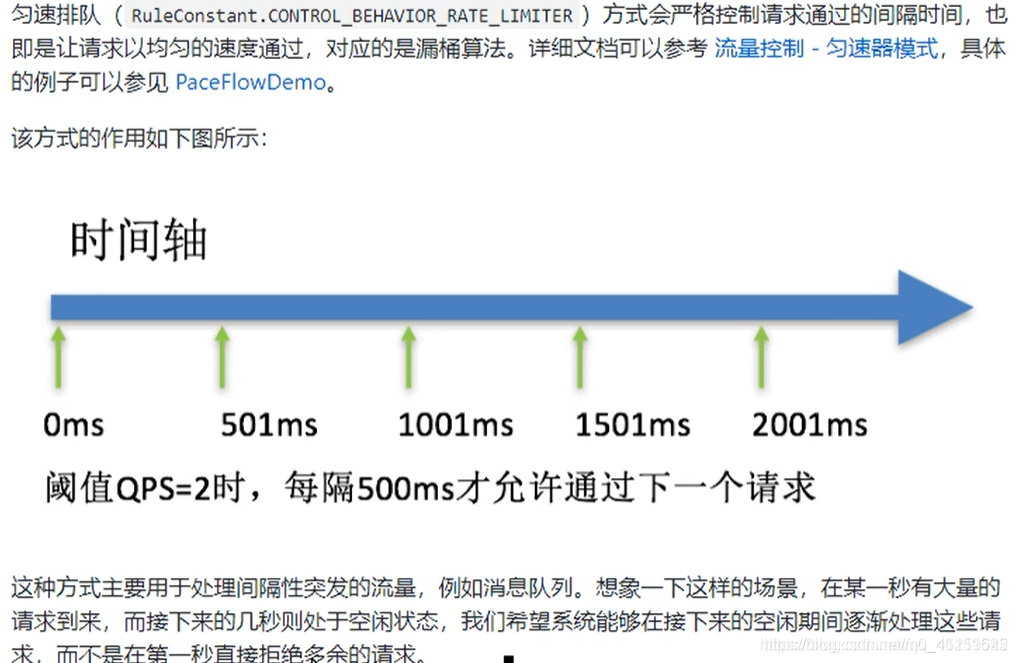
- 排隊等待:勻速排隊,讓請求以勻速的速度通過,閾值型別必須設定爲QPS。否則無效。
流控模式——直接 快速失敗
QPS:
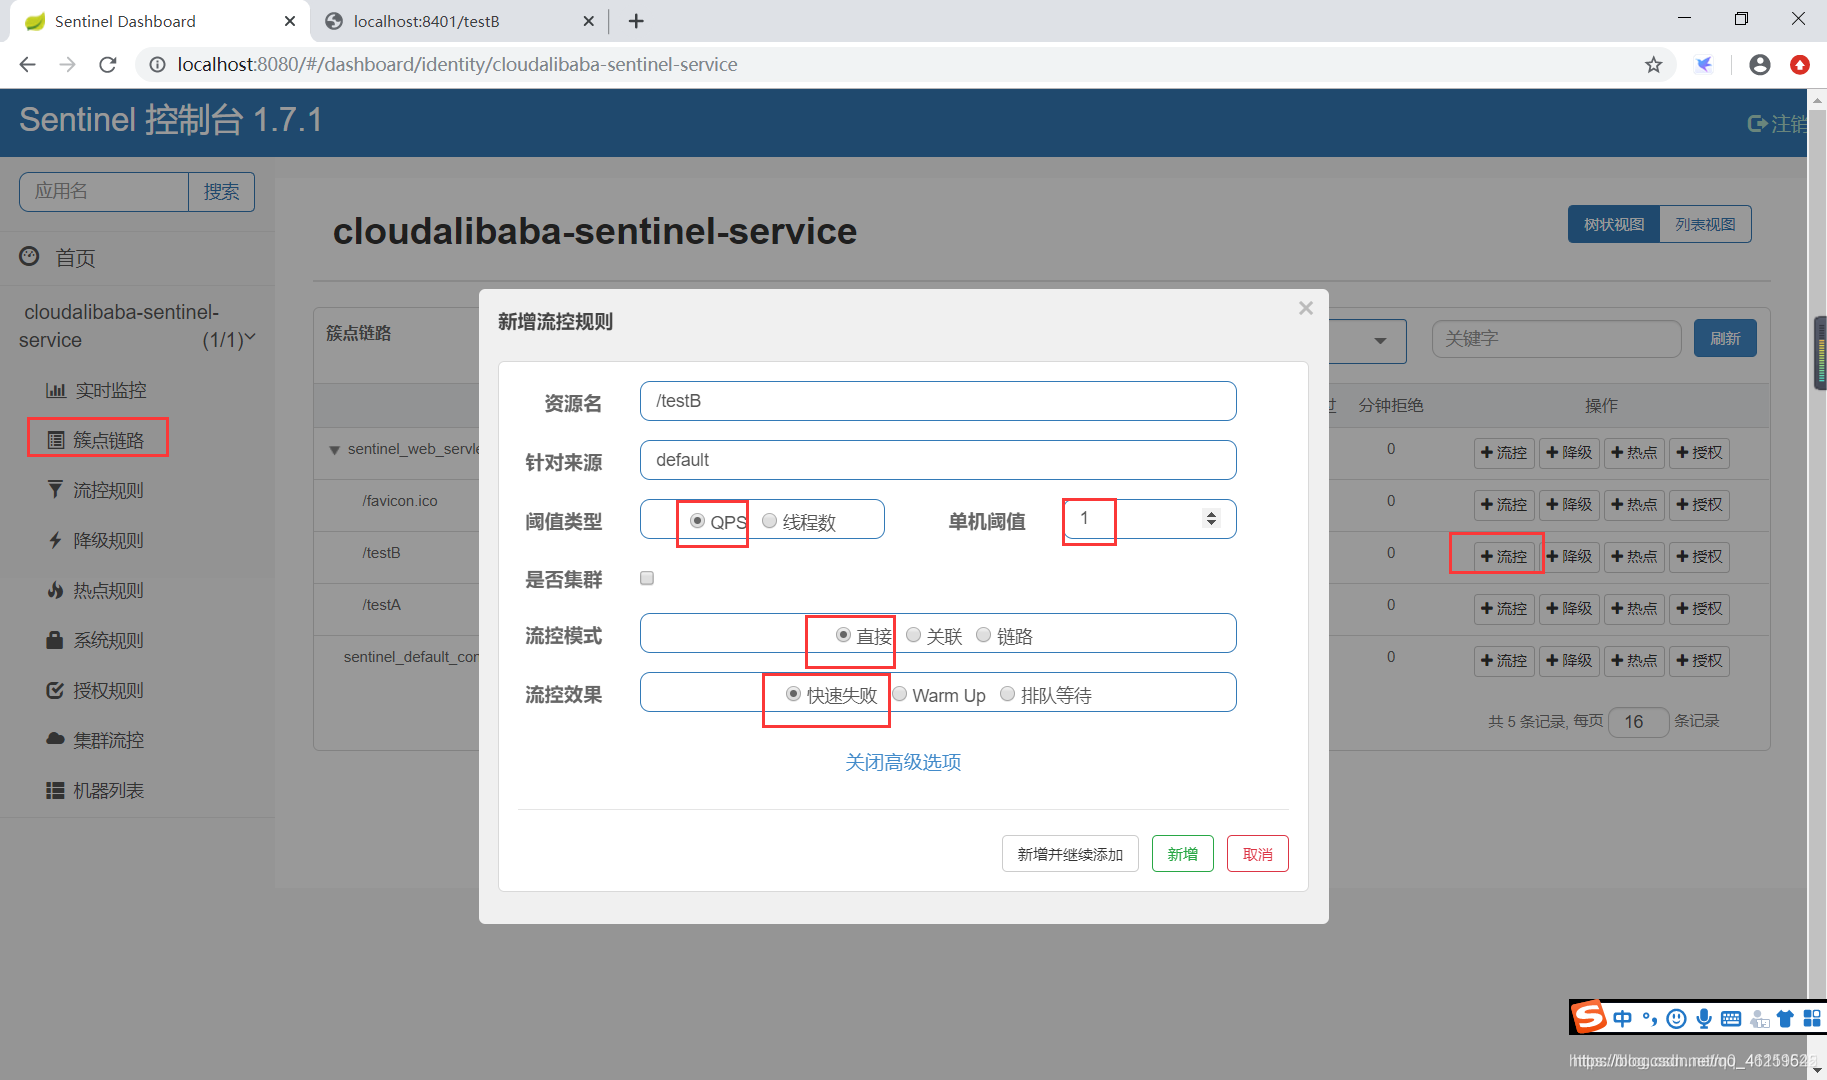
每秒內請求超過1次報錯,這就是限流了。
執行緒數:
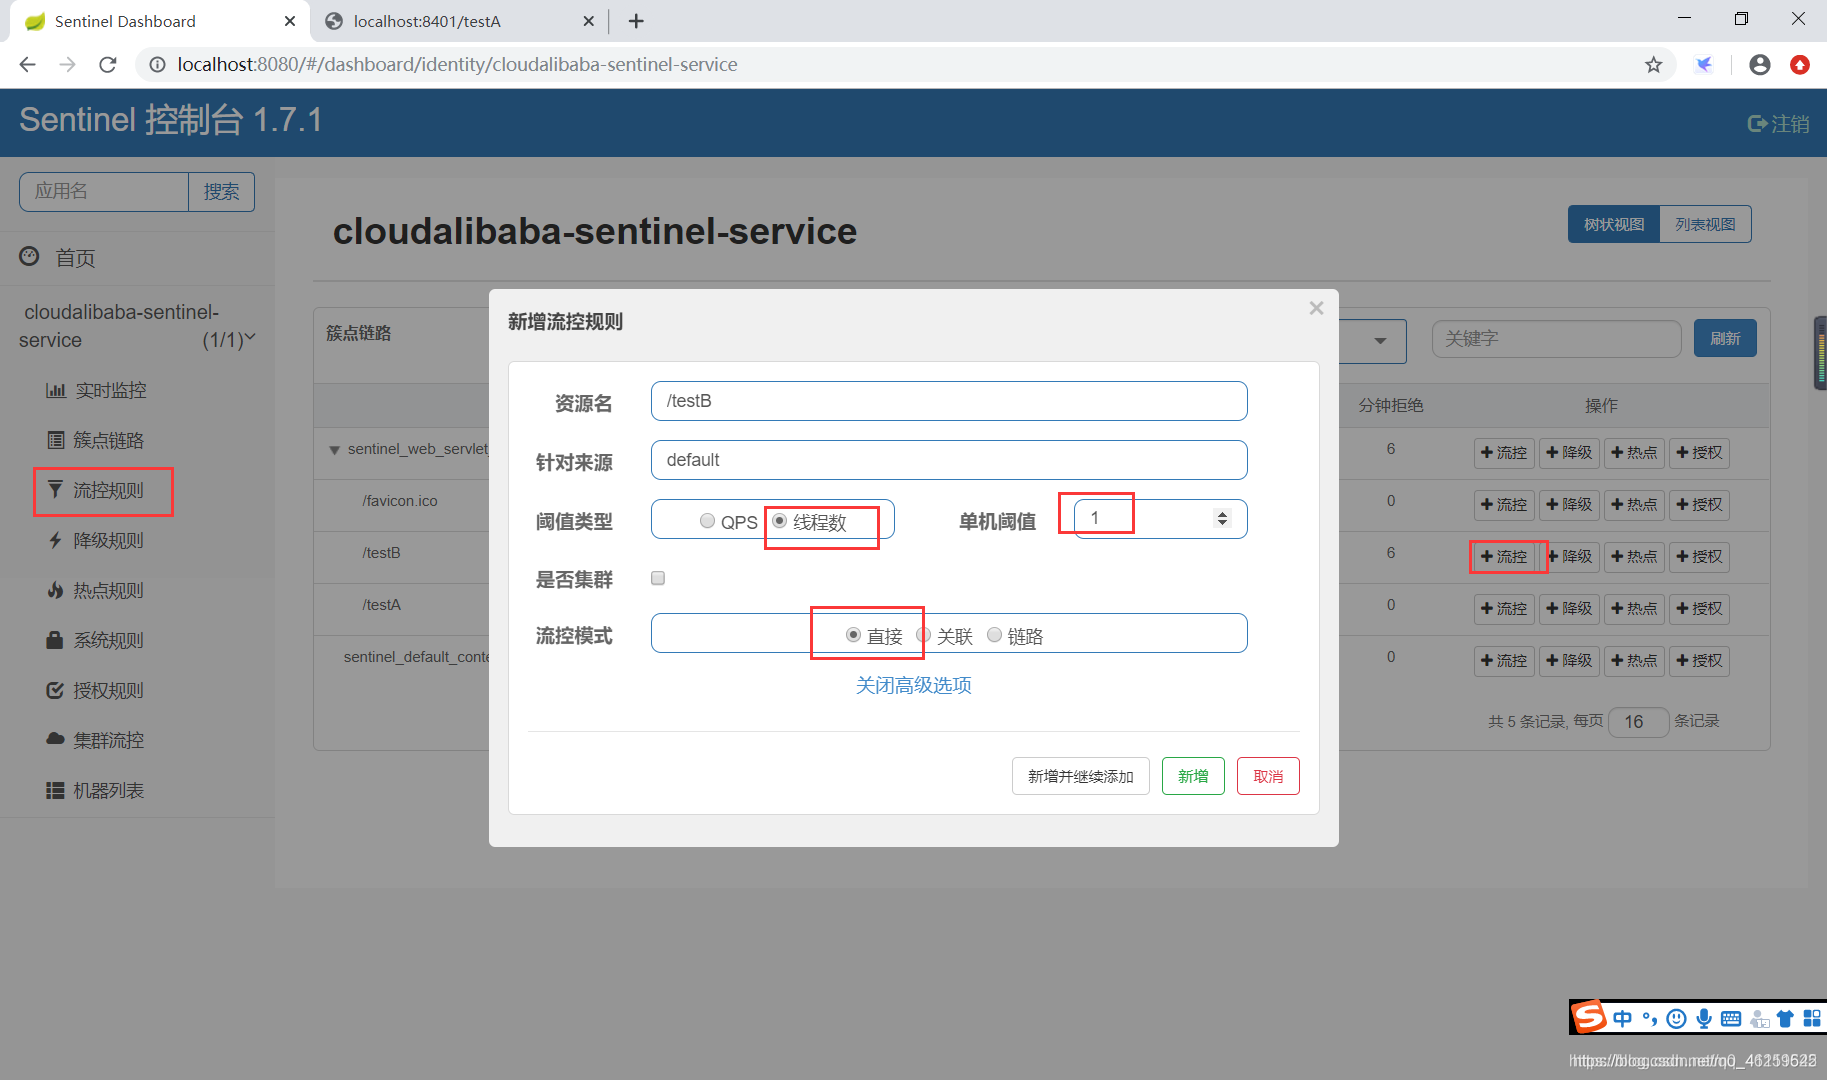
當呼叫該api的執行緒數達到閾值的時候,進行限流
流控模式——關聯 快速失敗
流控效果——Warm Up
Warm Up方式,即預熱/冷啓動方式。當系統長期處於低水位的情況下,當流量突然增加時,直接把系統拉昇到高水位可能瞬間把系統壓垮。通過「冷啓動」,讓通過的流量緩慢增加,在一定時間內逐漸增加到閾值上限,給冷系統一個預熱的時間,避免冷系統被壓垮。
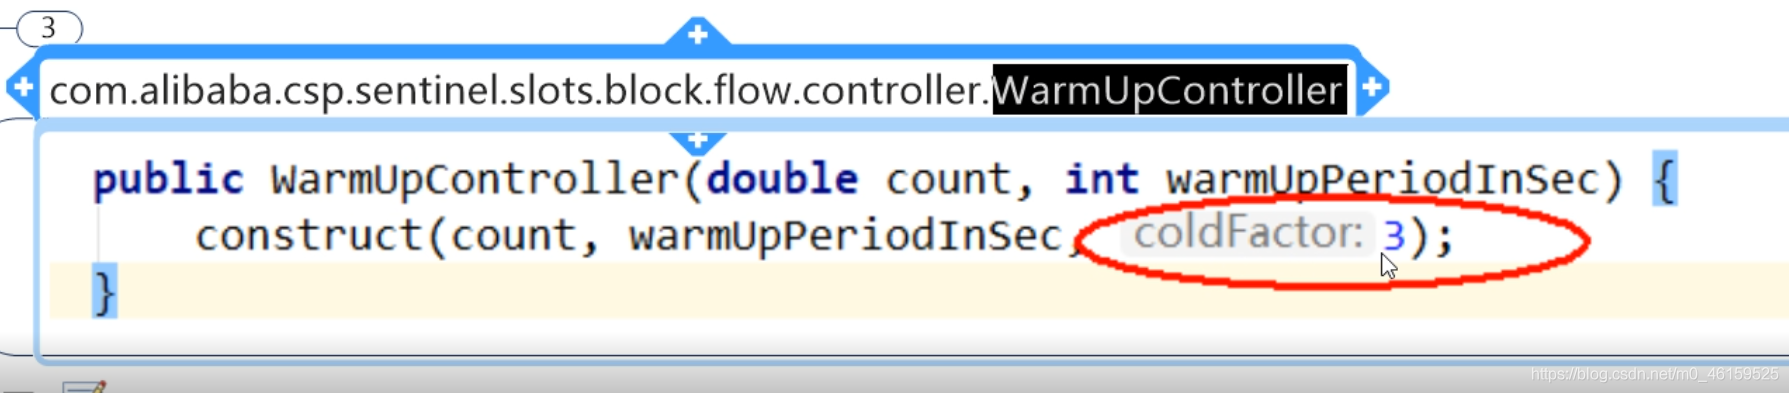
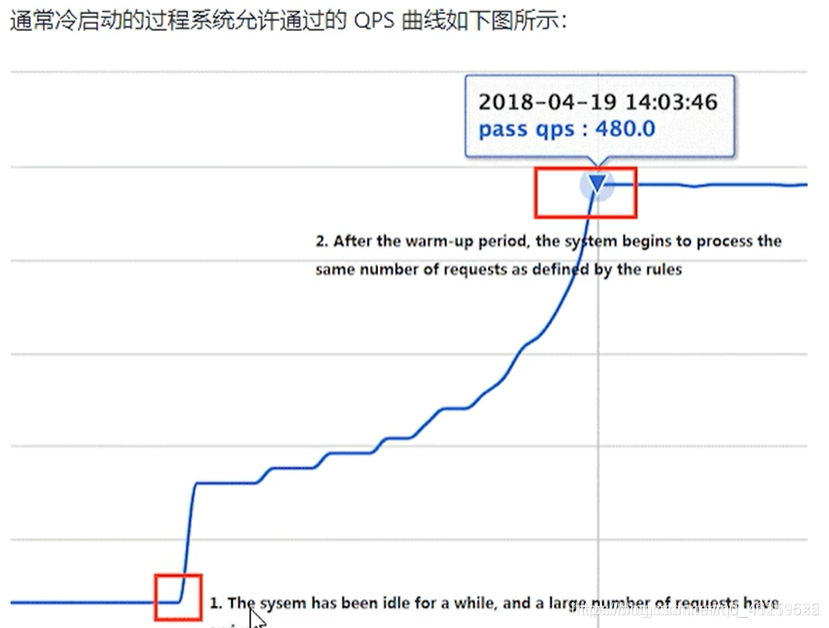 預設coldFactor爲3,即請求QPS從threshold / 3開始,經預熱時長逐漸升至設定的QPS閾值。
秒殺系統在開啓的瞬間,會有很多流量進來,很有可能把系統打死,預熱方式就是爲了保護系統,可慢慢的把流量放進來,慢慢的把閾值增長到設定的閾值。
流控效果——排隊等待
sentinel 熔斷降級
官網地址:https://github.com/alibaba/Sentinel/wiki/%E7%86%94%E6%96%AD%E9%99%8D%E7%BA%A7
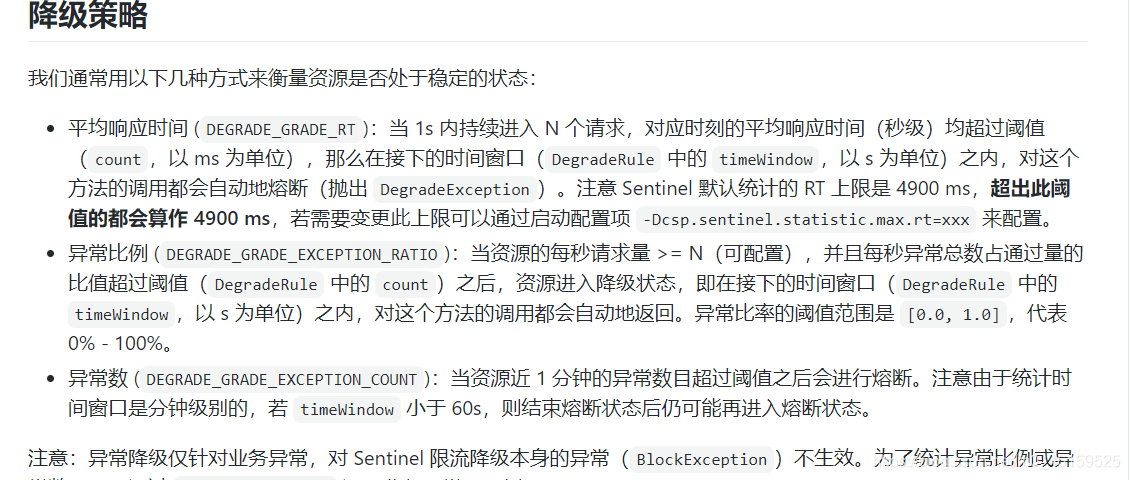
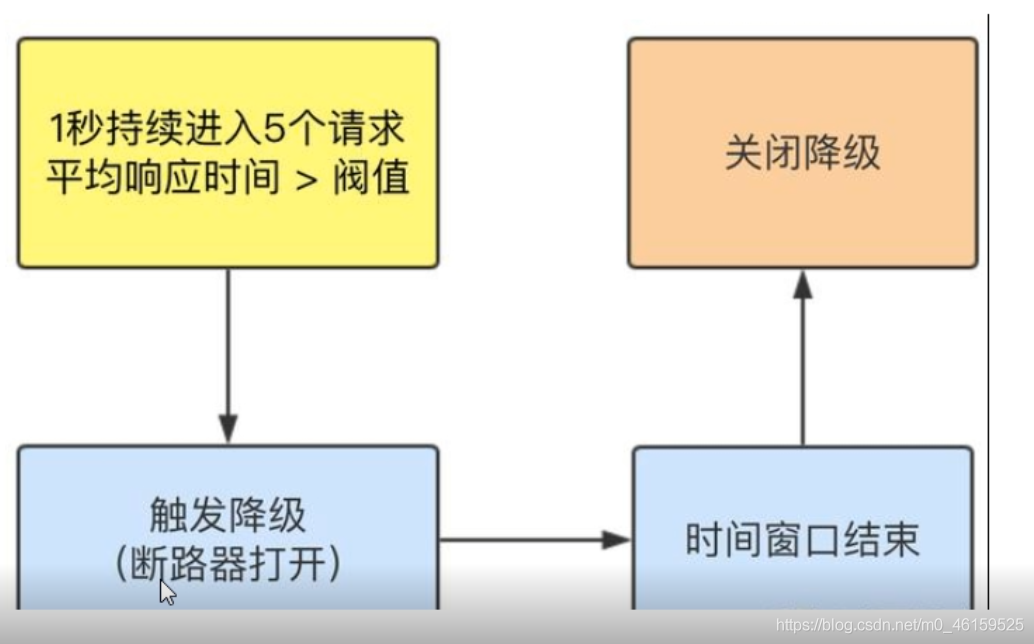
-
RT (平均響應時間,秒級)
平均響應時間超出閾值且在時間視窗內通過的請求>=5, 兩個條件同時滿足後觸發降級視窗期過後關閉斷路器。
RT最大4900 (更大的需要通過-Dcsp.sentinel.statistic.max.rt= XXXX才能 纔能生效) -
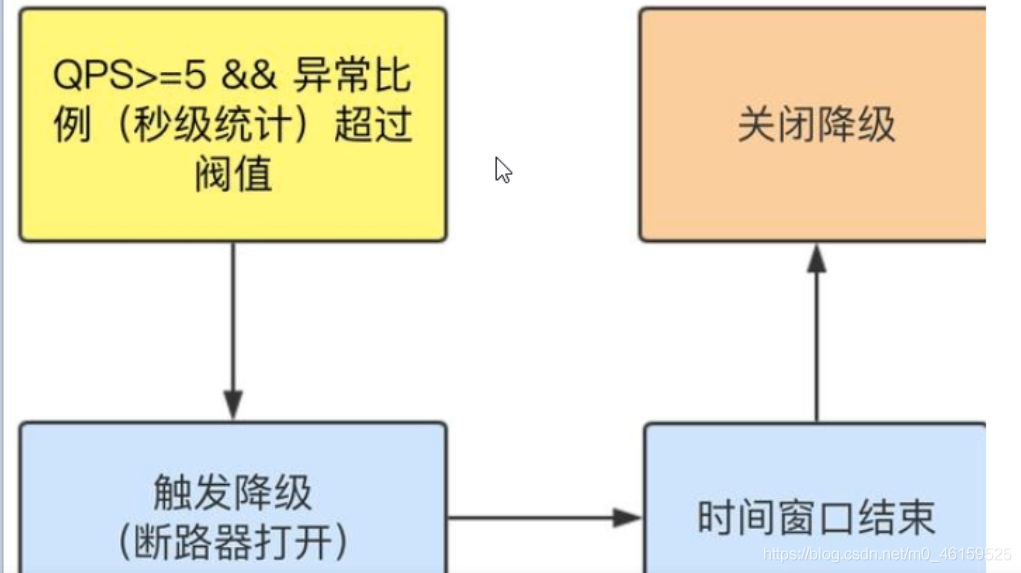
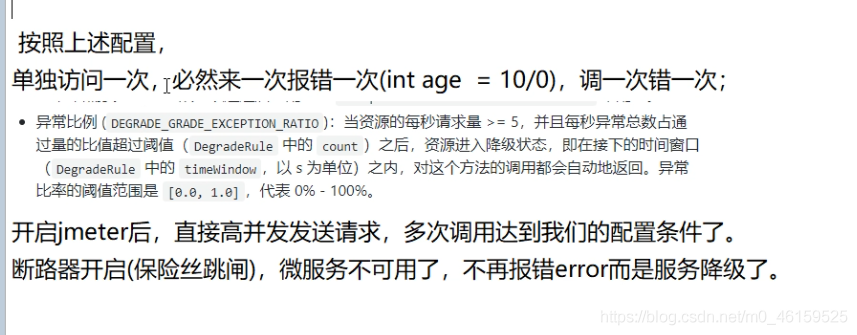
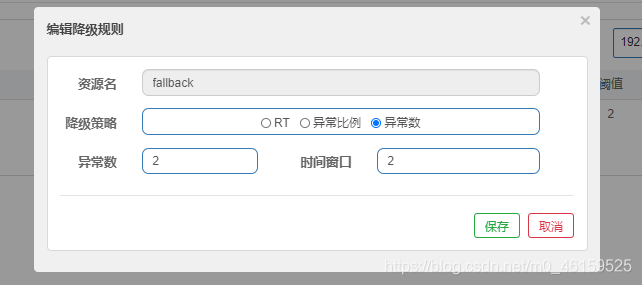
異常比列(秒級)
QPS >= 5且異常比例(秒級統計)超過閾值時,觸發降級;時間窗結束後,關閉降級 I -
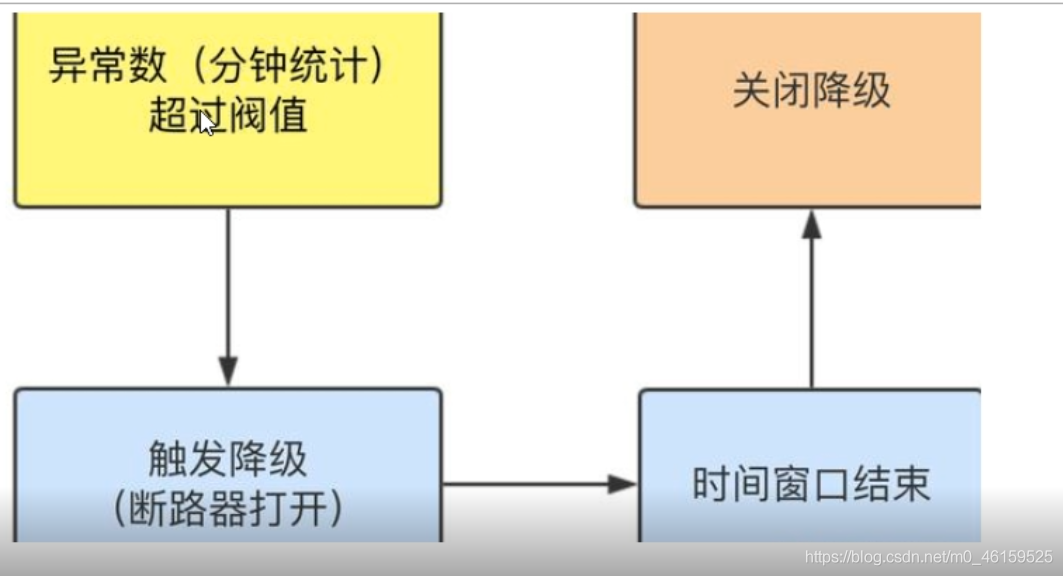
異常數(分鐘級)
異常數(分鐘統計)超過閾值時,觸發降級;時間窗結束後,關閉降級
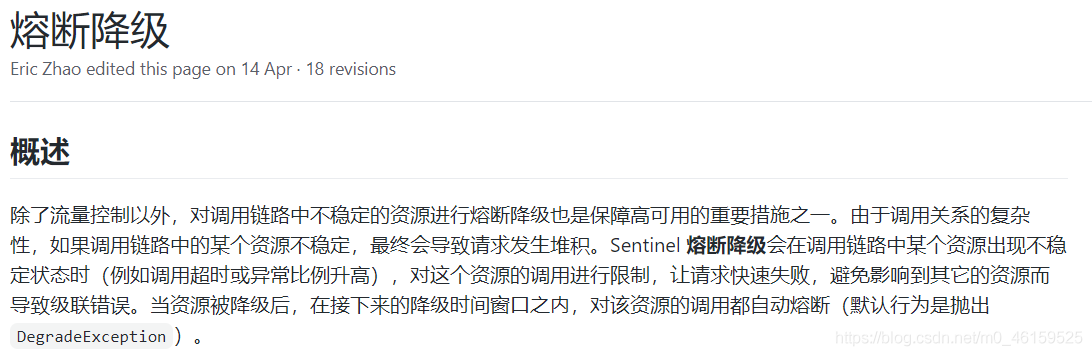
Sentinel熔斷降級會在呼叫鏈路中某個資源出現不穩定狀態時(例如呼叫超時或異常比例升高),對這個資源的呼叫進行限制,讓請求快速失敗,避免影響到其它的資源而導致級聯錯誤。
當資源被降級後,在接下來的降級時間視窗之內,對該資源的呼叫都自動熔斷(預設行爲是拋出DegradeException)。
進一步說明:
Sentinel的斷路器是沒有半開狀態的
Hystrix
- 半開的狀態系統自動去檢測是否請求有異常,
- 沒有異常就關閉斷路器恢復使用,
- 有異常則繼續開啓斷路器不可用。具體可以參考Hystrix
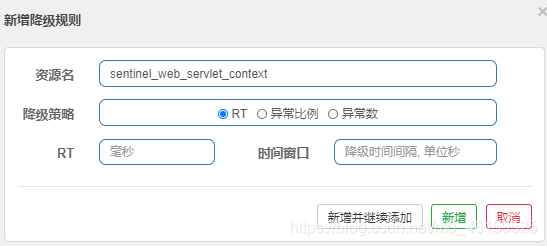
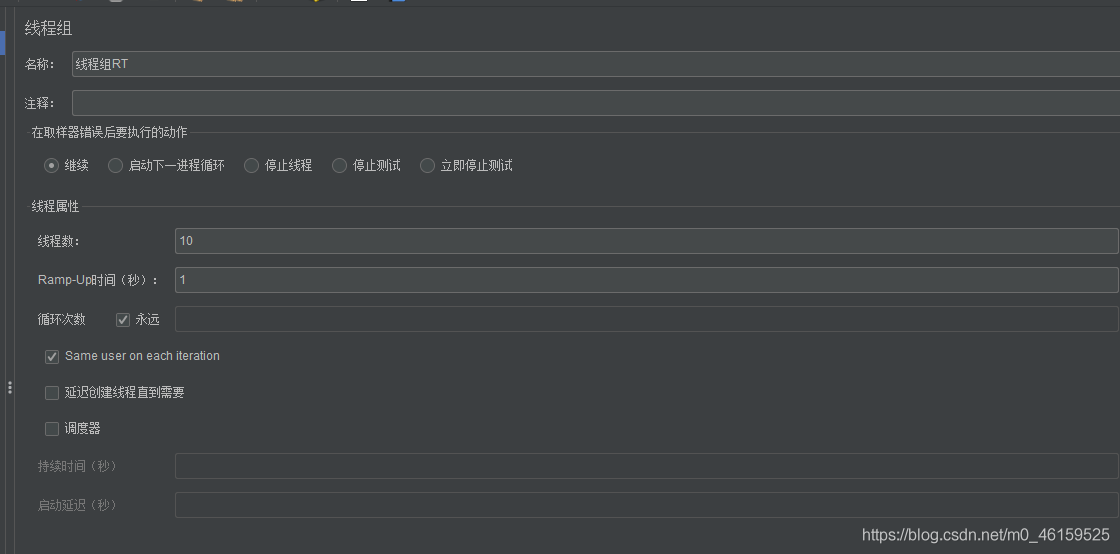
1. RT
兩百毫秒之內響應一次,否則降級熔斷
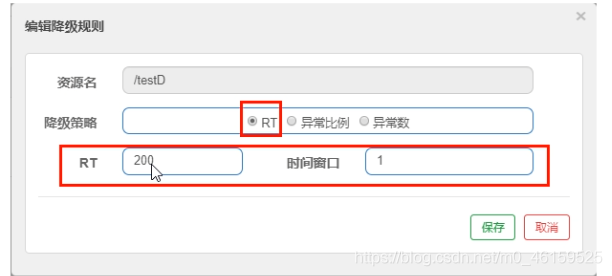
測試程式碼:
@GetMapping("/testD")
    public  String testD(){
        try {
            TimeUnit.SECONDS.sleep(1);
        } catch (InterruptedException e) {
            e.printStackTrace();
        }

        log.info("test 測試RT");
        return "-----testD";
    }
使用 jmeter 進行壓力測試
2. 異常比例
描述:

設定:
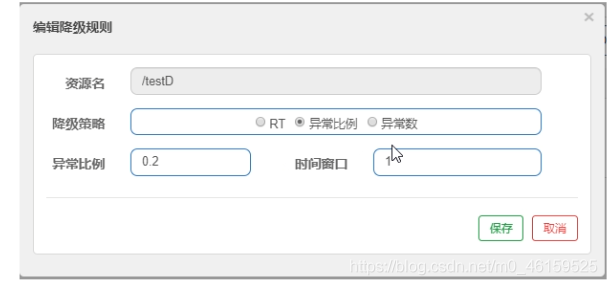
測試程式碼:
 @GetMapping("/testD")
    public  String testD(){
        log.info("testD 異常比例");
        int age = 10/0;
        return "-----testD";
    }
使用 jmeter 進行測試
3. 異常數
●異常數(DEGRADE_ GRADE_ EXCEPTION_ _COUNT ): 當資源近1分鐘的異常數目超過閾值之後會進行熔斷。注意由於統計時間視窗是分鐘級別的,若timeWindow小於60s,則結束熔斷狀態後嗎可能
再進入熔斷狀態。
時間視窗一定要大於等於60秒。
測試程式碼
@GetMapping("/testE")
    public  String testE(){

        log.info("testE 異常比數");
        int age = 10/0;
        return "-----testE 測試異常比數";
    }
sentinel 設定
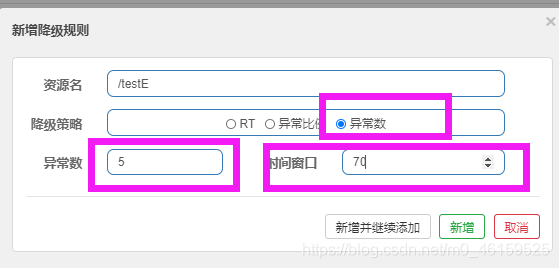
五次之後自動進行降級熔斷
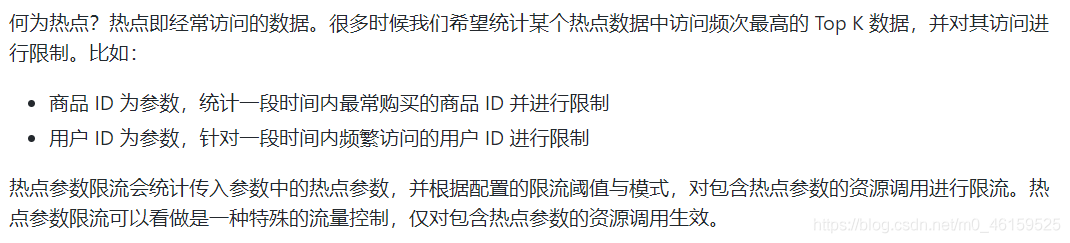
Sentinel熱點key
官網:https://github.com/alibaba/Sentinel/wiki/%E7%83%AD%E7%82%B9%E5%8F%82%E6%95%B0%E9%99%90%E6%B5%81
兜底方法
分爲系統預設和客戶自定義,兩種
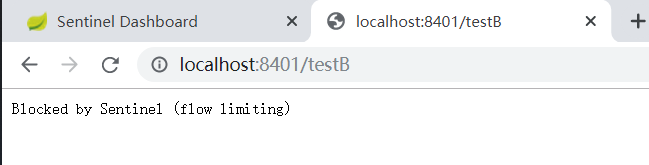
之前的case,限流出問題後,都是用sentinel系統預設的提示: Blocked by Sentinel (flow limiting)
我們能不能自定?類似hystrix,某個方法出問題了,就找對應的兜底降級方法?
結論
從HystrixCommand到面SentinelResource
熱點限流原始碼:
測試程式碼
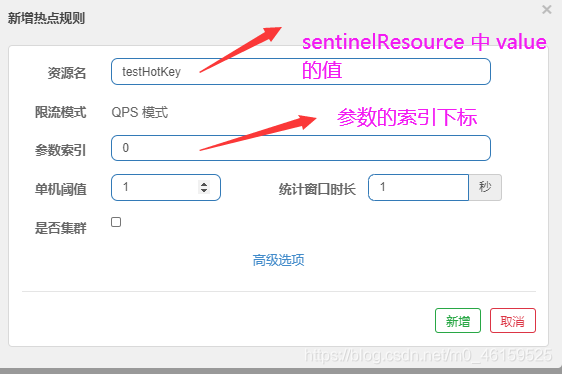
@GetMapping("/testHotKey")
// value 可以爲任意值,但是爲了編碼的統一和規範使用的 rest 的地址
// blockHandler 定義處理降級熔斷的方法名稱
@SentinelResource(value = "testHotKey", blockHandler = "deal_testHotkey")
public String testHotKey(@RequestParam(value = "p1", required = false) String p1,
@RequestParam(value = "p2", required = false) String p2
) {
return "------- testHotKey 成功";
}
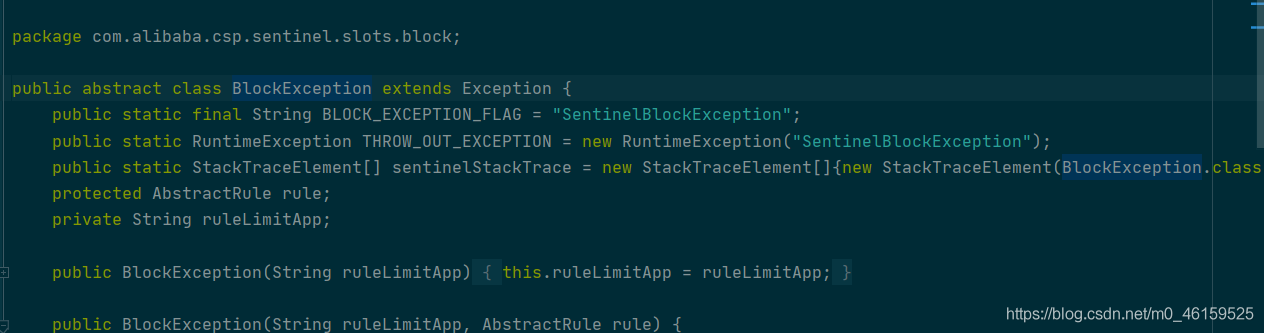
// 要加入 BlockException
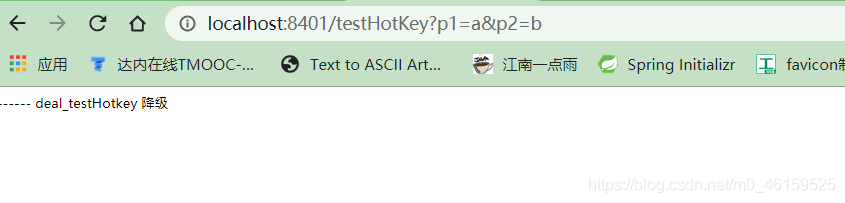
public String deal_testHotkey(String p1, String p2, BlockException exception) {
return "------ deal_testHotkey 降級";//sentinel系統預設的提示:Blocked by Sentinel (flow limiting)
}
sentinel 熱點設定
測試結果
@SentinelResource(value = 「testHotKey」) 異常打到了前臺用戶介面看到,不友好
@SentinelResource(value = 「testHotKey」, blockHandler = 「deal_testHotkey」)
方法testHotKey裏面第一個 參數只要QPS超過每秒1次,馬上降級處理用了我們自己定義的。
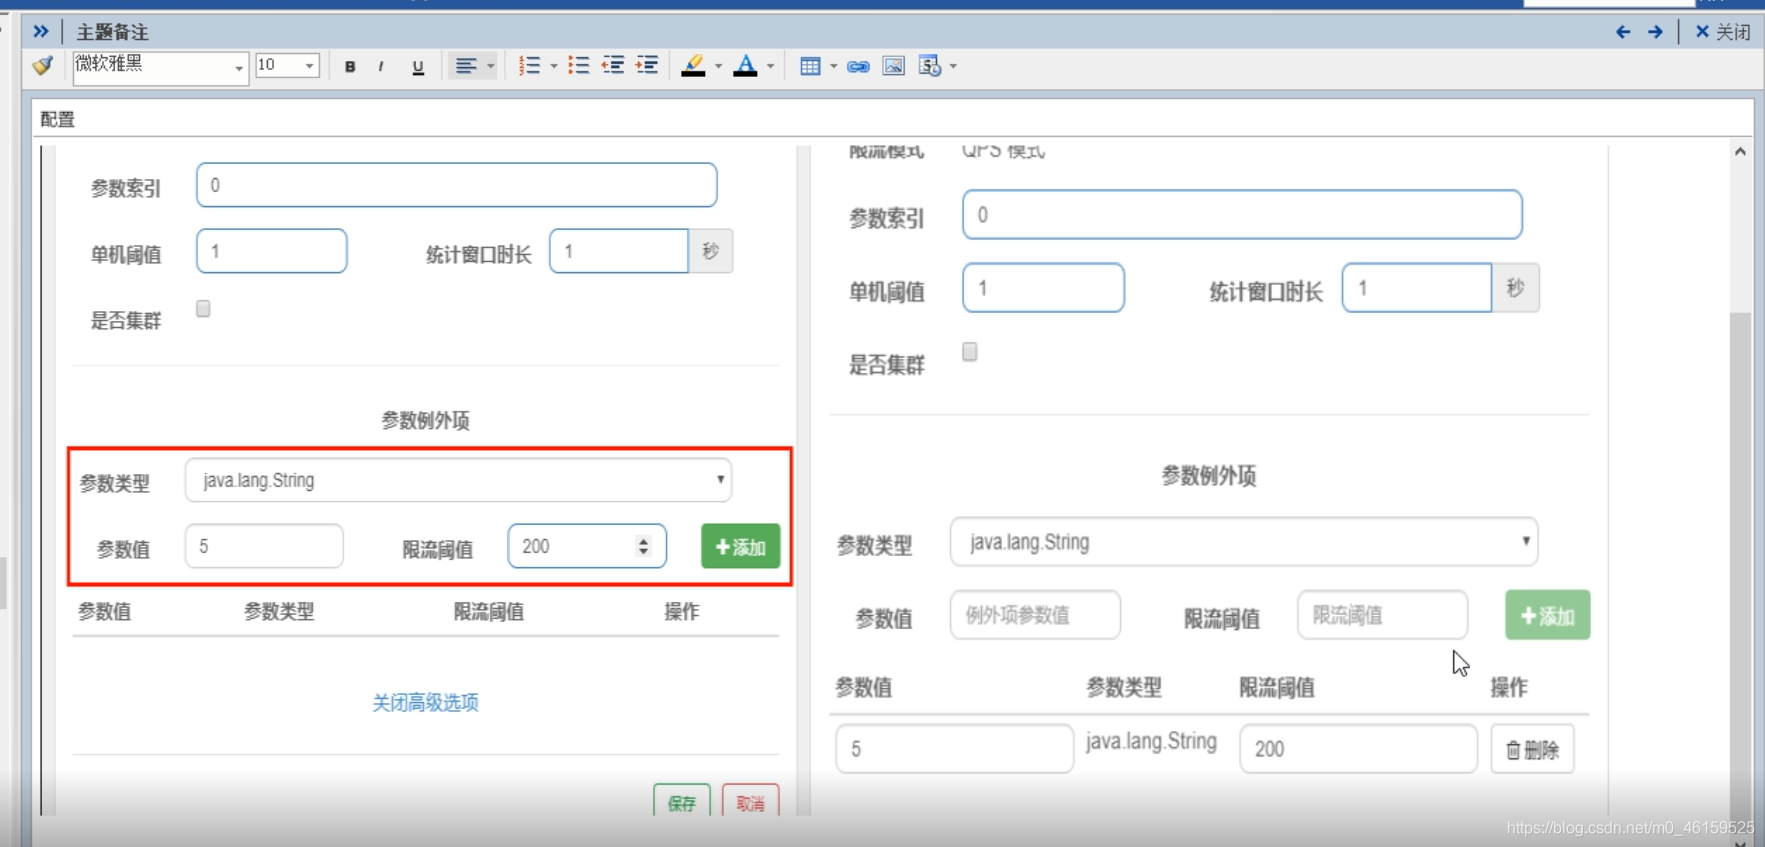
參數例外項
普通:超過1秒鐘一個後,達到閾值1後馬上被限流
我們期望p1參數當它是某個特殊值時,它的限流值和平時不一樣
特例:假如當p1的值等於5時,它的閾值可以達到200
設定:
當p1等於5的時候,閾值變爲200
當p1不等於5的時候,閾值就是平常的1
熱點參數的注意點,參數必須是基本型別或者String
@Sent inelResource
處理的是Sentinel控制檯設定的違規情況,有blockHandler方法設定的兜底處理;
Runt imeException
int age = 10/0, 這個是java執行時報出的執行時異常RunTimeException,@SentinelResource不管
總結:
@SentinelResource主管設定出錯,執行出錯該走異常走異常
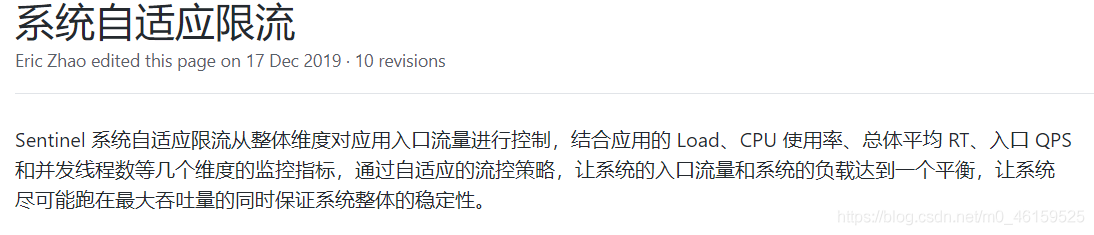
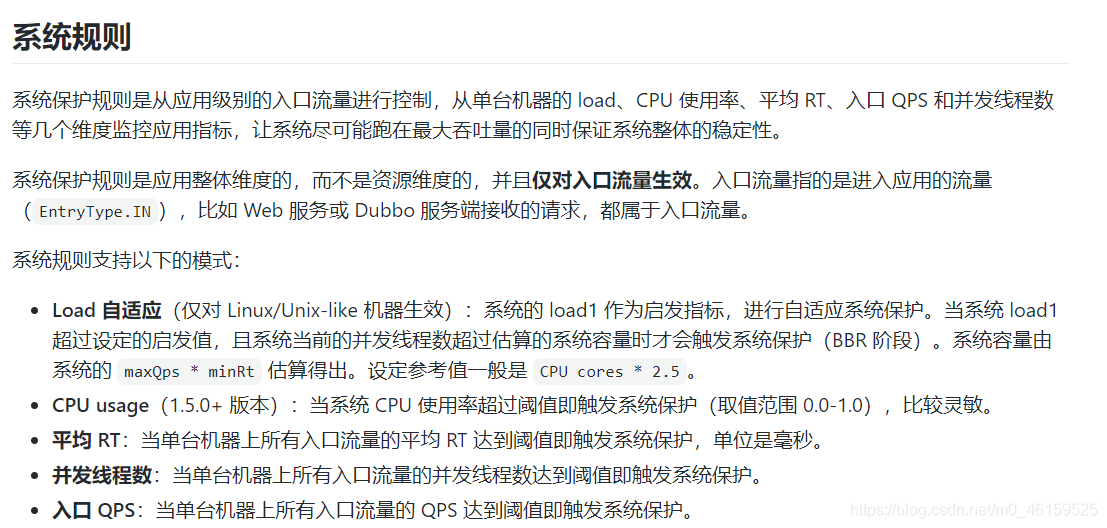
系統規則
@SentinelResource設定
新增依賴:
        <dependency><!-- 引入自己定義的api通用包,可以使用Payment支付Entity -->
            <groupId>com.atguigu.springclund</groupId>
            <artifactId>cloud-api-commons</artifactId>
            <version>1.0-SNAPSHOT</version>
        </dependency>
新增 RateLimitController 類:
@RestController
public class RateLimitController
{
    @GetMapping("/byResource")
    @SentinelResource(value = "byResource",blockHandler = "handleException")
    public CommonResult byResource()
    {
        return new CommonResult(200,"按資源名稱限流測試OK",new Payment(2020L,"serial001"));
    }
    public CommonResult handleException(BlockException exception)
    {
        return new CommonResult(444,exception.getClass().getCanonicalName()+"\t 服務不可用");
    }


    @GetMapping("/rateLimit/byUrl")
    @SentinelResource(value = "byUrl")
    public CommonResult byUrl()
    {
        return new CommonResult(200,"按url限流測試OK",new Payment(2020L,"serial002"));
    }

}
- 按資源名稱限流+後續處理
- 按照Ur|地址限流+後續處理
客戶自定義限流處理邏輯
- 按照資源名稱限流問題解決
新增測試程式碼:
// CustomerBlockHandler
// blockHandlerClass 表示降級接收的類
// blockHandler 降級接收的類,該類中所需要降級的方法名
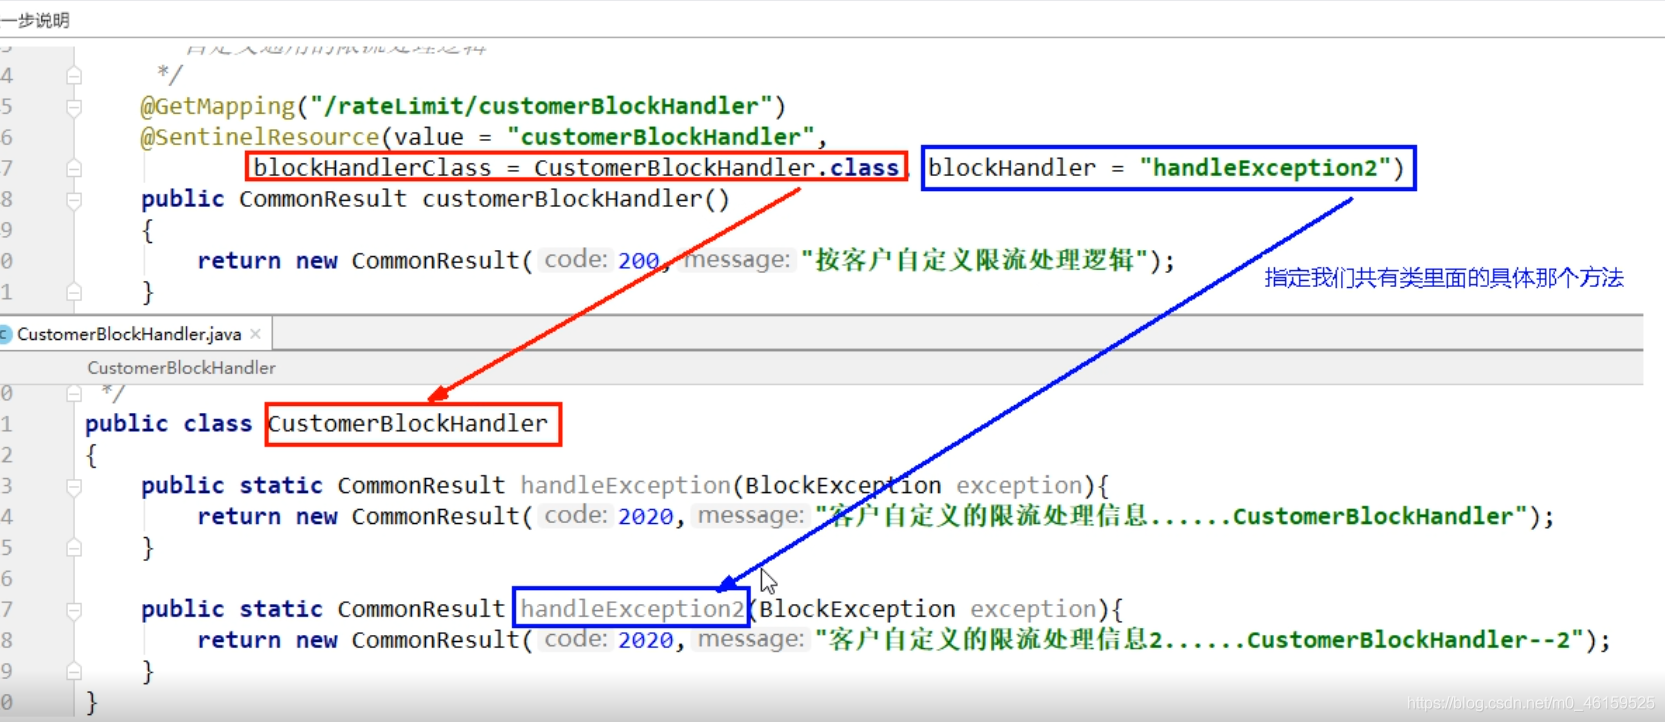
@GetMapping("/rateLimit/customerBlockHandler")
@SentinelResource(value = "customerBlockHandler",blockHandlerClass = CustomerBlockHandler.class,blockHandler ="handlerException2" )
public CommonResult customerBlockHandler()
{
return new CommonResult(200,"客戶自定義",new Payment(2020L,"serial003"));
}
新建 CustomerBlockHandler 類:
public class CustomerBlockHandler {

    public static CommonResult handlerException(BlockException exception)
    {
        return new CommonResult(4444,"按客戶自定義,global handlerException----1");
    }
    public static CommonResult handlerException2(BlockException exception)
    {
        return new CommonResult(4444,"按客戶自定義,global handlerException----2");
    }
}
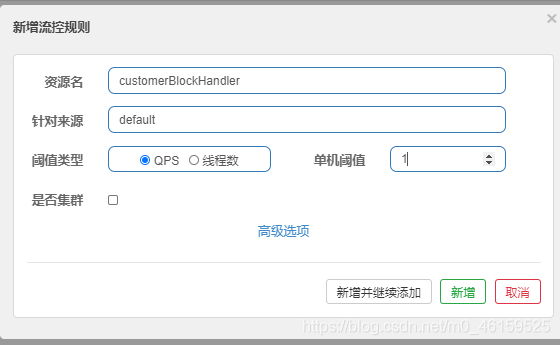
新增流控:
進一步說明:
更多註解屬性說明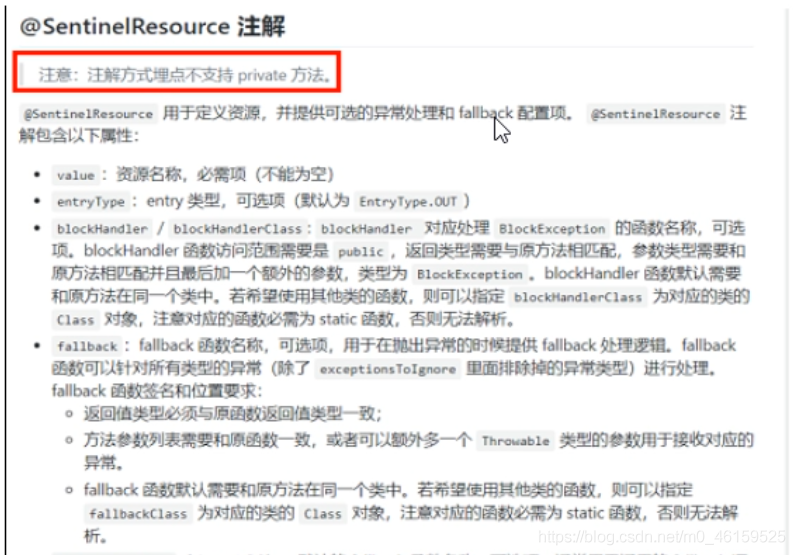
Sentinel主要有三個核心Api:
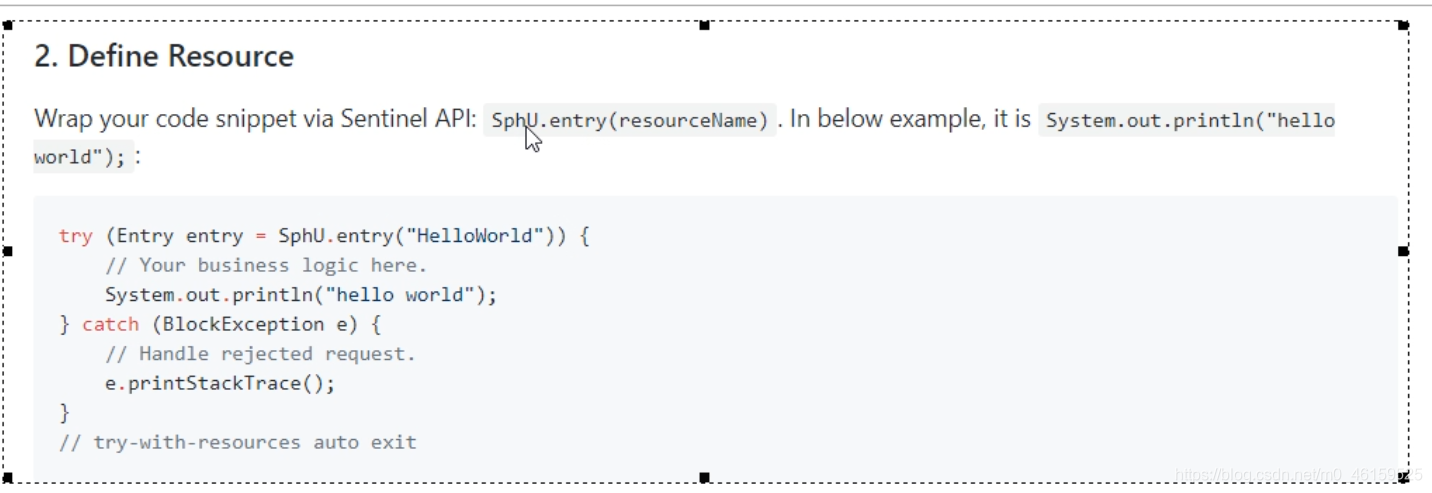
- SphU定義資源
- Tracer定義統計
- ContextUti定義了上下文
Sentinel服務熔斷Ribbon環境
生產者
新建 cloudalibaba-provider-payment9003 和 cloudalibaba-provider-payment9004
pom:
  <dependencies>
        <!--SpringCloud ailibaba nacos -->
        <dependency>
            <groupId>com.alibaba.cloud</groupId>
            <artifactId>spring-cloud-starter-alibaba-nacos-discovery</artifactId>
        </dependency>
        <dependency><!-- 引入自己定義的api通用包,可以使用Payment支付Entity -->
            <groupId>com.atguigu.springclund</groupId>
            <artifactId>cloud-api-commons</artifactId>
            <version>1.0-SNAPSHOT</version>
        </dependency>
        <!-- SpringBoot整合Web元件 -->
        <dependency>
            <groupId>org.springframework.boot</groupId>
            <artifactId>spring-boot-starter-web</artifactId>
        </dependency>
        <dependency>
            <groupId>org.springframework.boot</groupId>
            <artifactId>spring-boot-starter-actuator</artifactId>
        </dependency>
        <!--日常通用jar包設定-->
        <dependency>
            <groupId>org.springframework.boot</groupId>
            <artifactId>spring-boot-devtools</artifactId>
            <scope>runtime</scope>
            <optional>true</optional>
        </dependency>
        <dependency>
            <groupId>org.projectlombok</groupId>
            <artifactId>lombok</artifactId>
            <optional>true</optional>
        </dependency>
        <dependency>
            <groupId>org.springframework.boot</groupId>
            <artifactId>spring-boot-starter-test</artifactId>
            <scope>test</scope>
        </dependency>
    </dependencies>
yaml檔案:
server:
  port: 9004

spring:
  application:
    name: nacos-payment-provider
  cloud:
    nacos:
      discovery:
        server-addr: localhost:8848 #設定Nacos地址

management:
  endpoints:
    web:
      exposure:
        include: '*'
啓動類:
package com.atguigu.springcloud.alibaba;

import org.springframework.boot.SpringApplication;
import org.springframework.boot.autoconfigure.SpringBootApplication;

/**
 * @author yueLQ
 * @date 2020-08-10 6:56
 */
@SpringBootApplication
public class Payment9004 {
    public static void main(String[] args) {
            SpringApplication.run(Payment9004.class,args);
        }
}
PaymentController:
package com.atguigu.springcloud.alibaba.controller;

import com.atguigu.springcloud.entities.CommonResult;
import com.atguigu.springcloud.entities.Payment;
import org.springframework.beans.factory.annotation.Value;
import org.springframework.web.bind.annotation.GetMapping;
import org.springframework.web.bind.annotation.PathVariable;
import org.springframework.web.bind.annotation.RestController;

import java.util.HashMap;

/**
 * @author yueLQ
 * @date 2020-08-10 7:00
 */
@RestController
public class PaymentController
{
    @Value("${server.port}")
    private String serverPort;

    public static HashMap<Long,Payment> hashMap = new HashMap<>();
    static
    {
        hashMap.put(1L,new Payment(1L,"28a8c1e3bc2742d8848569891fb42181"));
        hashMap.put(2L,new Payment(2L,"bba8c1e3bc2742d8848569891ac32182"));
        hashMap.put(3L,new Payment(3L,"6ua8c1e3bc2742d8848569891xt92183"));
    }

    @GetMapping(value = "/paymentSQL/{id}")
    public CommonResult<Payment> paymentSQL(@PathVariable("id") Long id)
    {
        Payment payment = hashMap.get(id);
        CommonResult<Payment> result = new CommonResult(200,"from mysql,serverPort:  "+serverPort,payment);
        return result;
    }


}
消費者
新建cloudalibaba-consumer-nacos-order84
pom:
 <dependencies>
        <!--SpringCloud openfeign -->
        <dependency>
            <groupId>org.springframework.cloud</groupId>
            <artifactId>spring-cloud-starter-openfeign</artifactId>
        </dependency>
        <!--SpringCloud ailibaba nacos -->
        <dependency>
            <groupId>com.alibaba.cloud</groupId>
            <artifactId>spring-cloud-starter-alibaba-nacos-discovery</artifactId>
        </dependency>
        <!--SpringCloud ailibaba sentinel -->
        <dependency>
            <groupId>com.alibaba.cloud</groupId>
            <artifactId>spring-cloud-starter-alibaba-sentinel</artifactId>
        </dependency>
        <!-- 引入自己定義的api通用包,可以使用Payment支付Entity -->
        <dependency>
            <groupId>com.atguigu.springclund</groupId>
            <artifactId>cloud-api-commons</artifactId>
            <version>1.0-SNAPSHOT</version>
        </dependency>
        <!-- SpringBoot整合Web元件 -->
        <dependency>
            <groupId>org.springframework.boot</groupId>
            <artifactId>spring-boot-starter-web</artifactId>
        </dependency>
        <dependency>
            <groupId>org.springframework.boot</groupId>
            <artifactId>spring-boot-starter-actuator</artifactId>
        </dependency>
        <!--日常通用jar包設定-->
        <dependency>
            <groupId>org.springframework.boot</groupId>
            <artifactId>spring-boot-devtools</artifactId>
            <scope>runtime</scope>
            <optional>true</optional>
        </dependency>
        <dependency>
            <groupId>org.projectlombok</groupId>
            <artifactId>lombok</artifactId>
            <optional>true</optional>
        </dependency>
        <dependency>
            <groupId>org.springframework.boot</groupId>
            <artifactId>spring-boot-starter-test</artifactId>
            <scope>test</scope>
        </dependency>
    </dependencies>
yaml :
server:
  port: 84


spring:
  application:
    name: nacos-order-consumer
  cloud:
    nacos:
      discovery:
        server-addr: localhost:8848
    sentinel:
      transport:
        #設定Sentinel dashboard地址
        dashboard: localhost:8080
        #預設8719埠,假如被佔用會自動從8719開始依次+1掃描,直至找到未被佔用的埠
        port: 8719

#消費者將要去存取的微服務名稱(註冊成功進nacos的微服務提供者)
service-url:
  nacos-user-service: http://nacos-payment-provider

# 啓用Sentinel對Feign的支援
feign:
  sentinel:
    enabled: true
啓動類:
package com.atguigu.springcloud.alibaba;

import org.springframework.boot.SpringApplication;
import org.springframework.boot.autoconfigure.SpringBootApplication;
import org.springframework.cloud.client.discovery.EnableDiscoveryClient;

/**
 * @author yueLQ
 * @date 2020-08-10 7:15
 */
@SpringBootApplication
@EnableDiscoveryClient
@EnableFeignClients
public class OrderNacosMain84 {

    public static void main(String[] args) {
            SpringApplication.run(OrderNacosMain84.class,args);
        }
}
設定類:
package com.atguigu.springcloud.alibaba.config;

import org.springframework.cloud.client.loadbalancer.LoadBalanced;
import org.springframework.context.annotation.Bean;
import org.springframework.context.annotation.Configuration;
import org.springframework.web.client.RestTemplate;

/**
 * @author yueLQ
 * @date 2020-08-10 7:17
 */
@Configuration
public class ApplicationContextConfig {

    @Bean
    @LoadBalanced
    public RestTemplate restTemplate(){
        return new RestTemplate();
    }
}
PaymentService:
package com.atguigu.springcloud.alibaba.config.service;
import com.atguigu.springcloud.entities.CommonResult;
import com.atguigu.springcloud.entities.Payment;
import org.springframework.cloud.openfeign.FeignClient;
import org.springframework.web.bind.annotation.GetMapping;
import org.springframework.web.bind.annotation.PathVariable;
/**
* @author yueLQ
* @date 2020-08-10 7:23
*/
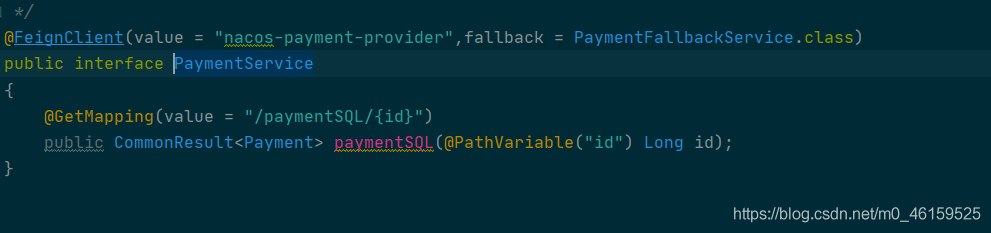
@FeignClient(value = "nacos-payment-provider",fallback = PaymentFallbackService.class)
public interface PaymentService
{
@GetMapping(value = "/paymentSQL/{id}")
public CommonResult<Payment> paymentSQL(@PathVariable("id") Long id);
}
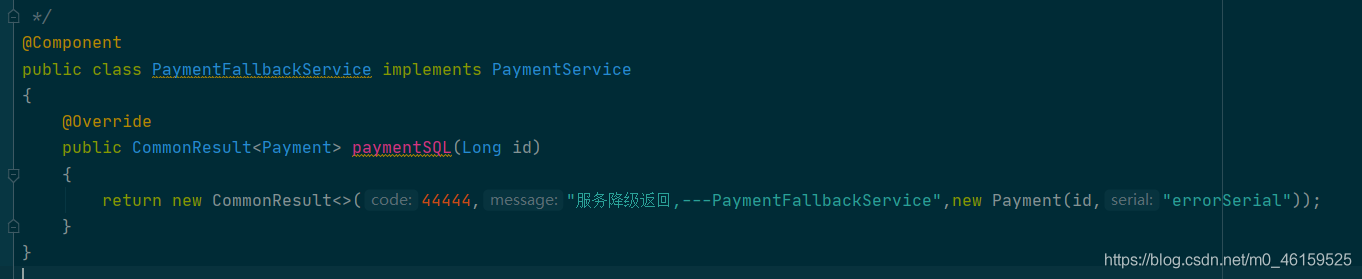
實現類 PaymentFallbackService
package com.atguigu.springcloud.alibaba.config.service;

import com.atguigu.springcloud.entities.CommonResult;
import com.atguigu.springcloud.entities.Payment;
import org.springframework.stereotype.Component;

/**
 * @author yueLQ
 * @date 2020-08-10 7:22
 */
@Component
public class PaymentFallbackService implements PaymentService
{
    @Override
    public CommonResult<Payment> paymentSQL(Long id)
    {
        return new CommonResult<>(44444,"服務降級返回,---PaymentFallbackService",new Payment(id,"errorSerial"));
    }
}
建立 controller 類:
package com.atguigu.springcloud.alibaba.controller;
import com.alibaba.csp.sentinel.annotation.SentinelResource;
import com.alibaba.csp.sentinel.slots.block.BlockException;
import com.atguigu.springcloud.alibaba.config.service.PaymentService;
import com.atguigu.springcloud.entities.CommonResult;
import com.atguigu.springcloud.entities.Payment;
import lombok.extern.slf4j.Slf4j;
import org.springframework.web.bind.annotation.GetMapping;
import org.springframework.web.bind.annotation.PathVariable;
import org.springframework.web.bind.annotation.RequestMapping;
import org.springframework.web.bind.annotation.RestController;
import org.springframework.web.client.RestTemplate;
import javax.annotation.Resource;
/**
* @author yueLQ
* @date 2020-08-10 7:19
*/
@RestController
@Slf4j
public class CircleBreakerController
{
public static final String SERVICE_URL = "http://nacos-payment-provider";
@Resource
private RestTemplate restTemplate;
@RequestMapping("/consumer/fallback/{id}")
//@SentinelResource(value = "fallback") //沒有設定
//@SentinelResource(value = "fallback",fallback = "handlerFallback") //fallback只負責業務異常
//@SentinelResource(value = "fallback",blockHandler = "blockHandler") //blockHandler只負責sentinel控制檯設定違規
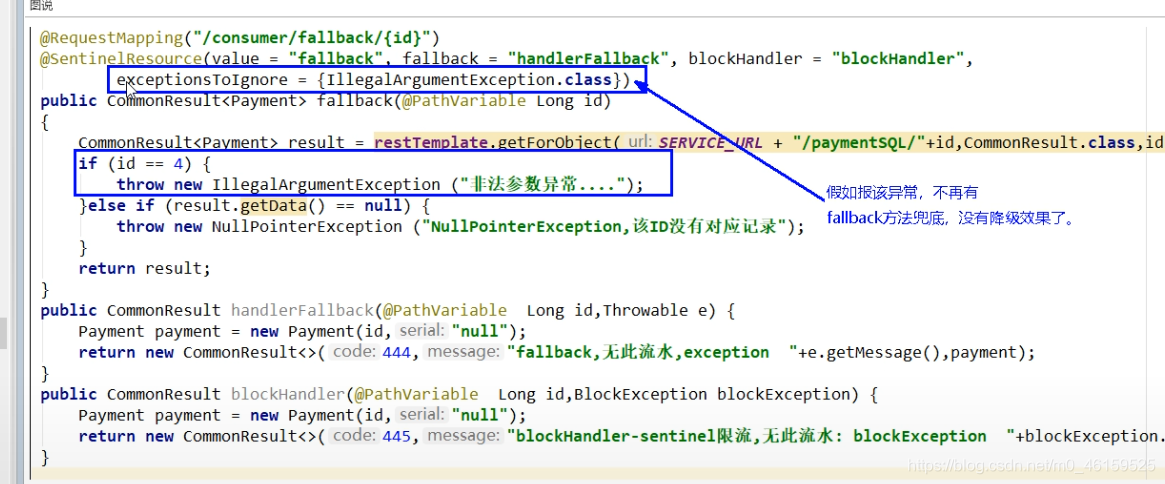
@SentinelResource(value = "fallback",fallback = "handlerFallback",blockHandler = "blockHandler",
exceptionsToIgnore = {IllegalArgumentException.class})
public CommonResult<Payment> fallback(@PathVariable Long id)
{
CommonResult<Payment> result = restTemplate.getForObject(SERVICE_URL + "/paymentSQL/"+id,CommonResult.class,id);
if (id == 4) {
throw new IllegalArgumentException ("IllegalArgumentException,非法參數異常....");
}else if (result.getData() == null) {
throw new NullPointerException ("NullPointerException,該ID沒有對應記錄,空指針異常");
}
return result;
}
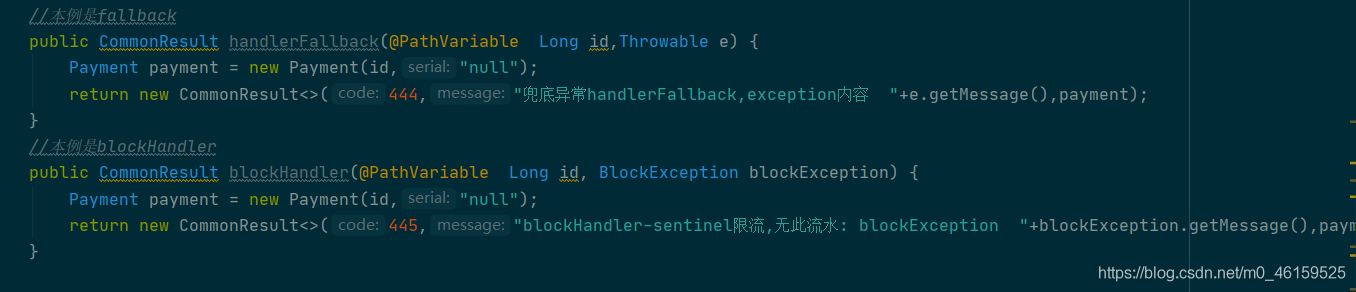
//本例是fallback
public CommonResult handlerFallback(@PathVariable Long id,Throwable e) {
Payment payment = new Payment(id,"null");
return new CommonResult<>(444,"兜底異常handlerFallback,exception內容 "+e.getMessage(),payment);
}
//本例是blockHandler
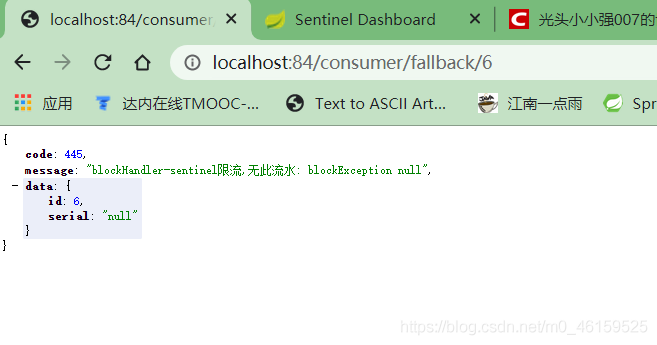
public CommonResult blockHandler(@PathVariable Long id, BlockException blockException) {
Payment payment = new Payment(id,"null");
return new CommonResult<>(445,"blockHandler-sentinel限流,無此流水: blockException "+blockException.getMessage(),payment);
}
//==================OpenFeign
@Resource
private PaymentService paymentService;
@GetMapping(value = "/consumer/paymentSQL/{id}")
public CommonResult<Payment> paymentSQL(@PathVariable("id") Long id)
{
return paymentService.paymentSQL(id);
}
}
熱部署對java程式碼級生效及時
對 @SentinelResource 註解內屬性,有時效果不好
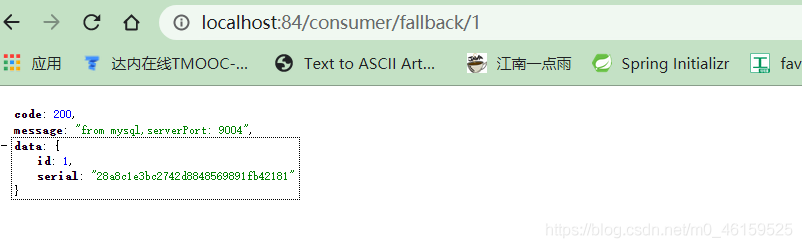
存取路徑:http://localhost:84/consumer/fallback/1 進行負載均衡。
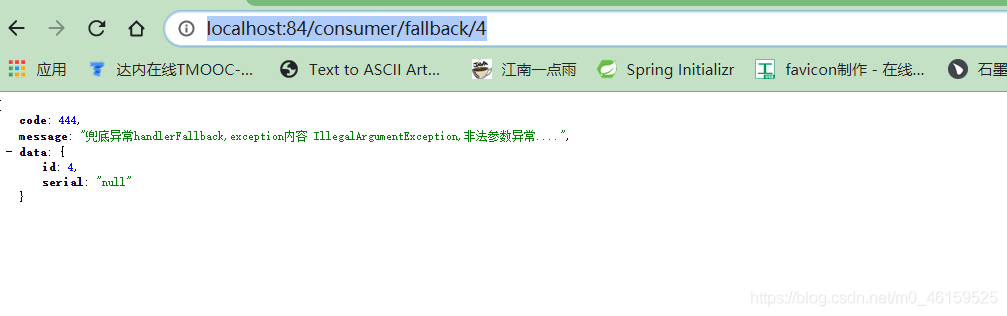
1. Sentinel服務熔斷只設定fallback


測試:http://localhost:84/consumer/fallback/4
出現異常時,返回了自己建立的方法
2. Sentinel服務熔斷只設定blockHandler
測試程式碼塊:


sentinel 設定
測試結果:兩次錯誤之後,返回降級方法
3. Sentinel服務熔斷fallback和blockHandler都設定
程式碼塊:

sentinel 設定
測試結果:
有數據據時:
沒有數據時:

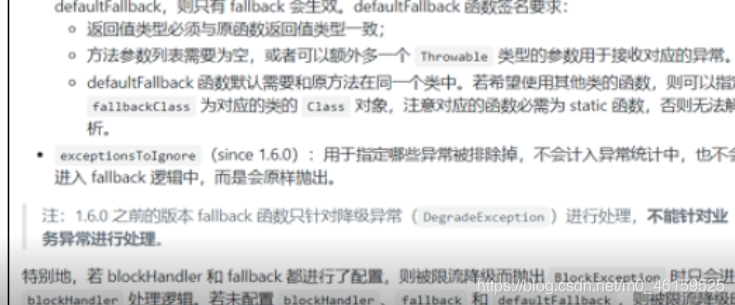
結果:若blockHandler和fallback都進行了設定,則被限流降級而拋出BlockException時只會進入blockHandler處理邏輯。
4. Sentinel服務熔斷exceptionsToIgnore(忽略屬性)
5. Sentinel服務熔斷OpenFeign
測試程式碼塊 cloudalibaba-consumer-nacos-order84:
新增 OpenFeign 的依賴:
   <!--SpringCloud openfeign -->
        <dependency>
            <groupId>org.springframework.cloud</groupId>
            <artifactId>spring-cloud-starter-openfeign</artifactId>
        </dependency>
啓用Sentinel對Feign的支援:
# 啓用Sentinel對Feign的支援
feign:
  sentinel:
    enabled: true
啓動類新增 @EnableFeignClients 註解

CircleBreakerController

PaymentService
PaymentFallbackService
測試結果:

測試84呼叫9003,此時故意關閉9003微服務提供者,看84消費側自動降級

| Sentinel | Hystrix | resilience4j | |
|---|---|---|---|
| 隔離策略 | 號志隔離(井發執行緒數限流) | 執行緒池隔離/號志隔離 | 號志隔離 |
| 熔斷降級策略 | 基於響應時間、異常比率、異常數 | 基於異常比率 | 基於異常比率、響應時間 |
| 實時統計實現 | 滑動視窗(LeapAray) | 滑動視窗(基於RxJava) | Ring Bit Buffer |
| 動態規則設定 | 支援多種數據源 | 支援多種數據源 | 有限支援 |
| 擴充套件性 | 多個擴充套件點 | 外掛的形式 | 介面的形式 |
| 基於註解的支援 | 支援 | 支援 | 支援 |
| 限流 | 基於QPS,支援基於呼叫關係的限流 | 有限的支援 | Rate Limiter |
| 流量整形 | 支援預熱模式、勻速器模式、預熱排隊模式 | 不支援 | 簡單的Rate Limiter模式 |
| 系統自適應保護 | 支援 | 不支援 | 不支援 |
| 控制檯 | 提供開箱即用的控制檯,可設定規則,檢視秒級監控、機器發現等 | 簡單的監控檢視 | 不提供控制檯,可對接其它監控系統 |
Sentinel持久化規則
問題原因:
在 sentinel 控制檯中設定了以後,只要後臺服務重新啓動控制檯中的資訊就全部消失。一旦我們重新啓動應用,sentinel規則將消失, 生產環境需要將設定規則進行持久化。
解決辦法:
將限流設定規則持久化進Nacos儲存,只要刷8401某 個rest地址, sentinel控制檯的流控規則就能看到,只要Nacos裏面的設定不刪除,針對8401上 sentinel上的流控規則持續有效。
在 cloudalibaba-sentinel-service8401 模組上新增
- 新增持久化的依賴
<!--springcloud alibaba sentinel-datasource-nacos 後續做持久化用到-->
        <dependency>
            <groupId>com.alibaba.csp</groupId>
            <artifactId>sentinel-datasource-nacos</artifactId>
        </dependency>
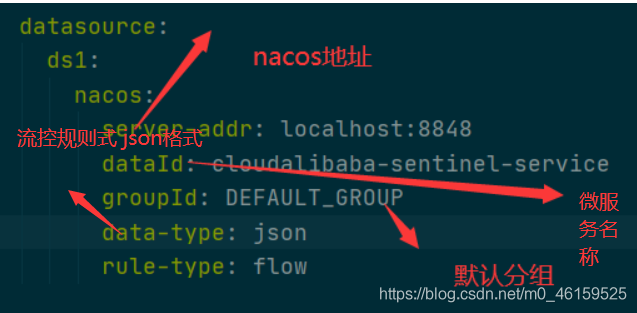
- 修改 yaml 檔案 Nacos業務規則設定:
server:
port: 8401
spring:
application:
name: cloudalibaba-sentinel-service
cloud:
nacos:
discovery:
server-addr: localhost:8848 #Nacos服務註冊中心地址
sentinel:
transport:
dashboard: localhost:8080 #設定Sentinel dashboard地址
port: 8719
datasource:
ds1:
nacos:
server-addr: localhost:8848
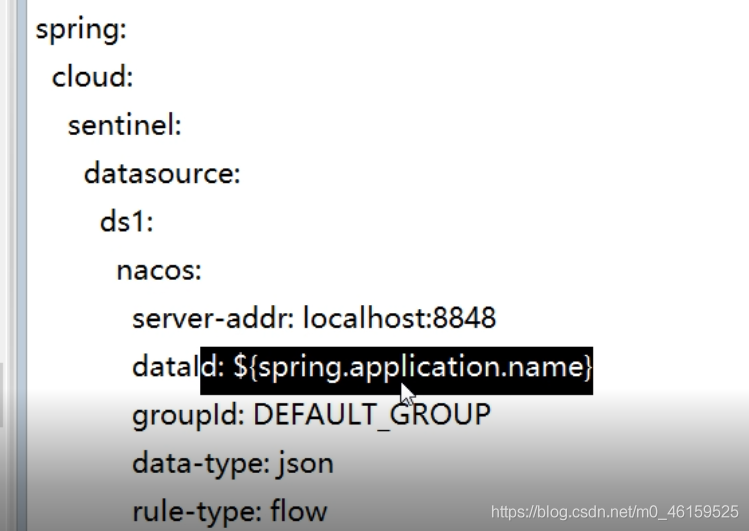
dataId: cloudalibaba-sentinel-service
groupId: DEFAULT_GROUP
data-type: json
rule-type: flow
management:
endpoints:
web:
exposure:
include: '*'
feign:
sentinel:
enabled: true # 啓用Sentinel對Feign的支援
- nacos 設定
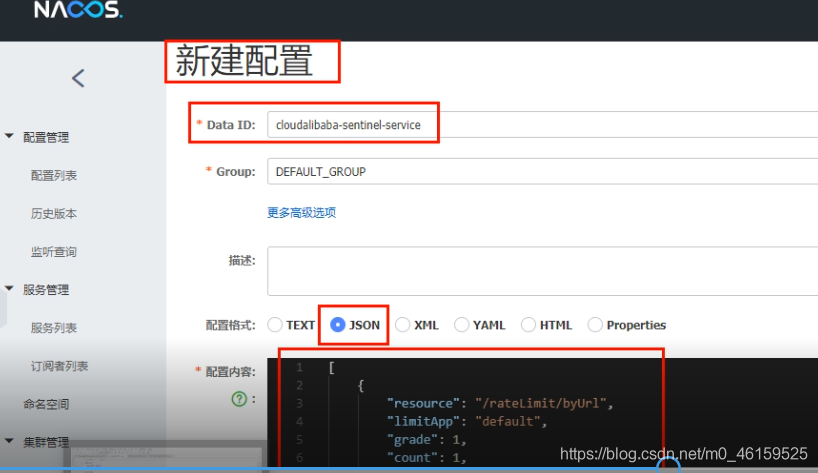
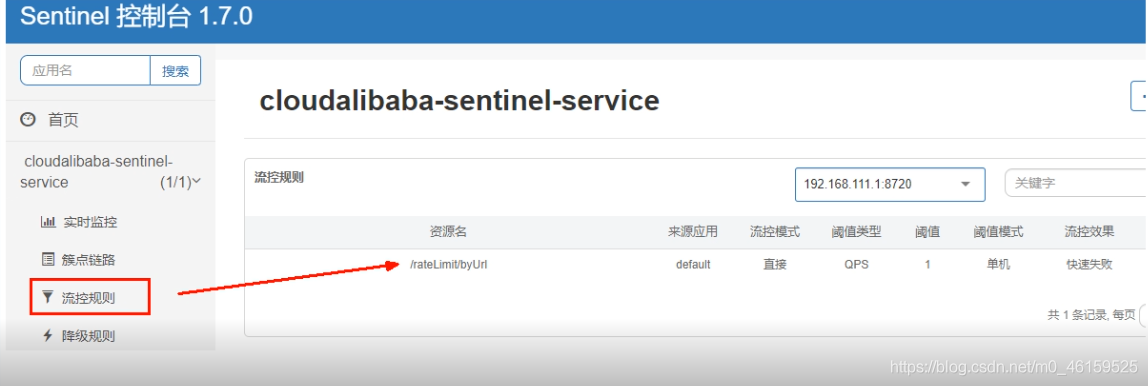
[
    {
      "resource":"/rateLimit/byUrl",
      "limitApp":"default",
      "grade":1,
      "count":1,
      "strategy":0,
      "controlBehavior":0,
      "clusterMode":false
    }

]
- resource:資源名稱;
- limitApp:來源應用;
- grade:閾值型別,0表示執行緒數,1表示QPS;
- count:單機閾值;
- strategy:流控模式,0表示直接,1表示關聯,2表示鏈路;
- controlBehavior:流控效果,
- 0表示快速失敗,
- 1表示Warm Up,
- 2- 表示排隊等待;
-
- clusterMode:是否叢集。
測試:

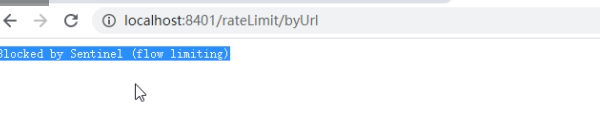
停止8401再看sentinel
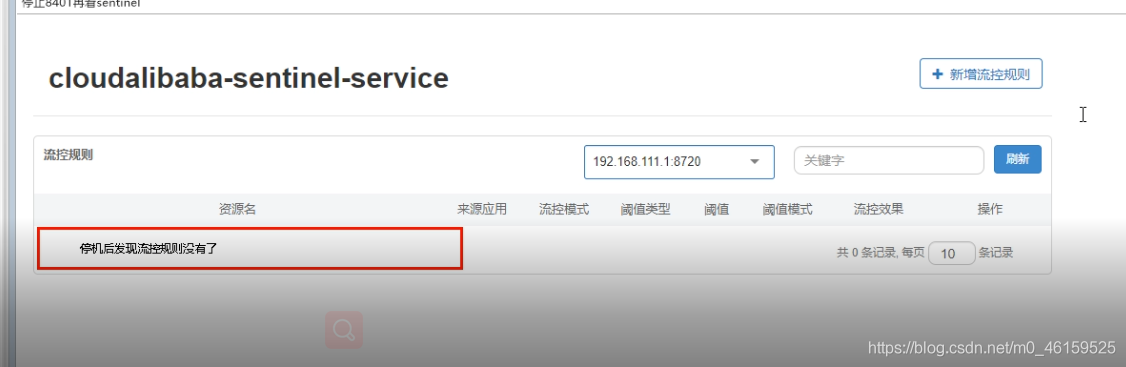
重新啓動8401再看sentinel
乍一看還是沒有,稍等一 會兒多次呼叫
http://localhost:8401/rateLimit/byUrI
啓動8401後重新整理sentinel發現業務規則有了

Seata
分佈式事務問題由來
分佈式問題:
單體應用被拆分成微服務應用,原來的三個模組被拆分成三個獨立的應用,分別使用三個獨立的數據源,業務操作需要呼叫三個服務來完成。此時每個服務內部的數據一致性由本地事務來保證,但是全域性的數據一致性問題沒法保證。

一次業務操作需要跨多個數據源或需要跨多個系統進行遠端呼叫,就會產生分佈式事務問題
Seata簡介
Seata是一款開源的分佈式事務解決方案,致力於在微服務架構下提供高效能和簡單易用的分佈式事務服務。
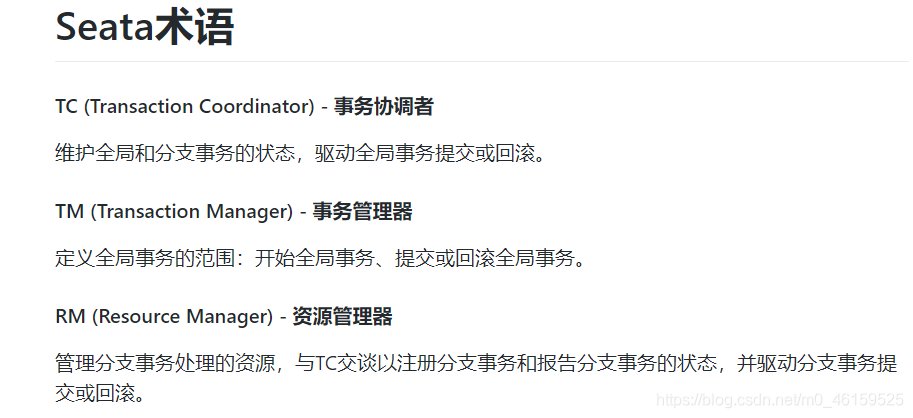
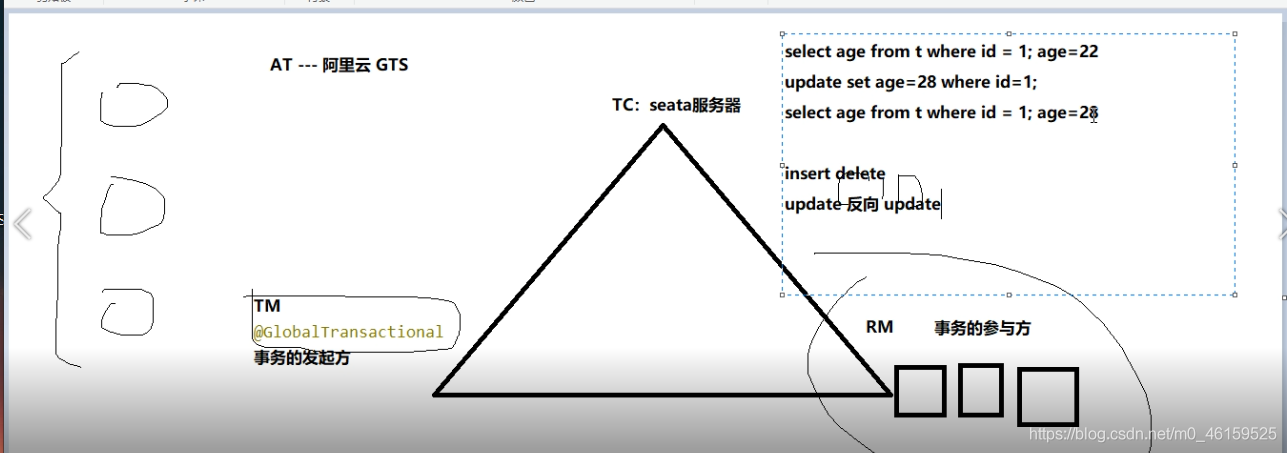
分佈式事務處理過程的一個ID+三元件模型:
| Transaction ID XID | 全域性唯一的事務ID |
|---|---|
| Transaction Coordinator(TC) | 事務協調器,維護全域性事務的執行狀態,負責協調並驅動事務的提交或回滾 |
| Transaction Manager(TM ) | 控制全域性事務的邊界,負責開啓一個全域性事務,並最終發起全域性提交或全域性回滾的決議 |
| Resource Manager(RM) | 控制分支事務,負責分支註冊、狀態彙報,並接收事務協調器的指令,驅動分支(本地)事務的提交或回滾 |
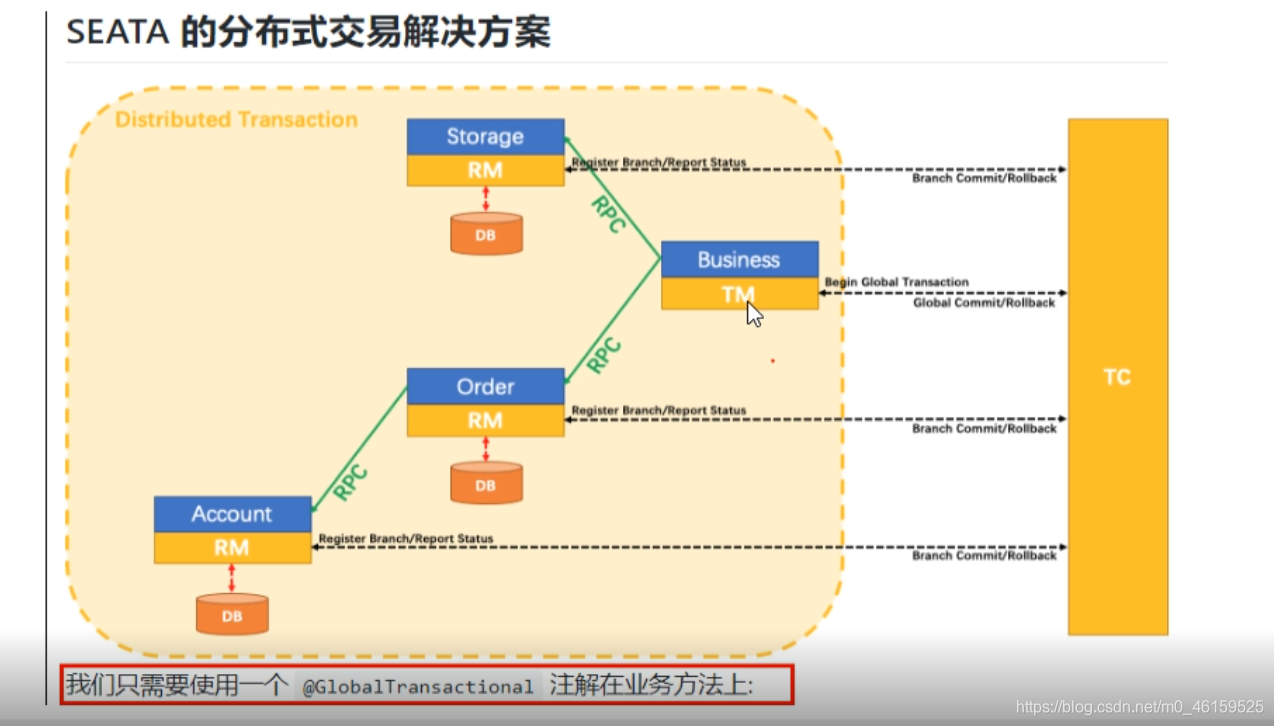
處理過程:
- TM向TC申請開啓一個全域性事務,全域性事務建立成功並生成一個全域性唯一的XID
- XID在微服務呼叫鏈路的上下文中傳播
- RM向TC註冊分支事務,將其納入XID對應全域性事務的管轄
- TM向TC發起針對XID的全域性提交或回滾決議
- TC排程XID下管轄的全部分支事務完成提交或回滾

Seata 下載安裝
地址:https://seata.io/zh-cn/blog/download.html
本地@Transactional
全域性@GlobalTransactional
-
seata-server-0.9.0.zip解壓到指定目錄並修改conf目錄下的file.conf組態檔,自定義事務組名稱+事務日誌儲存模式爲db +數據庫連線資訊
-
建立 seata 數據庫,建表db_ store.sql在\seata-server-0.9.0\seata\conf目錄裏面
-
修改seata-server-0.9.0\seata\conf目錄下的registry.conf設定文
件
-
先啓動Nacos端[口號8848
-
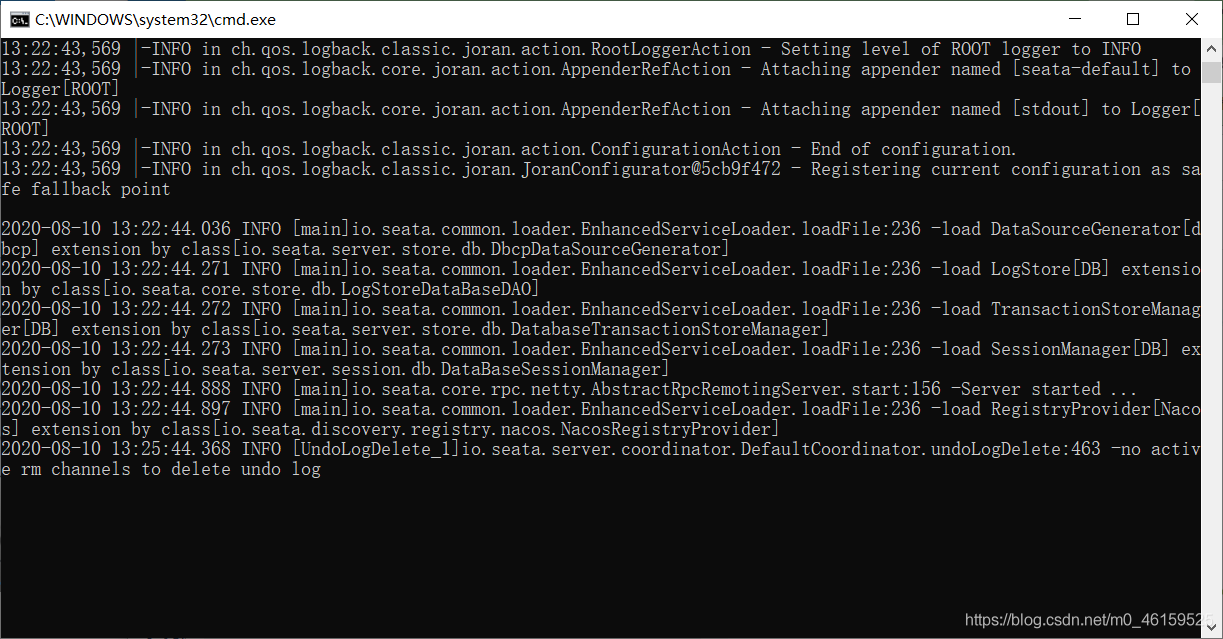
再啓動seata-server
Seata 業務數據準備
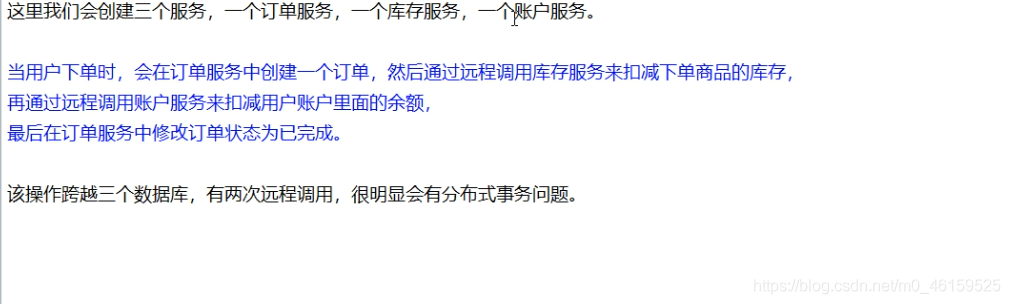
業務說明:
下訂單—>扣庫存—>減賬戶(餘額)
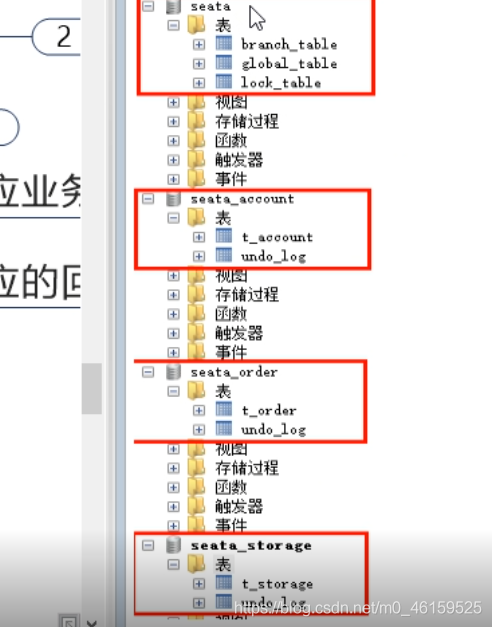
建立數據庫:
seata_ order:儲存訂單的數據庫;
seata_ storage: 儲存庫存的數據庫;
seata_ account:儲存賬戶資訊的數據庫。
CREATE DATABASE seata_order;
CREATE DATABASE seata_storage;
CREATE DATABASE seata_account;
在 seata_order 庫下執行該 sql 語句:
CREATE TABLE t_order(
`id` BIGINT(11) NOT NULL AUTO_INCREMENT PRIMARY KEY,
`user_id` BIGINT(11) DEFAULT NULL COMMENT '使用者id',
`product_id` BIGINT(11) DEFAULT NULL COMMENT '產品id',
`count` INT(11) DEFAULT NULL COMMENT '數量',
`money` DECIMAL(11,0) DEFAULT NULL COMMENT '金額',
`status` INT(1) DEFAULT NULL COMMENT '訂單狀態: 0:建立中; 1:已完結'
) ENGINE=INNODB AUTO_INCREMENT=7 DEFAULT CHARSET=utf8;

SELECT * FROM t_order;
CREATE TABLE t_storage(
id BIGINT(11) NOT NULL AUTO_INCREMENT PRIMARY KEY,
product_id BIGINT(11) DEFAULT NULL COMMENT '產品id',
total INT(11) DEFAULT NULL COMMENT '總庫存',
used INT(11) DEFAULT NULL COMMENT '已用庫存',
residue INT(11) DEFAULT NULL COMMENT '剩餘庫存'
)ENGINE=INNODB AUTO_INCREMENT=2 DEFAULT CHARSET=utf8;

INSERT INTO seata_storage.t_storage( id, product_id, total, used, residue )
VALUES ('1','1', '100' ,'0', '100');
CREATE TABLE t_account(
id BIGINT(11) NOT NULL AUTO_INCREMENT PRIMARY KEY COMMENT 'id',
user_id BIGINT(11) DEFAULT NULL COMMENT '使用者id',
total DECIMAL(10,0) DEFAULT NULL COMMENT '總額度',
used DECIMAL(10,0) DEFAULT NULL COMMENT '已用餘額',
residue DECIMAL(10,0) DEFAULT '0' COMMENT '剩餘可用額度'
)ENGINE=INNODB AUTO_INCREMENT=2 DEFAULT CHARSET=utf8;


INSERT INTO seata_account.t_account(id, user_id, total, used, residue) VALUES('1','1','1000','0','1000');
訂單-庫存-賬戶3個庫下都需要建各自的回滾日誌表
\seata-server-0.9.0\seata\conf目錄下的db_ undo_ log.sql
Seata之 Order-Module 設定搭建
業務需求:
下訂單一>減庫存->扣餘額->改(訂單)狀態
目錄結構:
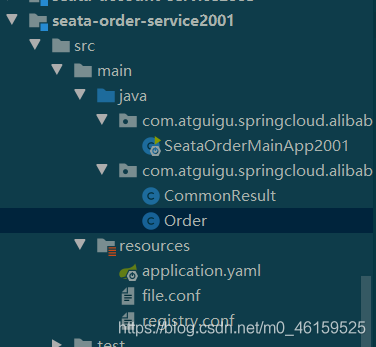
seata-order-service2001
pom檔案:
 <dependencies>
        <!--nacos-->
        <dependency>
            <groupId>com.alibaba.cloud</groupId>
            <artifactId>spring-cloud-starter-alibaba-nacos-discovery</artifactId>
        </dependency>
        <!--seata-->
        <dependency>
            <groupId>com.alibaba.cloud</groupId>
            <artifactId>spring-cloud-starter-alibaba-seata</artifactId>
            <!-- 排除他自身帶的seate-->
            <exclusions>
                <exclusion>
                    <artifactId>seata-all</artifactId>
                    <groupId>io.seata</groupId>
                </exclusion>
            </exclusions>
        </dependency>
        <!--匯入自己使用的seate-->
        <dependency>
            <groupId>io.seata</groupId>
            <artifactId>seata-all</artifactId>
            <version>0.9.0</version>
        </dependency>
        <!--feign-->
        <dependency>
            <groupId>org.springframework.cloud</groupId>
            <artifactId>spring-cloud-starter-openfeign</artifactId>
        </dependency>
        <!--web-actuator-->
        <dependency>
            <groupId>org.springframework.boot</groupId>
            <artifactId>spring-boot-starter-web</artifactId>
        </dependency>
        <dependency>
            <groupId>org.springframework.boot</groupId>
            <artifactId>spring-boot-starter-actuator</artifactId>
        </dependency>
        <!--mysql-druid-->
        <dependency>
            <groupId>mysql</groupId>
            <artifactId>mysql-connector-java</artifactId>
            <version>5.1.37</version>
        </dependency>
        <dependency>
            <groupId>com.alibaba</groupId>
            <artifactId>druid-spring-boot-starter</artifactId>
            <version>1.1.10</version>
        </dependency>
        <dependency>
            <groupId>org.mybatis.spring.boot</groupId>
            <artifactId>mybatis-spring-boot-starter</artifactId>
            <version>2.0.0</version>
        </dependency>
        <dependency>
            <groupId>org.springframework.boot</groupId>
            <artifactId>spring-boot-starter-test</artifactId>
            <scope>test</scope>
        </dependency>
        <dependency>
            <groupId>org.projectlombok</groupId>
            <artifactId>lombok</artifactId>
            <optional>true</optional>
        </dependency>
    </dependencies>
yaml 檔案
server:
  port: 2001

spring:
  application:
    name: seata-order-service
  cloud:
    alibaba:
      seata:
        #自定義事務組名稱需要與seata-server中的對應
        tx-service-group: fsp_tx_group
    nacos:
      discovery:
        server-addr: localhost:8848
  datasource:
    driver-class-name: com.mysql.jdbc.Driver
    url: jdbc:mysql://localhost:3306/seata_order
    username: root
    password: 123456

feign:
  hystrix:
    enabled: false

logging:
  level:
    io:
      seata: info

mybatis:
  mapperLocations: classpath:mapper/*.xml
file.conf
transport {
# tcp udt unix-domain-socket
type = "TCP"
#NIO NATIVE
server = "NIO"
#enable heartbeat
heartbeat = true
#thread factory for netty
thread-factory {
boss-thread-prefix = "NettyBoss"
worker-thread-prefix = "NettyServerNIOWorker"
server-executor-thread-prefix = "NettyServerBizHandler"
share-boss-worker = false
client-selector-thread-prefix = "NettyClientSelector"
client-selector-thread-size = 1
client-worker-thread-prefix = "NettyClientWorkerThread"
# netty boss thread size,will not be used for UDT
boss-thread-size = 1
#auto default pin or 8
worker-thread-size = 8
}
shutdown {
# when destroy server, wait seconds
wait = 3
}
serialization = "seata"
compressor = "none"
}
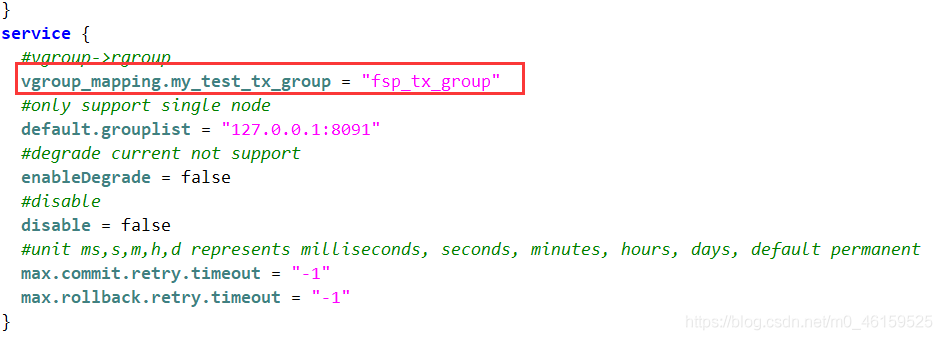
service {
vgroup_mapping.fsp_tx_group = "default" #修改自定義事務組名稱
default.grouplist = "127.0.0.1:8091"
enableDegrade = false
disable = false
max.commit.retry.timeout = "-1"
max.rollback.retry.timeout = "-1"
disableGlobalTransaction = false
}
client {
async.commit.buffer.limit = 10000
lock {
retry.internal = 10
retry.times = 30
}
report.retry.count = 5
tm.commit.retry.count = 1
tm.rollback.retry.count = 1
}
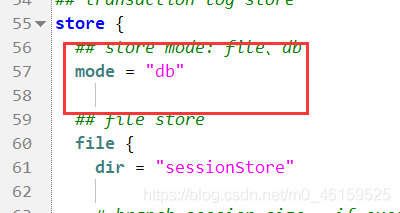
## transaction log store
store {
## store mode: file、db
mode = "db"
## file store
file {
dir = "sessionStore"
# branch session size , if exceeded first try compress lockkey, still exceeded throws exceptions
max-branch-session-size = 16384
# globe session size , if exceeded throws exceptions
max-global-session-size = 512
# file buffer size , if exceeded allocate new buffer
file-write-buffer-cache-size = 16384
# when recover batch read size
session.reload.read_size = 100
# async, sync
flush-disk-mode = async
}
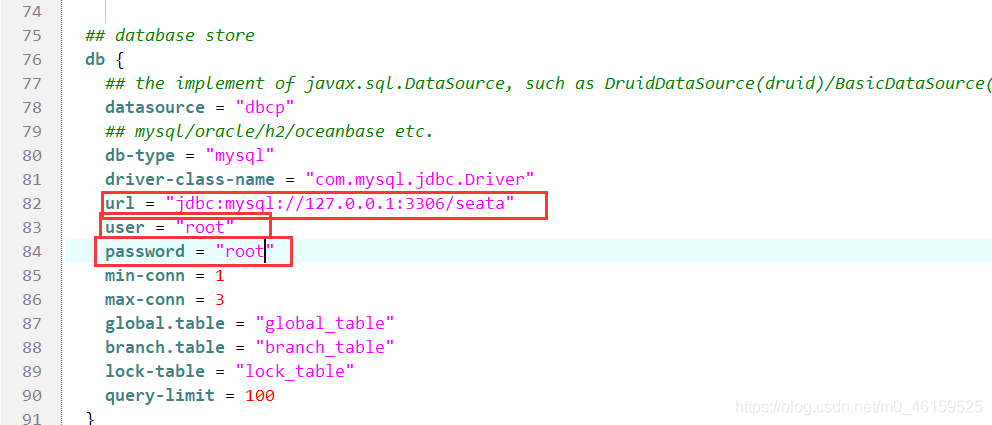
## database store
db {
## the implement of javax.sql.DataSource, such as DruidDataSource(druid)/BasicDataSource(dbcp) etc.
datasource = "dbcp"
## mysql/oracle/h2/oceanbase etc.
db-type = "mysql"
driver-class-name = "com.mysql.jdbc.Driver"
url = "jdbc:mysql://127.0.0.1:3306/seata"
user = "root"
password = "root"
min-conn = 1
max-conn = 3
global.table = "global_table"
branch.table = "branch_table"
lock-table = "lock_table"
query-limit = 100
}
}
lock {
## the lock store mode: local、remote
mode = "remote"
local {
## store locks in user's database
}
remote {
## store locks in the seata's server
}
}
recovery {
#schedule committing retry period in milliseconds
committing-retry-period = 1000
#schedule asyn committing retry period in milliseconds
asyn-committing-retry-period = 1000
#schedule rollbacking retry period in milliseconds
rollbacking-retry-period = 1000
#schedule timeout retry period in milliseconds
timeout-retry-period = 1000
}
transaction {
undo.data.validation = true
undo.log.serialization = "jackson"
undo.log.save.days = 7
#schedule delete expired undo_log in milliseconds
undo.log.delete.period = 86400000
undo.log.table = "undo_log"
}
## metrics settings
metrics {
enabled = false
registry-type = "compact"
# multi exporters use comma divided
exporter-list = "prometheus"
exporter-prometheus-port = 9898
}
support {
## spring
spring {
# auto proxy the DataSource bean
datasource.autoproxy = false
}
}
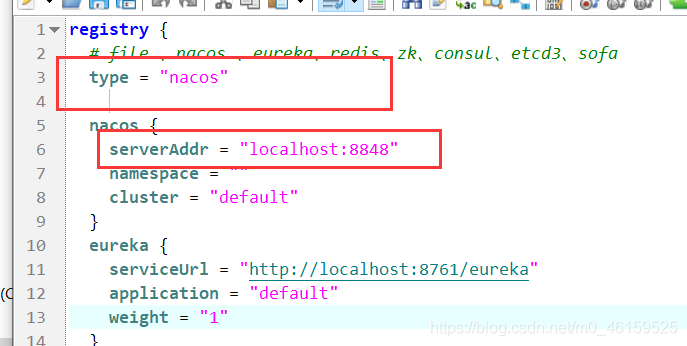
registry.conf
registry {
  # file 、nacos 、eureka、redis、zk、consul、etcd3、sofa
  type = "nacos"

  nacos {
    serverAddr = "localhost:8848"
    namespace = ""
    cluster = "default"
  }
  eureka {
    serviceUrl = "http://localhost:8761/eureka"
    application = "default"
    weight = "1"
  }
  redis {
    serverAddr = "localhost:6379"
    db = "0"
  }
  zk {
    cluster = "default"
    serverAddr = "127.0.0.1:2181"
    session.timeout = 6000
    connect.timeout = 2000
  }
  consul {
    cluster = "default"
    serverAddr = "127.0.0.1:8500"
  }
  etcd3 {
    cluster = "default"
    serverAddr = "http://localhost:2379"
  }
  sofa {
    serverAddr = "127.0.0.1:9603"
    application = "default"
    region = "DEFAULT_ZONE"
    datacenter = "DefaultDataCenter"
    cluster = "default"
    group = "SEATA_GROUP"
    addressWaitTime = "3000"
  }
  file {
    name = "file.conf"
  }
}

config {
  # file、nacos 、apollo、zk、consul、etcd3
  type = "file"

  nacos {
    serverAddr = "localhost"
    namespace = ""
  }
  consul {
    serverAddr = "127.0.0.1:8500"
  }
  apollo {
    app.id = "seata-server"
    apollo.meta = "http://192.168.1.204:8801"
  }
  zk {
    serverAddr = "127.0.0.1:2181"
    session.timeout = 6000
    connect.timeout = 2000
  }
  etcd3 {
    serverAddr = "http://localhost:2379"
  }
  file {
    name = "file.conf"
  }
}
SeataOrderMainApp2001
package com.atguigu.springcloud.alibaba;

import org.springframework.boot.SpringApplication;
import org.springframework.boot.autoconfigure.SpringBootApplication;

/**
 * @author yueLQ
 * @date 2020-08-10 19:55
 */
@SpringBootApplication(exclude = DataSourceAutoConfiguration.class) //取消數據源的自動裝配
@EnableFeignClients
@EnableDiscoveryClient
public class SeataOrderMainApp2001 {

    public static void main(String[] args) {
            SpringApplication.run(SeataOrderMainApp2001.class,args);
        }
}
Order
package com.atguigu.springcloud.alibaba.domain;

import lombok.AllArgsConstructor;
import lombok.Data;
import lombok.NoArgsConstructor;

import java.math.BigDecimal;

/**
 * @author yueLQ
 * @date 2020-08-10 19:58
 */
@Data
@AllArgsConstructor
@NoArgsConstructor
public class Order
{
    private Long id;

    private Long userId;

    private Long productId;

    private Integer count;

    private BigDecimal money;

    private Integer status; //訂單狀態:0:建立中;1:已完結
}
CommonResult
package com.atguigu.springcloud.alibaba.domain;

import lombok.AllArgsConstructor;
import lombok.Data;
import lombok.NoArgsConstructor;

/**
 * @author yueLQ
 * @date 2020-08-10 20:00
 */
@Data
@AllArgsConstructor
@NoArgsConstructor
public class CommonResult<T>
{
    private Integer code;
    private String  message;
    private T       data;

    public CommonResult(Integer code, String message)
    {
        this(code,message,null);
    }
}
OrderDao
package com.atguigu.springcloud.alibaba.dao;

import com.atguigu.springcloud.alibaba.domain.Order;
import org.apache.ibatis.annotations.Mapper;
import org.apache.ibatis.annotations.Param;

/**
 * @author yueLQ
 * @date 2020-08-10 20:21
 */
@Mapper
public interface OrderDao {

    // 新建頂頂那

    void create(Order order);

    // 修改訂單裝填 從 0 改爲 1
    void update(@Param("userId") Long userId,@Param("status") Integer status);


}
OrderMapper.xml
<?xml version="1.0" encoding="UTF-8" ?>
<!DOCTYPE mapper PUBLIC "-//mybatis.org//DTD Mapper 3.0//EN" "http://mybatis.org/dtd/mybatis-3-mapper.dtd" >

<mapper namespace="com.atguigu.springcloud.alibaba.dao.OrderDao">

    <resultMap id="BaseResultMap" type="com.atguigu.springcloud.alibaba.domain.Order">
        <id column="id" property="id" jdbcType="BIGINT"/>
        <result column="user_id" property="userId" jdbcType="BIGINT"/>
        <result column="product_id" property="productId" jdbcType="BIGINT"/>
        <result column="count" property="count" jdbcType="INTEGER"/>
        <result column="money" property="money" jdbcType="DECIMAL"/>
        <result column="status" property="status" jdbcType="INTEGER"/>
    </resultMap>

    <insert id="create">
        insert into t_order (id,user_id,product_id,count,money,status)
        values (null,#{userId},#{productId},#{count},#{money},0);
    </insert>


    <update id="update">
        update t_order set status = 1
        where user_id=#{userId} and status = #{status};
    </update>

</mapper>
OrderService
package com.atguigu.springcloud.alibaba.service;

import com.atguigu.springcloud.alibaba.domain.Order;

/**
 * @author yueLQ
 * @date 2020-08-10 20:48
 */
public interface OrderService {

    void create(Order order);
}
StorageService
package com.atguigu.springcloud.alibaba.service;

import com.atguigu.springcloud.alibaba.domain.CommonResult;
import org.springframework.cloud.openfeign.FeignClient;
import org.springframework.web.bind.annotation.PostMapping;
import org.springframework.web.bind.annotation.RequestParam;

/**
 * @author yueLQ
 * @date 2020-08-10 20:49
 */
@FeignClient( value = "seata-storage-service")
public interface StorageService {
    @PostMapping("/storage/decrease")
    CommonResult decrease(@RequestParam("productId") Long productId,
                          @RequestParam("count") Integer count
                          );

}
AccountService
package com.atguigu.springcloud.alibaba.service;

import com.atguigu.springcloud.alibaba.domain.CommonResult;
import org.springframework.cloud.openfeign.FeignClient;
import org.springframework.web.bind.annotation.PostMapping;
import org.springframework.web.bind.annotation.RequestParam;

import java.math.BigDecimal;

/**
 * @author yueLQ
 * @date 2020-08-10 20:49
 */
@FeignClient( value = "seata-account-service")
public interface AccountService {

    @PostMapping("/account/decrease")
    CommonResult decrease(@RequestParam("userId") Long userId,
                          @RequestParam("money") BigDecimal money
    );

}
OrderServiceImp
package com.atguigu.springcloud.alibaba.service.imp;

import com.atguigu.springcloud.alibaba.dao.OrderDao;
import com.atguigu.springcloud.alibaba.domain.Order;
import com.atguigu.springcloud.alibaba.service.AccountService;
import com.atguigu.springcloud.alibaba.service.OrderService;
import com.atguigu.springcloud.alibaba.service.StorageService;
import lombok.extern.slf4j.Slf4j;
import org.springframework.stereotype.Service;

import javax.annotation.Resource;

/**
 * @author yueLQ
 * @date 2020-08-10 20:50
 */

@Service
@Slf4j
public class OrderServiceImp implements OrderService {
    @Resource
    private OrderDao orderDao;
    @Resource
    private StorageService storageService;
    @Resource
    private AccountService accountService;

    @Override
    public void create(Order order) {
        log.info("------------>>> 開始新建訂單");
        orderDao.create(order);

        log.info("------->>>>> 訂單開始呼叫庫存,做扣減 Count 數量");
        // 扣減庫存
        storageService.decrease(order.getProductId(), order.getCount());
        log.info("------->>>>> 訂單開始呼叫庫存,做扣減  Count 數量 結束");


        log.info("------->>>>> 訂單開始呼叫賬戶,做 RMB的 扣減 Money 金額");
        // 扣減金額
        accountService.decrease(order.getUserId(), order.getMoney());
        log.info("------->>>>> 訂單開始呼叫賬戶,做 RMB的 扣減 Money 金額 結束");

        // 修改訂單狀態 從 0 到 1 代表完成
        log.info("------>>>>修改訂單狀態開始");
        orderDao.update(order.getUserId(), 0);
        log.info("------>>>>修改訂單狀態結束");
        log.info("------>>>>下訂單結束了,哈哈哈哈哈哈哈哈哈哈哈");

    }
}
DataSourceProxyConfig
package com.atguigu.springcloud.alibaba.config;

import com.alibaba.druid.pool.DruidDataSource;
import io.seata.rm.datasource.DataSourceProxy;
import org.apache.ibatis.session.SqlSessionFactory;
import org.mybatis.spring.SqlSessionFactoryBean;
import org.mybatis.spring.transaction.SpringManagedTransactionFactory;
import org.springframework.beans.factory.annotation.Value;
import org.springframework.boot.context.properties.ConfigurationProperties;
import org.springframework.context.annotation.Bean;
import org.springframework.context.annotation.Configuration;
import org.springframework.core.io.support.PathMatchingResourcePatternResolver;
import javax.sql.DataSource;

/**
 * @author yueLQ
 * @date 2020-08-10 22:00
 */
@Configuration
public class DataSourceProxyConfig {

    @Value("${mybatis.mapperLocations}")
    private String mapperLocations;

    @Bean
    @ConfigurationProperties(prefix = "spring.datasource")
    public DataSource druidDataSource(){
        return new DruidDataSource();
    }

    @Bean
    public DataSourceProxy dataSourceProxy(DataSource dataSource) {
        return new DataSourceProxy(dataSource);
    }

    @Bean
    public SqlSessionFactory sqlSessionFactoryBean(DataSourceProxy dataSourceProxy) throws Exception {
        SqlSessionFactoryBean sqlSessionFactoryBean = new SqlSessionFactoryBean();
        sqlSessionFactoryBean.setDataSource(dataSourceProxy);
        sqlSessionFactoryBean.setMapperLocations(new PathMatchingResourcePatternResolver().getResources(mapperLocations));
        sqlSessionFactoryBean.setTransactionFactory(new SpringManagedTransactionFactory());
        return sqlSessionFactoryBean.getObject();
    }

}
MyBatisConfig
package com.atguigu.springcloud.alibaba.config;

import org.mybatis.spring.annotation.MapperScan;
import org.springframework.context.annotation.Configuration;

/**
 * @author yueLQ
 * @date 2020-08-10 22:00
 */
@Configuration
@MapperScan({"com.atguigu.springcloud.alibaba.dao"})
public class MyBatisConfig {
}
OrderController
package com.atguigu.springcloud.alibaba.controller;

import com.atguigu.springcloud.alibaba.domain.CommonResult;
import com.atguigu.springcloud.alibaba.domain.Order;
import com.atguigu.springcloud.alibaba.service.OrderService;
import org.springframework.beans.factory.annotation.Autowired;
import org.springframework.web.bind.annotation.RestController;

/**
 * @author yueLQ
 * @date 2020-08-10 21:55
 */
@RestController
public class OrderController {

    @Autowired
    private OrderService orderService;

    public CommonResult create(Order order){
        orderService.create(order);
        return new CommonResult(200,"訂單建立成功");
    }

}
@GlobalTransactional
正常下單:
數據庫情況
http://localhost:2001/order/create?userId=1&productId=1&count=10&money=100
超時異常,沒加@GlobalTransactional
新增異常的程式碼AccountServiceImpl

故障原因:
當庫存和賬戶金額扣減後,訂單狀態並沒有設定爲已經完成,沒有從零改爲1,而且由於feign的重試機制 機製,賬戶餘額還有可能被多次扣減
超時異常,新增@GlobalTransactional
-
AccountServiceImpl新增超時
-
OrderServiceImpl@GlobalTransactional

-
下單後數據庫數據並沒有任何改變記錄都新增不進來
Seate 原理簡介
再看TC/TM/RM三大元件
- TM開啓分佈式事務(TM 向TC註冊全域性事務記錄) ;
- 按業務場景,編排數據庫、服務等事務內資源(RM向TC彙報資源準備狀態) ;
- TM結束分佈式事務,事務- -階段結束(TM通知TC提交/回滾分佈式事務) ;
- TC彙總事務資訊,決定分佈式事務是提交還是回滾;
- TC通知所有RM提交/回滾資源,事務二階段結束。
seata 的四種模式
-
AT 模式
提供無侵入自動補償的事務模式,目前已支援 MySQL、 Oracle 、PostgreSQL和 TiDB的AT模式,H2 開發中(預設使用該模式) -
TCC 模式
支援 TCC 模式並可與 AT 混用,靈活度更高 -
SAGA 模式
爲長事務提供有效的解決方案 -
XA 模式
支援已實現 XA 介面的數據庫的 XA 模式
AT模式如何做到對業務的無侵入
-
一階段:業務數據和回滾日誌記錄在同一個本地事務中提交,釋放本地鎖和連線資源。
-
二階段:
提交非同步化,非常快速地完成。
回滾通過一階段的回滾日誌進行反向補償。
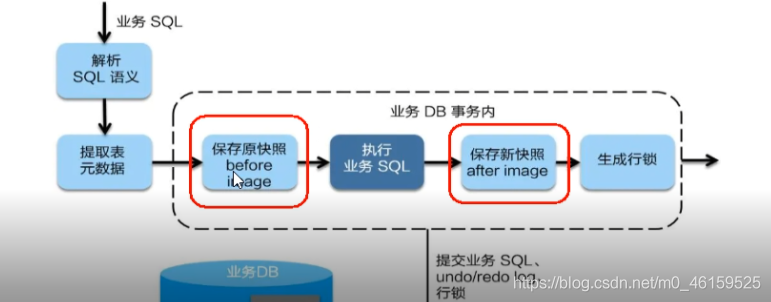
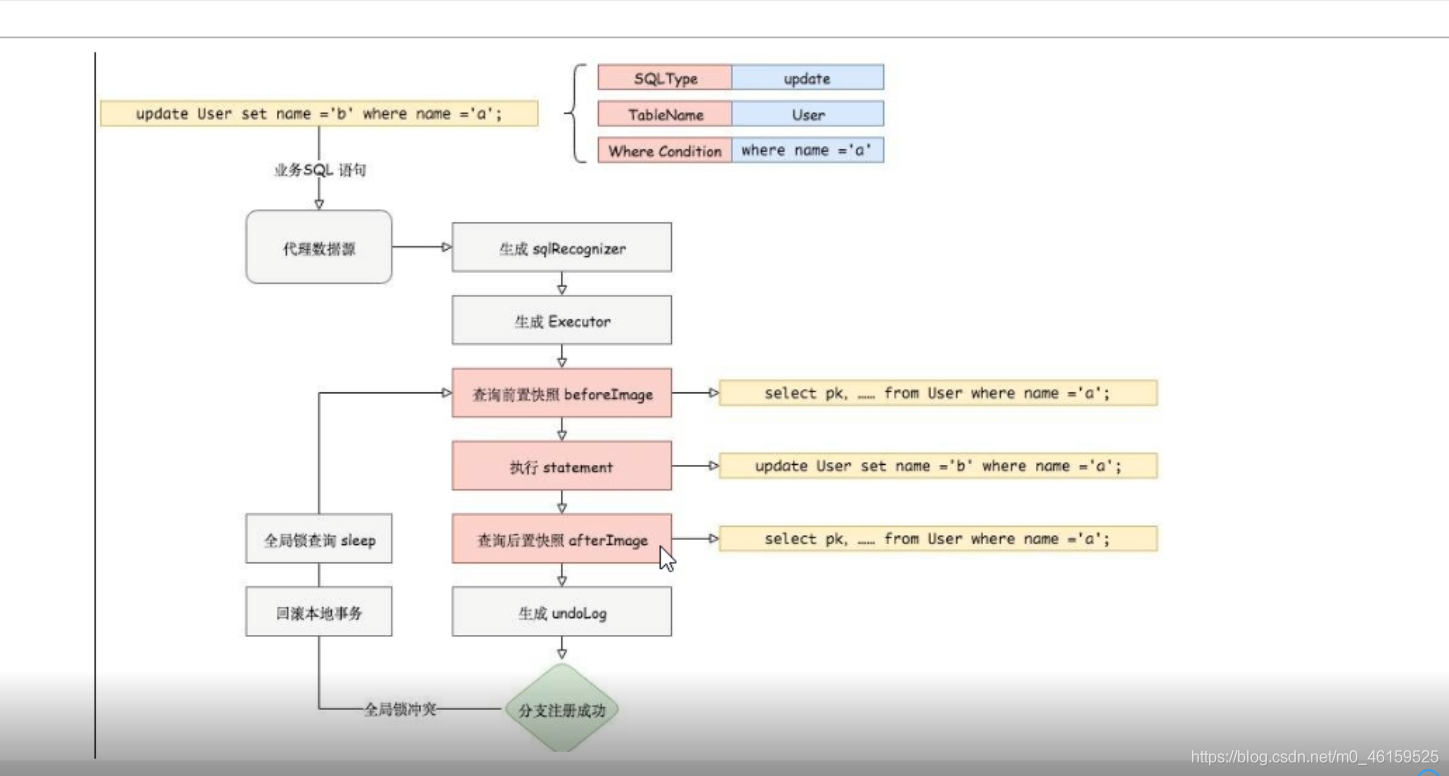
在一階段, Seata會攔截「業務SQL"
- 解析SQL語意,找到「業務SQL"要更新的業務數據,在業務數據被更新前,將其儲存成"before image" ,
- 執行「業務SQL"更新業務數據,在業務數據更新之後,
- 其儲存成"after image」 ,最後生成行鎖。
以上操作全部在一個數據庫事務內完成, 這樣保證了一階段操作的原子性。
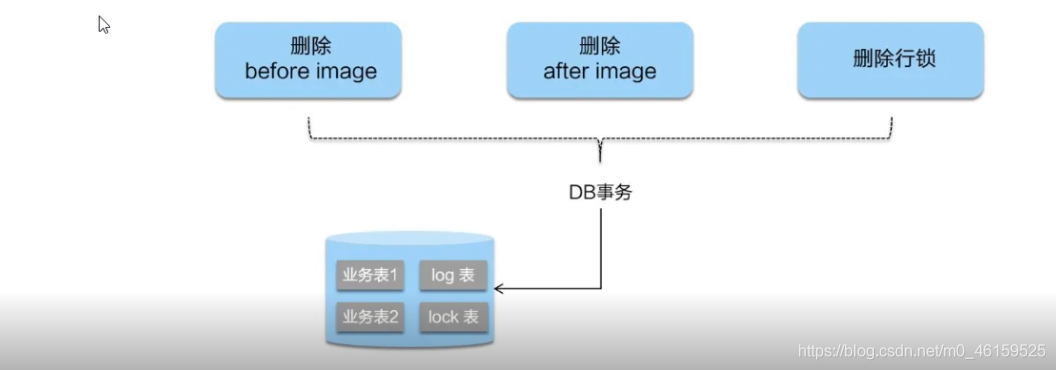
二階段如是順利提交的話,
因爲「業務SQL"在-階段已經提交至數據庫,所以Seata框架只需將一階段儲存的快照數據和行鎖刪掉, 完成數據清理即可.
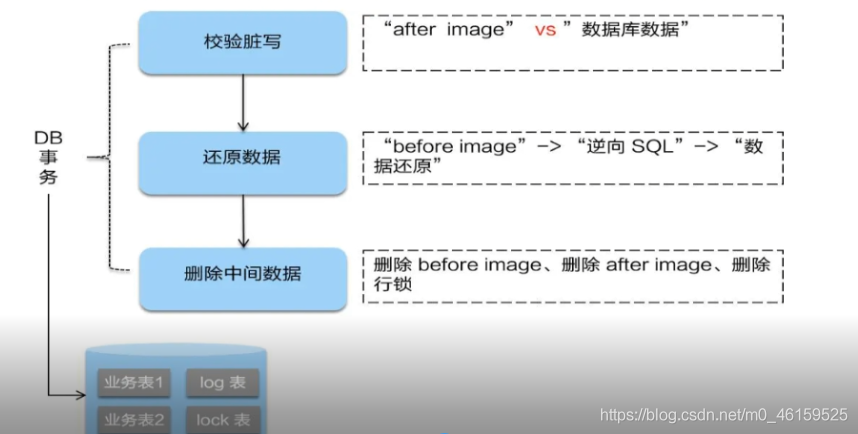
二階段回滾:
二階段如果是回滾的話,Seata 就需要回滾-階段已經執行的「業務SQL",還原業務數據。
回滾方式便是用"before image"還原業務數據;但在還原前要首先要校驗髒寫,對比「數據庫當前業務數據」和"after image」,如果兩份數據完全一致就說明沒有髒寫, 可以還原業務數據,如果不一致就說明有髒寫, 出現髒寫就需要轉人工處理。
debug
測試斷點:

數據庫結果


補充

本文部落格內容均來自:木魚水心-,特別感謝該博主