Windows10環境下VS Code設定c/c++環境
Windows10環境下VS Code設定c/c++環境
文章是對https://code.visualstudio.com/docs/cpp/config-mingw的翻譯。一來供自己快速檢視,二來給各位看官省去看原文的煩惱。不過,英文水平好的同學直接按照官方教學操作更佳。
1、安裝VS和Mingw-w64(建議路徑不要出現中文和空格)
1、Install Visual Studio Code.
2、Install the C/C++ extension for VS Code. You can install the C/C++ extension by searching for ‘c++’ in the Extensions view (Ctrl+Shift+X).

3、Install Mingw-w64 via the SourceForge website. Click Mingw-w64 to download the Windows Mingw-w64 installer.
- Run the installer.
- For Architecture select x86_64(關鍵) and then select Next.
- Next again to use the default installation folder and install MinGW.
4、Add the path to your Mingw-w64 bin folder to the Windows PATH environment variable by using the following steps:
環境變數新增此處不再贅述(可見英文)。
後面幾乎沒有英文,請放心食用。
2、檢查MinGW安裝
終端下輸入命令:
g++ -v
gdb -v
出現以下即爲成功


3、建立工程
1、在某個目錄下建立你的工程資料夾HELLOWORLD,用VS開啓

2、新增c++檔案helloworld.cpp, Ctrl+S儲存

程式碼:
#include <iostream>
#include <vector>
#include <string>
using namespace std;

int main()
{
    vector<string> msg {"Hello", "C++", "World", "from", "VS Code", "and the C++ extension!"};
    for (const string& word : msg)
    {
        cout << word << " ";
    }
    cout << endl;
}
4、編譯helloworld.cpp
1、建立tasks.json(告訴VS程式碼如何構建(編譯)程式),它會呼叫g++編譯器根據原始碼建立可執行檔案。
- choose Terminal > Configure Default Build Task.
- Choose
g++.exe build active file(將構建當前在編輯器中顯示(活動)的檔案)

這將在.vscode資料夾中建立一個task.json檔案,並在編輯器中將其開啓。
tasks.json
{
  "version": "2.0.0",
  "tasks": [
    {
      "type": "shell",
      "label": "C/C++: g++.exe build active file",
      "command": "C:\\Program Files\\mingw-w64\\x86_64-8.1.0-posix-seh-rt_v6-rev0\\mingw64\\bin\\g++.exe",
      "args": ["-g", "${file}", "-o", "${fileDirname}\\${fileBasenameNoExtension}.exe"],
      "options": {
        "cwd": "${workspaceFolder}"
      },
      "problemMatcher": ["$gcc"],
      "group": {
        "kind": "build",
        "isDefault": true
      }
    }
  ]
}
參考有關變數解釋
command:指定要執行的程式;在這個例子中就是g++。args:指定將傳遞給g++的命令列參數。這些參數必須按照編譯器所期望的順序指定。
這個任務告訴g++獲取活動檔案(${file}),編譯它,並在當前目錄(${fileDirname})中建立一個與活動檔案同名但擴充套件名爲.exe的可執行檔案(${fileBasenameNoExtension}.exe),在我們的範例中生成helloworld.exe。label:是你將在任務列表中看到的內容;你可以給它起任何你喜歡的名字。isDefault:組物件中的true值指定當您按Ctrl + Shift + B時將執行此任務。此屬性僅出於方便起見;如果將其設定爲false,仍然可以從「Terminal 」選單中使用「Tasks: Run Build Task.」來執行它。
5、執行編譯
1、返回helloworld.cpp。您的任務將構建活動檔案,並且您希望編譯helloworld.cpp。
2、要執行task.json中定義的構建任務,請按Ctrl + Shift + B或從**終端(Terminal)**主選單中選擇「執行構建任務(Run Build Task)」。
3、對於成功的g ++構建,輸出看起來像這樣:

或者

4、使用+按鈕建立一個新的終端,輸入hello(or .\helloworld.exeif you use a PowerShell terminal)

6、修改task.json
1、 using an argument like "${workspaceFolder}\\*.cpp"instead of ${file}.:這將在當前資料夾中生成所有.cpp檔案。
2、您也可以通過替換來修改輸出檔名"${fileDirname}\\${fileBasenameNoExtension}.exe"用帶有寫死的檔名(例如 "${workspaceFolder}\\myProgram.exe").
7、偵錯helloworld.cpp
1、建立一個launch.json檔案來設定VS Code,按F5偵錯程式時啓動GDB偵錯程式。
- 從主選單,選擇Run >新增設定…(Run > Add Configuration…)然後選擇c++ (GDB/LLDB)。
- 然後,您將看到各種預定義偵錯設定的下拉選單。選擇 g++.exe構建並偵錯活動檔案( g++.exe build and debug active file)。

launch.json
{
  "version": "0.2.0",
  "configurations": [
    {
      "name": "g++.exe - Build and debug active file",
      "type": "cppdbg",
      "request": "launch",
      "program": "${fileDirname}\\${fileBasenameNoExtension}.exe",
      "args": [],
      "stopAtEntry": false,
      "cwd": "${workspaceFolder}",
      "environment": [],
      "externalConsole": false,
      "MIMode": "gdb",
      "miDebuggerPath": "C:\\Program Files\\mingw-w64\\x86_64-8.1.0-posix-seh-rt_v6-rev0\\mingw64\\bin\\gdb.exe",
      "setupCommands": [
        {
          "description": "Enable pretty-printing for gdb",
          "text": "-enable-pretty-printing",
          "ignoreFailures": true
        }
      ],
      "preLaunchTask": "C/C++: g++.exe build active file"
    }
  ]
}
program:指定要偵錯的程式。在這裏它被設定爲活動資料夾${fileDirname}和擴充套件名爲.exe的活動檔名${fileBasenameNoExtension}。如果helloworld.cpp是活動檔案,它將是helloworld.exestopAtEntry:預設情況下,C ++擴充套件不會在原始碼中新增任何斷點,並且stopAtEntry值設定爲false。將stopAtEntry值更改爲true,以使偵錯程式在啓動偵錯時在main方法上停止。preLaunchTask:用於指定啓動前要執行的任務。確保它與task.json檔案標籤設定一致。
8、開始偵錯
1、返回helloworld.cpp,因此它是活動檔案。
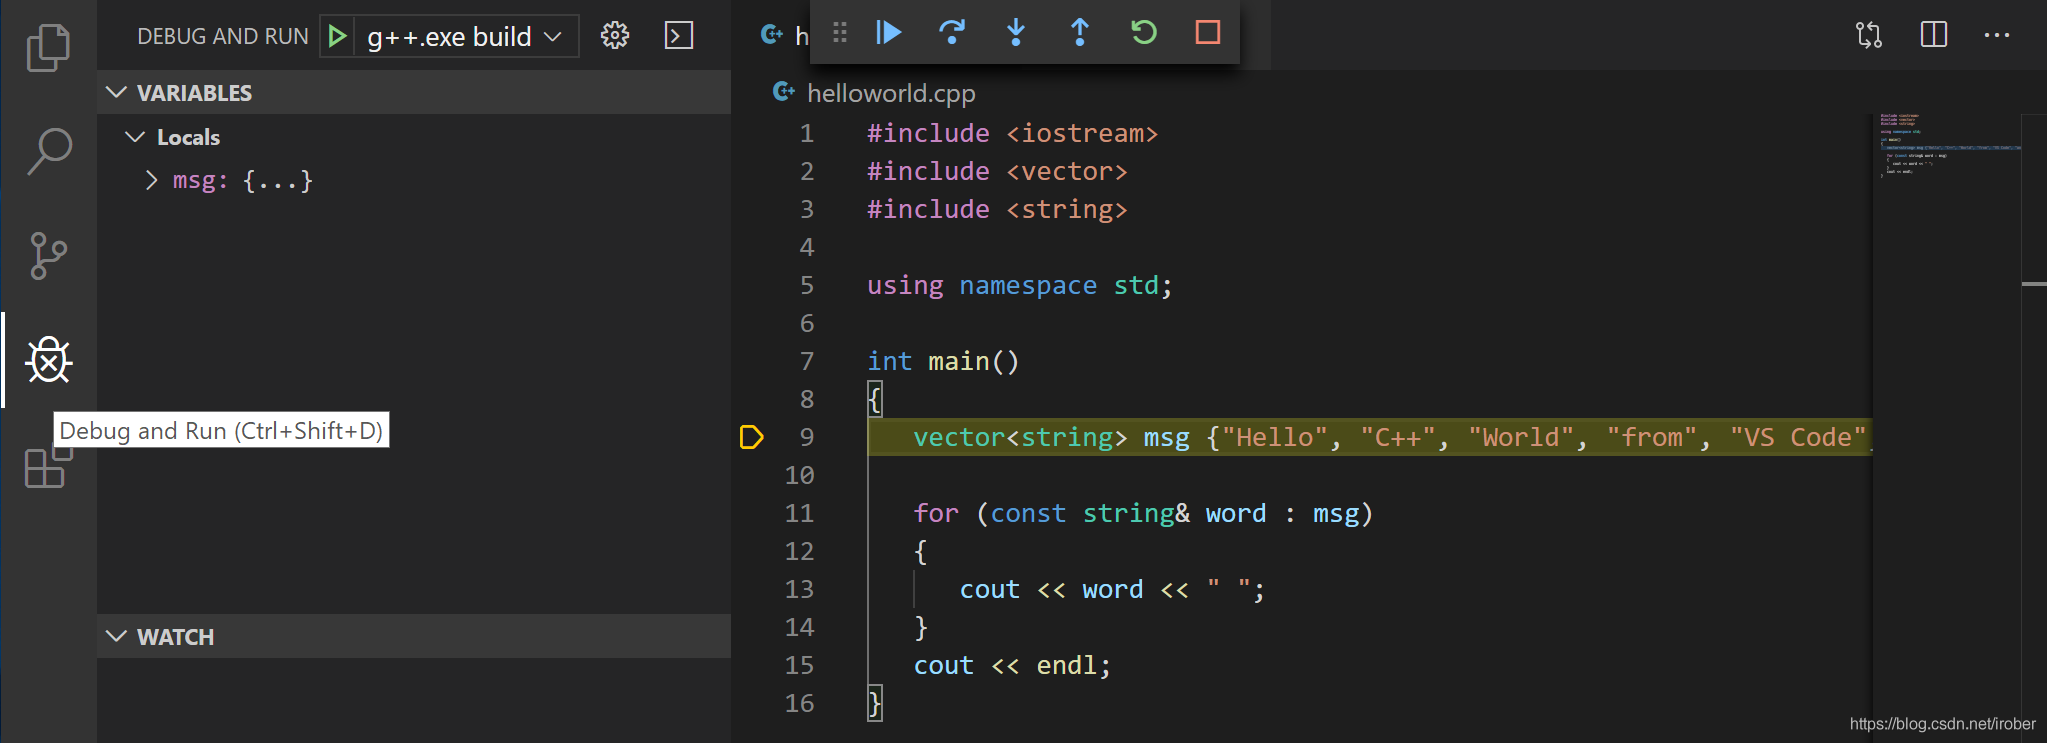
2、按F5或者執行>開始偵錯(Run > Start Debugging)。整合終端出現在原始碼編輯器的底部。在「偵錯輸出」索引標签中,您將看到指示偵錯程式已啓動並正在執行的輸出。編輯器突出顯示main方法中的第一條語句。這是C ++擴充套件自動爲您設定的斷點:

左側的「執行」檢視顯示偵錯資訊。在程式碼編輯器的頂部,將顯示一個偵錯控制面板。您可以通過抓住左側的點在螢幕上移動它。
具體偵錯指令在此就不再贅述。
9、C/C++ configurations
如有需要參考原文
如果希望對C/ c++擴充套件進行更多控制,可以建立一個c_cpp_properties.json檔案,這將允許您更改設定諸如編譯器的路徑,包括路徑,c++標準(預設是C + + 17),等等。
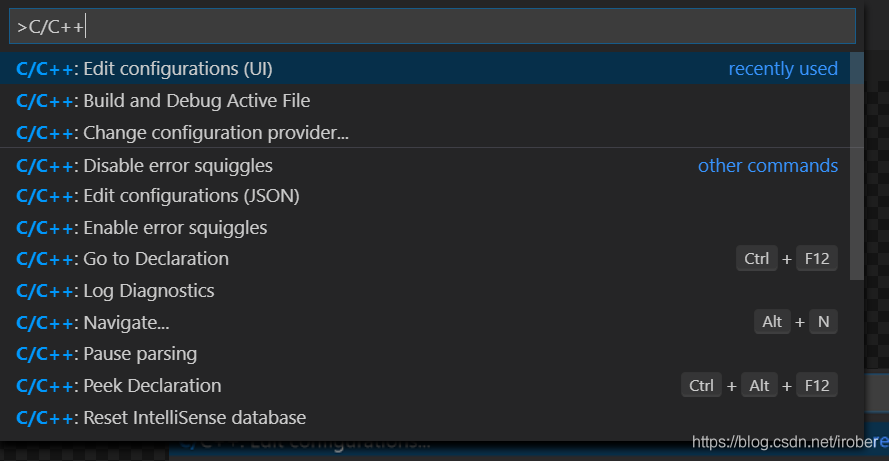
You can view the C/C++ configuration UI by running the command C/C++: Edit Configurations (UI) from the Command Palette (Ctrl+Shift+P).

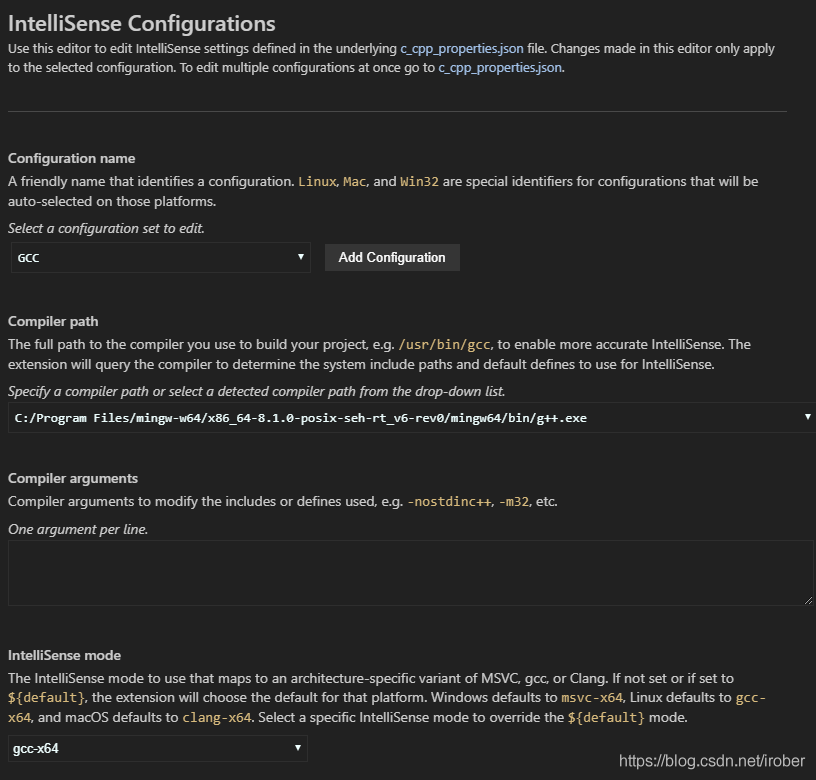
這將開啓「 C / C ++設定」頁面。當您在此處進行更改時,VS Code會將它們寫入.vscode資料夾中名爲c_cpp_properties.json的檔案中。
在這裏,我們將設定名更改爲GCC,將編譯器路徑下拉式選單設定爲g++編譯器,並將IntelliSense模式匹配編譯器(GCC -x64)

c_cpp_properties.json
{
  "configurations": [
    {
      "name": "GCC",
      "includePath": ["${workspaceFolder}/**"],
      "defines": ["_DEBUG", "UNICODE", "_UNICODE"],
      "windowsSdkVersion": "10.0.18362.0",
      "compilerPath": "C:/Program Files/mingw-w64/x86_64-8.1.0-posix-seh-rt_v6-rev0/mingw64/bin/g++.exe",
      "cStandard": "c11",
      "intelliSenseMode": "gcc-x64"
    }
  ],
  "version": 4
}
只有當您的程式包含的標頭檔案不在工作區中或在標準庫路徑中時,您才需要新增到Include path陣列設定中。