React實現(Web端)網易雲音樂專案(一),錯過了真的可惜呀
首先肯定是搭建專案的結構了,通過腳手架安裝這部分我就不說了
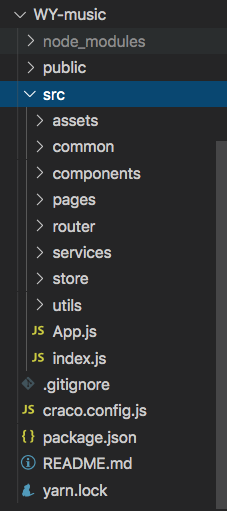
首先看專案的目錄結構

assets:放我們的靜態資源,圖片,字型和公共初始樣式等
common:放我們公共的JS檔案
components:放我們專案的公共元件
pages:放專案的主檢視元件
router:放專案的路由設定
services:網路請求部分
store:放redux的相關設定
utils:放一些處理我們數據的JS方法
一.我們引入檔案的時候經常就是這樣
../../../../
感覺太邋遢了
安裝一個外掛吧
yarn add @craco/craco
然後在我們專案的根目錄,也就是src的同級目錄,建立一個craco.config.js
// 匯入檔案可以用@
const path = require("path");

const resolve = dir => path.resolve(__dirname, dir);

module.exports = {
  webpack: {
    alias: {
      "@": resolve("src"),
      "components": resolve("src/components")
    }
  }
}
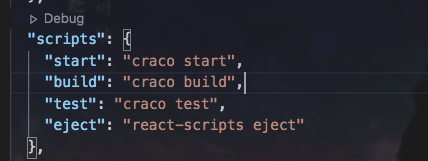
然後在我們的package.json中,將scripts改成這樣的

今後匯入我們的任何檔案直接這樣寫
import {  } from '@/common';
import  from '@/components';
二.先定義一些初始樣式比較好,在入口index.js引入,專案主要是用styled-components寫的
yarn add normalize.css
然後在assets中建立一個css檔案,css檔案裏面建立一個reset.css
@import "~normalize.css";

/* 樣式的重置 */
body, html, h1, h2, h3, h4, h5, h6, ul, ol, li, dl, dt, dd, header, menu, section, p, input, td, th, ins {
  padding: 0;
  margin: 0;
}

ul, ol, li {
  list-style: none;
}

a {
  text-decoration: none;
  color: #666;
}

a:hover {
  color: #666;
  text-decoration: underline;
}

i, em {
  font-style: normal;
}

input, textarea, button, select, a {
  outline: none;
  border: none;
}

table {
  border-collapse: collapse;
  border-spacing: 0;
}

img {
  border: none;
  vertical-align: middle;
}

/* 全域性樣式 */
body, textarea, select, input, button {
  font-size: 12px;
  color: #333;
  font-family: Arial, Helvetica, sans-serif;
  background-color: #f5f5f5;
}

.text-nowrap {
  white-space: nowrap;
  text-overflow: ellipsis;
  overflow: hidden;
}

.wrap-v1 {
  width: 1100px;
  margin: 0 auto;
}

.wrap-v2 {
  width: 980px;
  margin: 0 auto;
}

.sprite_01 {
  background: url(../img/sprite_01.png) no-repeat 0 9999px;
}

.sprite_02 {
  background: url(../img/sprite_02.png) no-repeat 0 9999px;
}

.sprite_covor {
  background: url(../img/sprite_cover.png) no-repeat 0 9999px;
}

.sprite_icon {
  background: url(../img/sprite_icon.png) no-repeat 0 9999px;
}

.sprite_icon2 {
  background: url(../img/sprite_icon2.png) no-repeat 0 9999px;
}

.sprite_button {
  background: url(../img/sprite_button.png) no-repeat 0 9999px;
}

.sprite_button2 {
  background: url(../img/sprite_button2.png) no-repeat 0 9999px;
}

.sprite_table {
  background: url(../img/sprite_table.png) no-repeat 0 9999px;
}

.image_cover {
  position: absolute;
  left: 0;
  right: 0;
  top: 0;
  bottom: 0;
  text-indent: -9999px;
  background: url(../img/sprite_cover.png) no-repeat -145px -57px;
}
我先把這些樣式寫這了,因爲網易雲音樂,它裏面很多的圖片都用的是精靈圖,我提前給他們把位置和樣式確定了一下
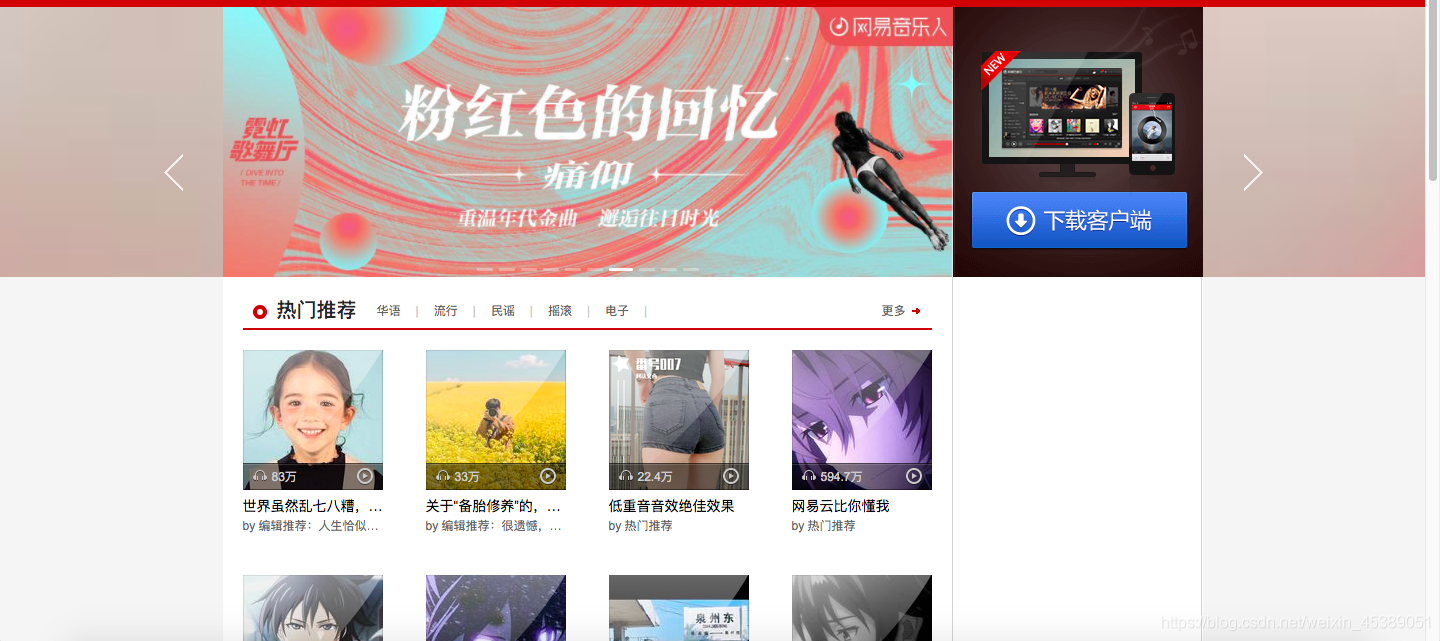
這篇部落格就先完成下面 下麪這個,我們先把基本的框架和路由搭好

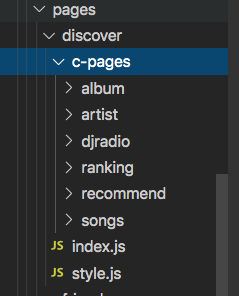
三.先在pages裏面建立三個檢視檔案,discover,friend,mine(其他幾個是跳轉外部鏈接的,不需要路由)
import React, { memo } from 'react';

export default memo(function LSHDiscover() {
  return (
    <div>
      <h2>LSHDiscover</h2>
    </div>
  )
})

import React, { memo } from 'react';

export default memo(function LSHFriend() {
  return (
    <div>
      <h2>HYFriend</h2>
    </div>
  )
})

import React, { memo } from 'react';

export default memo(function LSHMine() {
  return (
    <div>
      <h2>LSHMine</h2>
    </div>
  )
})
然後discover有6個子路由,我就不一一寫了

至於爲什麼用memo?節省效能
元件僅在它的 props 發生改變的時候進行重新渲染
四.設定路由
yarn add react-router-config
yarn add react-router-dom
在我們的router檔案中建立一個index.js
import React from 'react'

import LSHDiscover from "@/pages/discover";
import HYRecommend from "@/pages/discover/c-pages/recommend";
import HYRanking from "@/pages/discover/c-pages/ranking";
import HYSongs from "@/pages/discover/c-pages/songs";
import HYDjradio from "@/pages/discover/c-pages/djradio";
import HYArtist from "@/pages/discover/c-pages/artist";
import HYAlbum from "@/pages/discover/c-pages/album";

import LSHMine from "@/pages/mine";
import LSHFriend from "@/pages/friend";

import {Redirect} from 'react-router-dom'
Redirect是爲了重定向,當進頁面的時候展示哪一個
下面 下麪是routes
const routes = [
  {
    path: "/",
    exact:true,
    render:()=>(
      <Redirect to="/discover"/>
    )
  },
  {
    path: "/discover",
    component: LSHDiscover,
    routes: [
      {
        path: "/discover",
        exact: true,
        render: () => (
          <Redirect to="/discover/recommend"/>
        )
      },
      {
        path: "/discover/recommend",
        component: HYRecommend
      },
      {
        path: "/discover/ranking",
        component: HYRanking
      },
      {
        path: "/discover/songs",
        component: HYSongs
      },
      {
        path: "/discover/djradio",
        exact: true,
        component: HYDjradio
      },
      {
        path: "/discover/artist",
        component: HYArtist
      },
      {
        path: "/discover/album",
        component: HYAlbum
      }
    ]
  },
  {
    path: "/mine",
    component: LSHMine
  },
  {
    path: "/friend",
    component: LSHFriend
  },
];
同時別忘了導出
export default routes
五.在APP.js中設定
import React, { memo } from 'react'
import {renderRoutes} from 'react-router-config'
import { HashRouter } from 'react-router-dom';
import routes from './router'

import LSHAppHeader from '@/components/app-header'

export default memo(function App() {
  return (
    <HashRouter>
      <LSHAppHeader/>
      {renderRoutes(routes)}
    </HashRouter>
  )
})
在這裏我們用的是hash路由,LSHAppHeader是我們下面 下麪這個,下面 下麪開始寫

六.開始app-header元件的編寫
在components中建立一個app-header檔案,裏面建立一個index.js和style.js
由於我們這個東西用到了antd這個ui庫,先安裝一下,別忘了匯入樣式,可以在我們定義的reset.css中匯入
@import "~antd/dist/antd.css";
安裝antd
yarn add antd
yarn add @ant-design/icons
index.js
import React, { memo } from 'react';

import { headerLinks } from '@/common/local-data'

import { NavLink } from 'react-router-dom';
import { SearchOutlined } from '@ant-design/icons'
import { Input } from 'antd'
import {
  HeaderWrapper,
  HeaderLeft,
  HeaderRight
} from './style'

export default memo(function LSHAppHeader() {
  //業務程式碼
  const showSelectItem = (item, index) => {
    if (index < 3) {
      return (
        <NavLink to={item.link} exact>
          {item.title}
          <i className="sprite_01 icon"></i>
        </NavLink>
      )
    } else {
      return <a href={item.link}>{item.title}</a>
    }
  }

  //返回到jsx
  return (
    <HeaderWrapper>
      <div className="content wrap-v1">
        <HeaderLeft>
          <a href="#/" className="logo sprite_01">網易雲音樂</a>
          <div className="select-list">
            {
              headerLinks.map((item, index) => {
                return (
                  <div key={item.title} className="select-item">
                    {showSelectItem(item, index)}
                  </div>
                )
              })
            }
          </div>
        </HeaderLeft>
        <HeaderRight>
          <Input className="search"
            placeholder="音樂/視訊/電臺/使用者"
            prefix={<SearchOutlined />} />
          <div className="center">創作者中心</div>
          <div>登錄</div>
        </HeaderRight>
      </div>
      <div className="divider"></div>
    </HeaderWrapper>
  )
})
headerLinks是我們一些公共js數據,在common中建立一個local-data.js
export const headerLinks = [
  {
    title: "發現音樂",
    link: "/discover"
  },
  {
    title: "我的音樂",
    link: "/mine"
  },
  {
    title: "朋友",
    link: "/friend"
  },
  {
    title: "商城",
    link: "https://music.163.com/store/product"
  },
  {
    title: "音樂人",
    link: "https://music.163.com/nmusician/web/index#/"
  },
  {
    title: "下載用戶端",
    link: "https://music.163.com/#/download"
  }
]
style.js樣式爲,要先安裝我們的styled-components,yarn add styled-components
import styled from "styled-components";

export const HeaderWrapper = styled.div`
  height: 75px;
  font-size: 14px;
  color: #fff;
  background-color: #242424;

  .content {
    height: 70px;

    display: flex;
    justify-content: space-between;
  }

  .divider {
    height: 5px;
    background-color: #C20C0C;
  }
`

export const HeaderLeft = styled.div`
  display: flex;

  .logo {
    display: block;
    width: 176px;
    height: 69px;
    background-position: 0 0;
    text-indent: -9999px;
  }

  .select-list {
    display: flex;
    line-height: 70px;

    .select-item {
      position: relative;
      a {
        display: block;
        padding: 0 20px;
        color: #ccc;
      }

      :last-of-type a {
        position: relative;
        ::after {
          position: absolute;
          content: "";
          width: 28px;
          height: 19px;
          background-image: url(${require("@/assets/img/sprite_01.png")});
          background-position: -190px 0;
          top: 20px;
          right: -15px;
        }
      }

      &:hover a, a.active {
        color: #fff;
        background: #000;
        text-decoration: none;
      }

      .active .icon {
        position: absolute;
        display: inline-block;
        width: 12px;
        height: 7px;
        bottom: -1px;
        left: 50%;
        transform: translate(-50%, 0);
        background-position: -226px 0;
      }
    }
  }
`

export const HeaderRight = styled.div`
  display: flex;
  align-items: center;
  color: #ccc;
  font-size: 12px;


  .search {
    width: 158px;
    height: 32px;
    border-radius: 16px;

    input {
      &::placeholder {
        font-size: 12px;
      }
    }
  }

  .center {
    width: 90px;
    height: 32px;
    line-height: 32px;
    text-align: center;
    border: 1px solid #666;
    border-radius: 16px;
    margin: 0 16px;
    background-color: transparent;
  }
`
好了,最頂部的完成了
下面 下麪寫這個discover的子路由檢視

我們去到discover這個檔案的index.js中
import React, { memo } from 'react';
//子路由渲染
import { renderRoutes } from 'react-router-config';

import { dicoverMenu } from "@/common/local-data";

import { NavLink } from 'react-router-dom';

import {
  DiscoverWrapper,
  TopMenu
} from './style';

export default memo(function LSHDiscover(props) {
  // 子路由渲染
  const { route } = props;

  return (
    <DiscoverWrapper>
       <div className="top">
        <TopMenu className="wrap-v1">
          {
            dicoverMenu.map((item, index) => {
              return (
                <div className="item" key={item.title}>
                  <NavLink to={item.link}>{item.title}</NavLink>
                </div>
              )
            })
          }
        </TopMenu>
      </div>
      {renderRoutes(route.routes)}
    </DiscoverWrapper>
  )
})
dicoverMenu這個檔案的東西
export const dicoverMenu = [
  {
    title: "推薦",
    link: "/discover/recommend"
  },
  {
    title: "排行榜",
    link: "/discover/ranking"
  },
  {
    title: "歌單",
    link: "/discover/songs"
  },
  {
    title: "主播電臺",
    link: "/discover/djradio"
  },
  {
    title: "歌手",
    link: "/discover/artist"
  },
  {
    title: "新碟上架",
    link: "/discover/album"
  },
]
style.js
import styled from 'styled-components';

export const DiscoverWrapper = styled.div`
  .top {
    height: 30px;
    background-color: #C20C0C;
  }
`

export const TopMenu = styled.div`
  display: flex;
  padding-left: 180px;
  position: relative;
  top: -4px;

  .item {
    a {
      display: inline-block;
      height: 20px;
      line-height: 20px;
      padding: 0 13px;
      margin: 7px 17px 0;
      color: #fff;

      &:hover, &.active {
        text-decoration: none;
        background-color: #9B0909;
        border-radius: 20px;
      }
    }
  }
`
好了,這個頁面基本就完成了,下一篇部落格就要通過網路請求獲取數據到我們redux中儲存了,這兩個頁面

github專案地址:https://github.com/lsh555/WY-Music