linux運維基礎[啓動引導與修復]——————系統執行級別、rc.local檔案、grub啓動載入程式
2020-08-10 12:22:05
文章目錄
1.系統執行級別
linux中,用執行級別代表系統啓動之後進入的介面
| 執行級別 | 含義 |
|---|---|
| 0 | 關機 |
| 1 | 單使用者模式,主要用於系統修復(簡單的) |
| 2 | 不完全的命令列模式,不含有NFS(檔案共用服務) |
| 3 | 標準字元介面 |
| 4 | 沒有使用 |
| 5 | 圖形介面 |
| 6 | 重新啓動 |
1.1 修改當前級別
1)檢視執行級別:
[root@foundation5 ~]# runlevel
N 5
#之前沒有級別 5當前在圖形介面
#開機就進入圖形介面
2)修改執行級別
[root@server ~]# init 3
[root@server ~]# init 5
# 必須要安裝了圖形介面纔可以使用5介面,如果沒有安裝,不切換
[root@server ~]# runlevel
3 5
# 但是runlevel中會以爲進入了5級別,出現5
3)儘量不使用關機重新啓動:這種關機重新啓動不回正確關閉服務後關機,所以最好使用shutdown關機重新啓動。
[root@server ~]# init 0 # 關機
[root@server ~]# init 6 # 重新啓動
1.2 修改預設級別
修改一開機自動進入的級別:
1)儲存在預設的執行級別檔案中:
[root@server ~]# vim /etc/inittab

# inittab is no longer used when using systemd. 現在已經必用這個檔案了
# ADDING CONFIGURATION HERE WILL HAVE NO EFFECT ON YOUR SYSTEM.
# Ctrl-Alt-Delete is handled by /etc/systemd/system/ctrl-alt-del.target
# systemd uses 'targets' instead of runlevels. By default, there are two main targets: # 使用systemctl的target方式設定預設啓動介面
# multi-user.target: analogous to runlevel 3 # 一個代表init 3
# graphical.target: analogous to runlevel 5 # 一個代表init 5
# To set a default target, run: # 設定預設啓動方式執行下面 下麪一行的命令
# ln -sf /lib/systemd/system/<target name>.target /etc/systemd/system/default.target
2)修改爲預設字元介面即3級別
可以使用:
[root@server ~]# ln -sf /lib/systemd/system/multi-user.target /etc/systemd/system/default.target
還可以使用:
[root@server ~]# systemctl set-default multi-user.target
rm '/etc/systemd/system/default.target'
ln -s '/usr/lib/systemd/system/multi-user.target' '/etc/systemd/system/default.target'
# 這條命令與檔案中的要求命令相同。而且更方便
3)檢視修改:
[root@server ~]# systemctl get-default
multi-user.target # 也就是啓動級別3
2./etc/rc.d/rc.local
這個檔案中的命令,系統開基之後,登錄之前,會最後一個讀取這個檔案,將裏面的命令載入,如果你想要把一些命令自動執行,只需要寫在這個檔案中,就可以自動啓動:
[root@server ~]# ll /etc/rc.d/rc.local
-rwxr-xr-x. 1 root root 2652 Jul 11  2014 /etc/rc.d/rc.local
[root@server ~]# ll /etc/rc.local
lrwxrwxrwx. 1 root root 13 May  7  2014 /etc/rc.local -> rc.d/rc.local
[root@server ~]#
兩個檔案是同一個檔案。
檢視檔案內容:
[root@server ~]# vim /etc/rc.d/rc.local

touch /var/lock/subsys/local
# 每次開機都修改這個檔案的時間戳,這個時間就是開機時間,預設讓系統檢測到開機時間
任何開機要執行的命令,都可以寫在這個檔案中。
3.啓動載入程式
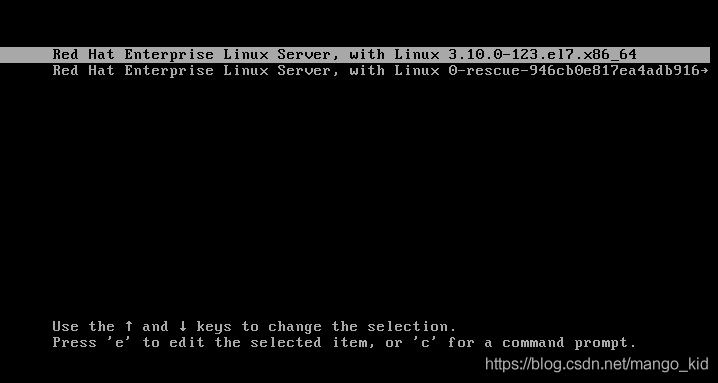
選擇進入哪個系統的程式,win10還是linux。
linux中的啓動載入程式是grub,就是這個介面:

3.1 grub的儲存位置
就在/boot下:
[root@server ~]# cd /boot
[root@server boot]# ll
total 73096
-rw-r--r--. 1 root root   122059 May  5  2014 config-3.10.0-123.el7.x86_64
drwxr-xr-x. 2 root root       37 May  7  2014 grub # grub內容
drwxr-xr-x. 6 root root      104 May  7  2014 grub2
-rw-r--r--. 1 root root 30676364 May  7  2014 initramfs-0-rescue-946cb0e817ea4adb916183df8c4fc817.img
-rw-r--r--. 1 root root 30299761 May  7  2014 initramfs-3.10.0-123.el7.x86_64.img
-rw-r--r--. 1 root root   867001 Jul 11  2014 initrd-plymouth.img
-rw-r--r--. 1 root root   228562 May  5  2014 symvers-3.10.0-123.el7.x86_64.gz # 內核,編譯之後系統載入的內核
-rw-------. 1 root root  2840084 May  5  2014 System.map-3.10.0-123.el7.x86_64
-rwxr-xr-x. 1 root root  4902000 May  7  2014 vmlinuz-0-rescue-946cb0e817ea4adb916183df8c4fc817
-rwxr-xr-x. 1 root root  4902000 May  5  2014 vmlinuz-3.10.0-123.el7.x86_64
檢視grub下內容:
[root@server boot]# cd grub
[root@server grub]# ll
total 4
-rw-r--r--. 1 root root 265 May  7  2014 grub.conf # 組態檔
lrwxrwxrwx. 1 root root   9 May  7  2014 menu.lst -> grub.conf # 軟鏈接
[root@server grub]# ll /etc/grub.conf  # 也是他的軟鏈接
lrwxrwxrwx. 1 root root 20 May  7  2014 /etc/grub.conf -> /boot/grub/grub.conf
3.2 Grub的組態檔
3.2.1 grub的分割區表示方法
| 硬碟 | 分割區 | linux中裝置檔名 | grub中裝置檔名 |
|---|---|---|---|
| 第一塊磁碟 | 第一個主分割區 | /dev/sda1 | hd(0,0) |
| 第二個主分割區 | /dev/sda2 | hd(0,1) | |
| 擴充套件分割區 | /dev/sda3 | hd(0,2) | |
| 第一個邏輯分割區 | /dev/sda5 | hd(0,4) | |
| 第二塊磁碟 | 第一個主分割區 | /dev/sdb1 | hd(1,0) |
| 第二個主分割區 | /dev/sdb2 | hd(1,1) | |
| 擴充套件分割區 | /dev/sdb3 | hd(1,2) | |
| 第一個邏輯分割區 | /dev/sdb5 | hd(1,4) |
3.2.2 Grub的組態檔
開啓:都是自動生成的
[root@server ~]# vim /etc/grub.conf
# 整體設定
default=0 # 預設啓動第一個操作系統
timeout=0 # 等待時間0秒,直接進入;-1一直等待(必須本機操作,不能遠端);5等待5秒

# 只有一個可啓動的操作系統,四行一個系統
title Red Hat Enterprise Linux 7 (3.10.0-123.el7.x86_64) # 這裏寫什麼,開機顯示什麼
        root (hd0) # 主啓動目錄的位置,/boot分割區,
        kernel /boot/vmlinuz-3.10.0-123.el7.x86_64 ro root=UUID=9bf6b9f7-92ad-441b-848e-0257cbb883d1 console=hvc0 LANG=en_US.UTF-8
        # 內核檔案 ro 根目錄的位置 語言方式
        initrd /boot/initramfs-3.10.0-123.el7.x86_64.img # 虛擬檔案系統
唯一需要該的是default就行。
在裝雙系統的時候,先裝windows,後裝linux。
- 因爲linux可以識別windows,linux後裝覆蓋後,windows還可以用。
- 如果先裝linux,windows不識別linux,覆蓋linux後,linux無法啓動。需要手工重新安裝grub。
實際工作中不需要裝windows。這就是個人機的問題。
3.3 Grub加密
如果grub沒有加密,使用者在啓動介面直接使用ctrl+c就可以破解密碼,所以將grub加密就可以保護root的密碼不被破解。
1)grub的加密使用md5格式,128位元加密:
[root@server ~]# grub-md5-crypt
passwd:
A978E8B914484136622E740CB2925F73
2)將它放在/etc/grub.conf檔案中:
default=0
timeout=0
password --md5 A978E8B914484136622E740CB2925F73/ # 不輸入密碼可以進入,單是進入e需要輸入密碼

title Red Hat Enterprise Linux 7 (3.10.0-123.el7.x86_64)
        root (hd0)
        kernel /boot/vmlinuz-3.10.0-123.el7.x86_64 ro root=UUID=9bf6b9f7-92ad-441b-848e-0257cbb883d1 console=hvc0 LANG=en_US.UTF-8
        initrd /boot/initramfs-3.10.0-123.el7.x86_64.img
3)加入lock:(伺服器絕對不能做)
default=0
timeout=0
password --md5 A978E8B914484136622E740CB2925F73/ # 不輸入密碼可以進入,單是進入e需要輸入密碼

title Red Hat Enterprise Linux 7 (3.10.0-123.el7.x86_64)
		lock # 不輸入grub密碼根本不能進入密碼,所以如果設定了就必須在物理機啓動。
        root (hd0)
        kernel /boot/vmlinuz-3.10.0-123.el7.x86_64 ro root=UUID=9bf6b9f7-92ad-441b-848e-0257cbb883d1 console=hvc0 LANG=en_US.UTF-8
        initrd /boot/initramfs-3.10.0-123.el7.x86_64.img