預測PM2.5--李宏毅機器學習梯度下降作業
初學python和機器學習,此文的寫作目的僅僅是日常學習筆記。
code以及詳細參考:https://blog.csdn.net/iteapoy/article/details/105431738
原始程式碼
1. 載入train.csv
import numpy as np
import sys
import pandas as pd

#讀入train.csv,繁體字以big5爲編碼, 用pandas庫讀取csv檔案
data = pd.read_csv('./train.csv', encoding = 'big5')
#顯示前20行
data.head(3)

第1列是日期,第2列是觀測站所在地,第3列是觀測指標,第4列-第27列是0-23共24小時。
data.shape
Out:
(4320, 27)
數據規格爲:4320行(12個月每個月前20天18個觀測指標),27列(日期+觀測地點+觀測指標+24個小時)
2. 預處理
MAC同時開啓多個終端快捷鍵:control+N
終端輸入:pip list
檢視pandas版本爲:0.23.4
更新pandas版本:
-
第一步:解除安裝pandas舊版本
pip3 uninstall pandas -
第二步:下載最新版本:https://pypi.org/project/pandas
說明:由於python預設源是國外的,所以下載可能會出現很慢的情況,這裏我建議直接切換映象源下載pip install -i https://pypi.tuna.tsinghua.edu.cn/simple -U pandas這個命令的意思是指定在https://pypi.tuna.tsinghua.edu.cn/simple網站 下載pandas的包
解釋一下上面的-U 和-i
-U:安裝升級
-i:指定源
-
第三步:更新成功後需關閉jupyter後重新開啓即可
# 丟棄前兩列,需要的是從第三列開始的數值
data = data.iloc[:, 3:]
# 把降雨的NR字元變成數值0
data[data == 'NR'] = 0
# 把dataframe轉換成numpy的陣列
raw_data = data.to_numpy()
raw_data
3. 特徵提取
4320行中,每18行(18個觀測指標)是一天的數據,將18行作爲一天,4320/18=240天(一年12個月,每個月20天),根據每個月將4320行×24列的數據分成12 組18 行(features) × 480 列(hours) 的數據:
(18行爲18個特徵值,480列爲連續的480個小時:20*24)
month_data = {}
for month in range(12):#12組
    sample = np.empty([18, 480])
    for day in range(20):#20天
        sample[:, day * 24 : (day + 1) * 24] = raw_data[18 * (20 * month + day) : 18 * (20 * month + day + 1), :]
    month_data[month] = sample
分成了12個月,每個月有18行×480列的數據。
對於每個月,每10個小時分成一組,由前9個小時的數據來預測第10個小時的PM2.5,把前9小時的數據放入x,把第10個小時的數據放入y。視窗的大小爲10,從第1個小時開始向右滑動,每次滑動1小時。因此,每個月都有471組這樣的數據。
把一組18×9的數據平鋪成一行向量,然後放入x的一行中,每個月有471組,共有12×471組向量,因此x有12×471行,18×9列。
將預測值放入y中,y有12(月)×471(組)行,1列。
x = np.empty([12 * 471, 18 * 9], dtype = float)
y = np.empty([12 * 471, 1], dtype = float)
for month in range(12):
    for day in range(20):
        for hour in range(24):
            if day == 19 and hour > 14:
                continue
            x[month * 471 + day * 24 + hour, :] = month_data[month][:,day * 24 + hour : day * 24 + hour + 9].reshape(1, -1) #vector dim:18*9 (9 9 9 9 9 9 9 9 9 9 9 9 9 9 9 9 9 9)
            y[month * 471 + day * 24 + hour, 0] = month_data[month][9, day * 24 + hour + 9] #value
print(x)
print(y)
out:
[[14.  14.  14.  ...  2.   2.   0.5]
 [14.  14.  13.  ...  2.   0.5  0.3]
 [14.  13.  12.  ...  0.5  0.3  0.8]
 ...
 [17.  18.  19.  ...  1.1  1.4  1.3]
 [18.  19.  18.  ...  1.4  1.3  1.6]
 [19.  18.  17.  ...  1.3  1.6  1.8]]
[[30.]
 [41.]
 [44.]
 ...
 [17.]
 [24.]
 [29.]]
4. 標準化(Normalization)
μ是xx的均值,σσ是xx的標準差。通過標準化,可以:將有量綱的表達式,經過變換,化爲無量綱的表達式,成爲標量使得數據更加符合獨立同分佈條件
'''
mean() 函數定義:
numpy.mean(a, axis, dtype, out,keepdims )

mean()函數功能:求取均值
經常操作的參數爲axis,以m * n矩陣舉例:

axis 不設定值,對 m*n 個數求均值,返回一個實數
axis = 0:壓縮成行,對各列求均值,返回 1* n 矩陣
axis =1 :壓縮成列,對各行求均值,返回 m *1 矩陣

np.std()是用來計算標準差
'''
mean_x = np.mean(x, axis = 0) #18 * 9
std_x = np.std(x, axis = 0) #18 * 9
for i in range(len(x)): #12 * 471
    for j in range(len(x[0])): #18 * 9
        if std_x[j] != 0:
            x[i][j] = (x[i][j] - mean_x[j]) / std_x[j]
x
這裏每一列是一個觀測指標,按列進行標準化。
把訓練數據分成訓練集train_set和驗證集validation,其中train_set用於訓練,而validation不會參與訓練,僅用於驗證。(在baseline中並沒有用)
import math
#`Math.floor()` 返回小於或等於一個給定數位的最大整數。
x_train_set = x[: math.floor(len(x) * 0.8), :]
y_train_set = y[: math.floor(len(y) * 0.8), :]
x_validation = x[math.floor(len(x) * 0.8): , :]
y_validation = y[math.floor(len(y) * 0.8): , :]
print(x_train_set)
print(y_train_set)
print(x_validation)
print(y_validation)
print(len(x_train_set))
print(len(y_train_set))
print(len(x_validation))
print(len(y_validation))
[[-1.35825331 -1.35883937 -1.359222   ...  0.26650729  0.2656797
  -1.14082131]
 [-1.35825331 -1.35883937 -1.51819928 ...  0.26650729 -1.13963133
  -1.32832904]
 [-1.35825331 -1.51789368 -1.67717656 ... -1.13923451 -1.32700613
  -0.85955971]
 ...
 [ 0.86929969  0.70886668  0.38952809 ...  1.39110073  0.2656797
  -0.39079039]
 [ 0.71018876  0.39075806  0.07157353 ...  0.26650729 -0.39013211
  -0.39079039]
 [ 0.3919669   0.07264944  0.07157353 ... -0.38950555 -0.39013211
  -0.85955971]]
[[30.]
 [41.]
 [44.]
 ...
 [ 7.]
 [ 5.]
 [14.]]
[[ 0.07374504  0.07264944  0.07157353 ... -0.38950555 -0.85856912
  -0.57829812]
 [ 0.07374504  0.07264944  0.23055081 ... -0.85808615 -0.57750692
   0.54674825]
 [ 0.07374504  0.23170375  0.23055081 ... -0.57693779  0.54674191
  -0.1095288 ]
 ...
 [-0.88092053 -0.72262212 -0.56433559 ... -0.57693779 -0.29644471
  -0.39079039]
 [-0.7218096  -0.56356781 -0.72331287 ... -0.29578943 -0.39013211
  -0.1095288 ]
 [-0.56269867 -0.72262212 -0.88229015 ... -0.38950555 -0.10906991
   0.07797893]]
[[13.]
 [24.]
 [22.]
 ...
 [17.]
 [24.]
 [29.]]
4521
4521
1131
1131
4. 訓練
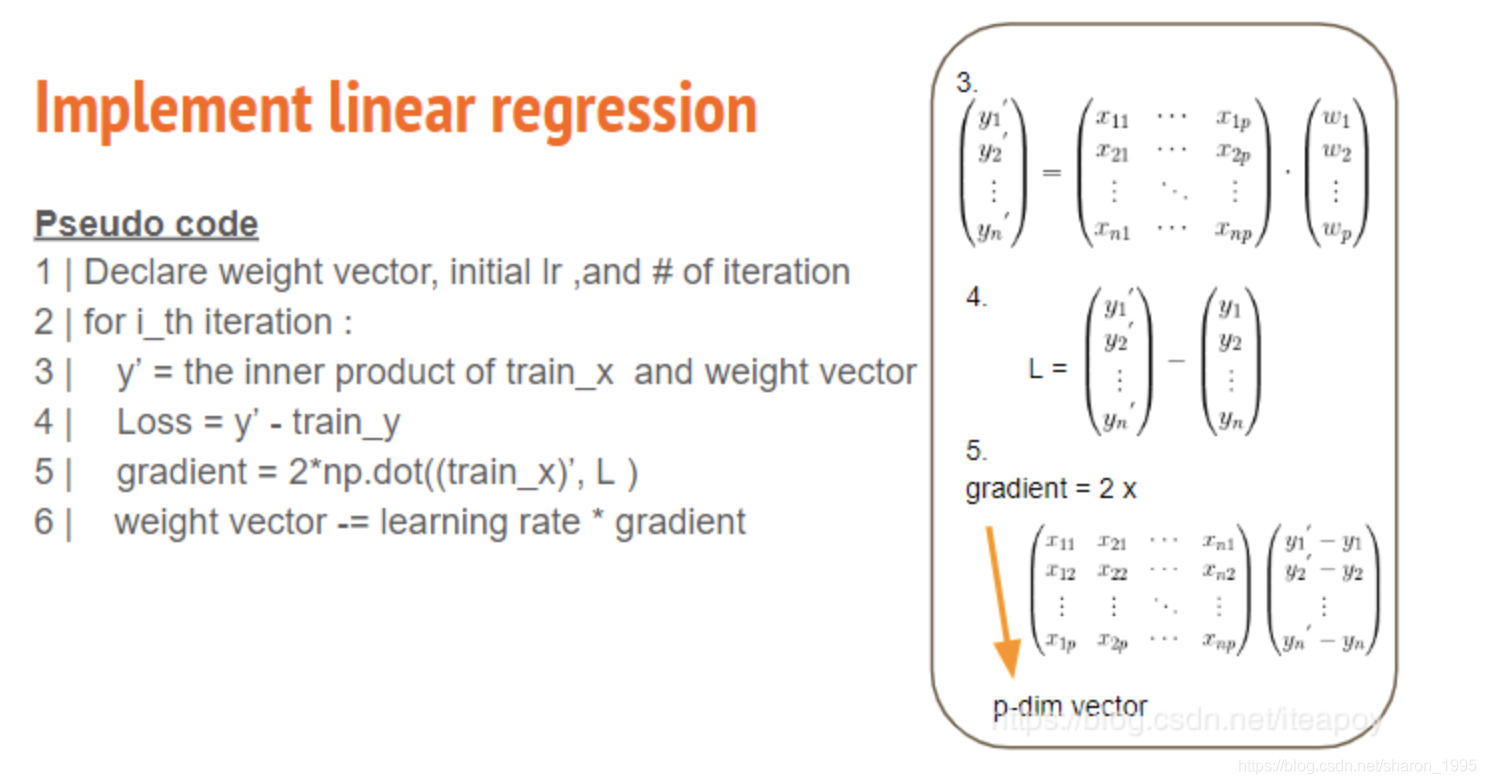
- Pseudo code
- Declare weight vector, initial lr , and # of iteration
- For i_th iteration
- y’ = the inner product of train_x and weight vector
- Loss = y’ - train_y
- Gradient = 2*np.dot((train_x)’ , L)
- Weight vector -= learning rate * gradient

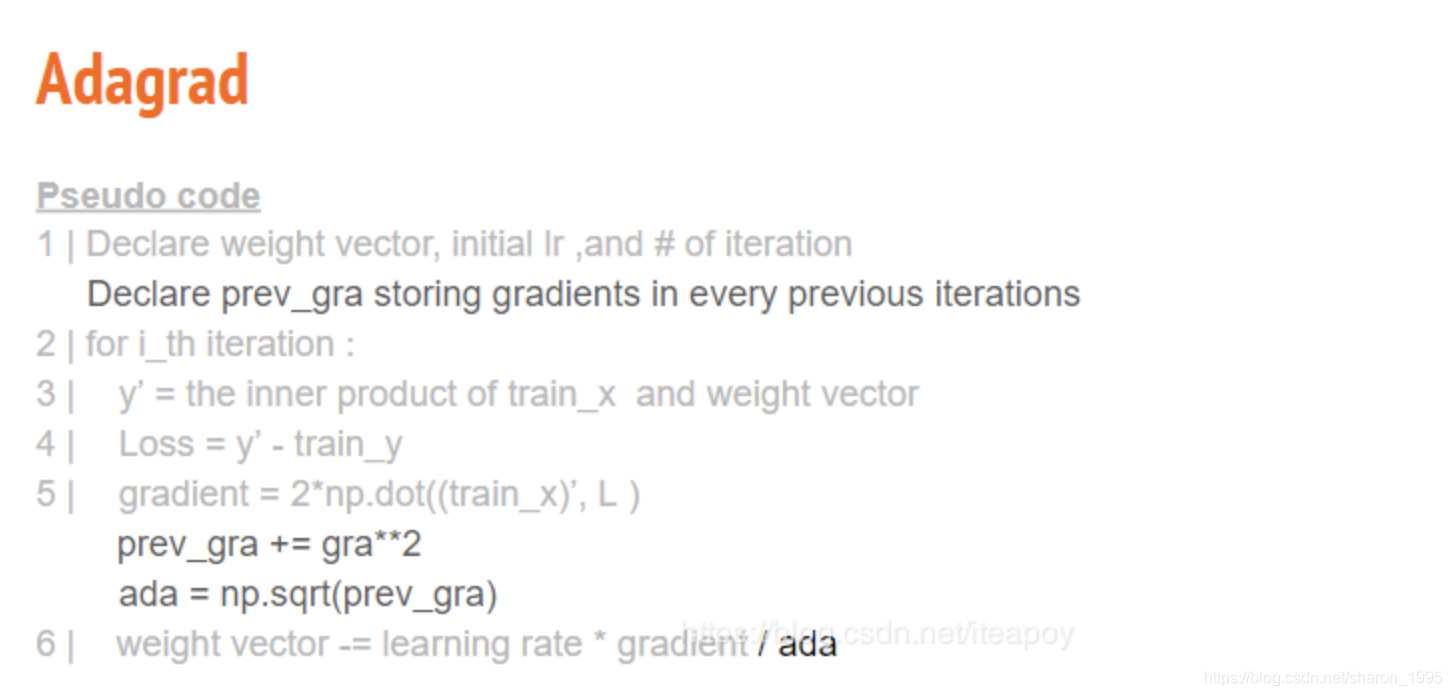
Adagrad

和上圖不同處: 下面 下麪Loss的程式碼用到的是 Root Mean Square Error
因爲存在常數項b,所以維度(dim)需要多加一列;eps項是極小值,避免adagrad的分母爲0.
每一個維度(dim)會對應到各自的gradient和權重w,通過一次次的迭代(iter_time)學習。最終,將訓練得到的模型(權重w)儲存爲.npy格式的檔案。
dim = 18 * 9 + 1
w = np.zeros([dim, 1])
'''
numpy提供了numpy.concatenate((a1,a2,...), axis=0)函數。能夠一次完成多個數組的拼接。其中a1,a2,...是陣列型別的參數
>>> a=np.array([[1,2,3],[4,5,6]])
>>> b=np.array([[11,21,31],[7,8,9]])
>>> np.concatenate((a,b),axis=0)
array([[ 1,  2,  3],
       [ 4,  5,  6],
       [11, 21, 31],
       [ 7,  8,  9]])

>>> np.concatenate((a,b),axis=1)  #axis=1表示對應行的陣列進行拼接
array([[ 1,  2,  3, 11, 21, 31],
       [ 4,  5,  6,  7,  8,  9]])
'''
x = np.concatenate((np.ones([12 * 471, 1]), x), axis = 1).astype(float)
learning_rate = 100
iter_time = 1000
'''
用法:zeros(shape, dtype=float, order='C')
返回:返回來一個給定形狀和型別的用0填充的陣列;
參數:shape:形狀
dtype:數據型別,可選參數,預設numpy.float64
order:可選參數,c代表與c語言類似,行優先;F代表列優先
'''
adagrad = np.zeros([dim, 1])
eps = 0.0000000001
for t in range(iter_time):
    loss = np.sqrt(np.sum(np.power(np.dot(x, w) - y, 2))/471/12)#rmse
    if(t%100==0):
        print(str(t) + ":" + str(loss))
    #Numpy中dot()函數主要功能有兩個:**向量點積和矩陣乘法**。
    gradient = 2 * np.dot(x.transpose(), np.dot(x, w) - y) #dim*1
    adagrad += gradient ** 2
    w = w - learning_rate * gradient / np.sqrt(adagrad + eps)
np.save('weight.npy', w)
w
5.測試
# 讀入測試數據test.csv
testdata = pd.read_csv('./test.csv', header = None, encoding = 'big5')
# 丟棄前兩列,需要的是從第3列開始的數據
test_data = testdata.iloc[:, 2:]
# 把降雨爲NR字元變成數位0
test_data[test_data == 'NR'] = 0
# 將dataframe變成numpy陣列
test_data = test_data.to_numpy()
# 將test數據也變成 240 個維度爲 18 * 9 + 1 的數據。
test_x = np.empty([240, 18*9], dtype = float)
for i in range(240):
    test_x[i, :] = test_data[18 * i: 18* (i + 1), :].reshape(1, -1)
for i in range(len(test_x)):
    for j in range(len(test_x[0])):
        if std_x[j] != 0:
            test_x[i][j] = (test_x[i][j] - mean_x[j]) / std_x[j]
test_x = np.concatenate((np.ones([240, 1]), test_x), axis = 1).astype(float)
test_x
out:
array([[ 1.        , -1.19914238, -1.35883937, ...,  0.73508789,
         0.73411671,  0.54674825],
       [ 1.        , -1.67647517, -1.67694799, ...,  0.36022341,
         0.82780412, -0.20328266],
       [ 1.        , -2.18563014, -1.67694799, ...,  0.82880401,
         0.0783049 , -0.29703653],
       ...,
       [ 1.        , -1.67647517, -1.8360023 , ...,  0.07907505,
        -0.10906991, -1.04706744],
       [ 1.        , -1.35825331, -1.51789368, ..., -0.10835719,
         0.35936711,  0.07797893],
       [ 1.        , -1.8355861 , -1.8360023 , ..., -1.04551839,
        -1.13963133, -1.14082131]])
載入模型即可對test數據進行預測,得到預測值ans_y。
w = np.load('weight.npy')
ans_y = np.dot(test_x, w)
ans_y
5. 將預測值儲存到csv檔案
import csv
with open('submit.csv', mode='w', newline='') as submit_file:
    csv_writer = csv.writer(submit_file)
    header = ['id', 'value']
    print(header)
    csv_writer.writerow(header)
    for i in range(240):
        row = ['id_' + str(i), ans_y[i][0]]
        csv_writer.writerow(row)
        print(row)
以上,baseline已完成,需要在baseline的基礎上優化模型。優化模型這一部分就不在這裏贅述了,我會另開一篇部落格,記錄我優化模型的幾個過程。