Mybatis筆記
寫在最前面
這篇筆記是看秦老師的 Mybatis 視訊跟着寫的, 建議去看視訊學習,能掌握更多的內容

B站鏈接在此:
視訊鏈接
https://www.bilibili.com/video/BV1NE411Q7Nx
主頁鏈接
https://space.bilibili.com/95256449

1、簡介
1.1 什麼是Mybatis
- MyBatis 是一款優秀的持久層框架,
- 它支援自定義 SQL、儲存過程以及高階對映。
- MyBatis 免除了幾乎所有的 JDBC 程式碼以及設定參數和獲取結果集的工作。
- MyBatis 可以通過簡單的 XML 或註解來設定和對映原始型別、介面和 Java POJO(Plain Old Java Objects,普通老式 Java 物件)爲數據庫中的記錄。
- MyBatis 本是apache的一個開源專案iBatis, 2010年這個專案由apache software foundation 遷移到了google code,並且改名爲MyBatis 。2013年11月遷移到Github。
1.2 如何獲得Mybatis?
-
maven倉庫:
<!-- https://mvnrepository.com/artifact/org.mybatis/mybatis --> <dependency> <groupId>org.mybatis</groupId> <artifactId>mybatis</artifactId> <version>3.4.6</version> </dependency> -
GitHub: https://github.com/mybatis/mybatis-3/releases
-
中文文件: https://mybatis.org/mybatis-3/zh/index.html
1.3 持久化
數據持久化
- 持久化就是將程式的數據在持久狀態和瞬時時態轉換的過程
- 記憶體: 斷電即失
爲什麼需要數據持久化
- 一些數據不能丟棄
- 記憶體太貴了
1.4持久層
Dao層, Service層. …
- 完成持久化工作的程式碼塊
- 層次明顯
1.5爲什麼需要Mybatis?
- 幫助程式設計師將數據存入數據庫中
- 方便
- 傳統的JDBC程式碼複雜, 通過框架簡化。
- 更容易上手
- 優點
- 簡單易學:本身就很小且簡單。沒有任何第三方依賴,最簡單安裝只要兩個jar檔案+設定幾個sql對映檔案易於學習,易於使用,通過文件和原始碼,可以比較完全的掌握它的設計思路和實現。
- 靈活:mybatis不會對應用程式或者數據庫的現有設計強加任何影響。 sql寫在xml裡,便於統一管理和優化。通過sql語句可以滿足操作數據庫的所有需求。
- 解除sql與程式程式碼的耦合:通過提供DAO層,將業務邏輯和數據存取邏輯分離,使系統的設計更清晰,更易維護,更易單元測試。sql和程式碼的分離,提高了可維護性。
- 提供對映標籤,支援物件與數據庫的orm欄位關係對映
- 提供物件關係對映標籤,支援物件關係組建維護
- 提供xml標籤,支援編寫動態sql。
- 使用的人多,
2、第一個Mybatis程式
思路: 搭建環境—> 匯入Mybatis–> 編寫程式碼–>測試
2.1搭建環境
搭建數據庫
CREATE Database `mybatis`;

USE `mybatis`;

create table `user`(
	`id` INT(20) not null primary key,
	`name` varchar(30) DEFAULT null,
	`pwd` varchar(30) DEFAULT null
) engine=INNODB DEFAULT CHARSET=utf8;

insert into `user` values
(1,'xiangming','123456'),
(2,'xiangsing','123456'),
(3,'xiangaing','123456'),
(4,'xiangding','123456')
新建專案
-
新建一個普通的maven專案
-
刪除src目錄
-
匯入maven依賴
    <!--匯入依賴-->
    <dependencies>
        <!--mysql驅動-->
        <dependency>
            <groupId>mysql</groupId>
            <artifactId>mysql-connector-java</artifactId>
            <version>5.1.46</version>
        </dependency>
        <!--Mybatis-->
        <!-- https://mvnrepository.com/artifact/org.mybatis/mybatis -->
        <dependency>
            <groupId>org.mybatis</groupId>
            <artifactId>mybatis</artifactId>
            <version>3.4.6</version>
        </dependency>

        <!--Junit-->
        <dependency>
            <groupId>junit</groupId>
            <artifactId>junit</artifactId>
            <version>4.13</version>
            <scope>test</scope>
        </dependency>
    </dependencies>
2.2建立子模組
-
建立一個子模組Mybatis01
-
編寫核心組態檔
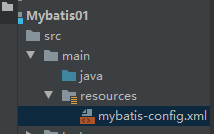
<?xml version="1.0" encoding="UTF-8" ?> <!DOCTYPE configuration PUBLIC "-//mybatis.org//DTD Config 3.0//EN" "http://mybatis.org/dtd/mybatis-3-config.dtd"> <!-- configuration core configure--> <configuration> <environments default="development"> <environment id="development"> <transactionManager type="JDBC"/> <dataSource type="POOLED"> <property name="driver" value="com.mysql.jdbc.Driver"/> <property name="url" value="jdbc:mysql://121.89.197.115:3306/mybatis?useSSL=false&useUnicode=true&characterEncoding=UTF-8"/> <property name="username" value="root"/> <property name="password" value="123456"/> </dataSource> </environment> </environments> </configuration> -
編寫Mybatis工具類
每個基於 MyBatis 的應用都是以一個 SqlSessionFactory 的範例爲核心的。SqlSessionFactory 的範例可以通過 SqlSessionFactoryBuilder 獲得。而 SqlSessionFactoryBuilder 則可以從 XML 組態檔或一個預先設定的 Configuration 範例來構建出 SqlSessionFactory 範例。
package com.qwrdxer.utils;

import org.apache.ibatis.io.Resources;
import org.apache.ibatis.session.SqlSession;
import org.apache.ibatis.session.SqlSessionFactory;
import org.apache.ibatis.session.SqlSessionFactoryBuilder;

import java.io.IOException;
import java.io.InputStream;

//sqlSessionFactory -->sqlSession

public class MybatisUtils {
    private static SqlSessionFactory sqlSessionFactory;
    static {//第一步 獲取sqlSessionFactory物件
        try {
            String resource = "mybatis-config.xml";
            InputStream inputStream = Resources.getResourceAsStream(resource);
            SqlSessionFactory sqlSessionFactory = new SqlSessionFactoryBuilder().build(inputStream);
        } catch (IOException e) {
            e.printStackTrace();
        }
    }

    //既然有了 SqlSessionFactory,顧名思義,我們可以從中獲得 SqlSession 的範例。
    // SqlSession 提供了在數據庫執行 SQL 命令所需的所有方法。你可以通過 SqlSession 範例來直接執行已對映的 SQL 語句。
    public static SqlSession getSqlSession(){
        return sqlSessionFactory.openSession();
    }
}
2.3 編寫程式碼
-
實體類
package com.qwrdxer.pojo; public class User { private int id; private String name; private String pwd; public User() { } public User(int id, String name, String pwd) { this.id = id; this.name = name; this.pwd = pwd; } public int getId() { return id; } public void setId(int id) { this.id = id; } public String getName() { return name; } public void setName(String name) { this.name = name; } public String getPwd() { return pwd; } public void setPwd(String pwd) { this.pwd = pwd; } @Override public String toString() { final StringBuilder sb = new StringBuilder("{"); sb.append("\"id\":") .append(id); sb.append(",\"name\":\"") .append(name).append('\"'); sb.append(",\"pwd\":\"") .append(pwd).append('\"'); sb.append('}'); return sb.toString(); } } -
DAO介面
package com.qwrdxer.dao; import com.qwrdxer.pojo.User; import java.util.List; public interface UserDao { List<User> getUserList(); } -
實現類(由原來的UserDaoImpl實現類轉換爲 一個Mapper組態檔)
注: 用來系結介面<?xml version="1.0" encoding="UTF-8" ?> <!DOCTYPE mapper PUBLIC "-//mybatis.org//DTD Mapper 3.0//EN" "http://mybatis.org/dtd/mybatis-3-mapper.dtd"> <!--namespace bind Dao/mapper interface--> <mapper namespace="com.qwrdxer.dao.UserDao"> <!--select --> <select id="getUserList" resultType="com.qwrdxer.pojo.User" > select * from mybatis.user </select> </mapper>
2.4測試
注意點:
org.apache.ibatis.binding.BindingException: Type interface com.qwrdxer.dao.UserDao is not known to the MapperRegistry. 需 要在覈心組態檔中設定 Mapper.xml位置
mapper.xml不能有中文註釋
maven由於他的約定大於設定,我們之後可以能遇到我們寫的組態檔,無法被導出或者生效的問題,解決方案:
<!--在build中設定resources,來防止我們資源導出失敗的問題-->
<build>
    <resources>
        <resource>
            <directory>src/main/resources</directory>
            <includes>
                <include>**/*.properties</include>
                <include>**/*.xml</include>
            </includes>
            <filtering>true</filtering>
        </resource>
        <resource>
            <directory>src/main/java</directory>
            <includes>
                <include>**/*.properties</include>
                <include>**/*.xml</include>
            </includes>
            <filtering>true</filtering>
        </resource>
    </resources>
</build>
- junit測試
在test重新建立檔案

package com.qwrdxer.dao;

import com.qwrdxer.pojo.User;
import com.qwrdxer.utils.MybatisUtils;
import org.apache.ibatis.session.SqlSession;
import org.junit.Test;

import java.util.List;

public class UserDaoTest {
    @Test
    public void test(){
        try{
         //獲取Sqlsession物件
            SqlSession sqlSession = MybatisUtils.getSqlSession();

            //方式1. getMapper
            UserDao mapper = sqlSession.getMapper(UserDao.class);
            List<User> userList = mapper.getUserList();
            for (User user : userList) {
                System.out.println(user);
            }

            //方式2. 不推薦
            List<User> userList1 = sqlSession.selectList("com.qwrdxer.dao.UserDao.getUserList");
            for (User user : userList1) {
                System.out.println(user);
            }
        }catch(Exception e){

        }finally{
                    //關閉Sqlsession
        	sqlSession.close();
        }


    }
}
-
在mybatis-config.xml註冊mapper
<mappers> <mapper resource="com/qwrdxer/dao/UserMapper.xml"></mapper> </mappers> -
可能遇到的問題:
- 組態檔沒有註冊
- 系結介面錯誤
- 方法名不對
- 返回型別不對
- maven導出資源未設定
3、CRUD(增刪改查)
3.1 namespace
namespace中的包名要和dao/mapper介面包名一致
select
選擇,查詢語句
    <select id="getUserList" resultType="com.qwrdxer.pojo.User" >
    select * from mybatis.user
  </select>
- id就是對應namespace中的方法名
- resultType: Sql語句執行的返回值型別
- parameterType: 參數型別
insert
    //介面
    int addUser(User user);

    // xml設定
    <insert id="addUser" parameterType="com.qwrdxer.pojo.User">
        insert into mybatis.user (id,name,pwd) values (#{id},#{name},#{pwd});
    </insert>

    //測試
    //增刪改需要提交事務
    @Test
    public  void Insert(){
        SqlSession sqlSession = MybatisUtils.getSqlSession();
        UserMapper mapper = sqlSession.getMapper(UserMapper.class);
        int xiaobai = mapper.addUser(new User(11, "xiaobai", "123456"));
        sqlSession.commit();//提交事務
        System.out.println(xiaobai);
        sqlSession.close();
    }
update
    <update id="updateUser" parameterType="com.qwrdxer.pojo.User">
        update  mybatis.user set name=#{name},pwd=#{pwd } where id=#{id};
    </update>
map和模糊查詢
當實體類屬性太多時,直接構造 實體類物件作爲參數過於麻煩,使用map構造需要傳入的相關參數, 可以簡化操作
	//xml檔案. 對於map物件, 只要鍵值對的鍵 和xml檔案中的變數一致即可

	<insert id="addUser2" parameterType="map">
        insert into mybatis.user (id,name,pwd) values (#{userid},#{userName},#{password});
    </insert>

	//測試類

	    @Test
    public void addUser2(){
        SqlSession sqlSession = MybatisUtils.getSqlSession();
        UserMapper mapper = sqlSession.getMapper(UserMapper.class);
        HashMap<String, Object> map = new HashMap<String, Object>();
        //        insert into mybatis.user (id,name,pwd) values (#{userid},#{userName},#{password});
        map.put("userid",13);
        map.put("userName","小紅");
        map.put("password","12345678");
        mapper.addUser2(map);
        sqlSession.commit();
        sqlSession.close();
    }
- Map傳遞參數,直接在sql中取出key即可![parmeterType=「map」]
- 物件傳遞參數,直接在sql中取物件即可! [parmeterType=「實體類」]
- 只有一個基本型別的情況下, 可以直接在sql中取到 [parmeterType=「int /String」 可以不寫]
- 多個參數 使用Map, 或者註解!
模糊查詢(擴充套件)
        //模糊查詢
    List<User> getUserLike(String value);
		//xml設定
	<select id="getUserLike" resultType="com.qwrdxer.pojo.User">
        select * from mybatis.user where name like "%"#{value}"%"
    </select>


        //測試程式碼
            //模糊查詢
    @Test
    public void getUserLike(){
        SqlSession sqlSession = MybatisUtils.getSqlSession();
        UserMapper mapper = sqlSession.getMapper(UserMapper.class);
        List<User> xia = mapper.getUserLike("xia");
        for (User user : xia) {
            System.out.println(user.toString());
        }
        sqlSession.close();
    }
4.設定解析
4.1核心組態檔
-
核心組態檔官方推薦命名是 mybatis-config.xml
-
MyBatis的組態檔包含了會深深影響Mybatis行爲的設定和屬性
configuration(設定)
properties(屬性)
settings(設定)
typeAliases(型別別名)
typeHandlers(型別處理器)
objectFactory(物件工廠)
plugins(外掛)
environments(環境設定)
environment(環境變數)
transactionManager(事務管理器)
dataSource(數據源)
databaseIdProvider(數據庫廠商標識)
mappers(對映器)
4.2 環境設定
儘管可以設定多個環境, 但是每個SQLSessionFactory範例只能選擇一種環境(組態檔)
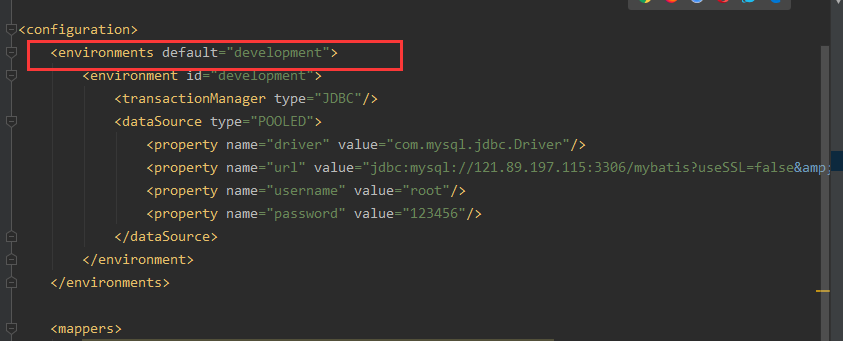
注意一些關鍵點:
- 預設使用的環境 ID(比如:default=「development」)。
- 每個 environment 元素定義的環境 ID(比如:id=「development」)。
- 事務管理器的設定(比如:type=「JDBC」)。
- 數據源的設定(比如:type=「POOLED」)。
事務管理器(瞭解)
在 MyBatis 中有兩種型別的事務管理器(也就是 type="[JDBC|MANAGED]"):
- JDBC – 這個設定直接使用了 JDBC 的提交和回滾設施,它依賴從數據源獲得的連線來管理事務作用域。
- MANAGED – 這個設定幾乎沒做什麼。它從不提交或回滾一個連線,而是讓容器來管理事務的整個生命週期(比如 JEE 應用伺服器的上下文)。 預設情況下它會關閉連線。然而一些容器並不希望連線被關閉,因此需要將 closeConnection 屬性設定爲 false 來阻止預設的關閉行爲
數據源(瞭解 POOLED)
數據源(dataSource)
dataSource 元素使用標準的 JDBC 數據源介面來設定 JDBC 連線物件的資源。
- 大多數 MyBatis 應用程式會按範例中的例子來設定數據源。雖然數據源設定是可選的,但如果要啓用延遲載入特性,就必須設定數據源。
有三種內建的數據源型別(也就是 type="[UNPOOLED|POOLED|JNDI]"):
UNPOOLED– 這個數據源的實現會每次請求時開啓和關閉連線。雖然有點慢,但對那些數據庫連線可用性要求不高的簡單應用程式來說,是一個很好的選擇。 效能表現則依賴於使用的數據庫,對某些數據庫來說,使用連線池並不重要,這個設定就很適合這種情形。UNPOOLED 型別的數據源僅僅需要設定以下 5 種屬性:
driver– 這是 JDBC 驅動的 Java 類全限定名(並不是 JDBC 驅動中可能包含的數據源類)。url– 這是數據庫的 JDBC URL 地址。username– 登錄數據庫的使用者名稱。password– 登錄數據庫的密碼。defaultTransactionIsolationLevel– 預設的連線事務隔離級別。defaultNetworkTimeout– 等待數據庫操作完成的預設網路超時時間(單位:毫秒)。檢視java.sql.Connection#setNetworkTimeout()的 API 文件以獲取更多資訊。作爲可選項,你也可以傳遞屬性給數據庫驅動。只需在屬性名加上「driver.」字首即可,例如:
driver.encoding=UTF8這將通過 DriverManager.getConnection(url, driverProperties) 方法傳遞值爲
UTF8的encoding屬性給數據庫驅動。POOLED– 這種數據源的實現利用「池」的概念將 JDBC 連線物件組織起來,避免了建立新的連線範例時所必需的初始化和認證時間。 這種處理方式很流行,能使併發 Web 應用快速響應請求。
除了上述提到 UNPOOLED 下的屬性外,還有更多屬性用來設定 POOLED 的數據源:
poolMaximumActiveConnections– 在任意時間可存在的活動(正在使用)連線數量,預設值:10poolMaximumIdleConnections– 任意時間可能存在的空閒連線數。poolMaximumCheckoutTime– 在被強制返回之前,池中連線被檢出(checked out)時間,預設值:20000 毫秒(即 20 秒)poolTimeToWait– 這是一個底層設定,如果獲取連線花費了相當長的時間,連線池會列印狀態日誌並重新嘗試獲取一個連線(避免在誤設定的情況下一直失敗且不列印日誌),預設值:20000 毫秒(即 20 秒)。poolMaximumLocalBadConnectionTolerance– 這是一個關於壞連線容忍度的底層設定, 作用於每一個嘗試從快取池獲取連線的執行緒。 如果這個執行緒獲取到的是一個壞的連線,那麼這個數據源允許這個執行緒嘗試重新獲取一個新的連線,但是這個重新嘗試的次數不應該超過poolMaximumIdleConnections與poolMaximumLocalBadConnectionTolerance之和。 預設值:3(新增於 3.4.5)poolPingQuery– 發送到數據庫的偵測查詢,用來檢驗連線是否正常工作並準備接受請求。預設是「NO PING QUERY SET」,這會導致多數數據庫驅動出錯時返回恰當的錯誤訊息。poolPingEnabled– 是否啓用偵測查詢。若開啓,需要設定poolPingQuery屬性爲一個可執行的 SQL 語句(最好是一個速度非常快的 SQL 語句),預設值:false。poolPingConnectionsNotUsedFor– 設定 poolPingQuery 的頻率。可以被設定爲和數據庫連線超時時間一樣,來避免不必要的偵測,預設值:0(即所有連線每一時刻都被偵測 — 當然僅當 poolPingEnabled 爲 true 時適用)。JNDI – 這個數據源實現是爲了能在如 EJB 或應用伺服器這類容器中使用,容器可以集中或在外部設定數據源,然後放置一個 JNDI 上下文的數據源參照。這種數據源設定只需要兩個屬性:
initial_context– 這個屬性用來在 InitialContext 中尋找上下文(即,initialContext.lookup(initial_context))。這是個可選屬性,如果忽略,那麼將會直接從 InitialContext 中尋找 data_source 屬性。data_source– 這是參照數據源範例位置的上下文路徑。提供了 initial_context 設定時會在其返回的上下文中進行查詢,沒有提供時則直接在 InitialContext 中查詢。
Mybatis 預設的事務管理器是JDBC , 數據源:連線池 POOLED
4.3 屬性(properties)
我們可以通過properties屬性來實現參照組態檔
這些屬性可以在外部進行設定,並可以進行動態替換。你既可以在典型的 Java 屬性檔案中設定這些屬性,也可以在 properties 元素的子元素中設定。
注: 在XML檔案中所有的標籤都可以規定其順序

- 手動編寫一個db.properties檔案

driver=com.mysql.jdbc.Driver
url=jdbc:mysql://localhost:3306/mybatis?useSSL=false&useUnicode=true&characterEncoding=UTF-8
username=root
password=123456
-
在覈心組態檔中引入 ,即可使用
<properties resource="db.properties"></properties> <environments default="development"> <environment id="development"> <transactionManager type="JDBC"/> <dataSource type="POOLED"> <property name="driver" value="${driver}"/> <property name="url" value="${url}"/> <property name="username" value="${username}"/> <property name="password" value="${passwd}"/> </dataSource> </environment> </environments> -
在properties標籤中也可以直接設定propertiy, 這種內部的屬性會在外部屬性檔案引入後 ,產生同名屬性覆蓋(即優先使用外部檔案設定)。
4.4型別別名(typeAliases)
- 型別別名可爲 Java 型別設定一個縮寫名字。 它僅用於 XML 設定,意在降低冗餘的全限定類名書寫。例如:
    <typeAliases>
        <typeAlias type="com.qwrdxer.pojo.User" alias="User"></typeAlias>
    </typeAliases>
當這樣設定時,User 可以用在任何使用 com.qwrdxer.pojo.User 的地方。

- 也可以指定一個包名,MyBatis 會在包名下面 下麪搜尋需要的 Java Bean,比如:
<typeAliases>
  <package name="com.qwrdxer.pojo"/>
</typeAliases>
每一個在包 com.qwrdxer.pojo 中的 Java Bean,在沒有註解的情況下,會使用 Bean 的首字母小寫的非限定類名來作爲它的別名,。
比如包下的User實體類, 可以使用user作爲別名參照.
若有註解,則別名爲其註解值。見下面 下麪的例子:
@Alias("author")
public class Author {
    ...
}
-
第一種使用可以自定義名字, 第二種不行, 如果非要修改, 需要使用註解
-
下面 下麪是一些爲常見的 Java 型別內建的型別別名。它們都是不區分大小寫的,注意,爲了應對原始型別的命名重複,採取了特殊的命名風格。
別名 對映的型別 _byte byte _long long _short short _int int _integer int _double double _float float _boolean boolean string String byte Byte long Long short Short int Integer integer Integer double Double float Float boolean Boolean date Date decimal BigDecimal bigdecimal BigDecimal object Object map Map hashmap HashMap list List arraylist ArrayList collection Collection iterator Iterator
4.5設定
這是 MyBatis 中極爲重要的調整設定,它們會改變 MyBatis 的執行時行爲。
https://mybatis.org/mybatis-3/zh/configuration.html#settings
| logImpl | 指定 MyBatis 所用日誌的具體實現,未指定時將自動查詢。 | SLF4J | LOG4J | LOG4J2 | JDK_LOGGING | COMMONS_LOGGING | STDOUT_LOGGING | NO_LOGGING | 未設定 |
|---|---|---|---|
| cacheEnabled | 全域性性地開啓或關閉所有對映器組態檔中已設定的任何快取。 | true | false | true |
|---|---|---|---|
| lazyLoadingEnabled | 延遲載入的全域性開關。當開啓時,所有關聯物件都會延遲載入。 特定關聯關係中可通過設定 fetchType 屬性來覆蓋該項的開關狀態。 |
true | false | false |
一個設定完整的 settings 元素的範例如下:
<settings>
  <setting name="cacheEnabled" value="true"/>
  <setting name="lazyLoadingEnabled" value="true"/>
  <setting name="multipleResultSetsEnabled" value="true"/>
  <setting name="useColumnLabel" value="true"/>
  <setting name="useGeneratedKeys" value="false"/>
  <setting name="autoMappingBehavior" value="PARTIAL"/>
  <setting name="autoMappingUnknownColumnBehavior" value="WARNING"/>
  <setting name="defaultExecutorType" value="SIMPLE"/>
  <setting name="defaultStatementTimeout" value="25"/>
  <setting name="defaultFetchSize" value="100"/>
  <setting name="safeRowBoundsEnabled" value="false"/>
  <setting name="mapUnderscoreToCamelCase" value="false"/>
  <setting name="localCacheScope" value="SESSION"/>
  <setting name="jdbcTypeForNull" value="OTHER"/>
  <setting name="lazyLoadTriggerMethods" value="equals,clone,hashCode,toString"/>
</settings>
4.6 其他設定
- typeHandlers(型別處理器)
- objectFactory(物件工廠)
- plugins外掛
- Mybatis-generator-core
- mybatis-plus
- 通用Map普洱
4.7 對映器(Mappers)
MapperRegistry :註冊系結Mapper檔案
    <mappers>
        <mapper resource="com/qwrdxer/dao/UserMapper.xml"></mapper>
    </mappers>
既然 MyBatis 的行爲已經由上述元素設定完了,我們現在就要來定義 SQL 對映語句了。 但首先,我們需要告訴 MyBatis 到哪裏去找到這些語句。 在自動查詢資源方面,Java 並沒有提供一個很好的解決方案,所以最好的辦法是直接告訴 MyBatis 到哪裏去找對映檔案。 你可以使用相對於類路徑的資源參照,或完全限定資源定位符(包括 file:/// 形式的 URL),或類名和包名等。例如:
方式一:推薦
<!-- 使用相對於類路徑的資源參照 -->
<mappers>
  <mapper resource="org/mybatis/builder/AuthorMapper.xml"/>
  <mapper resource="org/mybatis/builder/BlogMapper.xml"/>
  <mapper resource="org/mybatis/builder/PostMapper.xml"/>
</mappers>
方式二: 使用class檔案系結註冊
<!-- 使用對映器介面實現類的完全限定類名 -->
<mappers>
  <mapper class="org.mybatis.builder.AuthorMapper"/>
  <mapper class="org.mybatis.builder.BlogMapper"/>
  <mapper class="org.mybatis.builder.PostMapper"/>
</mappers>
注意點:
- 介面和他的Mapper必須同名
- 介面和他的Mapper必須在同一個包下
方式三:使用掃描包進行注入系結 (在Mapper多時推薦使用)
<!-- 將包內的對映器介面實現全部註冊爲對映器 -->
<mappers>
  <package name="org.mybatis.builder"/>
</mappers>
注意點:
-
介面和他的Mapper必須同名
-
介面和他的Mapper必須在同一個包下
-
也可以通過在resource檔案下建立同樣的包路徑, 將xml檔案放入實現分離(JVM)
4.8 生命週期和作用域
作用域和生命週期類別是至關重要的,因爲錯誤的使用會導致非常嚴重的併發問題。
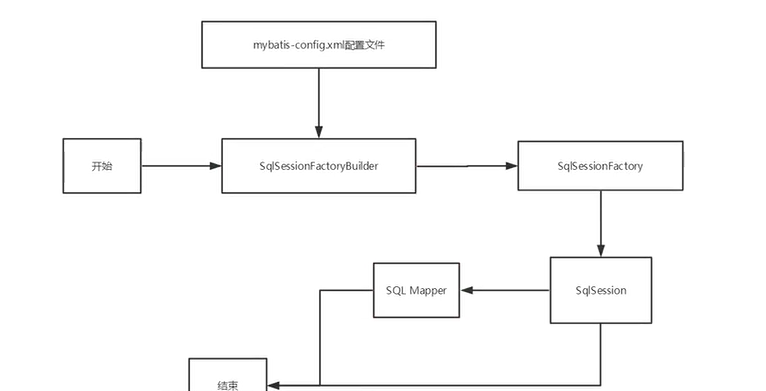
SqlSessionFactoryBuilder:
- 一旦建立了sqlSessionFactory, 就不在需要他了
- 是區域性變數
SqlSessionFacotory:
- 可以想象爲數據庫連線池
- 一旦被建立就應該在應用的執行期間一直存在,沒有任何理由丟棄它或重新建立另一個範例。
- SqlSessionFactory 的最佳作用域是應用作用域
- 最簡單的就是使用單例模式或者靜態單例模式。
SqlSession:
- 連線到連線池的一個請求
- 需要被關閉, 防止資源被佔用
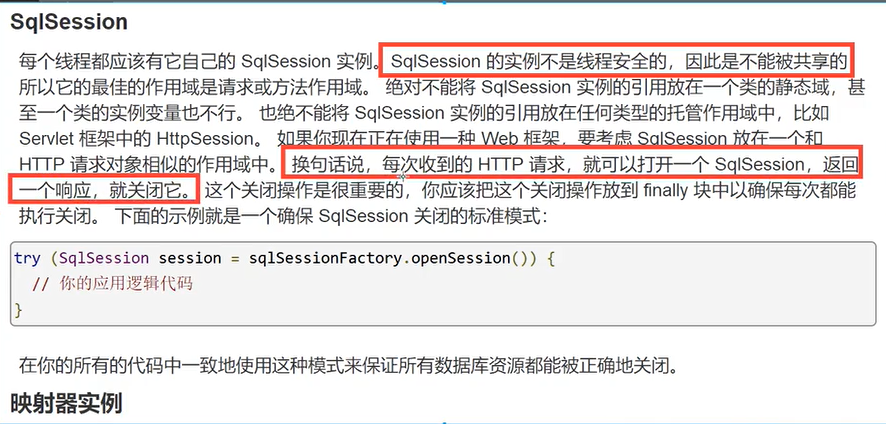
- SqlSession 的範例不是執行緒安全的,因此是不能被共用的,所以它的最佳的作用域是請求或方法作用域。
- 比如在web中, 每次收到 HTTP 請求,就可以開啓一個 SqlSession,返回一個響應後,就關閉它。
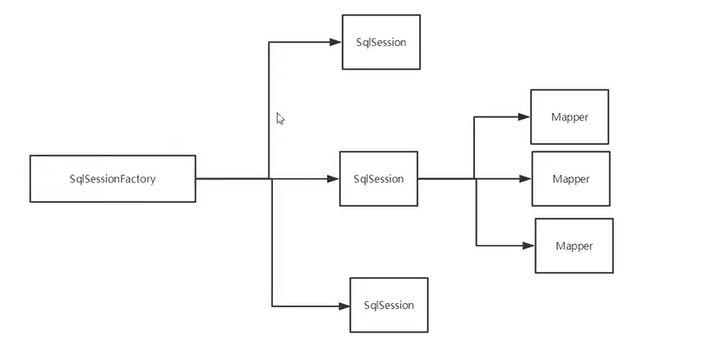
這裏面的每一個mapper 就代表一個具體的業務
5、解決屬性名和欄位名不一致的問題
1.問題描述
數據庫中欄位
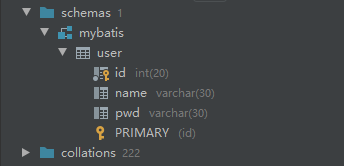
測試實體類不一致的情況( 數據庫爲pwd 實體類爲password)
public class User {
    private int id;
    private String name;
    private String password;
返回結果爲空:

select * from mybatis.user where id =#{i}
↓類轉換器↓
select id,name,pwd from mybatis.user where id =#{i}
2,解決方法
解決方法:
- 起別名select id,name,pwd as password from mybatis.user where id =#{i}
{"id":2,"name":"xiangsing","password":"123456"}成功
-
使用resultmap結果集對映
id name pwd
id name password
<!--結果集對映--> <resultMap id="UserMap" type="com.qwrdxer.pojo.User"> <result column="id" property="id"></result> <result column="name" property="name"></result> <result column="pwd" property="password"></result> </resultMap> <select id="getUserById" resultType="UserMap" parameterType="int"> select * from mybatis.user where id =#{i} </select>resultMap元素是 MyBatis 中最重要最強大的元素- ResultMap 的設計思想是,對簡單的語句做到零設定,對於複雜一點的語句,只需要描述語句之間的關係就行了。
- 通過設定ResultMap , 然後將 語句中的resultType 更改爲resultMap 並讓值爲我們自己設定的id值
- 如果這個世界總是這麼簡單就好了。
6.日誌
6.1 日誌工廠
如果一個數據庫操作出現了異常, 我們需要排除錯誤, 日誌就是最好的幫手

- SLF4J |
- LOG4J | (掌握)
- LOG4J2 |
- JDK_LOGGING |
- COMMONS_LOGGING |
- STDOUT_LOGGING | (瞭解)
- NO_LOGGING
在Mybatis中, 具體使用哪一個日誌 需要在設定中指定
<!--在覈心組態檔中設定-->
<settings>
    <setting name="logImpl" value="STDOUT_LOGGING"/>
</settings>
執行語句輸出結果
Logging initialized using 'class org.apache.ibatis.logging.stdout.StdOutImpl' adapter.
PooledDataSource forcefully closed/removed all connections.
PooledDataSource forcefully closed/removed all connections.
PooledDataSource forcefully closed/removed all connections.
PooledDataSource forcefully closed/removed all connections.
Opening JDBC Connection
Created connection 19717364.
Setting autocommit to false on JDBC Connection [com.mysql.jdbc.JDBC4Connection@12cdcf4]
==>  Preparing: select * from mybatis.user where id =?;
==> Parameters: 2(Integer)
<==    Columns: id, name, pwd
<==        Row: 2, xiangsing, 123456
<==      Total: 1
{"id":2,"name":"xiangsing","password":"123456"}
Resetting autocommit to true on JDBC Connection [com.mysql.jdbc.JDBC4Connection@12cdcf4]
Closing JDBC Connection [com.mysql.jdbc.JDBC4Connection@12cdcf4]
Returned connection 19717364 to pool.

Process finished with exit code 0
6.2 LOG4J 日誌
Log4j是Apache的一個開源專案,通過使用Log4j,我們可以控制日誌資訊輸送的目的地是控制檯、檔案、GUI元件,甚至是套介面伺服器、NT的事件記錄器、UNIX Syslog守護行程等;我們也可以控制每一條日誌的輸出格式;通過定義每一條日誌資訊的級別,我們能夠更加細緻地控制日誌的生成過程。最令人感興趣的就是,這些可以通過一個組態檔來靈活地進行設定,而不需要修改應用的程式碼。
<settings>
    <setting name="logImpl" value="LOG4J"/>
</settings>
直接使用會報錯,缺少依賴包

1、 先匯入 LOG4J包
<!-- https://mvnrepository.com/artifact/log4j/log4j -->
<dependency>
    <groupId>log4j</groupId>
    <artifactId>log4j</artifactId>
    <version>1.2.17</version>
</dependency>
2、建立log4j.properties ,編寫組態檔
# priority  :debug<info<warn<error
#you cannot specify every priority with different file for log4j
log4j.rootLogger=debug,stdout,info,debug,warn,error

#console
log4j.appender.stdout=org.apache.log4j.ConsoleAppender
log4j.appender.stdout.layout=org.apache.log4j.PatternLayout
log4j.appender.stdout.layout.ConversionPattern= [%d{yyyy-MM-dd HH:mm:ss a}]:%p %l%m%n
#info log
log4j.logger.info=info
log4j.appender.info=org.apache.log4j.DailyRollingFileAppender
log4j.appender.info.DatePattern='_'yyyy-MM-dd'.log'
log4j.appender.info.File=./src/com/hp/log/info.log
log4j.appender.info.Append=true
log4j.appender.info.Threshold=INFO
log4j.appender.info.layout=org.apache.log4j.PatternLayout
log4j.appender.info.layout.ConversionPattern=%d{yyyy-MM-dd HH:mm:ss a} [Thread: %t][ Class:%c >> Method: %l ]%n%p:%m%n
#debug log
log4j.logger.debug=debug
log4j.appender.debug=org.apache.log4j.DailyRollingFileAppender
log4j.appender.debug.DatePattern='_'yyyy-MM-dd'.log'
log4j.appender.debug.File=./src/com/hp/log/debug.log
log4j.appender.debug.Append=true
log4j.appender.debug.Threshold=DEBUG
log4j.appender.debug.layout=org.apache.log4j.PatternLayout
log4j.appender.debug.layout.ConversionPattern=%d{yyyy-MM-dd HH:mm:ss a} [Thread: %t][ Class:%c >> Method: %l ]%n%p:%m%n
#warn log
log4j.logger.warn=warn
log4j.appender.warn=org.apache.log4j.DailyRollingFileAppender
log4j.appender.warn.DatePattern='_'yyyy-MM-dd'.log'
log4j.appender.warn.File=./src/com/hp/log/warn.log
log4j.appender.warn.Append=true
log4j.appender.warn.Threshold=WARN
log4j.appender.warn.layout=org.apache.log4j.PatternLayout
log4j.appender.warn.layout.ConversionPattern=%d{yyyy-MM-dd HH:mm:ss a} [Thread: %t][ Class:%c >> Method: %l ]%n%p:%m%n
#error
log4j.logger.error=error
log4j.appender.error = org.apache.log4j.DailyRollingFileAppender
log4j.appender.error.DatePattern='_'yyyy-MM-dd'.log'
log4j.appender.error.File = ./src/com/hp/log/error.log
log4j.appender.error.Append = true
log4j.appender.error.Threshold = ERROR
log4j.appender.error.layout = org.apache.log4j.PatternLayout
log4j.appender.error.layout.ConversionPattern = %d{yyyy-MM-dd HH:mm:ss a} [Thread: %t][ Class:%c >> Method: %l ]%n%p:%m%n
輸出
[2020-08-03 21:35:21 下午]:DEBUG org.apache.ibatis.logging.LogFactory.setImplementation(LogFactory.java:135)Logging initialized using 'class org.apache.ibatis.logging.log4j.Log4jImpl' adapter.
[2020-08-03 21:35:21 下午]:DEBUG org.apache.ibatis.logging.LogFactory.setImplementation(LogFactory.java:135)Logging initialized using 'class org.apache.ibatis.logging.log4j.Log4jImpl' adapter.
[2020-08-03 21:35:21 下午]:DEBUG org.apache.ibatis.datasource.pooled.PooledDataSource.forceCloseAll(PooledDataSource.java:335)PooledDataSource forcefully closed/removed all connections.
[2020-08-03 21:35:21 下午]:DEBUG org.apache.ibatis.datasource.pooled.PooledDataSource.forceCloseAll(PooledDataSource.java:335)PooledDataSource forcefully closed/removed all connections.
[2020-08-03 21:35:21 下午]:DEBUG org.apache.ibatis.datasource.pooled.PooledDataSource.forceCloseAll(PooledDataSource.java:335)PooledDataSource forcefully closed/removed all connections.
[2020-08-03 21:35:21 下午]:DEBUG org.apache.ibatis.datasource.pooled.PooledDataSource.forceCloseAll(PooledDataSource.java:335)PooledDataSource forcefully closed/removed all connections.
[2020-08-03 21:35:22 下午]:DEBUG org.apache.ibatis.transaction.jdbc.JdbcTransaction.openConnection(JdbcTransaction.java:137)Opening JDBC Connection
[2020-08-03 21:35:23 下午]:DEBUG org.apache.ibatis.datasource.pooled.PooledDataSource.popConnection(PooledDataSource.java:406)Created connection 838411509.
[2020-08-03 21:35:23 下午]:DEBUG org.apache.ibatis.transaction.jdbc.JdbcTransaction.setDesiredAutoCommit(JdbcTransaction.java:101)Setting autocommit to false on JDBC Connection [com.mysql.jdbc.JDBC4Connection@31f924f5]
[2020-08-03 21:35:23 下午]:DEBUG org.apache.ibatis.logging.jdbc.BaseJdbcLogger.debug(BaseJdbcLogger.java:159)==>  Preparing: select * from mybatis.user where id =?;
[2020-08-03 21:35:23 下午]:DEBUG org.apache.ibatis.logging.jdbc.BaseJdbcLogger.debug(BaseJdbcLogger.java:159)==> Parameters: 2(Integer)
[2020-08-03 21:35:23 下午]:DEBUG org.apache.ibatis.logging.jdbc.BaseJdbcLogger.debug(BaseJdbcLogger.java:159)<==      Total: 1
{"id":2,"name":"xiangsing","password":"123456"}
[2020-08-03 21:35:23 下午]:DEBUG org.apache.ibatis.transaction.jdbc.JdbcTransaction.resetAutoCommit(JdbcTransaction.java:123)Resetting autocommit to true on JDBC Connection [com.mysql.jdbc.JDBC4Connection@31f924f5]
[2020-08-03 21:35:23 下午]:DEBUG org.apache.ibatis.transaction.jdbc.JdbcTransaction.close(JdbcTransaction.java:91)Closing JDBC Connection [com.mysql.jdbc.JDBC4Connection@31f924f5]
[2020-08-03 21:35:23 下午]:DEBUG org.apache.ibatis.datasource.pooled.PooledDataSource.pushConnection(PooledDataSource.java:363)Returned connection 838411509 to pool.

Process finished with exit code 0
簡單使用
-
在要使用Log4j的類中, 匯入包import org.apache.log4j.Logger;
-
使用
static  Logger logger = Logger.getLogger(UserDaoTest.class);
@Test
public void testLog4j(){
    logger.info("進入testlog4j方法");
    logger.debug("debug 中");
    logger.error("出現錯誤");
}
7.分頁
爲什麼分頁?
- 減少數據的處理量
- 提供良好的使用者體驗
使用Limit分頁
語法 : SELECT * from table limit start,end;
- limit num; 返回 num 個結果
- limit start,num; 從 第start個開始,返回num個結果
7.1使用Mybatis 實現分頁
-
介面
public interface UserMapper { //根據id查詢 User getUserById(int i); //分頁查詢 List<User> getUserByLimit(Map<String,Integer> map); } -
mapper.xml
<select id="getUserByLimit" resultType="User" parameterType="map"> select * from mybatis.user limit #{start},#{end}; </select> -
測試
    @Test
    public void getUserByLimit(){
        SqlSession sqlSession = MybatisUtils.getSqlSession();
        UserMapper mapper = sqlSession.getMapper(UserMapper.class);
        HashMap<String, Integer> map = new HashMap<String, Integer>();
        map.put("start",1);
        map.put("end",2);
        List<User> userByLimit = mapper.getUserByLimit(map);
        for (User user : userByLimit) {
            System.out.println(user.toString());
        }
    }
7.2 使用Roubounds 分頁(瞭解, 效率低)
-
介面
public interface UserMapper { //分頁查詢 RowBounds實現 List<User> getUserByRowBounds(); } -
mapper.xml
<select id="getUserByRowBounds" resultType="User"> select * from mybatis.user; </select> -
測試
@Test
public  void getUserByRowBounds(){
    SqlSession sqlSession = MybatisUtils.getSqlSession();

    //RowBounds實現分頁
    RowBounds rowBounds = new RowBounds(1, 2);
    List<User> userList = sqlSession.selectList("com.qwrdxer.dao.UserMapper.getUserByRowBounds", null, rowBounds);
    for (User user : userList) {
        System.out.println(user.toString());
    }
}
7.3 分頁外掛
[外連圖片轉存失敗,源站可能有防盜鏈機制 機製,建議將圖片儲存下來直接上傳(img-SQ0p3izn-1596949630610)(C:\Users\19442\AppData\Roaming\Typora\typora-user-images\image-20200804192621244.png)]
8、 使用註解開發
8.1 面向介面程式設計
- 大家之前都學過物件導向程式設計,也學習過介面,但在真正的開發中,很多時候我們會選擇面向介面程式設計根本原因:解耦,可拓展,提高複用,分層開發中,上層不用管具體的實現,大家都遵守共同的標準,使得開發變得容易,規範性更好。
- 在一個物件導向的系統中,系統的各種功能是由許許多多的不同對象共同作業完成的。在這種情況下,各個物件內部是如何實現自己的對系統設計人員來講就不那麼重要了
- 而各個物件之間的共同作業關係則成爲系統設計的關鍵。小到不同類之間的通訊,大到各模組之間的互動,在系統設計之初都是要着重考慮的,這也是系統設計的主要工作內容。面向介面程式設計就是指按照這種思想來程式設計。
關於介面的理解
- 介面從更深層次的理解,應是定義(規範,約東)與實現(名實分離的原則)的分離。
- 介面的本身反映了系統設計人員對系統的抽象理解。
- 介面應有兩類
- 第一類是對一個個體的抽象,它可對應爲一個抽象體( abstract class)
- 第二類是對一個個體某一方面的抽象,即形成一個抽象面( interface);
- 個體有可能有多個抽象面。抽象體與抽象面是有區別的
三個面向的區別
- 物件導向是指,我們考康問題時,以物件爲單位,考慮它的屬性及方法
- 程序導向是指,我們考慮問題時,以一個具體的流程(事務過程)爲單位,考慮它的實現
- 介面設計與非介面設計是針對複用技術而言的,與物件導向(過程)不是一個問題,更多的體現就是對系統整體的
8.2使用註解開發
-
編寫介面, 使用註解
public interface UserMapper { @Select("select * from mybatis.user") List<User> getUser(); } -
在覈心組態檔中系結介面
<mappers> <mapper class="com.qwrdxer.dao.UserMapper"></mapper> </mappers> -
測試
public class UserDaoTest {
    @Test
    public void test(){
        SqlSession sqlSession = MybatisUtils.getSqlSession();
        //底層主要應用反射
        UserMapper mapper = sqlSession.getMapper(UserMapper.class);
        List<User> user = mapper.getUser();
        for (User user1 : user) {
            System.out.println(user1.toString());
        }
        sqlSession.close();
    }
}
使用註解來對映簡單語句會使程式碼顯得更加簡潔,但對於稍微複雜一點的語句,Java 註解不僅力不從心,還會讓你本就複雜的 SQL 語句更加混亂不堪。 因此,如果你需要做一些很複雜的操作,最好用 XML 來對映語句。
本質: 反射機制 機製實現
底層: 動態代理
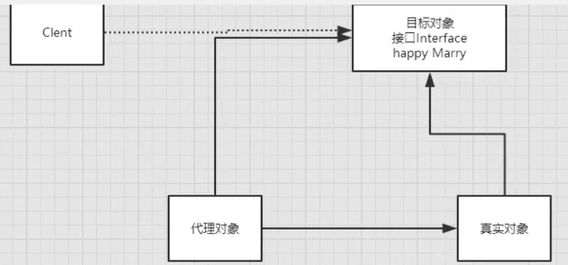
Mybatis 詳細執行流程
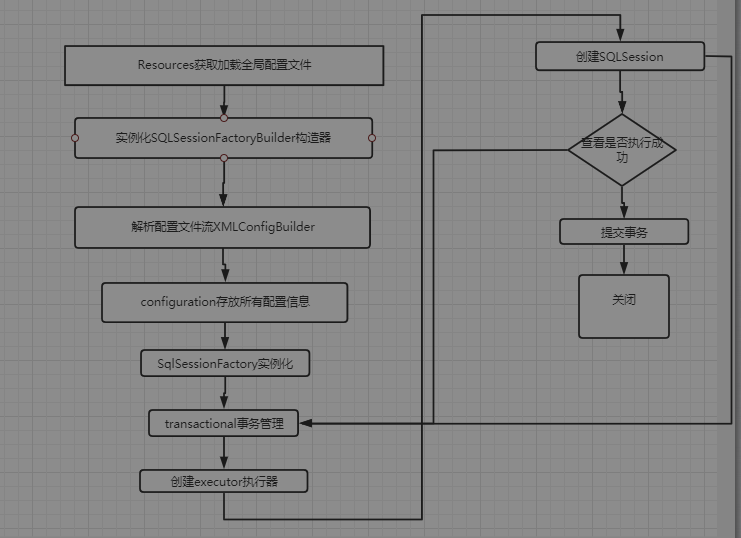
8.3、CRUD

通過在工具類指定參數爲true 設定自動提交事務
//條件查詢

    @Select("select * from user where id=#{id}")
    //方法存在多個參數, 所有的參數前面必須加上@Param
	User getUserByID(@Param("id") int id,@Param("name") String name);

//插入

    @Insert("insert into user(id,name,pwd) values(#{id},#{name},#{pwd})")
    int addUser(User user);

//修改
    @Update("update user set name=#{name},pwd=#{password} where id=#{id}")
    int updateUser(User user);
//刪除
    @Delete("delete from user where id=#{uid}")
    int deleteUser(@Param("uid") int id);
關於@Param()註解
- 基本型別的參數或者String 需要加上
- 參照型別不需要加
- 如果只有一個基本型別的話,可以忽略,但是建議加上
#{} ${}區別
#預編譯, 能很大程度上防止sql注入
9.Lombok
使用步驟:
-
安裝外掛
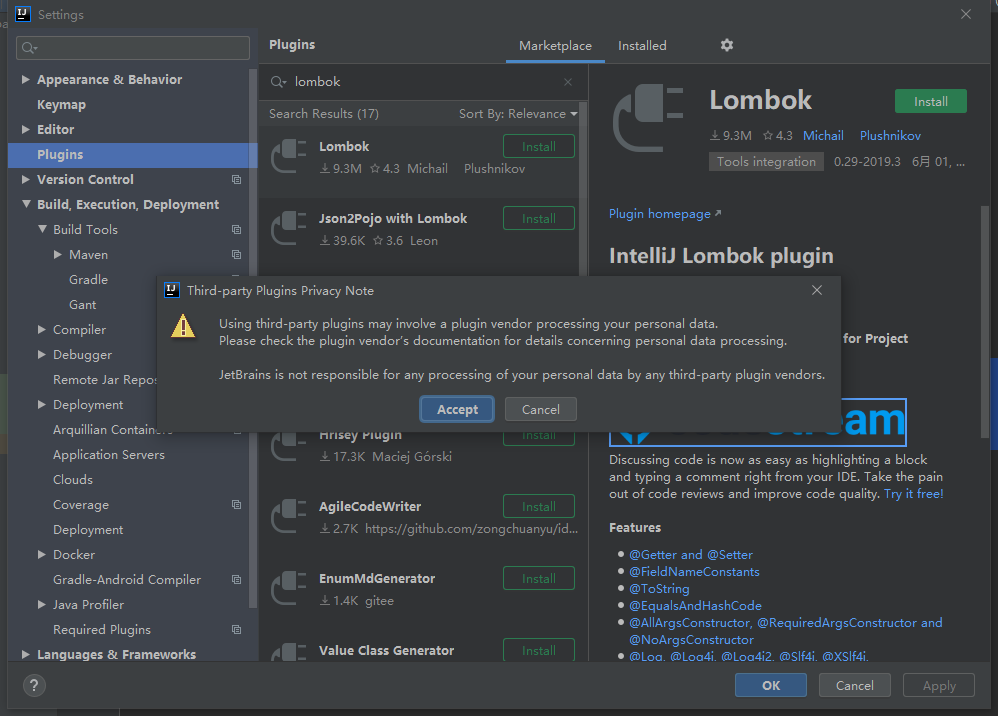
-
在maven中新增lombok的jar包
<!-- https://mvnrepository.com/artifact/org.projectlombok/lombok --> <dependency> <groupId>org.projectlombok</groupId> <artifactId>lombok</artifactId> <version>1.18.12</version> </dependency> -
常用註解
@Getter and @Setter √ @FieldNameConstants @ToString √ @EqualsAndHashCode @AllArgsConstructor, @RequiredArgsConstructor and @NoArgsConstructor @Log, @Log4j, @Log4j2, @Slf4j, @XSlf4j, @CommonsLog, @JBossLog, @Flogger, @CustomLog @Data √ @Builder @SuperBuilder @Singular @Delegate @Value @Accessors @Wither @With @SneakyThrows -
在原先的實體類中測試
package com.qwrdxer.pojo; import lombok.Data; @Data public class User { private int id; private String name; private String pwd; } -
可以發現自動新增了常用的getset tostring 等方法
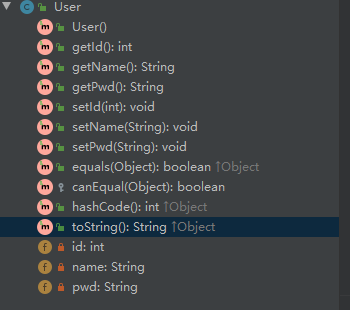
說明
@AllArgsConstructor 有參構造
@NoArgsConstructor 無參構造

...
10、複雜查詢: 多對一處理
- 如多個學生對應一個老師
- 對於學生這邊而言, [關聯] 多個學生關聯一個老師 [多對一]
- 對於老師而言 , [集合] 一個老師對應多個學生 [一對多]
建立數據表
create table `teacher`(
	`id` int(10) not null,
	`name` varchar(30) DEFAULT null,
	primary key (`id`)
	) engine=INNODB DEFAULT charset=utf8

	insert into teacher(`id`,`name`) VALUES (1,"秦老師");

	create table `student`(
	`id` int(10) not null,
	`name` varchar(30) DEFAULT null,
	`tid` int(10) DEFAULT NULL,
	PRIMARY KEY (`id`),
	KEY `fktid` (`tid`),
	CONSTRAINT `fktid` FOREIGN KEY (`tid`) REFERENCES `teacher` (`id`)
	) engine=INNODB DEFAULT charset=utf8

INSERT INTO `student` (`id`, `name`, `tid`) VALUES ('1', '小明', '1');
INSERT INTO `student` (`id`, `name`, `tid`) VALUES ('2', '小紅', '1');
INSERT INTO `student` (`id`, `name`, `tid`) VALUES ('3', '小張', '1');
INSERT INTO `student` (`id`, `name`, `tid`) VALUES ('4', '小李', '1');
INSERT INTO `student` (`id`, `name`, `tid`) VALUES ('5', '小王', '1');
實體類
--------------老師
package com.qwrdxer.pojo;


import lombok.Data;

@Data
public class Teacher {
    private int id ;
    private String name;
}

--------------學生
package com.qwrdxer.pojo;

import lombok.Data;

@Data
public class Student {
    private int id;
    private String name;

    //學生需要關聯一個老師
    private Teacher teacher;
}
XML
<?xml version="1.0" encoding="UTF-8" ?>
<!DOCTYPE mapper
        PUBLIC "-//mybatis.org//DTD Mapper 3.0//EN"
        "http://mybatis.org/dtd/mybatis-3-mapper.dtd">
<mapper namespace="com.qwrdxer.dao.StudentMapper">

</mapper>
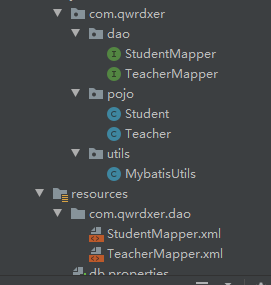
報錯: 在資源目錄使用/而不是. resource com/qwrdxer/dao/*Mapper.xml

查詢學生表以及對應的老師的資訊
方式1.按照查詢巢狀處理
思路:
- 查詢所有的學生資訊
- 根據查詢出來的學生tid , 尋找對應的老師
<select id="getStudent" resultType="com.qwrdxer.pojo.Student">
    select * from student;
</select>
簡單的查詢返回值爲null
Student(id=1, name=小明, teacher=null)
Student(id=2, name=小紅, teacher=null)
Student(id=3, name=小張, teacher=null)
Student(id=4, name=小李, teacher=null)
Student(id=5, name=小王, teacher=null)
<?xml version="1.0" encoding="UTF-8" ?>
<!DOCTYPE mapper
        PUBLIC "-//mybatis.org//DTD Mapper 3.0//EN"
        "http://mybatis.org/dtd/mybatis-3-mapper.dtd">
<mapper namespace="com.qwrdxer.dao.StudentMapper">

    <select id="getStudent" resultMap="StudentTeacher">
        select * from student;
    </select>
    <resultMap id="StudentTeacher" type="Student">
        <result property="id" column="id"></result>
        <result property="name" column="name"></result>
        <association property="teacher" column="tid" javaType="Teacher" select="getTeacher"></association>
    </resultMap>

    <select id="getTeacher" resultType="Teacher">
        select * from teacher where id= #{id}
    </select>
</mapper>
-
對於學生實體類中特殊的成員Teacher 需要設定resultMap, 在其中使用association 來系結實體類, 而它的值的獲得是通過設定select 方法, 指定另一個查詢來獲得。
-
複雜的屬性, 需要單獨處理 :物件使用association 集合使用collection
javaType= 指定屬性的型別
集閤中的泛型資訊, 使用ofType來獲取
    <select id="getStudent2" resultMap="StudentTeacher2">
        select s.id sid,s.name sname,t.name tname,t.id tid
        from student s,teacher t
        where s.tid=t.id;
    </select>
    <resultMap id="StudentTeacher2" type="Student">
        <result property="id" column="sid"></result>
        <result property="name" column="sname"></result>
        <association property="teacher" javaType="Teacher">
            <result property="name" column="tname"></result>
            <result property="id" column="tid"></result>
        </association>
    </resultMap>
回顧MySQL多表查詢
- 子查詢( select * from xx where ss=(select * from xxxx ))
- 聯表查詢(select x.a,x.b,s.c,s.e from x,s)
11、一對多處理
比如: 一個老師有多個學生, 對於老師來說, 就是一對多的關係
實體類
-----學生類

package com.qwrdxer.pojo;
import lombok.Data;
import java.util.List;
@Data
public class Teacher {
    private int id ;
    private String name;
    //一個老師對應多個學生
    private List<Student> studentlist;
}
-----老師類

package com.qwrdxer.pojo;
import lombok.Data;
@Data
public class Student {
    private int id;
    private String name;
    private int tid;
}
package com.qwrdxer.dao;

import com.qwrdxer.pojo.Teacher;
import org.apache.ibatis.annotations.Param;
import org.apache.ibatis.annotations.Select;

import java.util.List;

public interface TeacherMapper {
    //獲取老師
    @Select("select * from teacher")
    List<Teacher> getTeacher();
    //獲取老師和對應學生的資訊
    List<Teacher> getTeacherAndStudent(@Param("tid") int id);
}
<mapper namespace="com.qwrdxer.dao.TeacherMapper">

    <select id="getTeacherAndStudent" resultMap="TeacherStudent">
       select s.id sid,s.name sname, t.name tname,t.id tid  from student s,teacher t where s.tid=t.id and t.id=#{tid};
    </select>
    <!--  private int id ;
    private String name;
    //一個老師對應多個學生
    private List<Student> studentlist;-->
    <resultMap id="TeacherStudent" type="Teacher">
        <result property="name" column="tname"></result>
        <result property="id" column="tid"></result>

        <collection property="studentlist" ofType="Student">
            <result property="id" column="sid"></result>
            <result property="name" column="sname"></result>
        </collection>
    </resultMap>

</mapper>
複雜的屬性, 需要單獨處理 :物件使用association 集合使用collection
javaType= 指定屬性的型別
集閤中的泛型資訊, 使用ofType來獲取
另一種方式
    <!--另一種方式-->
    <select id="getTeacherAndStudent2" resultMap="TeacherStudent2">
        select * from teacher where id=#{tid};
    </select>
    <resultMap id="TeacherStudent2" type="Teacher">
        <collection property="studentlist"  column="id" javaType="ArrayList" ofType="Student" select="selectStudent">
        </collection>
    </resultMap>
    <select id="selectStudent" resultType="Student">
        select * from student where tid=#{id};
    </select>
小結
-
關聯- association [ 多對一]
-
集合- collection [一對多]
-
JavaType | ofType
- javaType 指定實體類中屬性的型別
- ofType 指定對映到List或者集閤中的pojo型別, 泛型中的約束型別
注意點:
- 保證SQL的可讀性
- 注意一對多和多對一中,屬性名和欄位名的問題
- 使用日誌排錯
面試高頻
- mysql引擎
- innoDB 底層原理
- 索引
- 索引優化
12. 動態SQL
什麼是動態SQL: 動態SQl 就是根據不同的條件生成不同的SQL語句
[外連圖片轉存失敗,源站可能有防盜鏈機制 機製,建議將圖片儲存下來直接上傳(img-0WHGBOtz-1596949630643)(C:\Users\19442\AppData\Roaming\Typora\typora-user-images\image-20200807215332473.png)]
動態 SQL 是 MyBatis 的強大特性之一。如果你使用過 JDBC 或其它類似的框架,你應該能理解根據不同條件拼接 SQL 語句有多痛苦,例如拼接時要確保不能忘記新增必要的空格,還要注意去掉列表最後一個列名的逗號。利用動態 SQL,可以徹底擺脫這種痛苦。
如果你之前用過 JSTL 或任何基於類 XML 語言的文字處理器,你對動態 SQL 元素可能會感覺似曾相識
- if
- choose (when, otherwise)
- trim (where, set)
- foreach
環境搭建:
建立數據庫


import com.qwrdxer.mapper.BlogMapper;
import com.qwrdxer.pojo.Blog;
import com.qwrdxer.utils.IDutils;
import com.qwrdxer.utils.MybatisUtils;
import org.apache.ibatis.session.SqlSession;
import org.junit.Test;

import java.util.Date;

public class MyTest {
    @Test
    public void addInitBlog(){
        SqlSession sqlSession = MybatisUtils.getSqlSession();
        BlogMapper mapper = sqlSession.getMapper(BlogMapper.class);

        Blog blog=new Blog();
        blog.setId(IDutils.getId());
        blog.setTitle("Mybatis如此簡單");
        blog.setAuthor("狂神說");
        blog.setCreateTime(new Date());
        blog.setViews(2222);
        mapper.addBlog(blog);

        blog.setId(IDutils.getId());
        blog.setTitle("JAVA如此簡單");
        mapper.addBlog(blog);

        blog.setId(IDutils.getId());
        blog.setTitle("Spring如此簡單");
        mapper.addBlog(blog);

        blog.setId(IDutils.getId());
        blog.setTitle("微服務如此簡單");
        mapper.addBlog(blog);
        sqlSession.close();
    }
}

----------------------------------

package com.qwrdxer.utils;

import org.junit.jupiter.api.Test;

import java.util.UUID;

public class IDutils {

    public static String getId(){
        return UUID.randomUUID().toString().replaceAll("-","");
    }


@Test
  public void test(){
        System.out.println(getId());
}
}
-
導包
-
組態檔
-
util包
-
編寫實體類
@Data public class Blog { private String id; private String title; private String author; private Date createTime;//屬性名和欄位名不一致 核心設定類中設定set <setting name="mapUnderscoreToCamelCase" value="true"/> private int views; } -
mapper
IF語句
使用動態 SQL 最常見情景是根據條件包含 where 子句的一部分。比如:
<select id="findActiveBlogWithTitleLike"
     resultType="Blog">
  SELECT * FROM BLOG
  WHERE state = ‘ACTIVE’
  <if test="title != null">
    AND title like #{title}
  </if>
</select>
    <select id="queryBlogIF" parameterType="map" resultType="Blog">
        select * from mybatis.blog
        <where>
            <if test="title!=null">
                 title=#{title}
            </if>
            <if test="author!=null">
                and author=#{author}
            </if>
        </where>
    </select>
    @Test
    public void queryBlogIF(){
        SqlSession sqlSession = MybatisUtils.getSqlSession();

        BlogMapper mapper = sqlSession.getMapper(BlogMapper.class);

        HashMap map =new HashMap();
        map.put("author","root");
        List<Blog> blogs = mapper.queryBlogIF(map);
        for (Blog blog : blogs) {
            System.out.println(blog.toString());
        }
        sqlSession.close();
    }
choose (when, otherwise)
MyBatis 提供了 choose 元素,它有點像 Java 中的 switch 語句。 從上 往下依次檢視每個when標籤的值, 如果爲真, 拼接sql, 結束, 如果when都不爲真, 拼接otherwise
    <select id="queryBlogChoose" parameterType="map" resultType="Blog">
        select * from mybatis.blog
        <where>
            <choose>
                <when test="title!=null">
                    title=#{title}
                </when>
                <when test="author!=null">
                     author=#{author}
                </when>
                <otherwise></otherwise>
            </choose>

        </where>
    </select>
    @Test
    public void queryBlogChoose(){
        SqlSession sqlSession = MybatisUtils.getSqlSession();

        BlogMapper mapper = sqlSession.getMapper(BlogMapper.class);

        HashMap map =new HashMap();
        map.put("author","root");
        List<Blog> blogs = mapper.queryBlogChoose(map);
        for (Blog blog : blogs) {
            System.out.println(blog.toString());
        }
        sqlSession.close();
    }
trim (where, set)
前面幾個例子已經合宜地解決了一個臭名昭著的動態 SQL 問題。現在回到之前的 「if」 範例,這次我們將 「state = ‘ACTIVE’」 設定成動態條件,看看會發生什麼。
<select id="findActiveBlogLike"
     resultType="Blog">
  SELECT * FROM BLOG
  WHERE
  <if test="state != null">
    state = #{state}
  </if>
  <if test="title != null">
    AND title like #{title}
  </if>
  <if test="author != null and author.name != null">
    AND author_name like #{author.name}
  </if>
</select>
如果沒有匹配的條件會怎麼樣?最終這條 SQL 會變成這樣:
SELECT * FROM BLOG
WHERE
這會導致查詢失敗。如果匹配的只是第二個條件又會怎樣?這條 SQL 會是這樣:
SELECT * FROM BLOG
WHERE
AND title like ‘someTitle’
這個查詢也會失敗。這個問題不能簡單地用條件元素來解決。這個問題是如此的難以解決,以至於解決過的人不會再想碰到這種問題。
MyBatis 有一個簡單且適合大多數場景的解決辦法。而在其他場景中,可以對其進行自定義以符合需求。而這,只需要一處簡單的改動:
<select id="findActiveBlogLike"
     resultType="Blog">
  SELECT * FROM BLOG
  <where>
    <if test="state != null">
         state = #{state}
    </if>
    <if test="title != null">
        AND title like #{title}
    </if>
    <if test="author != null and author.name != null">
        AND author_name like #{author.name}
    </if>
  </where>
</select>
where 元素只會在子元素返回任何內容的情況下才插入 「WHERE」 子句。而且,若子句的開頭爲 「AND」 或 「OR」,where 元素也會將它們去除。
如果 where 元素與你期望的不太一樣,你也可以通過自定義 trim 元素來定製 where 元素的功能。比如,和 where 元素等價的自定義 trim 元素爲:
<trim prefix="WHERE" prefixOverrides="AND |OR ">
  ...
</trim>
prefixOverrides 屬性會忽略通過管道符分隔的文字序列(注意此例中的空格是必要的)。上述例子會移除所有 prefixOverrides 屬性中指定的內容,並且插入 prefix 屬性中指定的內容。
用於動態更新語句的類似解決方案叫做 set。set 元素可以用於動態包含需要更新的列,忽略其它不更新的列。比如:
<update id="updateAuthorIfNecessary">
  update Author
    <set>
      <if test="username != null">username=#{username},</if>
      <if test="password != null">password=#{password},</if>
      <if test="email != null">email=#{email},</if>
      <if test="bio != null">bio=#{bio}</if>
    </set>
  where id=#{id}
</update>
這個例子中,set 元素會動態地在行首插入 SET 關鍵字,並會刪掉額外的逗號(這些逗號是在使用條件語句給列賦值時引入的)。
來看看與 set 元素等價的自定義 trim 元素吧:
<trim prefix="SET" suffixOverrides=",">
  ...
</trim>
注意,我們覆蓋了後綴值設定,並且自定義了字首值。
13快取
13.1簡介
查詢 每次都需要連線數據庫, 消耗資源, 如果將查詢的結果暫存到可以直接取到的地方 --> 記憶體 : 快取
再次查詢到相同的數據是, 直接走快取, 而不是數據庫
- 什麼是快取[Cache]?
- 存在記憶體中的臨時數據
- 將使用者經常查詢的數據放在快取中, 使用者查詢相同的數據就不用數據庫從磁碟中查詢, 直接從快取中獲取, 從而提高查詢效率, 解決了高併發系統的效能問題
- 爲什麼使用快取?
- 減少和數據庫的互動次數, 減少系統開銷, 提高系統效率.
- 什麼樣的數據能夠使用快取?
- 經常查詢並且不經常改變的數據
13.2 Mybatis快取
-
MyBatis 包含一個非常強大的查詢快取特性, 它可以非常方便地制定和設定快取.快取可以 極大的提升查詢效率。
-
Mybatis系統中預設定義了兩級快取, 一級快取和二級快取。
- 預設情況下, 只有一級快取開啓, (SQLSession級別快取, 也稱爲本地快取)
- 二級快取需要手動設定, 它是namespace級別的快取(Mapper)
- 爲了提高擴充套件性, Mybatis定義了快取介面Cache , 我們可以通過實現Cache介面來自定義二級快取。
-
對映語句檔案中的所有 select 語句的結果將會被快取。
-
對映語句檔案中的所有 insert、update 和 delete 語句會重新整理快取。
-
快取會使用最近最少使用演算法(LRU, Least Recently Used)演算法來清除不需要的快取。
-
快取不會定時進行重新整理(也就是說,沒有重新整理間隔)。
-
快取會儲存列表或物件(無論查詢方法返回哪種)的 1024 個參照。
-
快取會被視爲讀/寫快取,這意味着獲取到的物件並不是共用的,可以安全地被呼叫者修改,而不幹 不乾擾其他呼叫者或執行緒所做的潛在修改。
13.3 一級快取
- 一級快取也叫本地快取: SQLSession
- 與數據庫同一次對談期間查詢到的數據會放在本地快取中。
- 以後如果需要獲取相同的數據 ,直接從快取中拿,沒必要再去查詢數據庫
測試步驟:
- 開啓日誌
- 測試在一個Session中查詢兩次相同記錄
- 檢視日誌輸出
    @Test
    public void getUserByid(){
        SqlSession sqlSession = MybatisUtils.getSqlSession();
        UserMapper mapper = sqlSession.getMapper(UserMapper.class);
        User userByID = mapper.getUserByID(1);
        System.out.println(userByID.toString());

        System.out.println("-----------查詢重複數據-----------");
        User userByID2 = mapper.getUserByID(1);
        System.out.println(userByID2.toString());
        sqlSession.close();
    }
輸出
PooledDataSource forcefully closed/removed all connections.
PooledDataSource forcefully closed/removed all connections.
PooledDataSource forcefully closed/removed all connections.
PooledDataSource forcefully closed/removed all connections.
Opening JDBC Connection
Created connection 141289226.
==>  Preparing: select * from user where id =?
==> Parameters: 1(Integer)
<==    Columns: id, name, pwd
<==        Row: 1, 小明, 12345678
<==      Total: 1
User(id=1, name=小明, pwd=12345678)
-----------查詢重複數據-----------
User(id=1, name=小明, pwd=12345678)  				<----< 直接從快取中獲取數據
Closing JDBC Connection [com.mysql.jdbc.JDBC4Connection@86be70a]
Returned connection 141289226 to pool.
通過呼叫SQLSession.clearCache() 方法可以手動清除快取
小節: 一級快取是預設開啓的, 只在一次SQLSession 有效
13.4 二級快取
預設情況下,只啓用了原生的對談快取(一級快取),它僅僅對一個對談中的數據進行快取。 要啓用全域性的二級快取,只需要在你的 SQL 對映檔案(Mapper) 中新增一行:
<cache/>
- 二級快取也叫全域性快取, 一級快取作用域過低,所以誕生了二級快取
- 基於namespace 級別的快取,一個名稱空間(Mapper) 對應一個二級快取
- 工作機制 機製
- 一個對談查詢一條數據, 這個數據就會被放在當前對談的一級快取中
- 如果當前對談關閉流, 和這個對談對應的一級快取就沒了, 但是我們想要的是, 對談關閉了,一級快取的數據可以儲存到二級快取中
- 新的對談查詢相同的資訊時 ,就可以從二級快取中獲取內容
步驟:
-
開啓全域性快取
在settings 中顯示設定(預設開啓)<setting name="cacheEnabled" value="true"></setting> -
在要使用二級快取的mapper 中開啓(設定cache標籤)
<cache/> -
測試
需要將實體類序列化@Test public void getUserByid(){ SqlSession sqlSession = MybatisUtils.getSqlSession(); UserMapper mapper = sqlSession.getMapper(UserMapper.class); User userByID = mapper.getUserByID(1); System.out.println(userByID.toString()); sqlSession.close(); System.out.println("第二個sqlsession 開啓"); SqlSession sqlSession2 = MybatisUtils.getSqlSession(); UserMapper mapper2 = sqlSession2.getMapper(UserMapper.class); User userByID2 = mapper2.getUserByID(1); System.out.println(userByID2.toString()); sqlSession2.close(); } Created connection 963522361. ==> Preparing: select * from user where id =? ==> Parameters: 1(Integer) <== Columns: id, name, pwd <== Row: 1, 小明, 12345678 <== Total: 1 User(id=1, name=小明, pwd=12345678) Closing JDBC Connection [com.mysql.jdbc.JDBC4Connection@396e2f39] Returned connection 963522361 to pool. 第二個sqlsession 開啓 Cache Hit Ratio [com.qwrdxer.dao.UserMapper]: 0.5 User(id=1, name=小明, pwd=12345678)
提示 快取只作用於 cache 標籤所在的對映檔案中的語句。如果你混合使用 Java API 和 XML 對映檔案,在共用介面中的語句將不會被預設快取。你需要使用 @CacheNamespaceRef 註解指定快取作用域。
這些屬性可以通過 cache 元素的屬性來修改。比如:
<cache
  eviction="FIFO"
  flushInterval="60000"
  size="512"
  readOnly="true"/>
這個更高階的設定建立了一個 FIFO 快取,每隔 60 秒重新整理,最多可以儲存結果物件或列表的 512 個參照,而且返回的物件被認爲是隻讀的,因此對它們進行修改可能會在不同線程中的呼叫者產生衝突。
可用的清除策略有:
LRU– 最近最少使用:移除最長時間不被使用的物件。FIFO– 先進先出:按物件進入快取的順序來移除它們。SOFT– 軟參照:基於垃圾回收器狀態和軟參照規則移除物件。WEAK– 弱參照:更積極地基於垃圾收集器狀態和弱參照規則移除物件。
預設的清除策略是 LRU。
flushInterval(重新整理間隔)屬性可以被設定爲任意的正整數,設定的值應該是一個以毫秒爲單位的合理時間量。 預設情況是不設定,也就是沒有重新整理間隔,快取僅僅會在呼叫語句時重新整理。
size(參照數目)屬性可以被設定爲任意正整數,要注意欲快取物件的大小和執行環境中可用的記憶體資源。預設值是 1024。
readOnly(只讀)屬性可以被設定爲 true 或 false。只讀的快取會給所有呼叫者返回快取物件的相同範例。 因此這些物件不能被修改。這就提供了可觀的效能提升。而可讀寫的快取會(通過序列化)返回快取物件的拷貝。 速度上會慢一些,但是更安全,因此預設值是 false。
查詢語句可以顯示的設定是否使用快取
<select id="test" useCache="false"></select>
小結:
- 只要開啓了二級快取, 在同一個Mapper下有效
- 所有的數據都會優先放在一級快取中
- 一個sqlsession關閉後, 纔會將數據提交到二級快取
13.5 快取原理
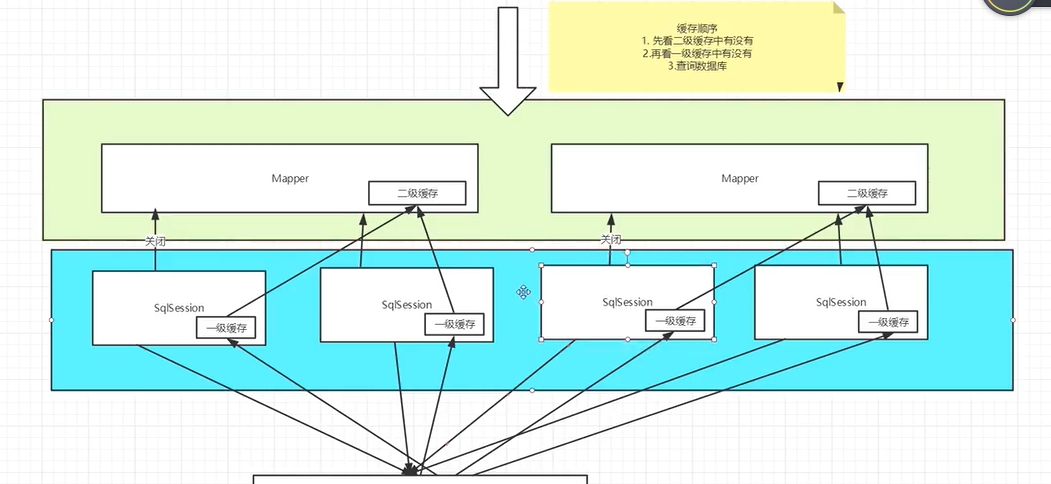
13.6 自定義快取- ehcache
Ehcache是一種廣泛使用的開源Java分佈式快取。
-
導包
<!-- https://mvnrepository.com/artifact/org.mybatis.caches/mybatis-ehcache --> <dependency> <groupId>org.mybatis.caches</groupId> <artifactId>mybatis-ehcache</artifactId> <version>1.2.1</version> </dependency> -
自定義快取
<cache type="org.mybatis.caches.ehcache.EhcacheCache"></cache> -
建立組態檔ehcache,xml 定義快取策略
 SqlSession sqlSession2 = MybatisUtils.getSqlSession();
    UserMapper mapper2 = sqlSession2.getMapper(UserMapper.class);
    User userByID2 = mapper2.getUserByID(1);
    System.out.println(userByID2.toString());

    sqlSession2.close();
}
Created connection 963522361.
> Preparing: select * from user where id =?
> Parameters: 1(Integer)
< Columns: id, name, pwd
< Row: 1, 小明, 12345678
<== Total: 1
User(id=1, name=小明, pwd=12345678)
Closing JDBC Connection [com.mysql.jdbc.JDBC4Connection@396e2f39]
Returned connection 963522361 to pool.
第二個sqlsession 開啓
Cache Hit Ratio [com.qwrdxer.dao.UserMapper]: 0.5
User(id=1, name=小明, pwd=12345678)
提示 快取只作用於 cache 標籤所在的對映檔案中的語句。如果你混合使用 Java API 和 XML 對映檔案,在共用介面中的語句將不會被預設快取。你需要使用 @CacheNamespaceRef 註解指定快取作用域。
這些屬性可以通過 cache 元素的屬性來修改。比如:
<cache
  eviction="FIFO"
  flushInterval="60000"
  size="512"
  readOnly="true"/>
這個更高階的設定建立了一個 FIFO 快取,每隔 60 秒重新整理,最多可以儲存結果物件或列表的 512 個參照,而且返回的物件被認爲是隻讀的,因此對它們進行修改可能會在不同線程中的呼叫者產生衝突。
可用的清除策略有:
LRU– 最近最少使用:移除最長時間不被使用的物件。FIFO– 先進先出:按物件進入快取的順序來移除它們。SOFT– 軟參照:基於垃圾回收器狀態和軟參照規則移除物件。WEAK– 弱參照:更積極地基於垃圾收集器狀態和弱參照規則移除物件。
預設的清除策略是 LRU。
flushInterval(重新整理間隔)屬性可以被設定爲任意的正整數,設定的值應該是一個以毫秒爲單位的合理時間量。 預設情況是不設定,也就是沒有重新整理間隔,快取僅僅會在呼叫語句時重新整理。
size(參照數目)屬性可以被設定爲任意正整數,要注意欲快取物件的大小和執行環境中可用的記憶體資源。預設值是 1024。
readOnly(只讀)屬性可以被設定爲 true 或 false。只讀的快取會給所有呼叫者返回快取物件的相同範例。 因此這些物件不能被修改。這就提供了可觀的效能提升。而可讀寫的快取會(通過序列化)返回快取物件的拷貝。 速度上會慢一些,但是更安全,因此預設值是 false。
查詢語句可以顯示的設定是否使用快取
<select id="test" useCache="false"></select>
小結:
- 只要開啓了二級快取, 在同一個Mapper下有效
- 所有的數據都會優先放在一級快取中
- 一個sqlsession關閉後, 纔會將數據提交到二級快取
13.5 快取原理
[外連圖片轉存中…(img-boi6uSeb-1596949630652)]
13.6 自定義快取- ehcache
Ehcache是一種廣泛使用的開源Java分佈式快取。
-
導包
<!-- https://mvnrepository.com/artifact/org.mybatis.caches/mybatis-ehcache --> <dependency> <groupId>org.mybatis.caches</groupId> <artifactId>mybatis-ehcache</artifactId> <version>1.2.1</version> </dependency> -
自定義快取
<cache type="org.mybatis.caches.ehcache.EhcacheCache"></cache> -
建立組態檔ehcache,xml 定義快取策略