STM32升級方法(一):IAP升級
此部落格主要用於記錄學習過程中的心得以及防止遺忘,下面 下麪的一些圖片來源於網上,如有侵犯請聯繫。
STM32晶片的升級方式衆多,這裏簡單介紹下,主要有ICP((In-Circuit Programming – ICP)、ISP(In-System Programming)、IAP((In-Application Programming – IAP),定義和區別如下:
- ISP(In-System Programming)在系統可程式化,指電路板上的空白器件可以程式設計寫入終端使用者程式碼, 而不需要從電路板上取下器件,已經程式設計的器件也可以用 ISP 方式擦除或再程式設計。
- 線上程式設計(In-Circuit Programming – ICP)方式用於更新快閃記憶體記憶體的全部內容,它通過JTAG、SWD協定或系統載入程(Bootloader)下載使用者應用程式到微控制器中。ICP是一種快速有效的程式設計方法,消除了封裝和管座的困擾。
- 在程式中程式設計(In-Application Programming – IAP)可以使用微控制器支援的任一種通訊介面(如I/O埠、USB、CAN、UART、I 2 C、SPI等)下載程式或數據到記憶體中。IAP允許使用者在程式執行時重新燒寫快閃記憶體記憶體中的內容。然而,IAP要求至少有一部分程式已經使用ICP燒到快閃記憶體記憶體中。
其中ISP屬於ICP中的一種,在下載的時候需要控制boot0/boot1引腳,使用系統自帶的載入程式(bootloader)進行升級使用者程式,優點是:快遞程式設計、晶片內部可以不需要任何的程式(即空白晶片也可以升級)、晶片佔用的資源少。缺點是:只能使用固定的外設和協定,其中stmf10x只能通過USART1來進行升級,靈活性不高。
IAP使用的boot loader是使用者自己編寫的,所以需要提前把這部分程式燒入flash中。其優點是:很靈活,可以通過各種外設給晶片進行升級,如USART、SPI、乙太網、以及SD卡等等,協定完全可以有自己定義,只要上位機和下位機一致既可。缺點是IAP佔用一部分flash資源,需要提前把程式燒入進去。
ISP和IAP是STM32晶片升級的趨勢,JTAGA和SWD方式在偵錯程式的時候使用的會多些,但是在出廠後,使用這些方式升級相對來說很麻煩。所以基本上使用ISP和IAP,我做的專案中上位機使用的是3399,採集信號使用的是stm32f10r8,使用SPI外設直接進行升級,3399上面跑安卓系統,只要把升級檔案下載下來就可以進行升級。當然這只是其中的一種方式,還可以通過無線通訊等方式對stm32進行升級,非常的靈活。
STM32 IAP升級原理簡介
STM32 IAP 升級官方資料彙總,這些都是標準庫。
- STM32F10xxx in-application programming using the USART (AN2557)
- STM32F2xx in-application programming using the USART (AN3374)
- STM32F4 in-application programming (IAP) using the USART (AN3965)
- STM32L1xx in-application programming (IAP) using the USART (AN3310)
- STM32F3xx in-application programming (IAP) using the USART (AN4045)
- STM32F0xx in-application programming using the USART (AN4065)
- STM32F107 in-application programming (IAP) over Ethernet (AN3226)
- STM32F2x7 in-application programming (IAP) over Ethernet based on LwIP TCP/IP stack (AN3376)
- LwIP TCP/IP stack demonstration for STM32F2x7 microcontrollers based on LwIP TCP/IP stack and FreeRTOS (AN3384)
- STM32F4x7 in-application programming (IAP) over Ethernet based on LwIP TCP/IP stack (AN3968)
上面的鏈接是下載官方的IAPdemo,理解了官方的demo後可以自己編寫符合自身要求的boot loader程式,需要注意的是這demo使用的韌體庫是3.3的比較舊。
STM32 IAP原理
咱們都知道IAP升級是使用客戶自己編寫的boot loader而不是系統自帶的,所以flash需要爲兩部分,一部分用來存放IAP(boot loader)程式,另外一部分用於存放使用者程式,即晶片真正需要跑的程式。

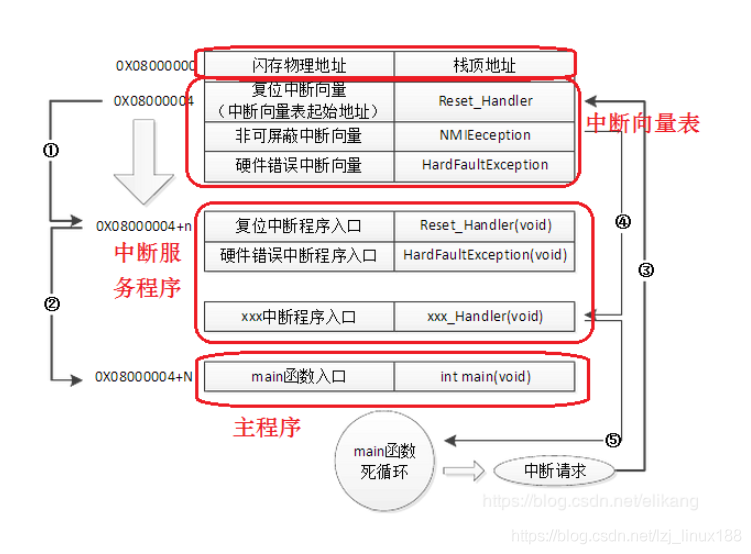
咱們需要知道晶片從上電到執行的過程。M3的啓動流程是:上電後從0x0800 0004取出復位中斷向量地址,然後跳轉到復位中斷程式入口(主要是初始化系統時鐘,以及呼叫_main),執行結束後跳轉到main函數。流程如下:

上圖是針對執行一個程式的流程圖,咱們的IAP+user Programs屬於兩個程式,所以咱們需要把IAP放在flash的起始地址,即上電後先執行boot loader,檢視升級條件是否滿足(如按鍵、引腳的電位等),滿足的話就進行升級使用者程式,不滿足的話直接跳轉到之前的使用者程式。升級其實就是把flash內的內容擦除然後寫入新的程式。
IAP執行流程

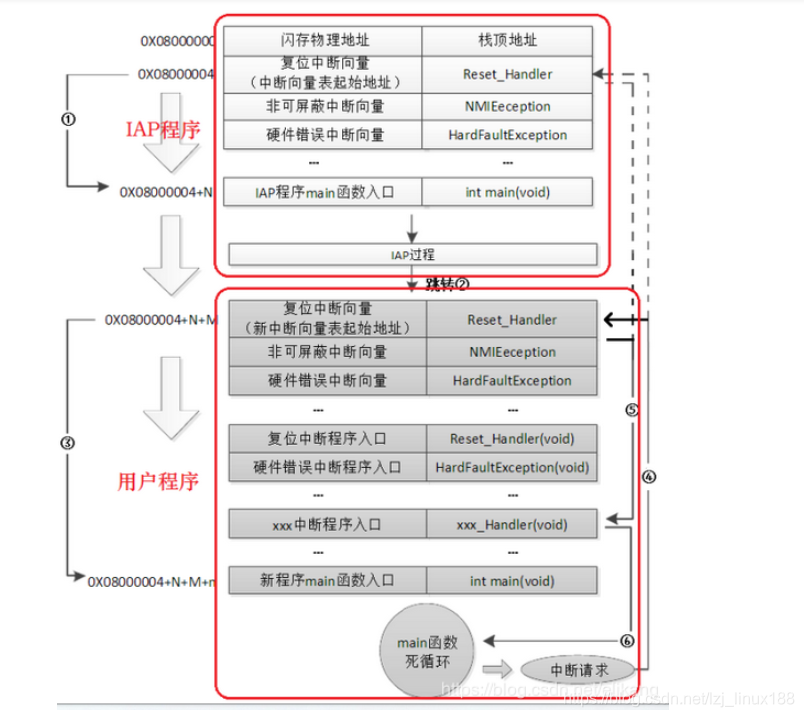
上電初始程式依然從0x08000004處取出復位中斷向量地址,執行復位中斷函數後跳轉到IAP的main(標號①所示),在IAP的main函數判斷升級條件,如果升級條件滿足則進行升級,否則強制跳轉到0x08000004+N+M處(標號②所示),即使用者程式中斷向量表的復位中斷地址處,執行復位中斷,最後跳轉到使用者main函數中(標號③所示),
當發生中斷請求後,程式跳轉到新的中斷向量表中取出新的中斷函數入口地址,再跳轉到新的中斷服務函數中執行(標號④⑤所示),執行完中斷函數後再返回到main函數中來(標號⑥所示)。
對於步驟④⑤我認爲的是,在main函數的執行過程中,如果CPU得到一箇中斷請求,PC指針本來應該跳轉到0x08000004處的中斷向量表,由於我們設定了中斷向量表偏移量爲N+M,因此PC指針被強制跳轉到0x08000004+N+M處的中斷向量表中得到相應的中斷函數地址,再跳轉到相應新的中斷服務函數,執行結束後返回到main函數中來
原理就是這麼簡單,下面 下麪分析下官方的demo,這裏以stm32f10x爲例(AN2557)。
IAP/src/main.c

int main(void)
{
  /* Flash unlock */
  /*flash解鎖,因爲需要操作flash*/
  FLASH_Unlock();

  /* Initialize Key Button mounted on STM3210X-EVAL board */
  /*初始化按鍵,demo中的升級觸發條件爲按鍵按下*/
  STM_EVAL_PBInit(BUTTON_KEY, BUTTON_MODE_GPIO);

  /* Test if Key push-button on STM3210X-EVAL Board is pressed */
  if (STM_EVAL_PBGetState(BUTTON_KEY)  == 0x00)
  {
    /* If Key is pressed */
    /*如果按鍵按下,即觸發升級,進行升級*/
    /* Execute the IAP driver in order to re-program the Flash */
    /*初始化串列埠,demo裏面使用的是usart1 + Y-MODe協定*/
    IAP_Init();
    SerialPutString("\r\n================================================================");
    SerialPutString("\r\n=          (C) COPYRIGHT 2010 STMicroelectronics           =");
    SerialPutString("\r\n=                                                          =");
    SerialPutString("\r\n=  In-Application Programming Application  (Version 3.3.0) =");
    SerialPutString("\r\n=                                                          =");
    SerialPutString("\r\n=                       By MCD Application Team            =");
    SerialPutString("\r\n============================================================");
    SerialPutString("\r\n\r\n");
    /*升級選單*/
    Main_Menu ();
  }
  /* Keep the user application running */
  else
  {
    /* Test if user code is programmed starting from address "ApplicationAddress" */
    /*升級條件不滿足,跳轉到使用者程式處執行使用者程式*/
    if (((*(__IO uint32_t*)ApplicationAddress) & 0x2FFE0000 ) == 0x20000000)
    {
      /* Jump to user application */
      /*ApplicationAddress爲使用者程式的棧地址,+4便爲使用者程式的復位中斷向量地址*/
      JumpAddress = *(__IO uint32_t*) (ApplicationAddress + 4);
      Jump_To_Application = (pFunction) JumpAddress;
      /* Initialize user application's Stack Pointer */
      __set_MSP(*(__IO uint32_t*) ApplicationAddress);
      /*執行使用者空間的復位中斷向量函數,裏面主要是進行系統時鐘設定,執行使用者空間的main函數數*/
      Jump_To_Application();
    }
  }

  while (1)
  {}
}
上述的就是IAP的入口,先檢視是否觸發了升級條件,觸發了進行升級處理,要是沒有觸發則跳轉到使用者中斷向量表中獲取復位中斷函數的入口,然後執行復位中斷服務函數,最好執行使用者空間的main函數。note:只要修改觸發方式,根據自己的板子來選擇相應的觸發方式,以及相應的外設傳輸。
升級條件滿足後進入升級主選單中, IAP/src/common.c 檔案裏面,升級主選單主要是選擇相應的操作指令,進行相應的操作。這裏有下載使用者程式指令、獲取使用者程式指令、跳轉到使用者程式指令以及解除防寫指令。note:咱們根據自己的情況可以適當的裁剪,比如不想使用過多的記憶體資源的話,可以只實現下載升級指令。
void Main_Menu(void)
{
  uint8_t key = 0;

  /* Get the number of block (4 or 2 pages) from where the user program will be loaded */
  /*計算IAP佔用的flash頁數*/
  BlockNbr = (FlashDestination - 0x08000000) >> 12;

  /* Compute the mask to test if the Flash memory, where the user program will be
     loaded, is write protected */
#if defined (STM32F10X_MD) || defined (STM32F10X_MD_VL)
  UserMemoryMask = ((uint32_t)~((1 << BlockNbr) - 1));
#else /* USE_STM3210E_EVAL */
  if (BlockNbr < 62)
  {
    UserMemoryMask = ((uint32_t)~((1 << BlockNbr) - 1));
  }
  else
  {
    UserMemoryMask = ((uint32_t)0x80000000);
  }
#endif /* (STM32F10X_MD) || (STM32F10X_MD_VL) */


  /* Test if any page of Flash memory where program user will be loaded is write protected */
  /*檢測flash中使用者空間的防寫鎖是否開啓*/
  if ((FLASH_GetWriteProtectionOptionByte() & UserMemoryMask) != UserMemoryMask)
  {
    FlashProtection = 1;
  }
  else
  {
    FlashProtection = 0;
  }

  while (1)
  {
    SerialPutString("\r\n================== Main Menu ============================\r\n\n");
    SerialPutString("  Download Image To the STM32F10x Internal Flash ------- 1\r\n\n");
    SerialPutString("  Upload Image From the STM32F10x Internal Flash ------- 2\r\n\n");
    SerialPutString("  Execute The New Program ------------------------------ 3\r\n\n");

    if(FlashProtection != 0)
    {
      SerialPutString("  Disable the write protection ------------------------- 4\r\n\n");
    }

    SerialPutString("==========================================================\r\n\n");

    key = GetKey();

    if (key == 0x31)
    {
      /* Download user application in the Flash */
      /*下載程式*/
      SerialDownload();
    }
    else if (key == 0x32)
    {
      /* Upload user application from the Flash */
      SerialUpload();
    }
    else if (key == 0x33)
    {
      JumpAddress = *(__IO uint32_t*) (ApplicationAddress + 4);

      /* Jump to user application */
      Jump_To_Application = (pFunction) JumpAddress;
      /* Initialize user application's Stack Pointer */
      __set_MSP(*(__IO uint32_t*) ApplicationAddress);
      Jump_To_Application();
    }
    else if ((key == 0x34) && (FlashProtection == 1))
    {
      /* Disable the write protection of desired pages */
      FLASH_DisableWriteProtectionPages();
    }
    else
    {
      if (FlashProtection == 0)
      {
        SerialPutString("Invalid Number ! ==> The number should be either 1, 2 or 3\r");
      }
      else
      {
        SerialPutString("Invalid Number ! ==> The number should be either 1, 2, 3 or 4\r");
      }
    }
  }
}
下面 下麪主要以下載指令爲線索簡介下demo中的過程,當然這部分完全可以由使用者自己實現,比如使用別的外設傳輸。其它的功能可以自己檢視下程式碼,其實很簡單的。下載程式碼程式的核心在 IAP/src/ymodem.c 中的int32_t Ymodem_Receive (uint8_t *buf)函數裏面實現,使用的是Y-mode協定。如不太熟悉ymodem協定的可以查https://blog.csdn.net/huangdenan/article/details/103611081這個鏈接,簡單不錯。
int32_t Ymodem_Receive (uint8_t *buf)
{
  uint8_t packet_data[PACKET_1K_SIZE + PACKET_OVERHEAD], file_size[FILE_SIZE_LENGTH], *file_ptr, *buf_ptr;
  int32_t i, j, packet_length, session_done, file_done, packets_received, errors, session_begin, size = 0;

  /* Initialize FlashDestination variable */
  FlashDestination = ApplicationAddress;

  for (session_done = 0, errors = 0, session_begin = 0; ;)
  {
    for (packets_received = 0, file_done = 0, buf_ptr = buf; ;)
    {
      switch (Receive_Packet(packet_data, &packet_length, NAK_TIMEOUT))
      {
        case 0:
          errors = 0;
          switch (packet_length)
          {
            /* Abort by sender */
            case - 1:
              Send_Byte(ACK);
              return 0;
            /* End of transmission */
            case 0:
              Send_Byte(ACK);
              file_done = 1;
              break;
            /* Normal packet */
            default:
              if ((packet_data[PACKET_SEQNO_INDEX] & 0xff) != (packets_received & 0xff))
              {/*幀序號錯誤*/
                Send_Byte(NAK);
              }
              else
              {	/*接收到的包是正確的*/
                if (packets_received == 0)
                {
                  /* Filename packet */
                  if (packet_data[PACKET_HEADER] != 0)
                  {
                    /* Filename packet has valid data */
                    for (i = 0, file_ptr = packet_data + PACKET_HEADER; (*file_ptr != 0) && (i < FILE_NAME_LENGTH);)
                    {
                      file_name[i++] = *file_ptr++;
                    }
                    file_name[i++] = '\0';
                    for (i = 0, file_ptr ++; (*file_ptr != ' ') && (i < FILE_SIZE_LENGTH);)
                    {
                      file_size[i++] = *file_ptr++;
                    }
                    file_size[i++] = '\0';
                    Str2Int(file_size, &size);

                    /* Test the size of the image to be sent */
                    /* Image size is greater than Flash size */
                    if (size > (FLASH_SIZE - 1))
                    {
                      /* End session */
                      Send_Byte(CA);
                      Send_Byte(CA);
                      return -1;
                    }

                    /* Erase the needed pages where the user application will be loaded */
                    /* Define the number of page to be erased */
                    NbrOfPage = FLASH_PagesMask(size);

                    /* Erase the FLASH pages */
                    for (EraseCounter = 0; (EraseCounter < NbrOfPage) && (FLASHStatus == FLASH_COMPLETE); EraseCounter++)
                    {
                      FLASHStatus = FLASH_ErasePage(FlashDestination + (PageSize * EraseCounter));
                    }
                    Send_Byte(ACK);
                    Send_Byte(CRC16);
                  }
                  /* Filename packet is empty, end session */
                  else
                  {
                    Send_Byte(ACK);
                    file_done = 1;
                    session_done = 1;
                    break;
                  }
                }
                /* Data packet */
                else
                {
                  memcpy(buf_ptr, packet_data + PACKET_HEADER, packet_length);
                  RamSource = (uint32_t)buf;
                  for (j = 0;(j < packet_length) && (FlashDestination <  ApplicationAddress + size);j += 4)
                  {
                    /* Program the data received into STM32F10x Flash */
                    FLASH_ProgramWord(FlashDestination, *(uint32_t*)RamSource);

                    if (*(uint32_t*)FlashDestination != *(uint32_t*)RamSource)
                    {
                      /* End session */
                      Send_Byte(CA);
                      Send_Byte(CA);
                      return -2;
                    }
                    FlashDestination += 4;
                    RamSource += 4;
                  }
                  Send_Byte(ACK);
                }
                packets_received ++;
                session_begin = 1;
              }
          }
          break;
        case 1:
		  /*中斷傳輸*/
          Send_Byte(CA);
          Send_Byte(CA);
          return -3;
        default:
          if (session_begin > 0)
          {
            errors ++;
          }
          if (errors > MAX_ERRORS)
          {	/*單個包傳輸最大的容錯次數*/
            Send_Byte(CA);
            Send_Byte(CA);
            return 0;
          }
		  /*就緒,等待發送包*/
          Send_Byte(CRC16);
          break;
      }
      if (file_done != 0)
      {	/*檔案接收結束*/
        break;
      }
    }
    if (session_done != 0)
    { /*對談結束*/
      break;
    }
  }
  return (int32_t)size;
}
這裏就不一一講解了,主要講解下框架,在這個函數中,一直讀取上位機發送過來的包。y-modem協定的起始幀會有升級檔案的大小以及檔名,後面的數據幀傳送的是升級檔案的內容。在起始幀收到後解析升級檔案的大小,然後把將要佔用的flash給擦除。在後面接收到的升級數據後直接寫入flash中,這裏有校驗過程,即寫入的和讀出的不一樣便會提示升級錯誤。note:這裏沒有使用檔案的長度來確定傳送結束的邊界,而是在結束傳輸後,上位機發送一個空的幀。也沒有校驗數據CRC,所以傳輸出錯的話升級估計也會存在問題。這部分咱們可以自己實現以及修改。如使用別的外設升級,主要是修改這部分。
最後在講解下使用者空間主應用的程式碼,有個地方需要特別注意的,就是使用者空間的程式碼不在flash的起始地址,所以中斷向量表需要修改下。要不然的話響應中斷會跳到IAP中斷向量表中。在使用者程式中需要新增下列程式碼來設定新的中斷向量表。中斷向量表的位置便是使用者運用程式的起始地址。
  /* Set the Vector Table base location at 0x3000 */
  NVIC_SetVectorTable(NVIC_VectTab_FLASH, 0x3000);
demo給IAP分配的空間爲12k(0x08000000-0x08003000),所以使用者程式的起始地址也爲0x08003000,所以設定新的向量表的時候需要把中斷向量表偏移個0x3000。
所以在demo中會出現下列的程式碼,使用者程式的起始地址爲0x08003000,這個地址也是flash的目標地址。即接收到的數據就往這個地址寫入就可以。

起始IAP的程式還是比較容易,思路就是檢測到升級條件,然後從相應的外設把升級檔案接收然後寫入相應的flash就可以。
STM32在keil中的設定。
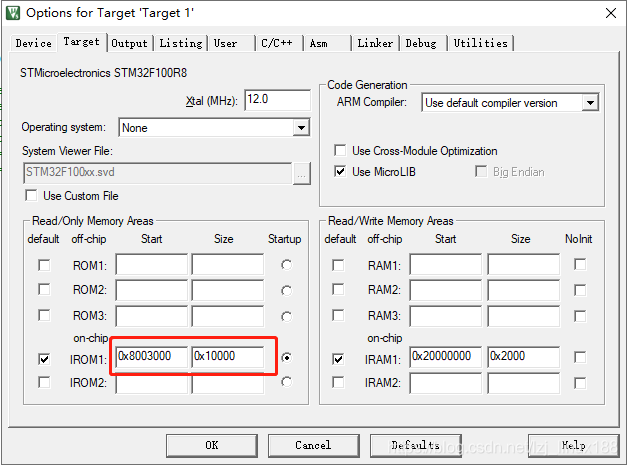
上述講解的demo中IAP空間設定爲12k,這個咱們可以自行修改,但是必須要是以頁爲單位。空間不足的時候可以減小些。在IAP程式碼中修改了,怎麼告訴使用者程式呢?起始很簡單的,在keil中編譯使用者程式的時候,告訴keil新的使用者程式的棧頂就可以了,具體的設定如下圖:

這樣使用者程式的中斷位置便是正確的,要不然的話中斷程式無法正確處理。
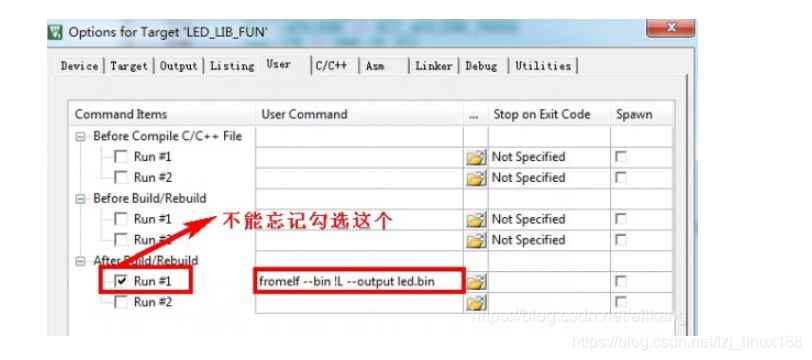
其次IAP升級的時候需要使用bin檔案,在keil中的設定爲:

基本的命令格式是fromelf --bin !L --output xxx.bin 這裏需要注意空格,大小寫。
視窗中有如下的提示資訊,表示bin檔案生成成功。

好了 這就是IAP升級的主要原理。要是有不明白的地方可以an2557文件,這些文件ST官網都有。如果大家覺得有必要寫下ISP的升級流程的話,到時我也會寫個上位機控制的升級流程,上位機不是電腦。