記憶體對齊問題案例分析和共用
2020-08-09 10:40:35
記憶體對齊問題案例分析和共用
案例背景
筆者小白一枚,在開發LogViewer工具時,遇到了記憶體對齊的問題。網上有很多關於記憶體對齊問題的部落格,本文僅分享一下實際案例,希望能幫到讀者去理解記憶體對齊。
LogViewer是一款自研的協定棧信令解析工具,協定棧通過TCP將信令上傳給LogViewer進行解析(信令本質上就是C語言中的結構體)。筆者所接觸的4G協定棧是基於x86系統開發的,而5G協定棧是基於x64系統開發的。因此,5G協定棧結構體的儲存預設是8位元組對齊的,而LogViewer在沒有更改設定的情況下依舊按照4位元組對齊去解析,於是導致數據異常。
爲了方便闡述記憶體對齊的問題,筆者將具體信令抽象成如下MEM_ALIGN_DEMO_T結構體,讀者可忽略信令及其內容的實際意義。
typedef struct mem_align_demo_t
{
        unsigned short  A;      // 2bytes
        unsigned short  B;      // 2bytes
        unsigned long   C;      // 8bytes
        unsigned long   D;      // 8bytes
        unsigned char   E;      // 1bytes
}MEM_ALIGN_DEMO_T;
案例分析
(1) 利用Excel形象化記憶體對齊問題
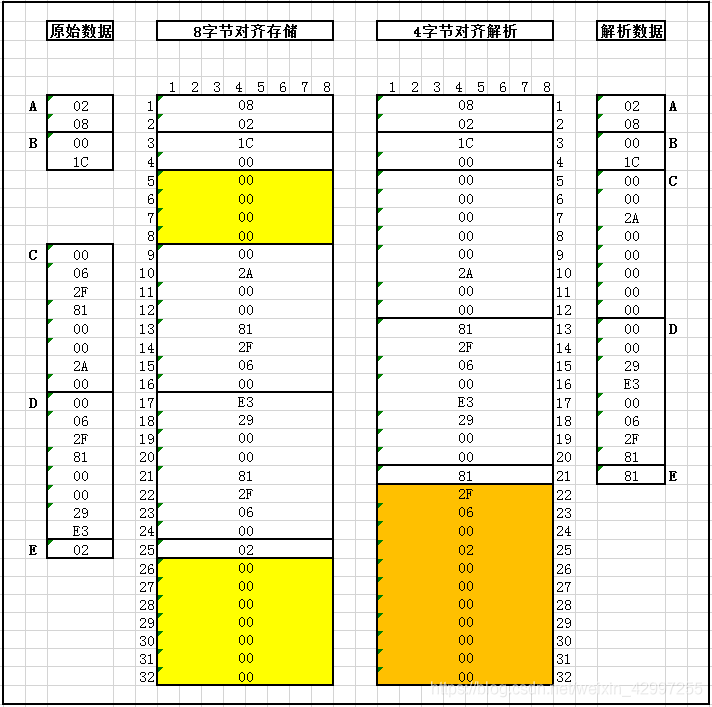
閒言少敘,直接上圖。建議讀者遇到記憶體對齊問題時,可以利用Excel將數據的儲存和解析過程形象化。下面 下麪對圖示幾個部分做具體的說明:
- 原始數據
原始數據,即MEM_ALIGN_DEMO_T結構體各成員的原始數據,包括A->E共5個成員,其型別和數據在下圖中一目瞭然。例如A=0x0208,佔2個位元組,以此類推。 - 8位元組對齊儲存
8位元組對齊儲存,即MEM_ALIGN_DEMO_T結構體以8位元組對齊形式存入記憶體後的實際數據。圖示1->8表示同一位元組的Bit位序列,1->32表示不同位元組各自的記憶體地址序列。需要注意如下幾點:
【1】黃色區域是8位元組對齊時自動補齊佔位的位元組,並且其值是不確定的,之所以圖示中全部爲零,是因爲提前將MEM_ALIGN_DEMO_T結構體記憶體全部置0了。讀者可以使用下文中的C程式進行驗證,如果不將結構體記憶體全部置0,每次執行時,黃色區域的值是不一樣的。
【2】8位元組對齊,可以簡單的理解成以8個位元組爲一個基本單元進行儲存。比如,以圖示1->8和9->16這兩個基本元爲例進行說明。A=0x0208佔2位元組,直接存入1->2兩個位元組即可;B=0x001C佔2位元組,接着A後面存入3->4兩個位元組即可;當繼續儲存C=0x00062F8100002A00的時候,第一個基本單元(1->8位元組)只剩下4個位元組了,不能儲存佔8個位元組的C,所以C要放到下一個基本單元(9->16)儲存,而第一個基本單元中的後4個位元組(5->8)只起到佔位補齊的作用。同理E後面的7個位元組(25->32)也是佔位補齊。
【3】細心的讀者會發現,爲什麼存入記憶體後的位元組是反的。比如說A=0x0208,存入記憶體後,變成了0x0802。這就涉及到大端模式和小端模式的問題,不是本文討論的重點。大端模式指數據的高位元組儲存在記憶體的低地址,小端模式指數據的高位元組儲存在記憶體的高地址,筆者的系統是小端模式。 - 4位元組對齊解析
4位元組對齊解析,即以4位元組對齊方式解析8位元組對齊儲存的結構體數據,部分數據就會面目全非。其中橙色部分的數據就會被捨棄,具體解析結果見解析數據部分。 - 解析數據
解析數據,即以4位元組對齊方式解析之後的MEM_ALIGN_DEMO_T結構體各成員的實際數據。A和B未受影響,正好共同佔用了4個位元組,而解析C數據時會將補齊佔位的5->8位元組也當成C的數據部分,於是C、D、E數據都會發生錯誤,分別變成了0x00002A0000000000、0x000029E300062F81、0x81。

(2) 簡單的C程式驗證記憶體對齊問題
筆者做了一個簡單的c程式mem_align.c,該程式實現MEM_ALIGN_DEMO_T結構體成員的value、addr、size的列印,並且以16進位制輸出實際儲存在記憶體中的結構體數據,讀者可以在此基礎上進行驗證和學習。
#include <stdio.h>
#include <stdlib.h>
#include <string.h>

typedef struct mem_align_demo_t
{
        unsigned short	A;	// 2bytes
        unsigned short 	B;	// 2bytes
        unsigned long 	C; 	// 8bytes
		unsigned long 	D;	// 8bytes
		unsigned char 	E;	// 1bytes
}MEM_ALIGN_DEMO_T;

int main()
{
	unsigned char	*buffer	= NULL;
	unsigned int 	i 		= 0;

	/** Define and print struct */
	MEM_ALIGN_DEMO_T		t;
	memset(&t, 0, sizeof(t));
	t.A = 0x0208;
	t.B = 0x001c;
	t.C = 0x00062f8100002a00;
	t.D = 0x00062f81000029e3;
	t.E = 0x02;

	printf("=================================================================\n");
	printf("\tvalue\t\t\taddr\t\t\tsize\n");
	printf("t.A\t%04x\t\t\t%p\t\t%ld\n", t.A, &(t.A), sizeof(t.A));
	printf("t.B\t%04x\t\t\t%p\t\t%ld\n", t.B, &(t.B), sizeof(t.B));
	printf("t.C\t%016lx\t%p\t\t%ld\n", t.C, &(t.C), sizeof(t.C));
	printf("t.D\t%016lx\t%p\t\t%ld\n", t.D, &(t.D), sizeof(t.D));
	printf("t.E\t%02x\t\t\t%p\t\t%ld\n", t.E, &(t.E), sizeof(t.E));
	printf("t\t--\t\t\t%p\t\t%ld\n", &t, sizeof(t));
	printf("=================================================================\n");

	/** Output actual stored struct content in hex */
	buffer = (unsigned char *)malloc(sizeof(t));
	memcpy(buffer, (unsigned char *)(&t), sizeof(t));
	printf("Actual Struct Content:\n");
	for (i=0; i<sizeof(t); i++)
	{
		printf("%02x", *(buffer + i));
	}
	printf("\n");
	printf("=================================================================\n");
   	free(buffer);

	return 1;
}
建立mem_align.c檔案,將程式碼複製下來儲存(筆者系統ubuntu18.04.3-x64,gcc版本7.5.0)。
編譯:gcc -Wall -g mem_align.c -o mem_align
執行:./mem_align
輸出結果如下,注意觀察各成員的記憶體地址addr的變化,請讀者自行和上述Excel表格對應分析,不做贅述。另外,整個結構體的大小爲32位元組,而不是2+2+8+8+1=21個位元組,自然是因爲8位元組對齊時補齊佔位造成的。
root@ubuntu:/home/share/study# gcc -Wall -g mem_align.c -o mem_align
root@ubuntu:/home/share/study# ./mem_align
=================================================================
		value				addr				size
t.A		0208				0x7ffde716fac0		2
t.B		001c				0x7ffde716fac2		2
t.C		00062f8100002a00	0x7ffde716fac8		8
t.D		00062f81000029e3	0x7ffde716fad0		8
t.E		02					0x7ffde716fad8		1
t		--					0x7ffde716fac0		32
=================================================================
Actual Struct Content:
08021c0000000000002a0000812f0600e3290000812f06000200000000000000
=================================================================
root@ubuntu:/home/share/study#
總結說明
- 網上有很多關於記憶體對齊問題的部落格,本文僅提供一個實際案例供讀者參考學習。另外,強烈推薦使用Excel表格的方式去分析記憶體對齊問題。
- 筆者小白一枚,此文件僅用於學習記錄和交流,如能幫助到讀者倍感榮幸。