記錄:指針儀表 儀錶盤視覺讀取專案學習過程
今天在整理電腦檔案時,發現了幾個月前做的一個專案,是關於指針儀表 儀錶盤讀取的,也是當時導師佈置給我的一個任務,我決定梳理下,寫個部落格,也方便以後若有需要時可以隨時查詢。
本篇部落格記錄了我開發這個小專案的全部過程,以及對於需求的改變、方案的更新等等。PS:用到的都是傳統的機器視覺方法,不涉及深度學習方面的知識。僅供參考
方案1.0
一.任務說明(僅關於視覺部分)
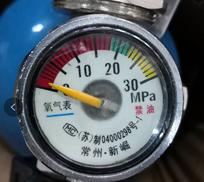
要求:可精確穩定的識別出表頭中的數據,精確到1MPa。
場景:①對方就唯一的這種表,也就是物件唯一。
②有一個檢測箱,箱裏有攝像頭和其他硬體可遠端通訊,壓力錶連同被測罐連在一起,放到檢測箱裏固定位置度數及檢查其他內容。也就是讀表只是它的一部分工作。
③那麼每個表和攝像頭之間位置是相對固定的。
(其他關於介面、硬體部分需求這裏就不介紹了)
二.方案內容
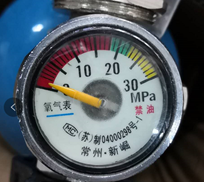
一開始接到的圖片就這麼一張,我首先想到的是用opencv自帶的模板匹配的方法,將刻度盤作爲我的模板,去尋找圖片中的ROI區域,很顯然,在當時只有一種圖片的情況下,效果簡直太棒,然而卻忽視了一個重要的問題。
先看下當時的效果:
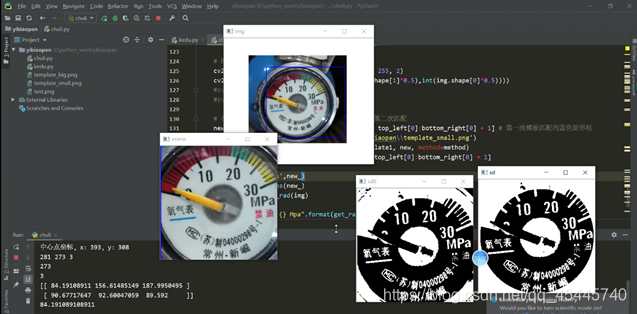
關於模板匹配參考的資料:
https://blog.csdn.net/wzz18191171661/article/details/91345166
方案2.0
一.方案描述
在方案1.0中,提到了當時我忽視了一個重要的問題,就是模板匹配這個方法,要求你的模板大小尺寸必須和你要匹配的影象中的目標物件尺寸差不多,就好比你的模板是300×300的,而你要匹配的影象ROI區域可能只有100×100或者900×900的大小,這樣模板匹配的方法就行不通了。過了幾天,導師又給了我第二批的圖片。
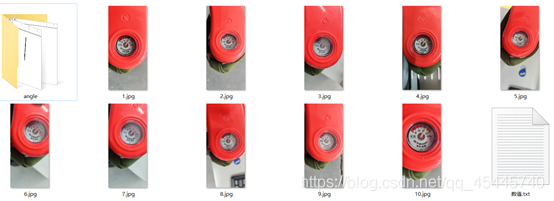
(上面這批圖片都是1840*4000的大圖片,ROI區域很大)
思考了下,突然想到可以使用多尺度模板匹配的方法,所謂多尺度,比如說我這裏選取的模板大小就是300×300的,對於圖片的1840×4000的超大圖片,我把它一步一步的縮小或者放大(這裏是縮小),就這樣每次縮小圖片的一點點,縮小一次就拿我的300×300模板去匹配一次,雖然有點笨且執行速度相比於之前慢了些,但能解決問題就行,果然這種方法還是可靠的。
效果如下:
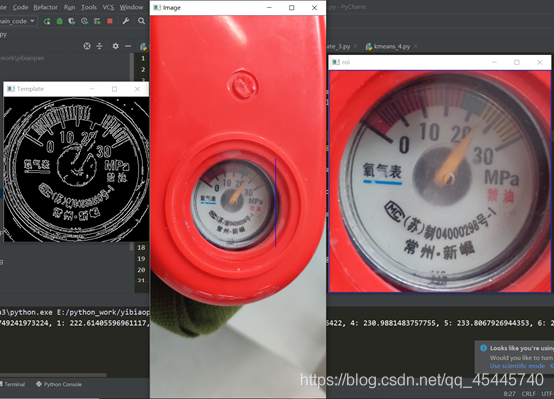
二.程式思路
1.需要一個儀表 儀錶盤的模板,要正,精確,清楚,標定好這個模板的刻度的畫素座標,圓心的畫素座標等等,用這個模板去匹配相機拍攝到的物件,這裏執行opencv自帶的特徵匹配。(採用多尺度模板匹配的方法)
2.提取到ROI區域後,對於影象是否正,還需要進行旋轉矯正,觀察發現刻度盤中氧氣下面 下麪的藍色線的特徵,以此爲基準來獲取當前刻度盤的旋轉角度。(這裏預設刻度盤是180°內的傾斜,總不至於刻度盤是顛倒的吧)
(影象矯正時還考慮到了用離散傅裡葉矯正,因爲曾經在看書的時候書上說離散傅裡葉對於影象處理的一個重要應該就是可以判斷當前圖片的傾斜角度,後發現不行,參考部落格:
https://blog.csdn.net/wsp_1138886114/article/details/83374333
3.採用無監督學習的Kmeans演算法,鑑於影象的複雜度,提取出每個刻度不太容易,觀察發現因爲刻度和指針的顏色肯定和周圍不同,至於到底是什麼顏色我不需要管,交給Kmeans就行了,只要設定最後的聚類種類爲2,返回聚類後的結果獲得兩個閾值點,然後以這個爲閾值,把影象進行二值化分割,影象進行二值化分割後,這裏有沒有刻度反而對我不重要了,因爲在模板中我已經將所有的刻度都標定好了,這裏只需要讀取當前指針的位置就行了。(採用Kmeans二值化後,指針是白色的,採用影象的顏色反轉,將指針變成黑色,從而進行後續操作),這裏使用形態學處理會讓效果更好,https://segmentfault.com/a/1190000015650320
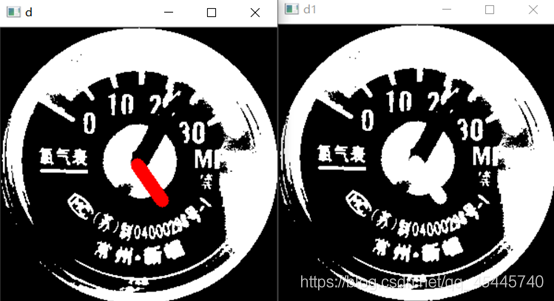
4.錶盤讀取的方法:以錶盤中心爲起點,畫一條線段,進行旋轉,這條直線的粗細程度要看當前指針的粗細程度,讓這條直線進行旋轉,當它與指針重合最多的時候,就是該位置,讀取當前的角度值,再去我之前設定好了的刻度表裏面去讀數就好了
三.遇到的問題
①當時使用多尺度模板匹配的方法,雖然可以很精確地擷取到圖片中的ROI區域,但帶來了另一個問題,就是提取到的ROI區域這個刻度圓盤,它發生了旋轉,更爲要命的是有的刻度圓盤已經發生了畸形。
②在影象處理中,對於正常的旋轉矯正,只需要知道當前的傾斜角度就可以旋轉了;而對於畸形的這種,則需要透視矯正,比較麻煩。
③先解決傾斜角度的旋轉,首先如何獲取這個角度的值是一個問題,正常的方法是使用霍夫直線檢測來提取直線的傾斜角度,根據我的觀察發現,無論是什麼情況,刻度圓盤中氧氣表三個字下面 下麪的藍色線段,很明顯且清楚,於是從這裏下手。
四.解決思路
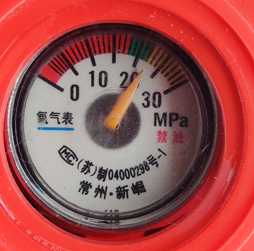
上面這幅圖是儀表 儀錶盤比較清除的影象,
緊接着,如何識別出這個藍色的線段呢?若採用霍夫直線檢測,則會檢測出很多的直線出來,到時候這個篩選標準又是什麼?又是一個問題。某日在逛知乎的時候,突然看到了一篇文章
https://zhuanlan.zhihu.com/p/67930839(RGB、HSV和HSL顏色空間)
其中有一段話:RGB顏色空間更加面向於工業,而HSV更加面向於使用者,大多數做影象識別這一塊的都會運用HSV顏色空間,因爲HSV顏色空間表達起來更加直觀。這時候想到,這個藍色在整個ROI區域中都是獨一無二的,何不把它提取出來呢?關於獲取圖片中指定的顏色部分,參考了這篇部落格
https://blog.csdn.net/qq_40456669/article/details/93375709

可以看到藍色的HSV值,程式設計後的效果如下:效果直呼感人!
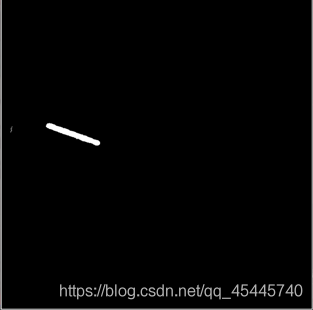
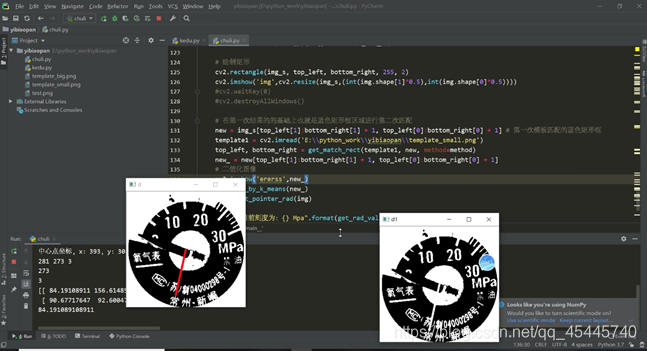
進入下一個問題,怎麼知道這個線段的傾斜角度呢?這裏我採用了指針刻度讀取的辦法,在該圖的中心畫一個線段,旋轉360°,先把這個圖取反,然後讀取每旋轉一度畫個指針與該度數方向重合的點的數量,讀取重合點的數量最多的時候的度數值,經過運算就可以知道這條線段的傾斜角度,也就是整個ROI區域的旋轉角度,解決!
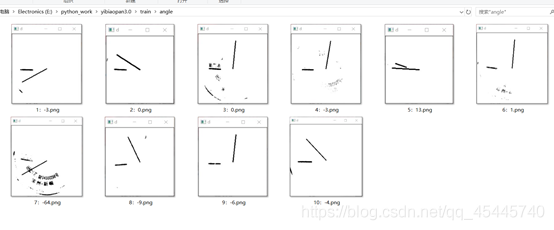
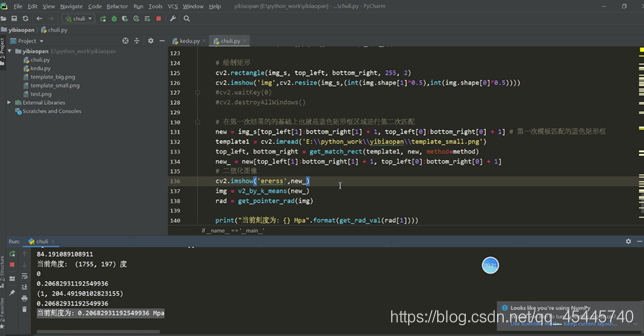
而對於畸形,透視矯正,當時並沒有考慮,這裏先等下說,先看下程式效果:
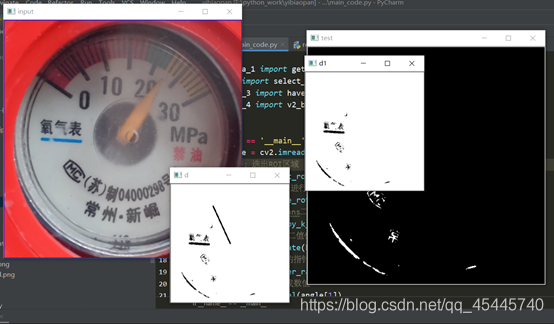
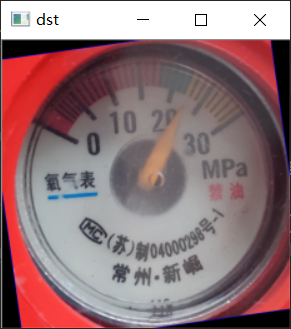
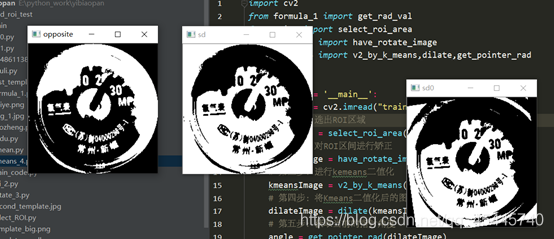
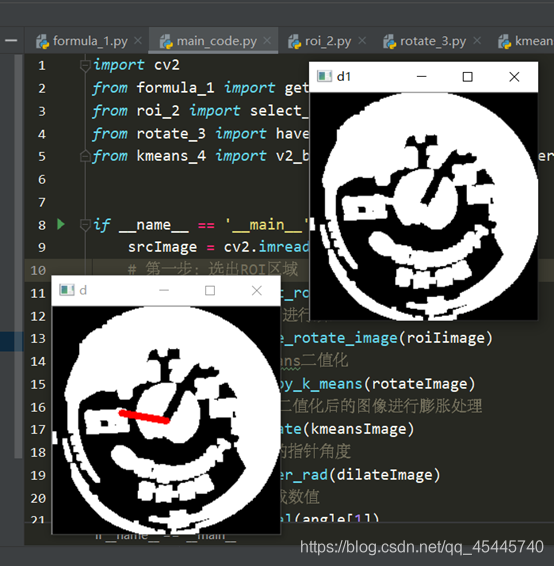
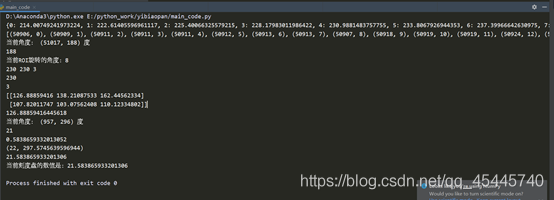
五.原始碼
程式細節:
選取特徵匹配的模板:second_template
300*300
程式碼:
1_formulas 角度轉數值的計算公式
2_roi 提取ROI區域,返回框選好了的ROI區域img_2
3_rotate 將影象矯正 返回矯正好了的影象 img_3
4_kmeans 採用kmeans二值化處理
formula_1.py
import math

center = [151 , 147]  # 模板template1指針刻度盤的圓心位置

# 刻度盤上每個數值的座標
a = {0:(68,91),1:(76,78),2:(80,75),3:(83,71),4:(87,68),5:(91,65),6:(96,61),7:(102,57),
     8:(107,53),9:(113,52),10:(121,50),11:(126,47),12:(132,46),13:(139,45),14:(145,44),
     15:(152,45),16:(159,45),17:(166,46),18:(172,47),19:(179,49),20:(186,51),21:(192,54),
     22:(198,57),23:(204,61),24:(210,65),25:(215,69),26:(220,74),27:(224,79),28:(229,84),
     29:(233,90),30:(238,97)}

count = 0
result = {}

# 計算指針刻度盤中每個刻度的角度
for k ,v in a.items():
    r = math.acos((v[0]-center[0])/((v[0]-center[0])**2 + (v[1]-center[1])**2)**0.5) # 得到弧度值
    r = r*180/math.pi  # 將弧度值轉化爲角度值
    a[k] = r
    if k != 31:
        r=360-r
        # print(k, r)
    result[k]=r
    count+=1

print(result)

result_list = result.items()
lst = sorted(result_list,key=lambda x:x[1])

# 讀取指針所指的刻度,稍微大一點的整數刻度,比如20,30,40等等
def get_next(c):
    l = len(lst) # 10
    n = 0
    for i in range(len(lst)):
        if lst[i][0] == c:
            n = i+1
            if n == l:
                n = 0
            break
    return lst[n]


# 參數rad:表示當前指針所指的角度。角度是以右邊x軸爲0刻度,順時針旋轉讀取
def get_rad_val(rad):
    old=None
    for k, v in lst:
        # print(k,v)
        if rad > v :
            old = k
    print(old)
    r = result[old]
    d = rad-r
    nx = get_next(old)
    print(1*abs(d/(nx[1] - r)))
    print(nx)
    t = old+1*abs(d/(nx[1] - r))
    print(t)
    return t
roi_2.py
"""第一第二步:該程式的目的是用模板匹配到圖片中的ROI區域"""
import numpy as np
import argparse
import glob
import imutils
import cv2

def select_roi_area(img):
    ap = argparse.ArgumentParser()
    ap.add_argument("-v", "--visualize", help="Flag indicating whether or not to visualize each iteration")
    args = vars(ap.parse_args())

    # 讀取模板圖片
    template = cv2.imread("second_template.jpg")
    # 轉換爲灰度圖片
    template = cv2.cvtColor(template, cv2.COLOR_BGR2GRAY)
    # 執行邊緣檢測
    template = cv2.Canny(template, 50, 200)
    (tH, tW) = template.shape[:2]
    # 顯示模板
    cv2.imshow("Template", template)

    # 遍歷所有的圖片尋找模板
    # 讀取測試圖片並將其轉化爲灰度圖片
    gray = cv2.cvtColor(img, cv2.COLOR_BGR2GRAY)
    found = None

    # 回圈遍歷不同的尺度
    for scale in np.linspace(0.2, 1.0, 20)[::-1]:
        # 根據尺度大小對輸入圖片進行裁剪
        resized = imutils.resize(gray, width = int(gray.shape[1] * scale))
        r = gray.shape[1] / float(resized.shape[1])

        # 如果裁剪之後的圖片小於模板的大小直接退出
        if resized.shape[0] < tH or resized.shape[1] < tW:
            break

        # 首先進行邊緣檢測,然後執行模板檢測,接着獲取最小外接矩形
        edged = cv2.Canny(resized, 50, 200)
        result = cv2.matchTemplate(edged, template, cv2.TM_CCOEFF)
        (_, maxVal, _, maxLoc) = cv2.minMaxLoc(result)

        # 結果視覺化
        if args.get("visualize", False):
            # 繪製矩形框並顯示結果
            clone = np.dstack([edged, edged, edged])
            cv2.rectangle(clone, (maxLoc[0], maxLoc[1]), (maxLoc[0] + tW, maxLoc[1] + tH), (0, 0, 255), 2)
            cv2.imshow("Visualize", clone)
            cv2.waitKey(0)

        # 如果發現一個新的關聯值則進行更新
        if found is None or maxVal > found[0]:
            found = (maxVal, maxLoc, r)

    # 計算測試圖片中模板所在的具體位置,即左上角和右下角的座標值,並乘上對應的裁剪因子
    (_, maxLoc, r) = found
    (startX, startY) = (int(maxLoc[0] * r), int(maxLoc[1] * r))
    (endX, endY) = (int((maxLoc[0] + tW) * r), int((maxLoc[1] + tH) * r))

    # 繪製並顯示結果
    cv2.rectangle(img, (startX, startY), (endX, endY), (255, 0, 0), 2)
    cv2.imshow("Image", cv2.resize(img,(int(img.shape[1]*0.2),int(img.shape[0]*0.2))))
    new_ = img[startY:endY + 1, startX:endX + 1, ]
    img_2 = cv2.resize(new_,(int(new_.shape[1]*0.5),int(new_.shape[0]*0.5)))
    cv2.imshow("roi",img_2)
    cv2.waitKey(0)
    cv2.destroyAllWindows()

    return img_2
rotate_3.py
# 第三步:影象的矯正
import cv2
import numpy as np
from math import cos, pi, sin

def get_rotate_rad(img):
    '''獲取角度'''
    shape = img.shape
    c_y, c_x= int(shape[0] / 2), int(shape[1] / 2)
    x1=c_x+c_x*0.8
    src = img.copy()

    freq_list = []
    for i in range(361):
        x = (x1 - c_x) * cos(i * pi / 180) + c_x
        y = (x1 - c_x) * sin(i * pi / 180) + c_y
        temp = src.copy()
        cv2.line(temp, (c_x, c_y), (int(x), int(y)+14), (0, 0, 255), thickness=2)
        t1 = img.copy()
        t1[temp[:, :] == 255] = 255
        c = img[temp[:, :] == 255]
        points = c[c == 255]
        freq_list.append((len(points), i))
        cv2.imshow('d', temp)
        cv2.imshow('d1', t1)
        cv2.waitKey(1)
    print(freq_list)
    print('當前角度:',max(freq_list, key=lambda x: x[0]),'度')
    cv2.destroyAllWindows()
    return max(freq_list)


def have_rotate_image(src):
    cv2.namedWindow("input", cv2.WINDOW_AUTOSIZE)
    cv2.imshow("input", src)
    """
    提取圖中的藍色部分
    """
    hsv = cv2.cvtColor(src, cv2.COLOR_BGR2HSV)
    low_hsv = np.array([100,43,46])
    high_hsv = np.array([124,255,255])
    mask = cv2.inRange(hsv,lowerb=low_hsv,upperb=high_hsv)
    cv2.imshow("test",mask)

    no_mask = 255 - mask  # 顏色取反,將指針變爲黑色

    n_mask = cv2.resize(no_mask,(int(no_mask.shape[1]*0.5),int(no_mask.shape[0]*0.5)))

    a = get_rotate_rad(n_mask)
    print(a[1])

    angle = a[1] - 180
    # angle爲正,逆時針旋轉;爲負,順時針旋轉
    print("當前ROI旋轉的角度:{}".format(angle))

    matRotate = cv2.getRotationMatrix2D((src.shape[1]*0.5,src.shape[0]*0.5),angle,1)
    dst = cv2.warpAffine(src,matRotate,(src.shape[1],src.shape[0]))

    img_3 = cv2.resize(dst,(int(dst.shape[1]*0.5),int(dst.shape[0]*0.5)))

    cv2.imshow("dst",img_3)
    cv2.waitKey(0)
    cv2.destroyAllWindows()

    return img_3
kmeans_4.py
import numpy as np
import cv2
from sklearn.cluster import KMeans
from sklearn.utils import shuffle
from math import cos, pi, sin


def v2_by_k_means(img):
    '''使用k-means二值化'''
    original_img = np.array(img, dtype=np.float64) # original_img與img格式一樣,但爲白色
    src = original_img.copy()
    delta_y = int(original_img.shape[0] * (0.4))
    delta_x = int(original_img.shape[1] * (0.4))
    original_img = original_img[delta_y:-delta_y, delta_x:-delta_x]
    h, w, d = src.shape
    print(w, h, d)
    dts = min([w, h])
    print(dts)
    r2 = (dts / 2) ** 2
    c_x, c_y = w / 2, h / 2
    a: np.ndarray = original_img[:, :, 0:3].astype(np.uint8)
    # 獲取尺寸(寬度、長度、深度)
    height, width = original_img.shape[0], original_img.shape[1]
    depth = 3
    print(depth)
    image_flattened = np.reshape(original_img, (width * height, depth))
    '''K-Means演算法'''
    image_array_sample = shuffle(image_flattened, random_state=0)# 隨機打亂image_flattened中的元素
    estimator = KMeans(n_clusters=2, random_state=0) # 生成兩個質心
    estimator.fit(image_array_sample)
    '''
    爲原始圖片的每個畫素進行類的分配。
    '''
    src_shape = src.shape
    new_img_flattened = np.reshape(src, (src_shape[0] * src_shape[1], depth))
    cluster_assignments = estimator.predict(new_img_flattened)
    '''
    我們建立通過壓縮調色板和類分配結果建立壓縮後的圖片
    '''
    compressed_palette = estimator.cluster_centers_
    print(compressed_palette) # 收斂到的質心位置
    a = np.apply_along_axis(func1d=lambda x: np.uint8(compressed_palette[x]), arr=cluster_assignments, axis=0)
    img = a.reshape(src_shape[0], src_shape[1], depth)
    print(compressed_palette[0, 0])
    threshold = (compressed_palette[0, 0] + compressed_palette[1, 0]) / 2
    img[img[:, :, 0] > threshold] = 255
    img[img[:, :, 0] < threshold] = 0
    cv2.imshow('sd0', img)
    # 下一步因爲指針儀表 儀錶盤是圓形,所以去除掉圓以外的幹擾因素
    for x in range(w):
        for y in range(h):
            distance = ((x - c_x) ** 2 + (y - c_y) ** 2)
            if distance > r2:
                pass
                img[y, x] = (255, 255, 255)
    cv2.imshow('sd', img)
    img = 255 - img
    cv2.imshow('opposite',img)
    cv2.waitKey(0)
    cv2.destroyAllWindows()
    return img


def dilate(img):
    '''將Kmeans二值化後的影象進行膨脹處理'''
    kernel = np.ones((5, 5), np.uint8)
    dilation = cv2.dilate(img, kernel, iterations=1)
    return dilation


def get_pointer_rad(img):
    '''獲取角度'''
    shape = img.shape
    c_y, c_x, depth = int(shape[0] / 2), int(shape[1] / 2), shape[2]
    x1=c_x+c_x*0.4
    src = img.copy()

    freq_list = []
    for i in range(361):
        x = (x1 - c_x) * cos(i * pi / 180) + c_x
        y = (x1 - c_x) * sin(i * pi / 180) + c_y
        temp = src.copy()
        cv2.line(temp, (c_x, c_y), (int(x), int(y)), (0, 0, 255), thickness=6)
        t1 = img.copy()
        t1[temp[:, :, 2] == 255] = 255
        c = img[temp[:, :, 2] == 255]
        points = c[c == 0]
        freq_list.append((len(points), i))
        cv2.imshow('d', temp)
        cv2.imshow('d1', t1)
        cv2.waitKey(1)
    print('當前角度:',max(freq_list, key=lambda x: x[0]),'度')
    cv2.destroyAllWindows()

    return max(freq_list, key=lambda x: x[0])
main_code.py
import cv2
from formula_1 import get_rad_val
from roi_2 import select_roi_area
from rotate_3 import have_rotate_image
from kmeans_4 import v2_by_k_means,dilate,get_pointer_rad


if __name__ == '__main__':
    srcImage = cv2.imread("train/3.jpg")

    # 第一步:選出ROI區域
    roiIimage = select_roi_area(srcImage)

    # 第二步:對ROI區間進行矯正
    rotateImage = have_rotate_image(roiIimage)

    # 第三步:進行kemeans二值化
    kmeansImage = v2_by_k_means(rotateImage)

    # 第四步:將Kmeans二值化後的影象進行膨脹處理
    dilateImage = dilate(kmeansImage)

    # 第五步:獲取當前的指針角度
    angle = get_pointer_rad(dilateImage)

    # 第六步:角度轉換成數值
    value = get_rad_val(angle[1])

    print("當前刻度盤的數值是:{}".format(value))
PS:後來與老師的溝通中,才瞭解到實際的工作環境中,攝像頭能夠保證與刻度盤的平面互相平行,這樣一來就不存在刻度盤的畸形這種情況了,就是說不需要進行透視矯正了。
方案3.0
一.問題描述
雖然否決了影象畸形不需要透視矯正,但又有了個問題,因爲給的那十張圖片場景都很單一,如果放在更爲複雜的環境當中,或者與很多的刻度盤放在一起,那還能準確的找到ROI區域嗎?一開始我認爲,多尺度模板匹配可以很好的解決這些問題,也沒太在意。不過後來想想還是去測試一下吧,於是我簡單的P了幾張圖片,如下:

然後當我使用多尺度模板匹配的方法去尋找ROI區域時,發現根本找不到ROI區域。
二.解決方法
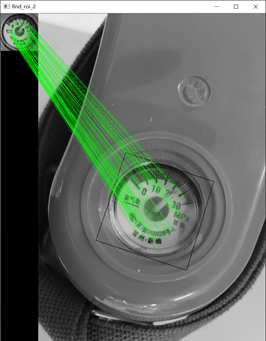
①查了相關資料,總結:若多尺度模板匹配的方法效果不好的話,可以考慮關鍵點匹配法,比較經典的關鍵點檢測演算法包括SIFT和SURF等,主要的思路是首先通過關鍵點檢測演算法獲取模板和測試圖片中的關鍵點;然後使用關鍵點匹配演算法處理即可,這些關鍵點可以很好的處理尺度變化、視角變換、旋轉變化、光照變化等,具有很好的不變性。
查詢資料:https://blog.csdn.net/zhuisui_woxin/article/details/84400439
(基於FLANN的匹配器(FLANN based Matcher)描述特徵點)精確完成了特徵匹配的任務!
意外發現:之前在方案2.0中說到了,獲取ROI區域的旋轉角度時,費了工夫,然而當我使用基於FLANN的匹配器的時候,發現框選的部分,自動將那個旋轉角度的多邊形給框選了出來:
②但接着又遇到一個新問題,python的PIL庫自帶的方法只能進行矩形的切割,但這裏是多邊形各個頂點的座標,如何對現有的圖片按照這個多邊形進行切割呢?首先可以確定的是,我肯定已經獲取到了這個四邊形的四個頂點座標,否則不會框選出來,依照這個思路,參考這篇文章:http://www.6tie.net/p/1177178.html (使用Opencv python從Image中裁剪凹面多邊形)
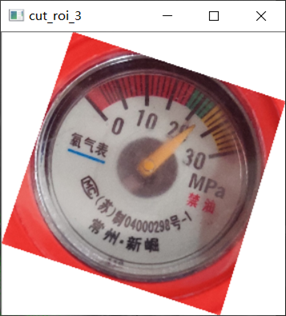
完美切割出來,
進入下一個步驟,將這個裁剪出來的ROI區域進行透視變換,參考資料:
https://blog.csdn.net/t6_17/article/details/78729097。部落格中是自己寫的四個點座標,這裏因爲上一步已經獲取到了四個頂點的座標,所以這裏直接進行透視變換,因爲我選的模板是300*300的正方形,所以我把這個ROI區域也透視變換爲正方形的圖片,方便後面的進一步運算,透視變換的結果如下:
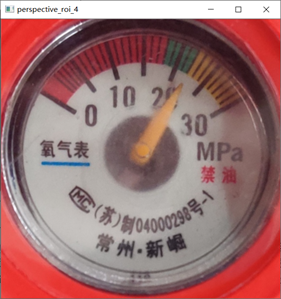 至此,下面 下麪的操作就和之前的方案一樣了:
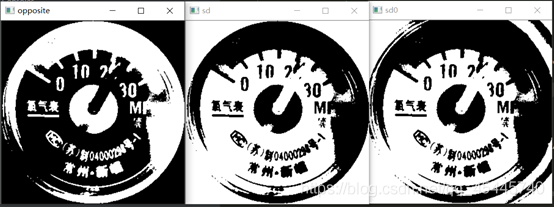
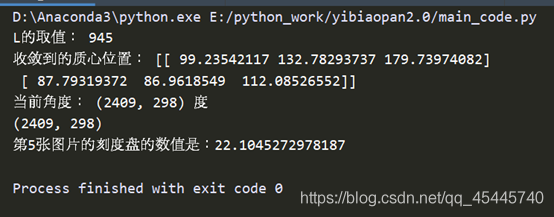
三.原始碼
程式細節:
選取特徵匹配的模板:second_template
300*300
程式碼:
第一步:指針數值的演算法理論 formula_1
第二步:基於FLANN匹配roi區域 find_roi_FLANN_2
第三步:在原圖上剪下出需要的多邊形roi區域
cut_roi_3
第四步:進行透視變換將多邊形轉化爲正方形(爲了與模板一樣方便後面運算)perspective_roi_4
第五步:kmeans_5
formula_1.py
import math

center = [151 , 147]  # 模板template1指針刻度盤的圓心位置

# 刻度盤上每個數值的座標
a = {0:(68,91),1:(76,78),2:(80,75),3:(83,71),4:(87,68),5:(91,65),6:(96,61),7:(102,57),
     8:(107,53),9:(113,52),10:(121,50),11:(126,47),12:(132,46),13:(139,45),14:(145,44),
     15:(152,45),16:(159,45),17:(166,46),18:(172,47),19:(179,49),20:(186,51),21:(192,54),
     22:(198,57),23:(204,61),24:(210,65),25:(215,69),26:(220,74),27:(224,79),28:(229,84),
     29:(233,90),30:(238,97)}

count = 0
result = {}

# 計算指針刻度盤中每個刻度的角度
for k ,v in a.items():
    r = math.acos((v[0]-center[0])/((v[0]-center[0])**2 + (v[1]-center[1])**2)**0.5) # 得到弧度值
    r = r*180/math.pi  # 將弧度值轉化爲角度值
    a[k] = r
    if k != 31:
        r=360-r
        # print(k, r)
    result[k]=r
    count+=1

# print(result)
# {0: 214.00749241973224, 1: 222.61405596961117, 2: 225.40066325579215, 3: 228.17983011986422,
# 4: 230.9881483757755, 5: 233.8067926944353, 6: 237.39966642630975, 7: 241.43416320625343,
# 8: 244.91640599380906, 9: 248.19859051364818, 10: 252.81429385577522, 11: 255.9637565320735,
# 12: 259.3460974000615, 13: 263.2901631922431, 14: 266.6661493384634, 15: 270.56170533256653,
# 16: 274.4846060095446, 17: 278.44752724790845, 18: 281.85977912094796, 19: 285.94539590092285,
# 20: 290.03101268089773, 21: 293.79077386577717, 22: 297.5745639596944, 23: 301.64465903709254,
# 24: 305.735476014867, 25: 309.36931724236473, 26: 313.38646106711883, 27: 317.0309142368531,
# 28: 321.0724564072077, 29: 325.1959882472868, 30: 330.113473059576}

result_list = result.items()
lst = sorted(result_list,key=lambda x:x[1])


# 讀取指針所指的刻度,稍微大一點的整數刻度,比如20,30,40等等
def get_next(c):
    l = len(lst) # 10
    n = 0
    for i in range(len(lst)):
        if lst[i][0] == c:
            n = i+1
            if n == l:
                n = 0
            break
    return lst[n]


# 參數rad:表示當前指針所指的角度。角度是以右邊x軸爲0刻度,順時針旋轉讀取

def get_rad_val(rad):
    old=None
    for k, v in lst:
        # print(k,v)
        if rad > v :
            old = k
    # print(old)
    r = result[old]
    d = rad-r
    nx = get_next(old)
    # print(1*abs(d/(nx[1] - r)))
    # print(nx)
    t = old+1*abs(d/(nx[1] - r))
    # print(t)

    return t
find_roi_FLANN_2.py
"""第一第二步:該程式的目的是用模板匹配到圖片中的ROI區域"""
# 基於FLANN的匹配器(FLANN based Matcher)定點陣圖片
import numpy as np
import cv2

def find_roi(template,target):
    MIN_MATCH_COUNT = 10  # 設定最低特徵點匹配數量爲10
    #建立sift檢測器
    sift = cv2.xfeatures2d.SIFT_create()
    #使用SIFT查詢關鍵點和描述符(keypoints和descriptors)
    kp1, des1 = sift.detectAndCompute(template, None) #計算出影象的關鍵點和sift特徵向量
    kp2, des2 = sift.detectAndCompute(target, None)

    # 建立設定FLANN匹配
    FLANN_INDEX_KDTREE = 0 # FLANN 參數
    index_params = dict(algorithm=FLANN_INDEX_KDTREE, trees=5)
    search_params = dict(checks=50)
    flann = cv2.FlannBasedMatcher(index_params, search_params) # 使用FlannBasedMatcher 尋找最近鄰近似匹配
    matches = flann.knnMatch(des1, des2, k=2) # 使用knnMatch匹配處理,並返回匹配matches
    # 通過coff係數來決定匹配的有效關鍵點數量
    good = [] # 0.1 0.7  0.8  參數可以自己修改進行測試
    # 捨棄大於0.7的匹配
    # 還是通過描述符的距離進行選擇需要的點
    for m, n in matches:
        if m.distance < 0.7 * n.distance:
            good.append(m)
    if len(good) > MIN_MATCH_COUNT:
        # 獲取關鍵點的座標
        src_pts = np.float32([kp1[m.queryIdx].pt for m in good]).reshape(-1, 1, 2)
        dst_pts = np.float32([kp2[m.trainIdx].pt for m in good]).reshape(-1, 1, 2)
        # 計算變換矩陣和MASK
        M, mask = cv2.findHomography(src_pts, dst_pts, cv2.RANSAC, 5.0)#找到兩個平面之間的轉換矩陣
        matchesMask = mask.ravel().tolist()
        h, w = template.shape
        # 使用得到的變換矩陣對原影象的四個角進行變換,獲得在目標影象上對應的座標
        pts = np.float32([[0, 0], [0, h - 1], [w - 1, h - 1], [w - 1, 0]]).reshape(-1, 1, 2)
        dst = cv2.perspectiveTransform(pts, M)
        cv2.polylines(target, [np.int32(dst)], True, 0, 2, cv2.LINE_AA)
        # cv2.drawContours(target, [np.int32(dst)], -1, (0, 255, 0), 3)
    else:
        print("Not enough matches are found - %d/%d" % (len(good), MIN_MATCH_COUNT))
        matchesMask = None
    draw_params = dict(matchColor=(0, 255, 0),
                       singlePointColor=None,
                       matchesMask=matchesMask,
                       flags=2)
    result = cv2.drawMatches(template, kp1, target, kp2, good, None, **draw_params) #進行畫圖操作
    result = cv2.resize(result,(int(result.shape[1]*0.3),int(result.shape[0]*0.3)))
    cv2.imshow("find_roi_2", result)

    cv2.waitKey(0)

    return result,dst
cut_roi_3.py
# 多邊形的切割
import numpy as np
import cv2

def polylines_cut(img,pts):
    ## (1) 裁剪邊界矩形
    rect = cv2.boundingRect(pts)
    x,y,w,h = rect
    croped = img[y:y+h, x:x+w].copy()

    ## (2) 生成掩膜
    pts = pts - pts.min(axis=0)
    mask = np.zeros(croped.shape[:2], np.uint8)
    cv2.drawContours(mask, [pts], -1, (255, 255, 255), -1, cv2.LINE_AA)

    ## (3) 反運算
    dst = cv2.bitwise_and(croped, croped, mask=mask)

    ## (4) 新增白色背景
    bg = np.ones_like(croped, np.uint8)*255
    cv2.bitwise_not(bg,bg, mask=mask)
    dst2 = bg + dst
    cv2.imshow("cut_roi_3", cv2.resize(dst2,(int(dst2.shape[1]*0.3),int(dst2.shape[0]*0.3))))

    cv2.waitKey(0)

    return dst2,pts
perspective_roi_4.py
import numpy as np
import cv2


def perspective_roi(cut_img,src_img,points):
    if cut_img.shape[0]>cut_img.shape[1]:
        L = cut_img.shape[0]
    else:
        L = cut_img.shape[1]
    print("L的取值:",L)
    # 下面 下麪進行透視變換
    src = np.float32([[np.int(points[0][0][0]),np.int(points[0][0][1])],[np.int(points[1][0][0]),np.int(points[1][0][1])],
                     [np.int(points[2][0][0]),np.int(points[2][0][1])],[np.int(points[3][0][0]),np.int(points[3][0][1])]])
    dst = np.float32([[0, 0], [0, L], [L, L], [L, 0]])
    m = cv2.getPerspectiveTransform(src, dst)
    result = cv2.warpPerspective(src_img, m, (L, L))
    result = cv2.resize(result, (int(result.shape[1] * 0.5), int(result.shape[0] * 0.5)))

    cv2.imshow("perspective_roi_4", result)

    goal_result = cv2.resize(result,(300,300))

    cv2.waitKey(0)

    return goal_result
xiugai_kmeans_5.py
import numpy as np
import cv2
from sklearn.cluster import KMeans
from sklearn.utils import shuffle
from math import cos, pi, sin


def v2_by_k_means(img):
    '''使用k-means二值化'''
    original_img = np.array(img, dtype=np.float64) # original_img與img格式一樣,但爲白色
    src = original_img.copy() # 300*300
    delta_y = int(original_img.shape[0] * (0.4)) #120
    delta_x = int(original_img.shape[1] * (0.4)) #120
    original_img = original_img[delta_y:-delta_y, delta_x:-delta_x] #60*60
    # print("delta_y:{},delta_x:{},original_img:{}".format(delta_y,delta_x,original_img.shape)
    h, w, d = src.shape
    # print("h,w,d:",h,w,d)
    dts = min([w, h])
    r2 = (dts / 2) ** 2
    c_x, c_y = w / 2, h / 2
    a: np.ndarray = original_img[:, :, 0:3].astype(np.uint8)
    # 獲取尺寸(寬度、長度、深度)
    height, width = original_img.shape[0], original_img.shape[1]
    depth = 3
    image_flattened = np.reshape(original_img, (width * height, depth))
    '''K-Means演算法'''
    image_array_sample = shuffle(image_flattened, random_state=0)# 隨機打亂image_flattened中的元素
    estimator = KMeans(n_clusters=2, random_state=0) # 生成兩個質心
    estimator.fit(image_array_sample)
    '''
    爲原始圖片的每個畫素進行類的分配。
    '''
    src_shape = src.shape
    new_img_flattened = np.reshape(src, (src_shape[0] * src_shape[1], depth))
    cluster_assignments = estimator.predict(new_img_flattened)
    '''
    我們建立通過壓縮調色板和類分配結果建立壓縮後的圖片
    '''
    compressed_palette = estimator.cluster_centers_
    print("收斂到的質心位置:",compressed_palette) # 收斂到的質心位置
    a = np.apply_along_axis(func1d=lambda x: np.uint8(compressed_palette[x]), arr=cluster_assignments, axis=0)
    img = a.reshape(src_shape[0], src_shape[1], depth)
    threshold = (compressed_palette[0, 0] + compressed_palette[1, 0]) / 2
    img[img[:, :, 0] > threshold] = 255
    img[img[:, :, 0] < threshold] = 0
    cv2.imshow('sd0', img) # 300*300
    # 下一步因爲指針儀表 儀錶盤是圓形,所以去除掉圓以外的幹擾因素
    for x in range(w):
        for y in range(h):
            distance = ((x - c_x) ** 2 + (y - c_y) ** 2)
            if distance > r2:
                pass
                img[y, x] = (255, 255, 255)
    cv2.imshow('sd', img)
    img = 255 - img
    cv2.imshow('opposite',img)
    cv2.waitKey(0)
    cv2.destroyAllWindows()

    return img


def dilate(img):
    '''將Kmeans二值化後的影象進行膨脹處理'''
    kernel = np.ones((3, 3), np.uint8)
    dilation = cv2.dilate(img, kernel, iterations=1)
    return dilation


'''下面 下麪纔是刻度盤讀取的核心'''
def get_pointer_rad(img):
    '''獲取角度'''
    shape = img.shape
    c_y, c_x, depth = int(shape[0] / 2), int(shape[1] / 2), shape[2]
    # c_y,c_x表示畫的指針線段的起點(圓心)
    x1=c_x+c_x*0.3
    src = img.copy()
    freq_list = []
    for i in range(361):
        # 下面 下麪的x,y是指針線段的終點座標
        x = (x1 - c_x) * cos(i * pi / 180) + c_x
        y = (x1 - c_x) * sin(i * pi / 180) + c_y
        temp = src.copy()
        cv2.line(temp, (c_x-2, c_y-2), (int(x), int(y)), (0, 0, 255), thickness=14)
        t1 = img.copy()
        t1[temp[:, :, 2] == 255] = 255
        c = img[temp[:, :, 2] == 255]
        points = c[c == 0] # 0表示黑色,即旋轉指針中重合黑色的點最多的角度
        freq_list.append((len(points), i))
        cv2.imshow('d', temp)
        cv2.imshow('d1', t1)
        cv2.waitKey(0)
    print('當前角度:',max(freq_list, key=lambda x: x[0]),'度')
    print(max(freq_list, key=lambda x: x[0]))
    return max(freq_list, key=lambda x: x[0])
main_code.py
import cv2
import numpy as np
from formula_1 import get_rad_val
from find_roi_FLANN_2 import find_roi
from cut_roi_3 import polylines_cut
from perspective_roi_4 import perspective_roi
from xiugai_kmeans_5 import v2_by_k_means,dilate,get_pointer_rad


if __name__ == '__main__':
    template = cv2.imread("second_template.jpg",0)
    target = cv2.imread('train/5.jpg')
    target_gray = cv2.cvtColor(target,cv2.COLOR_BGR2GRAY)  # 目標影象
    cv2.imshow("src",template)

    #第一步:基於FLANN匹配roi區域
    find_roi_image,points = find_roi(template,target_gray)

    #第二步:在原圖上剪下出需要的多邊形roi區域
    pts = np.array([[np.int(points[0][0][0]),np.int(points[0][0][1])],[np.int(points[1][0][0]),np.int(points[1][0][1])],
                    [np.int(points[2][0][0]),np.int(points[2][0][1])],[np.int(points[3][0][0]),np.int(points[3][0][1])]])
    cut_roi_image,keypoints = polylines_cut(target,pts)

    #第三步:進行透視變換將多邊形轉化爲正方形(爲了與模板一樣方便後面運算)perspective_roi_4
    jiaozheng_image = perspective_roi(cut_roi_image,target,points)

    #第四步:kmeans_5
    kmeansImage = v2_by_k_means(jiaozheng_image)

    # 第四步:將Kmeans二值化後的影象進行膨脹處理
    # dilateImage = dilate(kmeansImage)

    # 第五步:獲取當前的指針角度
    angle = get_pointer_rad(kmeansImage)

    # 第六步:角度轉換成數值
    value = get_rad_val(angle[1])
    print("第5張圖片的刻度盤的數值是:{}".format(value))
    #cv2.waitKey(0)
PS
①在模板的製作中,需要對每個刻度進行畫素點位置的測量,可以自己編個程式獲取畫素點位置,我偷了個懶,用的Photoshop軟體,如若電腦沒有下載,可以使用PS線上軟體
https://www.uupoop.com/
https://blog.csdn.net/xiaocao9903/article/details/53008613
②
最終10個樣本的測試結果:
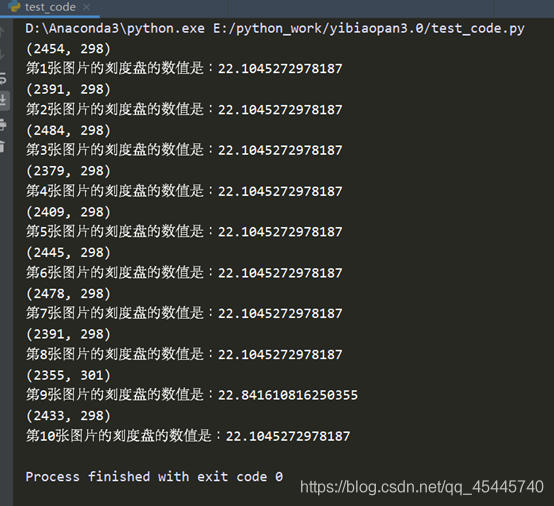 關於精度的問題,要調整畫的那個指針的長度,線段的起點,即圓心的位置,指針的粗細等等,都會影響到讀數的精度
