親們!一篇文章告訴你如何升級到mysql8,有想做版本升級的小夥伴可以參考下
2020-08-09 10:19:45
前言
不知不覺,MySQL8.0已經有好多個GA小版本了。目前網際網路上也有很多關於MySQL8.0的內容了,MySQL8.0版本基本已到穩定期,相信很多小夥伴已經在接觸8.0了。本篇文章主要介紹從5.7升級到8.0版本的過程及注意事項。
升級前準備及注意事項
首先,我們要大概瞭解下MySQL5.7和8.0有哪些不同,參考官方文件和其他網友文章,概括總結出MySQL8.0以下幾點新特性:
- 預設字元集由latin1變爲utf8mb4。
- MyISAM系統表全部換成InnoDB表。
- JSON特性增強。
- 支援不可見索引,支援直方圖。
- sql_mode參數預設值變化。
- 預設密碼策略變更。
- 新增角色管理。
- 支援視窗函數,支援Hash join。
根據版本變化及官方升級教學,列舉出以下幾點注意事項:
- 注意字元集設定。爲了避免新舊物件字元集不一致的情況,可以在組態檔將字元集和校驗規則設定爲舊版本的字元集和比較規則。
- 密碼認證外掛變更。爲了避免連線問題,可以仍採用5.7的mysql_native_password認證外掛。
- sql_mode支援問題。8.0版本sql_mode不支援NO_AUTO_CREATE_USER,要避免設定的sql_mode中帶有NO_AUTO_CREATE_USER。
- 是否需要手動升級系統表。在MySQL 8.0.16版本之前,需要手動的執行mysql_upgrade來完成該步驟的升級,在MySQL
8.0.16版本及之後是由mysqld來完成該步驟的升級。
具體升級過程
下面 下麪以Linux系統爲例,展示下具體升級過程。我的系統是CentOS7.7,原版本是MySQL5.7.23,以In-Place方式直接升級到MySQL8.0.19。
- 下載解壓安裝包
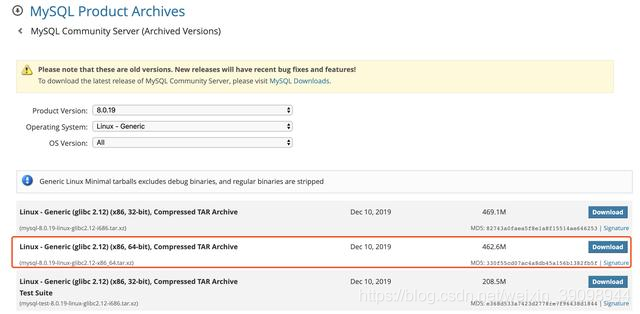
官網下載對應版本的tar包,可通過wget下載或者本地下載後上傳。
下載地址:
https://downloads.mysql.com/archives/community/
選擇 mysql-8.0.19-linux-glibc2.12-x86_64.tar.xz

執行以下步驟解壓tar包:
# 安裝包上傳至原安裝包目錄下 我的是/usr/local/
cd /usr/local/

# 解壓安裝包
xz -d mysql-8.0.19-linux-glibc2.12-x86_64.tar.xz
tar -xvf mysql-8.0.19-linux-glibc2.12-x86_64.tar

# 資料夾重新命名爲mysql8
mv mysql-8.0.19-linux-glibc2.12-x86_64 mysql8

# 更改資料夾所屬
chown -R mysql.mysql /usr/local/mysql8/
- 更改組態檔my.cnf
因5.7版本與8.0版本參數有所不同,爲了能順利升級,我們需要更改部分設定參數。主要注意sql_mode、basedir、密碼認證外掛及字元集設定,其他參數最好還是按照原5.7的來,不需要做調整。下面 下麪展示下更改後的組態檔:
# 最後幾個for8.0的參數要格外注意
[mysqld]
user = mysql
datadir = /data/mysql/data
port = 3306

socket = /data/mysql/tmp/mysql.sock
pid-file  = /data/mysql/tmp/mysqld.pid
tmpdir = /data/mysql/tmp
skip_name_resolve = 1
max_connections = 2000
group_concat_max_len = 1024000
lower_case_table_names = 1
log_timestamps=SYSTEM
max_allowed_packet = 32M
binlog_cache_size = 4M
sort_buffer_size = 2M
read_buffer_size = 4M
join_buffer_size = 4M
tmp_table_size = 96M
max_heap_table_size = 96M
max_length_for_sort_data = 8096
default_time_zone = '+8:00'

#logs
server-id = 1003306
log-error = /data/mysql/logs/error.log
slow_query_log = 1
slow_query_log_file = /data/mysql/logs/slow.log
long_query_time = 3
log-bin = /data/mysql/logs/binlog
binlog_format = row
log_bin_trust_function_creators = 1
gtid_mode = ON
enforce_gtid_consistency = ON

#for8.0
sql_mode = STRICT_TRANS_TABLES,NO_ZERO_IN_DATE,NO_ZERO_DATE,ERROR_FOR_DIVISION_BY_ZERO,NO_ENGINE_SUBSTITUTION
character-set-server = utf8
collation_server = utf8_general_ci
basedir = /usr/local/mysql8
skip_ssl
default_authentication_plugin=mysql_native_password
- 執行升級程式
所有前置工作準備好後就可以開始正式升級了,不過升級前還是建議先全庫備份下。萬事俱備後,按照如下指示進行正式升級。
# 進入原5.7 mysql命令列 正確關閉數據庫
mysql> select version();
+------------+
| version()  |
+------------+
| 5.7.23-log |
+------------+
1 row in set (0.00 sec)

mysql> show variables like 'innodb_fast_shutdown';
+----------------------+-------+
| Variable_name        | Value |
+----------------------+-------+
| innodb_fast_shutdown | 1     |
+----------------------+-------+
1 row in set (0.00 sec)
# 確保數據都刷到硬碟上,更改成0
mysql> set global innodb_fast_shutdown=0;
Query OK, 0 rows affected (0.00 sec)

mysql> shutdown;
Query OK, 0 rows affected (0.00 sec)

mysql> exit
Bye

# 退出至終端 用mysql8.0.19用戶端直接啓動
[root@centos ~]# /usr/local/mysql8/bin/mysqld_safe --defaults-file=/etc/my.cnf --user=mysql &
[1] 23333
[root@centos ~]# 2020-05-20T07:07:02.337626Z mysqld_safe Logging to '/data/mysql/logs/error.log'.
2020-05-20T07:07:02.366244Z mysqld_safe Starting mysqld daemon with databases from /data/mysql/data

# 可觀察下錯誤日誌看是否報錯 然後重新登錄測試
[root@centos ~]# mysql -uroot -p123456
mysql: [Warning] Using a password on the command line interface can be insecure.
Welcome to the MySQL monitor.  Commands end with ; or \g.
Your MySQL connection id is 17
Server version: 8.0.19 MySQL Community Server - GPL

Copyright (c) 2000, 2018, Oracle and/or its affiliates. All rights reserved.

Oracle is a registered trademark of Oracle Corporation and/or its
affiliates. Other names may be trademarks of their respective
owners.

Type 'help;' or '\h' for help. Type '\c' to clear the current input statement.

mysql> select version();
+-----------+
| version() |
+-----------+
| 8.0.19    |
+-----------+
1 row in set (0.00 sec)
- 環境變數修改
因basedir由/usr/local/mysql變成了/usr/local/mysql8,故相關環境變數推薦修改下。可按照以下步驟來操作驗證:
# 修改mysql服務啓動項設定
vi /etc/init.d/mysql
# 修改basedir目錄
basedir=/usr/local/mysql8

# 修改PATH變數
vi /etc/profile
# 將PATH中的/usr/local/mysql/bin改爲/usr/local/mysql8/bin

# 生效驗證
[root@centos ~]# source /etc/profile
[root@centos ~]# which mysql
/usr/local/mysql8/bin/mysql
[root@centos ~]# mysql -V
mysql  Ver 8.0.19 for linux-glibc2.12 on x86_64 (MySQL Community Server - GPL)
寫在最後
至此,我們的數據庫由5.7成功升級至8.0!對比MySQL安裝過程及升級過程,發現二者很相似,其實升級過程並不複雜,複雜的是升級後的驗證及相容測試,特別是對於複雜的業務庫,MySQL版本升級還是要小心的。真實環境建議先升級從庫,驗證無誤後再逐步對主庫進行升級。
如果覺得有用,請關注我吧_
