SpringCloud筆記
1. 學習前言
1.1 內容概述
學習前提:
- JavaSE
- 數據庫
- 前端
- Servlet
- Http
- Mybatis + Spring + SpringMVC
- Springboot
- Dubbo + Zookeeper + 分佈式基礎
- Maven + Git
- Ajax + Json
這個階段如何學習?
三層架構 + MVC

框架:
	Spring(輕量級的Java開源框架):解決企業開發的複雜性	IOC、AOP

	SpringBoot(Spring的升級版):新一代的JavaEE開發標準 自動裝配

	模組化~	all in one

	模組化的開發===all in one 程式碼沒發生變

微服務架構4個核心問題:
	1. 服務很多,用戶端怎麼存取?
	2. 這麼多服務,服務之間如何通訊?
	3. 這麼多服務,如何治理?
	4. 服務掛了怎麼辦?

解決方案選型:
	SpringCloud 是一種生態!	學習前提已經會使用Springboot,有分佈式基礎,瞭解Dubbo+ZooKeeper

    1. Spring Cloud NetFlix(已經停止維護):一站式解決方案!可解決上述4個核心問題
		API閘道器:zuul元件
		通訊:Feign ---- HttpClient ---- Http通訊方式,同步,阻塞
		服務註冊和發現:Eureka
		熔斷機制 機製:Hystrix
		......

    2. Apache Dubbo Zookeeper:半自動!需要整合別人的
    	API閘道器:沒有,找第三方元件(比如整合zull元件),或者自己實現
    	通訊:Dubbo 是一個基於Java的高效能的RPC通訊框架(效能比Feign強大)
    	服務註冊和發現:Zookeeper
    	熔斷機制 機製:沒有,需要藉助Hystrix

    3. Spring Cloud Alibaba:目前最新的一站式解決方案!可解決上述4個核心問題,更簡單
    	API閘道器:
    	通訊:
		服務註冊和發現:
		熔斷機制 機製:

新概念:服務網格~ Server Mesh
	istio

萬變不離其宗4個問題:
	1. API閘道器
	2. HTTP,RPC通訊
	3. 註冊和發現
	4. 熔斷機制 機製
1.2 常見面試題
1.1 什麼是微服務?
1.2 微服務之間是如何獨立通訊的?
1.3 SpringCloud 和 Dubbo有那些區別?
1.4 SpringBoot 和 SpringCloud,請談談你對他們的理解
1.5 什麼是服務熔斷?什麼是服務降級?
1.6 微服務的優缺點分別是什麼?說下你在專案開發中遇到的坑
1.7 你所知道的微服務技術棧有哪些?列舉一二
1.8 Eureka和Zookeeper都可以提供服務註冊與發現的功能,請說說兩者的區別
2. 微服務概述
2.1 什麼是微服務
微服務(Microservice Architecture) 是近幾年流行的一種架構思想,關於它的概念很難一言以蔽之。
究竟什麼是微服務呢?我們在此參照ThoughtWorks 公司的首席科學家 Martin Fowler 於2014年提出的一段話:
原文:https://martinfowler.com/articles/microservices.html
漢化:https://www.cnblogs.com/liuning8023/p/4493156.html
- 就目前而言,對於微服務,業界並沒有一個統一的,標準的定義。
- 但通常而言,微服務架構是一種架構模式,或者說是一種架構風格,它體長將單一的應用程式劃分成一組小的服務,每個服務執行在其獨立的自己的進程內,服務之間互相協調,互相設定,爲使用者提供最終價值,服務之間採用輕量級的通訊機制 機製(HTTP)互相溝通,每個服務都圍繞着具體的業務進行構建,並且能狗被獨立的部署到生產環境中,另外,應儘量避免統一的,集中式的服務管理機制 機製,對具體的一個服務而言,應該根據業務上下文,選擇合適的語言,工具(Maven)對其進行構建,可以有一個非常輕量級的集中式管理來協調這些服務,可以使用不同的語言來編寫服務,也可以使用不同的數據儲存。
再來從技術維度角度理解下:
微服務化的核心就是將傳統的一站式應用,根據業務拆分成一個一個的服務,徹底地去耦合,每一個微服務提供單個業務功能的服務,一個服務做一件事情,從技術角度看就是一種小而獨立的處理過程,類似進程的概念,能夠自行單獨啓動或銷燬,擁有自己獨立的數據庫。
2.2 微服務與微服務架構
2.2.1 微服務
強調的是服務的大小,它關注的是某一個點,是具體解決某一個問題/提供落地對應服務的一個服務應用,狹義的看,可以看作是IDEA中的一個個微服務工程,或者Moudel。
IDEA 工具裏面使用Maven開發的一個個獨立的小Moudel,它具體是使用SpringBoot開發的一個小模組,專業的事情交給專業的模組來做,一個模組就做着一件事情。
強調的是一個個的個體,每個個體完成一個具體的任務或者功能。
2.2.2 微服務架構
一種新的架構形式,Martin Fowler 於2014年提出。
微服務架構是一種架構模式,它體長將單一應用程式劃分成一組小的服務,服務之間相互協調,互相配合,爲使用者提供最終價值。每個服務執行在其獨立的進程中,服務與服務之間採用輕量級的通訊機制 機製
(如HTTP)互相共同作業,每個服務都圍繞着具體的業務進行構建,並且能夠被獨立的部署到生產環境中,另外,應儘量避免統一的,集中式的服務管理機制 機製,對具體的一個服務而言,應根據業務上下文,選擇合適的語言、工具(如Maven)
對其進行構建。
2.3 微服務優缺點
優點
- 單一職責原則;
- 每個服務足夠內聚,足夠小,程式碼容易理解,這樣能聚焦一個指定的業務功能或業務需求;
- 開發簡單,開發效率高,一個服務可能就是專一的只幹一件事;
- 微服務能夠被小團隊單獨開發,這個團隊只需2-5個開發人員組成;
- 微服務是松耦合的,是有功能意義的服務,無論是在開發階段或部署階段都是獨立的;
- 微服務能使用不同的語言開發;
- 易於和第三方整合,微服務允許容易且靈活的方式整合自動部署,通過持續整合工具,如jenkins,Hudson,bamboo;
- 微服務易於被一個開發人員理解,修改和維護,這樣小團隊能夠更關注自己的工作成果,無需通過合作才能 纔能體現價值;
- 微服務允許利用和融合最新技術;
- 微服務只是業務邏輯的程式碼,不會和HTML,CSS,或其他的介面混合;
- 每個微服務都有自己的儲存能力,可以有自己的數據庫,也可以有統一的數據庫;
缺點
- 開發人員要處理分佈式系統的複雜性;
- 多服務運維難度,隨着服務的增加,運維的壓力也在增大;
- 系統部署依賴問題;
- 服務間通訊成本問題;
- 數據一致性問題;
- 系統整合測試問題;
- 效能和監控問題;
2.4 微服務技術棧有那些
| 微服務技術條目 | 落地技術 |
|---|---|
| 服務開發 | SpringBoot、Spring、SpringMVC等 |
| 服務設定與管理 | Netfix公司的Archaius、阿裡的Diamond等 |
| 服務註冊與發現 | Eureka、Consul、Zookeeper等 |
| 服務呼叫 | Rest、PRC、gRPC |
| 服務熔斷器 | Hystrix、Envoy等 |
| 負載均衡 | Ribbon、Nginx等 |
| 服務介面呼叫(用戶端呼叫服務的簡化工具) | Fegin等 |
| 訊息佇列 | Kafka、RabbitMQ、ActiveMQ等 |
| 服務設定中心管理 | SpringCloudConfig、Chef等 |
| 服務路由(API閘道器) | Zuul等 |
| 服務監控 | Zabbix、Nagios、Metrics、Specatator等 |
| 全鏈路追蹤 | Zipkin、Brave、Dapper等 |
| 數據流操作開發包 | SpringCloud Stream(封裝與Redis,Rabbit,Kafka等發送接收訊息) |
| 時間訊息總棧 | SpringCloud Bus |
| 服務部署 | Docker、OpenStack、Kubernetes等 |
2.5 爲什麼選擇SpringCloud作爲微服務架構
-
選型依據
-
整體解決方案和框架成熟度
-
社羣熱度
-
可維護性
-
學習曲線
-
-
當前各大IT公司用的微服務架構有那些?
-
阿裡:dubbo+HFS
-
京東:JFS
-
新浪:Motan
-
噹噹網:DubboX
…
-
- 各微服務架構對比
| 功能點/服務架構 | Netflix/SpringCloud | Motan | gRPC | Thrift | Dubbo/DubboX |
|---|---|---|---|---|---|
| 功能定位 | 完整的微服務架構 | RPC框架,但整合了ZK或Consul,實現叢集環境的基本服務註冊發現 | RPC框架 | RPC框架 | 服務架構 |
| 支援Rest | 是,Ribbon支援多種可拔插的序列號選擇 | 否 | 否 | 否 | 否 |
| 支援RPC | 否 | 是(Hession2) | 是 | 是 | 是 |
| 支援多語言 | 是(Rest形式) | 否 | 是 | 是 | 否 |
| 負載均衡 | 是(伺服器端zuul+用戶端Ribbon),zuul-服務,動態路由,雲端負載均衡Eureka(針對中間層伺服器) | 是(用戶端) | 否 | 否 | 是(用戶端) |
| 設定服務 | Netfix Archaius,Spring Cloud Config Server 集中設定 | 是(Zookeeper提供) | 否 | 否 | 否 |
| 服務呼叫鏈監控 | 是(zuul),zuul提供邊緣服務,API閘道器 | 否 | 否 | 否 | 否 |
| 高可用/容錯 | 是(伺服器端Hystrix+用戶端Ribbon) | 是(用戶端) | 否 | 否 | 是(用戶端) |
| 典型應用案例 | Netflix | Sina | |||
| 社羣活躍程度 | 高 | 一般 | 高 | 一般 | 2017年後重新開始維護,之前中斷了5年 |
| 學習難度 | 中等 | 低 | 高 | 高 | 低 |
| 文件豐富程度 | 高 | 一般 | 一般 | 一般 | 高 |
| 其他 | Spring Cloud Bus爲我們的應用程式帶來了更多管理端點 | 支援降級 | Netflix內部在開發整合gRPC | IDL定義 | 實踐的公司比較多 |
3. SpringCloud入門概述
3.1 SpringCloud是什麼?
Spring官網:https://spring.io/
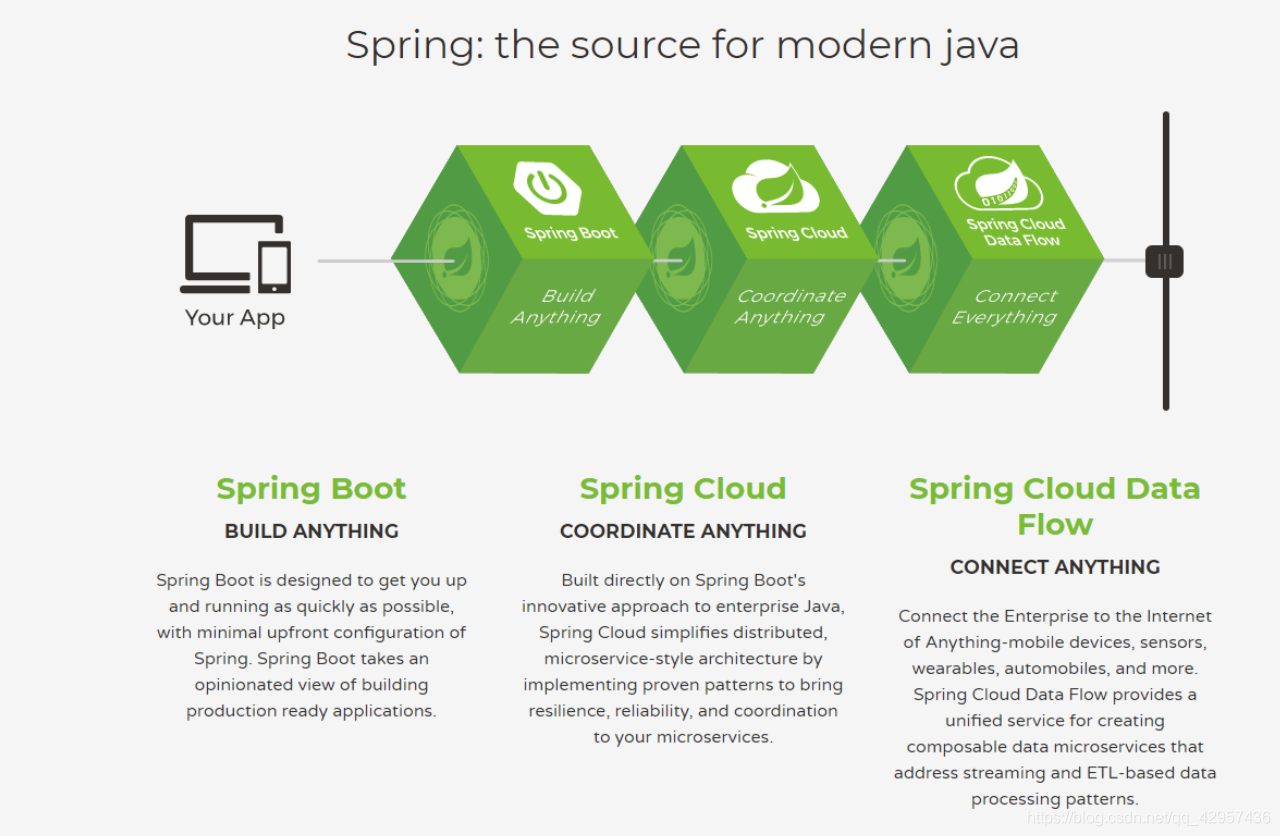
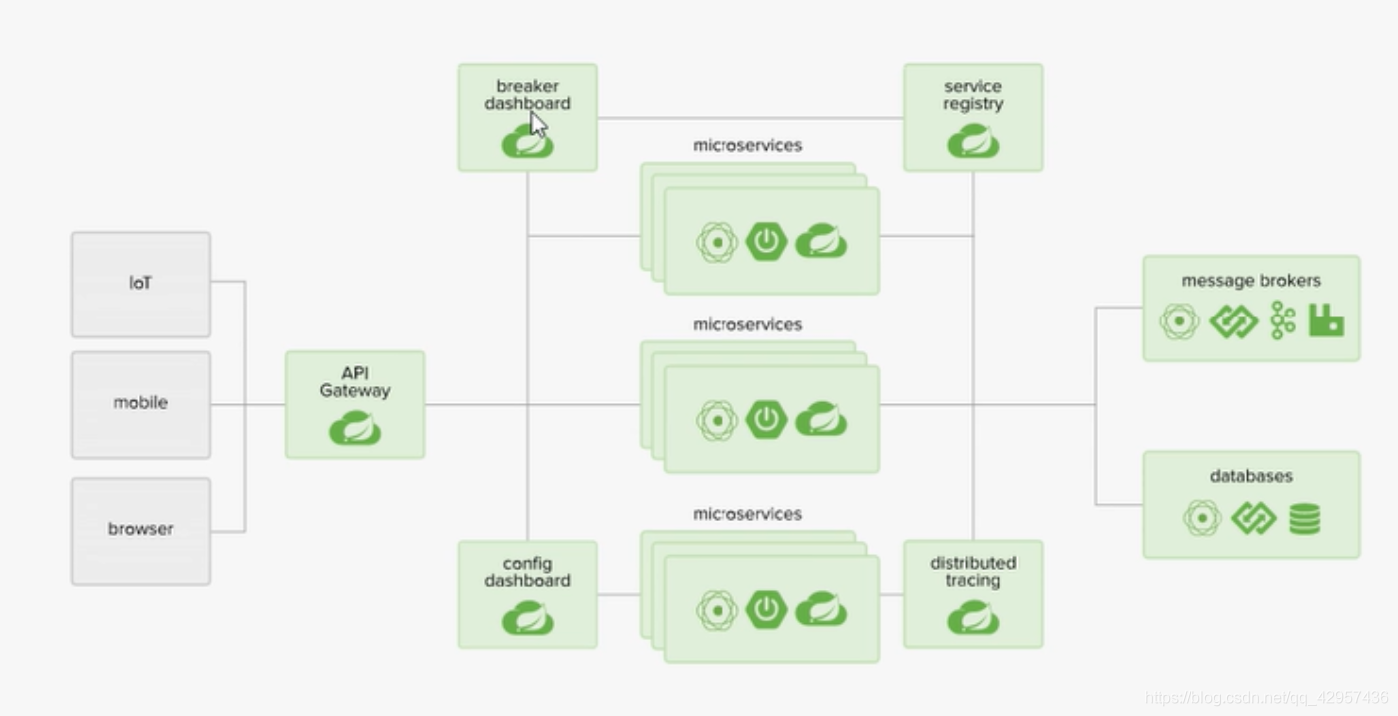
Spring Cloud provides tools for developers to quickly build some of the common patterns in distributed systems (e.g. configuration management, service discovery, circuit breakers, intelligent routing, micro-proxy, control bus, one-time tokens, global locks, leadership election, distributed sessions, cluster state). Coordination of distributed systems leads to boiler plate patterns, and using Spring Cloud developers can quickly stand up services and applications that implement those patterns. They will work well in any distributed environment, including the developer’s own laptop, bare metal data centres, and managed platforms such as Cloud Foundry.
翻譯:
Spring Cloud爲開發人員提供了快速構建分佈式系統中的一些常見模式的工具(例如設定管理、服務發現、斷路器、智慧路由、微代理、控制匯流排、一次性令牌、全域性鎖、領導人選舉、分佈式對談、叢集狀態)。分佈式系統的協調導致了鍋爐板模式,而使用Spring Cloud開發人員可以快速建立實現這些模式的服務和應用程式。它們在任何分佈式環境中都能很好地工作,包括開發人員自己的筆記型電腦、裸金屬數據中心和雲端計算等託管平臺。
3.2 SpringCloud和SpringBoot的關係
- SpringBoot專注於開發方便的開發單個個體微服務;
- SpringCloud是關注全域性的微服務協調整理治理框架,它將SpringBoot開發的一個個單體微服務,整合併管理起來,爲各個微服務之間提供:設定管理、服務發現、斷路器、路由、爲代理、事件總棧、全域性鎖、決策競選、分佈式對談等等整合服務;
- SpringBoot可以離開SpringCloud獨立使用,開發專案,但SpringCloud離不開SpringBoot,屬於依賴關係;
- SpringBoot專注於快速、方便的開發單個個體微服務,SpringCloud關注全域性的服務治理框架;
3.3 Dubbo 和 SpringCloud技術選型
-
分佈式+服務治理Dubbo
目前成熟的網際網路架構,應用服務化拆分+訊息中介軟體 -
Dubbo 和 SpringCloud對比
可以看一下社羣活躍度:
https://github.com/dubbo
https://github.com/spring-cloud
- 對比結果:
| Dubbo | SpringCloud | |
|---|---|---|
| 服務註冊中心 | Zookeeper | Spring Cloud Netfilx Eureka |
| 服務呼叫方式 | RPC | REST API |
| 服務監控 | Dubbo-monitor | Spring Boot Admin |
| 斷路器 | 不完善 | Spring Cloud Netfilx Hystrix |
| 服務閘道器 | 無 | Spring Cloud Netfilx Zuul |
| 分佈式設定 | 無 | Spring Cloud Config |
| 服務跟蹤 | 無 | Spring Cloud Sleuth |
| 訊息總棧 | 無 | Spring Cloud Bus |
| 數據流 | 無 | Spring Cloud Stream |
| 批次任務 | 無 | Spring Cloud Task |
最大區別:Spring Cloud 拋棄了Dubbo的RPC通訊,採用的是基於HTTP的REST方式
嚴格來說,這兩種方式各有優劣。雖然從一定程度上來說,後者犧牲了服務呼叫的效能,但也避免了上面提到的原生RPC帶來的問題。而且REST相比RPC更爲靈活,服務提供方和呼叫方的依賴只依靠一紙契約,不存在程式碼級別的強依賴,這個優點在當下強調快速演化的微服務環境下,顯得更加合適。
品牌機和組裝機的區別
社羣支援與更新力度的區別
- 總結:
二者解決的問題域不一樣:Dubbo的定位是一款RPC框架,而SpringCloud的目標是微服務架構下的一站式解決方案。
3.4 SpringCloud能幹嘛
- Distributed/versioned configuration 分佈式/版本控制設定
- Service registration and discovery 服務註冊與發現
- Routing 路由
- Service-to-service calls 服務到服務的呼叫
- Load balancing 負載均衡設定
- Circuit Breakers 斷路器
- Distributed messaging 分佈式訊息管理
3.5 SpringCloud下載
官網:http://projects.spring.io/spring-cloud/
版本號有點特別:
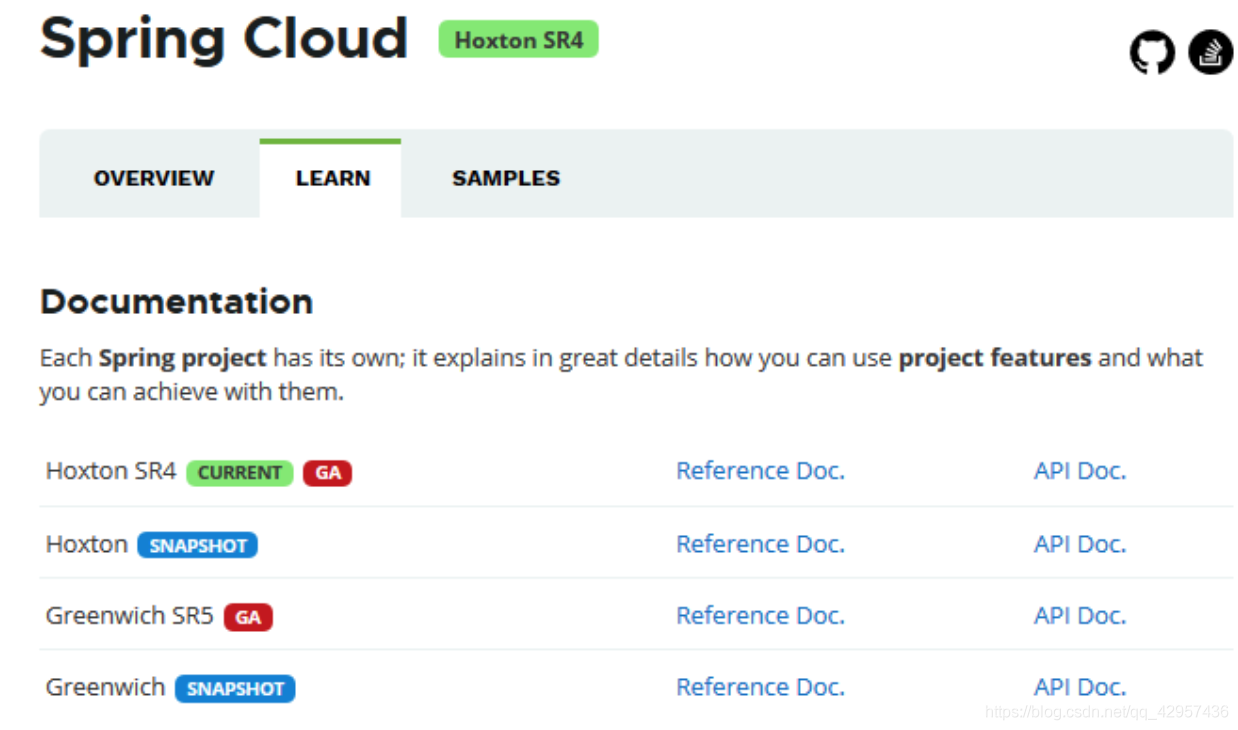
SpringCloud沒有採用數位編號的方式命名版本號,而是採用了倫敦地鐵站的名稱,同時根據字母表的順序來對應版本時間順序,比如最早的Realse版本:Angel,第二個Realse版本:Brixton,然後是Camden、Dalston、Edgware,目前最新的是Hoxton SR4 CURRENT GA通用穩定版
自學參考書:
- SpringCloud Netflix 中文文件:https://springcloud.cc/spring-cloud-netflix.html
- SpringCloud 中文API文件(官方文件翻譯版):https://springcloud.cc/spring-cloud-dalston.html
- SpringCloud中國社羣:http://springcloud.cn/
- SpringCloud中文網:https://springcloud.cc
4. SpringCloud Rest學習環境搭建:服務提供者
4.1 介紹
我們會使用一個Dept部門模組做一個微服務通用案例Consumer消費者(Client)通過REST呼叫Provider提供者(Server)提供的服務。
回顧Spring,SpringMVC,Mybatis等以往學習的知識。
Maven的分包分模組架構複習。
一個簡單的Maven模組結構是這樣的:

-- app-parent: 一個父專案(app-parent)聚合了很多子專案(app-util\app-dao\app-web...)
  |-- pom.xml
  |
  |-- app-core
  ||---- pom.xml
  |
  |-- app-web
  ||---- pom.xml
  ......
一個父工程帶着多個Moudule子模組
MicroServiceCloud父工程(Project)下初次帶着3個子模組(Module)
microservicecloud-api 【封裝的整體entity/介面/公共設定等】
microservicecloud-consumer-dept-80 【服務提供者】
microservicecloud-provider-dept-8001 【服務消費者】
4.2 SpringCloud版本選擇
4.2.1 大版本說明
| SpringBoot | SpringCloud | 關係 |
|---|---|---|
| 1.2.x | Angel版本(天使) | 相容SpringBoot1.2x |
| 1.3.x | Brixton版本(布裡克斯頓) | 相容SpringBoot1.3x,也相容SpringBoot1.4x |
| 1.4.x | Camden版本(卡姆登) | 相容SpringBoot1.4x,也相容SpringBoot1.5x |
| 1.5.x | Dalston版本(多爾斯頓) | 相容SpringBoot1.5x,不相容SpringBoot2.0x |
| 1.5.x | Edgware版本(埃奇韋爾) | 相容SpringBoot1.5x,不相容SpringBoot2.0x |
| 2.0.x | Finchley版本(芬奇利) | 相容SpringBoot2.0x,不相容SpringBoot1.5x |
| 2.1.x | Greenwich版本(格林威治) |
4.2.2 實際開發版本關係
| spring-boot-starter-parent | spring-cloud-dependencles | ||
|---|---|---|---|
| 版本號 | 發佈日期 | 版本號 | 發佈日期 |
| 1.5.2.RELEASE | 2017-03 | Dalston.RC1 | 2017-x |
| 1.5.9.RELEASE | 2017-11 | Edgware.RELEASE | 2017-11 |
| 1.5.16.RELEASE | 2018-04 | Edgware.SR5 | 2018-10 |
| 1.5.20.RELEASE | 2018-09 | Edgware.SR5 | 2018-10 |
| 2.0.2.RELEASE | 2018-05 | Fomchiey.BULD-SNAPSHOT | 2018-x |
| 2.0.6.RELEASE | 2018-10 | Fomchiey-SR2 | 2018-10 |
| 2.1.4.RELEASE | 2019-04 | Greenwich.SR1 | 2019-03 |
使用後兩個
4.3 建立父工程
-
新建父工程專案springcloud,切記Packageing是pom模式(刪除父工程src)
-
主要是定義POM檔案,將後續各個子模組公用的jar包等統一提取出來
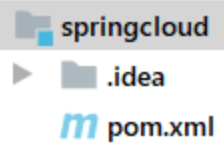
父類別pom.xml
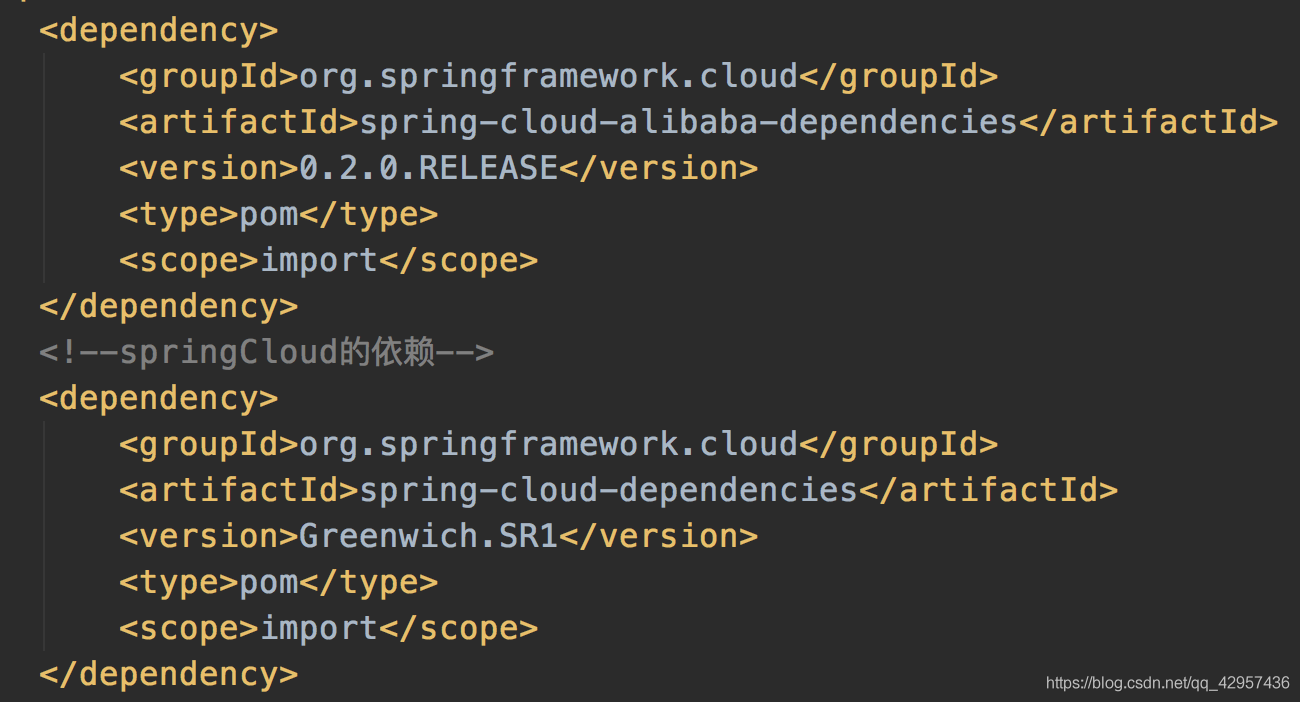
(預留位置)
父工程爲springcloud,其下有多個子mudule
4.4 建立子模組
4.4.1 建立子模組1 springcloud-api
建立第一個模組 springcloud-api 公共介面

子模組1 pom.xml
<?xml version="1.0" encoding="UTF-8"?>
<project xmlns="http://maven.apache.org/POM/4.0.0"
         xmlns:xsi="http://www.w3.org/2001/XMLSchema-instance"
         xsi:schemaLocation="http://maven.apache.org/POM/4.0.0 http://maven.apache.org/xsd/maven-4.0.0.xsd">
    <parent>
        <artifactId>springcloud</artifactId>
        <groupId>com.kuang</groupId>
        <version>1.0-SNAPSHOT</version>
    </parent>
    <modelVersion>4.0.0</modelVersion>

    <artifactId>springcloud-api</artifactId>


    <!--當前的Module自己需要的依賴,如果父依賴中已經設定了版本。這裏就不用寫了-->
    <dependencies>
        <!--feign-->
        <dependency>
            <groupId>org.springframework.cloud</groupId>
            <artifactId>spring-cloud-starter-feign</artifactId>
            <version>1.4.6.RELEASE</version>
        </dependency>
        <dependency>
            <groupId>org.projectlombok</groupId>
            <artifactId>lombok</artifactId>
        </dependency>
    </dependencies>

</project>
只需要寫一個pojo
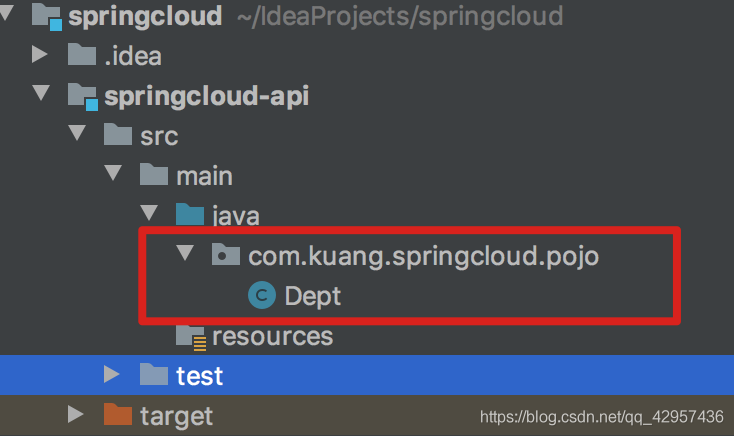
Dept.java
package com.kuang.springcloud.pojo;

import lombok.Data;
import lombok.NoArgsConstructor;
import lombok.experimental.Accessors;
import org.omg.CosNaming.NamingContextExtPackage.StringNameHelper;

import java.io.Serializable;

/**
 * @program: springcloud
 * @description:
 * @author: Mr.Luo
 * @create: 2020-08-01 10:36
 */
@Data
@NoArgsConstructor
@Accessors(chain = true)
public class Dept implements Serializable {
    //Dept實體類  類表關係對映
    private long deptno;
    private String dname;

    //這個數據是存在哪個數據庫的欄位?微服務,一個服務對應一個數據庫,同一個資訊可能存在不同的額數據庫
    private String db_source;

    public Dept(String dname) {
        this.dname = dname;
    }

/*    鏈式寫法
    Dept dept = new Dept();
    dept.setDepNo(11).setDname("sss").setDB_source("001")
    */
}
4.4.2 建立子模組2 springcloud-config-dept-8001
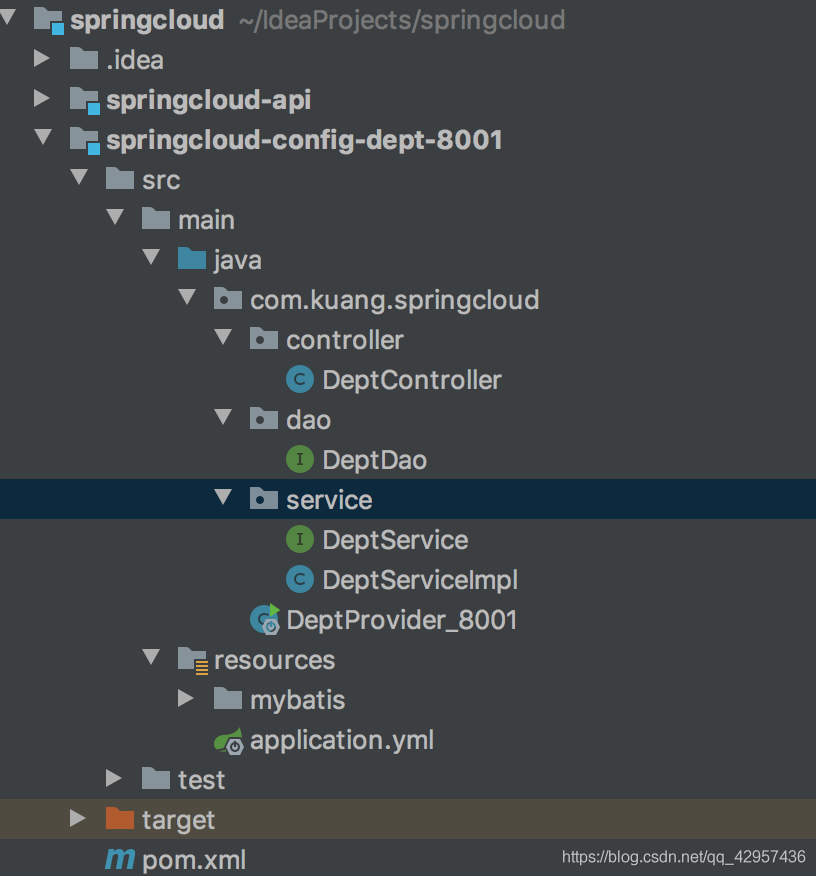
pom.xml
<?xml version="1.0" encoding="UTF-8"?>
<project xmlns="http://maven.apache.org/POM/4.0.0"
         xmlns:xsi="http://www.w3.org/2001/XMLSchema-instance"
         xsi:schemaLocation="http://maven.apache.org/POM/4.0.0 http://maven.apache.org/xsd/maven-4.0.0.xsd">
    <parent>
        <artifactId>springcloud</artifactId>
        <groupId>com.kuang</groupId>
        <version>1.0-SNAPSHOT</version>
    </parent>
    <modelVersion>4.0.0</modelVersion>

    <artifactId>springcloud-config-dept-8001</artifactId>
    <dependencies>
        <!--config-->
        <!-- https://mvnrepository.com/artifact/org.springframework.cloud/spring-cloud-starter-config -->
        <dependency>
            <groupId>org.springframework.cloud</groupId>
            <artifactId>spring-cloud-starter-config</artifactId>
            <version>2.1.1.RELEASE</version>
        </dependency>

        <dependency>
            <groupId>org.springframework.cloud</groupId>
            <artifactId>spring-cloud-starter-hystrix</artifactId>
            <version>1.4.6.RELEASE</version>
        </dependency>
        <!--EUREKA-->
        <!-- https://mvnrepository.com/artifact/org.springframework.cloud/spring-cloud-starter-eureka -->
        <dependency>
            <groupId>org.springframework.cloud</groupId>
            <artifactId>spring-cloud-starter-eureka</artifactId>
            <version>1.4.6.RELEASE</version>
        </dependency>
        <!--actuator完善監控資訊-->
        <dependency>
            <groupId>org.springframework.boot</groupId>
            <artifactId>spring-boot-starter-actuator</artifactId>
        </dependency>

        <!--我們需要拿到實體類,所以要設定api module-->
        <dependency>
            <groupId>com.kuang</groupId>
            <artifactId>springcloud-api</artifactId>
            <version>1.0-SNAPSHOT</version>
        </dependency>
        <!--junit-->
        <dependency>
            <groupId>junit</groupId>
            <artifactId>junit</artifactId>
        </dependency>
        <dependency>
            <groupId>mysql</groupId>
            <artifactId>mysql-connector-java</artifactId>
        </dependency>
        <dependency>
            <groupId>com.alibaba</groupId>
            <artifactId>druid</artifactId>
        </dependency>
        <dependency>
            <groupId>ch.qos.logback</groupId>
            <artifactId>logback-core</artifactId>
        </dependency>
        <dependency>
            <groupId>org.mybatis.spring.boot</groupId>
            <artifactId>mybatis-spring-boot-starter</artifactId>
        </dependency>
        <!--test-->
        <dependency>
            <groupId>org.springframework.boot</groupId>
            <artifactId>spring-boot-test</artifactId>
        </dependency>
        <dependency>
            <groupId>org.springframework.boot</groupId>
            <artifactId>spring-boot-starter-web</artifactId>
        </dependency>
        <!--jetty-->
        <dependency>
            <groupId>org.springframework.boot</groupId>
            <artifactId>spring-boot-starter-jetty</artifactId>
        </dependency>
        <!--熱部署工具-->
        <dependency>
            <groupId>org.springframework.boot</groupId>
            <artifactId>spring-boot-devtools</artifactId>
        </dependency>
    </dependencies>

</project>
DeptController.java
package com.kuang.springcloud.controller;

import com.kuang.springcloud.pojo.Dept;
import com.kuang.springcloud.service.DeptService;
import org.springframework.beans.factory.annotation.Autowired;
import org.springframework.web.bind.annotation.*;

import java.util.List;

/**
 * @program: springcloud
 * @description:
 * @author: Mr.Luo
 * @create: 2020-08-01 12:03
 */
//提供Restful服務
@RestController
public class DeptController {
    @Autowired
    private DeptService deptService;

    @PostMapping("/dept/add")
    public boolean addDept(Dept dept){
        return deptService.addDept(dept);
    }

    @GetMapping("/dept/get/{id}")
    public Dept queryById(@PathVariable("id")Long id){
        return deptService.queryById(id);
    }

    @GetMapping("/dept/list")
    public List queryAll(Dept dept){
        return deptService.queryAll();
    }


}
DeptDao.java
package com.kuang.springcloud.dao;

import com.kuang.springcloud.pojo.Dept;
import org.apache.ibatis.annotations.Mapper;
import org.springframework.stereotype.Repository;

import java.util.List;

/**
 * @program: springcloud
 * @description:
 * @author: Mr.Luo
 * @create: 2020-08-01 11:52
 */
@Mapper
@Repository //表示它是dao層的東西哎
public interface DeptDao {
    public boolean addDept(Dept dept);

    public Dept queryById(long id);

    public List<Dept> queryAll();

}
DeptService.java
package com.kuang.springcloud.service;

import com.kuang.springcloud.pojo.Dept;

import java.util.List;

/**
 * @program: springcloud
 * @description:
 * @author: Mr.Luo
 * @create: 2020-08-01 12:00
 */

public interface DeptService {
    public boolean addDept(Dept dept);

    public Dept queryById(long id);

    public List<Dept> queryAll();
}
DeptServiceImpl.java
package com.kuang.springcloud.service;

import com.kuang.springcloud.dao.DeptDao;
import com.kuang.springcloud.pojo.Dept;
import org.springframework.beans.factory.annotation.Autowired;
import org.springframework.stereotype.Service;

import java.util.List;

/**
 * @program: springcloud
 * @description:
 * @author: Mr.Luo
 * @create: 2020-08-01 12:01
 */
@Service
public class DeptServiceImpl implements DeptService {

    @Autowired
    private DeptDao deptDao;


    @Override
    public boolean addDept(Dept dept) {
        return deptDao.addDept(dept);
    }

    @Override
    public Dept queryById(long id) {
        return deptDao.queryById(id);
    }

    @Override
    public List<Dept> queryAll() {
        return deptDao.queryAll();
    }
}
DeptProvider_8001.java SpringBoot啓動類
package com.kuang.springcloud;

import org.springframework.boot.SpringApplication;
import org.springframework.boot.autoconfigure.SpringBootApplication;
import org.springframework.cloud.netflix.eureka.EnableEurekaClient;

/**
 * @program: springcloud
 * @description:
 * @author: Mr.Luo
 * @create: 2020-08-01 23:53
 */
@SpringBootApplication
@EnableEurekaClient //在服務啓動後,自動註冊到Eureka中(CS模式)
public class DeptProvider_8001 {
    public static void main(String[] args){
        SpringApplication.run(DeptProvider_8001.class,args);
    }
}
application.yml
server:
  port: 8001

# mybatis設定
mybatis:
  config-location: classpath:mybatis/mybatis-config.xml
  mapper-locations: classpath:mybatis/mapper/*.xml
  type-aliases-package: com.kuang.springcloud.pojo

# Spring設定
spring:
  application:
    name: spring-cloud-provider-dept
  datasource:
    type: com.alibaba.druid.pool.DruidDataSource
    driver-class-name: com.mysql.jdbc.Driver
    url: jdbc:mysql://localhost:3306/db01?useUnicode=true&characterEncoding=utf-8
    username: root
    password: admin

eureka:
  client:
    service-url:
      defaultZone: http://localhost:7001/eureka/
DeptMapper.xml
<?xml version="1.0" encoding="UTF-8" ?>
<!DOCTYPE mapper
        PUBLIC "-//mybatis.org//DTD Config 3.0//EN"
        "http://mybatis.org/dtd/mybatis-3-mapper.dtd">
<mapper namespace="com.kuang.springcloud.dao.DeptDao">
    <insert id="addDept" parameterType="Dept">
        insert into dept (dname, db_source)
        VALUES (#(dname),DATABASE());
    </insert>

    <select id="queryById" resultType="Dept" parameterType="Long">
        select * from dept where deptno=#(deptno);
    </select>

    <select id="queryAll" resultType="Dept">
        select * from dept;
    </select>

</mapper>
mybatis-config.xml
<?xml version="1.0" encoding="UTF-8" ?>
<!DOCTYPE configuration
        PUBLIC "-//mybatis.org//DTD Config 3.0//EN"
        "http://mybatis.org/dtd/mybatis-3-config.dtd">
<configuration>
<!--    開啓二級快取-->
    <settings>
        <setting name="cacheEnabled" value="true"/>
    </settings>
</configuration>
存取:http://localhost:8001/dept/list

測試成功
4.4.3 建立子模組3 springcloud-consumer-dept-80
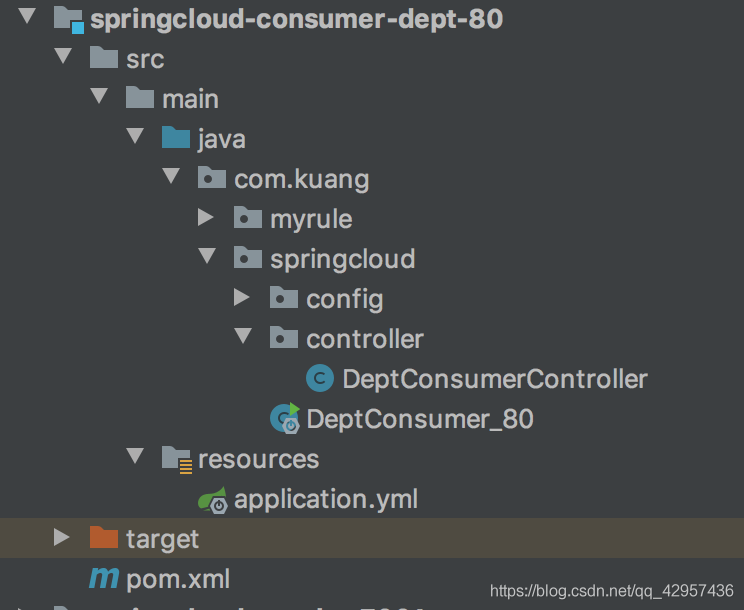
pom.xml
<?xml version="1.0" encoding="UTF-8"?>
<project xmlns="http://maven.apache.org/POM/4.0.0"
         xmlns:xsi="http://www.w3.org/2001/XMLSchema-instance"
         xsi:schemaLocation="http://maven.apache.org/POM/4.0.0 http://maven.apache.org/xsd/maven-4.0.0.xsd">
    <parent>
        <artifactId>springcloud</artifactId>
        <groupId>com.kuang</groupId>
        <version>1.0-SNAPSHOT</version>
    </parent>
    <modelVersion>4.0.0</modelVersion>

    <artifactId>springcloud-consumer-dept-80</artifactId>


    <dependencies>
        <dependency>
            <groupId>com.kuang</groupId>
            <artifactId>springcloud-api</artifactId>
            <version>1.0-SNAPSHOT</version>
        </dependency>
        <dependency>
            <groupId>org.springframework.boot</groupId>
            <artifactId>spring-boot-starter-web</artifactId>
        </dependency>
        <dependency>
            <groupId>org.springframework.boot</groupId>
            <artifactId>spring-boot-devtools</artifactId>
        </dependency>
    </dependencies>
</project>
DeptConsumerController.java
package com.kuang.springcloud.controller;

import com.kuang.springcloud.pojo.Dept;
import org.springframework.beans.factory.annotation.Autowired;
//import org.springframework.stereotype.Controller;
import org.springframework.web.bind.annotation.PathVariable;
import org.springframework.web.bind.annotation.RequestMapping;
import org.springframework.web.bind.annotation.RestController;
import org.springframework.web.client.RestTemplate;

import java.util.List;

@RestController
public class DeptConsumerController {

    // 理解:消費者,不應該有service層~
    // RestTemplate .... 供我們直接呼叫就可以了! 註冊到Spring中
    // (url, 實體:Map ,Class<T> responseType)
    @Autowired
    private RestTemplate restTemplate; //提供多種便捷存取遠端http服務的方法,簡單的Restful服務模板~

    //Ribbon。我們這裏的地址,應該是一個變數,通過服務名來存取
    //private static final String REST_URL_PREFIX = "http://localhost:8001";
    private static final String REST_URL_PREFIX = "http://localhost:8001";
    //private static final String REST_URL_PREFIX = "http://SPRINGCLOUD-PROVIDER-DEPT";

    @RequestMapping("/consumer/dept/add")
    public boolean add(Dept dept){
        return restTemplate.postForObject(REST_URL_PREFIX+"/dept/add",dept,Boolean.class);
    }

    @RequestMapping("/consumer/dept/get/{id}")
    public Dept get(@PathVariable("id") Long id){
        return restTemplate.getForObject(REST_URL_PREFIX+"/dept/get/"+id,Dept.class);
    }


    @RequestMapping("/consumer/dept/list")
    public List<Dept> list(){
        return restTemplate.getForObject(REST_URL_PREFIX+"/dept/list",List.class);
    }

}
DeptConsumer_80.java
package com.kuang.springcloud;

//import com.kuang.myrule.KuangRule;
import org.springframework.boot.SpringApplication;
import org.springframework.boot.autoconfigure.SpringBootApplication;
//import org.springframework.cloud.netflix.eureka.EnableEurekaClient;
//import org.springframework.cloud.netflix.ribbon.RibbonClient;

//Ribbon 和 Eureka 整合以後,用戶端可以直接呼叫,不用關心IP地址和埠號~
@SpringBootApplication
//@EnableEurekaClient
//在微服務啓動的時候就能去載入我們自定義Ribbon類
//@RibbonClient(name = "SPRINGCLOUD-PROVIDER-DEPT",configuration = KuangRule.class)
public class DeptConsumer_80 {
    public static void main(String[] args) {
        SpringApplication.run(DeptConsumer_80.class,args);
    }
}
application.yml
80埠被佔用,換成了8002埠,測試成功
server:
  port: 8002
存取:http://localhost:8002/consumer/dept/list

測試成功
5. Eureka服務註冊與發現
5.1 什麼是Eureka
- Netflix在涉及Eureka時,遵循的就是API原則.
- Eureka是Netflix的有個子模組,也是核心模組之一。Eureka是基於REST的服務,用於定位服務,以實現雲端中介軟體層服務發現和故障轉移,服務註冊與發現對於微服務來說是非常重要的,有了服務註冊與發現,只需要使用服務的識別符號,就可以存取到服務,而不需要修改服務呼叫的組態檔了,功能類似於Dubbo的註冊中心,比如Zookeeper.
5.2 原理理解
5.2.1 Eureka基本的架構
-
Springcloud 封裝了Netflix公司開發的Eureka模組來實現服務註冊與發現 (對比Zookeeper).
-
Eureka採用了C-S的架構設計,EurekaServer作爲服務註冊功能的伺服器,他是服務註冊中心.
-
而系統中的其他微服務,使用Eureka的用戶端連線到EurekaServer並維持心跳連線。這樣系統的維護人員就可以通過EurekaServer來監控系統中各個微服務是否正常執行,Springcloud 的一些其他模組 (比如Zuul) 就可以通過EurekaServer來發現系統中的其他微服務,並執行相關的邏輯.
5.2.2 和Dubbo架構對比.
-
Eureka 包含兩個元件:Eureka Server 和 Eureka Client.
-
Eureka Server 提供服務註冊,各個節點啓動後,回在EurekaServer中進行註冊,這樣Eureka Server中的服務註冊表中將會儲存所有課用服務節點的資訊,服務節點的資訊可以在介面中直觀的看到.
-
Eureka Client 是一個Java用戶端,用於簡化EurekaServer的互動,用戶端同時也具備一個內建的,使用輪詢負載演算法的負載均衡器。在應用啓動後,將會向EurekaServer發送心跳 (預設週期爲30秒) 。如果Eureka Server在多個心跳週期內沒有接收到某個節點的心跳,EurekaServer將會從服務註冊表中把這個服務節點移除掉 (預設週期爲90s).
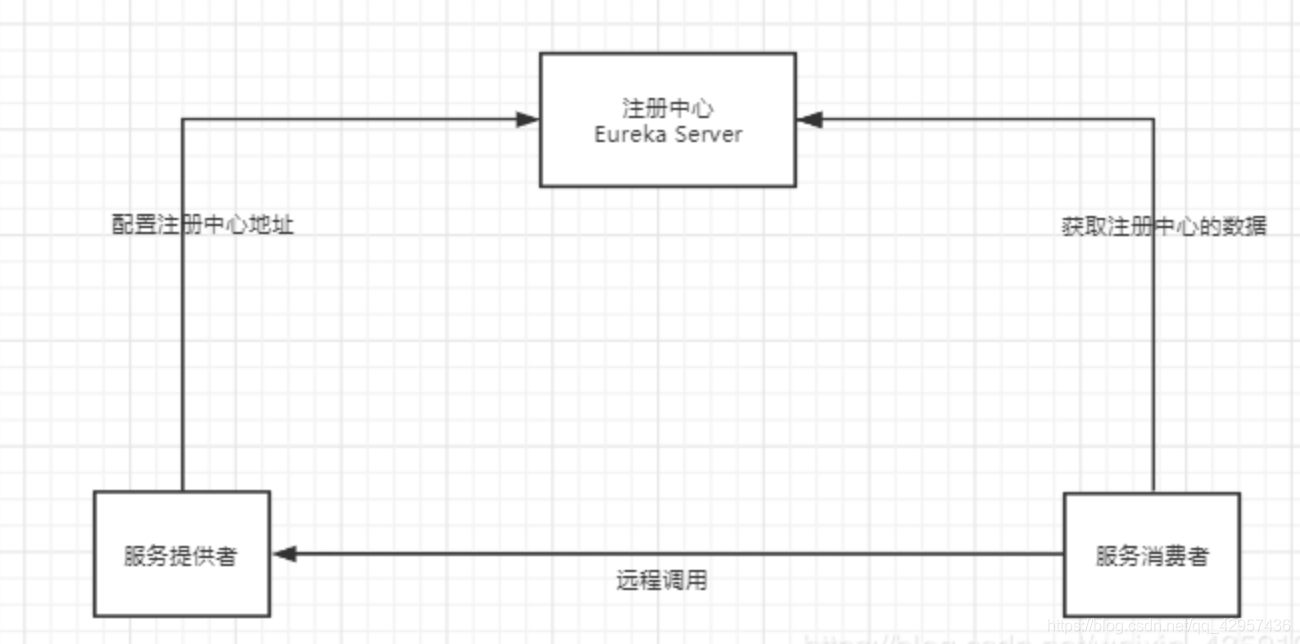
5.2.3 三大角色
- Eureka Server:提供服務的註冊與發現
- Service Provider:服務生產方,將自身服務註冊到Eureka中,從而使服務消費方能夠找到
- Service Consumer:服務消費方,從Eureka中獲取註冊服務列表,從而找到消費服務
5.3.1 建立子模組4 springcloud-eureka-7001
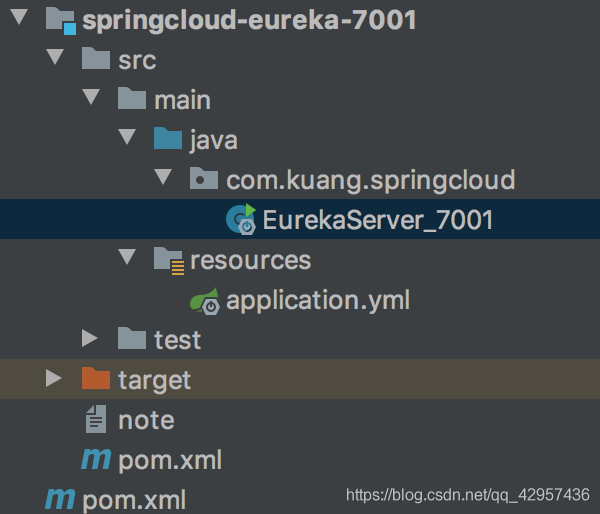
pom.xml
<?xml version="1.0" encoding="UTF-8"?>
<project xmlns="http://maven.apache.org/POM/4.0.0"
         xmlns:xsi="http://www.w3.org/2001/XMLSchema-instance"
         xsi:schemaLocation="http://maven.apache.org/POM/4.0.0 http://maven.apache.org/xsd/maven-4.0.0.xsd">
    <parent>
        <artifactId>springcloud</artifactId>
        <groupId>com.kuang</groupId>
        <version>1.0-SNAPSHOT</version>
    </parent>
    <modelVersion>4.0.0</modelVersion>

    <artifactId>springcloud-eureka-7001</artifactId>

    <dependencies>
        <!-- https://mvnrepository.com/artifact/org.springframework.cloud/spring-cloud-starter-eureka-server -->
        <dependency>
            <groupId>org.springframework.cloud</groupId>
            <artifactId>spring-cloud-starter-eureka-server</artifactId>
            <version>1.4.6.RELEASE</version>
        </dependency>
        <!--熱部署工具-->
        <dependency>
            <groupId>org.springframework.boot</groupId>
            <artifactId>spring-boot-devtools</artifactId>
        </dependency>
    </dependencies>

</project>
EurekaServer_7001.java
package com.kuang.springcloud;

import org.springframework.boot.SpringApplication;
import org.springframework.boot.autoconfigure.SpringBootApplication;
import org.springframework.cloud.netflix.eureka.server.EnableEurekaServer;

//啓動之後,存取 http://localhost:7001/
@SpringBootApplication
@EnableEurekaServer //EnableEurekaServer 伺服器端的啓動類,可以接受別人註冊進來~
public class EurekaServer_7001 {
    public static void main(String[] args) {
        SpringApplication.run(EurekaServer_7001.class,args);
    }
}
application.yml
server:
  port: 7001

#Eureka設定
eureka:
  instance:
    hostname: localhost #Eureka伺服器端的範例名稱
  client:
    register-with-eureka: false # 表示是否向eureka註冊中心註冊自己,這裏寫的是伺服器,不需要註冊
    fetch-registry: false #fetch-registry如果爲false,則表示自己爲註冊中心
    service-url: # 監控頁面
      defaultZone: http://${eureka.instance.hostname}:${server.port}/eureka/
      # 單機: defaultZone: http://${eureka.instance.hostname}:${server.port}/eureka/
      # 叢集(關聯):
      # defaultZone: http://eureka7002.com:7002/eureka/,http://eureka7003.com:7003/eureka/
5.3.2 完善監控資訊:

note:
1.匯入依賴
2.編寫組態檔
3.開啓這個功能 @EnableXXXXX
4.設定類
5.3.3 修改Eureka的預設名字

效果:

5.3.4 修改應用的資訊

效果:

點選鏈接之後,跳轉頁面

如果此時停掉springcloud-provider-dept-8001 等30s後 監控會開啓保護機制 機製

5.4 EureKa自我保護機制 機製:好死不如賴活着
一句話總結就是:某時刻某一個微服務不可用,eureka不會立即清理,依舊會對該微服務的資訊進行儲存!
-
預設情況下,當eureka server在一定時間內沒有收到範例的心跳,便會把該範例從註冊表中刪除(預設是90秒),但是,如果短時間內丟失大量的範例心跳,便會觸發eureka server的自我保護機制 機製,比如在開發測試時,需要頻繁地重新啓動微服務範例,但是我們很少會把eureka server一起重新啓動(因爲在開發過程中不會修改eureka註冊中心),當一分鐘內收到的心跳數大量減少時,會觸發該保護機制 機製。可以在eureka管理介面看到Renews threshold和Renews(last min),當後者(最後一分鐘收到的心跳數)小於前者(心跳閾值)的時候,觸發保護機制 機製,會出現紅色的警告:**EMERGENCY!EUREKA MAY BE INCORRECTLY CLAIMING INSTANCES ARE UP WHEN THEY’RE NOT.RENEWALS ARE LESSER THAN THRESHOLD AND HENCE THE INSTANCES ARE NOT BEGING EXPIRED JUST TO BE SAFE.**從警告中可以看到,eureka認爲雖然收不到範例的心跳,但它認爲範例還是健康的,eureka會保護這些範例,不會把它們從註冊表中刪掉。
-
該保護機制 機製的目的是避免網路連線故障,在發生網路故障時,微服務和註冊中心之間無法正常通訊,但服務本身是健康的,不應該註銷該服務,如果eureka因網路故障而把微服務誤刪了,那即使網路恢復了,該微服務也不會重新註冊到eureka server了,因爲只有在微服務啓動的時候纔會發起註冊請求,後面只會發送心跳和服務列表請求,這樣的話,該範例雖然是執行着,但永遠不會被其它服務所感知。所以,eureka server在短時間內丟失過多的用戶端心跳時,會進入自我保護模式,該模式下,eureka會保護註冊表中的資訊,不在註銷任何微服務,當網路故障恢復後,eureka會自動退出保護模式。自我保護模式可以讓叢集更加健壯。
-
但是我們在開發測試階段,需要頻繁地重啓發布,如果觸發了保護機制 機製,則舊的服務範例沒有被刪除,這時請求有可能跑到舊的範例中,而該範例已經關閉了,這就導致請求錯誤,影響開發測試。所以,在開發測試階段,我們可以把自我保護模式關閉,只需在eureka server組態檔中加上如下設定即可:eureka.server.enable-self-preservation=false
詳細內容可以參考下這篇部落格內容:https://blog.csdn.net/wudiyong22/article/details/80827594
5.5 DeptController.java新增方法
註冊進來的微服務,獲取一些訊息~
//獲取一些設定的資訊,得到具體的微服務!
@Autowired
private DiscoveryClient client;

 //註冊進來的微服務~,獲取一些訊息~
 @GetMapping("/dept/discovery")
 public Object discovery() {
     //獲取微服務列表的清單
     List<String> services = client.getServices();
     System.out.println("discovery=>services:" + services);
     //得到一個具體的微服務資訊,通過具體的微服務id,applicaioinName;
     List<ServiceInstance> instances = client.getInstances("SPRINGCLOUD-PROVIDER-DEPT");
     for (ServiceInstance instance : instances) {
         System.out.println(
                 instance.getHost() + "\t" + // 主機名稱
                         instance.getPort() + "\t" + // 埠號
                         instance.getUri() + "\t" + // uri
                         instance.getServiceId() // 服務id
         );
     }
     return this.client;
 }
5.6 Eureka:叢集環境設定
5.6.1 初始化
新建springcloud-eureka-7002、springcloud-eureka-7003 模組
1.爲pom.xml新增依賴 (與springcloud-eureka-7001相同)
<!--導包~-->
<dependencies>
    <!-- https://mvnrepository.com/artifact/org.springframework.cloud/spring-cloud-starter-eureka-server -->
    <!--匯入Eureka Server依賴-->
    <dependency>
        <groupId>org.springframework.cloud</groupId>
        <artifactId>spring-cloud-starter-eureka-server</artifactId>
        <version>1.4.6.RELEASE</version>
    </dependency>
    <!--熱部署工具-->
    <dependency>
        <groupId>org.springframework.boot</groupId>
        <artifactId>spring-boot-devtools</artifactId>
    </dependency>
</dependencies>
2.application.yml設定(與springcloud-eureka-7001相同)
server:
  port: 7003

#Eureka設定
eureka:
  instance:
    hostname: localhost #Eureka伺服器端的範例名字
  client:
    register-with-eureka: false #表示是否向 Eureka 註冊中心註冊自己(這個模組本身是伺服器,所以不需要)
    fetch-registry: false #fetch-registry如果爲false,則表示自己爲註冊中心
    service-url: #監控頁面~
      #重寫Eureka的預設埠以及存取路徑 --->http://localhost:7001/eureka/
      defaultZone: http://${eureka.instance.hostname}:${server.port}/eureka/
3.主啓動類(與springcloud-eureka-7001相同)
//啓動之後,存取 http://localhost:7001/
@SpringBootApplication
@EnableEurekaServer //EnableEurekaServer 伺服器端的啓動類,可以接受別人註冊進來~
public class EurekaServer_7003 {
    public static void main(String[] args) {
        SpringApplication.run(EurekaServer_7003.class,args);
    }
}
5.6.2 叢集成員相互關聯
設定一些自定義本機名字,找到本機hosts檔案並開啓

修改application.yml的設定,如圖爲springcloud-eureka-7001設定,springcloud-eureka-7002/springcloud-eureka-7003同樣分別修改爲其對應的名稱即可

在叢集中使springcloud-eureka-7001關聯springcloud-eureka-7002、springcloud-eureka-7003
完整的springcloud-eureka-7001下的application.yml如下
server:
  port: 7001

#Eureka設定
eureka:
  instance:
    hostname: eureka7001.com #Eureka伺服器端的範例名字
  client:
    register-with-eureka: false #表示是否向 Eureka 註冊中心註冊自己(這個模組本身是伺服器,所以不需要)
    fetch-registry: false #fetch-registry如果爲false,則表示自己爲註冊中心
    service-url: #監控頁面~
      #重寫Eureka的預設埠以及存取路徑 --->http://localhost:7001/eureka/
      # 單機: defaultZone: http://${eureka.instance.hostname}:${server.port}/eureka/
      # 叢集(關聯):7001關聯7002、7003
      defaultZone: http://eureka7002.com:7002/eureka/,http://eureka7003.com:7003/eureka/
同時在叢集中使springcloud-eureka-7002關聯springcloud-eureka-7001、springcloud-eureka-7003
完整的springcloud-eureka-7002下的application.yml如下
server:
  port: 7002

#Eureka設定
eureka:
  instance:
    hostname: eureka7002.com #Eureka伺服器端的範例名字
  client:
    register-with-eureka: false #表示是否向 Eureka 註冊中心註冊自己(這個模組本身是伺服器,所以不需要)
    fetch-registry: false #fetch-registry如果爲false,則表示自己爲註冊中心
    service-url: #監控頁面~
      #重寫Eureka的預設埠以及存取路徑 --->http://localhost:7001/eureka/
      # 單機: defaultZone: http://${eureka.instance.hostname}:${server.port}/eureka/
      # 叢集(關聯):7002關聯7001、7003
      defaultZone: http://eureka7001.com:7001/eureka/,http://eureka7003.com:7003/eureka/
springcloud-eureka-7003設定方式同理可得.
通過springcloud-provider-dept-8001下的yml組態檔,修改Eureka設定:設定服務註冊中心地址
# Eureka設定:設定服務註冊中心地址
eureka:
  client:
    service-url:
      # 註冊中心地址7001-7003
      defaultZone: http://eureka7001.com:7001/eureka/,http://eureka7002.com:7002/eureka/,http://eureka7003.com:7003/eureka/
  instance:
    instance-id: springcloud-provider-dept-8001 #修改Eureka上的預設描述資訊
這樣模擬叢集就搭建號了,就可以把一個專案掛載到三個伺服器上了
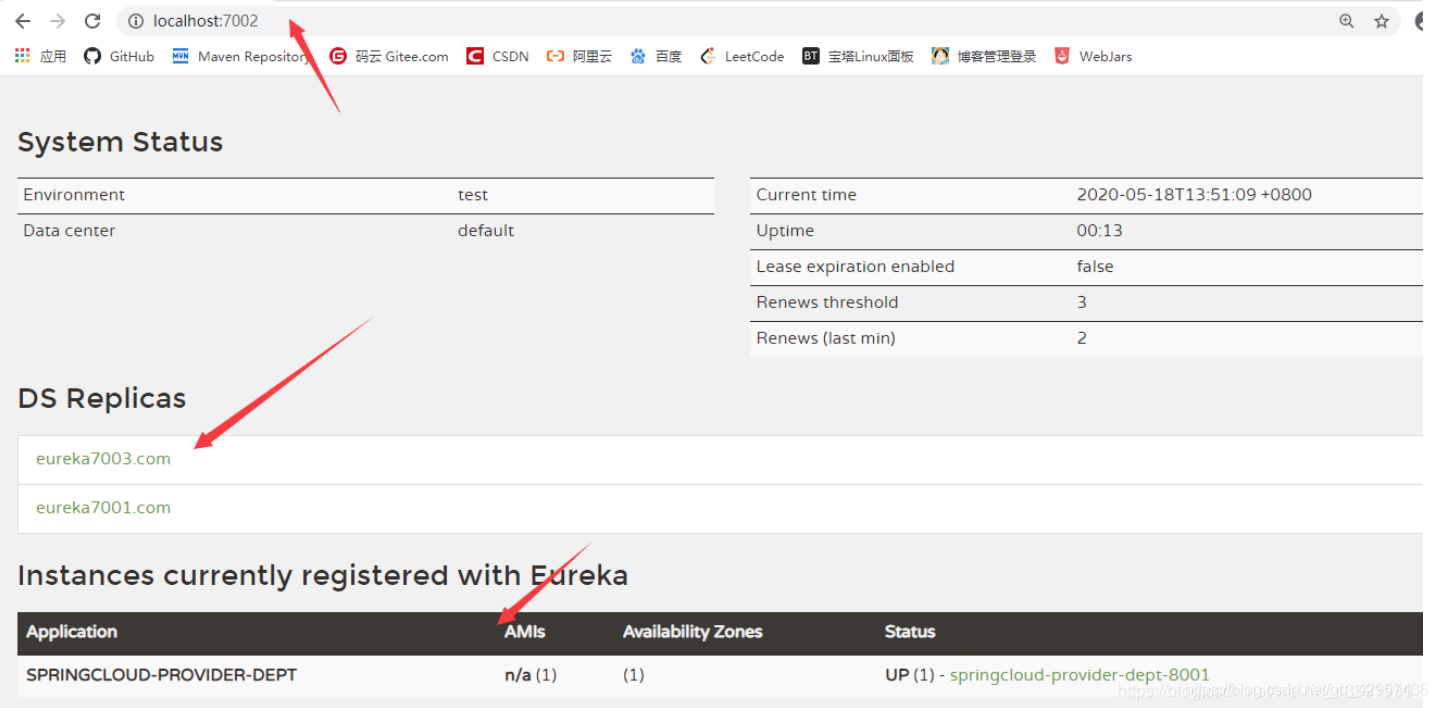
5.6 對比和Zookeeper區別
- 回顧CAP原則
- RDBMS (MySQL\Oracle\sqlServer) ===> ACID
- NoSQL (Redis\MongoDB) ===> CAP
- ACID是什麼?
- A (Atomicity) 原子性
- C (Consistency) 一致性
- I (Isolation) 隔離性
- D (Durability) 永續性
- CAP是什麼?
- C (Consistency) 強一致性
- A (Availability) 可用性
- P (Partition tolerance) 分割區容錯性
CAP的三進二:CA、AP、CP
- CAP理論的核心
- 一個分佈式系統不可能同時很好的滿足一致性,可用性和分割區容錯性這三個需求
- 根據CAP原理,將NoSQL數據庫分成了滿足CA原則,滿足CP原則和滿足AP原則三大類
- CA:單點叢集,滿足一致性,可用性的系統,通常可延伸性較差
- CP:滿足一致性,分割區容錯的系統,通常效能不是特別高
- AP:滿足可用性,分割區容錯的系統,通常可能對一致性要求低一些
- 作爲分佈式服務註冊中心,Eureka比Zookeeper好在哪裏?
- 著名的CAP理論指出,一個分佈式系統不可能同時滿足C (一致性) 、A (可用性) 、P (容錯性),由於分割區容錯性P再分佈式系統中是必須要保證的,因此我們只能再A和C之間進行權衡。
- Zookeeper 保證的是CP
- Eureka 保證的是AP
Zookeeper保證的是CP
當向註冊中心查詢服務列表時,我們可以容忍註冊中心返回的是幾分鐘以前的註冊資訊,但不能接收服務直接down掉不可用。也就是說,服務註冊功能對可用性的要求要高於一致性。但zookeeper會出現這樣一種情況,當master節點因爲網路故障與其他節點失去聯繫時,剩餘節點會重新進行leader選舉。問題在於,選舉leader的時間太長,30-120s,且選舉期間整個zookeeper叢集是不可用的,這就導致在選舉期間註冊服務癱瘓。在雲部署的環境下,因爲網路問題使得zookeeper叢集失去master節點是較大概率發生的事件,雖然服務最終能夠恢復,但是,漫長的選舉時間導致註冊長期不可用,是不可容忍的。
Eureka保證的是AP
Eureka看明白了這一點,因此在設計時就優先保證可用性。Eureka各個節點都是平等的,幾個節點掛掉不會影響正常節點的工作,剩餘的節點依然可以提供註冊和查詢服務。而Eureka的用戶端在向某個Eureka註冊時,如果發現連線失敗,則會自動切換至其他節點,只要有一臺Eureka還在,就能保住註冊服務的可用性,只不過查到的資訊可能不是最新的,除此之外,Eureka還有之中自我保護機制 機製,如果在15分鐘內超過85%的節點都沒有正常的心跳,那麼Eureka就認爲用戶端與註冊中心出現了網路故障,此時會出現以下幾種情況:
- Eureka不在從註冊列表中移除因爲長時間沒收到心跳而應該過期的服務
- Eureka仍然能夠接受新服務的註冊和查詢請求,但是不會被同步到其他節點上 (即保證當前節點依然可用)
- 當網路穩定時,當前範例新的註冊資訊會被同步到其他節點中
因此,Eureka可以很好的應對因網路故障導致部分節點失去
聯繫的情況,而不會像zookeeper那樣使整個註冊服務癱瘓
6. Ribbon:負載均衡(基於用戶端)
6.1 負載均衡以及Ribbon
Ribbon是什麼?
- Spring Cloud Ribbon 是基於Netflix Ribbon 實現的一套用戶端負載均衡的工具。
- 簡單的說,Ribbon 是 Netflix 發佈的開源專案,主要功能是提供用戶端的軟體負載均衡演算法,將 Netflix 的中間層服務連線在一起。Ribbon 的用戶端元件提供一系列完整的設定項,如:連線超時、重試等。簡單的說,就是在組態檔中列出 LoadBalancer (簡稱LB:負載均衡) 後面所有的及其,Ribbon 會自動的幫助你基於某種規則 (如簡單輪詢,隨機連線等等) 去連線這些機器。我們也容易使用 Ribbon 實現自定義的負載均衡演算法!
Ribbon能幹嘛?
- LB,即負載均衡 (LoadBalancer) ,在微服務或分佈式叢集中經常用的一種應用。
- 負載均衡簡單的說就是將使用者的請求平攤的分配到多個服務上,從而達到系統的HA (高用)。
- 常見的負載均衡軟體有 Nginx、Lvs 等等。
- Dubbo、SpringCloud 中均給我們提供了負載均衡,SpringCloud 的負載均衡演算法可以自定義。
- 負載均衡簡單分類
- 集中式LB
- 即在服務的提供方和消費方之間使用獨立的LB設施,如Nginx,由該設施負責把存取請求通過某種策略轉發至服務的提供方!
- 進程式LB
- 將LB邏輯整合到消費方,消費方從服務註冊中心獲知有哪些地址可用,然後自己再從這些地址中選出一個合適的伺服器。
- Ribbon 就屬於進程內LB,它只是一個類庫,整合於消費方進程,消費方通過它來獲取到服務提供方的地址!
- 集中式LB
6.2 整合Ribbon
- springcloud-consumer-dept-80向pom.xml中新增Ribbon和Eureka依賴
<!--Ribbon-->
<dependency>
    <groupId>org.springframework.cloud</groupId>
    <artifactId>spring-cloud-starter-ribbon</artifactId>
    <version>1.4.6.RELEASE</version>
</dependency>
<!--Eureka: Ribbon需要從Eureka服務中心獲取要拿什麼-->
<dependency>
    <groupId>org.springframework.cloud</groupId>
    <artifactId>spring-cloud-starter-eureka</artifactId>
    <version>1.4.6.RELEASE</version>
</dependency>
- 在application.yml檔案中設定Eureka
# Eureka設定
eureka:
  client:
    register-with-eureka: false # 不向 Eureka註冊自己
    service-url: # 從三個註冊中心中隨機取一個去存取
      defaultZone: http://eureka7001.com:7001/eureka/,http://eureka7002.com:7002/eureka/,http://eureka7003.com:7003/eureka/
- 主啓動類加上@EnableEurekaClient註解,開啓Eureka
//Ribbon 和 Eureka 整合以後,用戶端可以直接呼叫,不用關心IP地址和埠號
@SpringBootApplication
@EnableEurekaClient //開啓Eureka 用戶端
public class DeptConsumer_80 {
    public static void main(String[] args) {
        SpringApplication.run(DeptConsumer_80.class, args);
    }
}
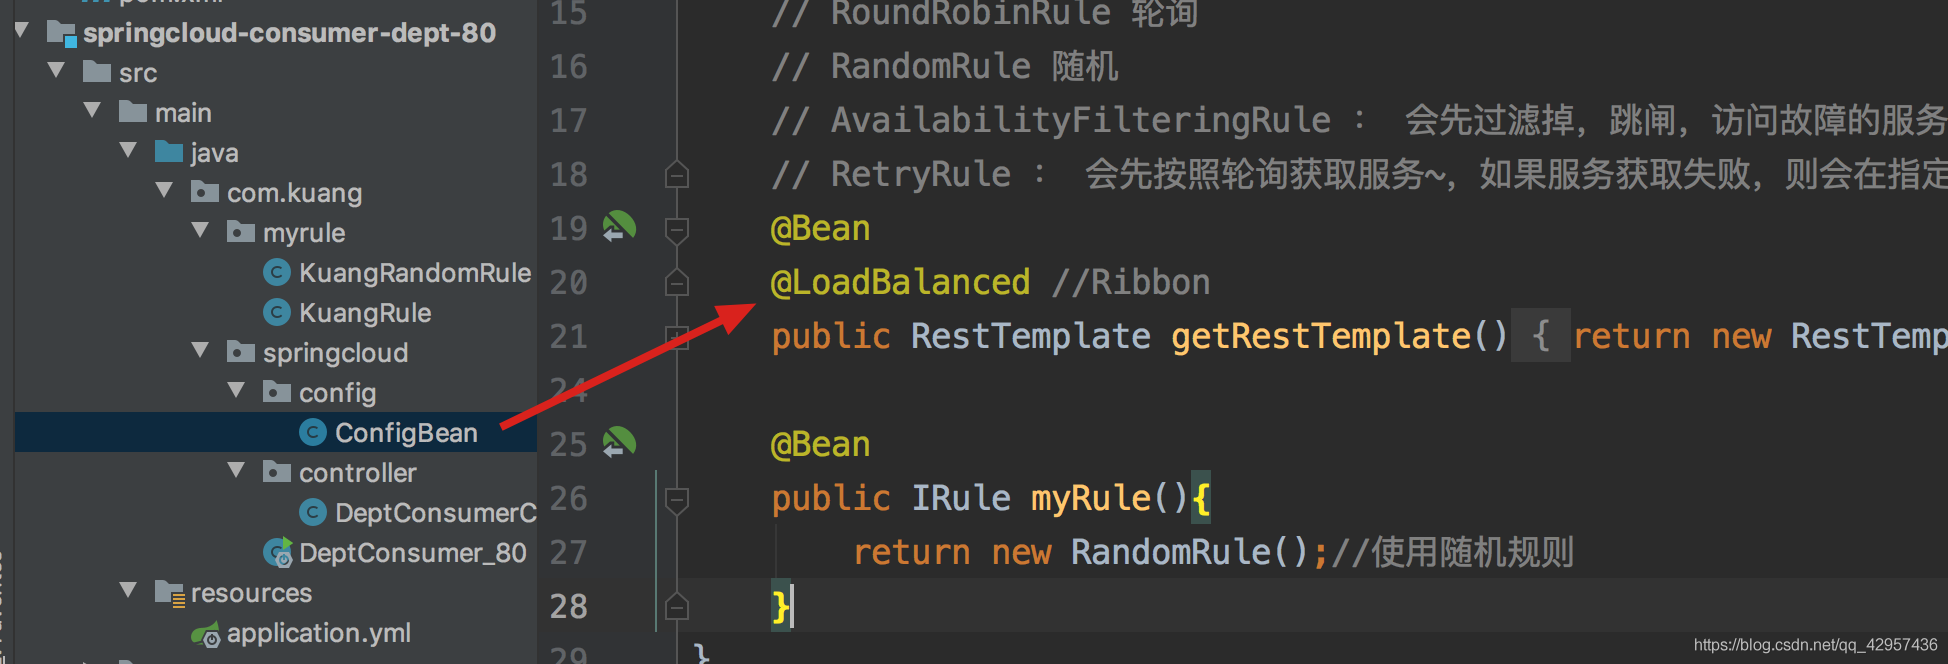
- 自定義Spring設定類:ConfigBean.java 設定負載均衡實現RestTemplate
@Configuration
public class ConfigBean {//@Configuration -- spring  applicationContext.xml

    @LoadBalanced //設定負載均衡實現RestTemplate
    @Bean
    public RestTemplate getRestTemplate() {
        return new RestTemplate();
    }
}
- 修改conroller:DeptConsumerController.java
//Ribbon:我們這裏的地址,應該是一個變數,通過服務名來存取
//private static final String REST_URL_PREFIX = "http://localhost:8001";
private static final String REST_URL_PREFIX = "http://SPRINGCLOUD-PROVIDER-DEPT";
6.3 使用Ribbon實現負載均衡
流程圖:
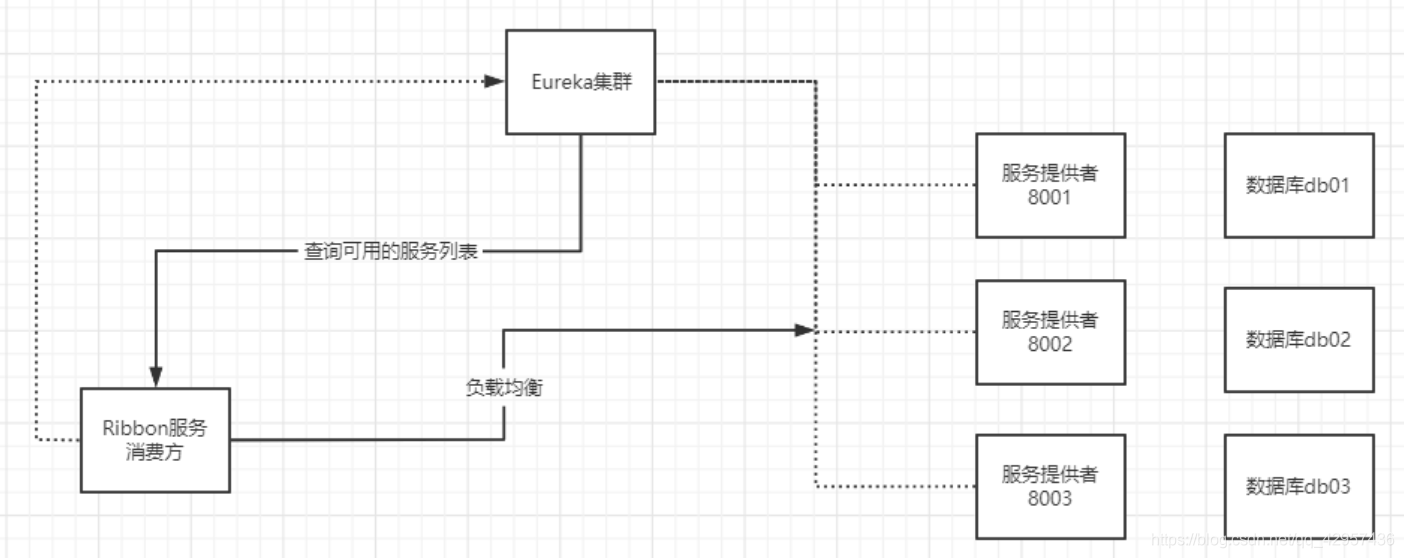
1.新建兩個服務提供者Moudle:springcloud-provider-dept-8003、springcloud-provider-dept-8002
2.參照springcloud-provider-dept-8001 依次爲另外兩個Moudle新增pom.xml依賴 、resourece下的mybatis和application.yml設定,Java程式碼
3.啓動所有服務測試(根據自身電腦設定決定啓動服務的個數),存取http://eureka7001.com:7001/檢視結果
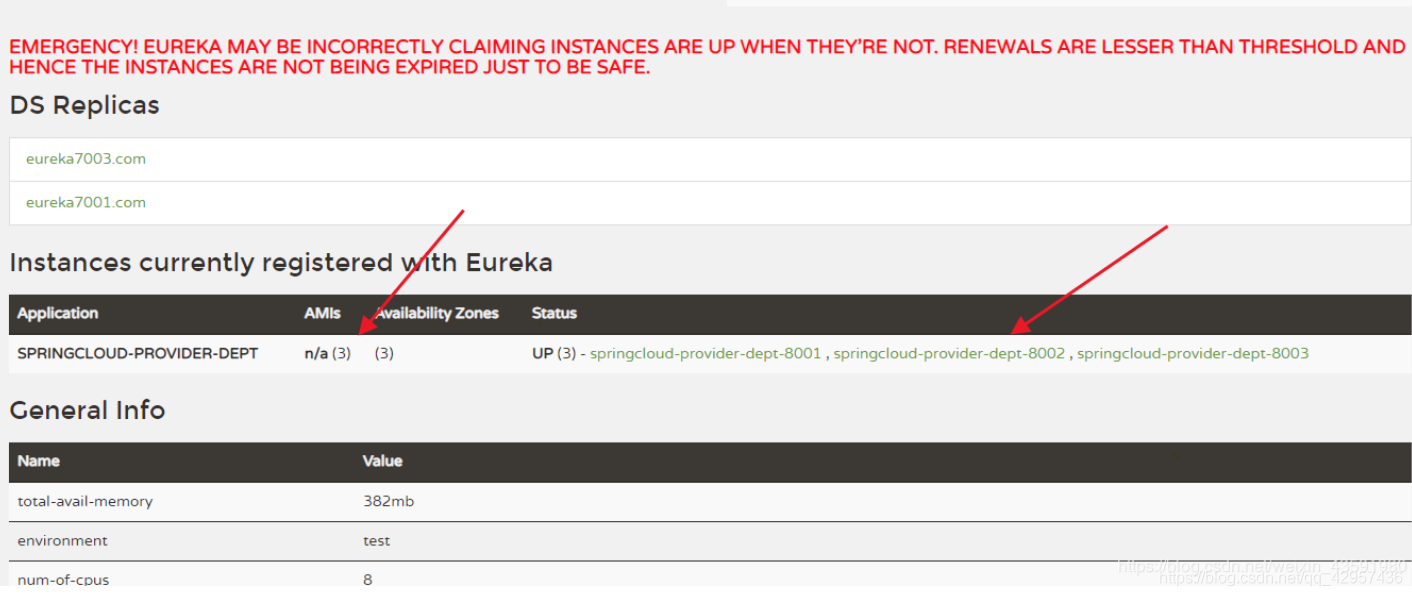
測試存取http://localhost/consumer/dept/list 這時候隨機存取的是服務提供者8003

再次存取http://localhost/consumer/dept/list這時候隨機的是服務提供者8001

以上這種每次存取http://localhost/consumer/dept/list隨機存取叢集中某個服務提供者,這種情況叫做輪詢,輪詢演算法在SpringCloud中可以自定義。
6.4 如何切換或者自定義規則呢?
在springcloud-provider-dept-80模組下的ConfigBean中進行設定,切換使用不同的規則
@Configuration
public class ConfigBean {//@Configuration -- spring  applicationContext.xml

    /**
     * IRule:
     * RoundRobinRule 輪詢
     * RandomRule 隨機
     * AvailabilityFilteringRule : 會先過濾掉,跳閘,存取故障的服務~,對剩下的進行輪詢~
     * RetryRule : 會先按照輪詢獲取服務~,如果服務獲取失敗,則會在指定的時間內進行,重試
     */
    @LoadBalanced //設定負載均衡實現RestTemplate
    @Bean
    public RestTemplate getRestTemplate() {
        return new RestTemplate();
    }

    @Bean
    public IRule myRule(){
        return new RandomRule();//使用隨機規則
    }
}
也可以自定義規則,在myRule包下自定義一個設定類MyRule.java,注意:該包不要和主啓動類所在的包同級,要跟啓動類所在包同級:
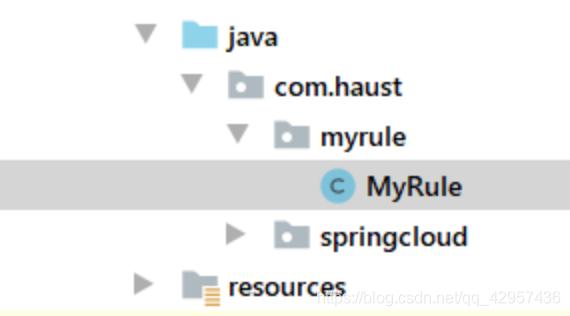
MyRule.java
/**
 * @Auther: csp1999
 * @Date: 2020/05/19/11:58
 * @Description: 自定義規則
 */
@Configuration
public class MyRule {

    @Bean
    public IRule myRule(){
        return new MyRandomRule();//預設是輪詢RandomRule,現在自定義爲自己的
    }
}
主啓動類開啓負載均衡並指定自定義的MyRule設定類
//Ribbon 和 Eureka 整合以後,用戶端可以直接呼叫,不用關心IP地址和埠號
@SpringBootApplication
@EnableEurekaClient
//在微服務啓動的時候就能載入自定義的Ribbon類(自定義的規則會覆蓋原有預設的規則)
@RibbonClient(name = "SPRINGCLOUD-PROVIDER-DEPT",configuration = MyRule.class)//開啓負載均衡,並指定自定義的規則
public class DeptConsumer_80 {
    public static void main(String[] args) {
        SpringApplication.run(DeptConsumer_80.class, args);
    }
}
自定義的規則(這裏我們參考Ribbon中預設的規則程式碼自己稍微改動):
MyRandomRule.java
public class MyRandomRule extends AbstractLoadBalancerRule {

    /**
     * 每個服務存取5次則換下一個服務(總共3個服務)
     * <p>
     * total=0,預設=0,如果=5,指向下一個服務節點
     * index=0,預設=0,如果total=5,index+1
     */
    private int total = 0;//被呼叫的次數
    private int currentIndex = 0;//當前是誰在提供服務

    //@edu.umd.cs.findbugs.annotations.SuppressWarnings(value = "RCN_REDUNDANT_NULLCHECK_OF_NULL_VALUE")
    public Server choose(ILoadBalancer lb, Object key) {
        if (lb == null) {
            return null;
        }
        Server server = null;

        while (server == null) {
            if (Thread.interrupted()) {
                return null;
            }
            List<Server> upList = lb.getReachableServers();//獲得當前活着的服務
            List<Server> allList = lb.getAllServers();//獲取所有的服務

            int serverCount = allList.size();
            if (serverCount == 0) {
                /*
                 * No servers. End regardless of pass, because subsequent passes
                 * only get more restrictive.
                 */
                return null;
            }

            //int index = chooseRandomInt(serverCount);//生成區間亂數
            //server = upList.get(index);//從或活着的服務中,隨機獲取一個

            //=====================自定義程式碼=========================

            if (total < 5) {
                server = upList.get(currentIndex);
                total++;
            } else {
                total = 0;
                currentIndex++;
                if (currentIndex > upList.size()) {
                    currentIndex = 0;
                }
                server = upList.get(currentIndex);//從活着的服務中,獲取指定的服務來進行操作
            }

            //======================================================

            if (server == null) {
                /*
                 * The only time this should happen is if the server list were
                 * somehow trimmed. This is a transient condition. Retry after
                 * yielding.
                 */
                Thread.yield();
                continue;
            }

            if (server.isAlive()) {
                return (server);
            }

            // Shouldn't actually happen.. but must be transient or a bug.
            server = null;
            Thread.yield();
        }

        return server;

    }

    protected int chooseRandomInt(int serverCount) {
        return ThreadLocalRandom.current().nextInt(serverCount);
    }

    @Override
    public Server choose(Object key) {
        return choose(getLoadBalancer(), key);
    }

    @Override
    public void initWithNiwsConfig(IClientConfig clientConfig) {
        // TODO Auto-generated method stub

    }
}
核心總結:
- 80匯入ribbon依賴
- 編寫application.yml組態檔(去哪裏獲取)
- 在Restful增加一個註解@LoadBalance
- 自定義的話,在啓動類外面建立一個包,自定義Rule
7.Feign:負載均衡(基於伺服器端)
7.1 Feign簡介
Feign是宣告式Web Service用戶端,它讓微服務之間的呼叫變得更簡單,類似controller呼叫service。SpringCloud整合了Ribbon和Eureka,可以使用Feigin提供負載均衡的http用戶端
只需要建立一個介面,然後新增註 加注解即可~
Feign,主要是社羣版,大家都習慣面向介面程式設計。這個是很多開發人員的規範。呼叫微服務存取兩種方法
- 微服務名字 【ribbon】
- 介面和註解 【feign】
Feign能幹什麼?
- Feign旨在使編寫Java Http用戶端變得更容易
- 前面在使用Ribbon + RestTemplate時,利用RestTemplate對Http請求的封裝處理,形成了一套模板化的呼叫方法。但是在實際開發中,由於對服務依賴的呼叫可能不止一處,往往一個介面會被多處呼叫,所以通常都會針對每個微服務自行封裝一個用戶端類來包裝這些依賴服務的呼叫。所以,Feign在此基礎上做了進一步的封裝,由他來幫助我們定義和實現依賴服務介面的定義,在Feign的實現下,我們只需要建立一個介面並使用註解的方式來設定它 (類似以前Dao介面上標註Mapper註解,現在是一個微服務介面上面標註一個Feign註解),即可完成對服務提供方的介面系結,簡化了使用Spring Cloud Ribbon 時,自動封裝服務呼叫用戶端的開發量。
Feign預設整合了Ribbon
利用Ribbon維護了MicroServiceCloud-Dept的服務列表資訊,並且通過輪詢實現了用戶端的負載均衡,而與Ribbon不同的是,通過Feign只需要定義服務系結介面且以宣告式的方法,優雅而簡單的實現了服務呼叫。
7.2 Feign的使用步驟
- 建立springcloud-consumer-fdept-feign模組
拷貝springcloud-consumer-dept-80模組下的pom.xml,resource,以及java程式碼到springcloud-consumer-feign模組,並新增feign依賴。
<!--Feign的依賴-->
<dependency>
    <groupId>org.springframework.cloud</groupId>
    <artifactId>spring-cloud-starter-feign</artifactId>
    <version>1.4.6.RELEASE</version>
</dependency>
通過Ribbon實現:—原來的controller:
DeptConsumerController.java
package com.haust.springcloud.controller;

import com.haust.springcloud.pojo.Dept;
import org.springframework.beans.factory.annotation.Autowired;
import org.springframework.web.bind.annotation.PathVariable;
import org.springframework.web.bind.annotation.RequestMapping;
import org.springframework.web.bind.annotation.RestController;
import org.springframework.web.client.RestTemplate;

import java.util.List;

/**
 * @Auther: csp1999
 * @Date: 2020/05/17/22:44
 * @Description:
 */
@RestController
public class DeptConsumerController {

    // 理解:消費者,不應該有service層~
    // RestTemplate .... 供我們直接呼叫就可以了! 註冊到Spring中
    // (url, 實體:Map ,Class<T> responseType)
    @Autowired
    private RestTemplate restTemplate; //提供多種便捷存取遠端http服務的方法,簡單的Restful服務模板~

    //Ribbon:我們這裏的地址,應該是一個變數,通過服務名來存取
    //private static final String REST_URL_PREFIX = "http://localhost:8001";
    private static final String REST_URL_PREFIX = "http://SPRINGCLOUD-PROVIDER-DEPT";

    @RequestMapping("/consumer/dept/add")
    public boolean add(Dept dept) {
        return restTemplate.postForObject(REST_URL_PREFIX + "/dept/add", dept, Boolean.class);
    }

    @RequestMapping("/consumer/dept/get/{id}")
    public Dept get(@PathVariable("id") Long id) {
        return restTemplate.getForObject(REST_URL_PREFIX + "/dept/get/" + id, Dept.class);
    }


    @RequestMapping("/consumer/dept/list")
    public List<Dept> list() {
        return restTemplate.getForObject(REST_URL_PREFIX + "/dept/list", List.class);
    }
}
通過Feign實現:—改造後controller:DeptConsumerController.java
@RestController
public class DeptConsumerController {

    @Autowired
    private DeptClientService deptClientService = null;

    @RequestMapping("/consumer/dept/add")
    public boolean add(Dept dept) {
        return this.deptClientService.addDept(dept);
    }

    @RequestMapping("/consumer/dept/get/{id}")
    public Dept get(@PathVariable("id") Long id) {
       return this.deptClientService.queryById(id);
    }

    @RequestMapping("/consumer/dept/list")
    public List<Dept> list() {
        return this.deptClientService.queryAll();
    }
}
Feign和Ribbon二者對比,前者顯現出面向介面程式設計特點,程式碼看起來更清爽
主設定類
@SpringBootApplication
@EnableEurekaClient
//feign用戶端註解,並指定要掃描的包以及設定介面DeptClientService
@EnableFeignClients(basePackages = {"com.haust.springcloud"})
//掃描所有自己的包,讓所有註解也能生效
@ComponentScan("com.haust.springcloud")
public class FeignDeptConsumer_80 {
    public static void main(String[] args) {
        SpringApplication.run(FeignDeptConsumer_80.class, args);
    }
}
- 改造springcloud-api模組
pom.xml新增feign依賴
<!--Feign的依賴-->
<dependency>
    <groupId>org.springframework.cloud</groupId>
    <artifactId>spring-cloud-starter-feign</artifactId>
    <version>1.4.6.RELEASE</version>
</dependency>
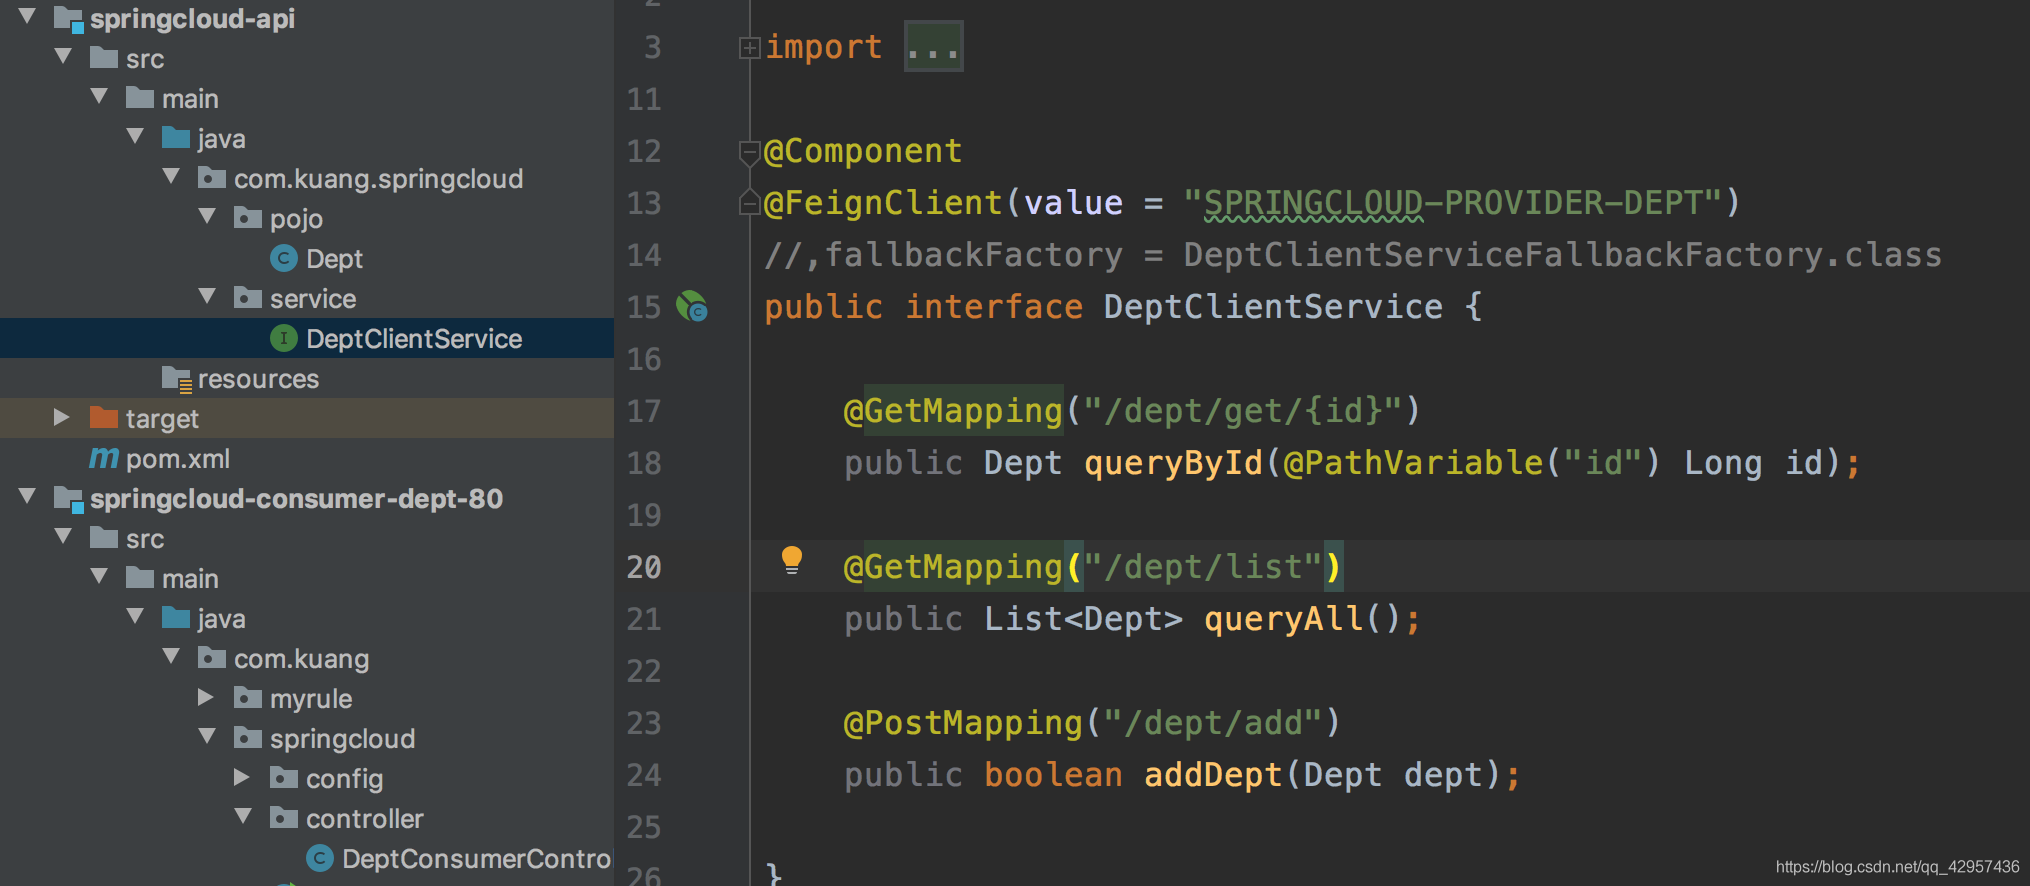
新建service包,並新建DeptClientService.java介面,
//@FeignClient:微服務用戶端註解,value:指定微服務的名字,這樣就可以使Feign用戶端直接找到對應的微服務
@FeignClient(value = "SPRINGCLOUD-PROVIDER-DEPT")
public interface DeptClientService {

    @GetMapping("/dept/get/{id}")
    public Dept queryById(@PathVariable("id") Long id);

    @GetMapping("/dept/list")
    public Dept queryAll();

    @GetMapping("/dept/add")
    public Dept addDept(Dept dept);
}
7.3 Feign和Ribbon如何選擇?
根據個人習慣而定,如果喜歡REST風格使用Ribbon;如果喜歡社羣版的面向介面風格使用Feign.
相比而言:
Ribbon需要寫一個服務名

Feign不需要,依賴Service提供服務
8. Hystrix:服務熔斷
分佈式系統面臨的問題
複雜分佈式體系結構中的應用程式有數十個依賴關係,每個依賴關係在某些時候將不可避免失敗!
8.1 服務雪崩
-
多個微服務之間呼叫的時候,假設微服務A呼叫微服務B和微服務C,微服務B和微服務C又呼叫其他的微服務,這就是所謂的「扇出」,如果扇出的鏈路上某個微服務的呼叫響應時間過長,或者不可用,對微服務A的呼叫就會佔用越來越多的系統資源,進而引起系統崩潰,所謂的「雪崩效應」。
-
對於高流量的應用來說,單一的後端依賴可能會導致所有伺服器上的所有資源都在幾十秒內飽和。比失敗更糟糕的是,這些應用程式還可能導致服務之間的延遲增加,備份佇列,執行緒和其他系統資源緊張,導致整個系統發生更多的級聯故障,這些都表示需要對故障和延遲進行隔離和管理,以便單個依賴關係的失敗,不能取消整個應用程式或系統。
我們需要,棄車保帥
8.2 什麼是Hystrix?
-
Hystrix是一個應用於處理分佈式系統的延遲和容錯的開源庫,在分佈式系統裡,許多依賴不可避免的會呼叫失敗,比如超時,異常等,Hystrix能夠保證在一個依賴出問題的情況下,不會導致整個體系服務失敗,避免級聯故障,以提高分佈式系統的彈性。
-
「斷路器」本身是一種開關裝置,當某個服務單元發生故障之後,通過斷路器的故障監控 (類似熔斷保險絲) ,向呼叫方方茴一個服務預期的,可處理的備選響應 (FallBack) ,而不是長時間的等待或者拋出呼叫方法無法處理的異常,這樣就可以保證了服務呼叫方的執行緒不會被長時間,不必要的佔用,從而避免了故障在分佈式系統中的蔓延,乃至雪崩。
8.3 Hystrix能幹嘛?
- 服務降級
- 服務熔斷
- 服務限流
- 接近實時的監控
當一切正常時,請求流可以如下所示:
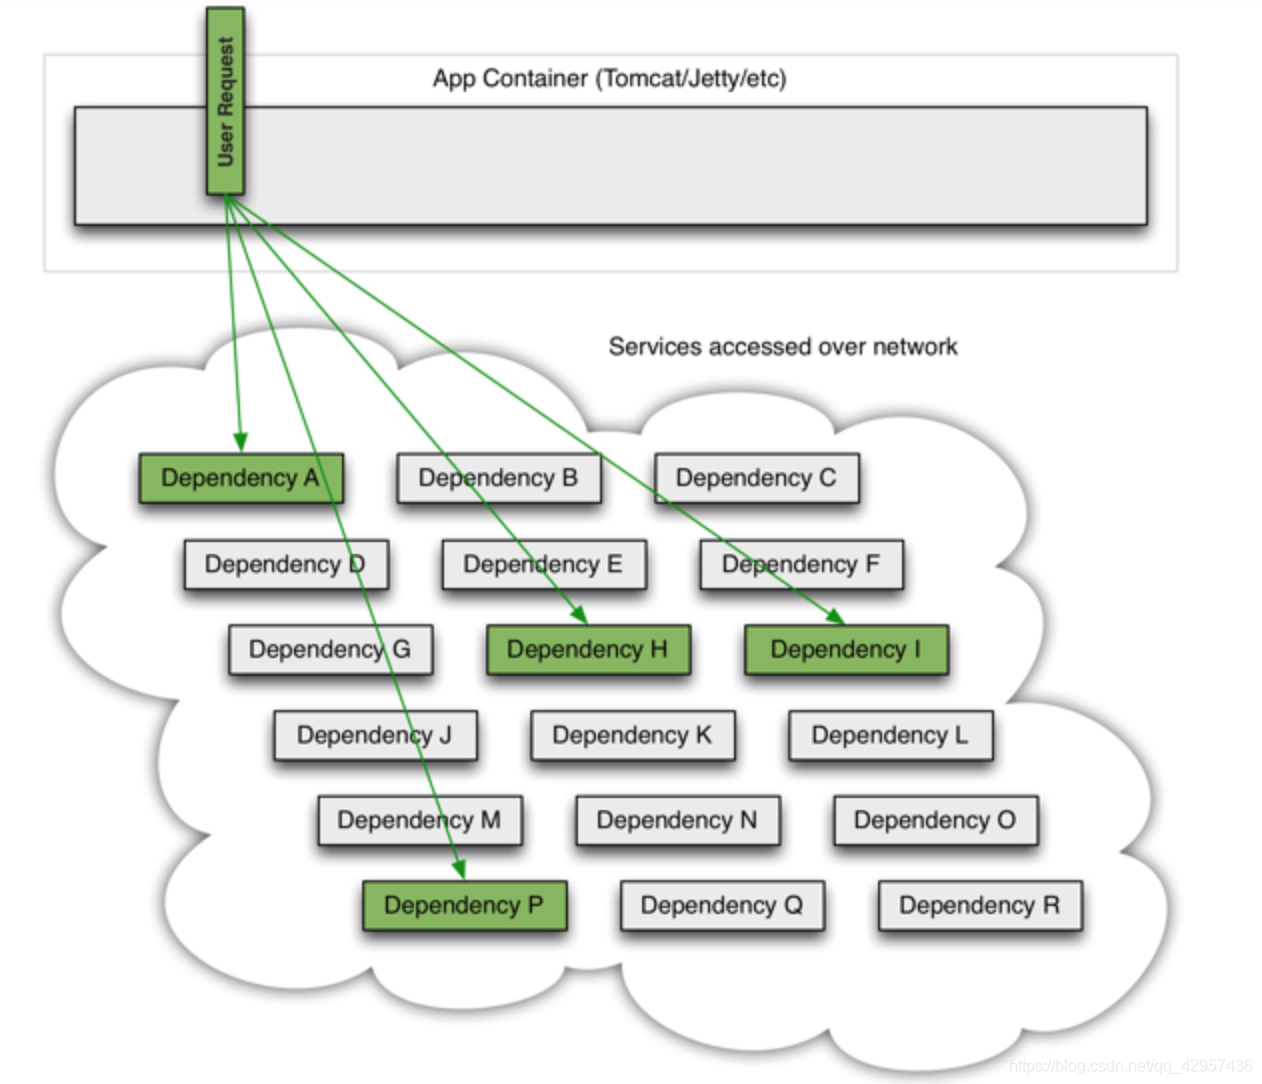
當許多後端系統中有一個潛在時,它可以阻止整個使用者請求:
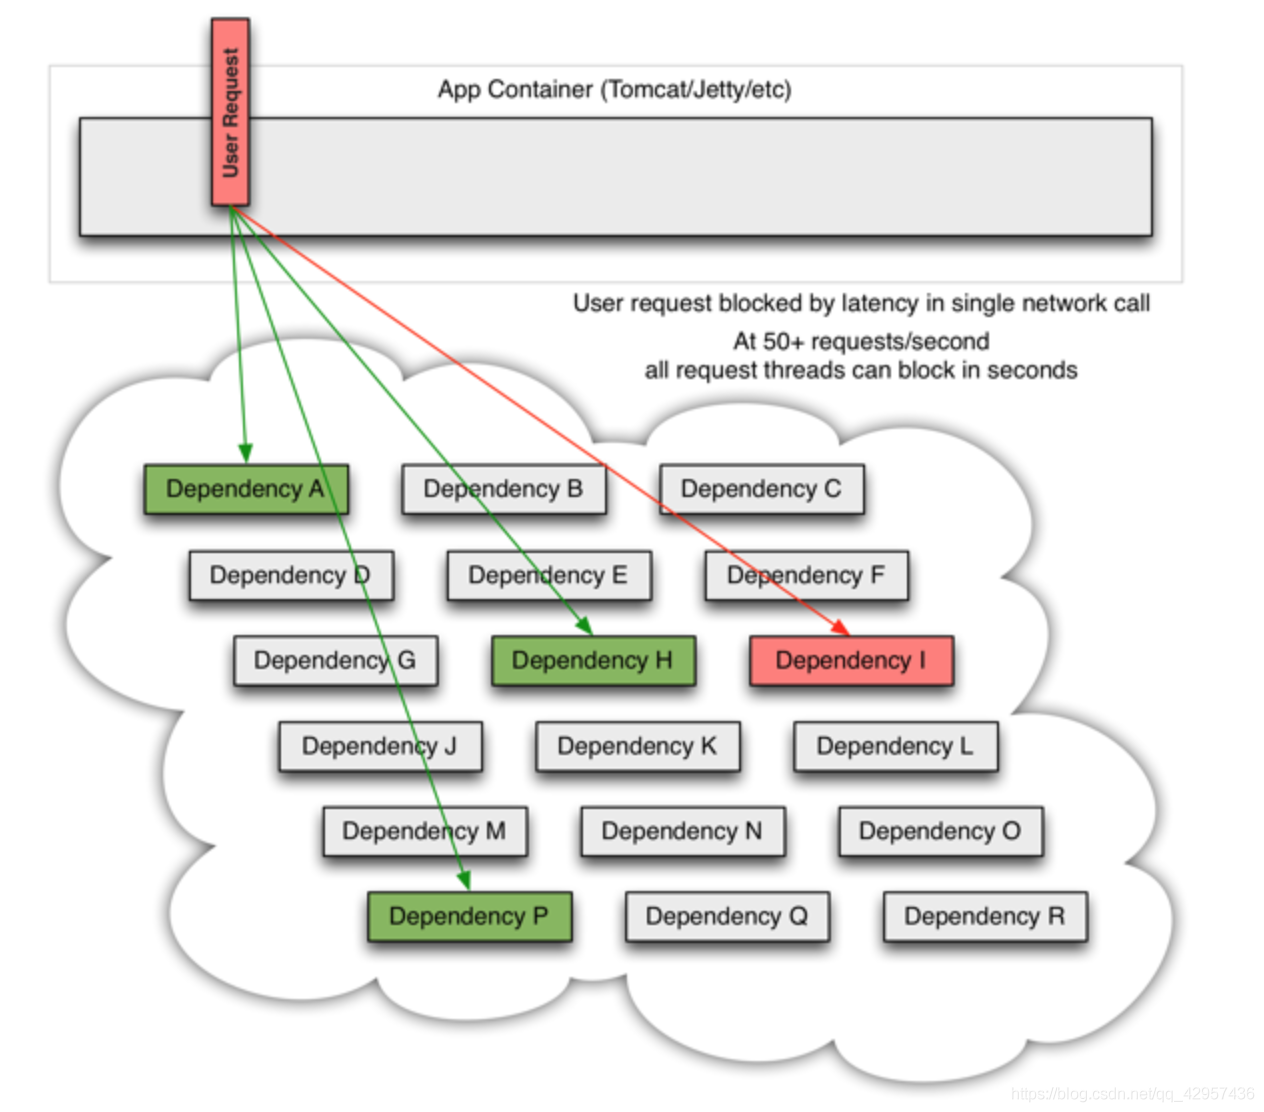
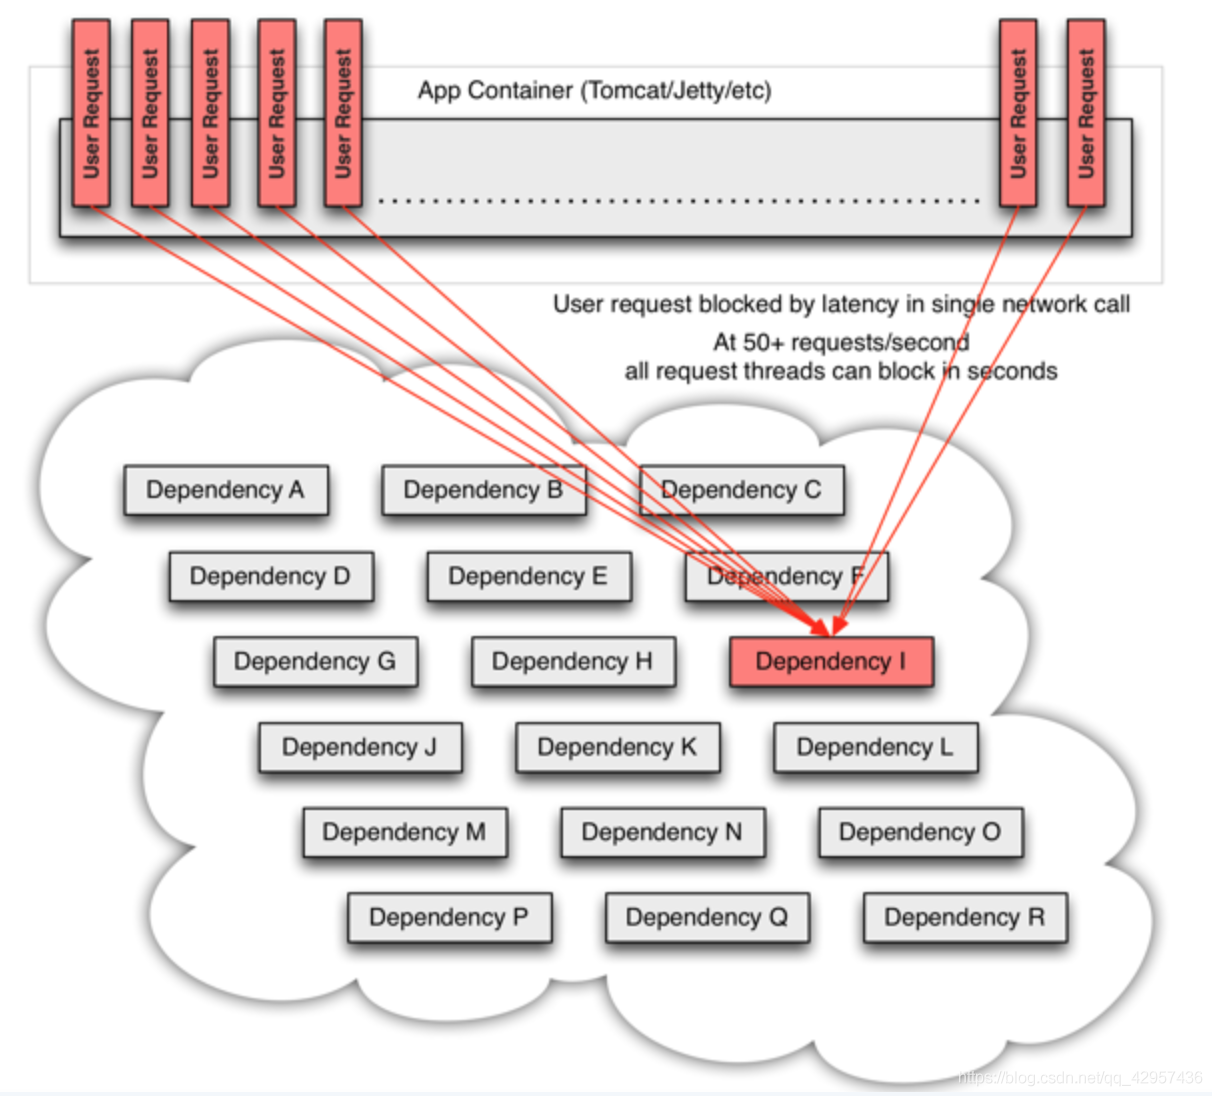
隨着大容量通訊量的增加,單個後端依賴項的潛在性會導致所有伺服器上的所有資源在幾秒鐘內飽和。
應用程式中通過網路或用戶端庫可能導致網路請求的每個點都是潛在故障的來源。比失敗更糟糕的是,這些應用程式還可能導致服務之間的延遲增加,從而備份佇列、執行緒和其他系統資源,從而導致更多跨系統的級聯故障。
當使用hystrix包裝每個基礎依賴項時,上面的圖表中所示的體系結構會發生類似於以下關係圖的變化。每個依賴項是相互隔離的,限制在延遲發生時它可以填充的資源中,幷包含在回退邏輯中,該邏輯決定在依賴項中發生任何型別的故障時要做出什麼樣的響應: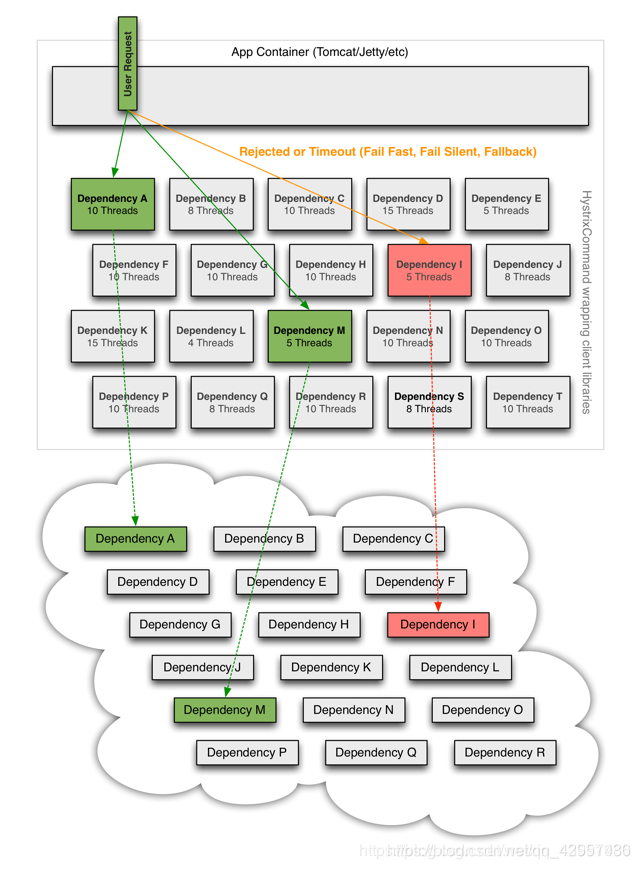
官網資料:https://github.com/Netflix/Hystrix/wiki
8.4 服務熔斷
什麼是服務熔斷
- 熔斷機制 機製是賭贏雪崩效應的一種微服務鏈路保護機制 機製。
- 在微服務架構中,微服務之間的數據互動通過遠端呼叫完成,微服務A呼叫微服務B和微服務C,微服務B和微服務C又呼叫其它的微服務,此時如果鏈路上某個微服務的呼叫響應時間過長或者不可用,那麼對微服務A的呼叫就會佔用越來越多的系統資源,進而引起系統崩潰,導致「雪崩效應」。
- 服務熔斷是應對雪崩效應的一種微服務鏈路保護機制 機製。例如在高壓電路中,如果某個地方的電壓過高,熔斷器就會熔斷,對電路進行保護。同樣,在微服務架構中,熔斷機制 機製也是起着類似的作用。當呼叫鏈路的某個微服務不可用或者響應時間太長時,會進行服務熔斷,不再有該節點微服務的呼叫,快速返回錯誤的響應資訊。當檢測到該節點微服務呼叫響應正常後,恢復呼叫鏈路。
- 當扇出鏈路的某個微服務不可用或者響應時間太長時,會進行服務的降級,進而熔斷該節點微服務的呼叫,快速返回錯誤的響應資訊。檢測到該節點微服務呼叫響應正常後恢復呼叫鏈路。在SpringCloud框架裡熔斷機制 機製通過Hystrix實現。Hystrix會監控微服務間呼叫的狀況,當失敗的呼叫到一定閥值預設是5秒內20次呼叫失敗,就會啓動熔斷機制 機製。熔斷機制 機製的註解是:@HystrixCommand 。
- 服務熔斷解決如下問題: 1. 當所依賴的物件不穩定時,能夠起到快速失敗的目的;2. 快速失敗後,能夠根據一定的演算法動態試探所依賴物件是否恢復。
8.5 入門案例
新建springcloud-provider-dept-hystrix-8001模組並拷貝springcloud-provider-dept–8001內的pom.xml、resource和Java程式碼進行初始化並調整。
匯入hystrix依賴
<!--匯入Hystrix依賴-->
<dependency>
    <groupId>org.springframework.cloud</groupId>
    <artifactId>spring-cloud-starter-hystrix</artifactId>
    <version>1.4.6.RELEASE</version>
</dependency>
調整yml組態檔
server:
  port: 8001

# mybatis設定
mybatis:
  # springcloud-api 模組下的pojo包
  type-aliases-package: com.haust.springcloud.pojo
  # 本模組下的mybatis-config.xml核心組態檔類路徑
  config-location: classpath:mybatis/mybatis-config.xml
  # 本模組下的mapper組態檔類路徑
  mapper-locations: classpath:mybatis/mapper/*.xml

# spring設定
spring:
  application:
    #專案名
    name: springcloud-provider-dept
  datasource:
    # 德魯伊數據源
    type: com.alibaba.druid.pool.DruidDataSource
    driver-class-name: com.mysql.jdbc.Driver
    url: jdbc:mysql://localhost:3306/db01?useUnicode=true&characterEncoding=utf-8
    username: root
    password: root

# Eureka設定:設定服務註冊中心地址
eureka:
  client:
    service-url:
      # 註冊中心地址7001-7003
      defaultZone: http://eureka7001.com:7001/eureka/,http://eureka7002.com:7002/eureka/,http://eureka7003.com:7003/eureka/
  instance:
    instance-id: springcloud-provider-dept-hystrix-8001 #修改Eureka上的預設描述資訊
    prefer-ip-address: true #改爲true後預設顯示的是ip地址而不再是localhost

#info設定
info:
  app.name: haust-springcloud #專案的名稱
  company.name: com.haust #公司的名稱
prefer-ip-address: false:
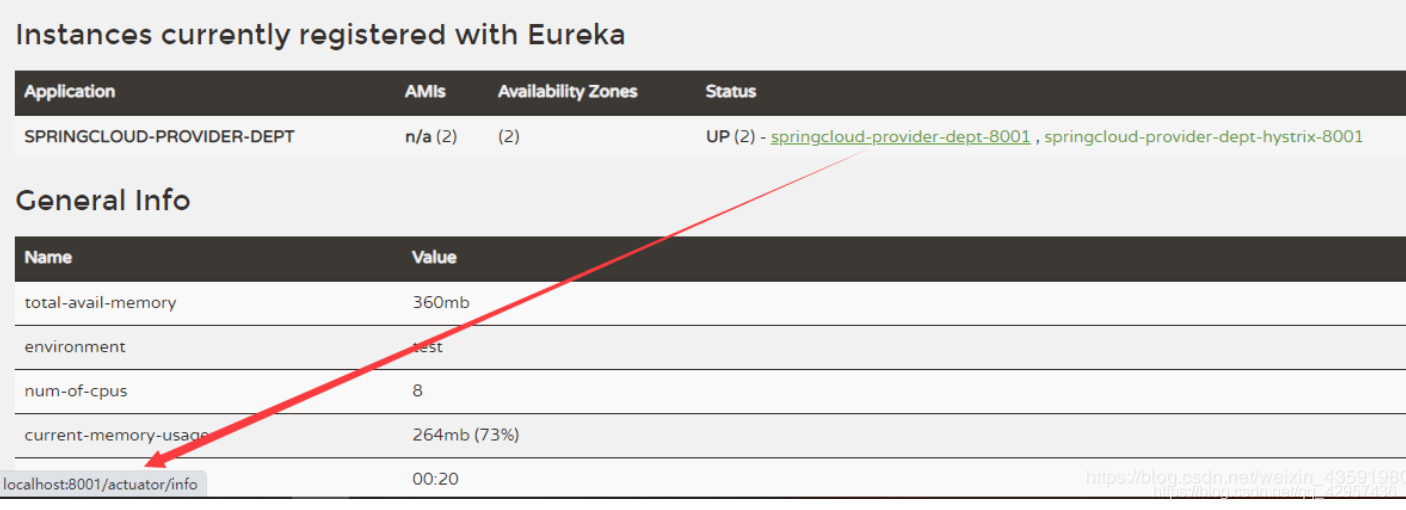
prefer-ip-address: true:

修改controller
//提供Restful服務
@RestController
public class DeptController {

    @Autowired
    private DeptService deptService;

    @HystrixCommand(fallbackMethod = "hystrixGet")//如果根據id查詢出現異常,走這段程式碼
    @GetMapping("/dept/get/{id}")//根據id查詢
    public Dept get(@PathVariable("id") Long id){
        Dept dept = deptService.queryById(id);

        if (dept==null){
            throw new RuntimeException("這個id=>"+id+",不存在該使用者,或資訊無法找到~");
        }
        return dept;
    }

    //根據id查詢備選方案(熔斷)
    public Dept hystrixGet(@PathVariable("id") Long id){

        return new Dept().setDeptno(id)
                .setDname("這個id=>"+id+",沒有對應的資訊,null---@Hystrix~")
                .setDb_source("在MySQL中沒有這個數據庫");
    }
}
爲主啓動類新增對熔斷的支援註解@EnableCircuitBreaker
@SpringBootApplication
@EnableEurekaClient //EnableEurekaClient 用戶端的啓動類,在服務啓動後自動向註冊中心註冊服務
@EnableCircuitBreaker//新增對熔斷的支援註解
public class HystrixDeptProvider_8001 {
    public static void main(String[] args) {
        SpringApplication.run(HystrixDeptProvider_8001.class,args);
    }
}
測試:
使用熔斷後,當存取一個不存在的id時,前臺頁展示數據如下

而不使用熔斷的springcloud-provider-dept–8001模組存取相同地址會出現下面 下麪狀況

因此,爲了避免因某個微服務後臺出現異常或錯誤而導致整個應用或網頁報錯,使用熔斷是必要的
總結:
- 匯入依賴
- 編寫熔斷機制 機製+註解
- 開啓熔斷機制 機製
8.5 服務降級
8.5.1 什麼是服務降級
- 服務降級是指 當伺服器壓力劇增的情況下,根據實際業務情況及流量,對一些服務和頁面有策略的不處理或換種簡單的方式處理,從而釋放伺服器資源以保證核心業務正常運作或高效運作。說白了,就是儘可能的把系統資源讓給優先順序高的服務。
- 資源有限,而請求是無限的。如果在併發高峯期,不做服務降級處理,一方面肯定會影響整體服務的效能,嚴重的話可能會導致宕機某些重要的服務不可用。所以,一般在高峯期,爲了保證核心功能服務的可用性,都要對某些服務降級處理。比如當雙11活動時,把交易無關的服務統統降級,如檢視螞蟻深林,檢視歷史訂單等等。
- 服務降級主要用於什麼場景呢?當整個微服務架構整體的負載超出了預設的上限閾值或即將到來的流量預計將會超過預設的閾值時,爲了保證重要或基本的服務能正常執行,可以將一些 不重要 或 不緊急 的服務或任務進行服務的 延遲使用 或 暫停使用。
- 降級的方式可以根據業務來,可以延遲服務,比如延遲給使用者增加積分,只是放到一個快取中,等服務平穩之後再執行 ;或者在粒度範圍內關閉服務,比如關閉相關文章的推薦。
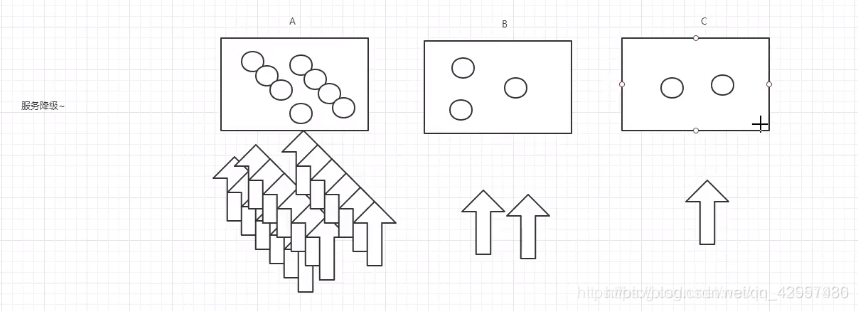
由上圖可得,當某一時間內服務A的存取量暴增,而B和C的存取量較少,爲了緩解A服務的壓力,這時候需要B和C暫時關閉一些服務功能,去承擔A的部分服務,從而爲A分擔壓力,叫做服務降級。
8.5.2 服務降級需要考慮的問題
- 1)那些服務是核心服務,哪些服務是非核心服務
- 2)那些服務可以支援降級,那些服務不能支援降級,降級策略是什麼
- 3)除服務降級之外是否存在更復雜的業務放通場景,策略是什麼?
8.5.3 自動降級分類
1)超時降級:主要設定好超時時間和超時重試次數和機制 機製,並使用非同步機制 機製探測回覆 回復情況
2)失敗次數降級:主要是一些不穩定的api,當失敗呼叫次數達到一定閥值自動降級,同樣要使用非同步機制 機製探測回覆 回復情況
3)故障降級:比如要呼叫的遠端服務掛掉了(網路故障、DNS故障、http服務返回錯誤的狀態碼、rpc服務拋出異常),則可以直接降級。降級後的處理方案有:預設值(比如庫存服務掛了,返回預設現貨)、兜底數據(比如廣告掛了,返回提前準備好的一些靜態頁面)、快取(之前暫存的一些快取數據)
4)限流降級:秒殺或者搶購一些限購商品時,此時可能會因爲存取量太大而導致系統崩潰,此時會使用限流來進行限制存取量,當達到限流閥值,後續請求會被降級;降級後的處理方案可以是:排隊頁面(將使用者導流到排隊頁面等一會重試)、無貨(直接告知使用者沒貨了)、錯誤頁(如活動太火爆了,稍後重試)。
8.5.4 入門案例
在springcloud-api模組下的service包中新建降級設定類DeptClientServiceFallBackFactory.java
//降級 ~
@Component
public class DeptClientServiceFallBackFactory implements FallbackFactory {

    @Override
    public DeptClientService create(Throwable cause) {

        return new DeptClientService() {
            @Override
            public Dept queryById(Long id) {
                return new Dept()
                        .setDeptno(id)
                        .setDname("id=>" + id + "沒有對應的資訊,用戶端提供了降級的資訊,這個服務現在已經被關閉")
                        .setDb_source("沒有數據~");
            }

            @Override
            public List<Dept> queryAll() {
                return null;
            }

            @Override
            public Boolean addDept(Dept dept) {
                return false;
            }
        };
    }
}
在DeptClientService中指定降級設定類DeptClientServiceFallBackFactory
@Component //註冊到spring容器中
//@FeignClient:微服務用戶端註解,value:指定微服務的名字,這樣就可以使Feign用戶端直接找到對應的微服務
@FeignClient(value = "SPRINGCLOUD-PROVIDER-DEPT",fallbackFactory = DeptClientServiceFallBackFactory.class)//fallbackFactory指定降級設定類
public interface DeptClientService {

    @GetMapping("/dept/get/{id}")
    public Dept queryById(@PathVariable("id") Long id);

    @GetMapping("/dept/list")
    public List<Dept> queryAll();

    @GetMapping("/dept/add")
    public Boolean addDept(Dept dept);
}
在springcloud-consumer-dept-feign模組中開啓降級
server:
  port: 80

# Eureka設定
eureka:
  client:
    register-with-eureka: false # 不向 Eureka註冊自己
    service-url: # 從三個註冊中心中隨機取一個去存取
      defaultZone: http://eureka7001.com:7001/eureka/,http://eureka7002.com:7002/eureka/,http://eureka7003.com:7003/eureka/

# 開啓降級feign.hystrix
feign:
  hystrix:
    enabled: true
8.6 服務熔斷和降級的區別
- 服務熔斷—>伺服器端:某個服務超時或異常,引起熔斷~,類似於保險絲(自我熔斷)
- 服務降級—>用戶端:從整體網站請求負載考慮,當某個服務熔斷或者關閉之後,服務將不再被呼叫,此時在用戶端,我們可以準備一個 FallBackFactory ,返回一個預設的值(預設值)。會導致整體的服務下降,但是好歹能用,比直接掛掉強。
- 觸發原因不太一樣,服務熔斷一般是某個服務(下遊服務)故障引起,而服務降級一般是從整體負荷考慮;管理目標的層次不太一樣,熔斷其實是一個框架級的處理,每個微服務都需要(無層級之分),而降級一般需要對業務有層級之分(比如降級一般是從最外圍服務開始)
- 實現方式不太一樣,服務降級具有程式碼侵入性(由控制器完成/或自動降級),熔斷一般稱爲自我熔斷。
- 限流:限制併發的請求存取量,超過閾值則拒絕;
- 降級:服務分優先順序,犧牲非核心服務(不可用),保證核心服務穩定;從整體負荷考慮;
- 熔斷:依賴的下遊服務故障觸發熔斷,避免引發本系 本係統崩潰;系統自動執行和恢復
8.7 Dashboard 流監控
新建springcloud-consumer-hystrix-dashboard模組
新增依賴
<!--Hystrix依賴-->
<dependency>
    <groupId>org.springframework.cloud</groupId>
    <artifactId>spring-cloud-starter-hystrix</artifact
    <version>1.4.6.RELEASE</version>
</dependency>
<!--dashboard依賴-->
<dependency>
    <groupId>org.springframework.cloud</groupId>
    <artifactId>spring-cloud-starter-hystrix-dashboard</artifactId>
    <version>1.4.6.RELEASE</version>
</dependency>
<!--Ribbon-->
<dependency>
    <groupId>org.springframework.cloud</groupId>
    <artifactId>spring-cloud-starter-ribbon</artifactI
    <version>1.4.6.RELEASE</version>
</dependency>
<!--Eureka-->
<dependency>
    <groupId>org.springframework.cloud</groupId>
    <artifactId>spring-cloud-starter-eureka</artifactI
    <version>1.4.6.RELEASE</version>
</dependency>
<!--實體類+web-->
<dependency>
    <groupId>com.haust</groupId>
    <artifactId>springcloud-api</artifactId>
    <version>1.0-SNAPSHOT</version>
</dependency>
<dependency>
    <groupId>org.springframework.boot</groupId>
    <artifactId>spring-boot-starter-web</artifactId>
</dependency>
<!--熱部署-->
<dependency>
    <groupId>org.springframework.boot</groupId>
    <artifactId>spring-boot-devtools</artifactId>
</dependency>
主啓動類
@SpringBootApplication
//開啓Dashboard
@EnableHystrixDashboard
public class DeptConsumerDashboard_9001 {
    public static void main(String[] args) {
        SpringApplication.run(DeptConsumerDashboard_9001.class,args);
    }
}
給springcloud-provider-dept-8001模組下的主啓動類新增如下程式碼,新增監控
@SpringBootApplication
@EnableEurekaClient //EnableEurekaClient 用戶端的啓動類,在服務啓動後自動向註冊中心註冊服務
public class DeptProvider_8001 {
    public static void main(String[] args) {
        SpringApplication.run(DeptProvider_8001.class,args);
    }

    //增加一個 Servlet
    @Bean
    public ServletRegistrationBean hystrixMetricsStreamServlet(){
        ServletRegistrationBean registrationBean = new ServletRegistrationBean(new HystrixMetricsStreamServlet());
        //存取該頁面就是監控頁面
        registrationBean.addUrlMappings("/actuator/hystrix.stream");

        return registrationBean;
    }
}
總結:
- 匯入dashboard依賴,
- 編寫埠設定
- 開啓服務,即對熔斷的支援
9. Zull路由閘道器
概述
什麼是zuul?
Zull包含了對請求的路由(用來跳轉的)和過濾兩個最主要功能:
其中路由功能負責將外部請求轉發到具體的微服務範例上,是實現外部存取統一入口的基礎,而過濾器功能則負責對請求的處理過程進行幹預,是實現請求校驗,服務聚合等功能的基礎。Zuul和Eureka進行整合,將Zuul自身註冊爲Eureka服務治理下的應用,同時從Eureka中獲得其他服務的訊息,也即以後的存取微服務都是通過Zuul跳轉後獲得。
-
注意:Zuul服務最終還是會註冊進Eureka
-
提供:代理+路由+過濾 三大功能!
Zuul能幹嘛?
- 路由
- 過濾
官方文件:https://github.com/Netflix/zuul/
新建springcloud-zuul模組,並匯入依賴
<dependencies>
    <!--匯入zuul依賴-->
    <dependency>
        <groupId>org.springframework.cloud</groupId>
        <artifactId>spring-cloud-starter-zuul</artifactId
        <version>1.4.6.RELEASE</version>
    </dependency>
    <!--Hystrix依賴-->
    <dependency>
        <groupId>org.springframework.cloud</groupId>
        <artifactId>spring-cloud-starter-hystrix</artifac
        <version>1.4.6.RELEASE</version>
    </dependency>
    <!--dashboard依賴-->
    <dependency>
        <groupId>org.springframework.cloud</groupId>
        <artifactId>spring-cloud-starter-hystrix-dashboar
        <version>1.4.6.RELEASE</version>
    </dependency>
    <!--Ribbon-->
    <dependency>
        <groupId>org.springframework.cloud</groupId>
        <artifactId>spring-cloud-starter-ribbon</artifact
        <version>1.4.6.RELEASE</version>
    </dependency>
    <!--Eureka-->
    <dependency>
        <groupId>org.springframework.cloud</groupId>
        <artifactId>spring-cloud-starter-eureka</artifact
        <version>1.4.6.RELEASE</version>
    </dependency>
    <!--實體類+web-->
    <dependency>
        <groupId>com.haust</groupId>
        <artifactId>springcloud-api</artifactId>
        <version>1.0-SNAPSHOT</version>
    </dependency>
    <dependency>
        <groupId>org.springframework.boot</groupId>
        <artifactId>spring-boot-starter-web</artifactId>
    </dependency>
    <!--熱部署-->
    <dependency>
        <groupId>org.springframework.boot</groupId>
        <artifactId>spring-boot-devtools</artifactId>
    </dependency>
</dependencies>
application.yml
server:
  port: 9527

spring:
  application:
    name: springcloud-zuul #微服務名稱

eureka:
  client:
    service-url:
      defaultZone: http://eureka7001.com:7001/eureka/,http://eureka7002.com:7002/eureka/,http://eureka7003.com:7003/eureka/
  instance: #範例的id
    instance-id: zuul9527.com
    prefer-ip-address: true # 顯示ip

info:
  app.name: haust.springcloud #專案名稱
  company.name: haust #公司名稱

zuul:
  routes:
    mydept.serviceId: springcloud-provider-dept
    mydept.path: /mydept/**
    ignored-services: "*"  # 不能再使用某個(*:全部)路徑訪問了,ignored : 忽略,隱藏全部的~
    prefix: /kuagn # 設定公共的字首,實現隱藏原有路由

主啓動類
@SpringBootApplication
@EnableZuulProxy //開啓Zuul
public class ZuulApplication_9527 {
    public static void main(String[] args) {
        SpringApplication.run(ZuulApplication_9527.class,args);
    }
}
詳情參考springcloud中文社羣zuul元件 :https://www.springcloud.cc/spring-cloud-greenwich.html#_router_and_filter_zuul
10. Spring Cloud Config 分佈式設定
Dalston.RELEASE
Spring Cloud Config爲分佈式系統中的外部設定提供伺服器和用戶端支援。使用Config Server,您可以在所有環境中管理應用程式的外部屬性。用戶端和伺服器上的概念對映與Spring Environment和PropertySource抽象相同,因此它們與Spring應用程式非常契合,但可以與任何以任何語言執行的應用程式一起使用。隨着應用程式通過從開發人員到測試和生產的部署流程,您可以管理這些環境之間的設定,並確定應用程式具有遷移時需要執行的一切。伺服器儲存後端的預設實現使用git,因此它輕鬆支援標籤版本的設定環境,以及可以存取用於管理內容的各種工具。很容易新增替代實現,並使用Spring設定將其插入。
10.1 概述
10.1. 分佈式系統面臨的–組態檔問題
微服務意味着要將單體應用中的業務拆分成一個個子服務,每個服務的粒度相對較小,因此係統中會出現大量的服務,由於每個服務都需要必要的設定資訊才能 纔能執行,所以一套集中式的,動態的設定管理設施是必不可少的。spring cloud提供了configServer來解決這個問題,我們每一個微服務自己帶着一個application.yml,那上百個的組態檔修改起來,令人頭疼!
10.1.2 什麼是SpringCloud config分佈式設定中心?
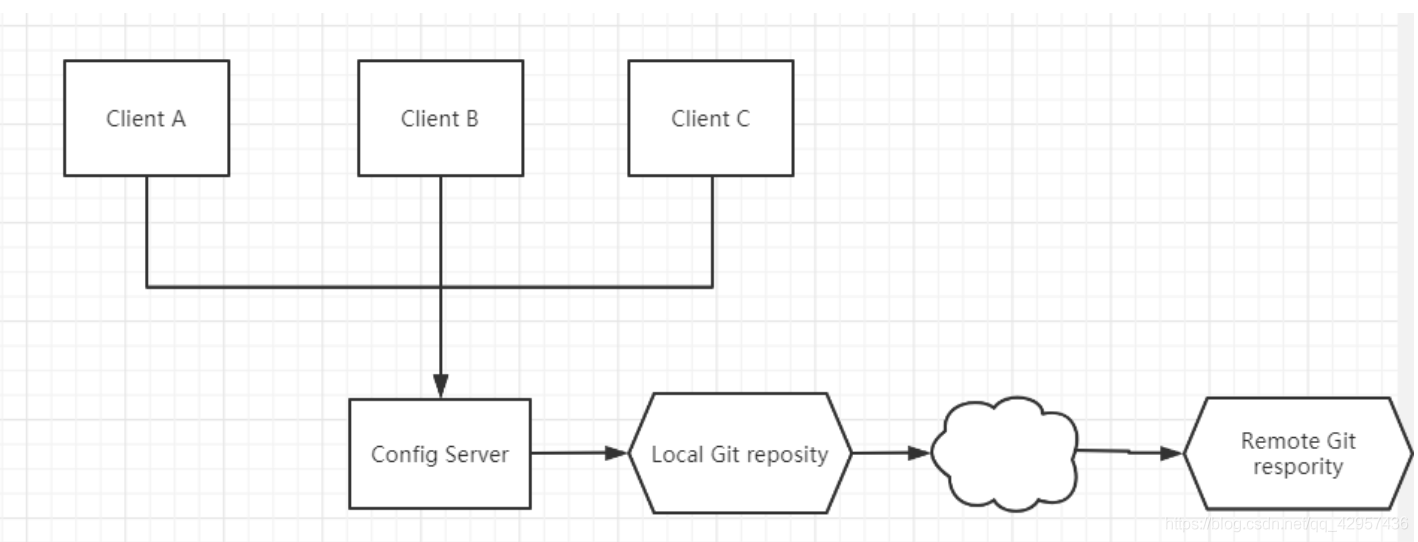
spring cloud config 爲微服務架構中的微服務提供集中化的外部支援,設定伺服器爲各個不同微服務應用的所有環節提供了一箇中心化的外部設定。
spring cloud config 分爲伺服器端和用戶端兩部分。
-
伺服器端也稱爲 分佈式設定中心,它是一個獨立的微服務應用,用來連線設定伺服器併爲用戶端提供獲取設定資訊,加密,解密資訊等存取介面。
-
用戶端則是通過指定的設定中心來管理應用資源,以及與業務相關的設定內容,並在啓動的時候從設定中心獲取和載入設定資訊。設定伺服器預設採用git來儲存設定資訊,這樣就有助於對環境設定進行版本管理。並且可用通過git用戶端工具來方便的管理和存取設定內容。
spring cloud config 分佈式設定中心能幹嘛?
- 集中式管理組態檔
- 不同環境,不同設定,動態化的設定更新,分環境部署,比如 /dev /test /prod /beta /release
- 執行期間動態調整設定,不再需要在每個服務部署的機器上編寫組態檔,服務向設定中心統一拉取設定自己的資訊
- 當設定發生變動時,服務不需要重新啓動,即可感知到設定的變化,並應用新的設定
- 將設定資訊以REST介面的形式暴露
10. 2 spring cloud config 分佈式設定中心與GitHub整合
由於spring cloud config 預設使用git來儲存組態檔 (也有其他方式,比如自持SVN 和本地檔案),但是最推薦的還是git ,而且使用的是 http / https 存取的形式。
10.2.1 入門案例
10.2.2 伺服器端
新建springcloud-config-server-3344模組匯入pom.xml依賴
<dependencies>
    <!--web-->
    <dependency>
        <groupId>org.springframework.boot</groupId>
        <artifactId>spring-boot-starter-web</artifactId>
    </dependency>
    <!--config-->
    <dependency>
        <groupId>org.springframework.cloud</groupId>
        <artifactId>spring-cloud-config-server</artifactId>
        <version>2.1.1.RELEASE</version>
    </dependency>
    <!--eureka-->
    <dependency>
        <groupId>org.springframework.cloud</groupId>
        <artifactId>spring-cloud-starter-eureka</artifactId>
        <version>1.4.6.RELEASE</version>
    </dependency>
</dependencies>
resource下建立application.yml組態檔,Spring Cloud Config伺服器從git儲存庫(必須提供)爲遠端用戶端提供設定:
server:
  port: 3344

spring:
  application:
    name: springcloud-config-server
  # 連線碼雲遠端倉庫
  cloud:
    config:
      server:
        git:
          #注意是https的而不是ssh
          uri: https://gitee.com/cao_shi_peng/springcloud-config.git
            # 通過 config-server可以連線到git,存取其中的資源以及設定~

# 不加這個設定會報Cannot execute request on any known server 這個錯:連線Eureka伺服器端地址不對
# 或者直接註釋掉eureka依賴 這裏暫時用不到eureka
eureka:
  client:
    register-with-eureka: false
    fetch-registry: false
主啓動類
@EnableConfigServer //開啓spring cloud config server服務
@SpringBootApplication
public class Config_server_3344 {
    public static void main(String[] args) {
        SpringApplication.run(Config_server_3344.class,args);
    }
}
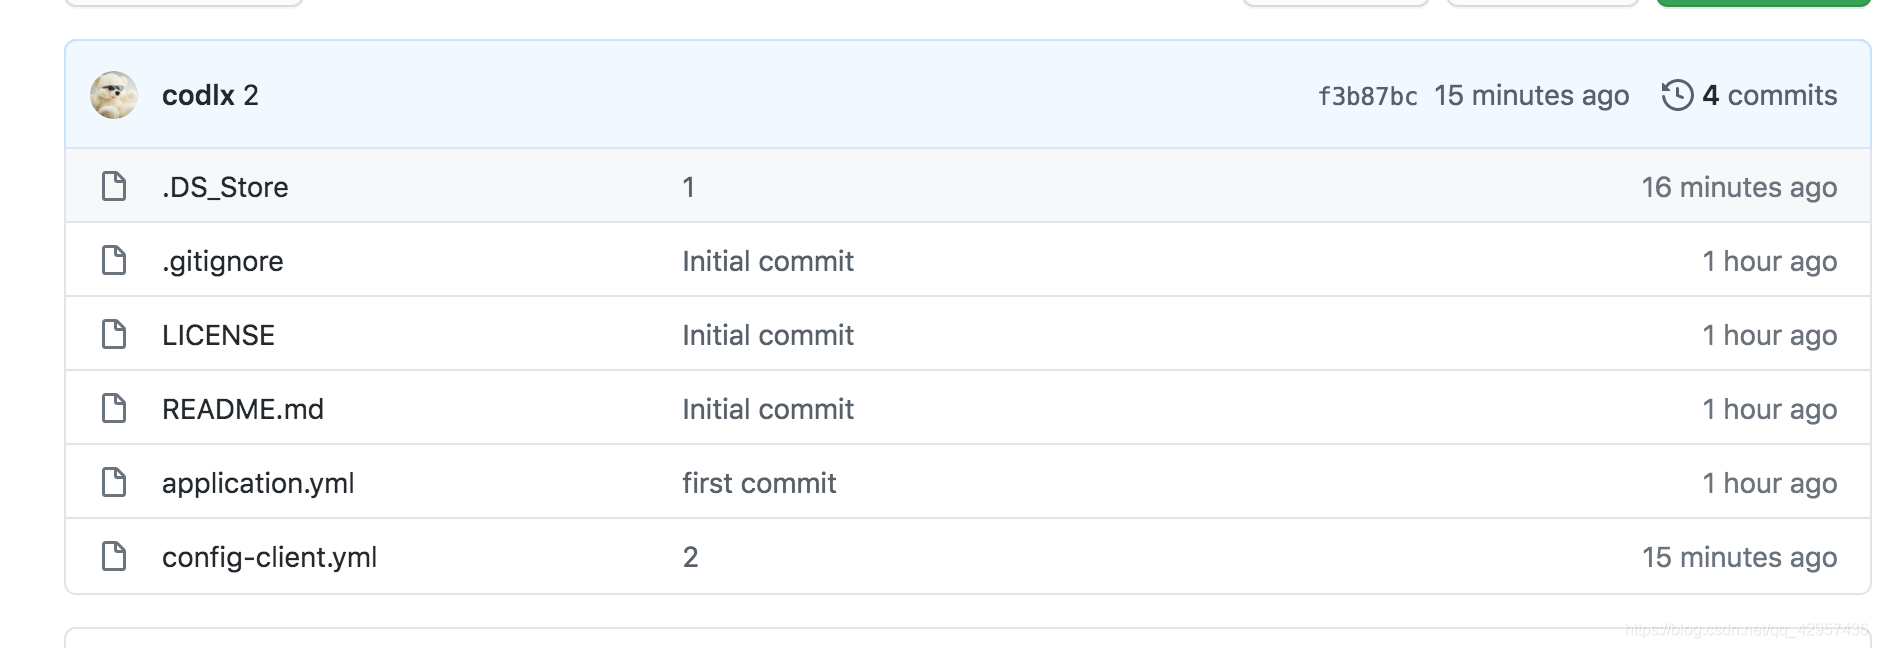
將本地git倉庫springcloud-config資料夾下新建的application.yml提交到github倉庫:
定位資源的預設策略是克隆一個git倉庫(在spring.cloud.config.server.git.uri),並使用它來初始化一個迷你SpringApplication。小應用程式的Environment用於列舉屬性源並通過JSON端點發布。
HTTP服務具有以下格式的資源:
/{application}/{profile}[/{label}]
/{application}-{profile}.yml
/{label}/{application}-{profile}.yml
/{application}-{profile}.properties
/{label}/{application}-{profile}.properties
其中「應用程式」作爲SpringApplication中的spring.config.name注入(即常規的Spring Boot應用程式中通常是「應用程式」),「組態檔」是活動組態檔(或逗號分隔列表的屬性),「label」是可選的git標籤(預設爲「master」)。
測試存取http://localhost:3344/application-dev.yml

測試存取 http://localhost:3344/application/test/master

如果測試存取不存在的設定則不顯示 如:http://localhost:3344/master/application-aaa.yml
10.2.3 用戶端
將本地git倉庫springcloud-config資料夾下新建的config-client.yml提交到github倉庫:
將本地git倉庫springcloud-config資料夾下新建的config-client.yml提交到github倉庫:
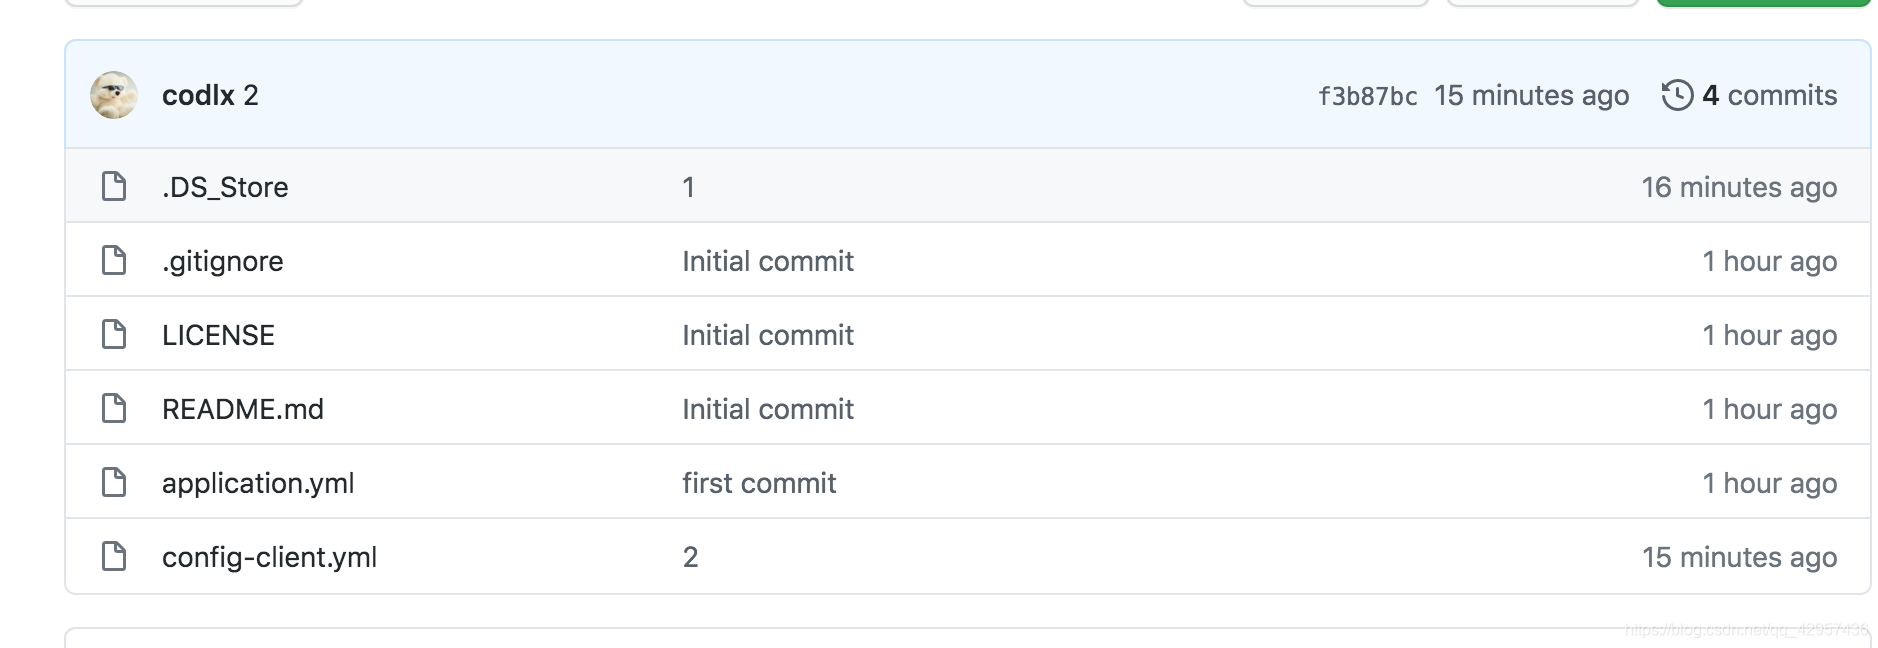
新建一個springcloud-config-client-3355模組,並匯入依賴
<!--config-->
<!-- https://mvnrepository.com/artifact/org.springframework.cloud/spring-cloud-start
<dependency>
    <groupId>org.springframework.cloud</groupId>
    <artifactId>spring-cloud-starter-config</artifactId>
    <version>2.1.1.RELEASE</version>
</dependency>
<dependency>
    <groupId>org.springframework.boot</groupId>
    <artifactId>spring-boot-starter-actuator</artifactId>
</dependency>
<dependency>
    <groupId>org.springframework.boot</groupId>
    <artifactId>spring-boot-starter-web</artifactId>
</dependency>
pendencies>
resources下建立application.yml和bootstrap.yml組態檔
bootstrap.yml是系統級別的設定
# 系統級別的設定
spring:
  cloud:
    config:
      name: config-client # 需要從git上讀取的資源名稱,不要後綴
      profile: dev
      label: master
      uri: http://localhost:3344
application.yml是使用者級別的設定
# 使用者級別的設定
spring:
  application:
    name: springcloud-config-client
建立controller包下的ConfigClientController.java用於測試
@RestController
public class ConfigClientController {

    @Value("${spring.application.name}")
    private String applicationName; //獲取微服務名稱

    @Value("${eureka.client.service-url.defaultZone}")
    private String eurekaServer; //獲取Eureka服務

    @Value("${server.port}")
    private String port; //獲取伺服器端的埠號


    @RequestMapping("/config")
    public String getConfig(){
        return "applicationName:"+applicationName +
         "eurekaServer:"+eurekaServer +
         "port:"+port;
    }
}
主啓動類
@SpringBootApplication
public class ConfigClient {
    public static void main(String[] args) {
        SpringApplication.run(ConfigClient.class,args);
    }
}
測試:
啓動伺服器端Config_server_3344 再啓動用戶端ConfigClient
存取:http://localhost:8201/config/

10.2.4 小案例
本地新建config-dept.yml和config-eureka.yml並提交到github
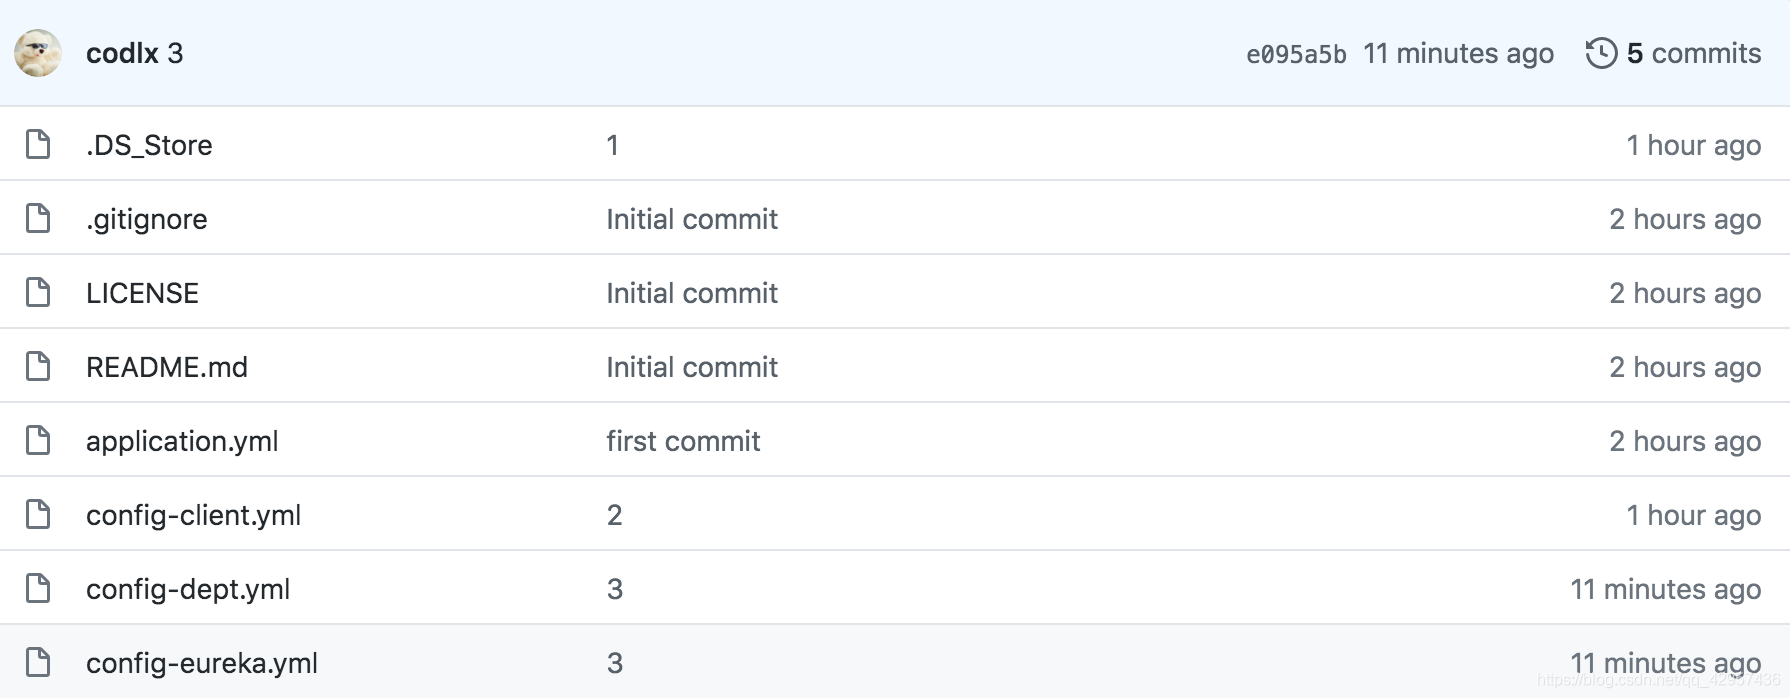
新建springcloud-config-eureka-7001模組,並將原來的springcloud-eureka-7001模組下的內容拷貝的該模組。
1.清空該模組的application.yml設定,並新建bootstrap.yml連線遠端設定
spring:
  cloud:
    config:
      name: config-eureka # 倉庫中的組態檔名稱
      label: master
      profile: dev
      uri: http://localhost:3344
2.在pom.xml中新增spring cloud config依賴
<!--config-->
<!-- https://mvnrepository.com/artifact/org.springframework.cloud/spring-cloud-starter-config -->
<dependency>
    <groupId>org.springframework.cloud</groupId>
    <artifactId>spring-cloud-starter-config</artifactId>
    <version>2.1.1.RELEASE</version>
</dependency>
3.主啓動類
@SpringBootApplication
@EnableEurekaServer //EnableEurekaServer 伺服器端的啓動類,可以接受別人註冊進來~
public class ConfigEurekaServer_7001 {
    public static void main(String[] args) {
        SpringApplication.run(ConfigEurekaServer_7001.class,args);
    }
}
4.測試
第一步:啓動 Config_Server_3344,並存取 http://localhost:3344/master/config-eureka-dev.yml 測試
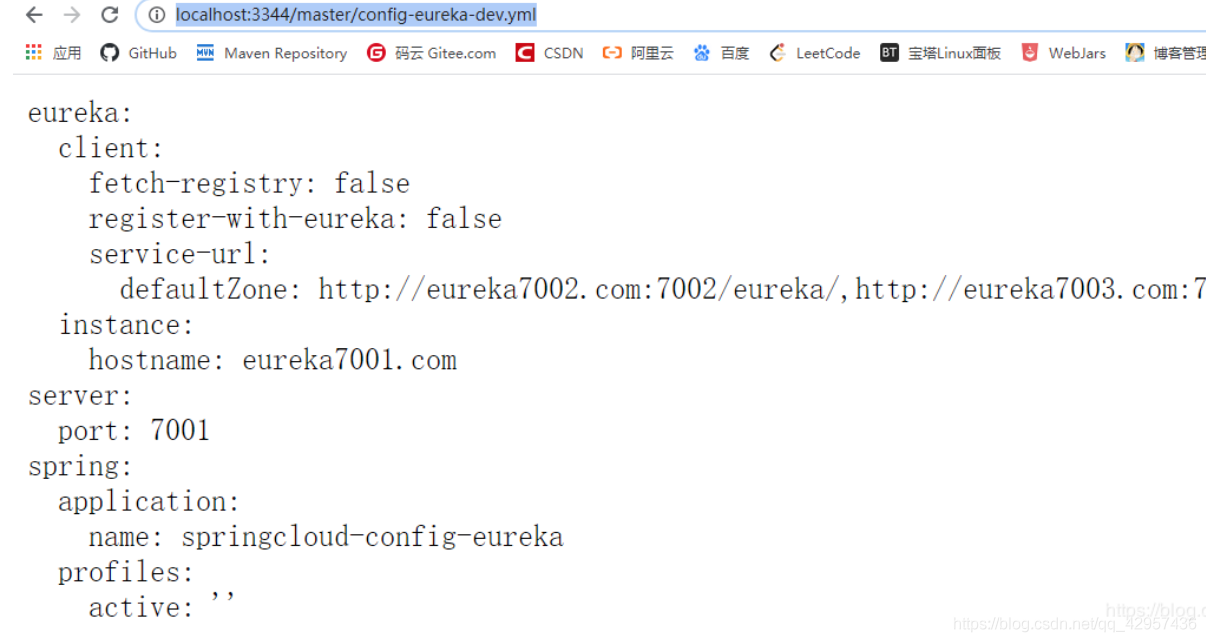
第二步:啓動ConfigEurekaServer_7001,存取 http://localhost:7001/ 測試

顯示上圖則成功
新建springcloud-config-dept-8001模組並拷貝springcloud-provider-dept-8001的內容
同理匯入spring cloud config依賴、清空application.yml 、新建bootstrap.yml組態檔並設定
spring:
  cloud:
    config:
      name: config-dept
      label: master
      profile: dev
      uri: http://localhost:3344
主啓動類
@SpringBootApplication
@EnableEurekaClient //在服務啓動後自動註冊到Eureka中!
@EnableDiscoveryClient //服務發現~
@EnableCircuitBreaker //
public class ConfigDeptProvider_8001 {
    public static void main(String[] args) {
        SpringApplication.run(ConfigDeptProvider_8001.class,args);
    }

    //增加一個 Servlet
    @Bean
    public ServletRegistrationBean hystrixMetricsStreamServlet(){
        ServletRegistrationBean registrationBean = new ServletRegistrationBean(new HystrixMetricsStreamServlet());
        registrationBean.addUrlMappings("/actuator/hystrix.stream");
        return registrationBean;
    }
}
