【PyTorch】02:動態圖機制 機製和autograd與邏輯迴歸
2020-08-09 02:53:02
1. 計算圖
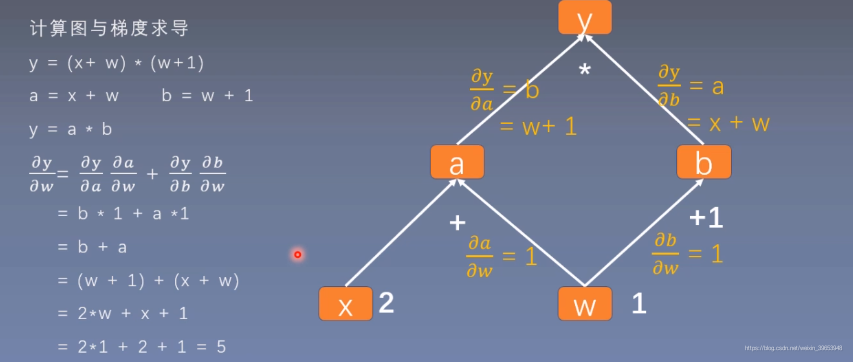
- 計算圖是用來描述運算的有向無環圖。
- 計算圖有兩個主要元素:結點(Node)和邊(Edge)。
- 結點表示數據,如向量,矩陣,張量;邊表示運算,如加減乘除,折積等。
用計算圖表示:
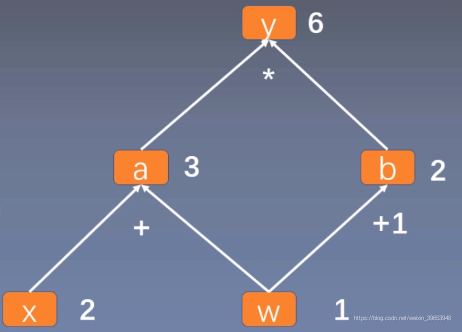
【Notes】使用計算圖可以使得求導更加方便。
程式碼實現:
import torch

w = torch.tensor([1.], requires_grad=True)
x = torch.tensor([2.], requires_grad=True)

a = torch.add(w, x)
b = torch.add(w, 1)
y = torch.mul(a, b)

y.backward()
print(w.grad)
輸出:
tensor([5.])
1.1 is_leaf 與 grad 屬性
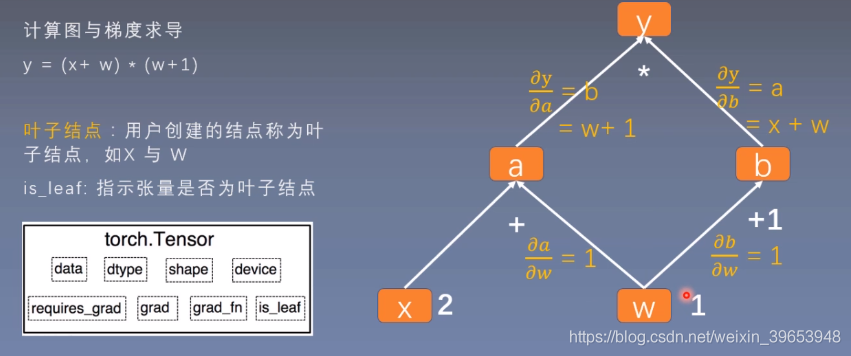
【Notes】設定葉子節點是爲了節省記憶體。
程式碼驗證:
# 檢視葉子結點
print(w.is_leaf, x.is_leaf, a.is_leaf, b.is_leaf, y.is_leaf)

'''
True True False False False
'''

# 檢視梯度
print(w.grad, x.grad, a.grad, b.grad, y.grad)

'''
tensor([5.]) tensor([2.]) None None None
'''
可以看到非葉子節點的梯度爲 None,這是因爲在反向傳播結束之後,其梯度值被釋放掉,以節省記憶體開銷。可以通過 .retain_grad() 方法儲存非葉子節點的梯度:
w = torch.tensor([1.], requires_grad=True)
x = torch.tensor([2.], requires_grad=True)

a = torch.add(w, x)

a.retain_grad()

b = torch.add(w, 1)
y = torch.mul(a, b)

y.backward()

print(w.grad, x.grad, a.grad, b.grad, y.grad)


'''
tensor([5.]) tensor([2.]) tensor([2.]) None None

可以看到a的梯度儲存了下來
'''
1.2 grad_fn 屬性
grad_fn:記錄建立該張量時所用的方法(函數)。
print(w.grad_fn, x.grad_fn, a.grad_fn, b.grad_fn, y.grad_fn)

'''
None None <AddBackward0 object at 0x000002425B065748> <AddBackward0 object at 0x000002425B0657C8> <MulBackward0 object at 0x000002425B0659C8>
'''
【Notes】可以看到葉子結點的改屬性爲None,這是因爲w和x這兩個張量是使用者直接建立的,而不是使用函數或者方法生成的。
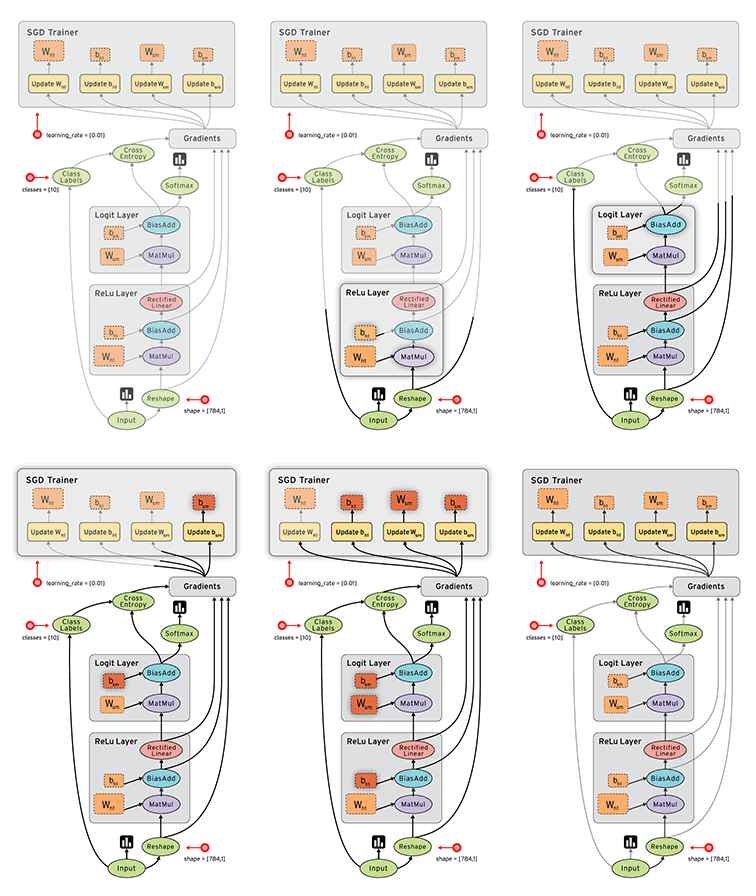
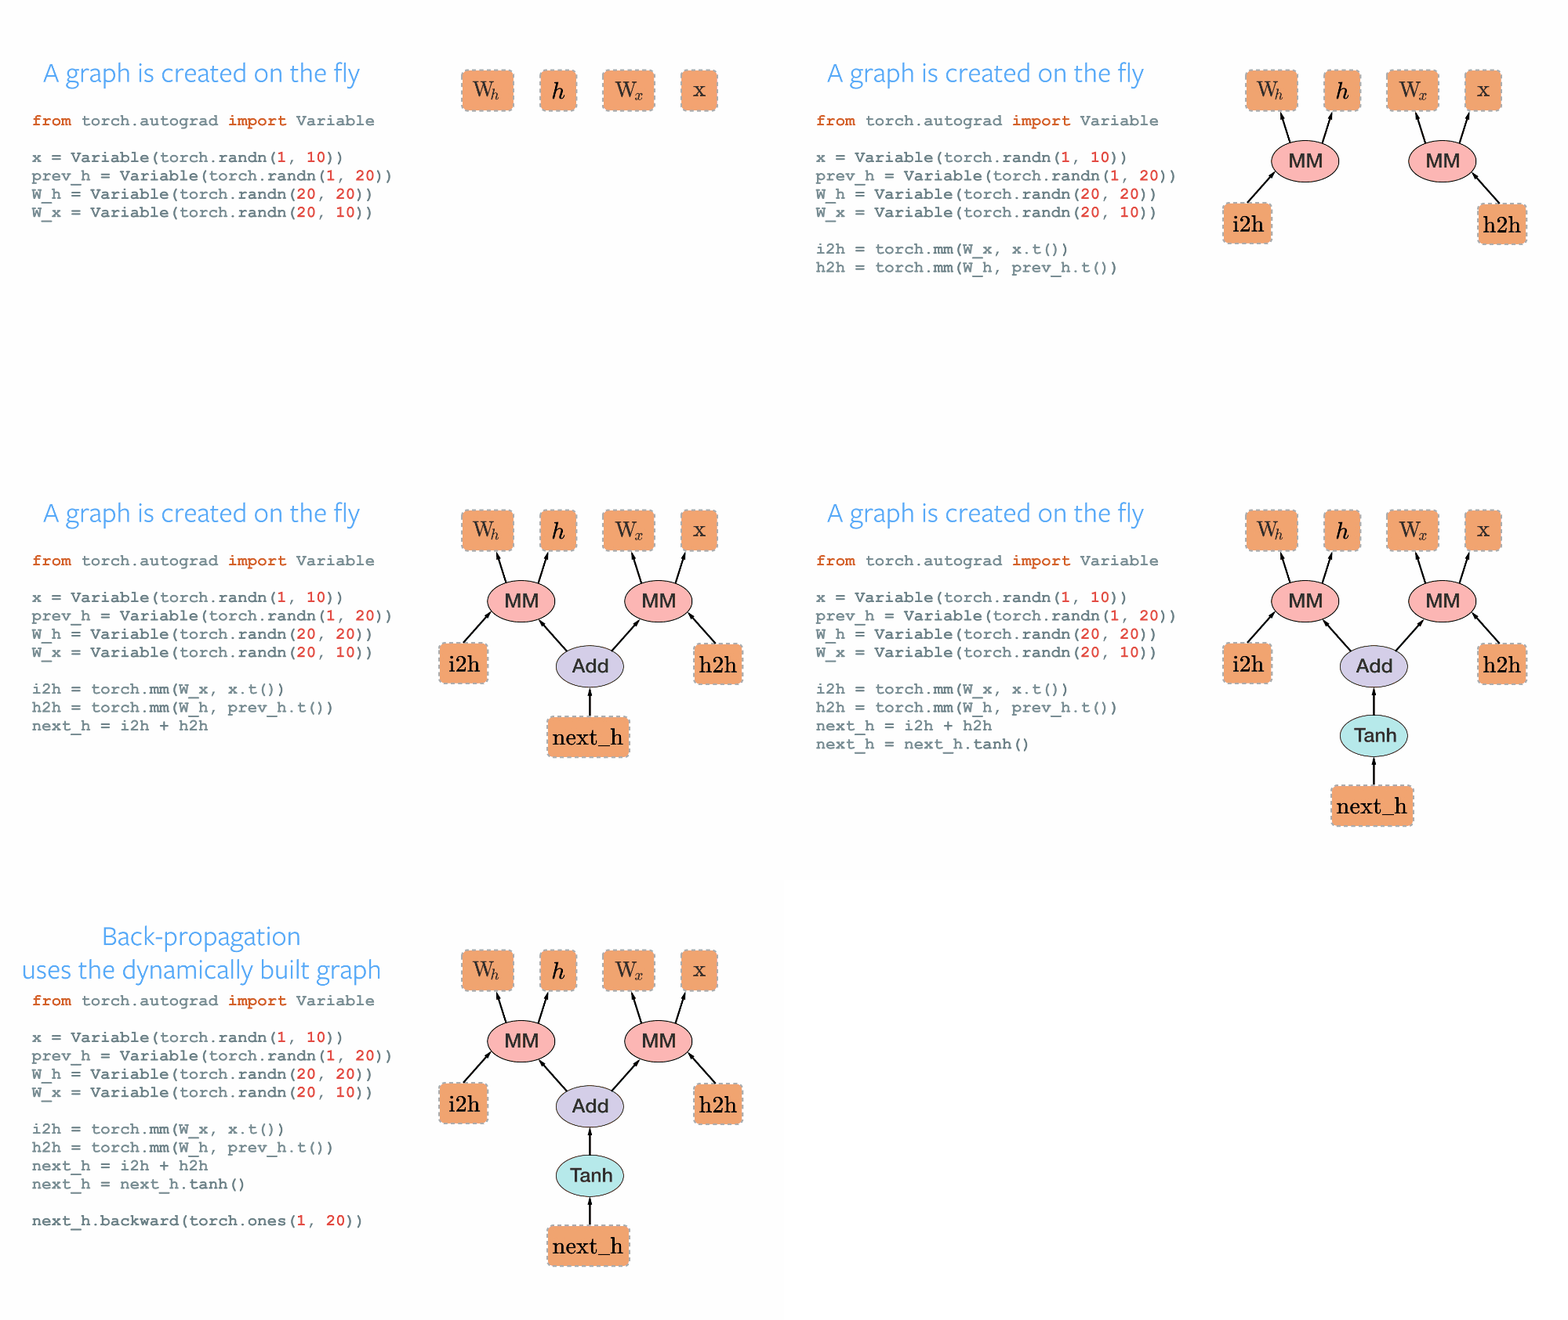
2. 動態圖
根據計算圖搭建方式,可將計算圖分爲動態圖和靜態圖。

TensorFlow 靜態圖機制 機製:
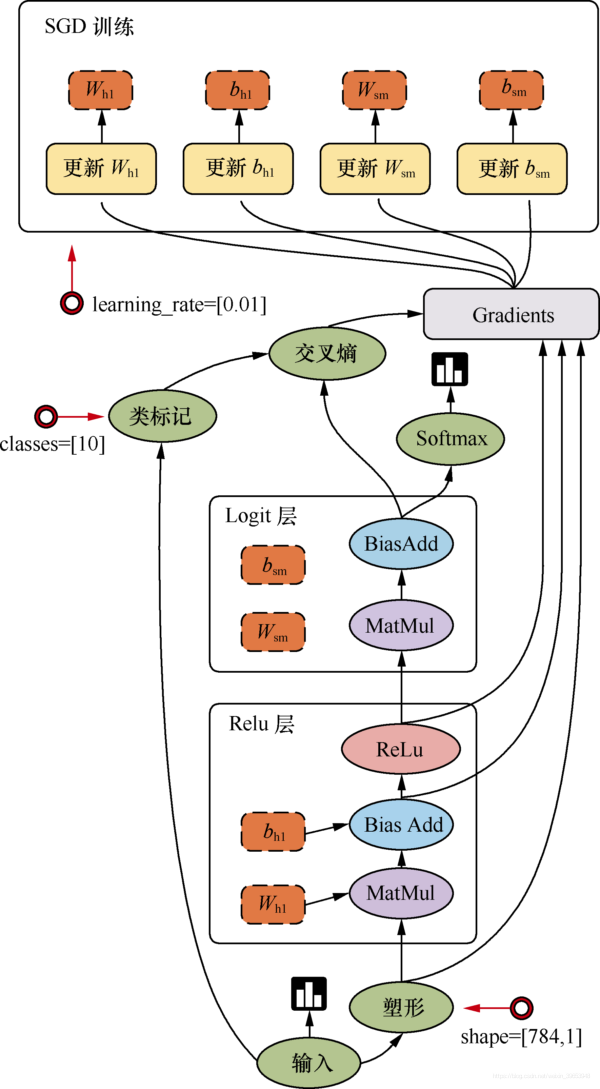
Pytorch 動態圖機制 機製:
3. autograd
torch.autograd.backward(tensors: Union[torch.Tensor, Sequence[torch.Tensor]],
                        grad_tensors: Union[torch.Tensor, Sequence[torch.Tensor], None] = None,
                        retain_graph: Optional[bool] = None,
                        create_graph: bool = False,
                        grad_variables: Union[torch.Tensor, Sequence[torch.Tensor], None] = None)
功能:自動求取梯度。
- tensors:用於求導的張量,如loss;
- retain_graph:儲存計算圖;
- create_graph:建立導數計算圖,用於高階求導;
- grad_tensors:多梯度權重。
【Notes】實際上執行 .backward() 呼叫的是 torch.autograd.backward() 方法。
torch.autograd.grad(outputs: Union[torch.Tensor, Sequence[torch.Tensor]],
                    inputs: Union[torch.Tensor, Sequence[torch.Tensor]],
                    grad_outputs: Union[torch.Tensor, Sequence[torch.Tensor], None] = None,
                    retain_graph: Optional[bool] = None,
                    create_graph: bool = False,
                    only_inputs: bool = True,
                    allow_unused: bool = False)
功能:求取梯度。
- outputs:用於求導的張量,如loss;
- inputs:需要梯度的張量;
- retain_graph:儲存計算圖;
- create_graph:建立導數計算圖,用於高階求導;
- grad_tensors:多梯度權重。
範例:
x = torch.tensor([3.], requires_grad=True)
y = torch.pow(x, 2) # y = x ** 2

grad_1 = torch.autograd.grad(y, x, create_graph=True)
print(grad_1)

grad_2 = torch.autograd.grad(grad_1[0], x)
print(grad_2)

'''
(tensor([6.], grad_fn=<MulBackward0>),)
(tensor([2.]),)
'''
- 度不自動清零;
- 依賴於葉子結點的結點,
requires_grad預設爲True; - 葉子結點不可執行 in-place 操作(在原始記憶體中改變數據);
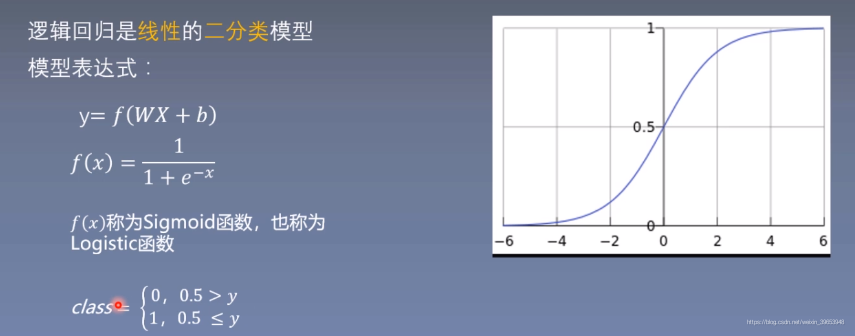
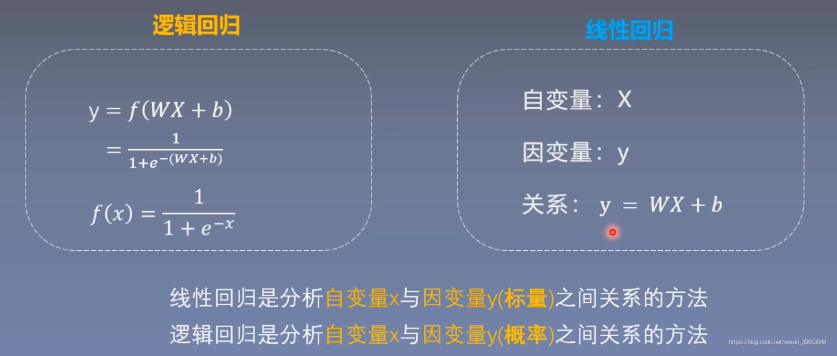
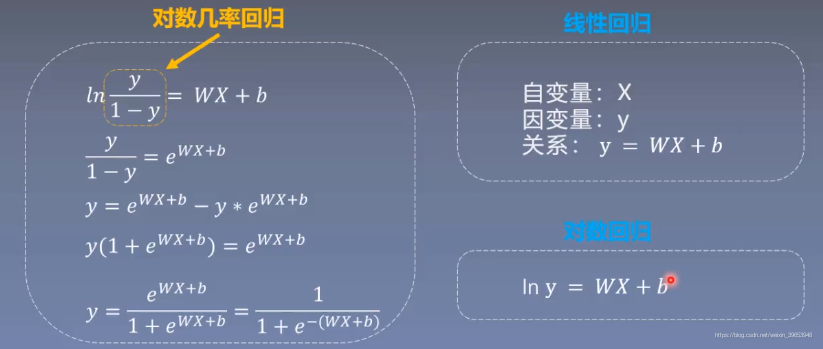
4. 邏輯迴歸
4.1 機器學習模型的訓練步驟

程式碼實現:
# 1. 構造數據
sample_nums = 100
mean_value = 1.6
bias = 1

n_data = torch.ones(sample_nums, 2)               # 類別0 數據 shape=(100,2)
x0 = torch.normal(mean_value * n_data, 1) + bias  # 類別0 標籤 shape=(100,1)
y0 = torch.zeros(sample_nums)                     # 類別1 數據 shape=(100,2)
x1 = torch.normal(- mean_value * n_data, 1) + bias  # 類別1 標籤 shape=(100,1)
y1 = torch.ones(sample_nums)

train_x = torch.cat((x0, x1), 0)
train_y = torch.cat((y0, y1), 0)

# 2.定義模型
class LR(nn.Module):
    def __init__(self):
        super(LR, self).__init__()
        self.features = nn.Linear(2, 1)
        self.sigmoid = nn.Sigmoid()

    def forward(self, x):
        x = self.features(x)
        x = self.sigmoid(x)
        return x

lr_net = LR()

# 3.設定損失函數
loss_fn = nn.BCELoss()  # 二分類交叉熵損失函數

# 4.設定優化器
lr = 0.01
optimizer = torch.optim.SGD(lr_net.parameters(), lr=lr, momentum=0.9)

# 5.訓練
for iteration in range(1000):
    # 前向傳播
    y_pred = lr_net(train_x)

    # 計算 loss
    loss = loss_fn(y_pred.squeeze(), train_y)

    # 反向傳播
    loss.backward()

    # 更新參數
    optimizer.step()

    # 繪圖
    if iteration % 20 == 0:

        mask = y_pred.ge(0.5).float().squeeze()  # 以0.5 爲閾值進行分類
        correct = (mask == train_y).sum()
        acc = correct.item() / train_y.size(0)  # 計算分類準確率

        plt.scatter(x0.data.numpy()[:, 0], x0.data.numpy()[:, 1], c='r', label='class 0')
        plt.scatter(x1.data.numpy()[:, 0], x1.data.numpy()[:, 1], c='b', label='class 1')

        w0, w1 = lr_net.features.weight[0]
        w0, w1 = float(w0.item()), float(w1.item())
        plot_b = float(lr_net.features.bias[0].item())
        plot_x = np.arange(-6, 6, 0.1)
        plot_y = (-w0 * plot_x - plot_b) / w1

        plt.xlim(-5, 7)
        plt.ylim(-7, 7)
        plt.plot(plot_x, plot_y)

        plt.text(-5, 5, 'Loss=%0.4f' % loss.data.numpy(), fontdict={'size':20, 'color':'red'})
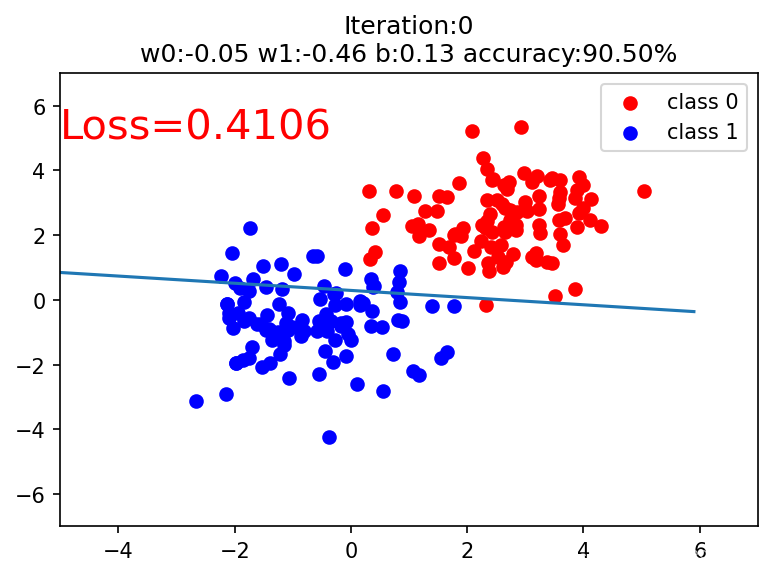
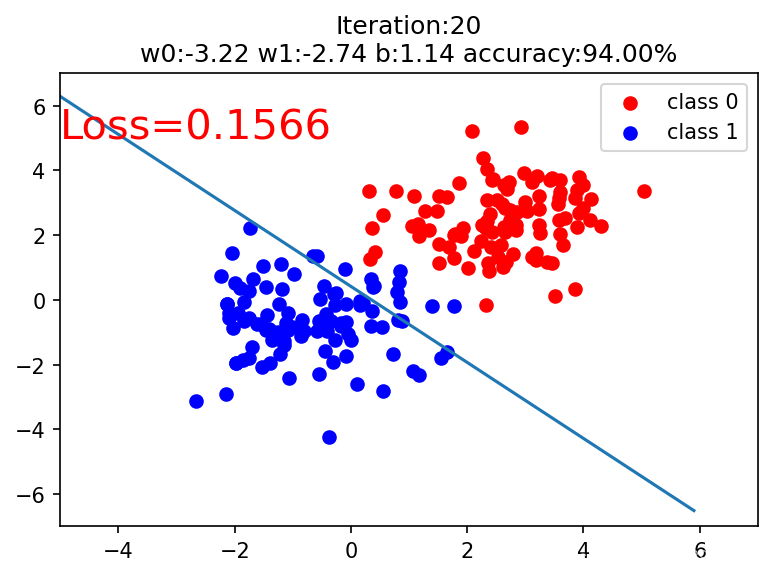
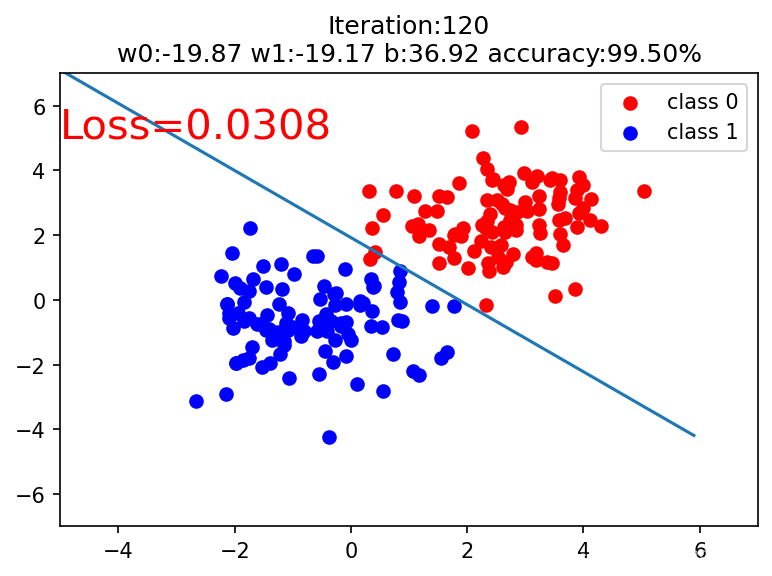
        plt.title('Iteration:{}\nw0:{:.2f} w1:{:.2f} b:{:.2f} accuracy:{:.2%}'.format(iteration, w0, w1, plot_b, acc))
        plt.legend()

        plt.show()
        plt.pause(0.5)

        if acc > 0.99:
            break
輸出:
