Hexo-Next實用主題優化
其餘相關內容可參考個人部落格
簡介
本文介紹Hexo部落格的Next主題下的一些基礎設定和實用優化設定,這些設定也在本文的部落格中有所體現。
基礎設定
本節內容介紹hexo部落格的一些基礎設定,主要是修改一些組態檔中的內容。
部落格名稱
修改站點組態檔:
# Site
title: 田宇的個人部落格      # 網站標題
subtitle: '學習筆記'        # 網站副標題
description: ''  # 網站描述 主要用於SEO,該部分內容還會出現在側邊欄作者下面 下麪
keywords:
author: yu.tian    # 作者名字 用於主題顯示文章的作者
language: zh-Hans   # 網站使用的語言
timezone: 'UTC'    # 網站時區 Hexo 預設使用您電腦的時區
部落格路徑
修改站點組態檔:
# URL
## If your site is put in a subdirectory, set url as 'http://yoursite.com/child' and root as '/child/'
## 如果您的網站存放在子目錄中,例如 http://yoursite.com/blog,則請將您的 url 設爲 http://yoursite.com/blog 並把 root 設爲 /blog/
url: http://tianyu-code.top    # 網址
root: /     # 網站根目錄
permalink: :title/    # 生成的部落格目錄包含年月日,不利於搜尋,簡化
permalink_defaults:
pretty_urls:
  trailing_index: true # Set to false to remove trailing 'index.html' from permalinks
  trailing_html: true # Set to false to remove trailing '.html' from permalinks
每頁文章數量
修改站點組態檔:
index_generator:
  path: ''
  per_page: 10      # 每頁顯示的文章量
  order_by: -date   # 排序:根據時間
# Pagination
## Set per_page to 0 to disable pagination
per_page: 20    # 每頁顯示的文章量 (0 = 關閉分頁功能)
pagination_dir: page    # 分頁目錄
修改網站主題
修改站點組態檔:
# Extensions
## Plugins: https://hexo.io/plugins/
## Themes: https://hexo.io/themes/
theme: next     # 當前主題名稱,值爲false時禁用主題
設定部落格主頁選單
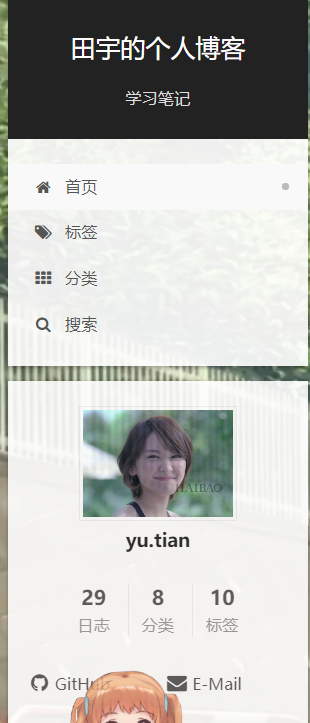
部落格主頁的各種按鈕需要設定才能 纔能正確跳轉,例如:
-
修改主題組態檔,其中
||符號前是跳轉路徑,後面是按鈕圖示# When running the site in a subdirectory (e.g. domain.tld/blog), remove the leading slash from link value (/archives -> archives). # Usage: `Key: /link/ || icon` # Key is the name of menu item. If translate for this menu will find in languages - this translate will be loaded; if not - Key name will be used. Key is case-senstive. # Value before `||` delimeter is the target link. # Value after `||` delimeter is the name of FontAwesome icon. If icon (with or without delimeter) is not specified, question icon will be loaded. menu: home: /|| home #about: /about/ || user tags: /tags/|| tags categories: /categories/|| th #archives: /archives/ || archive #schedule: /schedule/ || calendar #sitemap: /sitemap.xml || sitemap #commonweal: /404/ || heartbeat # Enable/Disable menu icons. menu_icons: enable: true我在設定時必須把跳轉路徑後面的空格去掉,不然在跳轉的時候空格也會在路徑中導致失敗
-
新增分類/標籤等目錄
在完成上述設定後,我們指定了按鈕的跳轉路徑,但是這個目錄還未存在,需要手動建立,在部落格目錄輸入
hexo new page categories,即可建立分類目錄,會在source下面 下麪生成categories目錄,裏面的index.md即爲categories介面的顯示檔案,index.md檔案修改如下:
-
寫部落格時新增分類
接下來我們在新增新部落格時,注意新增分類,下面 下麪給出一個多級分類的例子
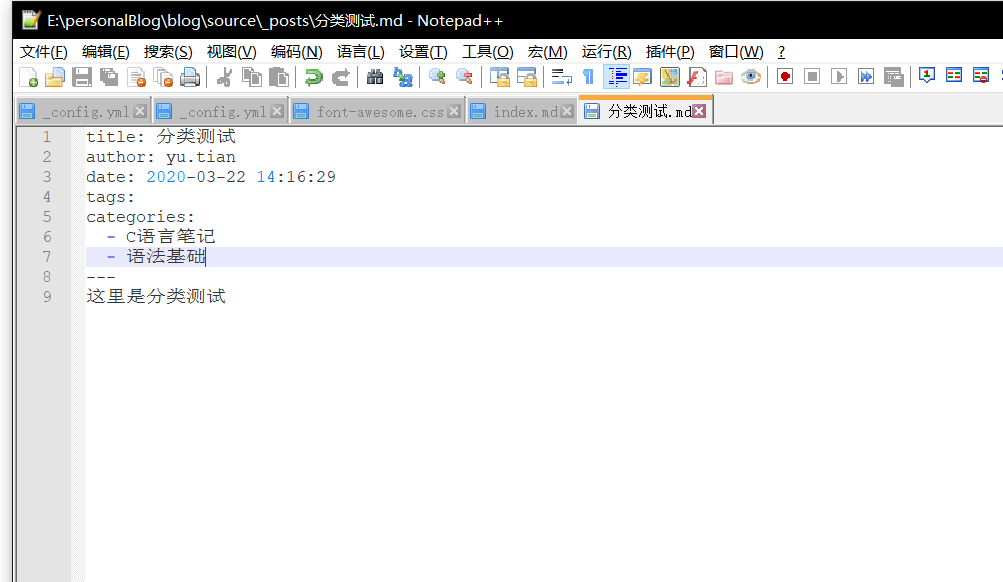
這樣我們點選分類就會自動出來剛剛的那篇文章了

其餘頁面同理,根據需要設定
設定主題風格
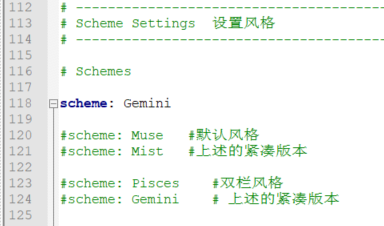
next主題預設提供了四種風格可選,本部落格是Gemini風格,修改主題組態檔:
側邊欄社交按鈕
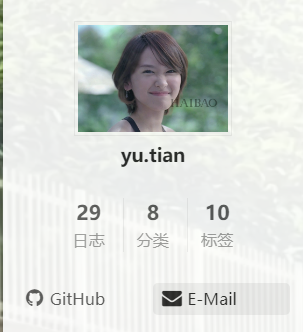
側邊欄可新增社交按鈕,修改主題組態檔,其中||前面是鏈接,後面是圖示
# Social Links.
# Usage: `Key: permalink || icon`
# Key is the link label showing to end users.
# Value before `||` delimeter is the target permalink.
# Value after `||` delimeter is the name of FontAwesome icon. If icon (with or without delimeter) is not specified, globe icon will be loaded.
social:
  GitHub: https://github.com/tianyu-code || github
  E-Mail: mailto:[email protected] || envelope
  #Google: https://plus.google.com/yourname || google
  #Twitter: https://twitter.com/yourname || twitter
  #FB Page: https://www.facebook.com/yourname || facebook
  #VK Group: https://vk.com/yourname || vk
  #StackOverflow: https://stackoverflow.com/yourname || stack-overflow
  #YouTube: https://youtube.com/yourname || youtube
  #Instagram: https://instagram.com/yourname || instagram
  #Skype: skype:yourname?call|chat || skype

social_icons:
  enable: true
  icons_only: false
  transition: false

# Blog rolls
links_icon: link
links_title: Links
links_layout: block
#links_layout: inline
效果如下:
側邊欄頭像
將頭像的圖片放在hexo/source/images下即可(若沒有該目錄則新建即可),修改主題組態檔:
# Sidebar Avatar 設定頭像
# in theme directory(source/images): /images/avatar.gif
# in site  directory(source/uploads): /uploads/avatar.gif
avatar: /images/user.jpg
側邊欄其他設定
側邊欄出現時機和位置
回到頂部按鈕
修改主題組態檔:
sidebar:
  # Sidebar Position, available value: left | right (only for Pisces | Gemini).
  position: left
  #position: right

  # Sidebar Display, available value (only for Muse | Mist):
  #  - post    expand on posts automatically. Default.
  #  - always  expand for all pages automatically
  #  - hide    expand only when click on the sidebar toggle icon.
  #  - remove  Totally remove sidebar including sidebar toggle.
  display: post
  #display: always
  #display: hide
  #display: remove

  # Sidebar offset from top menubar in pixels (only for Pisces | Gemini). 兩個欄的間隔畫素點
  offset: 12

  # Back to top in sidebar (only for Pisces | Gemini).   回到頂部按鈕是否開啓
  b2t: true

  # Scroll percent label in b2t button. 回到頂部按鈕是否顯示百分比
  scrollpercent: true

  # Enable sidebar on narrow view (only for Muse | Mist).
  onmobile: false
主頁文章顯示設定
閱讀更多按鈕
記錄上次閱讀位置
自動卷動到下面 下麪
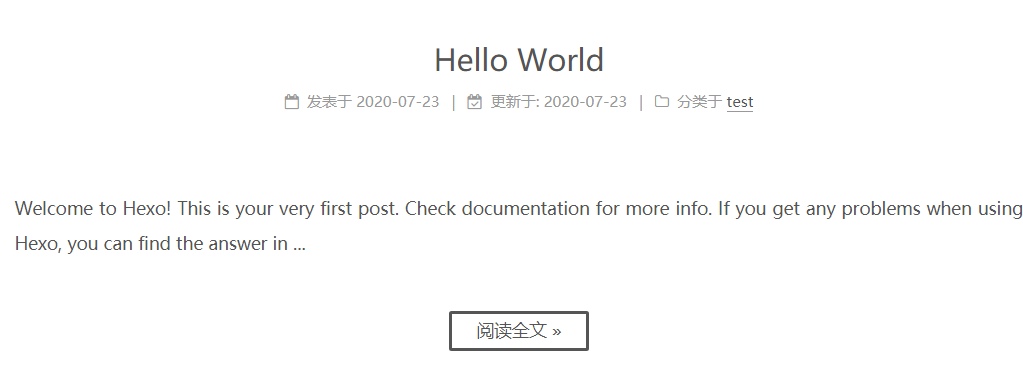
文章標題下面 下麪一些元素顯示,包括更新時間,建立時間等
上述設定均修改主題組態檔:
# ---------------------------------------------------------------
# Post Settings
# ---------------------------------------------------------------

# Automatically scroll page to section which is under <!-- more --> mark.
# 自動卷動到<!--more-->下面 下麪
scroll_to_more: false

# Automatically saving scroll position on each post/page in cookies.
# 使用cookies記錄上次閱讀位置
save_scroll: false

# Automatically excerpt description in homepage as preamble text.
excerpt_description: true

# Automatically Excerpt. Not recommend.
# Please use <!-- more --> in the post to control excerpt accurately.
# 開啓閱讀更多按鈕
auto_excerpt:
  enable: true
  length: 150

# Post meta display settings
# 文章標題下面 下麪的一些元素,可選顯示
post_meta:
  item_text: true
  created_at: true
  updated_at: true
  categories: true
效果如下:
文章版權宣告
修改主題組態檔:
# Declare license on posts
post_copyright:
  enable: true
  license: CC BY-NC-SA 3.0
  license_url: https://creativecommons.org/licenses/by-nc-sa/3.0/
效果如下,注意它生成的鏈接是根據站點設定中的URL生成的,效果圖:

程式碼塊高亮風格設定
next主題自帶tomorrow程式碼高亮,其中包含五種風格,修改站點組態檔:
highlight:      # 程式碼塊的設定
  enable: true
  line_number: true
  auto_detect: true    # 自動檢測程式碼型別
  tab_replace: ''
  wrap: true
  hljs: false
修改主題組態檔:
# Code Highlight theme
# Available value:
#    normal | night | night eighties | night blue | night bright
# https://github.com/chriskempson/tomorrow-theme
highlight_theme: night eighties
注意在寫部落格時,需要使用如下格式才能 纔能觸發程式碼高亮
```C
code…
```
頁尾設定
部落格最下方的頁尾有些雜亂,比如由Hexo強力驅動、hexo版本等,爲了簡潔我們可以去掉,修改主題組態檔:
footer:
  # Specify the date when the site was setup.
  # If not defined, current year will be used.
  since: 2020

  # Icon between year and copyright info.
  icon: user

  # If not defined, will be used `author` from Hexo main config.
  copyright:
  # -------------------------------------------------------------
  # Hexo link (Powered by Hexo).
  powered: false

  theme:
    # Theme & scheme info link (Theme - NexT.scheme).
    enable: false
    # Version info of NexT after scheme info (vX.X.X).
    version: false
  # -------------------------------------------------------------
  # Any custom text can be defined here.
  #custom_text: Hosted by <a target="_blank" href="https://pages.github.com">GitHub Pages</a>
  custom_text: 田宇的個人部落格
效果圖:

新增評論系統
綜合考慮下來,決定使用valine系統,它的優點如下:
(1)有國內網站,載入速度快,Leancloud管理評論也方便
(2)無需再使用第三方登錄,可遊客直接評論,直接設定自己的暱稱即可
-
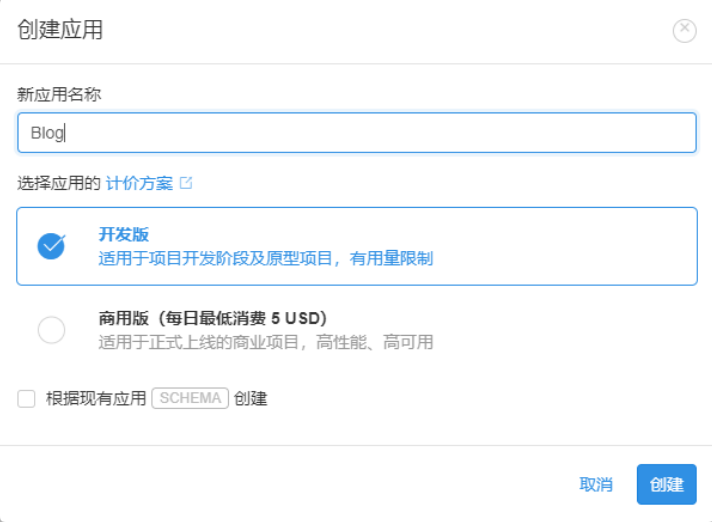
進入Leanclound,註冊登錄後建立應用,如下所示:
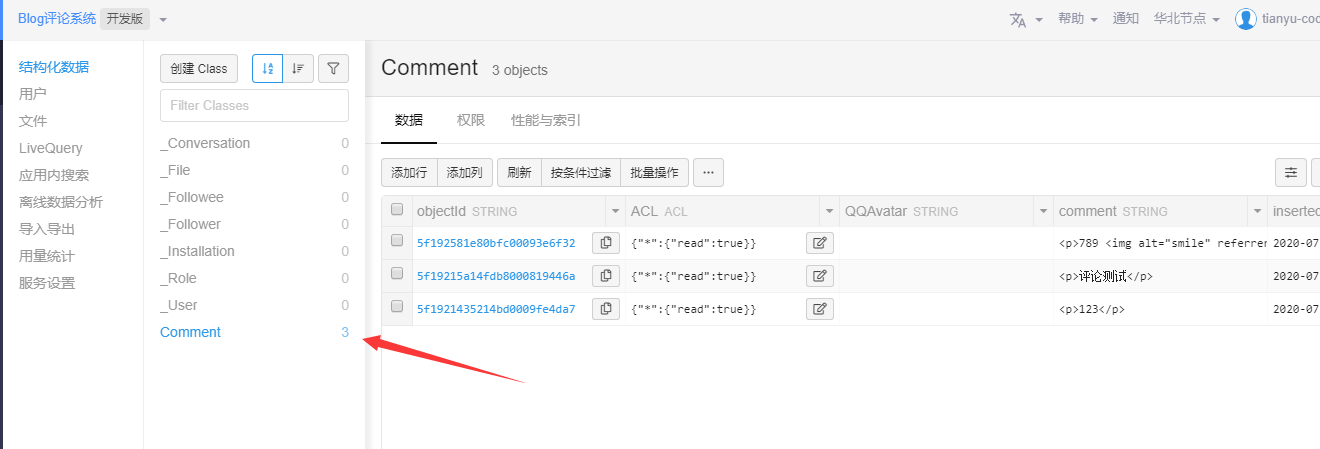
進入剛纔建立好的應用,在
「儲存」中選擇「建立Class」,設定Class名稱爲Comment,設定ACL許可權爲建立者可讀可寫,如下圖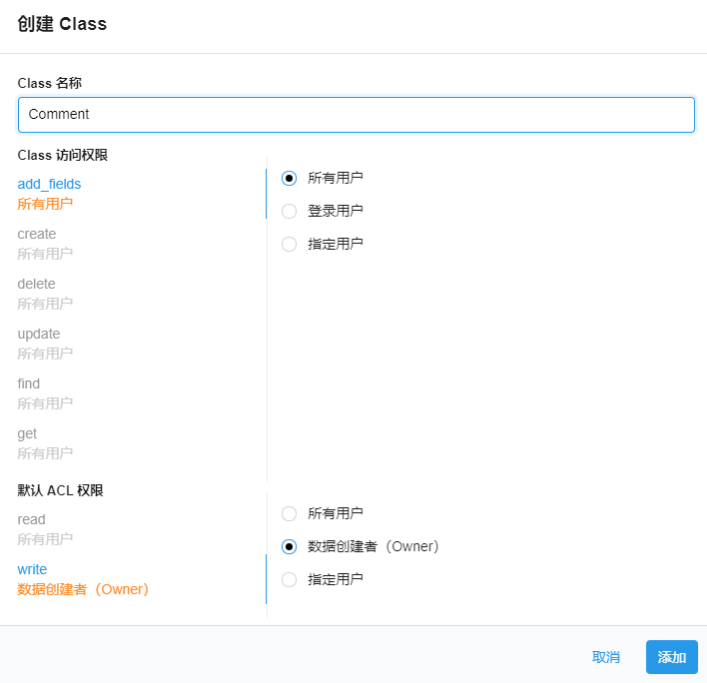
然後進入「設定」中的「安全中心」,新增Web安全域名,防止其他使用者盜用
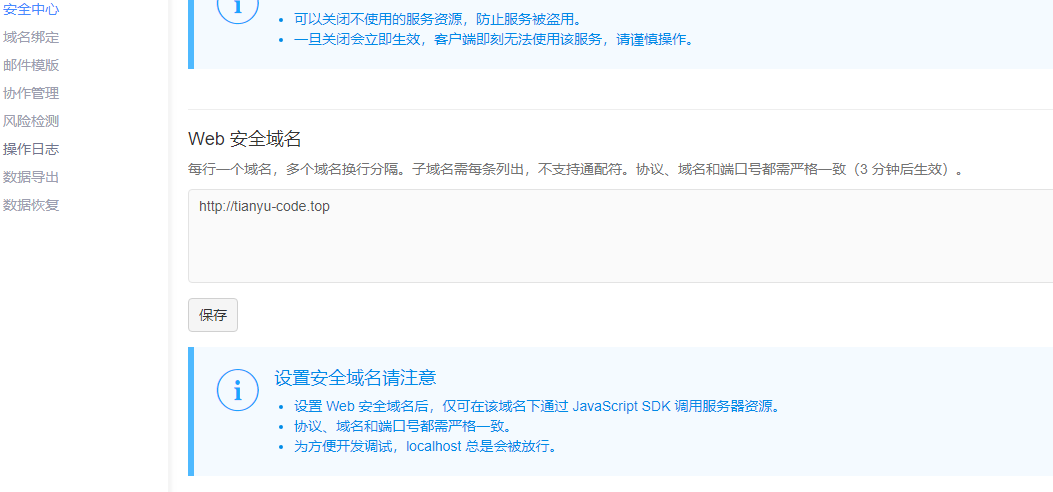
再進入
「設定」中的「應用Keys」,記錄App ID和AppKey的值 -
修改主題設定,將App ID和AppKey的值填入
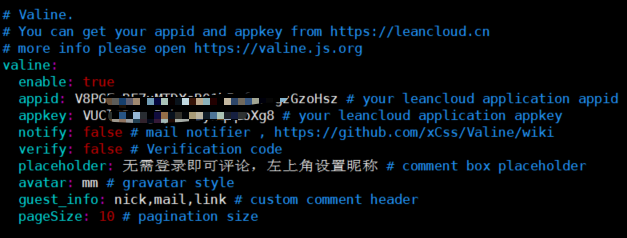
placeholder是在評論框中顯示的提示標語,預設Just go go可自行修改
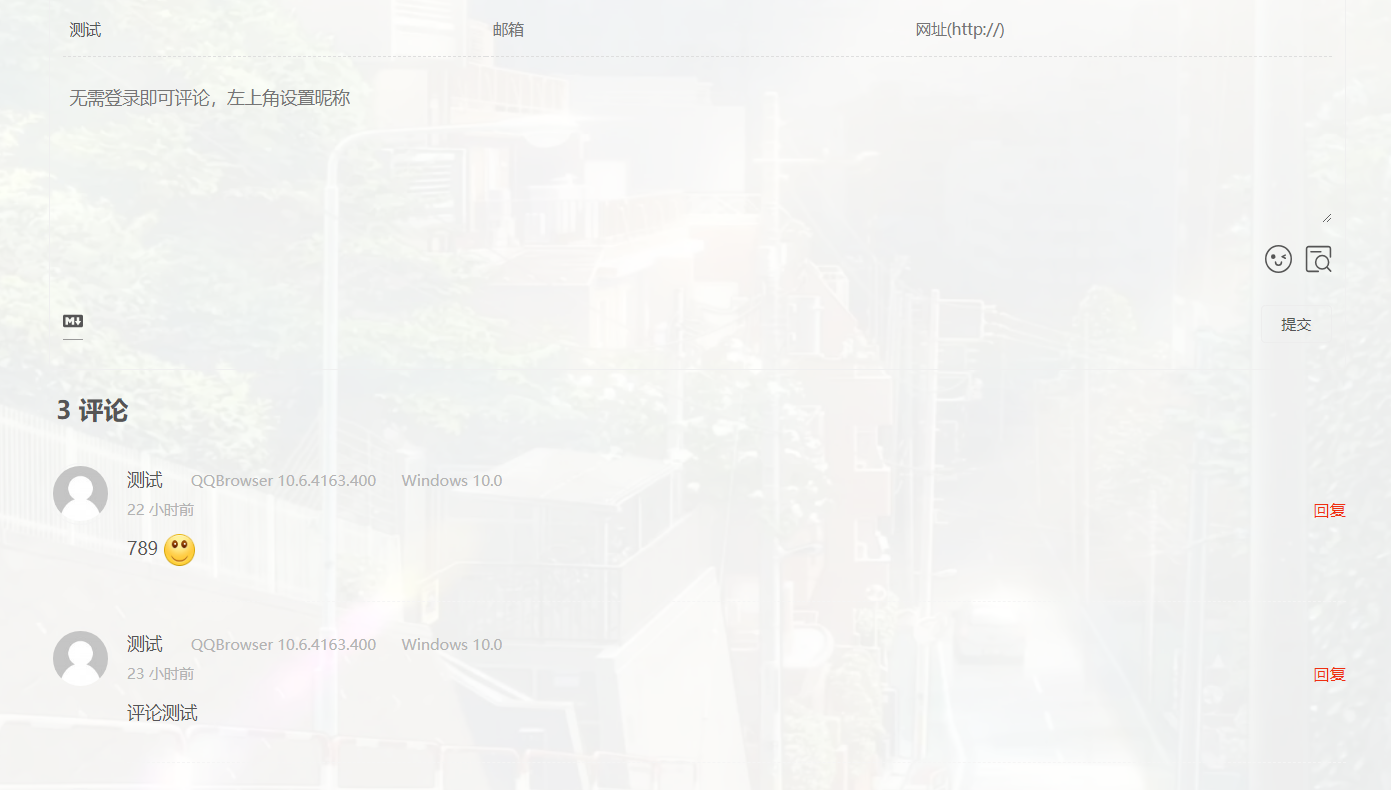
guest_info是評論上方顯示的頭部
新增成功後文章標題下訪還會有評論數的統計效果如下:
-
評論管理
管理評論在leanClound中即可
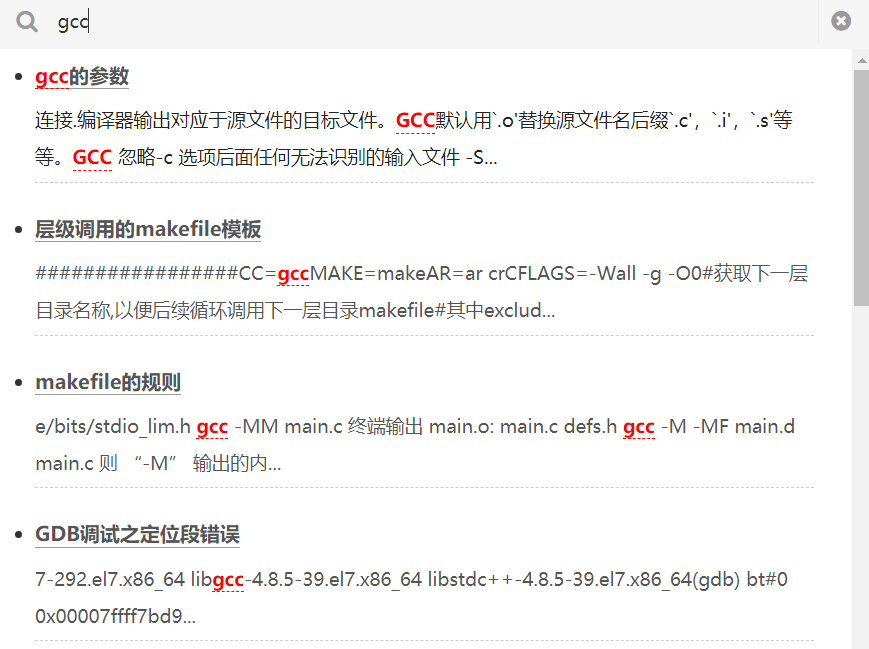
本地搜尋功能
在部落格根目錄安裝
npm install hexo-generator-searchdb --save
站點組態檔新增如下:
search:
  path: search.xml
  field: post
  format: html
  limit: 10000
主題組態檔修改如下:
# Local search
# Dependencies: https://github.com/flashlab/hexo-generator-search
local_search:
  enable: true
  # if auto, trigger search by changing input
  # if manual, trigger search by pressing enter key or search button
  trigger: auto
  # show top n results per article, show all results by setting to -1
  top_n_per_article: 1
效果圖:
取消主題預設動畫
next主題的內容和選單都有相關的動畫,影響載入速度,可以在主題組態檔中取消,將motion的enable改爲false即可
#! ---------------------------------------------------------------
#! DO NOT EDIT THE FOLLOWING SETTINGS
#! UNLESS YOU KNOW WHAT YOU ARE DOING
#! ---------------------------------------------------------------

# Use velocity to animate everything.
motion:
  enable: false
  async: false
  transition:
主要優化選項
該部分設定涉及了一些主題的css設定,影響了部落格內容的樣式等。
新增文章結束標識
在目錄 themes/next/layout/_macro/ 下新增 passage-end-tag.swig檔案,內容如下:
<div>
    {% if not is_index %}
        <div style="text-align:center;color: #ff4d4d;font-size:16px;">--------------------- 本文結束,感謝您的閱讀---------------------</div>
    {% endif %}
</div>
開啓 themes/next/layout/_macro/post.swig 檔案,新增內容如下:
<div>
    {% if not is_index %}
    {% include 'passage-end-tag.swig' %}
    {% endif %}
 </div>
開啓主題組態檔 ,新增程式碼如下:
# 文章末尾新增「本文結束」標記
passage_end_tag:
enabled: true
將亂碼的上一頁/下一頁修正
next主題存在一個bug,就是當首頁文章過多而分頁時,上一頁和下一頁會出現亂碼,如圖所示:

修改themes/next/layout/_partials/pagination.swig檔案:
{% if page.prev or page.next %}
  <nav class="pagination">
    {{
      paginator({
        prev_text: '上一頁',
        next_text: '下一頁',
        mid_size: 1
      })
    }}
  </nav>
{% endif %}
修復後效果圖:

修改文章鏈接樣式
開啓themes/next/source/css/_common/components/post/post.styl,在開頭新增
.post-body p a {
  color: #0593d3;
  border-bottom: none;
  border-bottom: 1px solid #0593d3;
  &:hover {
    color: #fc6423;
    border-bottom: none;
    border-bottom: 1px solid #fc6423;
  }
}
效果測試:個人部落格
常用CSS樣式修改
更改背景圖片
簡單程式碼塊樣式
歸檔和分類頁面的時間軸樣式
修改archives頁面行動端選單下拉的bug
部落格中參照的樣式
選中文字部分的樣式
以上所有的設定均在統一個檔案中修改:hexo/themes/next/source/css/_custom/custom.styl,該檔案一開始預設是空,可新增我們想要的css樣式(估計大部分的css修改都在此資料夾).
下面 下麪附上我的檔案修改,各種顏色,透明度等細節修改見註釋:
// Custom styles.

// 頁面整體設定

body {
	//background-image:url(https://source.unsplash.com/random/daily);
	background-image:url(/images/background.jpg); //這一行的括號裡填背景圖片的路徑,將圖片重新命名爲background.jpg放在\themes\next\source\images下
	background-repeat: no-repeat;
	background-attachment:fixed;
	background-position:50% 50%;
	background-size:100% 100%;//預設將圖片和當前視窗大小100%填充,強迫症福利
}


// ``簡單程式碼塊的自定義樣式

code {
    color: #000;
    background: rgba(255,0,0,.3);
    margin: 1px 3px;
    padding: 1px 3px;
}

// 歸檔和分類頁面的時間軸樣式

.posts-collapse {
    margin: 50px 0;
}
@media (max-width: 767px) {
    .posts-collapse {
        margin: 50px 20px;
    }
}

.posts-collapse::after {
    margin-left: -2px;
    background: rgba(255, 118, 0, 0.75);
}

.posts-collapse .post-title a {
    color: #0095ff;
}

.posts-collapse .post-title a:hover {
    color: #ff7600;
}


// 修改archives頁面行動端選單下拉的bug

.posts-collapse {
    z-index: initial;
}


// 部落格中參照的樣式
blockquote {
    padding-top: 3px;//參照框和字型上部的填充空白
    padding-right: 20px;//右邊的空白
    padding-bottom: 0px;//底部的空白
    padding-left: 20px;//左部的空白
    border-left: 5px solid rgba(255, 118, 0, 0.75);//豎條的屬性(寬度和顏色rgba,a爲透明度)
}

// 選中文字部分的樣式
::selection {
    background: rgb(46, 124, 160);
    color: rgb(255, 255, 255);
}
*::-moz-selection {
    background: rgb(46, 124, 160);
    color: rgb(255, 255, 255);
}
Gemini主題透明化
效果圖:

個人傾向於設定爲0.9,這樣不影響內容閱讀,且能模糊的看見背景緩解視覺疲勞
-
內容板塊透明
themes/next/source/css/_schemes/Pisces/_layout.styl檔案.content-wrap標籤下修改:
background: rgba(255,255,255,0.9); //0.9是透明度themes/next/source/css/_schemes/Gemini/index.styl檔案.post-block標籤下修改:
background: rgba(255,255,255,0.9); //0.9是透明度 -
分頁(主頁最下面 下麪的那一小塊)
themes/next/source/css/_schemes/Gemini/index.styl檔案.pagination標籤下修改:
background: rgba(255,255,255,0.9); //0.9是透明度 -
選單欄背景
themes/next/source/css/_schemes/Pisces/_layout.styl檔案.header-inner標籤下修改:
background: rgba(255,255,255,0.9); //0.9是透明度themes/next/source/css/_schemes/Pisces/_sidebar.styl檔案.sidebar標籤下增加一行:
opacity: 0.9; // 0.9透明度自己選擇 -
站點概況背景
themes/next/source/css/_schemes/Pisces/_sidebar.styl檔案.sidebar-inner標籤下修改:
background: rgba(255,255,255,0.9); //0.9是透明度themes/next/source/css/_schemes/Pisces/_layout.styl檔案.sidebar標籤下修改爲:
background: rgba(255,255,255,0.9); //0.9是透明度 -
評論區背景
themes/next/source/css/_schemes/Gemini/index.styl檔案.comments標籤下修改爲:
background: rgba(255,255,255,0.9); //0.9是透明度
文章目錄自動全展開
使用Next主題寫文章時, 只有當你瀏覽到相應的目錄級時纔會展開。想通過目錄快速定位某段文章的時候就很不方便,修改如下:
開啓檔案hexo/themes/next/source/css/_common/components/sidebar/sidebar-toc.styl
找到如下的程式碼:
.post-toc .nav .nav-child { display: none; }
修改爲:
.post-toc .nav .nav-child { display: block; }
修改Gemini風格的部落格介面佈局,即修改介面寬度和留白
開啓檔案hexo/themes/next/source/css/_variables/Gemini.styl
// Settings for some of the most global styles.
// --------------------------------------------------
$body-bg-color                    = #eee
$main-desktop                     = 90%      //代表整體佔用瀏覽器介面的百分比,即控制留白大小
$sidebar-desktop                  = 240px   //側邊欄出現的位置
$content-desktop                  = calc(100% - 250px)    //內容佔用的大小
修改前後對比圖:


修改字型
這裏只是簡單的改一下字型大小,格式什麼的就不動了,檔案:themes/next/source/css/_variables/base.styl
// Font size
$font-size-base           = 15px    //字型大小
$font-size-base           = unit(hexo-config('font.global.size'), px) if hexo-config('font.global.size') is a 'unit'
$font-size-small          = $font-size-base - 2px
$font-size-smaller        = $font-size-base - 4px
$font-size-large          = $font-size-base + 2px
$font-size-larger         = $font-size-base + 4px
使用不蒜子統計站點存取量
編輯主題組態檔
# Show PV/UV of the website/page with busuanzi.
# Get more information on http://ibruce.info/2015/04/04/busuanzi/
busuanzi_count:
  # count values only if the other configs are false
  enable: true
  # custom uv span for the whole site
  site_uv: true
  site_uv_header: <i class="fa fa-user"></i>本站總訪客數
  site_uv_footer: 人次
  # custom pv span for the whole site
  site_pv: true
  site_pv_header: <i class="fa fa-eye"></i>本站總存取量
  site_pv_footer: 次
  # custom pv span for one page only
  page_pv: true
  page_pv_header: 本文總閱讀量 # <i class="fa fa-file-o"></i>
  page_pv_footer: 次
由於不蒜子的域名有更改,所以我們也需要在next主題中修改:
/theme/next/layout/_third-party/analytics/busuanzi-counter.swig檔案:
src替換爲"https://busuanzi.ibruce.info/busuanzi/2.3/busuanzi.pure.mini.js"。
可選優化選項
該部分設定錦上添花,讓你的部落格變得更美觀和有意思。
圖片懶載入
當部落格圖片較多時,使用懶載入可大大加快載入速度,而且它只會載入當前介面的圖片,後續圖片當卷動到時纔會進行載入。
-
在部落格根目錄執行命令安裝外掛:
npm install hexo-lazyload-image --save. -
在站點組態檔新增設定
#懶載入設定 lazyload: enable: true onlypost: false loadingImg: # /images/loading.pngonlypost寫成false代表所有的圖片都啓用懶載入,否則就是僅文章中的圖片
loadingImg是未載入時的預設圖片,放到主題的目錄next/source/images目錄下,若不填寫則爲預設
新增介面寵物
該設定可在部落格頁面新增一隻寵物,例如:

-
在部落格根目錄安裝live2d外掛:
npm install --save hexo-helper-live2d -
在部落格根目錄安裝指定的寵物模型:
npm install live2d-widget-model-shizuku對應模型效果可參考寵物模型效果
-
在站點組態檔新增設定:
# live2D動畫
live2d:
  enable: true
  scriptFrom: local
  pluginRootPath: live2dw/
  pluginJsPath: lib/
  pluginModelPath: assets/
  tagMode: false
  debug: false
  model:
    use: live2d-widget-model-shizuku # 指明使用哪個動畫
  display:
    position: left
    width: 150    #寬度
    height: 240   #高度
    hOffset: 100  # 調節水平位置
    vOffset: 0    # 調節垂直位置
  mobile:
    show: false   #行動端是否顯示
  react:
    opacity: 0.8   #不透明度
上述設定呈現的效果即爲當前部落格中的寵物。個人部落格鏈接
新增實時溝通
儘管新增了評論系統,但是溝通效果還是差強人意,這裏我們使用daovoice,能在部落格介面新增實時溝通,將訊息發送到作者的微信
-
註冊登錄
首先進入daovoice註冊,然後通過邀請碼c54c97de啓用。之後找到APPID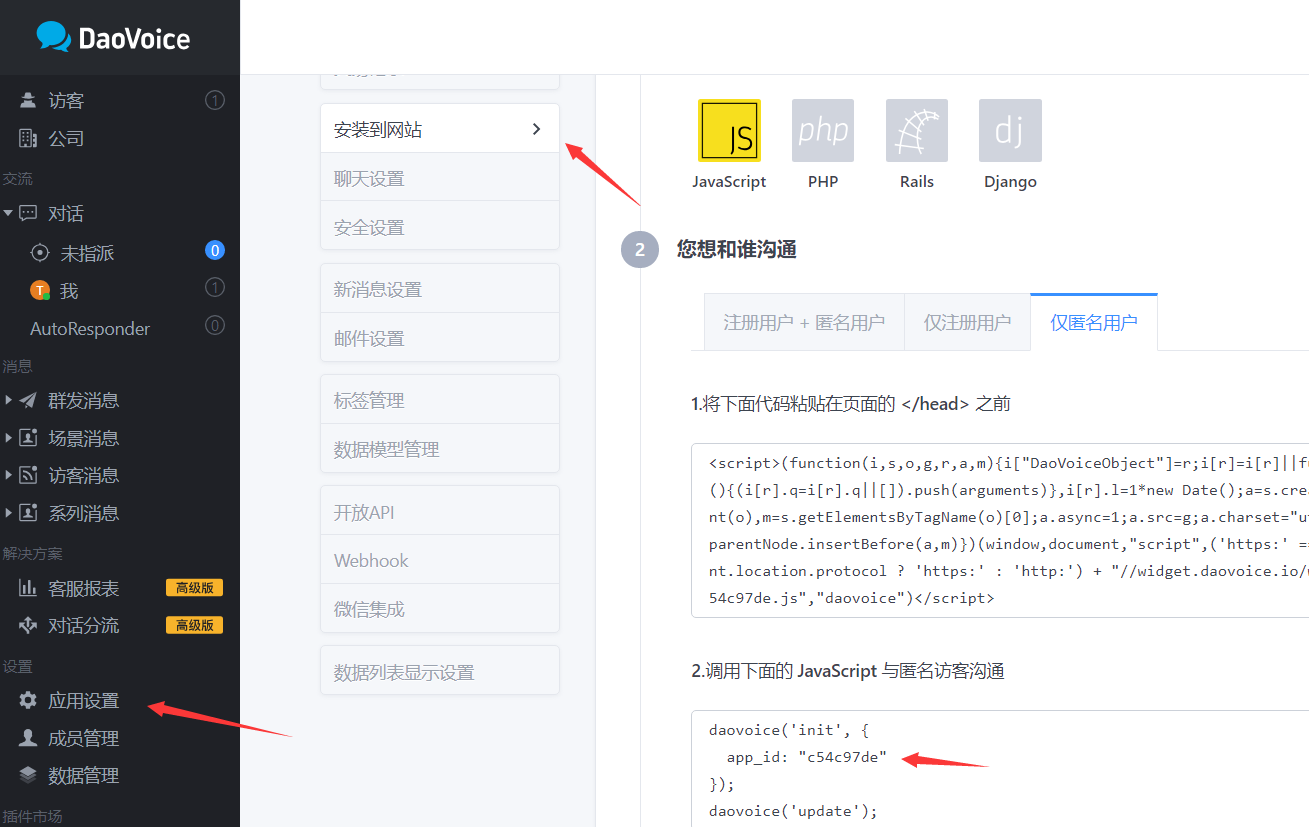
-
修改組態檔
開啓themes/next/layout/_partials/head.swig檔案,新增如下程式碼:
{% if theme.daovoice %}
  <script>
  (function(i,s,o,g,r,a,m){i["DaoVoiceObject"]=r;i[r]=i[r]||function(){(i[r].q=i[r].q||[]).push(arguments)},i[r].l=1*new Date();a=s.createElement(o),m=s.getElementsByTagName(o)[0];a.async=1;a.src=g;a.charset="utf-8";m.parentNode.insertBefore(a,m)})(window,document,"script",('https:' == document.location.protocol ? 'https:' : 'http:') + "//widget.daovoice.io/widget/0f81ff2f.js","daovoice")
  daovoice('init', {
      app_id: "{{theme.daovoice_app_id}}"
    });
  daovoice('update');
  </script>
{% endif %}
然後在主題組態檔最後新增設定
# Online contact
daovoice: true
daovoice_app_id: 這裏填你的剛纔獲得的 app_id
之後就可以看到圖示了,這個可能載入較慢