基於.NetCore開發部落格專案 StarBlog
前言
時隔五個月,終於又來更新 StarBlog 系列了~
這次是呼聲很大的評論系統。
由於涉及的程式碼量比較大,所以本文不會貼出所有程式碼,只介紹關鍵邏輯,具體程式碼請同學們自行檢視 GitHub 倉庫。
部落格前臺以及後端涉及的程式碼主要在以下檔案:
StarBlog.Web/Services/CommentService.csStarBlog.Web/Apis/Comments/CommentController.csStarBlog.Web/Views/Blog/Widgets/Comment.cshtmlStarBlog.Web/wwwroot/js/comment.js
管理後臺的程式碼在以下檔案:
src/views/Comment/Comments.vue
實現效果
在開始之前,先來看看實現的效果吧。
部落格前臺
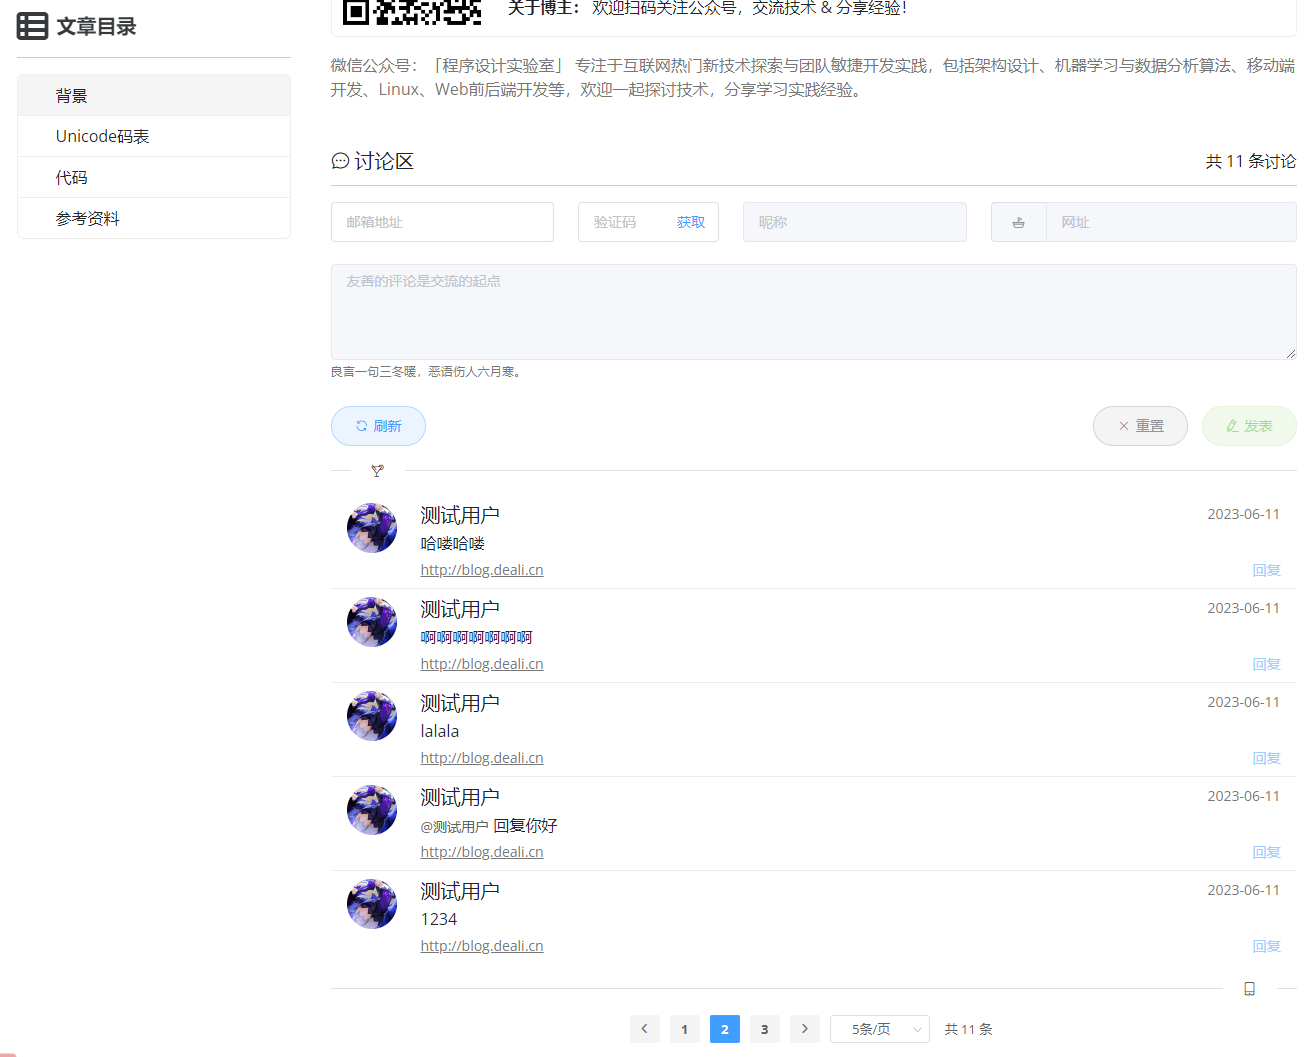
討論區的這部分UI使用 Vue 來驅動,為了開發效率還引入了 ElementUI 的元件,看起來風格跟部落格原本的 Bootstrap 不太一樣,不過還挺和諧的。
無須登入即可發表或回覆評論,但需要輸入郵箱地址並接收郵件驗證碼。
為了構建文明和諧的網路環境,發表評論之後會由小管家自動稽核,稽核通過才會展示。
如果小管家自動稽核沒有通過,會進入人工稽核流程。

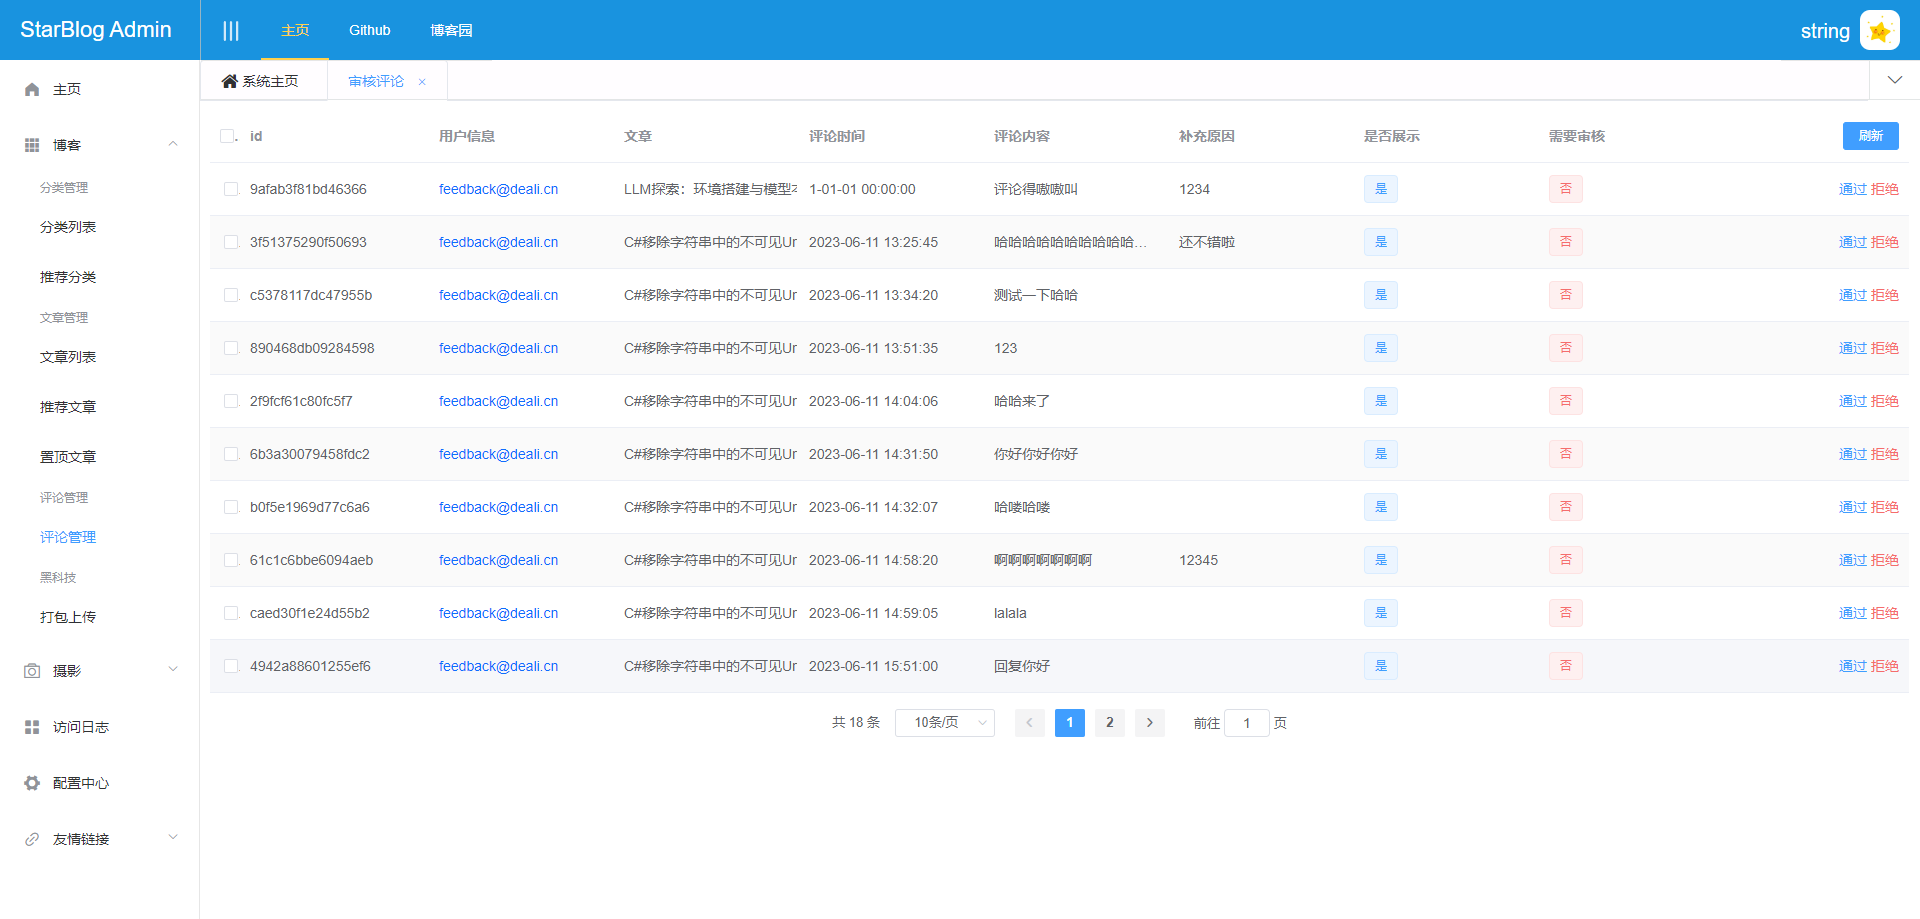
管理後臺
管理後臺可以設定評論的稽核通過或拒絕。

模型設計
功能介紹前面都說了,不再贅述,直接從程式碼開始講起。
這個功能新增了兩個實體類,分別是 Comment 和 AnonymousUser
評論實體類的程式碼如下,可以看到除了 AnonymousUser 的參照,我還預留了一個 User 屬性,目前部落格前臺是沒有做登入功能的,預留這個屬性可以方便以後的登入使用者進行評論。
public class Comment : ModelBase {
  [Column(IsIdentity = false, IsPrimary = true)]
  public string Id { get; set; }

  public string? ParentId { get; set; }
  public Comment? Parent { get; set; }
  public List<Comment>? Comments { get; set; }

  public string PostId { get; set; }
  public Post Post { get; set; }

  public string? UserId { get; set; }
  public User? User { get; set; }

  public string? AnonymousUserId { get; set; }
  public AnonymousUser? AnonymousUser { get; set; }

  public string? UserAgent { get; set; }
  public string Content { get; set; }
  public bool Visible { get; set; }

  /// <summary>
  /// 是否需要稽核
  /// </summary>
  public bool IsNeedAudit { get; set; } = false;

  /// <summary>
  /// 原因
  /// <para>如果驗證不通過的話,可能會附上原因</para>
  /// </summary>
  public string? Reason { get; set; }
}
匿名使用者實體類,簡簡單單的,需要訪客填寫的就三個欄位,IP地址自動記錄。
public class AnonymousUser : ModelBase {
  public string Id { get; set; }
  public string Name { get; set; }
  public string Email { get; set; }
  public string? Url { get; set; }
  public string? Ip { get; set; }
}
前端介面封裝
前端使用 axios 方便介面呼叫,當然使用 ES5 原生的 fetch 函數也可以,不過會多一些程式碼,懶是第一生產力。
使用 Promise 來包裝返回值,便於使用 ES5 的 async/await 語法,獲得跟C#類似的非同步開發體驗。
因為篇幅關係,本文無法列舉所有介面封裝程式碼,只舉兩個典型例子。
以下是獲取匿名使用者的介面,作為 GET 方法的例子。
getAnonymousUser(email, otp) {
  return new Promise((resolve, reject) => {
    axios.get(`/Api/Comment/GetAnonymousUser?email=${email}&otp=${otp}`)
      .then(res => resolve(res.data))
      .catch(res => resolve(res.response.data))
  })
}
以下是提交評論的介面,作為 POST 方法的例子。
submitComment(data) {
  return new Promise((resolve, reject) => {
    axios.post(`/Api/Comment`, {...data})
      .then(res => resolve(res.data))
      .catch(res => resolve(res.response.data))
  })
}
OK,這是倆最簡單的例子,沒有進行任何資料處理。
生成郵件驗證碼
通常使用雜湊表類的資料結構來儲存這種資料,本專案中,我使用 .NetCore 自帶的 MemoryCache 來儲存驗證碼,除此之外,直接使用 Dictionary 或者 Redis 都是可選項。
需要在傳送郵件的時候將郵箱地址與對應的驗證碼存入快取,然後在驗證的時候取出,驗證通過後刪除這一條記錄。
首先在 Program.cs 中註冊服務
builder.Services.AddMemoryCache();
檢查郵箱地址是否有效
在 CommentService.cs 中,封裝一個方法,使用正規表示式檢查郵箱地址。
/// <summary>
/// 檢查郵箱地址是否有效
/// </summary>
public static bool IsValidEmail(string email) {
  if (string.IsNullOrEmpty(email) || email.Length < 7) {
    return false;
  }

  var match = Regex.Match(email, @"[^@ \t\r\n]+@[^@ \t\r\n]+\.[^@ \t\r\n]+");
  var isMatch = match.Success;
  return isMatch;
}
傳送郵箱驗證碼
為了方便傳送郵件,我封裝了 EmailService,其中的傳送驗證碼的程式碼如下。
生成四位數的驗證碼直接使用 Random 生成一個在 1000-9999 之間的亂數即可。
關於發郵件,在友情連結的那篇文章裡有介紹: 基於.NetCore開發部落格專案 StarBlog - (28) 開發友情連結相關介面
/// <summary>
/// 傳送郵箱驗證碼
/// <returns>生成隨機驗證碼</returns>
/// <param name="mock">只生成驗證碼,不發郵件</param>
/// </summary>
public async Task<string> SendOtpMail(string email, bool mock = false) {
  var otp = Random.Shared.NextInt64(1000, 9999).ToString();

  var sb = new StringBuilder();
  sb.AppendLine($"<p>歡迎存取StarBlog!驗證碼:{otp}</p>");
  sb.AppendLine($"<p>如果您沒有進行任何操作,請忽略此郵件。</p>");

  if (!mock) {
    await SendEmailAsync(
      "[StarBlog]郵箱驗證碼",
      sb.ToString(),
      email,
      email
    );
  }

  return otp;
}
檢查是否有驗證碼的快取,沒有的話生成一個並行送郵件,然後存入快取,這裡我設定了過期時間是5分鐘。
public async Task<(bool, string?)> GenerateOtp(string email, bool mock = false) {
  var cacheKey = $"comment-otp-{email}";
  var hasCache = _memoryCache.TryGetValue<string>(cacheKey, out var existingValue);
  if (hasCache) return (false, existingValue);

  var otp = await _emailService.SendOtpMail(email, mock);
  _memoryCache.Set<string>(cacheKey, otp, new MemoryCacheEntryOptions {
    AbsoluteExpirationRelativeToNow = TimeSpan.FromMinutes(5)
  });

  return (true, otp);
}
介面
最後在 Controller 裡實現這個介面。
這裡只考慮了三種情況
- 郵箱地址錯誤
- 傳送郵件成功
- 上一個驗證碼在有效期,不傳送郵件
其實還有一種情況是傳送郵件失敗,不過我沒有寫在這個介面裡,如果傳送失敗會丟擲錯誤,然後被全域性的錯誤處理器攔截到並返回500資訊。
/// <summary>
/// 獲取郵件驗證碼
/// </summary>
[HttpGet("[action]")]
public async Task<ApiResponse> GetEmailOtp(string email) {
  if (!CommentService.IsValidEmail(email)) {
    return ApiResponse.BadRequest("提供的郵箱地址無效");
  }

  var (result, _) = await _commentService.GenerateOtp(email);
  return result
    ? ApiResponse.Ok("傳送郵件驗證碼成功,五分鐘內有效")
    : ApiResponse.BadRequest("上一個驗證碼還在有效期內,請勿重複請求驗證碼");
}
檢查驗證碼與獲取匿名使用者
前面在「模型設計」部分裡有說到,未登入和已登入使用者都可以發表評論(當然目前還沒有提供其他使用者登入的功能),本文只設計了未登入使用者(即匿名使用者)的評論發表流程。
在使用者傳送郵件驗證碼,並且驗證碼校驗通過之後,可以通過介面獲取到郵箱地址對應的匿名使用者資訊,這樣不會讓訪客需要多次重複輸入,同時也可以在下一次評論提交時修改這些資訊。
核對驗證碼
我在 CommentService.cs 中封裝了以下方法用於核對驗證碼,並且增加了 clear 引數,可以控制驗證通過後是否清除這個驗證碼。
/// <summary>
/// 驗證一次性密碼
/// </summary>
/// <param name="clear">驗證通過後是否清除</param>
public bool VerifyOtp(string email, string otp, bool clear = true) {
  var cacheKey = $"comment-otp-{email}";
  _memoryCache.TryGetValue<string>(cacheKey, out var value);

  if (otp != value) return false;

  if (clear) _memoryCache.Remove(cacheKey);
  return true;
}
後端介面
介面程式碼如下。
這裡把生成新驗證碼的程式碼註釋掉了,原本我設計的是獲取匿名使用者資訊和發評論都需要驗證碼,所以匿名使用者資訊獲取之後需要重新生成一個驗證碼(但不發郵件)給前端,然後前端更新一下暫存的驗證碼。
但是我發現這樣有點過度設計了,而且這種做法會給訪客帶來一定的困擾(提交的驗證碼和郵件收到的不是同一個),於是把這一個功能簡化了一下,但邏輯還保留著。
/// <summary>
/// 根據郵箱和驗證碼,獲取匿名使用者資訊
/// </summary>
[HttpGet("[action]")]
public async Task<ApiResponse> GetAnonymousUser(string email, string otp) {
  if (!CommentService.IsValidEmail(email)) return ApiResponse.BadRequest("提供的郵箱地址無效");

  var verified = _commentService.VerifyOtp(email, otp, clear: false);
  if (!verified) return ApiResponse.BadRequest("驗證碼無效");

  var anonymous = await _commentService.GetAnonymousUser(email);
  // 暫時不使用生成新驗證碼的功能,避免使用者體驗割裂
  // var (_, newOtp) = await _commentService.GenerateOtp(email, true);

  return ApiResponse.Ok(new {
    AnonymousUser = anonymous,
    NewOtp = otp
  });
}
前端邏輯
當訪客在討論區介面填寫了驗證碼之後,會觸發 change 事件,執行以下 JavaScript 程式碼。(篇幅關係做了簡化)
當用戶輸入的驗證碼長度符合要求之後,會請求後端介面校驗這個驗證碼是否正確,驗證碼正確的話後端會同時返回這個郵箱地址對應的匿名使用者資訊。
之後原本鎖著的幾個輸入框也能互動了,或者也可以點選「回覆」按鈕對其他人的評論進行回覆。
async handleEmailOtpChange(value) {
  console.log('handleEmailOtpChange', value)
  if (this.form.email?.length === 0 || value.length < 4) return

  // 設定 UI 載入狀態
  this.[對應的UI元件] = true

  // 校驗OTP & 獲取匿名使用者
  let res = await this.getAnonymousUser(this.form.email, value)

  if (res.successful) {
    if (res.data.anonymousUser) {
      this.form.userName = res.data.anonymousUser.name
      this.form.url = res.data.anonymousUser.url
    }
    this.form.emailOtp = res.data.newOtp
    // 鎖住郵箱和驗證碼,不用編輯了
    this.[對應的UI元件] = true
    // 開啟編輯使用者名稱、網址、內容、回覆
    this.[對應的UI元件] = false
  } else {
    this.$message.error(res.message)
  }
  this.userNameLoading = false
  this.urlLoading = false
}
提交評論
這部分是比較複雜的,一步步來介紹
表單驗證
利用 ElementUI 提供的表單驗證功能,雖然是比較老的元件庫了,但這塊的功能還是不錯的。
首先定義表單規則。
formRules: {
  userName: [
    {required: true, message: '請輸入使用者名稱稱', trigger: 'blur'},
    {min: 2, max: 20, message: '長度在 2 到 20 個字元', trigger: 'blur'}
  ],
  email: [
    {required: true, message: '請輸入郵箱', trigger: 'blur'},
    {type: 'email', message: '郵箱格式不正確'}
  ],
  emailOtp: [
    {required: true, message: '請輸入郵箱驗證碼', trigger: 'change'},
    {len: 4, message: '長度 4 個字元', trigger: 'change'}
  ],
  url: [
    {type: 'url', message: `請輸入正確的url`, trigger: 'blur'},
  ],
  content: [
    {required: true, message: '請輸入評論內容', trigger: 'blur'},
    {min: 1, max: 300, message: '長度 在 1 到 300 個字元', trigger: 'blur'},
    {whitespace: true, message: '評論內容只存在空格', trigger: 'blur'},
  ]
}
然後將這些定好的規則繫結到 form 元件上
<el-form :model="form" status-icon :rules="formRules" ref="form" class="my-3">
在提交的時候呼叫以下程式碼進行表單驗證。
驗證成功可以在其回撥裡執行介面呼叫等操作。
this.$refs.form.validate(async (valid) => {
  if (valid) {}
}
傳送請求
表單驗證通過之後呼叫前面封裝好的介面提交評論。
如果評論發表失敗,則顯示錯誤資訊。
如果評論發表成功,顯示資訊之後,清空整個表單,但保留郵件地址,便於訪客提交下一個評論。
最後無論成功與否,都會重新整理評論列表。
async handleSubmit() {
  this.$refs.form.validate(async (valid) => {
    if (valid) {
      this.submitLoading = true
      let res = await this.submitComment(this.form)
      if (res.successful) {
        this.$message.success(res.message)
        let email = `${this.form.email}`
        this.handleReset()
        this.form.email = email
      } else this.$message.error(res.message)
      this.submitLoading = false
      await this.getComments()
    }
  })
}
介面設計
前端的說完了,來到了後端部分,以下程式碼做了這些事:
- 核對驗證碼
- 獲取匿名使用者
- 生成新評論
- 小管家自動稽核(敏感詞檢測)
- 儲存評論並返回結果
[HttpPost]
public async Task<ApiResponse<Comment>> Add(CommentCreationDto dto) {
  if (!_commentService.VerifyOtp(dto.Email, dto.EmailOtp)) {
    return ApiResponse.BadRequest("驗證碼無效");
  }

  var anonymousUser = await _commentService.GetOrCreateAnonymousUser(
    dto.UserName, dto.Email, dto.Url,
    HttpContext.GetRemoteIPAddress()?.ToString().Split(":")?.Last()
  );

  var comment = new Comment {
    ParentId = dto.ParentId,
    PostId = dto.PostId,
    AnonymousUserId = anonymousUser.Id,
    UserAgent = Request.Headers.UserAgent,
    Content = dto.Content
  };

  string msg;
  if (_filter.CheckBadWord(dto.Content)) {
    comment.IsNeedAudit = true;
    comment.Visible = false;
    msg = "小管家發現您可能使用了不良用語,該評論將在稽核通過後展示~";
  }
  else {
    comment.Visible = true;
    msg = "評論由小管家稽核通過,感謝您參與討論~";
  }

  comment = await _commentService.Add(comment);

  return new ApiResponse<Comment>(comment) {
    Message = msg
  };
}
小管家稽核
說是評論稽核,實際上就是敏感詞檢測,本專案使用 DFA(確定性有限狀態自動機)來實現檢測。
本來這部分都可以單獨寫一篇文章介紹了,不過考慮到都寫到這了,也簡單介紹一下好了。
DFA即確定性有限狀態自動機,用於實現狀態之間的自動轉移。 與DFA對應的還有一個NFA非確定有限狀態自動機,二者統稱為有限自動狀態機FSM。它們的主要區別在於 從一個狀態轉移的時候是否能唯一確定下一個狀態。NFA在轉移的時候往往不是轉移到某一個確定狀態,而是某個狀態集合,其中的任一狀態都可作為下一個狀態,而DFA則是確定的。
DFA的組成
- 一個非空有限狀態集合 Q
- 一個輸入集合 E
- 狀態轉移函數 f
- 初始狀態 q0 為Q的一個元素
- 終止狀態集合 Z 為Q的子集
一個DFA可以寫成 M=(Q, E, f, q0, Z)
如何使用DFA實現敏感詞過濾演演算法
現假設有NND, CNM, MLGB三個敏感詞,則:
Q = {N, NN, NND, C, CN, CNM, M, ML, MLG, MLGB}
以所有敏感詞的組成作為狀態集合,狀態機只需在這些狀態之間轉移即可
E = {B, C, D, G, L, N, M}, 以所有組成敏感詞的單個字元作為輸入集合,狀態機只需識別構成敏感詞的字元。
qo = null 初始狀態為空,為空的初態可以轉移到任意狀態
Z = {NND, CNM, MLGB} 識別到任意一個敏感詞, 狀態轉移就可以終止了。
那麼f 就可以是一個 讀入一個字元后查詢是否為Q中的狀態進而轉移的函數,則轉移過程為
f(null, N) = N, f(N, N) = NN, f(NN, D) = NND
f(null, C) = C, f(C, N) = CN, f(CN, M) = CNM
f(null, M) = M , f(M, L) = ML, f(ML, G) = MLG, f(MLG, B) = MLGB
使用方式
具體的實現程式碼比較長,我就不貼了,本文的篇幅已經嚴重超長了…
總之我把這部分程式碼封裝好了,在 CodeLab.Share 這個 nuget 包裡,直接呼叫就完事了。
所以可以看到我在 StarBlog 專案裡寫了一個 TempFilterService
因為封裝好的 StopWordsToolkit 有很多功能,不僅可以檢測敏感詞,還可以自動替換成星號啥的,當時在做這個功能的時候還想著要不要加點奇奇怪怪的功能,所以叫把這個 service 加了個 temp 的字首。
public class TempFilterService {
    private readonly StopWordsToolkit _toolkit;

    public TempFilterService() {
        var words = JsonSerializer.Deserialize<IEnumerable<Word>>(File.ReadAllText("words.json"));
        _toolkit = new StopWordsToolkit(words!.Select(a => a.Value));
    }

    public bool CheckBadWord(string word) {
        return _toolkit.CheckBadWord(word);
    }
}
這裡初始化的時候需要 words.json 這個敏感詞庫檔案,為了網路環境的文明和諧,本專案的開原始碼裡不能提供,需要的同學可以自行蒐集。
格式是這樣的
[
  {
    "Id": 1,
    "Value": "小可愛",
    "Tag": "暴力"
  },
  {
    "Id": 2,
    "Value": "河蟹",
    "Tag": "廣告"
  }
]
人工稽核
當評論被小管家判定有敏感詞的時候,就會標記 IsNeedAudit=true 進入人工稽核流程。
就是 Accept 和 Reject 這倆方法。
public async Task<Comment> Accept(Comment comment, string? reason = null) {
  comment.Visible = true;
  comment.IsNeedAudit = false;
  comment.Reason = reason;
  await _commentRepo.UpdateAsync(comment);
  return comment;
}
對應的介面
[Authorize]
[HttpPost("{id}/[action]")]
public async Task<ApiResponse<Comment>> Accept([FromRoute] string id, [FromBody] CommentAcceptDto dto) {
  var item = await _commentService.GetById(id);
  if (item == null) return ApiResponse.NotFound();
  return new ApiResponse<Comment>(await _commentService.Accept(item, dto.Reason));
}
管理後臺
接下來會有專門的一個系列介紹基於 Vue 的管理後臺開發,所以本文不會花太多篇幅介紹,只簡單記錄一點。
原本我使用了 Dialog 來讓使用者輸入通過或拒絕某個評論稽核的原因,後面發現 ElementUI 提供了 prompt 功能,可以彈出一個簡單的輸入框。
所以拒絕某個評論的程式碼如下
handleReject(item) {
  this.$prompt('請輸入原因', '稽核評論 - 補充原因', {
    confirmButtonText: '確定',
    cancelButtonText: '取消',
  }).then(({value}) => {
    this.$api.comment.reject(item.id, value)
      .then(res => {
      this.$message.success('操作成功!')
    })
      .catch(res => {
      console.error(res)
      this.$message.warning(`操作失敗!${res.message}`)
    })
      .finally(() => this.loadData())
  }).catch(() => {
  })
}
小結
評論不是一個簡單的功能,本文僅僅介紹評論系統開發中的關鍵步驟和程式碼,就已經有了這麼長的篇幅,要做得完善好用需要考慮方方面面的細節,經過一段時間的努力,我已經初步在 StarBlog 裡完成一個簡單可用的評論系統。
參考資料
- element-ui 表單校驗 Rules 設定 常用黑科技 - https://www.cnblogs.com/loveyt/p/13282518.html
- http://mot.ttthyy.com/328.html