【YOLOv5】實現撲克牌的點數識別
前言
其實年初的時候,我也跟著別人的原始碼,用 Tensoflow 實現過撲克牌的目標檢測。雖然也通過博文的方式記錄了,但是那個專案使用的 TF 版本比較舊,自身對 TF 並不熟。後期如果說要升級或修改估計夠嗆,知道最近看到 YOLO 對目標檢測的實現方法,發現這個更方便快捷。
於是決定用 YOLOv5.6 來重新實現一下撲克牌的點數識別,本文章主要是個人記錄,也面向剛剛接觸 YOLO 的同學閱讀。所以以下會從資料標註,歸一化處理到模型訓練的實戰內容,也包括各種踩坑經歷和處理方法,最後對 detect.py 的重寫,完成目標物件的座標和識別標記輸出。
YOLO 簡介
YOLO(You Only Look Once)是一種基於深度神經網路的物件識別和定位演演算法,其最大的特點是執行速度很快,可以用於實時系統。現在 YOLO 已經發展到 v8 版本,每個版本都在原有基礎上改進演化的。選擇 V5 是因為後面幾個新版發行並不久,v5 相關資料和文章較多,踩坑起來也好搜尋。其中每個版本里又有按場景劃分幾個特定場景版本,比如:
- YOLOv5s:最小版本,速度最快,但檢測效能最低。
- YOLOv5m:中等版本,速度比 s 慢一些,但檢測效能更好。
- YOLOv5l:大型版本,速度比 m 慢,但檢測效能更好。
- YOLOv5x:最大版本,速度最慢,但是檢測效能最好。
- YOLOv5n6:中等版本,速度比 m 快一些,但檢測效能更好。
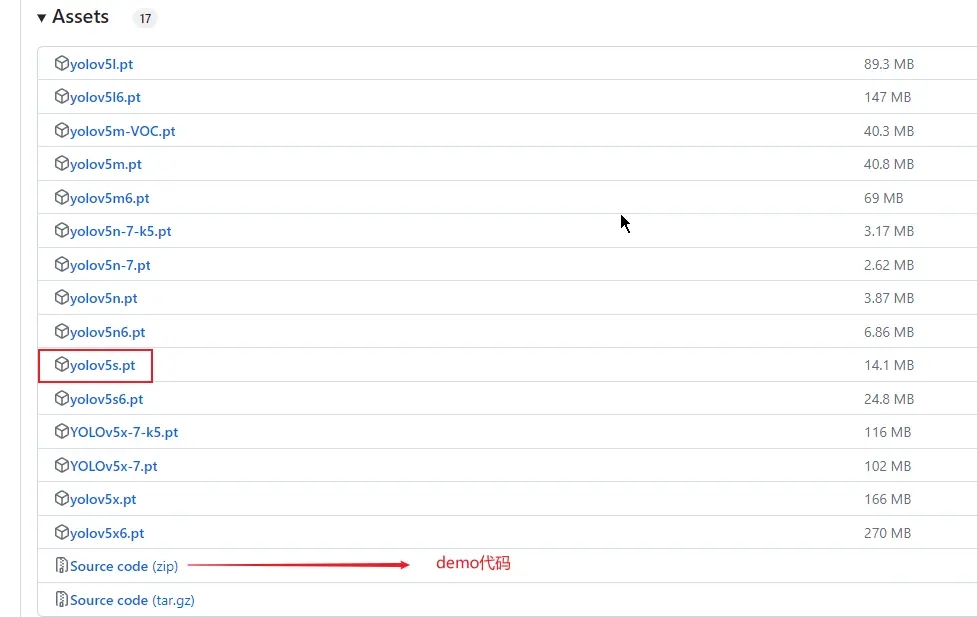
總之,根據具體需求和應用場景,可以選擇合適的 YOLOv5 版本以滿足效能、速度和準確性的要求,我這裡以 YOLOv5s 為例。然後在專案開始前呢,我們可以先去 https://github.com/ultralytics/yolov5 下載 demo 程式碼和權重檔案,比如 yolov5s.pt,下載完後就要準備資料集,也就是標記的圖片。
資料集
圖片的話,看你要識別的目標是啥,可以拍攝整理或去網上下載。為了讓訓練的模型稍微有點準確,最好準備一兩百張,我這裡就直接從原來 TF 專案那裡拿過來。一共有 363 張撲克牌圖片並且都已經用 VOC 格式標註好了,不過為了大家瞭解,這裡還是會介紹如何標註,以及標註工具 labelImg 的基本使用。
LabelImg 使用
操作介面
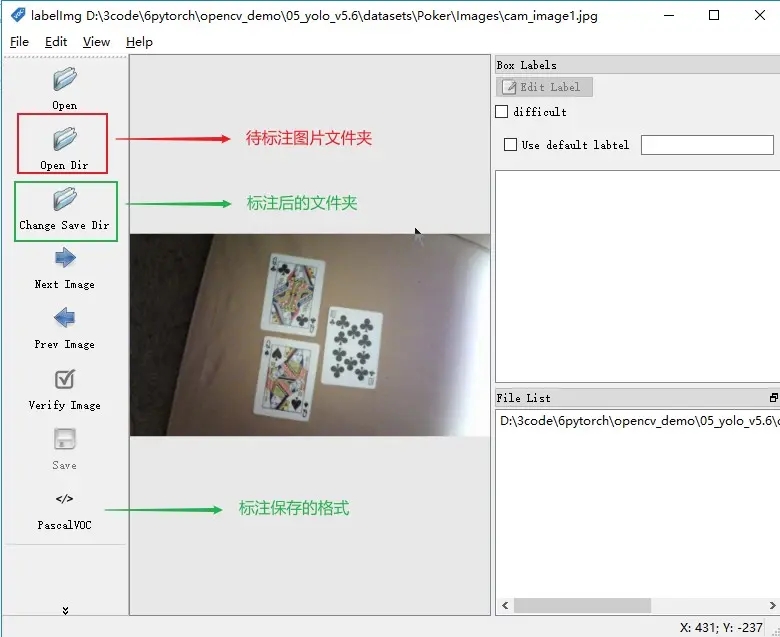
快捷使用
1、W 是進行標註
2、A 是切換到上一張圖片
3、D 是切換到下一張圖片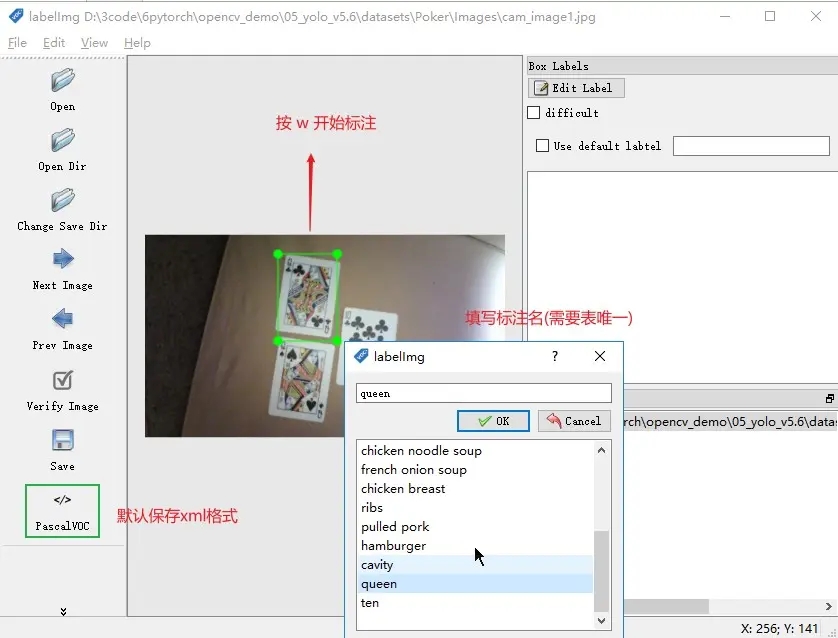
LabelImg 儲存格式
1. PascalVOC 預設,xml格式
2. YOLO text可以直接拿來訓練不用轉換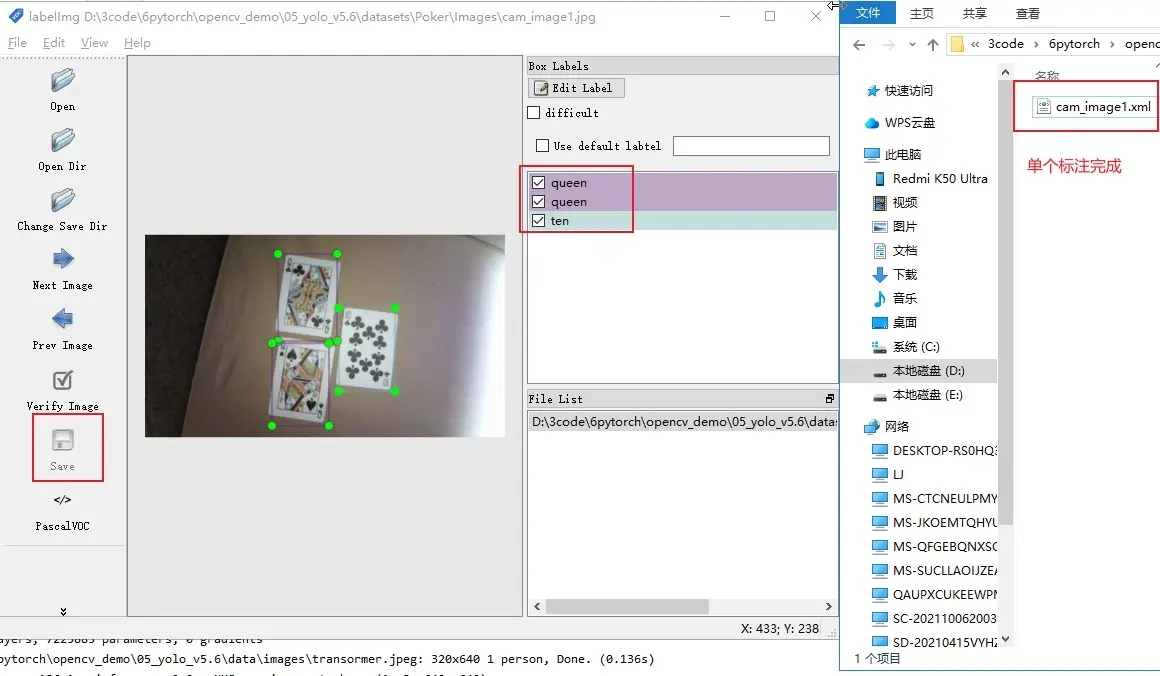
實戰
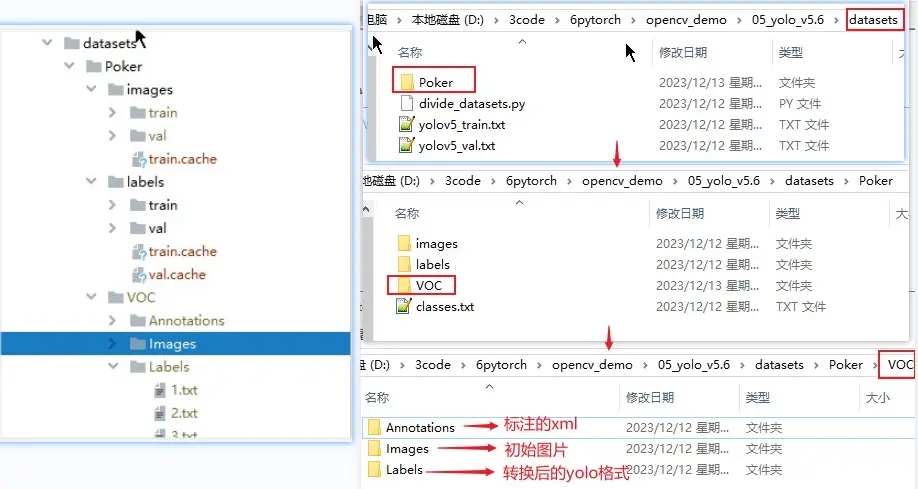
建立目錄
在根目錄下新建 datasets 用於放置訓練的資料集,由於用同一 yolo 可以建立多個檢測目標,所以在 datasets 先建立一個專案名目錄。然後再在專案名下可建立 VOC 和 YOLO 兩種格式的目錄,雖然 labelImg 標註後可以直接儲存 YOLO 格式也就是歸一化後的 text,但是畢竟三百多張圖的標註,我這裡依然使用以前 TF 的 VOC 的標註資料。如果需要這些資料集的,可以留言,到時我再放在評論區。
依賴安裝
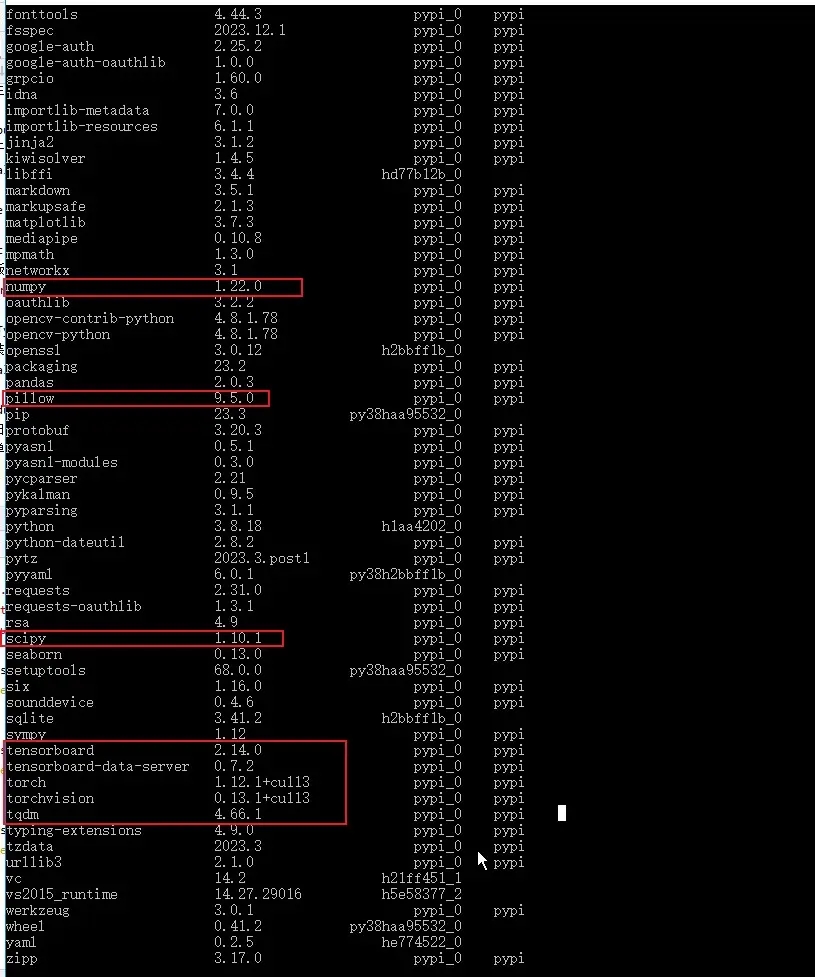
依賴直接安裝專案根目錄下的 requirements.txt 就可以,但是要嚴格按照裡面的版本。因為我用的是以前 conda 建立的環境,可以包都裝過,所以一開始就看到已經有的就沒裝,導致後面執行的時候很多問題都是包的版本問題。所以最好的方法就是用 conda 建立一個新環境,然後直接 pip install -r requirements.txt 是最好的。
歸一化和資料集劃分
如果 LabelImg 標註後儲存的是 YOLO 格式,歸一化過程就可以略過了。前面我也說了是用的以前撲克牌的 VOC 格式,所以需要對 xml 裡節點資料抽取座標和標記然後轉換成 yolo 的 txt 格式。以下程式碼是我從其他博主那薅過來的,主要就是歸一化和劃分訓練資料集和校驗資料集。特別主要是 classes 部分要修改成自己的目標分類,其他的可以不用改動,當然只是劃分的話可以適當刪減。
import xml.etree.ElementTree as ET
import pickle
import os
from os import listdir, getcwd
from os.path import join
import random
from shutil import copyfile

classes = ["nine", "ten", "jack", "queen", "king", "ace"]
TRAIN_RATIO = 80


def clear_hidden_files(path):
    dir_list = os.listdir(path)
    abspath = ""
    for i in dir_list:
        abspath = os.path.join(os.path.abspath(path), i)
    if os.path.isfile(abspath):
        if i.startswith("._"):
            os.remove(abspath)
    else:
        clear_hidden_files(abspath)


def convert(size, box):
    dw = 1. / size[0]
    dh = 1. / size[1]
    x = (box[0] + box[1]) / 2.0
    y = (box[2] + box[3]) / 2.0
    w = box[1] - box[0]
    h = box[3] - box[2]
    x = x * dw
    w = w * dw
    y = y * dh
    h = h * dh
    return (x, y, w, h)


def convert_annotation(image_id):
    in_file = open('Poker/VOC/Annotations/%s.xml' % image_id)
    out_file = open('Poker/VOC/Labels/%s.txt' % image_id, 'w')

    tree = ET.parse(in_file)
    root = tree.getroot()
    size = root.find('size')
    w = int(size.find('width').text)
    h = int(size.find('height').text)

    for obj in root.iter('object'):
        difficult = obj.find('difficult').text
        cls = obj.find('name').text
        if cls not in classes or int(difficult) == 1:
            continue

        cls_id = classes.index(cls)
        xmlbox = obj.find('bndbox')
        b = (float(xmlbox.find('xmin').text), float(xmlbox.find('xmax').text), float(xmlbox.find('ymin').text),
             float(xmlbox.find('ymax').text))
        bb = convert((w, h), b)

        out_file.write(str(cls_id) + " " + " ".join([str(a) for a in bb]) + '\n')

    in_file.close()
    out_file.close()

# 開始執行 ##
wd = os.getcwd()
data_base_dir = os.path.join(wd, "Poker/")
if not os.path.isdir(data_base_dir):
    os.mkdir(data_base_dir)

work_sapce_dir = os.path.join(data_base_dir, "VOC/")
if not os.path.isdir(work_sapce_dir):
    os.mkdir(work_sapce_dir)

annotation_dir = os.path.join(work_sapce_dir, "Annotations/")
if not os.path.isdir(annotation_dir):
    os.mkdir(annotation_dir)

image_dir = os.path.join(work_sapce_dir, "Images/")
if not os.path.isdir(image_dir):
    os.mkdir(image_dir)

yolo_labels_dir = os.path.join(work_sapce_dir, "Labels/")
if not os.path.isdir(yolo_labels_dir):
    os.mkdir(yolo_labels_dir)

yolov5_images_dir = os.path.join(data_base_dir, "images/")
if not os.path.isdir(yolov5_images_dir):
    os.mkdir(yolov5_images_dir)

yolov5_labels_dir = os.path.join(data_base_dir, "labels/")
if not os.path.isdir(yolov5_labels_dir):
    os.mkdir(yolov5_labels_dir)

yolov5_images_train_dir = os.path.join(yolov5_images_dir, "train/")
if not os.path.isdir(yolov5_images_train_dir):
    os.mkdir(yolov5_images_train_dir)

yolov5_images_test_dir = os.path.join(yolov5_images_dir, "val/")
if not os.path.isdir(yolov5_images_test_dir):
    os.mkdir(yolov5_images_test_dir)

yolov5_labels_train_dir = os.path.join(yolov5_labels_dir, "train/")
if not os.path.isdir(yolov5_labels_train_dir):
    os.mkdir(yolov5_labels_train_dir)

yolov5_labels_test_dir = os.path.join(yolov5_labels_dir, "val/")
if not os.path.isdir(yolov5_labels_test_dir):
    os.mkdir(yolov5_labels_test_dir)

train_file = open(os.path.join(wd, "yolov5_train.txt"), 'w')
test_file = open(os.path.join(wd, "yolov5_val.txt"), 'w')
train_file.close()
test_file.close()

train_file = open(os.path.join(wd, "yolov5_train.txt"), 'a')
test_file = open(os.path.join(wd, "yolov5_val.txt"), 'a')

list_imgs = os.listdir(image_dir)  # list image files
prob = random.randint(1, 100)
print("Probability: %d" % prob)

for i in range(0, len(list_imgs)):
    path = os.path.join(image_dir, list_imgs[i])
    if os.path.isfile(path):
        image_path = image_dir + list_imgs[i]
        voc_path = list_imgs[i]
        (nameWithoutExtention, extention) = os.path.splitext(os.path.basename(image_path))
        (voc_nameWithoutExtention, voc_extention) = os.path.splitext(os.path.basename(voc_path))
        annotation_name = nameWithoutExtention + '.xml'
        annotation_path = os.path.join(annotation_dir, annotation_name)

        label_name = nameWithoutExtention + '.txt'
        label_path = os.path.join(yolo_labels_dir, label_name)

    prob = random.randint(1, 100)
    print("Probability: %d" % prob)

    if (prob < TRAIN_RATIO):  # train dataset
        if os.path.exists(annotation_path):
            train_file.write(image_path + '\n')
            convert_annotation(nameWithoutExtention)  # convert label
            copyfile(image_path, yolov5_images_train_dir + voc_path)
            copyfile(label_path, yolov5_labels_train_dir + label_name)
    else:  # test dataset
        if os.path.exists(annotation_path):
            test_file.write(image_path + '\n')
            convert_annotation(nameWithoutExtention)  # convert label
            copyfile(image_path, yolov5_images_test_dir + voc_path)
            copyfile(label_path, yolov5_labels_test_dir + label_name)

train_file.close()
test_file.close()
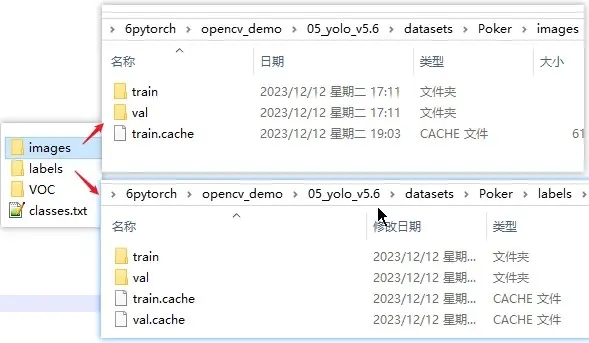
上面程式碼放在哪個位置看你自己,由於有些目錄是相對位置,所以如果不想改也跟我一樣放在 datasets 中。執行完上面程式碼後會在 datasets 下生成 images 和 labels 兩個目錄,而且特別注意的是這兩個目錄名最好就是也是這樣,比如在上面程式碼改了生成名,在後面訓練的時候,會提示找不到 labels 目錄。當然也可以修改 YOLO 提供原始碼的 dataset.py,看個人選擇,而且 images 裡的 train 和 val 需要設定到 data 的 yaml 中,這個馬上就會說。
設定
資料集設定
該預設檔案位於專案的 data/coco128.yaml,現在我們進行劃分了資料集和自己的目標種類,當然要對其進行重新設定。最好的方法就是複製一份 coco128 然後修改名稱,如下面 coco128_pocker.yaml 是我的設定範例。
train: D:\3code\6pytorch\opencv_demo\05_yolo_v5.6\datasets\Poker\images\train  # train images (relative to 'path') 128 images
val: D:\3code\6pytorch\opencv_demo\05_yolo_v5.6\datasets\Poker\images\val  # val images (relative to 'path') 128 images

# Classes
nc: 6  # number of classes
names: ["nine", "ten", "jack", "queen", "king", "ace"]  # class names

# Download script/URL (optional)
download: https://ultralytics.com/assets/coco128.zip
模型設定
該預設檔案位於專案的 model 下,然後選擇自己的場景,如我用的是 v5s 同樣就複製一份重新命名。這個檔案主要是定義模型的基本機構和引數,比如分類數目 nc,模型深度倍數 depth_multiple,每層通道數倍數 width_multiple,以及目標框的大小和比例的 anchors。在剛使用 YOLO 的話,我們就改個 nc 就可以,後面再研究這些引數的用法,下面是 yolov5s_pocker.yaml 的範例。
# Parameters
nc: 6  # number of classes
depth_multiple: 0.33  # model depth multiple
width_multiple: 0.50  # layer channel multiple
anchors:
  - [10,13, 16,30, 33,23]  # P3/8
  - [30,61, 62,45, 59,119]  # P4/16
  - [116,90, 156,198, 373,326]  # P5/32

# YOLOv5 v6.0 backbone
backbone:
  # [from, number, module, args]
  [[-1, 1, Conv, [64, 6, 2, 2]],  # 0-P1/2
   [-1, 1, Conv, [128, 3, 2]],  # 1-P2/4
   [-1, 3, C3, [128]],
   [-1, 1, Conv, [256, 3, 2]],  # 3-P3/8
   [-1, 6, C3, [256]],
   [-1, 1, Conv, [512, 3, 2]],  # 5-P4/16
   [-1, 9, C3, [512]],
   [-1, 1, Conv, [1024, 3, 2]],  # 7-P5/32
   [-1, 3, C3, [1024]],
   [-1, 1, SPPF, [1024, 5]],  # 9
  ]

# YOLOv5 v6.0 head
head:
  [[-1, 1, Conv, [512, 1, 1]],
   [-1, 1, nn.Upsample, [None, 2, 'nearest']],
   [[-1, 6], 1, Concat, [1]],  # cat backbone P4
   [-1, 3, C3, [512, False]],  # 13

   [-1, 1, Conv, [256, 1, 1]],
   [-1, 1, nn.Upsample, [None, 2, 'nearest']],
   [[-1, 4], 1, Concat, [1]],  # cat backbone P3
   [-1, 3, C3, [256, False]],  # 17 (P3/8-small)

   [-1, 1, Conv, [256, 3, 2]],
   [[-1, 14], 1, Concat, [1]],  # cat head P4
   [-1, 3, C3, [512, False]],  # 20 (P4/16-medium)

   [-1, 1, Conv, [512, 3, 2]],
   [[-1, 10], 1, Concat, [1]],  # cat head P5
   [-1, 3, C3, [1024, False]],  # 23 (P5/32-large)

   [[17, 20, 23], 1, Detect, [nc, anchors]],  # Detect(P3, P4, P5)
  ]
權重檔案
這個就是我們從 yolo 開源那裡下載的 yolov5s.pt,這裡面有 80 個類目的檢測,在基礎識別時候可以直接用它。而訓練自己的目標也需要基於他的權重再進行訓練,所以可以在專案中建立一個 weights,然後再將 yolov5s.pt 放到其中。
訓練
基礎預測
在訓練目標模型前,可以先試試以前的基礎檢測,這裡我們可以隨便拿一張圖放到 data/images 下,然後執行下面命令,根目錄下會生成 runs,而 runs 下的 detect 會根據每次執行的次數生成不同次的標註結果。
python detect.py --weights weights/yolov5s.pt --source data/images/zidane.jpg
指令介紹
source: 需要進行檢測的圖片或視訊的檔案位置
weigths: 指的是訓練好的網路模型,用來初始化網路權重
cfg:為configuration的縮寫,指的是網路結構,一般對應models資料夾下的xxx.yaml檔案
data:訓練資料路徑,一般為data資料夾下的xxx.yaml檔案
epochs:設定訓練的輪數(自己電腦上一般建議先小一點,測試一下,看跑一輪要多久)
batch-size:每次輸出給神經網路的圖片數,(需要根據自己電腦效能進行調整)
img-size:用於分別設定訓練集和測試集的大小。兩個數位前者為訓練集大小,後者為測試集大小
image-weights:測試過程中,影象的那些測試地方不太好,對這些不太好的地方加權重
device:訓練網路的裝置cpu還是gpu
multi-scale:訓練過程中對圖片進行尺度變換
workers: 多執行緒訓練
label-smoothing: 對標籤進行平滑處理,防止過擬合
開始訓練
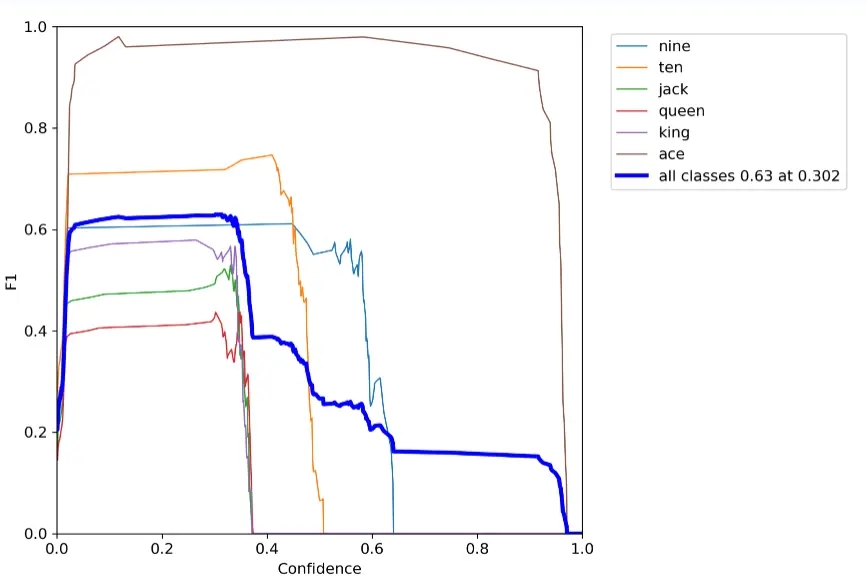
以下是我踩過坑後執行的命令,因為當時我用 CPU 訓練一輪要 7 分鐘就改成了 GPU,加了 --device 0 後速度快了 4 倍。batch-size 為 2,這麼小是因為我的顯示卡 750Ti 視訊記憶體只有 2G,就暫時用了這個數值。而加了 --workers 0,也是因為有坑,這個後面再說。訓練完成後,會在根目錄的 runs/train 下生成每次執行的權重檔案和損失準確範例圖等,其中 weights 下的 best.pt 和 last.pt,分別表示本輪訓練最好的權重和最新的權重。
python train.py --weights weights/yolov5s.pt --cfg models/yolov5s_pocker.yaml --data data/coco128_pocker.yaml --epochs 1 --batch-size 2 --multi-scale --device 0 --workers 0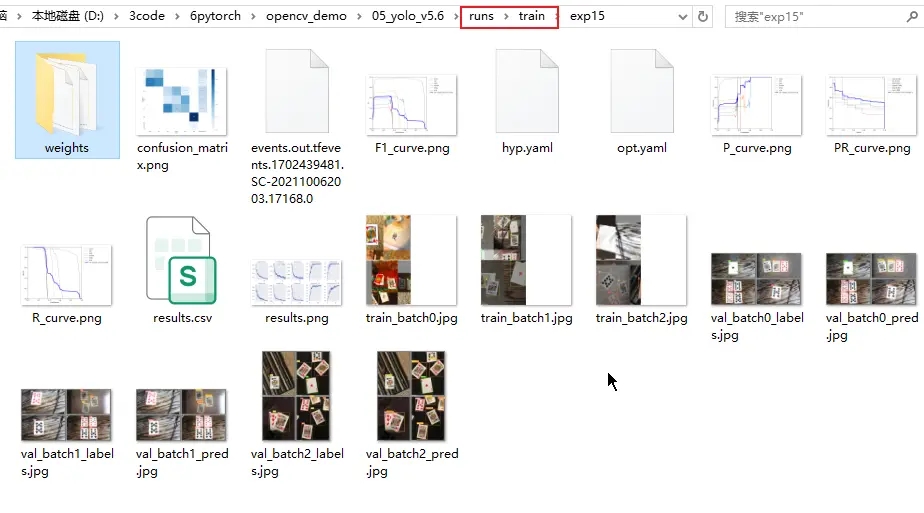
開始檢測
訓練完成後,我們可以把本輪的 best.pt 放到根目錄的 weights 下,以下是不同檢測方式的命令,可以分別都試一下。
1. 圖片
python detect.py  --weights weights/best.pt --data data/coco128_pocker.yaml --source data/images/cam_image16.jpg
2. 視訊
python detect.py  --weights weights/best.pt --data data/coco128_pocker.yaml --source data/images/test.mov
3. 使用cuda測試
python detect.py --device 0 --weights weights/best.pt --data data/coco128_pocker.yaml --source data/images/IMG_2681.JPG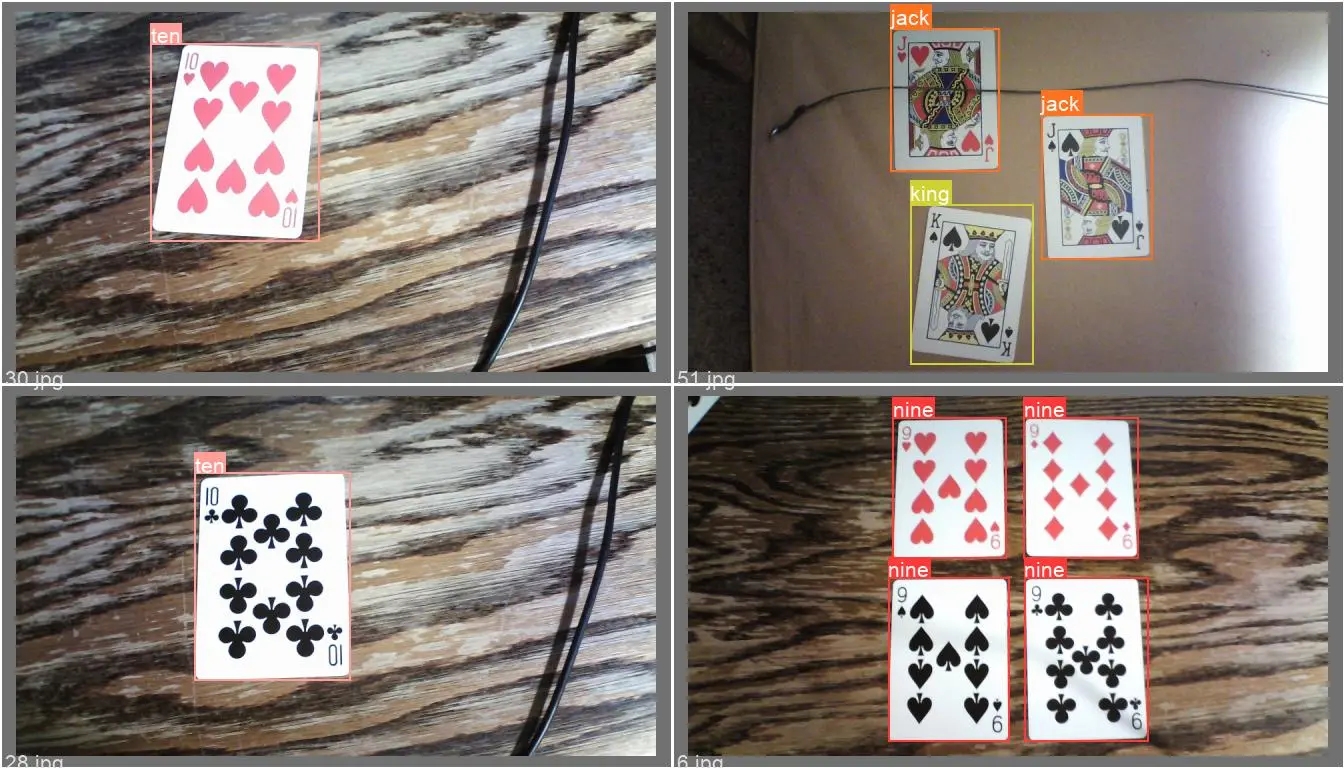
detect.py 重寫
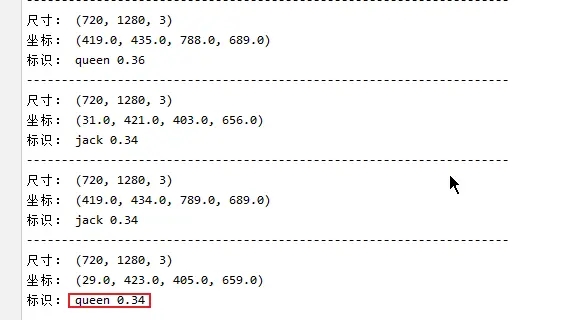
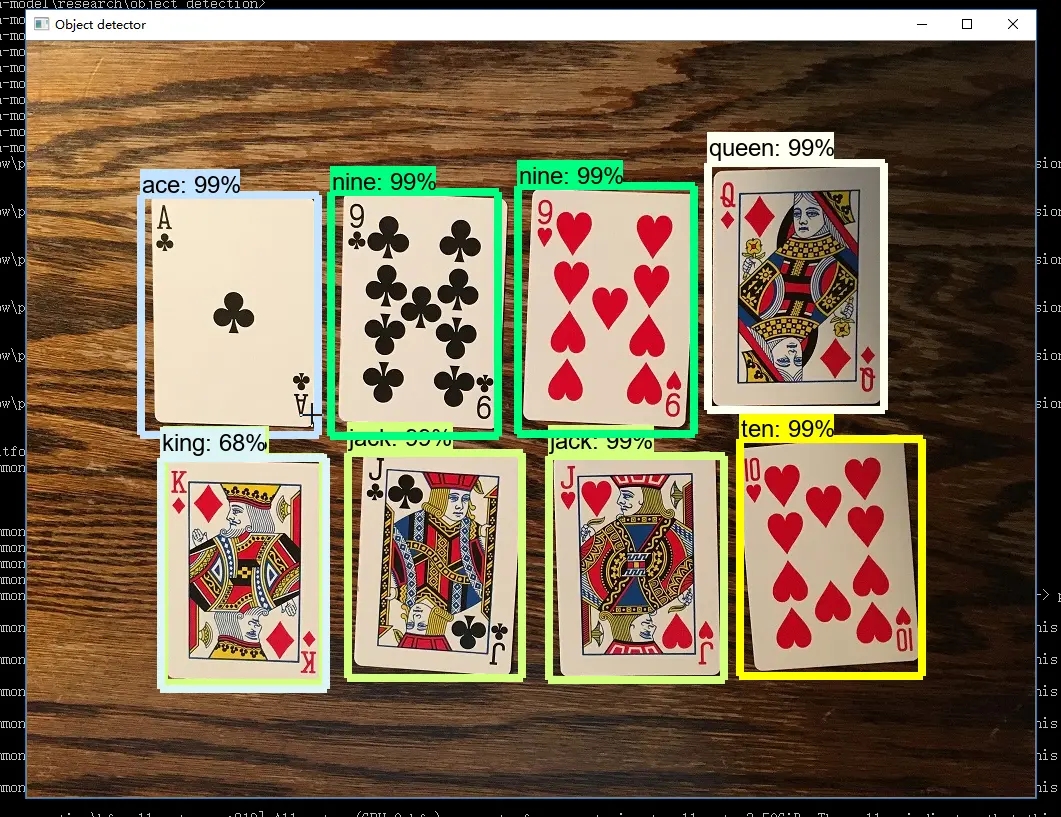
因為在實際專案中,我們對圖片和視訊的目標檢測,更多的可能是通過前端傳遞過來的圖片或視訊,模型給出的是預測的類目名稱和目標的位置,而不是直接生成標註的圖片和視訊。所以我對 demo 提供的 detect 進行了簡單的修改,修改結果就是前面放出的圖片,不過還是採用命令方式,當然也可以直接改成介面,最後就是如果需要程式碼的可以評論區留言哈。
import warnings

warnings.filterwarnings("ignore")
import argparse
from utils.datasets import *
from utils.torch_utils import *
from utils.augmentations import *
from utils.general import *
from models.common import DetectMultiBackend
from utils.plots import Annotator, colors, save_one_box
import time
import cv2
import torch
import random
import numpy as np


def detect(save_img=False):
    # 解析設定引數
    source, weights, data, imgsz = opt.source, opt.weights, opt.data, opt.img_size

    # 初始化 模型推理硬體
    device = select_device(opt.device)
    model = DetectMultiBackend(weights, device=device, dnn=False, data=data)
    stride, names, pt, jit, onnx, engine = model.stride, model.names, model.pt, model.jit, model.onnx, model.engine
    imgsz = check_img_size(imgsz, s=stride)

    dataset = LoadImages(source, img_size=imgsz, stride=stride, auto=pt)

    dt, seen = [0.0, 0.0, 0.0], 0
    for path, im, im0s, vid_cap, s in dataset:
        t1 = time_sync()
        # im = torch.from_numpy(im).to(device)
        im = torch.from_numpy(im.astype(np.float32)).to(device)
        im /= 255  # 0 - 255 to 0.0 - 1.0
        if len(im.shape) == 3:
            im = im[None]  # expand for batch dim
        t2 = time_sync()
        dt[0] += t2 - t1

        dt[0] += t2 - t1

        # Inference
        # visualize = increment_path(save_dir / Path(path).stem, mkdir=True) if visualize else False
        pred = model(im)
        t3 = time_sync()
        dt[1] += t3 - t2

        # NMS
        pred = non_max_suppression(pred, 0.25, 0.45, None, False, max_det=1000)
        dt[2] += time_sync() - t3

        for i, det in enumerate(pred):
            p, s, im0 = source, '', im0s

            # print('im0_shape:', im0.shape)

            s += '%gx%g ' % im.shape[2:]  # print string
            gn = torch.tensor(im0.shape)[[1, 0, 1, 0]]  #  normalization gain whwh

            if det is not None and len(det):
                # 推理的影象解析度轉為原圖解析度:Rescale boxes from img_size to im0 size
                det[:, :4] = scale_coords(im.shape[2:], det[:, :4], im0.shape).round()

                # Print results
                for c in det[:, -1].unique():
                    n = (det[:, -1] == c).sum()  # detections per class
                    s += '%g %ss, ' % (n, names[int(c)])  # add to string

                # Write results
                output_dict_ = []
                for *xyxy, conf, cls in det:
                    x1, y1, x2, y2 = xyxy
                    output_dict_.append((float(x1), float(y1), float(x2), float(y2)))
                    label = '%s %.2f' % (names[int(cls)], conf)
                    print("---------------------------------------------------------------------")
                    print("尺寸:", im0.shape)
                    print("座標:", (float(x1), float(y1), float(x2), float(y2)))
                    print("標識:", label)
                # print("output_dict_ : ", output_dict_)


if __name__ == '__main__':
    parser = argparse.ArgumentParser()
    parser.add_argument('--weights', type=str, default='weights/yolov5s.pt', help='model.pt path')
    parser.add_argument('--data', type=str, default='data/coco128_pocker.yaml', help='dataset.yaml path')
    parser.add_argument('--source', type=str, default="./video/1.mp4", help='source')  # file/folder, 0 for webcam
    parser.add_argument('--img-size', type=int, default=640, help='inference size (pixels)')
    parser.add_argument('--conf-thres', type=float, default=0.31, help='object confidence threshold')
    parser.add_argument('--iou-thres', type=float, default=0.45, help='IOU threshold for NMS')
    parser.add_argument('--fourcc', type=str, default='mp4v', help='output video codec (verify ffmpeg support)')
    parser.add_argument('--device', default='', help='cuda device, i.e. 0 or 0,1,2,3 or cpu')
    parser.add_argument('--classes', nargs='+', type=int, help='filter by class')
    parser.add_argument('--agnostic-nms', action='store_true', help='class-agnostic NMS')
    parser.add_argument('--augment', default=False, help='augmented inference')
    opt = parser.parse_args()
    print(opt)  # 列印輸入設定引數

    with torch.no_grad():
        detect(save_img=True)
報錯彙總
1. Scanning 'D:\3code\6pytorch\opencv_demo\05_yolo_v5.6\datasets\Poker\Images\train' images and labels...0 found, 284 missing, 0 empty, 0 corrupt
圖片和標註資料夾名稱,要分別是 images 和 labels,可以在 utils/datasets.py 中修改,為了快速執行還是把資料夾名字改一下解決。
2. AttributeError: module 'numpy' has no attribute 'int'.
主要是由於 numpy 的版本引起,將 numpy 降低 1.24 以下可解決,或者對 numpy 原始碼進行修改。
pip install numpy==1.22 -i https://pypi.tuna.tsinghua.edu.cn/simple3. result type Float can't be cast to the desired output type __int64
原因是新版的 torch 無法自動執行此轉換,可以通過降級 torch 解決,也可以在 yolo 專案的 utils 中找到 loss.py,將 gain = torch.ones (7, device=targets.device),
修改為 gain = torch.ones (7, device=targets.device).long ()
4. 'FreeTypeFont' object has no attribute 'getsize'
原因是安裝的 Pillow 版本過高,解決方法就是將其降級
pip install Pillow==9.5 -i https://pypi.tuna.tsinghua.edu.cn/simple5. No module named 'torch._dynamo'
通過報錯紀錄檔看到是先 import torchvision 後提示的錯誤,而我本地安裝的是 cuda 的 torch1.12.1,相對應的要下載 cuda 的 torchvision0.13.1 版本
如果需要單獨安裝可以去 https://download.pytorch.org/whl/torch_stable.html,找到對應平臺,python 指令碼和版本下載後再通過 pip 安裝
6. OSError: [WinError 1455] 頁面檔案太小,無法完成操作
在命令列中設定 --workers 0 ,這個是設定多執行緒的引數,在個人機器上,這個引數到底設定多少,一般和 --batch-siz 有關,如果 batch-size 設定小,workers 就調大
7. CUDA out of memory. Tried to allocate 20.00 MiB (GPU 0; 2.00 GiB total capacity; 1.08 GiB already allocated
顯示卡的視訊記憶體太小就把 batch 調小
python train.py --weights weights/yolov5s.pt --cfg models/yolov5s_pocker.yaml --data data/coco128_pocker.yaml --epochs 1 --batch-size 2 --multi-scale --device 0 --workers 0