SMTP操作使用詳解並通過python進行smtp郵件傳送範例
轉載請註明出處:
1.SMTP
SMTP 的全稱是「Simple Mail Transfer Protocol」,即簡單郵件傳輸協定。它是一組用於從源地址到目的地址傳輸郵件的規範,通過它來控制郵件的中轉方式。SMTP 協定屬於 TCP/IP 協定簇,它幫助每臺計算機在傳送或中轉信件時找到下一個目的地。SMTP 伺服器就是遵循 SMTP 協定的傳送郵件伺服器。
SMTP 認證,簡單地說就是要求必須在提供了賬戶名和密碼之後才可以登入 SMTP 伺服器,這就使得那些垃圾郵件的散播者無可乘之機。
增加 SMTP 認證的目的是為了使使用者避免受到垃圾郵件的侵擾。
2.網易郵箱可以通過以下方式開啟:
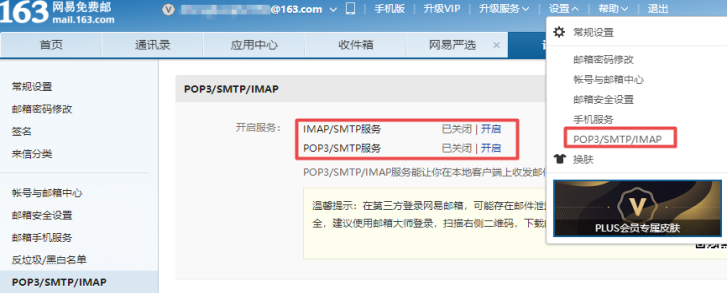
請登入網頁郵箱,點選郵箱頁面上方的「設定」,選擇「POP3/SMTP/IMAP」,請根據實際需求開啟POP3/IMAP或者SMTP/IMAP服務,並根據頁面提示進行簡訊驗證操作。開通後即可使用foxmail、Outlook等第三方使用者端進行收發郵件。(注:點選關閉,既可關閉成功

在開啟服務時,需要儲存好授權碼:

3.使用python實現smtp郵件傳送
3.1. 安裝smtplib和email模組
pip install smtplib
pip install email
3.2.傳送簡單純文字郵件
# -*- coding: utf-8 -*-
# 從[email protected]向[email protected]傳送一封郵件
# 注意, 此處要填寫你自己正確的郵件地址
import smtplib
from email.header import Header
from email.mime.text import MIMEText

fromAddr ='17****[email protected]'   # 傳送郵件地址
password = 'GXKLZMSNHOMPDVXH'   # SMTP服務的密碼, 就是上述圖中的授權碼
toAddr = '1****[email protected]'    # 目的郵件地址
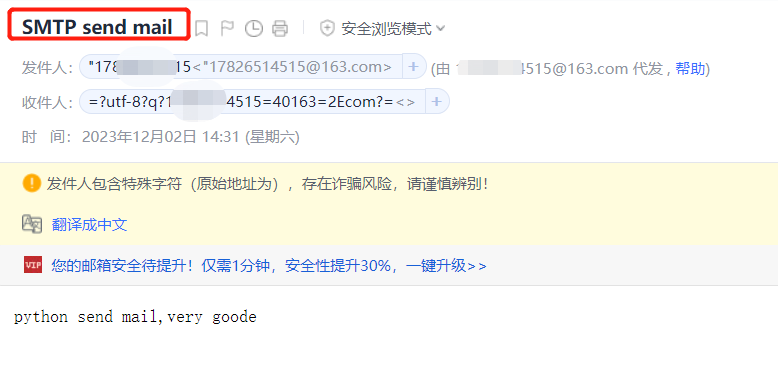
subject = 'SMTP send mail'         # 郵件標題
content = 'python send mail,very goode'            # 郵件內容

def makeMail():
    mail = MIMEText(content, 'plain', 'utf-8')      # 使用MIMEText()構造一個文字格式的郵件
    mail['From'] = Header(fromAddr, 'utf-8')        # 構造郵件頭From
    mail['To'] = Header(toAddr, 'utf-8')            # 構造郵件頭To
    mail['Subject'] = Header(subject, 'utf-8')      # 構造郵件主題
    return mail


def sendMail(mail):
    # smtp= smtplib.SMTP()                        # 建立SMTP範例
    # smtp.connect('smtp.qq.com')                 # 連線SMTP伺服器
    smtp = smtplib.SMTP_SSL("smtp.163.com")        # 此處直接一步到位
    smtp.login(fromAddr, password)                # 登入SMTP服務
    smtp.sendmail(fromAddr, toAddr, mail.as_string())    # 通過SMTP伺服器傳送郵件
    smtp.quit()


sendMail(makeMail())
print('success')
執行該python指令碼並驗證設定:

在接收方的郵箱可以看到傳送的郵件:

3.3.傳送HTML郵件:
import smtplib
from email.mime.text import MIMEText
from email.header import Header

sender = '[email protected]' #發件郵箱
passwd = 'lkugmgywydhfff' #傳送人郵箱授權碼
receivers = '[email protected]'   #收件郵箱

subject = 'python發郵Html郵件測試' #主題

content = """         #內容,HTML格式
<p>Python 郵件傳送測試...</p>
<p><a href="http://www.baidu.com">這是一個連結</a></p>
"""

msg = MIMEText(content,'html','utf-8')
# msg['Subject'] = subject
msg['Subject'] = Header(subject,'utf-8')
# msg['From'] = sender
msg['From'] = Header('大傻子','utf-8')
# msg['To'] = receivers
msg['To'] = Header('二愣子','utf-8')
try:
    s = smtplib.SMTP_SSL('smtp.qq.com',465)
    s.login(sender,passwd)
    s.sendmail(sender,receivers,msg.as_string())
    print('Send Success')

except:
    print('Send Failure')
3.4.傳送圖片郵件:
import smtplib
from email.mime.image import MIMEImage
from email.mime.text import MIMEText
from email.mime.multipart import MIMEMultipart

sender = '[email protected]'
passwd = 'lkugmgywydhfff'
receivers = '[email protected]'
subject = 'python發郵帶img的郵件測試' #主題

# 建立一個帶附件的範例
msg = MIMEMultipart()
msg['Subject'] = subject
msg['From'] = sender
msg['To'] = receivers

# 建立正文
msg.attach(MIMEText('使用python smtplib模組和email模組自動傳送郵件測試','plain','utf-8'))

# 建立圖片附件
import os
img_file = open(os.getcwd()+"/a4.jpg",'rb').read()
msg_img = MIMEImage(img_file)
msg_img.add_header('Content-Disposition','attachment', filename = "a4.jpg")
msg_img.add_header('Content-ID', '<0>')
msg.attach(msg_img)

try:
    s = smtplib.SMTP_SSL('smtp.qq.com',465)
    s.set_debuglevel(1) #輸出傳送郵件詳細過程
    s.login(sender,passwd)
    s.sendmail(sender,receivers,msg.as_string())
    print('Send Succese')

except:
    print('Send Failure')
3.5.傳送帶附件的郵件:
import smtplib
from email.mime.text import MIMEText
from email.mime.multipart import MIMEMultipart
from email.header import Header

sender = '[email protected]'  #發件郵箱
passwd = 'lkugmgywydhfff'  # 郵箱授權碼
receivers = '[email protected]'  #收件郵箱

subject = 'python髮帶附件的郵件測試' #主題
# 建立一個帶附件的範例
msg = MIMEMultipart()
msg['Subject'] = subject
msg['From'] = sender
msg['To'] = receivers

#建立正文,將文字檔案新增到MIMEMultipart中
msg.attach(MIMEText('使用python smtplib模組和email模組自動傳送郵件測試','plain','utf-8'))

#構造附件1,傳送當前目錄下  檔案
att1 = MIMEText(open('testdata.xlsx','rb').read(),'base64','utf-8') # rb以二進位制方式讀取
# att1["Content-Type"] = 'application/octet-stream'
# filename為附件名稱,可以任意寫,寫什麼名字,郵件中顯示什麼名字
att1["Content-Disposition"] = 'attachment; filename = "testdata.xlsx" '
#將附件新增到MIMEMultipart中
msg.attach(att1)

#構造附件2
att2 = MIMEText(open('db.cfg','rb').read(),'base64','utf-8')
# att2["Content-Type"] = 'application/octet-stream'
att2["Content-Disposition"] = 'attachment; filename = "db.cfg" '
#將附件新增到MIMEMultipart中
msg.attach(att2)

try:
    s = smtplib.SMTP_SSL('smtp.qq.com',465)
    s.set_debuglevel(1) #輸出傳送郵件詳細過程
    s.login(sender,passwd)
    s.sendmail(sender,receivers,msg.as_string())
    print('Send Succese')

except:
    print('Send Failure')
4.python 郵件傳送模組與語法總結
4.1smtplib模組:
主要通過SMTP類與郵件系統進行互動。使用方法如下:
1.範例化一個SMTP物件:
s = smtplib.SMTP(郵件服務地址,埠號)
s = smtplib.SMTP_SSL(郵件服務地址,埠號)
2.登陸郵件,許可權驗證:
s.login(使用者名稱,密碼)
3.傳送郵件:
s.sendmail(發件人郵箱,收件人郵箱,傳送內容)
4.斷開連線:
s.close()
4.2 email模組:
email模組:支援傳送的郵件內容為純文字、HTML內容、圖片、附件。email模組中有幾大類來針對不同的郵件內容形式,常用如下:
MIMEText:(MIME媒體型別)內容形式為純文字、HTML頁面。
MIMEImage:內容形式為圖片。
MIMEMultupart:多形式組合,可包含文字和附件。
每一類對應的匯入方式:
from email.mime.text import MIMEText
from email.mime.image import MIMEImage
from email.mime.multipart import MIMEMultipart
4.3 MIMEText:
  MIMEText(msg,type,chartset)
  msg:文字內容
  type:文字型別預設為plain(純文字)
  ## 傳送HTML格式的時候,修改為html,但同時要求msg的內容也是html的格式。
  chartset:文字編碼,中文為「utf-8」

  # 構造TEXT格式的訊息
  msg = MIMEText("hello.text","plain","utf-8")
  msg["Subject"] = "xxxxx"
  msg["From"] = "xxxx"
  msg["To"] = "xxxx"
  #傳送以上構造的郵件內容要使用as_string將構造的郵件內容轉換為string形式。
  s.sendmail("xxx","xxx",msg.as_string)
4.4 MIMEImage、MIMEMultipart:
    msg = MIMEMultipart()
  #範例化一個文字物件
  msg_sub = MIMEText("hello.text","plain","utf-8")
  #將text訊息新增到MIMEMultipart中,作為郵件正文。
  msg.attach(msg_sub)

  #圖片作為附件
  import os
  img_datas = open(os.getcwd()+ "/reports/xxxx.png","rb").read()
  msg_img = MIMEImage(img_data)
  msg_img.add_header('Content-Disposition','attachment', filename = "xxxx.png" )
  msg_img.add_header('Content-ID','<0>')
  #將圖片新增到MIMEMultiplart中,作為附件傳送。
  msg.attach(mag_img)