Mybatis和其他主流框架的整合使用
MyBatis歷史
-
MyBatis最初是Apache的一個開源專案iBatis, 2010年6月這個專案由Apache Software Foundation遷移到了Google Code。隨著開發團隊轉投Google Code旗下,iBatis3.x正式更名為MyBatis。程式碼於2013年11月遷移到Github
-
iBatis一詞來源於「internet」和「abatis」的組合,是一個基於Java的持久層框架。iBatis提供的持久層框架包括SQL Maps和Data Access Objects(DAO)
MyBatis特性
-
MyBatis 是支援客製化化 SQL、儲存過程以及高階對映的優秀的持久層框架
-
MyBatis 避免了幾乎所有的 JDBC 程式碼和手動設定引數以及獲取結果集
-
MyBatis可以使用簡單的XML或註解用於設定和原始對映,將介面和Java的POJO(Plain Old Java Objects,普通的Java物件)對映成資料庫中的記錄
-
 1 <dependencies>
 2         <dependency>
 3             <groupId>org.mybatis</groupId>
 4             <artifactId>mybatis</artifactId>
 5             <version>3.5.10</version>
 6         </dependency>
 7         <dependency>
 8             <groupId>mysql</groupId>
 9             <artifactId>mysql-connector-java</artifactId>
10             <version>8.0.33</version>
11         </dependency>
12     </dependencies>
要使用Mybatis需要設定Mybatis的核心設定,在resources資原始檔夾下建立一個mybatis組態檔(名字隨意),並寫入設定,設定參考Mybatis官方檔案mybatis – MyBatis 3 | 入門
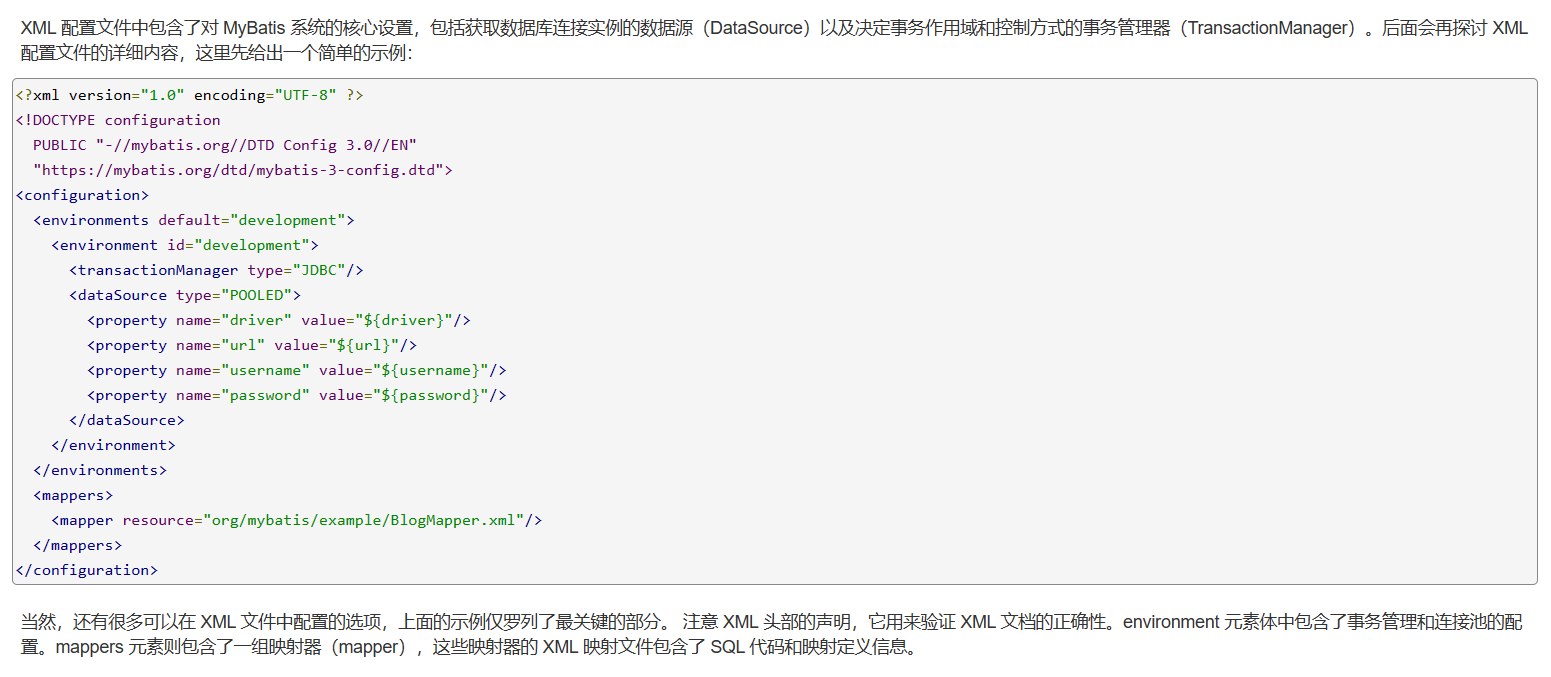
在資料來源<dataSource>的設定中,設定好driver,url,username,password
 1 <?xml version="1.0" encoding="UTF-8" ?>
 2 <!DOCTYPE configuration
 3         PUBLIC "-//mybatis.org//DTD Config 3.0//EN"
 4         "https://mybatis.org/dtd/mybatis-3-config.dtd">
 5 <configuration>
 6     <environments default="development">
 7         <environment id="development">
 8             <transactionManager type="JDBC"/>
 9             <dataSource type="POOLED">
10                 <property name="driver" value="com.mysql.cj.jdbc.Driver"/>
11                 <property name="url" value="jdbc:mysql://localhost:3307/mybatis"/>
12                 <property name="username" value="root"/>
13                 <property name="password" value="root"/>
14             </dataSource>
15         </environment>
16     </environments>
17     <!--<mappers>
18         <mapper resource="org/mybatis/example/BlogMapper.xml"/>
19     </mappers>-->
20 </configuration>
現在需要一個資料庫和表和一些資料用做連線測試
 1 CREATE DATABASE IF NOT EXISTS `mybatis` DEFAULT CHARACTER SET utf8mb4 COLLATE utf8mb4_unicode_ci;
 2
 3 CREATE TABLE USER(
 4      `id` INT UNSIGNED PRIMARY KEY AUTO_INCREMENT COMMENT 'ID',
 5      `name` VARCHAR(100) COMMENT '姓名',
 6      `age` TINYINT UNSIGNED COMMENT '年齡',
 7      `gender` TINYINT UNSIGNED COMMENT '性別, 1:男, 2:女',
 8      `phone` VARCHAR(11) COMMENT '手機號'
 9 ) COMMENT '使用者表';
10
11 INSERT INTO USER(id, NAME, age, gender, phone) VALUES (NULL,'白眉鷹王',55,'1','18800000000');
12 INSERT INTO USER(id, NAME, age, gender, phone) VALUES (NULL,'金毛獅王',45,'1','18800000001');
13 INSERT INTO USER(id, NAME, age, gender, phone) VALUES (NULL,'青翼蝠王',38,'1','18800000002');
14 INSERT INTO USER(id, NAME, age, gender, phone) VALUES (NULL,'紫衫龍王',42,'2','18800000003');
15 INSERT INTO USER(id, NAME, age, gender, phone) VALUES (NULL,'光明左使',37,'1','18800000004');
16 INSERT INTO USER(id, NAME, age, gender, phone) VALUES (NULL,'光明右使',48,'1','18800000005');
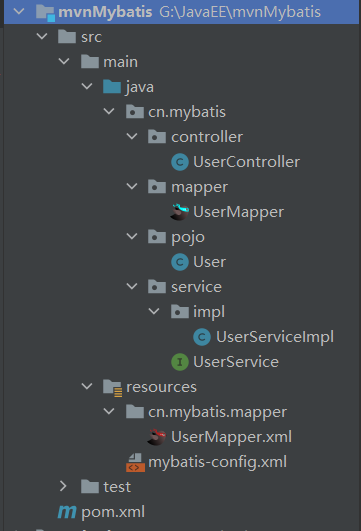
構建整體專案結構controller、service、mapper三層架構,建立一個實體類對應資料庫的表結構,建立MyBatis的對映檔案xxxMapper.xml
-
-
表所對應的實體類的類名+Mapper.xml
-
例如:表t_user,對映的實體類為User,所對應的對映檔案為UserMapper.xml
-
因此一個對映檔案對應一個實體類,對應一張表的操作
-
MyBatis對映檔案用於編寫SQL,存取以及操作表中的資料
-
在resources檔案目錄下建立mapper的時候需要和main檔案目錄下的mapper同包名,在建立directory的時候,目錄結構不能使用點,而是用/代替

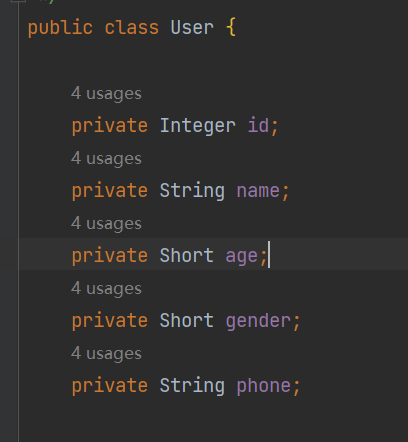
User實體類中的屬性需要和表中的欄位名相對應,這裡也可以用Lombok註解
然後在mapper中寫我們需要的語句,查詢語句用<select>、增加語句用<insert>、刪除語句用<delete>、修改語句用<update>標籤,返回型別resultType要和實體類中的實體類名稱對應
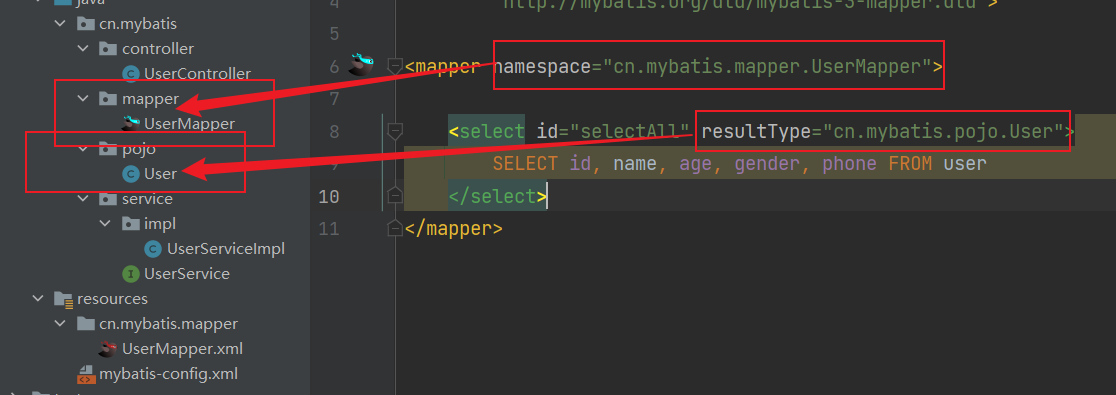
 1 <?xml version="1.0" encoding="UTF-8" ?>
 2 <!DOCTYPE mapper
 3         PUBLIC "-//mybatis.org//DTD Mapper 3.0//EN"
 4         "https://mybatis.org/dtd/mybatis-3-mapper.dtd">
 5
 6 <mapper namespace="mapper.UserMapper">
 7
 8     <select id="selectAll" resultType="pojo.User">
 9         SELECT id, name, age, gender, phone FROM user
10     </select>
11 </mapper>
寫好了之後回到mybatis-config.xml中設定一下mapper對映

在UserMapper中將UserMapper.xml中設定好的方法宣告一下,方法名要和上面的id對應上
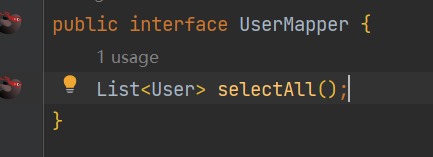
在service層寫好業務邏輯程式碼,在介面中宣告方法,在實現類中實現方法
 1 public class UserServiceImpl implements UserService {
 2
 3     @Override
 4     public List<User> selectAll() throws IOException {
 5         //讀取MyBatis的核心組態檔
 6         InputStream is = Resources.getResourceAsStream("mybatis-config.xml");
 7         //獲取SqlSessionFactoryBuilder物件
 8         SqlSessionFactoryBuilder sqlSessionFactoryBuilder = new SqlSessionFactoryBuilder();
 9         //通過核心組態檔所對應的位元組輸入流建立工廠類SqlSessionFactory,生產SqlSession物件
10         SqlSessionFactory sqlSessionFactory = sqlSessionFactoryBuilder.build(is);
11         //獲取sqlSession,此時通過SqlSession物件所操作的sql都必須手動提交或回滾事務
12         SqlSession sqlSession = sqlSessionFactory.openSession();
13         //通過代理模式建立UserMapper介面的代理實現類物件
14         UserMapper mapper = sqlSession.getMapper(UserMapper.class);
15         //呼叫UserMapper介面中的方法,就可以根據UserMapper的全類名匹配元素檔案,通過呼叫的方法名匹配對映檔案中的SQL標籤,並執行標籤中的SQL語句
16         List<User> users = mapper.selectAll();
17         return users;
18     }
19 }
在controller層中寫好處理結果程式碼
1 public class UserController {
2     private UserService userService = new UserServiceImpl();
3
4     public void selectAll() throws IOException {
5         List<User> users = userService.selectAll();
6         users.forEach(System.out::println);
7     }
8 }
建立一個Test類去測試mybatis資料庫連線,因為沒有引入單元測試依賴,所以這裡用主函數去測試
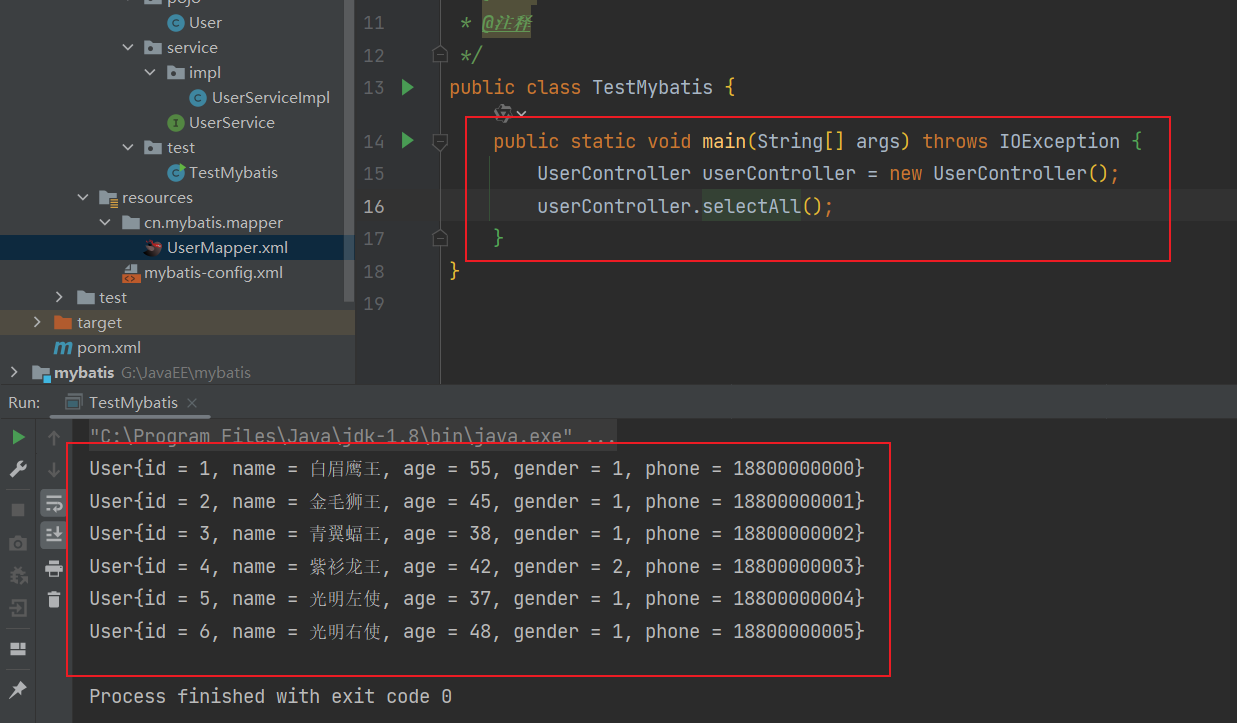
發現結果成功輸出列印
如果SQL語句比較簡單,可以使用mybatis中的註解,查詢語句用@Select、增加語句用@Insert、刪除語句用@Delete、修改語句用@Update註解
在裡面寫上sql語句,再執行發現,也可以查詢成功。

當然,複雜一點的sql語句和動態SQL建議還是使用Mapper設定,只是簡單的sql語句寫在註解裡面可以簡化,複雜的sql只會增加程式碼的複雜度
總結
在Maven專案中,使用mybatis需要先匯入mybatis依賴和連線資料庫的依賴,然後建立mybatis組態檔,在組態檔中設定資料來源細資訊,隨後建立MyBatis的對映檔案Mapper,在mapper檔案中寫好對應的語句,然後在業務層進行SqlSession連線,呼叫mapper中的方法,再在controller層處理返回方法。
2、用Spring框架整合Mybatis
 1 <dependencies>
 2         <dependency>
 3             <groupId>org.mybatis</groupId>
 4             <artifactId>mybatis</artifactId>
 5             <version>3.5.10</version>
 6         </dependency>
 7         <dependency>
 8             <groupId>mysql</groupId>
 9             <artifactId>mysql-connector-java</artifactId>
10             <version>8.0.33</version>
11         </dependency>
12         <dependency>
13             <groupId>org.springframework</groupId>
14             <artifactId>spring-context</artifactId>
15             <version>5.3.30</version>
16         </dependency>
17         <dependency>
18             <groupId>com.alibaba</groupId>
19             <artifactId>druid</artifactId>
20             <version>1.2.20</version>
21         </dependency>
22         <dependency>
23             <groupId>org.mybatis</groupId>
24             <artifactId>mybatis-spring</artifactId>
25             <version>1.3.2</version>
26         </dependency>
27         <dependency>
28             <groupId>org.springframework</groupId>
29             <artifactId>spring-jdbc</artifactId>
30             <version>5.3.2</version>
31         </dependency>
32     </dependencies>
構建整體專案結構
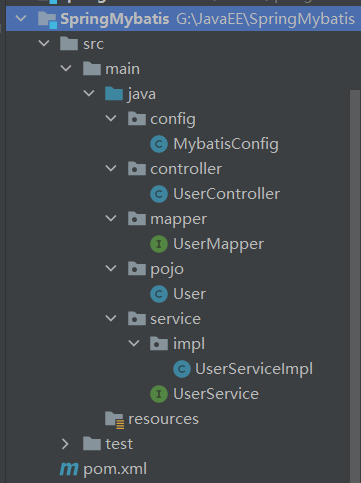
2.1、基於XML整合Mybatis
- 匯入Mybatis整合Spring的相關座標
- 編寫Mapper和Mapper.xml
- 設定SqlSessionFactoryBean和MapperScannerConfigurer
- 編寫測試程式碼
和上面步驟相同,編寫Mapper和Mapper.xml,一定要放在相同路徑下
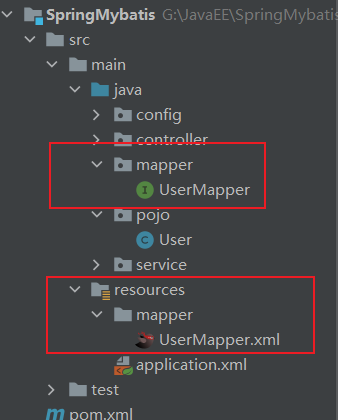
在UserMapper.xml中寫我們需要的語句,並在UserMapper介面中寫對應id的方法宣告;
 1 <?xml version="1.0" encoding="UTF-8" ?>
 2 <!DOCTYPE mapper
 3         PUBLIC "-//mybatis.org//DTD Mapper 3.0//EN"
 4         "https://mybatis.org/dtd/mybatis-3-mapper.dtd">
 5
 6 <mapper namespace="mapper.UserMapper">
 7
 8     <select id="selectAll" resultType="pojo.User">
 9         SELECT id, name, age, gender, phone FROM user
10     </select>
11 </mapper>
public interface UserMapper {

    List<User> selectAll();
}
同樣的,簡單的SQL語句也可以用@Select註解編寫,不需要UserMapper.xml設定
在Spring組態檔中設定SqlSessionFactoryBean
 1 <?xml version="1.0" encoding="UTF-8"?>
 2 <beans xmlns="http://www.springframework.org/schema/beans"
 3        xmlns:xsi="http://www.w3.org/2001/XMLSchema-instance"
 4        xsi:schemaLocation="http://www.springframework.org/schema/beans http://www.springframework.org/schema/beans/spring-beans.xsd">
 5
 6     <!--設定SqlSessionFactoryBean,作用將SqlSessionFactory儲存到spring容器-->
 7     <bean class="org.mybatis.spring.SqlSessionFactoryBean">
 8         <property name="dataSource" ref="dataSource"></property>
 9     </bean>
10
11     <!--設定資料來源資訊-->
12     <bean id="dataSource" class="com.alibaba.druid.pool.DruidDataSource">
13         <property name="driverClassName" value="com.mysql.cj.jdbc.Driver"></property>
14         <property name="url" value="jdbc:mysql://localhost:3307/mybatis"></property>
15         <property name="username" value="root"></property>
16         <property name="password" value="root"></property>
17     </bean>
18 </beans>
對應的是之前組態檔中的
1  <dataSource type="POOLED">
2                 <property name="driver" value="com.mysql.cj.jdbc.Driver"/>
3                 <property name="url" value="jdbc:mysql://localhost:3307/mybatis"/>
4                 <property name="username" value="root"/>
5                 <property name="password" value="root"/>
6 </dataSource>
在Spring組態檔中設定MapperScannerConfigurer
1 <!--MapperScannerConfigurer,作用掃描指定的包,產生Mapper物件儲存到Spring容器-->
2     <bean class="org.mybatis.spring.mapper.MapperScannerConfigurer">
3         <property name="basePackage" value="mapper"></property>
4     </bean>
對應的是
1 <mappers>
2         <package name="com.tedu.mapper"/>
3 </mappers>
在Spring組態檔中設定好之後,在使用的時候就不用手動建立了,直接注入即可。
在UserServiceImpl屬性中新增UserMapper,併為其新增setter方法用於注入。
 1 public class UserServiceImpl implements UserService {
 2     private UserMapper userMapper;
 3
 4     public void setUserMapper(UserMapper userMapper) {
 5         this.userMapper = userMapper;
 6     }
 7
 8     @Override
 9     public List<User> selectAll() {
10         return userMapper.selectAll();
11     }
12 }
同樣,在UserController屬性中新增UserService,併為其新增setter方法用於注入。在selectAll方法中處理返回的結果。
 1 public class UserController {
 2     private UserService userService;
 3
 4     public void setUserService(UserService userService) {
 5         this.userService = userService;
 6     }
 7
 8     public void selectAll(){
 9         List<User> users = userService.selectAll();
10         users.forEach(System.out::println);
11     }
12 }
在Spring組態檔中設定上述UserService和UserController用於注入
1 <bean id="userServiceImpl" class="service.impl.UserServiceImpl">
2         <property name="userMapper" ref="userMapper"></property>
3     </bean>
4
5     <bean id="userContorller" class="controller.UserController">
6         <property name="userService" ref="userServiceImpl"></property>
7     </bean>
最後建立一個測試類進行資料庫連線測試
1 public class TestSelectAll {
2     public static void main(String[] args) {
3         ApplicationContext context = new ClassPathXmlApplicationContext("application.xml");
4         UserController userController = context.getBean(UserController.class);
5         userController.selectAll();
6     }
7 }
可以在控制檯看到列印的結果
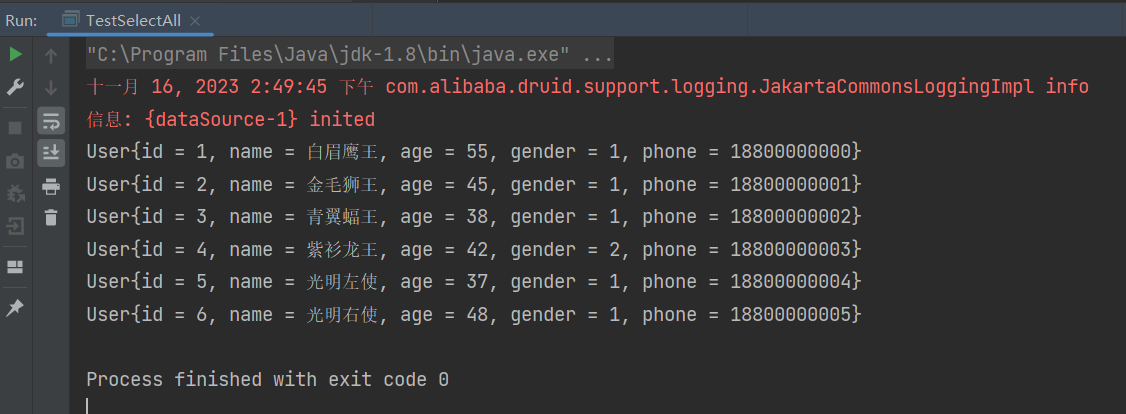
總結
基於XML方式整合Mybatis首先需要建立Spring的組態檔,在XML組態檔中去設定bean,將bean物件交由Spring容器管理,其餘的mapper和普通方法一樣。需要設定資料來源DataSource,設定SqlSessionFactoryBean、設定MapperScannerConfigurer,再設定UserMapper、UserService和UserController。在測試類中用ClassPathXmlApplicationContext和getBean獲取到UserContorller物件再呼叫其方法即可。這種方式不用編寫mybatis-config.xml組態檔,在Spring組態檔中全部設定了,雖然簡化了部分操作,但是還是較為繁瑣,下面講一種用註解方式整合mybatis。
2.2、基於註解整合Mybatis
匯入和上述基於XML整合mybatis方法相同的依賴
再構建同樣的專案結構
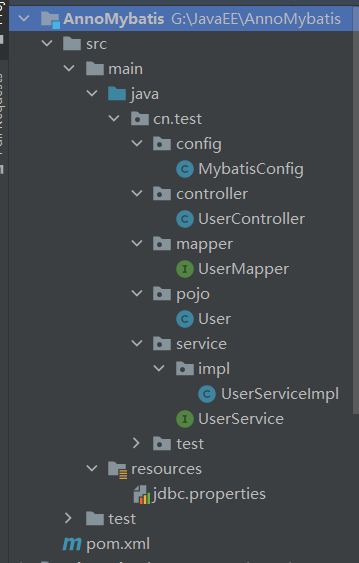
還需要在resources資源目錄下面新增一個組態檔用於存放資料來源設定資訊
jdbc.driver=com.mysql.cj.jdbc.Driver
jdbc.username=root
jdbc.password=root
jdbc.url=jdbc:mysql://localhost:3307/mybatis
除了像上面方法構建的專案結構之外,還需要一個設定類進行設定
 1 @Configuration
 2 @ComponentScan("cn.test")
 3 @PropertySource("classpath:jdbc.properties")
 4 @MapperScan("cn.test.mapper")
 5 public class MybatisConfig {
 6
 7     @Bean
 8     public DataSource dataSource(
 9             @Value("${jdbc.driver}") String driver,
10             @Value("${jdbc.username}") String username,
11             @Value("${jdbc.password}") String passwrod,
12             @Value("${jdbc.url}") String url
13     ){
14         DruidDataSource dataSource = new DruidDataSource();
15         dataSource.setDriverClassName(driver);
16         dataSource.setUsername(username);
17         dataSource.setPassword(passwrod);
18         dataSource.setUrl(url);
19         return dataSource;
20     }
21
22     @Bean
23     public SqlSessionFactoryBean sqlSessionFactoryBean(@Autowired DataSource dataSource){
24         SqlSessionFactoryBean sqlSessionFactoryBean = new SqlSessionFactoryBean();
25         sqlSessionFactoryBean.setDataSource(dataSource);
26         return sqlSessionFactoryBean;
27     }
28 }
@Configuration註解是宣告該類是一個設定類
@ComponentScan註解是包掃描,掃描該包和該包的子孫包中的類帶有@Component註解的類,交由Spring容器管理
@PropertySource註解是設定資原始檔目錄,classpath後是properties檔案的路徑,載入後可以用${}預留位置獲取properties檔案中的屬性
@MapperScan註解是設定Mapper檔案掃描,相當於mybatis組態檔中<mapper>標籤
組態檔中用@Bean註解設定非自定義Bean的設定,在dataSource方法中傳入連線資料庫四要素並且用@Value註解去注入值,其中用${}預留位置獲取properties檔案中的屬性,最後方法返回dataSource,同樣的用sqlSessionFactoryBean方法sqlSessionFactoryBean,在引數中用@AutoWried注入dataSource引數,其中@AuroWired註解可省略,最後方法返回sqlSessionFactoryBean。
這樣,在Config組態檔中就完成了SqlSessionFactoryBean和MapperScannerConfigurer的設定
接下來就是編寫UserMapper和UserMapper.xml檔案,這裡就不在用XML組態檔進行演示,如需要,上面的其他方法都有演示,這裡就用註解的方式編寫SQL語句。
隨後,編寫三層架構的程式碼,在UserController中,用@AuroWired註解自動注入UserService,並且在類上加上@Controller註解,表示該類是Contriller層類並交由Spring容器管理
 1 @Controller
 2 public class UserController {
 3     @Autowired
 4     private UserService userService;
 5
 6     public void findAll() {
 7         List<User> all = userService.findAll();
 8         all.forEach(System.out::println);
 9     }
10 }
在UserServiceImpl中用,@AuroWired註解自動注入UserMapper,並且在類上加上@Service註解,表示該類是Service層類並交由Spring容器管理
 1 @Service
 2 public class UserServiceImpl implements UserService {
 3
 4     @Autowired
 5     private UserMapper userMapper;
 6     @Override
 7     public List<User> findAll() {
 8         return userMapper.findAll();
 9     }
10 }
在UserMapper中,編寫SQL方法,用@Select註解編寫SQL語句,因為在組態檔中加了@MapperScan("cn.test.mapper")註解,所以在此類上不需要加任何Component註解
1 public interface UserMapper {
2     @Select("SELECT id, name, age, gender, phone FROM user")
3     List<User> findAll();
4 }
最後,編寫測試方法進行資料庫連線測試
1 public class TestAnnoMyBatis {
2     public static void main(String[] args) {
3         ApplicationContext context = new AnnotationConfigApplicationContext(MybatisConfig.class);
4         UserController userController = context.getBean(UserController.class);
5         userController.findAll();
6     }
7 }
在測試方法中用AnnotationConfigApplicationContext方法載入MybatisConfig組態檔,同樣在控制檯中可以看到成功輸出結果
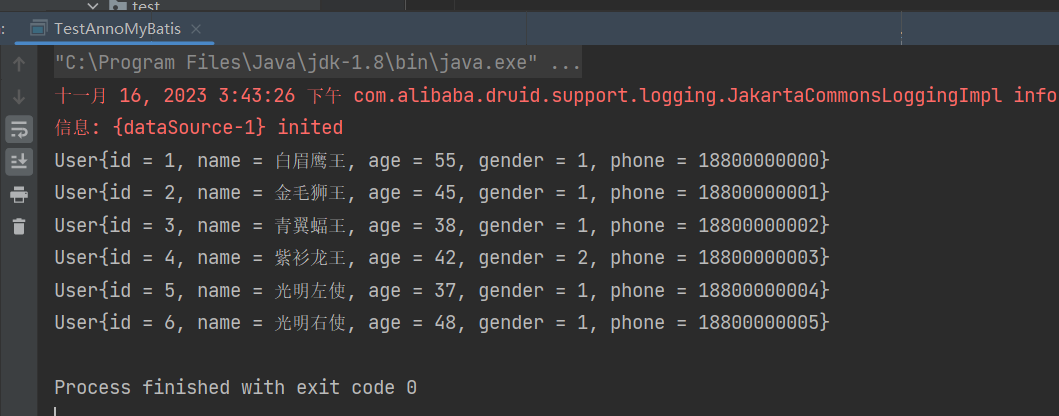
總結
基於註解整合Mybatis方法中,我們不需要設定任何XML檔案,其他操作基本相同,只需要新增一個組態檔,在組態檔中用一些註解和方法去完成設定。同時,在管理Bean時,也是用註解去自動裝配,交由Spring容器去管理。大大簡化了設定。
3、SpringBoot整合Mybatis
用SpringBoot框架整合Mybatis相對就較為簡單了
首先建立於一個SpringBoot專案
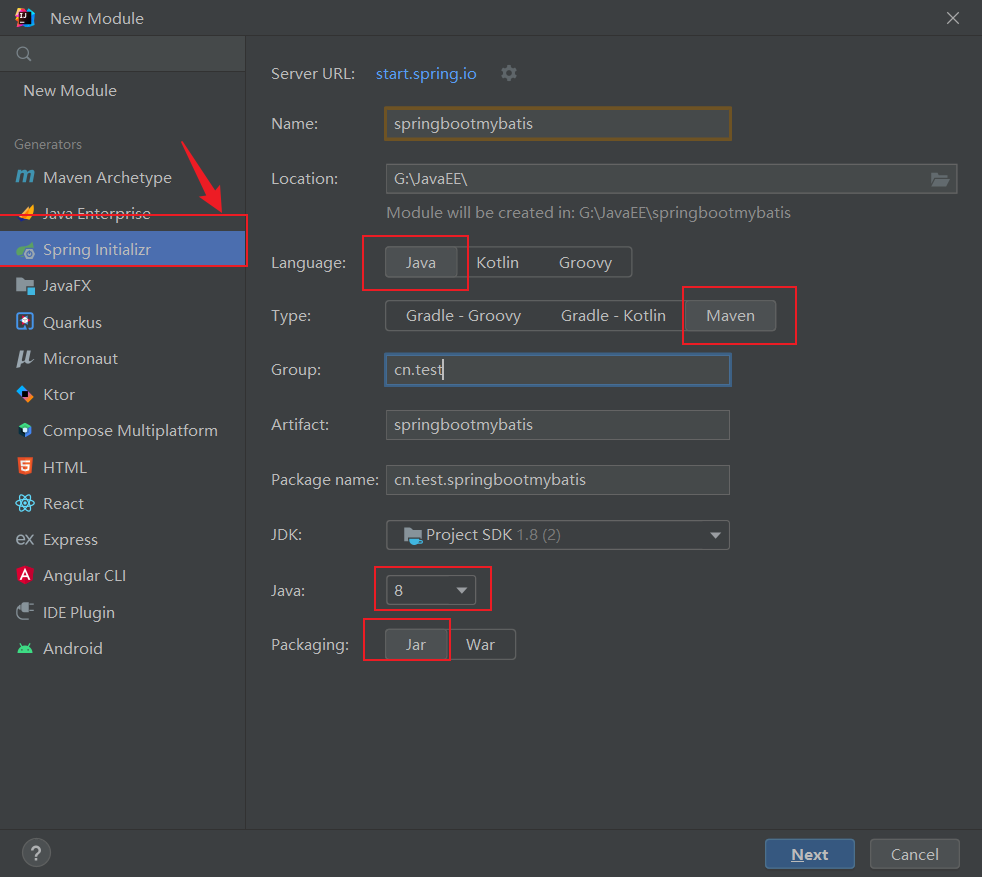
在勾選依賴的時候,需要勾選MyBatisFarmework依賴和MySql依賴進行資料的連線和Mybatis的使用
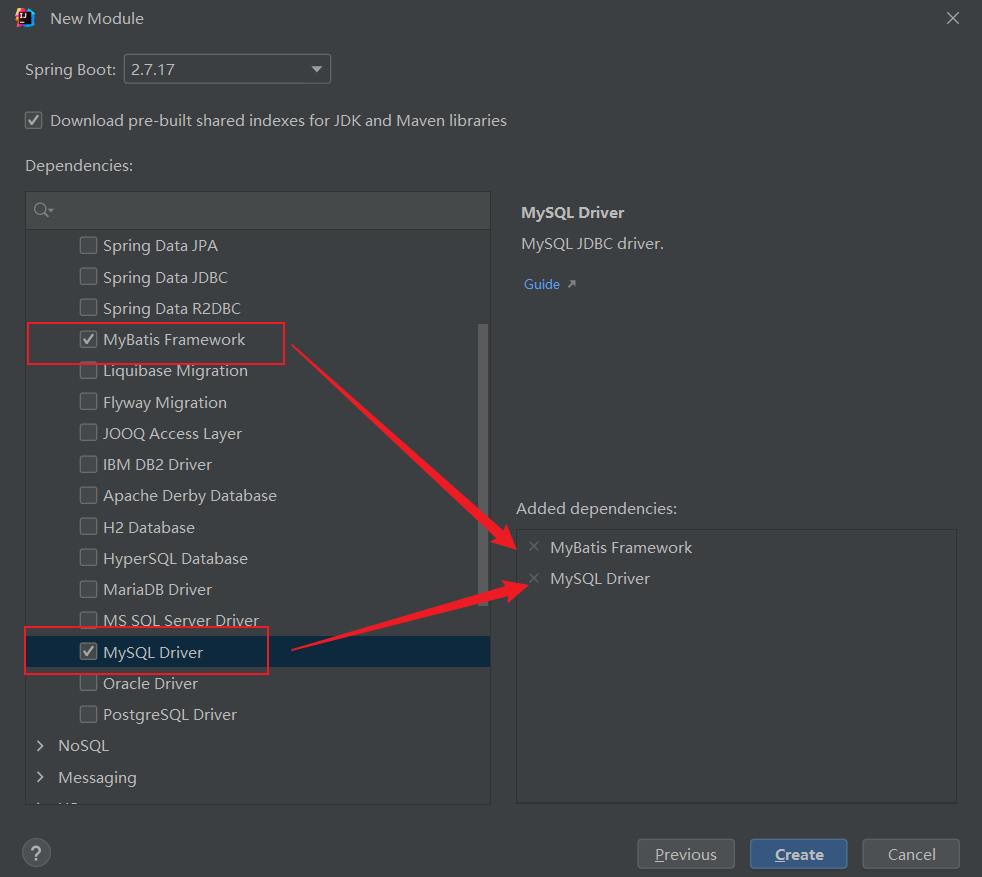
建立完成之後在application.properties組態檔中設定資料來源
spring.datasource.url=jdbc:mysql://localhost:3307/mybatis?serverTimezone=Asia/Shanghai&characterEncoding=utf8
spring.datasource.username=root
spring.datasource.password=root
spring.datasource.driver-class-name=com.mysql.cj.jdbc.Driver
然後在UserMapper中開始寫SQL語句
1 @Mapper
2 public interface UserMapper {
3
4     @Select("SELECT id, name, age, gender, phone FROM user")
5     List<User> userList();
6 }
一定要在UserMapper類上加上@Mapper註解,@Mapper註解是識別他為mybatis的mapper介面,會自動的把 加@Mapper 註解的介面生成動態代理類。
同樣的,在UserService中用@AutoWired對UserMapper進行注入,並在該類上加上@Service註解
1 @Service
2 public class UserServiceImpl implements UserService {
3     @Autowired
4     private UserMapper userMapper;
5
6     public List<User> userList(){
7         return userMapper.userList();
8     }
9 }
在UserController中用@AutoWired對UserService進行注入並處理返回的結果,並在該類上加上@Controiller註解
 1 @Controller
 2 public class UserController {
 3     @Autowired
 4     private UserService userService;
 5
 6     public void userList(){
 7         List<User> users = userService.userList();
 8         users.forEach(System.out::println);
 9     }
10 }
最後在SpringBoot的測試類中寫一個測試方法進行資料庫連線的測試
 1 @SpringBootTest
 2 class SpringBootMybatisApplicationTests {
 3
 4     @Autowired
 5     private UserController userController;
 6     @Test
 7     public void test(){
 8         userController.userList();
 9     }
10
11 }
可以看到控制檯成功輸出結果

總結
使用SpringBoot框架整合Mybatis更為簡單,只需要在application.properties組態檔中設定資料來源四要素就行,隨後就可以直接在Mapper中寫SQL語句,最後可以在SpringBootTest類中直接進行測試。