k8s-服務網格實戰-設定 Mesh(灰度釋出)

在上一篇 k8s-服務網格實戰-入門Istio中分享瞭如何安裝部署 Istio,同時可以利用 Istio 實現 gRPC 的負載均衡。
今天我們更進一步,深入瞭解使用 Istio 的功能。

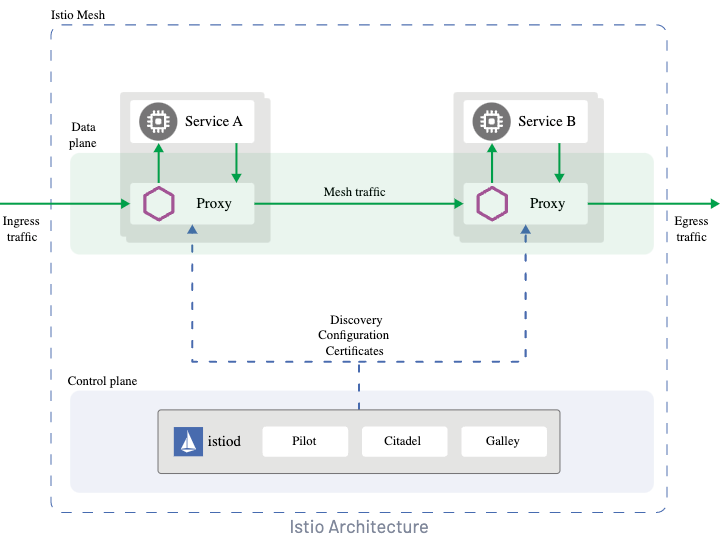
從 Istio 的流量模型中可以看出:Istio 支援管理叢集的出入口請求(gateway),同時也支援管理叢集內的 mesh 流量,也就是叢集內服務之間的請求。
本次先講解叢集內部的請求,配合實現以下兩個功能:
- 灰度釋出(對指定的請求分別路由到不同的 service 中)
- 設定 service 的請求權重
灰度釋出
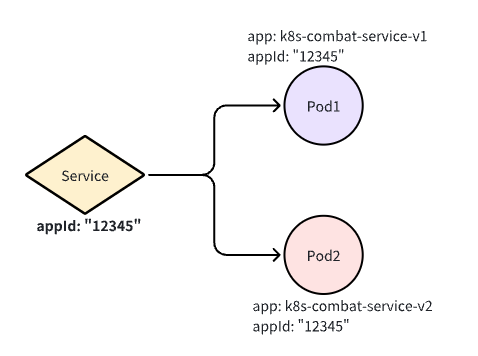
在開始之前會部署兩個 deployment 和一個 service,同時這兩個 deployment 所關聯的 Pod 分別對應了兩個不同的 label,由於在灰度的時候進行分組。

使用這個 yaml 會部署所需要的 deployment 和 service。
kubectl apply -f https://raw.githubusercontent.com/crossoverJie/k8s-combat/main/deployment/istio-mesh.yaml
首先設想下什麼情況下我們需要灰度釋出,一般是某個重大功能的測試,只對部分進入內測的使用者開放入口。
假設我們做的是一個 App,我們可以對拿到了內測包使用者的所有請求頭中加入一個版本號。
比如 version=200 表示新版本,version=100 表示老版本。
同時在伺服器端會將這個版本號列印出來,用於區分請求是否進入了預期的 Pod。
// Client
version := r.URL.Query().Get("version")
name := "world"
ctx, cancel := context.WithTimeout(context.Background(), time.Second)
md := metadata.New(map[string]string{
    "version": version,
})
ctx = metadata.NewOutgoingContext(ctx, md)
defer cancel()
g, err := c.SayHello(ctx, &pb.HelloRequest{Name: name})

// Server
func (s *server) SayHello(ctx context.Context, in *pb.HelloRequest) (*pb.HelloReply, error) {
    md, ok := metadata.FromIncomingContext(ctx)
    var version string
    if ok {
       version = md.Get("version")[0]
    }    log.Printf("Received: %v, version: %s", in.GetName(), version)
    name, _ := os.Hostname()
    return &pb.HelloReply{Message: fmt.Sprintf("hostname:%s, in:%s, version:%s", name, in.Name, version)}, nil
}
對 service 分組
進行灰度測試時往往需要新增部署一個灰度服務,這裡我們稱為 v2(也就是上圖中的 Pod2)。
同時需要將 v1 和 v2 分組:
apiVersion: networking.istio.io/v1alpha3
kind: DestinationRule
metadata:
  name: k8s-combat-service-ds
spec:
  host: k8s-combat-service-istio-mesh
  subsets:
    - name: v1
      labels:
        app: k8s-combat-service-v1
    - name: v2
      labels:
        app: k8s-combat-service-v2
這裡我們使用 Istio 的 DestinationRule 定義 subset,也就是將我們的 service 下的 Pod 分為 v1/v2。
使用 標籤
app進行分組
注意這裡的 host: k8s-combat-service-istio-mesh 通常設定的是 service 名稱。
apiVersion: v1
kind: Service
metadata:
  name: k8s-combat-service-istio-mesh
spec:
  selector:
    appId: "12345"
  type: ClusterIP
  ports:
    - port: 8081
      targetPort: 8081
      name: app
    - name: grpc
      port: 50051
      targetPort: 50051
也就是這裡 service 的名稱,同時也支援設定為 host: k8s-combat-service-istio-mesh.default.svc.cluster.local,如果使用的簡寫Istio 會根據當前指定的 namespace 進行解析。
Istio 更推薦使用全限定名替代我們這裡的簡寫,從而避免誤操作。
當然我們也可以在 DestinationRule 中設定負載均衡的策略,這裡我們先略過:
apiVersion: networking.istio.io/v1alpha3
kind: DestinationRule
metadata:
  name: k8s-combat-service-ds
spec:
  host: k8s-combat-service-istio-mesh
  trafficPolicy:
    loadBalancer:
      simple: ROUND_ROBIN

這樣我們就定義好了兩個分組:
- v1:app: k8s-combat-service-v1
- v2:app: k8s-combat-service-v2
之後就可以設定路由規則將流量分別指定到兩個不同的組中,這裡我們使用 VirtualService 進行設定。
apiVersion: networking.istio.io/v1alpha3
kind: VirtualService
metadata:
  name: k8s-combat-service-vs
spec:
  gateways:
    - mesh
  hosts:
    - k8s-combat-service-istio-mesh # match this host
http:
  - name: v1
    match:
      - headers:
          version:
            exact: '100'
    route:
      - destination:
          host: k8s-combat-service-istio-mesh
          subset: v1
  - name: v2
    match:
      - headers:
          version:
            exact: '200'
    route:
      - destination:
          host: k8s-combat-service-istio-mesh
          subset: v2
  - name: default
    route:
      - destination:
          host: k8s-combat-service-istio-mesh
          subset: v1
這個規則很簡單,會檢測 http 協定的 header 中的 version 欄位值,如果為 100 這路由到 subset=v1 這個分組的 Pod 中,同理為 200 時則路由到 subset=v2 這個分組的 Pod 中。
當沒有匹配到 header 時則進入預設的 subset:v1
gRPC也是基於 http 協定,它的metadata也就對應了http協定中的header。
header=100
Greeting: hostname:k8s-combat-service-v1-5b998dc8c8-hkb72, in:world, version:100istio-proxy@k8s-combat-service-v1-5b998dc8c8-hkb72:/$ curl "http://127.0.0.1:8081/grpc_client?name=k8s-combat-service-istio-mesh&version=100"
Greeting: hostname:k8s-combat-service-v1-5b998dc8c8-hkb72, in:world, version:100istio-proxy@k8s-combat-service-v1-5b998dc8c8-hkb72:/$ curl "http://127.0.0.1:8081/grpc_client?name=k8s-combat-service-istio-mesh&version=100"
Greeting: hostname:k8s-combat-service-v1-5b998dc8c8-hkb72, in:world, version:100istio-proxy@k8s-combat-service-v1-5b998dc8c8-hkb72:/$ curl "http://127.0.0.1:8081/grpc_client?name=k8s-combat-service-istio-mesh&version=100"
Greeting: hostname:k8s-combat-service-v1-5b998dc8c8-hkb72, in:world, version:100istio-proxy@k8s-combat-service-v1-5b998dc8c8-hkb72:/$ curl "http://127.0.0.1:8081/grpc_client?name=k8s-combat-service-istio-mesh&version=100"
header=200
Greeting: hostname:k8s-combat-service-v2-5db566fb76-xj7j6, in:world, version:200istio-proxy@k8s-combat-service-v1-5b998dc8c8-hkb72:/$ curl "http://127.0.0.1:8081/grpc_client?name=k8s-combat-service-istio-mesh&version=200"
Greeting: hostname:k8s-combat-service-v2-5db566fb76-xj7j6, in:world, version:200istio-proxy@k8s-combat-service-v1-5b998dc8c8-hkb72:/$ curl "http://127.0.0.1:8081/grpc_client?name=k8s-combat-service-istio-mesh&version=200"
Greeting: hostname:k8s-combat-service-v2-5db566fb76-xj7j6, in:world, version:200istio-proxy@k8s-combat-service-v1-5b998dc8c8-hkb72:/$ curl "http://127.0.0.1:8081/grpc_client?name=k8s-combat-service-istio-mesh&version=200"
Greeting: hostname:k8s-combat-service-v2-5db566fb76-xj7j6, in:world, version:200istio-proxy@k8s-combat-service-v1-5b998dc8c8-hkb72:/$ curl "http://127.0.0.1:8081/grpc_client?name=k8s-combat-service-istio-mesh&version=200"
Greeting: hostname:k8s-combat-service-v2-5db566fb76-xj7j6, in:world, version:200istio-proxy@k8s-combat-service-v1-5b998dc8c8-hkb72:/$ curl "http://127.0.0.1:8081/grpc_client?name=k8s-combat-service-istio-mesh&version=200"
Greeting: hostname:k8s-combat-service-v2-5db566fb76-xj7j6, in:world, version:200istio-proxy@k8s-combat-service-v1-5b998dc8c8-hkb72:/$ curl "http://127.0.0.1:8081/grpc_client?name=k8s-combat-service-istio-mesh&version=200"
Greeting: hostname:k8s-combat-service-v2-5db566fb76-xj7j6, in:world, version:200istio-proxy@k8s-combat-service-v1-5b998dc8c8-hkb72:/$ curl "http://127.0.0.1:8081/grpc_client?name=k8s-combat-service-istio-mesh&version=200"
根據以上的上面的測試請求來看,只要我們請求頭裡帶上指定的 version 就會被路由到指定的 Pod 中。
利用這個特性我們就可以在灰度驗證的時候單獨發一個灰度版本的 Deployment,同時配合使用者端指定版本就可以實現灰度功能了。
設定權重
同樣基於 VirtualService 我們還可以對不同的 subset 分組進行權重設定。
apiVersion: networking.istio.io/v1alpha3
kind: VirtualService
metadata:
  name: k8s-combat-service-vs
spec:
  gateways:
    - mesh
  hosts:
    - k8s-combat-service-istio-mesh # match this host
  http:
    - match:
        - uri:
            exact: /helloworld.Greeter/SayHello
      route:
        - destination:
            host: k8s-combat-service-istio-mesh
            subset: v1
          weight: 10
        - destination:
            host: k8s-combat-service-istio-mesh
            subset: v2
          weight: 90
      timeout: 5000ms
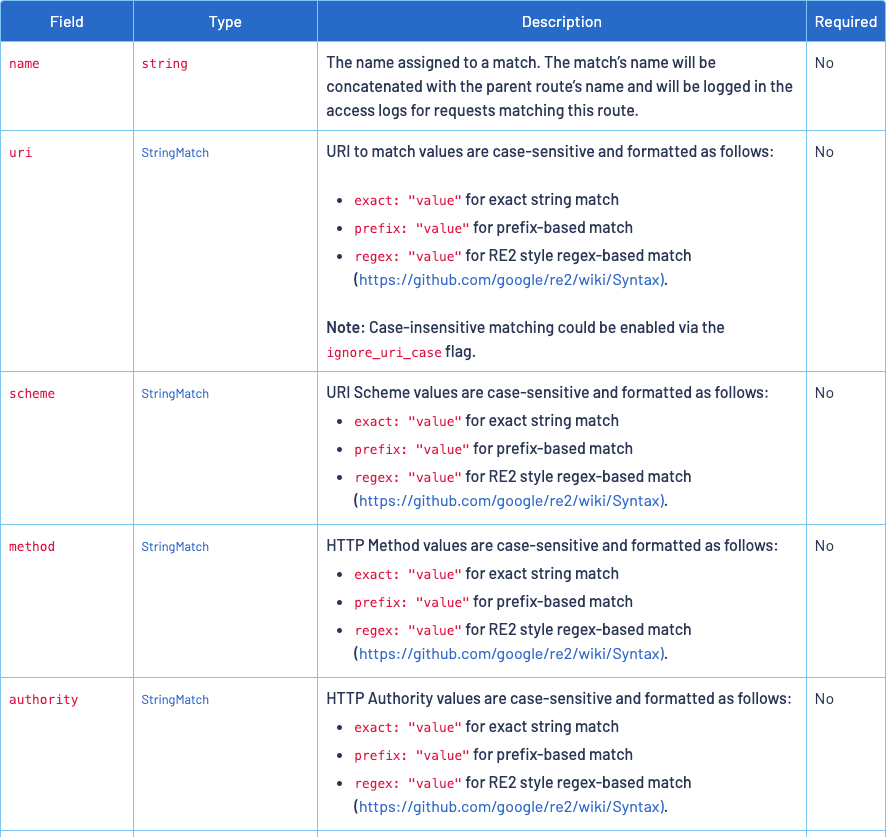
這裡演示的是針對 SayHello 介面進行權重設定(當然還有多種匹配規則),90% 的流量會進入 v2 這個 subset,也就是在 k8s-combat-service-istio-mesh service 下的 app: k8s-combat-service-v2 Pod。
Greeting: hostname:k8s-combat-service-v2-5db566fb76-xj7j6, in:world, version:200istio-proxy@k8s-combat-service-v1-5b998dc8c8-hkb72:/$ curl "http://127.0.0.1:8081/grpc_client?name=k8s-combat-service-istio-mesh&version=200"
Greeting: hostname:k8s-combat-service-v2-5db566fb76-xj7j6, in:world, version:200istio-proxy@k8s-combat-service-v1-5b998dc8c8-hkb72:/$ curl "http://127.0.0.1:8081/grpc_client?name=k8s-combat-service-istio-mesh&version=200"
Greeting: hostname:k8s-combat-service-v2-5db566fb76-xj7j6, in:world, version:200istio-proxy@k8s-combat-service-v1-5b998dc8c8-hkb72:/$ curl "http://127.0.0.1:8081/grpc_client?name=k8s-combat-service-istio-mesh&version=200"
Greeting: hostname:k8s-combat-service-v2-5db566fb76-xj7j6, in:world, version:200istio-proxy@k8s-combat-service-v1-5b998dc8c8-hkb72:/$ curl "http://127.0.0.1:8081/grpc_client?name=k8s-combat-service-istio-mesh&version=200"
Greeting: hostname:k8s-combat-service-v2-5db566fb76-xj7j6, in:world, version:200istio-proxy@k8s-combat-service-v1-5b998dc8c8-hkb72:/$ curl "http://127.0.0.1:8081/grpc_client?name=k8s-combat-service-istio-mesh&version=200"
Greeting: hostname:k8s-combat-service-v2-5db566fb76-xj7j6, in:world, version:200istio-proxy@k8s-combat-service-v1-5b998dc8c8-hkb72:/$ curl "http://127.0.0.1:8081/grpc_client?name=k8s-combat-service-istio-mesh&version=200"
Greeting: hostname:k8s-combat-service-**v1**-5b998dc8c8-hkb72, in:world, version:200istio-proxy@k8s-combat-service-v1-5b998dc8c8-hkb72:/$ curl "http://127.0.0.1:8081/grpc_client?name=k8s-combat-service-istio-mesh&version=200"
Greeting: hostname:k8s-combat-service-v2-5db566fb76-xj7j6, in:world, version:200istio-proxy@k8s-combat-service-v1-5b998dc8c8-hkb72:/$
經過測試會發現大部分的請求都會按照我們的預期進入 v2 這個分組。
當然除之外之外我們還可以:
- 超時時間
- 故障注入
- 重試
具體的設定可以參考 Istio 官方檔案:

當然在一些雲平臺也提供了視覺化的頁面,可以更直觀的使用。

以上是 阿里雲的截圖
但他們的管理的資源都偏 kubernetes,一般是由運維或者是 DevOps 來設定,不方便開發使用,所以還需要一個介於雲廠商和開發者之間的管理髮布平臺,可以由開發者以專案維度管理維護這些功能。
本文的所有原始碼在這裡可以存取:
https://github.com/crossoverJie/k8s-combat
作者: crossoverJie

歡迎關注博主公眾號與我交流。
本文版權歸作者所有,歡迎轉載,但未經作者同意必須保留此段宣告,且在文章頁面明顯位置給出, 如有問題, 可郵件(crossoverJie#gmail.com)諮詢。