手把手,完整的從0搭建vite-vue3-ts專案框架:設定less+svg+pinia+vant+axios
專案同步git:https://gitee.com/lixin_ajax/vue3-vite-ts-pinia-vant-less.git
覺得有幫助的小夥伴請點下小心心哦
為避免贅述,過於基礎的點會直接省略或貼圖,比如建立資料夾/檔案的路徑/路由一類
設定相應功能,也儘量只貼相關程式碼,並不代表整個檔案內容
我會盡量把每一步都記錄下來,讓跟隨檔案操作的朋友也能還原專案
專案不盡完美,但是主體功能應該都可以有所參考
一.本地初始環境

SvgIcon元件
// SvgIcon/index.vue

<template>
    <svg aria-hidden="true" class="svg-icon">
        <use :xlink:href="symbolId" :fill="color" />
    </svg>
</template>

<script lang="ts" setup>
import { computed } from "vue";

const props = defineProps({
    prefix: {
        type: String,
        default: "icon",
    },
    name: {
        type: String,
        required: true,
    },
    color: {
        type: String,
        default: "#333",
    },
});
const symbolId = computed(() => `#${props.prefix}-${props.name}`);
</script>
<style lang="less" scoped>
.svg-icon {
    width: 1em;
    height: 1em;
    fill: v-bind(color);
    vertical-align: middle;
    color: v-bind(color);
}
</style>
在main.ts中註冊SvgIcon為全域性元件
// main.ts

import { createApp } from 'vue'
import './style.css'
import "virtual:svg-icons-register";
import SvgIcon from "@/components/SvgIcon/index.vue";

import App from './App.vue'
import router from "./router";

const app = createApp(App as any);
app.use(router)

app.mount('#app')
app.component("SvgIcon", SvgIcon);
在test/index.vue中引入元件
// test/index.vue

<svg-icon name="test-vue" />
檢視頁面,測試是否成功
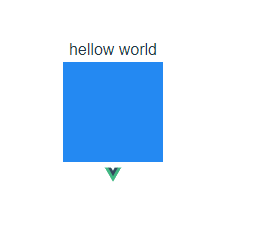
頁面顯示svg圖示,svg元件設定成功!
九.設定pinia
pinia: 類似vuex的倉庫
pinia-use-persist: 持久加密快取pinia資料
yarn add pinia pinia-use-persist -S
main.ts中引入pinia
// main.ts

import { createApp } from 'vue'
import { createPinia } from 'pinia'
import { usePersist } from 'pinia-use-persist'

import App from './App.vue'

const app = createApp(App as any);
const pinia = createPinia()
pinia.use(usePersist)
app.use(pinia)
src下建立store目錄存放相關檔案

/store/modules下存放專案不同模組需要通過pinia通訊的資料,假裝專案有一個test模組,存放了一個資料number
// store/modules/test/index.ts

import { defineStore } from "pinia";

interface stateType {
  number: number;
}

const useTestStore = defineStore("user", {
  state: (): stateType => ({
    number: 0,
  }),

  getters: {},

  actions: {
    setNumber(number: number): void {
      this.number = number;
    },
  },

  persist: {
    enabled: true,
    encryptionKey: "vueTest",
  },
});

export { useTestStore };
store/index.ts引入各模組
// store/index.ts

import { createPinia } from "pinia";
import { useTestStore } from "./modules/test";

const pinia = createPinia();

export { useTestStore };
export default pinia;
回到test/index.vue,測試pinia設定是否成功
// test/index.vue

<template>
    <!-- 測試pinia -->
    <button @click="number += 1">{{ number }}</button>
  </div>
</template>

<script setup lang="ts">
import { computed } from 'vue'
import { useTestStore } from '@/store'

const store = useTestStore()
const number = computed<number>({
  get() {
    return store.number
  },
  set(value) {
    store.setNumber(value)
  },
})
</script>
點選按鈕,重新整理後檢視頁面是否變化

頁面資料沒有初始化,pinia設定成功!
十.設定vant ui
vant ui:https://vant-contrib.gitee.io/vant/v4/
yarn add vant
這裡再推薦一個外掛,unplugin-vue-components【自動引入】,引入ui可以省去很多麻煩
yarn add unplugin-vue-components -D
vite.config.ts中引入vant ui
// vite.config.ts

import vue from '@vitejs/plugin-vue';
import Components from 'unplugin-vue-components/vite';
import { VantResolver } from 'unplugin-vue-components/resolvers';

export default {
  plugins: [
    vue(),
    Components({
      resolvers: [VantResolver()],
    }),
  ],
};
回到test/index.vue測試vant ui引入是否成功
// test/index.vue

<!-- 測試vant ui -->
<div>
  <van-button type="primary">vant button</van-button>
</div>
重新整理頁面檢視
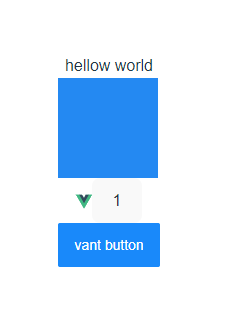
按鈕有樣式,vant ui引入成功!
但是官方描述:Vant 中有個別元件是以函數的形式提供的,包括 Toast,Dialog,Notify 和 ImagePreview 元件。在使用函陣列件時,unplugin-vue-components 無法自動引入對應的樣式,因此需要手動引入樣式。
所以,這幾個元件需要使用的話需要在main.ts中引入樣式
// main.ts

// Toast
import 'vant/es/toast/style';
// Dialog
import 'vant/es/dialog/style';
// Notify
import 'vant/es/notify/style';
// ImagePreview
import 'vant/es/image-preview/style';
回到test/index.vue測試,範例toast
// test/index.vue

import { Toast } from 'vant'

Toast('使用vant')
檢視頁面

toast有樣式,vant ui引入成功!
但是,使用vant ui多是行動端,所以還要做行動端做以下適配
參考: https://vant-contrib.gitee.io/vant/v4/
1.適配安全距離
根據vant ui提供,在根檔案index.html修改
// index.html

  <!-- 在 head 標籤中新增 meta 標籤,並設定 viewport-fit=cover 值 -->
  <meta name="viewport"
    content="width=device-width, initial-scale=1.0, maximum-scale=1.0, minimum-scale=1.0, viewport-fit=cover" />

  <!-- 開啟頂部安全區適配 -->
  <van-nav-bar safe-area-inset-top />

  <!-- 開啟底部安全區適配 -->
  <van-number-keyboard safe-area-inset-bottom />
2.Viewport 佈局
postcss-px-to-viewport-8-plugin:postcss-px-to-viewport-8-plugin 是一款 PostCSS 外掛,用於將 px 單位轉化為 vw/vh 單位。
yarn add postcss-px-to-viewport-8-plugin -D
vite.config.ts中更改設定
// vite.config.ts

import pxtovw from 'postcss-px-to-viewport-8-plugin'
const loder_pxtovw = pxtovw({
//這裡是設計稿寬度 自己修改
  viewportWidth: 375,
  viewportUnit: 'vw'
})
export default defineConfig({
  ......,
  css: {
    postcss: {
      plugins: [loder_pxtovw]
    }
  }
})
建立一個types/index.d.ts,用於處理包括postcss-px-to-viewport-8-plugin一類的沒有宣告檔案的依賴
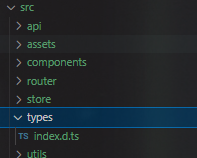
// src/types/index.d.ts

declare module "postcss-px-to-viewport-8-plugin"
重新整理頁面,F12檢視樣式

px已被轉換,vant ui 及 行動端設定成功!
十一.設定axios
yarn add axios
tsconfig.json:types里加上"vite/client"
// tsconfig.json

{
  "compilerOptions": {
    ......,
    "types": ["vite/client", "vite-plugin-svg-icons/client"]
  },
  "include": [
    "src/**/*.ts",
    "src/**/*.d.ts",
    "src/**/*.tsx",
    "src/**/*.vue",
    "*.ts",
  ],
  "exclude": ["node_modules", "dist"],
  "references": [{ "path": "./tsconfig.node.json" }]
}
src下建立axios請求檔案
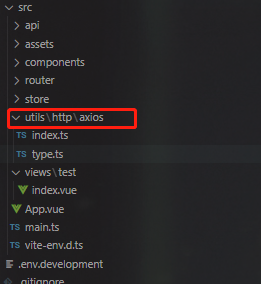
建立axios
// utils/http/axios/index.ts

import axios, {
  AxiosInstance,
  AxiosRequestConfig,
  AxiosResponse,
  AxiosError,
} from "axios";
import { IResponse } from "./type";

// 如果請求超過 `timeout` 的時間,請求將被中斷
axios.defaults.timeout = 5000;

const axiosInstance: AxiosInstance = axios.create({
  baseURL: import.meta.env.VITE_APP_API_BASEURL + "",
});

// axios範例攔截請求
axiosInstance.interceptors.request.use(
  (config: AxiosRequestConfig) => {
    // 設定headers
    config.headers = {
      ...config.headers,
    };
    return config;
  },
  (error: any) => {
    return Promise.reject(error);
  }
);

// axios範例攔截響應
axiosInstance.interceptors.response.use(
  // 請求成功
  (response: AxiosResponse) => {
    return response;
  },
  // 請求失敗
  (error: AxiosError) => {
    const { response } = error;
    console.error(response, "response error");
    if (response) {
      return Promise.reject(response.data);
    }
  }
);

const request = <T = any>(config: AxiosRequestConfig): Promise<T> => {
  const conf = config;
  return new Promise((resolve) => {
    axiosInstance
      .request<any, AxiosResponse<IResponse>>(conf)
      .then((res: AxiosResponse<IResponse>) => {
        const {
          data: { result },
        } = res;
        resolve(result as T);
      });
  });
};

export function get<T = any>(config: AxiosRequestConfig): Promise<T> {
  return request({ ...config, method: "GET" });
}

export function post<T = any>(config: AxiosRequestConfig): Promise<T> {
  return request({ ...config, method: "POST" });
}

export default request;
export type { AxiosInstance, AxiosResponse };
// utils/http/axios/type.ts

export interface RequestOptions {
    // Whether to process the request result
    isTransformResponse?: boolean;
}

// 返回res.data的interface
export interface IResponse<T = any> {
    code: number | string;
    result: T;
    data: T;
    message: string;
    status: string | number;
}
根目錄建立.env.development設定開發請求地址
// .env.development

# 開發環境

VITE_APP_API_BASEURL = 你的請求地址

NODE_ENV = development
vite.config.ts設定server
// vite.config.ts

    server: {
      hmr: { overlay: false }, // 禁用或設定 HMR 連線 設定 server.hmr.overlay 為 false 可以禁用伺服器錯誤遮罩層
            // 服務設定
            port: 3030, // 型別: number 指定伺服器埠;
            open: false, // 型別: boolean | string在伺服器啟動時自動在瀏覽器中開啟應用程式;
            cors: false, // 型別: boolean | CorsOptions 為開發伺服器設定 CORS。預設啟用並允許任何源
           host: "0.0.0.0", // IP設定,支援從IP啟動
           ["/api"]: {
        target: process.env.VITE_APP_API_BASEURL,
        changeOrigin: true,
        rewrite: (path: string) => path.replace(new RegExp("^/api"), ""),
      },
    },
建立api存放目錄

建立一個api
// api/test/index.ts

import { post } from "@/utils/http/axios";
import { IResponse } from "@/utils/http/axios/type";

export interface LoginData {
  username?: string;
  password?: string;
}

enum URL {
  login = "/api/user_center/testLogin",
}

/**
 * @description: 使用者登入
 * @params {LoginData} params
 * @return {Promise}
 */

const login = async (data: LoginData) =>
  post<IResponse>({ url: URL.login, data });

export { login };
回到test/index.vue呼叫api測試axios
// test/index.vue

<script setup lang="ts">
import { login } from '@/api/test'

login({})
</script>
回到頁面,檢視network
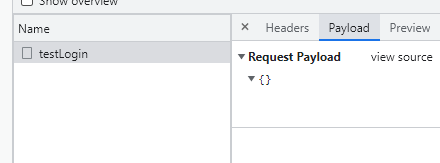
介面請求成功,axios設定成功!
最後,設定一下打包
// vite.config.ts

import { UserConfig, ConfigEnv, loadEnv } from "vite";

// https://vitejs.dev/config/
export default ({ command, mode }: ConfigEnv): UserConfig => {
  const env = loadEnv(mode, __dirname);
  return {
    base: env.NODE_ENV === "development" ? "/" : "./",
    build: {
      outDir: "dist",
      assetsDir: "assets", //指定靜態資源存放路徑
        sourcemap: false, //是否構建source map 檔案
    },
  };
};
啟動dist,沒問題!

結語:
專案到此主體功能就已經設定完畢了,細節之處大家多多檢視官網和眾多網友的分享
專案還有很多不完善甚至錯誤的地方,踩坑還會繼續,後續有時間還會繼續優化,實際使用中還有很多地方需要改進
專案同步git:https://gitee.com/lixin_ajax/vue3-vite-ts-pinia-vant-less.git