分散式儲存系統之Ceph叢集部署
前文我們瞭解了Ceph的基礎架構和相關元件的介紹,回顧請參考https://www.cnblogs.com/qiuhom-1874/p/16720234.html;今天我們來部署一個ceph叢集;
部署工具介紹
1、ceph-deploy:該部署工具是ceph官方的部署工具,它只依賴SSH存取伺服器,不需要額外的agent;它可以完全執行在自己的工作站上(比如admin host),不需要伺服器,資料庫類似的東西;該工具不是一個通用的部署工具,只針對ceph;相比ansible,puppet,功能相對單一;該工具可以推播組態檔,但它不處理使用者端設定,以及使用者端部署相關依賴等;
2、ceph-ansible:該工具是用ansible寫的劇本角色,我們只需要把對應的專案克隆下來,修改必要的引數,就可以正常的拉起一個ceph叢集;但這前提是我們需要熟練使用ansible;專案地址 https://github.com/ceph/ceph-ansible;
3、ceph-chef:chef也是類似ansible、puppet這類自動化部署工具,我們需要手動先安裝好chef,然後手動寫程式碼實現部署;ceph-chef就是寫好部署ceph的一個專案,我們可以下載對應專案在本地修改必要引數,也能正常拉起一個ceph叢集;前提是我們要熟練使用chef才行;專案下載地址https://github.com/ceph/ceph-chef;
4、puppet-ceph:很顯然該工具就是用puppet寫好的部署ceph的模組,也是下載下來修改必要引數,就可以正常拉起一個ceph叢集;
不管用什麼工具,我們首先都要熟練知道ceph叢集架構,它的必要元件,每個元件是怎麼工作的,有什麼作用,需要怎麼設定等等;除此之外我們還需要熟練使用各種自動化部署工具,才能很好的使用上述工具部署ceph叢集;
叢集拓撲網路
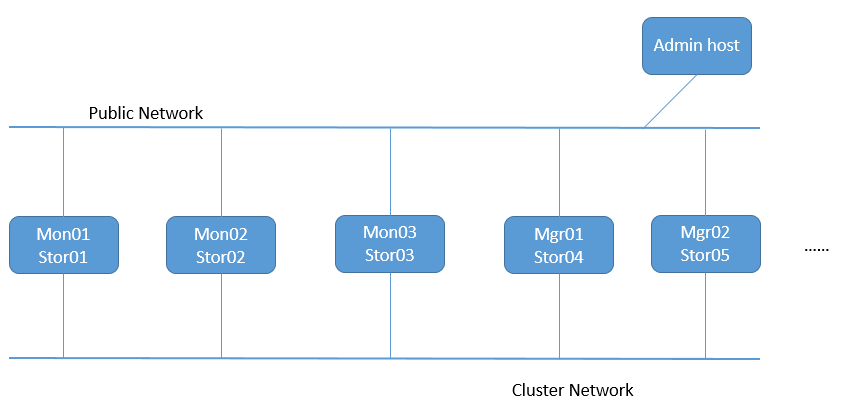
提示:Public Network是指公共網路,專供使用者端連線ceph叢集使用;一般如果節點不多,叢集規模和使用者的存取量不大的情況下,只有一個public network也是完全ok;存在cluster network主要原因是,叢集內部的事務處理,可能影響到使用者端在ceph儲存資料;所以cluster network是叢集私有網路,專門用於叢集內部各元件通訊協調使用;我們用於部署ceph的admin host 只需要有一個公共網路連入叢集下發設定即可;
Ceph叢集系統基礎環境設定
| 主機地址 | 角色 |
|
public network:192.168.0.70/24 |
admin host |
|
public network:192.168.0.71/24 cluster network:172.16.30.71/24 |
mon01/stor01 |
|
public network:192.168.0.72/24 cluster network:172.16.30.72/24 |
mon02/stor02 |
|
public network:192.168.0.73/24 cluster network:172.16.30.73/24 |
mon03/stor03 |
|
public network:192.168.0.74/24 cluster network:172.16.30.74/24 |
mgr01/stor04 |
|
public network:192.168.0.75/24 cluster network:172.16.30.75/24 |
mgr02/stor05 |
各主機主機名解析
192.168.0.70 ceph-admin ceph-admin.ilinux.io
192.168.0.71 ceph-mon01 ceph-mon01.ilinux.io ceph-stor01 ceph-stor01.ilinux.io
192.168.0.72 ceph-mon02 ceph-mon02.ilinux.io ceph-stor02 ceph-stor02.ilinux.io
192.168.0.73 ceph-mon03 ceph-mon03.ilinux.io ceph-stor03 ceph-stor03.ilinux.io
192.168.0.74 ceph-mgr01 ceph-mgr01.ilinux.io ceph-stor04 ceph-stor04.ilinux.io
192.168.0.75 ceph-mgr02 ceph-mgr02.ilinux.io ceph-stor05 ceph-stor05.ilinux.io

172.16.30.71 ceph-mon01 ceph-mon01.ilinux.io ceph-stor01 ceph-stor01.ilinux.io
172.16.30.72 ceph-mon02 ceph-mon02.ilinux.io ceph-stor02 ceph-stor02.ilinux.io
172.16.30.73 ceph-mon03 ceph-mon03.ilinux.io ceph-stor03 ceph-stor03.ilinux.io
172.16.30.74 ceph-mgr01 ceph-mgr01.ilinux.io ceph-stor04 ceph-stor04.ilinux.io
172.16.30.75 ceph-mgr02 ceph-mgr02.ilinux.io ceph-stor05 ceph-stor05.ilinux.io
各主機設定ntp服務設定各節點時間精準同步
[root@ceph-admin ~]# sed -i 's@^\(server \).*@\1ntp1.aliyun.com iburst@' /etc/chrony.conf
[root@ceph-admin ~]# systemctl restart chronyd
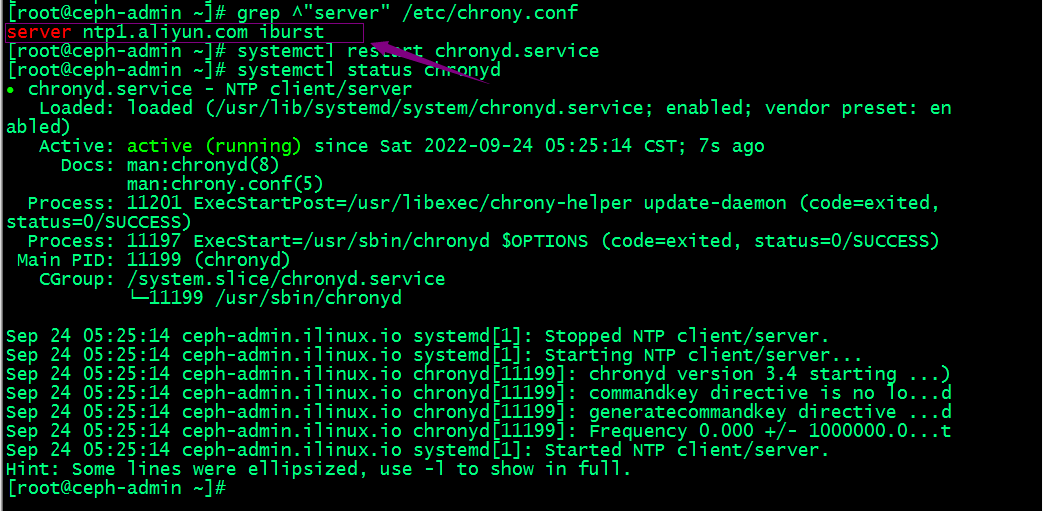
提示:上述伺服器都需要在chrony.conf中設定同步時間的伺服器,這裡推薦使用阿里雲,然後重啟chronyd服務即可;
各節點關閉iptables 或firewalld服務
[root@ceph-admin ~]# systemctl stop firewalld
[root@ceph-admin ~]# systemctl disable firewalld

提示:centos7 預設沒有安裝iptalbes服務,我們只需要關閉firewalld即可;
各節點關閉並禁用selinux
[root@ceph-admin ~]# sed -i 's@^\(SELINUX=\).*@\1Disabled@' /etc/sysconfig/selinu
[root@ceph-admin ~]# setenforce 0
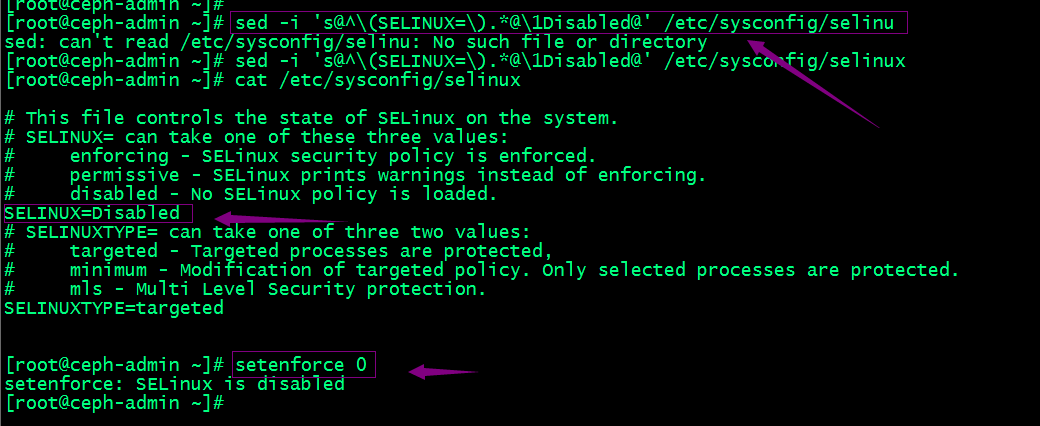
提示:上述sed命令表示查詢/etc/sysconfig/selinux組態檔中,以SELINUX開頭的行當所有內容,並將其替換為SELINUX=Disabled;ok,準備好叢集基礎環境以後,接下來我們開始部署ceph;
準備yum倉庫組態檔
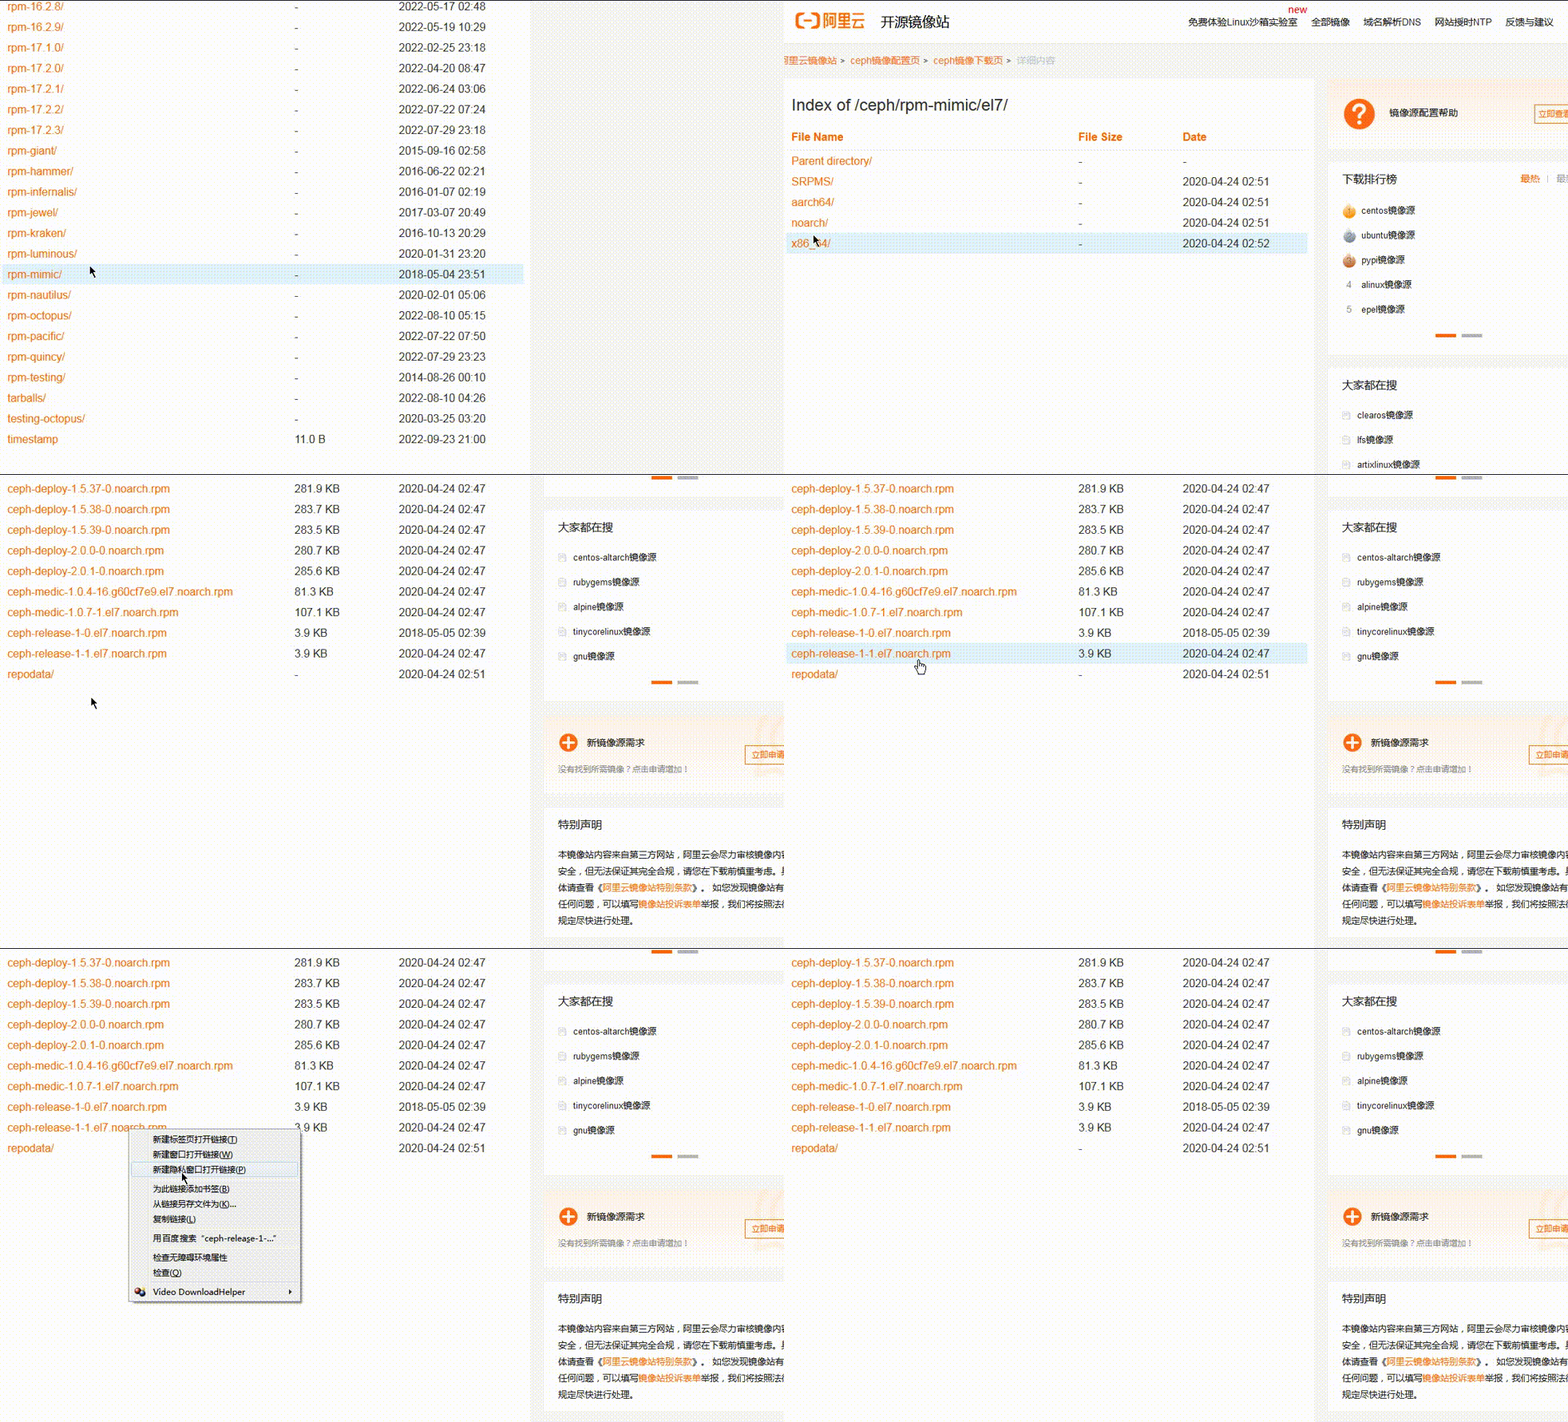
提示:在阿里雲的映象站找ceph,然後找到我們需要安裝的版本;然後找到ceph-release,可以下載,也可以複製對應下載連結,然後在伺服器的每個節點都安裝好對應的ceph-release包;
在叢集各節點安裝ceph-release包生成ceph倉庫組態檔
rpm -ivh https://mirrors.aliyun.com/ceph/rpm-mimic/el7/noarch/ceph-release-1-1.el7.noarch.rpm?spm=a2c6h.25603864.0.0.6e8b635btfWSIx

在叢集各節點安裝epel-release生成epel倉庫設定
[root@ceph-admin ~]# yum install -y epel-release

到此ceph的yum倉庫組態檔就準備好了
在叢集各節點建立部署ceph的特定使用者帳號
[root@ceph-admin ~]# useradd cephadm && echo "admin" |passwd --stdin cephadm

提示:部署工具ceph-deploy 必須以普通使用者登入到Ceph叢集的各目標節點,且此使用者需要擁有無密碼使用sudo命令的許可權,以便在安裝軟體及生成組態檔的過程中無需中斷設定過程。不過,較新版的ceph-deploy也支援用 」--username「 選項提供可無密碼使用sudo命令的使用者名稱(包括 root ,但不建議這樣做)。另外,使用」ceph-deploy --username {username} 「命令時,指定的使用者需要能夠通過SSH協定自動認證並連線到各Ceph節點,以免ceph-deploy命令在設定中途需要使用者輸入密碼。
確保叢集節點上新建立的cephadm使用者能夠無密碼執行sudo許可權
[root@ceph-admin ~]# echo "cephadm ALL = (root) NOPASSWD:ALL" |sudo tee /etc/sudoers.d/cephadm
[root@ceph-admin ~]# chmod 0440 /etc/sudoers.d/cephadm

切換至cephadm使用者,檢視sudo許可權

設定cephadm基於金鑰的ssh認證
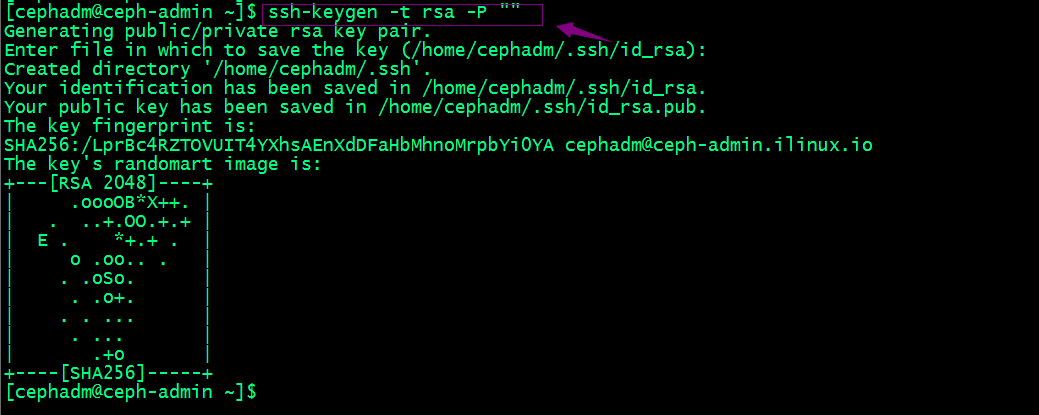
提示:先切換使用者到cephadm下然後生成金鑰;
拷貝公鑰給自己

複製被地.ssh目錄給其他主機,放置在cephadm使用者家目錄下
[cephadm@ceph-admin ~]$ scp -rp .ssh cephadm@ceph-mon01:/home/cephadm/
[cephadm@ceph-admin ~]$ scp -rp .ssh cephadm@ceph-mon02:/home/cephadm/
[cephadm@ceph-admin ~]$ scp -rp .ssh cephadm@ceph-mon03:/home/cephadm/
[cephadm@ceph-admin ~]$ scp -rp .ssh cephadm@ceph-mgr01:/home/cephadm/
[cephadm@ceph-admin ~]$ scp -rp .ssh cephadm@ceph-mgr02:/home/cephadm/
驗證:以cephadm使用者遠端叢集節點,看看是否是免密登入

提示:能夠正常遠端執行命令說明我們的免密登入就沒有問題;
在admin host上安裝ceph-deploy
[cephadm@ceph-admin ~]$ sudo yum update
[cephadm@ceph-admin ~]$ sudo yum install ceph-deploy python-setuptools python2-subprocess32
驗證ceph-deploy是否成功安裝
[cephadm@ceph-admin ~]$ ceph-deploy --version
2.0.1
[cephadm@ceph-admin ~]$
提示:能夠正常看到ceph-deploy的版本,說明ceph-deploy安裝成功;
部署RADOS儲存叢集
1、在admin host以cephadm使用者建立叢集相關組態檔目錄
[cephadm@ceph-admin ~]$ mkdir ceph-cluster
[cephadm@ceph-admin ~]$ cd ceph-cluster
[cephadm@ceph-admin ceph-cluster]$ pwd
/home/cephadm/ceph-cluster
[cephadm@ceph-admin ceph-cluster]$
2、初始化第一個mon節點
[cephadm@ceph-admin ceph-cluster]$ ceph-deploy --help
usage: ceph-deploy [-h] [-v | -q] [--version] [--username USERNAME]
                   [--overwrite-conf] [--ceph-conf CEPH_CONF]
                   COMMAND ...

Easy Ceph deployment

    -^-
   /   \
   |O o|  ceph-deploy v2.0.1
   ).-.(
  '/|||\`
  | '|` |
    '|`

Full documentation can be found at: http://ceph.com/ceph-deploy/docs

optional arguments:
  -h, --help            show this help message and exit
  -v, --verbose         be more verbose
  -q, --quiet           be less verbose
  --version             the current installed version of ceph-deploy
  --username USERNAME   the username to connect to the remote host
  --overwrite-conf      overwrite an existing conf file on remote host (if
                        present)
  --ceph-conf CEPH_CONF
                        use (or reuse) a given ceph.conf file

commands:
  COMMAND               description
    new                 Start deploying a new cluster, and write a
                        CLUSTER.conf and keyring for it.
    install             Install Ceph packages on remote hosts.
    rgw                 Ceph RGW daemon management
    mgr                 Ceph MGR daemon management
    mds                 Ceph MDS daemon management
    mon                 Ceph MON Daemon management
    gatherkeys          Gather authentication keys for provisioning new nodes.
    disk                Manage disks on a remote host.
    osd                 Prepare a data disk on remote host.
    repo                Repo definition management
    admin               Push configuration and client.admin key to a remote
                        host.
    config              Copy ceph.conf to/from remote host(s)
    uninstall           Remove Ceph packages from remote hosts.
    purgedata           Purge (delete, destroy, discard, shred) any Ceph data
                        from /var/lib/ceph
    purge               Remove Ceph packages from remote hosts and purge all
                        data.
    forgetkeys          Remove authentication keys from the local directory.
    pkg                 Manage packages on remote hosts.
    calamari            Install and configure Calamari nodes. Assumes that a
                        repository with Calamari packages is already
                        configured. Refer to the docs for examples
                        (http://ceph.com/ceph-deploy/docs/conf.html)

See 'ceph-deploy <command> --help' for help on a specific command
[cephadm@ceph-admin ceph-cluster]$
提示:我們通過檢視ceph-deploy 的幫助可以知道 它的子命令new就是建立一個叢集設定和生成一個keyring檔案;
檢視ceph-deploy new的用法
[cephadm@ceph-admin ceph-cluster]$ ceph-deploy new --help
usage: ceph-deploy new [-h] [--no-ssh-copykey] [--fsid FSID]
                       [--cluster-network CLUSTER_NETWORK]
                       [--public-network PUBLIC_NETWORK]
                       MON [MON ...]

Start deploying a new cluster, and write a CLUSTER.conf and keyring for it.

positional arguments:
  MON                   initial monitor hostname, fqdn, or hostname:fqdn pair

optional arguments:
  -h, --help            show this help message and exit
  --no-ssh-copykey      do not attempt to copy SSH keys
  --fsid FSID           provide an alternate FSID for ceph.conf generation
  --cluster-network CLUSTER_NETWORK
                        specify the (internal) cluster network
  --public-network PUBLIC_NETWORK
                        specify the public network for a cluster
[cephadm@ceph-admin ceph-cluster]$
提示:ceph-deploy new的命令格式 我們只需要對應節點的主機名即可;但是前提是對應主機名做了正確的解析;
[cephadm@ceph-admin ceph-cluster]$ ceph-deploy new ceph-mon01
[ceph_deploy.conf][DEBUG ] found configuration file at: /home/cephadm/.cephdeploy.conf
[ceph_deploy.cli][INFO  ] Invoked (2.0.1): /bin/ceph-deploy new ceph-mon01
[ceph_deploy.cli][INFO  ] ceph-deploy options:
[ceph_deploy.cli][INFO  ]  username                      : None
[ceph_deploy.cli][INFO  ]  func                          : <function new at 0x7f0660799ed8>
[ceph_deploy.cli][INFO  ]  verbose                       : False
[ceph_deploy.cli][INFO  ]  overwrite_conf                : False
[ceph_deploy.cli][INFO  ]  quiet                         : False
[ceph_deploy.cli][INFO  ]  cd_conf                       : <ceph_deploy.conf.cephdeploy.Conf instance at 0x7f065ff11b48>
[ceph_deploy.cli][INFO  ]  cluster                       : ceph
[ceph_deploy.cli][INFO  ]  ssh_copykey                   : True
[ceph_deploy.cli][INFO  ]  mon                           : ['ceph-mon01']
[ceph_deploy.cli][INFO  ]  public_network                : None
[ceph_deploy.cli][INFO  ]  ceph_conf                     : None
[ceph_deploy.cli][INFO  ]  cluster_network               : None
[ceph_deploy.cli][INFO  ]  default_release               : False
[ceph_deploy.cli][INFO  ]  fsid                          : None
[ceph_deploy.new][DEBUG ] Creating new cluster named ceph
[ceph_deploy.new][INFO  ] making sure passwordless SSH succeeds
[ceph-mon01][DEBUG ] connected to host: ceph-admin.ilinux.io
[ceph-mon01][INFO  ] Running command: ssh -CT -o BatchMode=yes ceph-mon01
[ceph-mon01][DEBUG ] connection detected need for sudo
[ceph-mon01][DEBUG ] connected to host: ceph-mon01
[ceph-mon01][DEBUG ] detect platform information from remote host
[ceph-mon01][DEBUG ] detect machine type
[ceph-mon01][DEBUG ] find the location of an executable
[ceph-mon01][INFO  ] Running command: sudo /usr/sbin/ip link show
[ceph-mon01][INFO  ] Running command: sudo /usr/sbin/ip addr show
[ceph-mon01][DEBUG ] IP addresses found: [u'172.16.30.71', u'192.168.0.71']
[ceph_deploy.new][DEBUG ] Resolving host ceph-mon01
[ceph_deploy.new][DEBUG ] Monitor ceph-mon01 at 192.168.0.71
[ceph_deploy.new][DEBUG ] Monitor initial members are ['ceph-mon01']
[ceph_deploy.new][DEBUG ] Monitor addrs are ['192.168.0.71']
[ceph_deploy.new][DEBUG ] Creating a random mon key...
[ceph_deploy.new][DEBUG ] Writing monitor keyring to ceph.mon.keyring...
[ceph_deploy.new][DEBUG ] Writing initial config to ceph.conf...
[cephadm@ceph-admin ceph-cluster]$
提示:我們可以在命令列使用--public-network 選項來指定叢集公共網路和使用--cluster-network選項來指定對應叢集網路;當然也可以生成好組態檔,然後在組態檔裡修改也行;
3、修改組態檔指定叢集的公共網路和叢集網路

提示:編輯生成的ceph.conf組態檔,在【global】設定段中設定ceph叢集面向使用者端通訊的網路ip地址所在公網網路地址和麵向叢集各節點通訊的網路ip地址所在叢集網路地址,如上所示;
4、安裝ceph叢集
[cephadm@ceph-admin ceph-cluster]$ ceph-deploy install ceph-mon01 ceph-mon02 ceph-mon03 ceph-mgr01 ceph-mgr02
提示:ceph-deploy命令能夠以遠端的方式連入Ceph叢集各節點完成程式包安裝等操作,所以我們只需要告訴ceph-deploy 那些主機需要安裝即可;
叢集各主機如果需要獨立安裝ceph程式包,方法如下
yum install ceph ceph-radosgw
提示:前提是該主機基礎環境都設定好了,比如關閉iptables或firewalld,同步時間,ssh免密登入,關閉selinux等;重要的是對應ceph的yum倉庫設定和epel倉庫設定都已經正常設定;
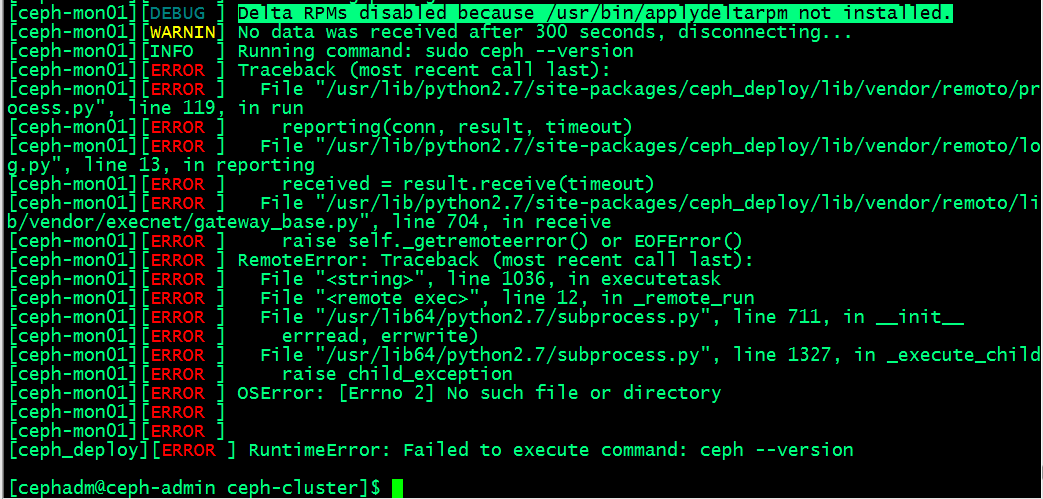
提示:這裡提示我們沒有安裝applydeltarpm;
查詢applydeltarpm安裝包
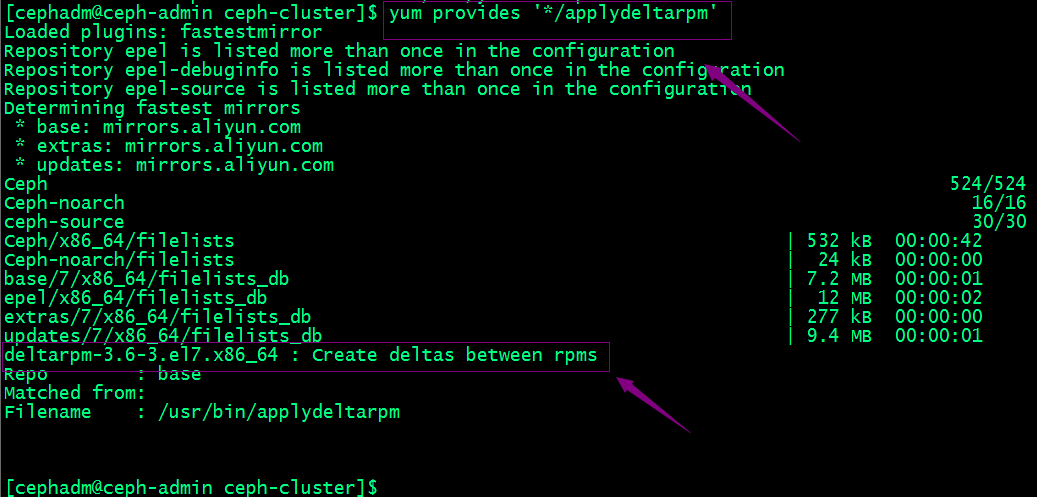
在叢集各節點安裝deltarpm包來解決上述報錯
yum install -y deltarpm-3.6-3.el7.x86_64
再次在admin host上用ceph-deploy安裝ceph叢集
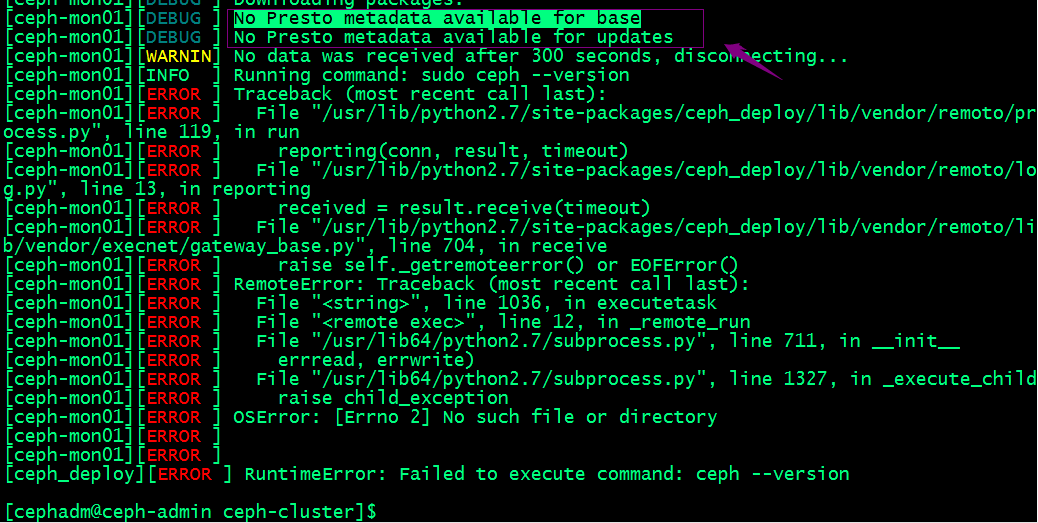
提示:這裡告訴我們沒有presto後設資料;解決辦法清除所有yum快取,重新生成快取;
yum clean all && yum makecache
提示:以上操作都需要在叢集各節點上操作;
再次在admin host上用ceph-deploy安裝ceph叢集

提示:如果在最後能夠看到ceph的版本,說明我們指定的節點都已經安裝好對應ceph叢集所需的程式包了;
5、設定初始MON節點,並收集所有金鑰
檢視ceph-deploy mon幫助
[cephadm@ceph-admin ceph-cluster]$ ceph-deploy mon --help
usage: ceph-deploy mon [-h] {add,create,create-initial,destroy} ...

Ceph MON Daemon management

positional arguments:
  {add,create,create-initial,destroy}
    add                 Add a monitor to an existing cluster:
                                ceph-deploy mon add node1
                        Or:
                                ceph-deploy mon add --address 192.168.1.10 node1
                        If the section for the monitor exists and defines a `mon addr` that
                        will be used, otherwise it will fallback by resolving the hostname to an
                        IP. If `--address` is used it will override all other options.
    create              Deploy monitors by specifying them like:
                                ceph-deploy mon create node1 node2 node3
                        If no hosts are passed it will default to use the
                        `mon initial members` defined in the configuration.
    create-initial      Will deploy for monitors defined in `mon initial
                        members`, wait until they form quorum and then
                        gatherkeys, reporting the monitor status along the
                        process. If monitors don't form quorum the command
                        will eventually time out.
    destroy             Completely remove Ceph MON from remote host(s)

optional arguments:
  -h, --help            show this help message and exit
[cephadm@ceph-admin ceph-cluster]$
提示:add 是新增mon節點,create是建立一個mon節點,但不初始化,如果要初始化需要在對應節點的組態檔中定義設定mon成員;create-initial是建立並初始化mon成員;destroy是銷燬一個mon移除mon節點;
初始化mon節點
[cephadm@ceph-admin ceph-cluster]$ ceph-deploy mon create-initial
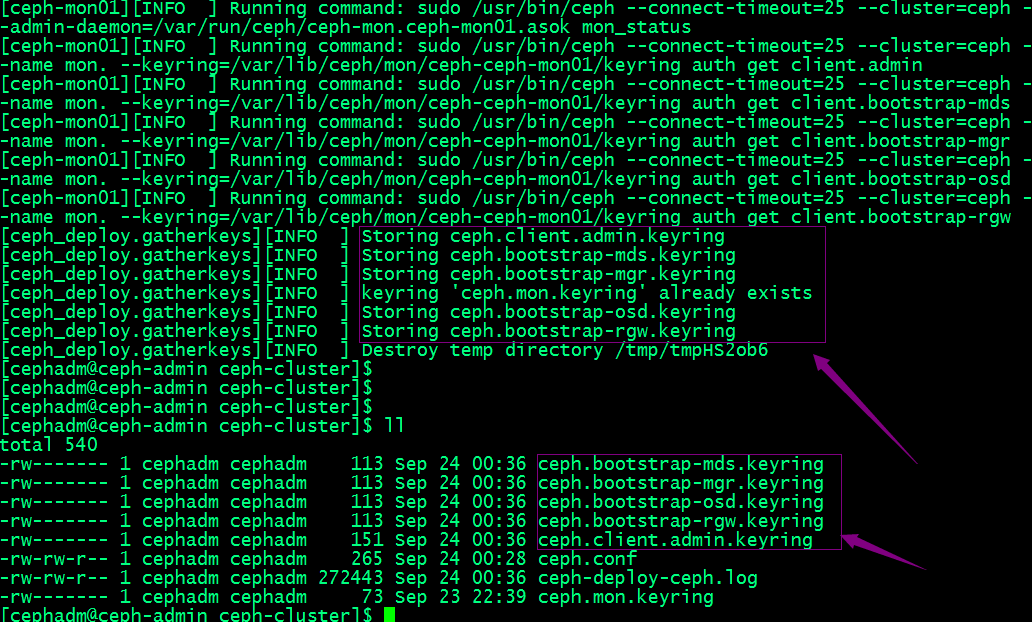
提示:從上面的輸出資訊可以看到該命令是從當前組態檔讀取mon節點資訊,然後初始化;我們在上面的new 命令裡只有給了mon01,所以這裡只初始化了mon01;並在當前目錄生成了引導mds、mgr、osd、rgw和使用者端連線ceph叢集的管理員金鑰;
6、拷貝組態檔和admin金鑰到叢集各節點
檢視ceph-deploy admin的幫助
[cephadm@ceph-admin ceph-cluster]$ ceph-deploy admin --help
usage: ceph-deploy admin [-h] HOST [HOST ...]

Push configuration and client.admin key to a remote host.

positional arguments:
  HOST        host to configure for Ceph administration

optional arguments:
  -h, --help  show this help message and exit
[cephadm@ceph-admin ceph-cluster]$
提示:ceph-deploy admin命令主要作用是向指定的叢集主機推播組態檔和使用者端管理員金鑰;以免得每次執行」ceph「命令列時不得不明確指定MON節點地址和ceph.client.admin.keyring;
[cephadm@ceph-admin ceph-cluster]$ ceph-deploy admin ceph-mon01 ceph-mon02 ceph-mon03 ceph-stor04 ceph-stor05
提示:推播設定和管理員金鑰我們只需要後面跟上對應叢集主機即可,注意主機名要做對應的解析;這裡還需要多說一句,組態檔是叢集每個節點都需要推播的,但是管理金鑰通常只需要推播給需要在對應主機上執行管理命令的主機上使用;所以ceph-deploy config命令就是用於專門推播組態檔,不推播管理金鑰;
檢視ceph-deploy config幫助
[cephadm@ceph-admin ceph-cluster]$ ceph-deploy config --help
usage: ceph-deploy config [-h] {push,pull} ...

Copy ceph.conf to/from remote host(s)

positional arguments:
  {push,pull}
    push       push Ceph config file to one or more remote hosts
    pull       pull Ceph config file from one or more remote hosts

optional arguments:
  -h, --help   show this help message and exit
[cephadm@ceph-admin ceph-cluster]$ ceph-deploy config push --help
usage: ceph-deploy config push [-h] HOST [HOST ...]

positional arguments:
  HOST        host(s) to push the config file to

optional arguments:
  -h, --help  show this help message and exit
[cephadm@ceph-admin ceph-cluster]$ ceph-deploy config pull --help
usage: ceph-deploy config pull [-h] HOST [HOST ...]

positional arguments:
  HOST        host(s) to pull the config file from

optional arguments:
  -h, --help  show this help message and exit
[cephadm@ceph-admin ceph-cluster]$
提示:ceph-deploy config 有兩個子命令,一個是push,表示把本機設定推播到對應指定的主機;pull表示把遠端主機的設定拉去到本地;
驗證:檢視mon01主機上,對應組態檔和管理員金鑰檔案是否都推播過去了?

提示:可以看到對應組態檔和管理員金鑰都推播到對應主機上,但是管理員金鑰的許可權對於cephadm是沒有讀許可權;
設定管理員金鑰能夠被cephadm使用者有讀許可權

提示:上述設定許可權的命令需要在每個節點都要設定;
7、設定Manager節點,啟動ceph-mgr程序(僅Luminious+版本)
檢視ceph-deploy mgr幫助
[cephadm@ceph-admin ceph-cluster]$ ceph-deploy mgr --help
usage: ceph-deploy mgr [-h] {create} ...

Ceph MGR daemon management

positional arguments:
  {create}
    create    Deploy Ceph MGR on remote host(s)

optional arguments:
  -h, --help  show this help message and exit
[cephadm@ceph-admin ceph-cluster]$
提示:mgr子命令就只有一個create命令用於部署mgr;
[cephadm@ceph-admin ceph-cluster]$ ceph-deploy mgr create ceph-mgr01 ceph-mgr02
[ceph_deploy.conf][DEBUG ] found configuration file at: /home/cephadm/.cephdeploy.conf
[ceph_deploy.cli][INFO  ] Invoked (2.0.1): /bin/ceph-deploy mgr create ceph-mgr01 ceph-mgr02
[ceph_deploy.cli][INFO  ] ceph-deploy options:
[ceph_deploy.cli][INFO  ]  username                      : None
[ceph_deploy.cli][INFO  ]  verbose                       : False
[ceph_deploy.cli][INFO  ]  mgr                           : [('ceph-mgr01', 'ceph-mgr01'), ('ceph-mgr02', 'ceph-mgr02')]
[ceph_deploy.cli][INFO  ]  overwrite_conf                : False
[ceph_deploy.cli][INFO  ]  subcommand                    : create
[ceph_deploy.cli][INFO  ]  quiet                         : False
[ceph_deploy.cli][INFO  ]  cd_conf                       : <ceph_deploy.conf.cephdeploy.Conf instance at 0x7f58a0514950>
[ceph_deploy.cli][INFO  ]  cluster                       : ceph
[ceph_deploy.cli][INFO  ]  func                          : <function mgr at 0x7f58a0d8d230>
[ceph_deploy.cli][INFO  ]  ceph_conf                     : None
[ceph_deploy.cli][INFO  ]  default_release               : False
[ceph_deploy.mgr][DEBUG ] Deploying mgr, cluster ceph hosts ceph-mgr01:ceph-mgr01 ceph-mgr02:ceph-mgr02
[ceph-mgr01][DEBUG ] connection detected need for sudo
[ceph-mgr01][DEBUG ] connected to host: ceph-mgr01
[ceph-mgr01][DEBUG ] detect platform information from remote host
[ceph-mgr01][DEBUG ] detect machine type
[ceph_deploy.mgr][INFO  ] Distro info: CentOS Linux 7.9.2009 Core
[ceph_deploy.mgr][DEBUG ] remote host will use systemd
[ceph_deploy.mgr][DEBUG ] deploying mgr bootstrap to ceph-mgr01
[ceph-mgr01][DEBUG ] write cluster configuration to /etc/ceph/{cluster}.conf
[ceph-mgr01][WARNIN] mgr keyring does not exist yet, creating one
[ceph-mgr01][DEBUG ] create a keyring file
[ceph-mgr01][DEBUG ] create path recursively if it doesn't exist
[ceph-mgr01][INFO  ] Running command: sudo ceph --cluster ceph --name client.bootstrap-mgr --keyring /var/lib/ceph/bootstrap-mgr/ceph.keyring auth get-or-create mgr.ceph-mgr01 mon allow profile mgr osd allow * mds allow * -o /var/lib/ceph/mgr/ceph-ceph-mgr01/keyring
[ceph-mgr01][INFO  ] Running command: sudo systemctl enable ceph-mgr@ceph-mgr01
[ceph-mgr01][WARNIN] Created symlink from /etc/systemd/system/ceph-mgr.target.wants/[email protected] to /usr/lib/systemd/system/[email protected].
[ceph-mgr01][INFO  ] Running command: sudo systemctl start ceph-mgr@ceph-mgr01
[ceph-mgr01][INFO  ] Running command: sudo systemctl enable ceph.target
[ceph-mgr02][DEBUG ] connection detected need for sudo
[ceph-mgr02][DEBUG ] connected to host: ceph-mgr02
[ceph-mgr02][DEBUG ] detect platform information from remote host
[ceph-mgr02][DEBUG ] detect machine type
[ceph_deploy.mgr][INFO  ] Distro info: CentOS Linux 7.9.2009 Core
[ceph_deploy.mgr][DEBUG ] remote host will use systemd
[ceph_deploy.mgr][DEBUG ] deploying mgr bootstrap to ceph-mgr02
[ceph-mgr02][DEBUG ] write cluster configuration to /etc/ceph/{cluster}.conf
[ceph-mgr02][WARNIN] mgr keyring does not exist yet, creating one
[ceph-mgr02][DEBUG ] create a keyring file
[ceph-mgr02][DEBUG ] create path recursively if it doesn't exist
[ceph-mgr02][INFO  ] Running command: sudo ceph --cluster ceph --name client.bootstrap-mgr --keyring /var/lib/ceph/bootstrap-mgr/ceph.keyring auth get-or-create mgr.ceph-mgr02 mon allow profile mgr osd allow * mds allow * -o /var/lib/ceph/mgr/ceph-ceph-mgr02/keyring
[ceph-mgr02][INFO  ] Running command: sudo systemctl enable ceph-mgr@ceph-mgr02
[ceph-mgr02][WARNIN] Created symlink from /etc/systemd/system/ceph-mgr.target.wants/[email protected] to /usr/lib/systemd/system/[email protected].
[ceph-mgr02][INFO  ] Running command: sudo systemctl start ceph-mgr@ceph-mgr02
[ceph-mgr02][INFO  ] Running command: sudo systemctl enable ceph.target
[cephadm@ceph-admin ceph-cluster]$
在叢集節點上執行ceph -s來檢視現在ceph叢集的狀態

提示:可以看到現在叢集有一個mon節點和兩個mgr節點;mgr01處於當前活躍狀態,mgr02處於備用狀態;對應沒有osd,所以叢集狀態顯示health warning;
向RADOS叢集新增OSD
列出並擦淨磁碟
檢視ceph-deploy disk命令的幫助

提示:ceph-deploy disk命令有兩個子命令,list表示列出對應主機上的磁碟;zap表示擦淨對應主機上的磁碟;
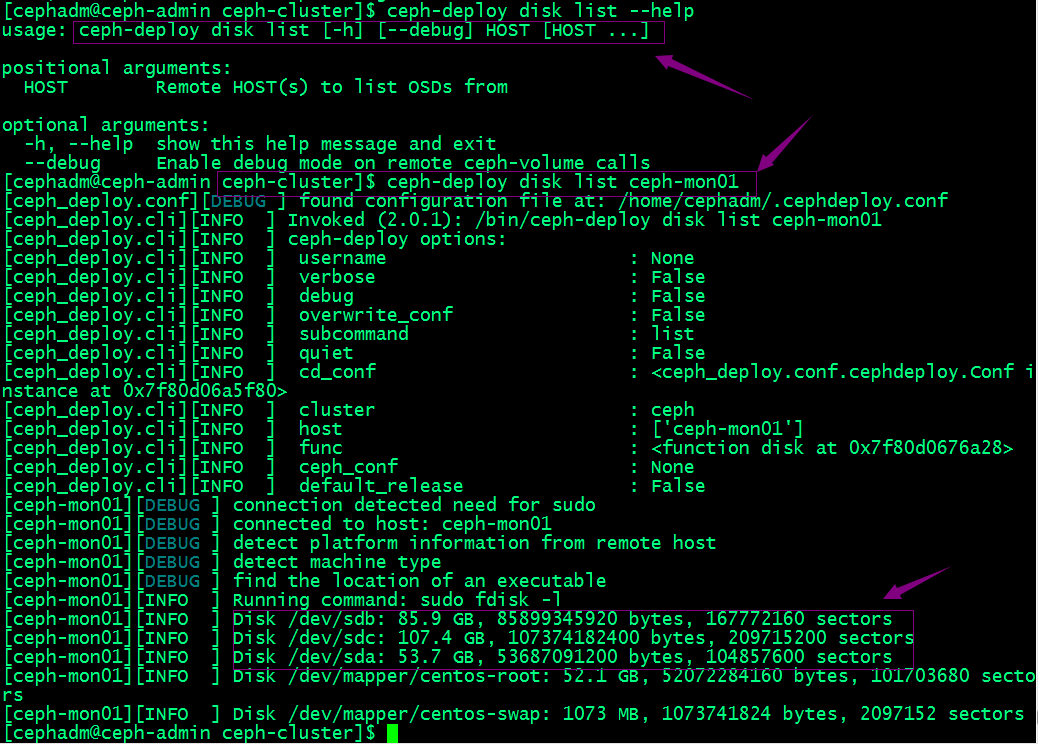
擦淨mon01的sdb和sdc
[cephadm@ceph-admin ceph-cluster]$ ceph-deploy disk zap --help
usage: ceph-deploy disk zap [-h] [--debug] [HOST] DISK [DISK ...]

positional arguments:
  HOST        Remote HOST(s) to connect
  DISK        Disk(s) to zap

optional arguments:
  -h, --help  show this help message and exit
  --debug     Enable debug mode on remote ceph-volume calls
[cephadm@ceph-admin ceph-cluster]$ ceph-deploy disk zap ceph-mon01 /dev/sdb /dev/sdc
[ceph_deploy.conf][DEBUG ] found configuration file at: /home/cephadm/.cephdeploy.conf
[ceph_deploy.cli][INFO  ] Invoked (2.0.1): /bin/ceph-deploy disk zap ceph-mon01 /dev/sdb /dev/sdc
[ceph_deploy.cli][INFO  ] ceph-deploy options:
[ceph_deploy.cli][INFO  ]  username                      : None
[ceph_deploy.cli][INFO  ]  verbose                       : False
[ceph_deploy.cli][INFO  ]  debug                         : False
[ceph_deploy.cli][INFO  ]  overwrite_conf                : False
[ceph_deploy.cli][INFO  ]  subcommand                    : zap
[ceph_deploy.cli][INFO  ]  quiet                         : False
[ceph_deploy.cli][INFO  ]  cd_conf                       : <ceph_deploy.conf.cephdeploy.Conf instance at 0x7f35f8500f80>
[ceph_deploy.cli][INFO  ]  cluster                       : ceph
[ceph_deploy.cli][INFO  ]  host                          : ceph-mon01
[ceph_deploy.cli][INFO  ]  func                          : <function disk at 0x7f35f84d1a28>
[ceph_deploy.cli][INFO  ]  ceph_conf                     : None
[ceph_deploy.cli][INFO  ]  default_release               : False
[ceph_deploy.cli][INFO  ]  disk                          : ['/dev/sdb', '/dev/sdc']
[ceph_deploy.osd][DEBUG ] zapping /dev/sdb on ceph-mon01
[ceph-mon01][DEBUG ] connection detected need for sudo
[ceph-mon01][DEBUG ] connected to host: ceph-mon01
[ceph-mon01][DEBUG ] detect platform information from remote host
[ceph-mon01][DEBUG ] detect machine type
[ceph-mon01][DEBUG ] find the location of an executable
[ceph_deploy.osd][INFO  ] Distro info: CentOS Linux 7.9.2009 Core
[ceph-mon01][DEBUG ] zeroing last few blocks of device
[ceph-mon01][DEBUG ] find the location of an executable
[ceph-mon01][INFO  ] Running command: sudo /usr/sbin/ceph-volume lvm zap /dev/sdb
[ceph-mon01][WARNIN] --> Zapping: /dev/sdb
[ceph-mon01][WARNIN] --> --destroy was not specified, but zapping a whole device will remove the partition table
[ceph-mon01][WARNIN] Running command: /bin/dd if=/dev/zero of=/dev/sdb bs=1M count=10 conv=fsync
[ceph-mon01][WARNIN]  stderr: 10+0 records in
[ceph-mon01][WARNIN] 10+0 records out
[ceph-mon01][WARNIN]  stderr: 10485760 bytes (10 MB) copied, 0.0721997 s, 145 MB/s
[ceph-mon01][WARNIN] --> Zapping successful for: <Raw Device: /dev/sdb>
[ceph_deploy.osd][DEBUG ] zapping /dev/sdc on ceph-mon01
[ceph-mon01][DEBUG ] connection detected need for sudo
[ceph-mon01][DEBUG ] connected to host: ceph-mon01
[ceph-mon01][DEBUG ] detect platform information from remote host
[ceph-mon01][DEBUG ] detect machine type
[ceph-mon01][DEBUG ] find the location of an executable
[ceph_deploy.osd][INFO  ] Distro info: CentOS Linux 7.9.2009 Core
[ceph-mon01][DEBUG ] zeroing last few blocks of device
[ceph-mon01][DEBUG ] find the location of an executable
[ceph-mon01][INFO  ] Running command: sudo /usr/sbin/ceph-volume lvm zap /dev/sdc
[ceph-mon01][WARNIN] --> Zapping: /dev/sdc
[ceph-mon01][WARNIN] --> --destroy was not specified, but zapping a whole device will remove the partition table
[ceph-mon01][WARNIN] Running command: /bin/dd if=/dev/zero of=/dev/sdc bs=1M count=10 conv=fsync
[ceph-mon01][WARNIN]  stderr: 10+0 records in
[ceph-mon01][WARNIN] 10+0 records out
[ceph-mon01][WARNIN] 10485760 bytes (10 MB) copied
[ceph-mon01][WARNIN]  stderr: , 0.0849861 s, 123 MB/s
[ceph-mon01][WARNIN] --> Zapping successful for: <Raw Device: /dev/sdc>
[cephadm@ceph-admin ceph-cluster]$
提示:擦淨磁碟我們需要在後面接對應主機和磁碟;若裝置上此前有資料,則可能需要在相應節點上以root使用者使用「ceph-volume lvm zap --destroy {DEVICE}」命令進行;
新增osd
檢視 ceph-deploy osd幫助
[cephadm@ceph-admin ceph-cluster]$ ceph-deploy osd --help
usage: ceph-deploy osd [-h] {list,create} ...

Create OSDs from a data disk on a remote host:

    ceph-deploy osd create {node} --data /path/to/device

For bluestore, optional devices can be used::

    ceph-deploy osd create {node} --data /path/to/data --block-db /path/to/db-device
    ceph-deploy osd create {node} --data /path/to/data --block-wal /path/to/wal-device
    ceph-deploy osd create {node} --data /path/to/data --block-db /path/to/db-device --block-wal /path/to/wal-device

For filestore, the journal must be specified, as well as the objectstore::

    ceph-deploy osd create {node} --filestore --data /path/to/data --journal /path/to/journal

For data devices, it can be an existing logical volume in the format of:
vg/lv, or a device. For other OSD components like wal, db, and journal, it
can be logical volume (in vg/lv format) or it must be a GPT partition.

positional arguments:
  {list,create}
    list         List OSD info from remote host(s)
    create       Create new Ceph OSD daemon by preparing and activating a
                 device

optional arguments:
  -h, --help     show this help message and exit
[cephadm@ceph-admin ceph-cluster]$
提示:ceph-deploy osd有兩個子命令,list表示列出遠端主機上osd;create表示建立一個新的ceph osd守護行程裝置;
檢視ceph-deploy osd create 幫助
[cephadm@ceph-admin ceph-cluster]$ ceph-deploy osd create --help
usage: ceph-deploy osd create [-h] [--data DATA] [--journal JOURNAL]
                              [--zap-disk] [--fs-type FS_TYPE] [--dmcrypt]
                              [--dmcrypt-key-dir KEYDIR] [--filestore]
                              [--bluestore] [--block-db BLOCK_DB]
                              [--block-wal BLOCK_WAL] [--debug]
                              [HOST]

positional arguments:
  HOST                  Remote host to connect

optional arguments:
  -h, --help            show this help message and exit
  --data DATA           The OSD data logical volume (vg/lv) or absolute path
                        to device
  --journal JOURNAL     Logical Volume (vg/lv) or path to GPT partition
  --zap-disk            DEPRECATED - cannot zap when creating an OSD
  --fs-type FS_TYPE     filesystem to use to format DEVICE (xfs, btrfs)
  --dmcrypt             use dm-crypt on DEVICE
  --dmcrypt-key-dir KEYDIR
                        directory where dm-crypt keys are stored
  --filestore           filestore objectstore
  --bluestore           bluestore objectstore
  --block-db BLOCK_DB   bluestore block.db path
  --block-wal BLOCK_WAL
                        bluestore block.wal path
  --debug               Enable debug mode on remote ceph-volume calls
[cephadm@ceph-admin
提示:create可以指定資料盤,紀錄檔盤以及block-db盤和bluestore 紀錄檔盤等資訊;
將ceph-mon01的/dev/sdb盤新增為叢集osd
[cephadm@ceph-admin ceph-cluster]$ ceph-deploy osd create ceph-mon01 --data /dev/sdb
檢視叢集狀態

提示:可以看到現在叢集osd有一個正常,儲存空間為80G;說明我們剛才新增到osd已經成功;後續其他主機上的osd也是上述過程,先擦淨磁碟,然後在新增為osd;
列出對應主機上的osd資訊
[cephadm@ceph-admin ceph-cluster]$ ceph-deploy osd list ceph-mon01
[ceph_deploy.conf][DEBUG ] found configuration file at: /home/cephadm/.cephdeploy.conf
[ceph_deploy.cli][INFO  ] Invoked (2.0.1): /bin/ceph-deploy osd list ceph-mon01
[ceph_deploy.cli][INFO  ] ceph-deploy options:
[ceph_deploy.cli][INFO  ]  username                      : None
[ceph_deploy.cli][INFO  ]  verbose                       : False
[ceph_deploy.cli][INFO  ]  debug                         : False
[ceph_deploy.cli][INFO  ]  overwrite_conf                : False
[ceph_deploy.cli][INFO  ]  subcommand                    : list
[ceph_deploy.cli][INFO  ]  quiet                         : False
[ceph_deploy.cli][INFO  ]  cd_conf                       : <ceph_deploy.conf.cephdeploy.Conf instance at 0x7f01148f9128>
[ceph_deploy.cli][INFO  ]  cluster                       : ceph
[ceph_deploy.cli][INFO  ]  host                          : ['ceph-mon01']
[ceph_deploy.cli][INFO  ]  func                          : <function osd at 0x7f011493d9b0>
[ceph_deploy.cli][INFO  ]  ceph_conf                     : None
[ceph_deploy.cli][INFO  ]  default_release               : False
[ceph-mon01][DEBUG ] connection detected need for sudo
[ceph-mon01][DEBUG ] connected to host: ceph-mon01
[ceph-mon01][DEBUG ] detect platform information from remote host
[ceph-mon01][DEBUG ] detect machine type
[ceph-mon01][DEBUG ] find the location of an executable
[ceph_deploy.osd][INFO  ] Distro info: CentOS Linux 7.9.2009 Core
[ceph_deploy.osd][DEBUG ] Listing disks on ceph-mon01...
[ceph-mon01][DEBUG ] find the location of an executable
[ceph-mon01][INFO  ] Running command: sudo /usr/sbin/ceph-volume lvm list
[ceph-mon01][DEBUG ]
[ceph-mon01][DEBUG ]
[ceph-mon01][DEBUG ] ====== osd.0 =======
[ceph-mon01][DEBUG ]
[ceph-mon01][DEBUG ]   [block]       /dev/ceph-56cdba71-749f-4c01-8364-f5bdad0b8f8d/osd-block-538baff0-ed25-4e3f-9ed7-f228a7ca0086
[ceph-mon01][DEBUG ]
[ceph-mon01][DEBUG ]       block device              /dev/ceph-56cdba71-749f-4c01-8364-f5bdad0b8f8d/osd-block-538baff0-ed25-4e3f-9ed7-f228a7ca0086
[ceph-mon01][DEBUG ]       block uuid                40cRBg-53ZO-Dbho-wWo6-gNcJ-ZJJi-eZC6Vt
[ceph-mon01][DEBUG ]       cephx lockbox secret
[ceph-mon01][DEBUG ]       cluster fsid              7fd4a619-9767-4b46-9cee-78b9dfe88f34
[ceph-mon01][DEBUG ]       cluster name              ceph
[ceph-mon01][DEBUG ]       crush device class        None
[ceph-mon01][DEBUG ]       encrypted                 0
[ceph-mon01][DEBUG ]       osd fsid                  538baff0-ed25-4e3f-9ed7-f228a7ca0086
[ceph-mon01][DEBUG ]       osd id                    0
[ceph-mon01][DEBUG ]       type                      block
[ceph-mon01][DEBUG ]       vdo                       0
[ceph-mon01][DEBUG ]       devices                   /dev/sdb
[cephadm@ceph-admin ceph-cluster]$
提示:到此我們RADOS叢集相關元件就都部署完畢了;
管理osd ceph命令檢視osd相關資訊
1、檢視osd狀態
[root@ceph-mon01 ~]#  ceph osd stat
10 osds: 10 up, 10 in; epoch: e56
提示:osds表示現有叢集裡osd總數;up表示活動線上的osd數量,in表示在叢集內的osd數量;
2、檢視osd編號
[root@ceph-mon01 ~]# ceph osd ls
0
1
2
3
4
5
6
7
8
9
[root@ceph-mon01 ~]#
3、檢視osd對映狀態
[root@ceph-mon01 ~]# ceph osd dump
epoch 56
fsid 7fd4a619-9767-4b46-9cee-78b9dfe88f34
created 2022-09-24 00:36:13.639715
modified 2022-09-24 02:29:38.086464
flags sortbitwise,recovery_deletes,purged_snapdirs
crush_version 25
full_ratio 0.95
backfillfull_ratio 0.9
nearfull_ratio 0.85
require_min_compat_client jewel
min_compat_client jewel
require_osd_release mimic
pool 1 'testpool' replicated size 3 min_size 2 crush_rule 0 object_hash rjenkins pg_num 16 pgp_num 16 last_change 42 flags hashpspool stripe_width 0
max_osd 10
osd.0 up   in  weight 1 up_from 55 up_thru 0 down_at 0 last_clean_interval [0,0) 192.168.0.71:6800/52355 172.16.30.71:6800/52355 172.16.30.71:6801/52355 192.168.0.71:6801/52355 exists,up bf3649af-e3f4-41a2-a5ce-8f1a316d344e
osd.1 up   in  weight 1 up_from 9 up_thru 42 down_at 0 last_clean_interval [0,0) 192.168.0.71:6802/49913 172.16.30.71:6802/49913 172.16.30.71:6803/49913 192.168.0.71:6803/49913 exists,up 7293a12a-7b4e-4c86-82dc-0acc15c3349e
osd.2 up   in  weight 1 up_from 13 up_thru 42 down_at 0 last_clean_interval [0,0) 192.168.0.72:6800/48196 172.16.30.72:6800/48196 172.16.30.72:6801/48196 192.168.0.72:6801/48196 exists,up 96c437c5-8e82-4486-910f-9e98d195e4f9
osd.3 up   in  weight 1 up_from 17 up_thru 55 down_at 0 last_clean_interval [0,0) 192.168.0.72:6802/48679 172.16.30.72:6802/48679 172.16.30.72:6803/48679 192.168.0.72:6803/48679 exists,up 4659d2a9-09c7-49d5-bce0-4d2e65f5198c
osd.4 up   in  weight 1 up_from 21 up_thru 55 down_at 0 last_clean_interval [0,0) 192.168.0.73:6800/48122 172.16.30.73:6800/48122 172.16.30.73:6801/48122 192.168.0.73:6801/48122 exists,up de019aa8-3d2a-4079-a99e-ec2da2d4edb9
osd.5 up   in  weight 1 up_from 25 up_thru 55 down_at 0 last_clean_interval [0,0) 192.168.0.73:6802/48601 172.16.30.73:6802/48601 172.16.30.73:6803/48601 192.168.0.73:6803/48601 exists,up 119c8748-af3b-4ac4-ac74-6171c90c82cc
osd.6 up   in  weight 1 up_from 29 up_thru 55 down_at 0 last_clean_interval [0,0) 192.168.0.74:6801/58248 172.16.30.74:6800/58248 172.16.30.74:6801/58248 192.168.0.74:6802/58248 exists,up 08d8dd8b-cdfe-4338-83c0-b1e2b5c2a799
osd.7 up   in  weight 1 up_from 33 up_thru 55 down_at 0 last_clean_interval [0,0) 192.168.0.74:6803/58727 172.16.30.74:6802/58727 172.16.30.74:6803/58727 192.168.0.74:6804/58727 exists,up 9de6cbd0-bb1b-49e9-835c-3e714a867393
osd.8 up   in  weight 1 up_from 37 up_thru 42 down_at 0 last_clean_interval [0,0) 192.168.0.75:6800/48268 172.16.30.75:6800/48268 172.16.30.75:6801/48268 192.168.0.75:6801/48268 exists,up 63aaa0b8-4e52-4d74-82a8-fbbe7b48c837
osd.9 up   in  weight 1 up_from 41 up_thru 42 down_at 0 last_clean_interval [0,0) 192.168.0.75:6802/48751 172.16.30.75:6802/48751 172.16.30.75:6803/48751 192.168.0.75:6803/48751 exists,up 6bf3204a-b64c-4808-a782-434a93ac578c
[root@ceph-mon01 ~]#
刪除osd
1、停用裝置
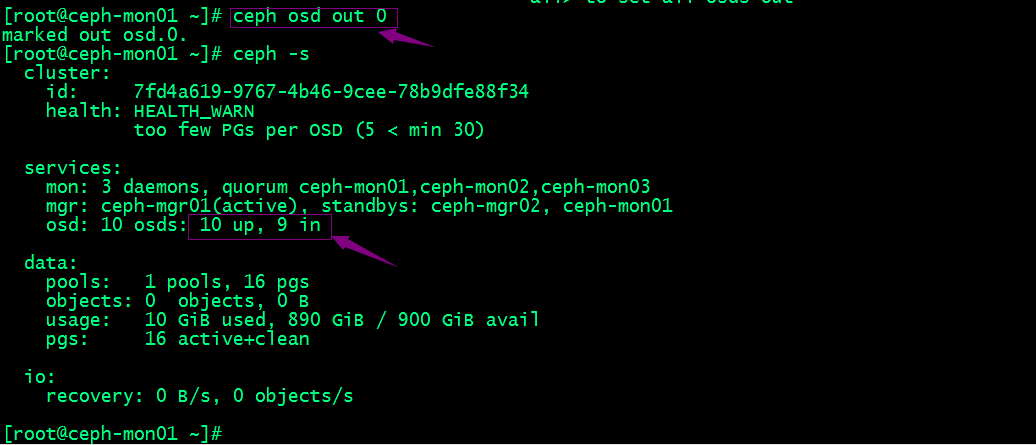
提示:可以看到我們將0號osd停用以後,對應叢集狀態裡osd就只有9個在叢集裡;
2、停止程序
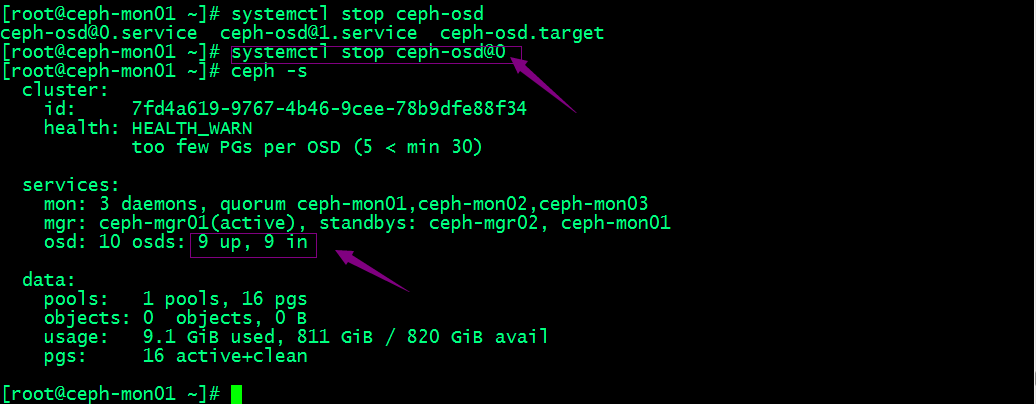
提示:停用程序需要在對應主機上停止ceph-osd@{osd-num};停止程序以後,對應叢集狀態就能看到對應只有9個osd程序處於up狀態;
3、移除裝置
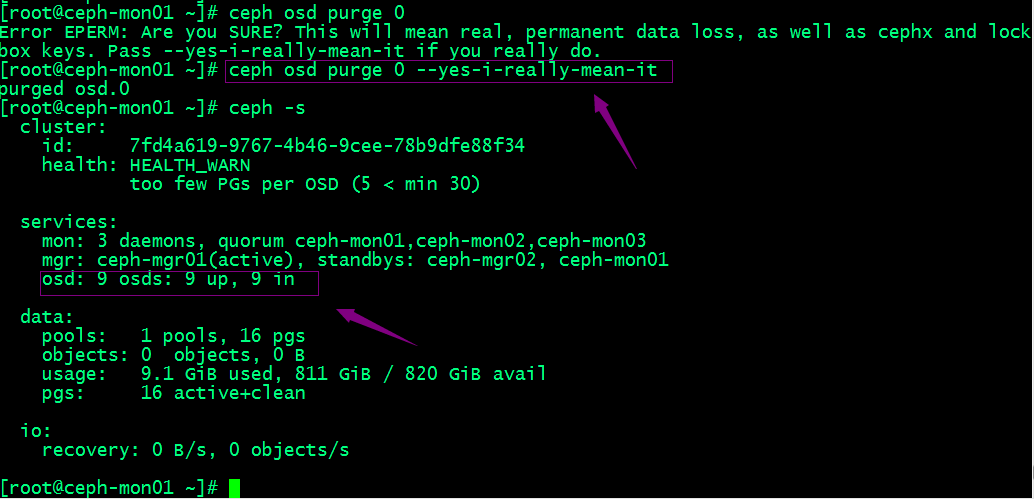
提示:可以看到移除osd以後,對應叢集狀態裡就只有9個osd了;若類似如下的OSD的設定資訊存在於ceph.conf組態檔中,管理員在刪除OSD之後手動將其刪除。
[osd.1] host = {hostname}
不過,對於Luminous之前的版本來說,管理員需要依次手動執行如下步驟刪除OSD裝置:
1. 於CRUSH執行圖中移除裝置:ceph osd crush remove {name}
2. 移除OSD的認證key:ceph auth del osd.{osd-num}
3. 最後移除OSD裝置:ceph osd rm {osd-num}
測試上傳下載資料物件
1、建立儲存池並設定PG數量為16個
[root@ceph-mon01 ~]# ceph osd pool create testpool 16 16
pool 'testpool' created
[root@ceph-mon01 ~]# ceph osd pool ls
testpool
[root@ceph-mon01 ~]#
2、上傳檔案到testpool
[root@ceph-mon01 ~]# rados put test /etc/issue -p testpool
[root@ceph-mon01 ~]# rados ls -p testpool
test
[root@ceph-mon01 ~]#
提示:可以看到我們上傳/etc/issue檔案到testpool儲存池中並命名為test,對應檔案已將在testpool儲存中存在;說明上傳沒有問題;
3、獲取儲存池中資料物件的具體位置資訊
[root@ceph-mon01 ~]# ceph osd map testpool test
osdmap e44 pool 'testpool' (1) object 'test' -> pg 1.40e8aab5 (1.5) -> up ([4,0,6], p4) acting ([4,0,6], p4)
[root@ceph-mon01 ~]#
提示:可以看到test檔案在testpool儲存中被分別存放編號為4、0、6的osd上去了;
4、下載檔案到本地
[root@ceph-mon01 ~]# ls
[root@ceph-mon01 ~]# rados get test test-down -p testpool
[root@ceph-mon01 ~]# ls
test-down
[root@ceph-mon01 ~]# cat test-down
\S
Kernel \r on an \m

[root@ceph-mon01 ~]#
5、刪除資料物件
[root@ceph-mon01 ~]# rados rm test  -p testpool
[root@ceph-mon01 ~]# rados ls -p testpool
[root@ceph-mon01 ~]#
6、刪除儲存池
[root@ceph-mon01 ~]# ceph osd pool rm testpool
Error EPERM: WARNING: this will *PERMANENTLY DESTROY* all data stored in pool testpool.  If you are *ABSOLUTELY CERTAIN* that is what you want, pass the pool name *twice*, followed by --yes-i-really-really-mean-it.
[root@ceph-mon01 ~]# ceph osd pool rm testpool --yes-i-really-really-mean-it.
Error EPERM: WARNING: this will *PERMANENTLY DESTROY* all data stored in pool testpool.  If you are *ABSOLUTELY CERTAIN* that is what you want, pass the pool name *twice*, followed by --yes-i-really-really-mean-it.
[root@ceph-mon01 ~]#
提示:刪除儲存池命令存在資料丟失的風險,Ceph於是預設禁止此類操作。管理員需要在ceph.conf組態檔中啟用支援刪除儲存池的操作後,方可使用類似上述命令刪除儲存池;
擴充套件ceph叢集
擴充套件mon節點
Ceph儲存叢集需要至少執行一個Ceph Monitor和一個Ceph Manager,生產環境中,為了實現高可用性,Ceph儲存叢集通常執行多個監視器,以免單監視器整個儲存叢集崩潰。Ceph使用Paxos演演算法,該演演算法需要半數以上的監視器大於n/2,其中n為總監視器數量)才能形成法定人數。儘管此非必需,但奇數個監視器往往更好。「ceph-deploy mon add {ceph-nodes}」命令可以一次新增一個監視器節點到叢集中。
[cephadm@ceph-admin ceph-cluster]$ ceph-deploy mon add ceph-mon02
[cephadm@ceph-admin ceph-cluster]$ ceph-deploy mon add ceph-mon03
檢視監視器及法定人數相關狀態
[root@ceph-mon01 ~]# ceph quorum_status --format json-pretty

{
    "election_epoch": 12,
    "quorum": [
        0,
        1,
        2
    ],
    "quorum_names": [
        "ceph-mon01",
        "ceph-mon02",
        "ceph-mon03"
    ],
    "quorum_leader_name": "ceph-mon01",
    "monmap": {
        "epoch": 3,
        "fsid": "7fd4a619-9767-4b46-9cee-78b9dfe88f34",
        "modified": "2022-09-24 01:56:24.196075",
        "created": "2022-09-24 00:36:13.210155",
        "features": {
            "persistent": [
                "kraken",
                "luminous",
                "mimic",
                "osdmap-prune"
            ],
            "optional": []
        },
        "mons": [
            {
                "rank": 0,
                "name": "ceph-mon01",
                "addr": "192.168.0.71:6789/0",
                "public_addr": "192.168.0.71:6789/0"
            },
            {
                "rank": 1,
                "name": "ceph-mon02",
                "addr": "192.168.0.72:6789/0",
                "public_addr": "192.168.0.72:6789/0"
            },
            {
                "rank": 2,
                "name": "ceph-mon03",
                "addr": "192.168.0.73:6789/0",
                "public_addr": "192.168.0.73:6789/0"
            }
        ]
    }
}
[root@ceph-mon01 ~]#
提示:可以看到現在有3個mon節點,其中mon01為leader節點,總共有3個選票;
擴充套件mgr節點
Ceph Manager守護行程以「Active/Standby」模式執行,部署其它ceph-mgr守護程式可確保在Active節點或其上的ceph-mgr守護行程故障時,其中的一個Standby範例可以在不中斷服務的情況下接管其任務。「ceph-deploy mgr create {new-manager-nodes}」命令可以一次新增多個Manager節點。
把ceph-mon01節點新增為mgr節點
[cephadm@ceph-admin ceph-cluster]$ ceph-deploy mgr create ceph-mon01
[ceph_deploy.conf][DEBUG ] found configuration file at: /home/cephadm/.cephdeploy.conf
[ceph_deploy.cli][INFO  ] Invoked (2.0.1): /bin/ceph-deploy mgr create ceph-mon01
[ceph_deploy.cli][INFO  ] ceph-deploy options:
[ceph_deploy.cli][INFO  ]  username                      : None
[ceph_deploy.cli][INFO  ]  verbose                       : False
[ceph_deploy.cli][INFO  ]  mgr                           : [('ceph-mon01', 'ceph-mon01')]
[ceph_deploy.cli][INFO  ]  overwrite_conf                : False
[ceph_deploy.cli][INFO  ]  subcommand                    : create
[ceph_deploy.cli][INFO  ]  quiet                         : False
[ceph_deploy.cli][INFO  ]  cd_conf                       : <ceph_deploy.conf.cephdeploy.Conf instance at 0x7fba72e66950>
[ceph_deploy.cli][INFO  ]  cluster                       : ceph
[ceph_deploy.cli][INFO  ]  func                          : <function mgr at 0x7fba736df230>
[ceph_deploy.cli][INFO  ]  ceph_conf                     : None
[ceph_deploy.cli][INFO  ]  default_release               : False
[ceph_deploy.mgr][DEBUG ] Deploying mgr, cluster ceph hosts ceph-mon01:ceph-mon01
[ceph-mon01][DEBUG ] connection detected need for sudo
[ceph-mon01][DEBUG ] connected to host: ceph-mon01
[ceph-mon01][DEBUG ] detect platform information from remote host
[ceph-mon01][DEBUG ] detect machine type
[ceph_deploy.mgr][INFO  ] Distro info: CentOS Linux 7.9.2009 Core
[ceph_deploy.mgr][DEBUG ] remote host will use systemd
[ceph_deploy.mgr][DEBUG ] deploying mgr bootstrap to ceph-mon01
[ceph-mon01][DEBUG ] write cluster configuration to /etc/ceph/{cluster}.conf
[ceph-mon01][WARNIN] mgr keyring does not exist yet, creating one
[ceph-mon01][DEBUG ] create a keyring file
[ceph-mon01][DEBUG ] create path recursively if it doesn't exist
[ceph-mon01][INFO  ] Running command: sudo ceph --cluster ceph --name client.bootstrap-mgr --keyring /var/lib/ceph/bootstrap-mgr/ceph.keyring auth get-or-create mgr.ceph-mon01 mon allow profile mgr osd allow * mds allow * -o /var/lib/ceph/mgr/ceph-ceph-mon01/keyring
[ceph-mon01][INFO  ] Running command: sudo systemctl enable ceph-mgr@ceph-mon01
[ceph-mon01][WARNIN] Created symlink from /etc/systemd/system/ceph-mgr.target.wants/[email protected] to /usr/lib/systemd/system/[email protected].
[ceph-mon01][INFO  ] Running command: sudo systemctl start ceph-mgr@ceph-mon01
[ceph-mon01][INFO  ] Running command: sudo systemctl enable ceph.target
[cephadm@ceph-admin ceph-cluster]$
檢視叢集狀態

提示:可以看到現在叢集有3個mgr;對應我們剛才加的cehp-mon01以standby的形式執行著;到此一個完整的RADOS叢集就搭建好了,該叢集現在有3個mon節點,3個mgr節點,10個osd;