基於 vite 建立 vue3 全家桶專案(vite + vue3 + tsx + pinia)
vite 最近非常火,它是 vue 作者尤大神釋出前端構建工具,底層基於 Rollup,無論是啟動速度還是熱載入速度都非常快。vite 隨 vue3 正式版一起釋出,剛開始的時候與 vue 繫結在一起,但之後的 v2 版本便比較獨立,vite 不僅支援 vue,還支援 React、Preact、Vanilla 等前端庫。
由於 vite 出現的時間不是很久,基於 vite 建立的專案沒有 vue-cli 那麼完整,如果要使用 vue 全家桶、ESLint 等,還需要開發人員手動新增和設定,步驟稍多,略繁瑣。雖然在建立專案時可以選擇 Customize with create-vue,但我由於網路問題,一直沒有成功過。所以我封裝了一個 cli 用於快速建立基於 vite + vue3 的專案,如果各位覺得一步步手動新增和設定比較麻煩,可以使用我封裝並行布到 npmjs 上的腳手架 yyg-cli,使用 yyg-cli 目前只能快速建立 Vite + Vue3 全家桶的專案,後面會逐步更新對其他庫的支援。各位可以直接去文章最後檢視 yyg-cli 的使用。
本文將一步步使用 vite 建立 vue3 專案,整合 vue 全家桶,實現基於 vue-cli 建立的專案的效果。整合的內容包括:
- vue3 + vite 2
- TypeScript、TSX
- ESLint Standard
- Sass
- Vue Router
- Pinia(狀態管理)
- Element Plus(含圖示全域性註冊)
1 建立專案
1.1 建立專案
我習慣使用 yarn 代替 npm 作為包管理工具,某些依賴使用 npm 安裝會有各種問題。使用 yarn 建立專案:
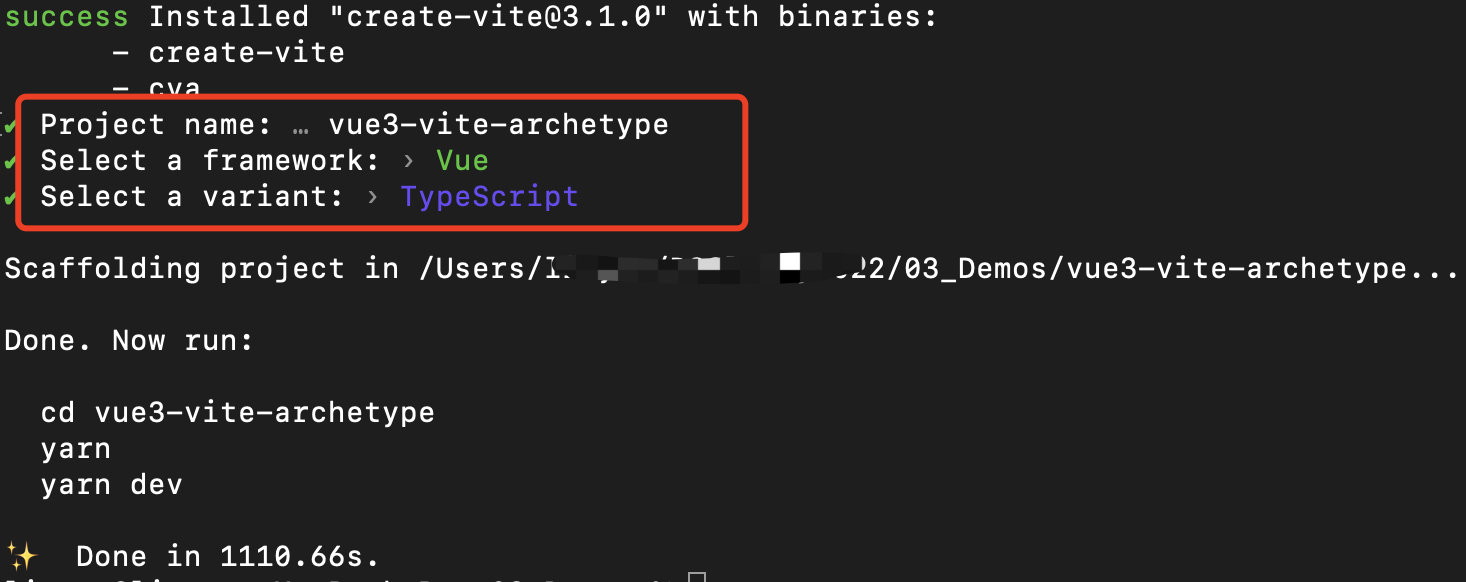
yarn create vite
1)Project name 輸入專案名: vue3-vite-archetype
2)Select a framework 選擇框架:Vue
3)Select a variant 選擇變種(語言):TypeScript

1.2 啟動專案
專案建立完成,按照命令列中的提示操作:
1)進入專案:cd vue3-vite-archetype
2)安裝依賴:yarn
3)啟動專案:yarn dev
控制檯出現如下資訊,則專案啟動成功,在瀏覽器中存取控制檯中的地址:

2 專案設定
2.1 新增編輯器組態檔
在根目錄下新增編輯器組態檔:.editorconfig
[*.{js,jsx,ts,tsx,vue}]
indent_style = space
indent_size = 2
trim_trailing_whitespace = true
insert_final_newline = true
2.2 設定別名
vue開發過程中,在引入檔案時,習慣使用 @ 代替 src,vite 預設是不識別的,例如 App.vue 中第4行(引入 HelloWorld 元件),如果修改為:
import HelloWorld from '@/components/HelloWorld.vue'
會出現如下錯誤:

需要在 vite.config.js 設定路徑別名。
1)安裝依賴:
yarn add @types/node -D
2)匯入 path
import path from 'path'
3)在匯出的物件中新增 resolve:
export default defineConfig({
  plugins: [vue()],
  resolve: {
    alias: {
      '@': path.resolve(__dirname, './src')
    }
  }
})
同樣的,可以繼續在 alias 中給常用的目錄定義其他別名。
除了上面三步,還需要修改專案根目錄下 tsconfig.json 檔案,在 compilerOptions 節點中新增兩個屬性設定 baseUrl 和 paths,如下:
{
  "compilerOptions": {
...
    "baseUrl": ".",
    "paths": {
      "@/*": ["src/*"]
    }
  },
...
}
此時就不會報錯了,在專案中可以使用 @ 代替 src。
2.3 處理 sass/scss
如果在工程中使用 scss,例如為 App.vue 中的 style 指定 lang="scss":
<style scoped lang="scss">
此時會出現錯誤,提示沒有找到 sass 依賴:

新增 sass/scss 的支援,只需要安裝 sass 開發依賴即可:
yarn add sass -D
2.4 處理 tsx
1)新增開發依賴
yarn add @vitejs/plugin-vue-jsx -D
2)在 vite.config.ts 中設定該外掛
import vueJsx from '@vitejs/plugin-vue-jsx'

...

export default defineConfig({
  plugins: [
    vue(),
    vueJsx(),
...
  ],
  ...
})
3 新增 ESLint
ESLint 主要用於程式碼規範、統一程式碼風格。
3.1 安裝依賴
首先安裝 eslint 為開發依賴:
yarn add eslint -D
3.2 初始化 ESLint 設定
接著執行命令初始化 eslint:
npx eslint --init
執行上述命令後,控制檯中會有如下步驟:
1)需要安裝 @eslint/create-config,問是否繼續: 當然需要繼續,直接回車;
2)使用 ESLint 來幹嘛:我選最後一個 To check syntax, find problems, and enforce code style(檢查語法、尋找問題、強制程式碼風格)
3)使用哪種模組化的方式:肯定選 JavaScript modules (import/export) (幾乎我參與的 vue 專案都是 ESModule)
4)專案使用什麼框架:Vue.js*
5)專案是否使用 TypeScript:Yes
6)專案執行在什麼環境:Browser
7)如何定義專案的程式碼風格:Use a popular style guide 使用流行的風格
8)在流行的風格中選擇其中一種:Standard
9)ESLint 組態檔的格式:JavaScript
10)根據上面選擇的,提示需要安裝一大堆依賴,是否安裝?Yes
11)選擇使用什麼包管理工具安裝:yarn
接下來耐心等待安裝依賴。
依賴安裝完畢後,專案的根目錄下也會自動生成 .eslintrc.cjs 檔案(可以將字尾名重新命名為 .js)。由於 eslint 預設整合的 vue 規範比較舊,咱們專案是 vue3,vue3 語法規則有些變化(如在 template 標籤下面可以允許有多個節點等),這些變化會導致 eslint 校驗不太適用於 vue3,所以需要修改 eslint的部分設定,使其對 vue3 友好。將 extends 中的 'plugin:vue/essential' 修改為 vue3 的 'plugin:vue/vue3-essential' 即可。
3.3 修改設定
修改後 .eslintrc.cjs 設定如下:
module.exports = {
  root: true,
  env: {
    browser: true,
    es2021: true,
  },
  extends: [
    'plugin:vue/vue3-essential',
    'standard'
  ],
  parserOptions: {
    ecmaVersion: 'latest',
    parser: '@typescript-eslint/parser',
    sourceType: 'module'
  },
  plugins: [
    'vue',
    '@typescript-eslint'
  ],
  rules: {}
}
3.4 外掛設定
上述步驟已經完成 eslint 的引入和設定了,接下來就是設定 vite 的 eslint 外掛,該外掛可以讓 vite 知道專案的 eslint 設定。
1)安裝外掛為開發依賴:
yarn add vite-plugin-eslint -D
2)在 vite.config.js 中新增該外掛:
//...
import eslint from 'vite-plugin-eslint'

export default defineConfig({
  plugins: [
    vue(),
    eslint()
  ],
//...
})
3.5 設定 Webstorm
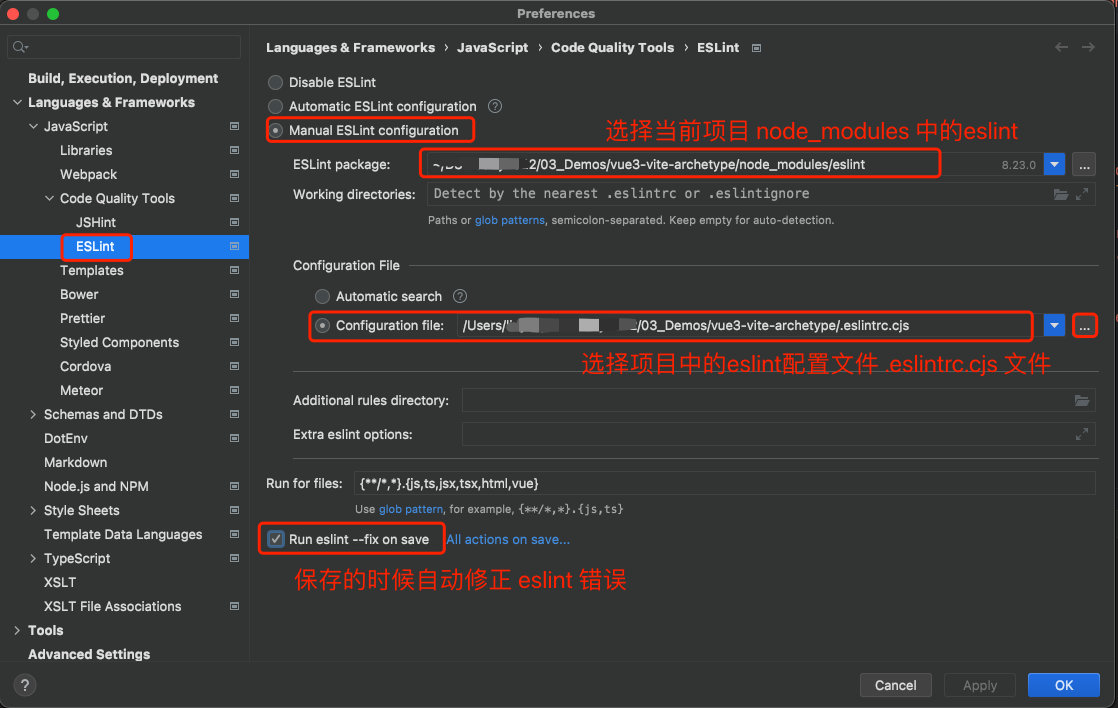
WebStorm 對 ESLint 支援非常好,可以在 WebStorm 指定 ESLint 設定,並自動修正,在 WebStorm 的 Preferences 中按照下圖進行設定:

4 新增 vue-router
4.1 安裝依賴
安裝 vue-router 依賴:
yarn add vue-router@next
4.2 建立測試頁面
在 src 中建立目錄 views,並在 src/views/ 中建立兩個檔案 about.vue 和 home.vue,兩個 vue 檔案的程式碼分別如下:
home.vue:
<template>
  <div class="home">
    <div>
      <a href="https://vitejs.dev" target="_blank">
        <img src="/vite.svg" class="logo" alt="Vite logo"/>
      </a>
      <a href="https://vuejs.org/" target="_blank">
        <img src="@/assets/vue.svg" class="logo vue" alt="Vue logo"/>
      </a>
    </div>
    <HelloWorld msg="Vite + Vue"/>
  </div>
</template>

<script lang="ts">
import { defineComponent } from 'vue'
import HelloWorld from '@/components/HelloWorld.vue'

export default defineComponent({
  name: 'home',
  components: {
    HelloWorld
  }
})
</script>
<style scoped>
.logo {
  height: 6em;
  padding: 1.5em;
  will-change: filter;
}

.logo:hover {
  filter: drop-shadow(0 0 2em #646cffaa);
}

.logo.vue:hover {
  filter: drop-shadow(0 0 2em #42b883aa);
}
</style>
about.vue :
<template>
  <div class="about">
    <h1>This is an about page</h1>
  </div>
</template>
4.3 設定路由
在 src 目錄下建立目錄 router,並在 src/router 中建立 index.ts 檔案,該檔案用於定義路由和建立路由物件。
src/router/index.ts:
import { createRouter, createWebHistory, RouteRecordRaw } from 'vue-router'
import Home from '../views/home.vue'

const routes: Array<RouteRecordRaw> = [
  {
    path: '/',
    name: 'Home',
    component: Home
  },
  {
    path: '/about',
    name: 'About',
    component: () => import('@/views/about.vue')
  }
]

const router = createRouter({
  history: createWebHistory(process.env.BASE_URL),
  routes
})

export default router
4.4 引入設定設定
修改 src/main.ts,引入路由。修改後內容如下:
import { createApp } from 'vue'
import './style.css'
import App from './App.vue'
import router from './router'

const app = createApp(App)
app.use(router)
app.mount('#app')
4.5 新增插座
修改 src/App.vue,新增連結和路由插座:
<template>
  <div id="nav">
    <router-link to="/">Home</router-link> |
    <router-link to="/about">About</router-link>
  </div>
  <router-view/>
</template>
樣式也可以調整一下,修改 src/style.css:
body {
  margin: 0;
  display: flex;
  min-width: 320px;
  min-height: 100vh;
}
#app {
  max-width: 1280px;
  margin: 0 auto;
  padding: 2rem;
  text-align: center;
}
a {
  font-weight: 500;
  text-decoration: inherit;
}
a.router-link-exact-active {
  color: #42b983;
}
svg {
  width: 1em;
  height: 1em;
}
5 狀態管理 Pinia
在 vue2 一般採用 vuex 進行狀態管理,在 vue3 中推薦使用 Pinia。Pinia 相對 vuex 語法更簡潔、拋棄了 mutations 操作、 對 TypeScript 支援也更好、滿足 Vue3 的 Composition API,是最新一代輕量級狀態管理外掛。按照尤大神的意思,vuex 將不再接受新的功能,推薦使用 Pinia。
5.1 安裝依賴
使用 yarn 安裝 pinia 依賴:
yarn add pinia
5.2 建立根儲存
在 src/main.ts 建立一個根儲存 pinia,並傳遞給應用程式:
...
import { createPinia } from 'pinia'
...
app.use(createPinia())
...
5.3 定義 store
在 src 目錄下建立 store,並在 src/store 中建立 demo.ts 檔案。該檔案中咱們使用 Composition API 的方式實現 store。
src/store/demo.ts:
import { defineStore } from 'pinia'
import { ref } from 'vue'

const useDemoStore = defineStore('demo', () => {
  const counter = ref(0)

  const increment = () => {
    counter.value++
  }

  return {
    counter,
    increment
  }
})

export default useDemoStore
5.4 使用 store
上面建立了 store,接下來再 src/views/about.vue 中使用 store:
<template>
  <div class="about">
    <h1>This is an about page</h1>
    <h3>counter: {{counter}}</h3>
    <button @click="add">Ad Count</button>
  </div>
</template>

<script lang="ts" setup>
import useDemoStore from '@/store/demo'
import { storeToRefs } from 'pinia'

const demoStore = useDemoStore()
const { counter } = storeToRefs(demoStore)

const add = () => {
  demoStore.increment()
}
</script>
如此便實現了 pinia 狀態管理的 demo,在 about 頁面上點選按鈕,會修改狀態 counter 的值。

6 使用 Element Plus
Element UI 是很常用的中後臺管理介面的 vue UI庫,對應 Vue3 的版本名為 Element Plus。
6.1 新增 Element Plus
1)安裝依賴:
yarn add element-plus
2)在 src/main.ts 中引入:
...
import ElementPlus from 'element-plus'
import 'element-plus/dist/index.css'

...
app.use(ElementPlus)
...
3)在 about.vue 中替換 button 按鈕測試:
<el-button @click="add">Ad Count</el-button>
6.2 全域性註冊圖示
在 element-ui 中,安裝 element-ui 後便可以直接使用圖示,但 element-plus 需要單獨安裝依賴,並在使用圖示時引入對應的圖示元件。咱可以進行簡單的封裝,使之與 element-ui 中的用法一致。
1)安裝依賴:
yarn add @element-plus/icons-vue
2)在 src 下建立 utils/str-utils.ts ,定義駝峰命名轉中劃線命名的函數:
export const camelCaseToLine = (v: string): string => {
  return v.replace(/([A-Z])/g, '-$1').toLowerCase()
}
3)在 src/main.ts 中全域性註冊所有圖示,
...
import * as ElementPlusIconsVue from '@element-plus/icons-vue'
import { camelCaseToLine } from '@/utils/str-utils'

...

for (const [key, component] of Object.entries(ElementPlusIconsVue)) {
  app.component(`el-icon${camelCaseToLine(key)}`, component)
}
...
4)在 about.vue 頁面上測試使用
<el-button @click="add">
  <el-icon-plus></el-icon-plus>
</el-button>
使用

至此便完成了 vite + vue3 + vue router + pinia + element plus 的基礎整合了,步驟較多較繁瑣,大家可以使用 yyg-cli 省略上述步驟。
7 yyg-cli
yyg-cli 實現了上面的步驟,只需要一個命令便可以建立 vue3 全家桶專案。
首先使用 npm 全域性安裝 yyg-cli:
npm install -g yyg-cli
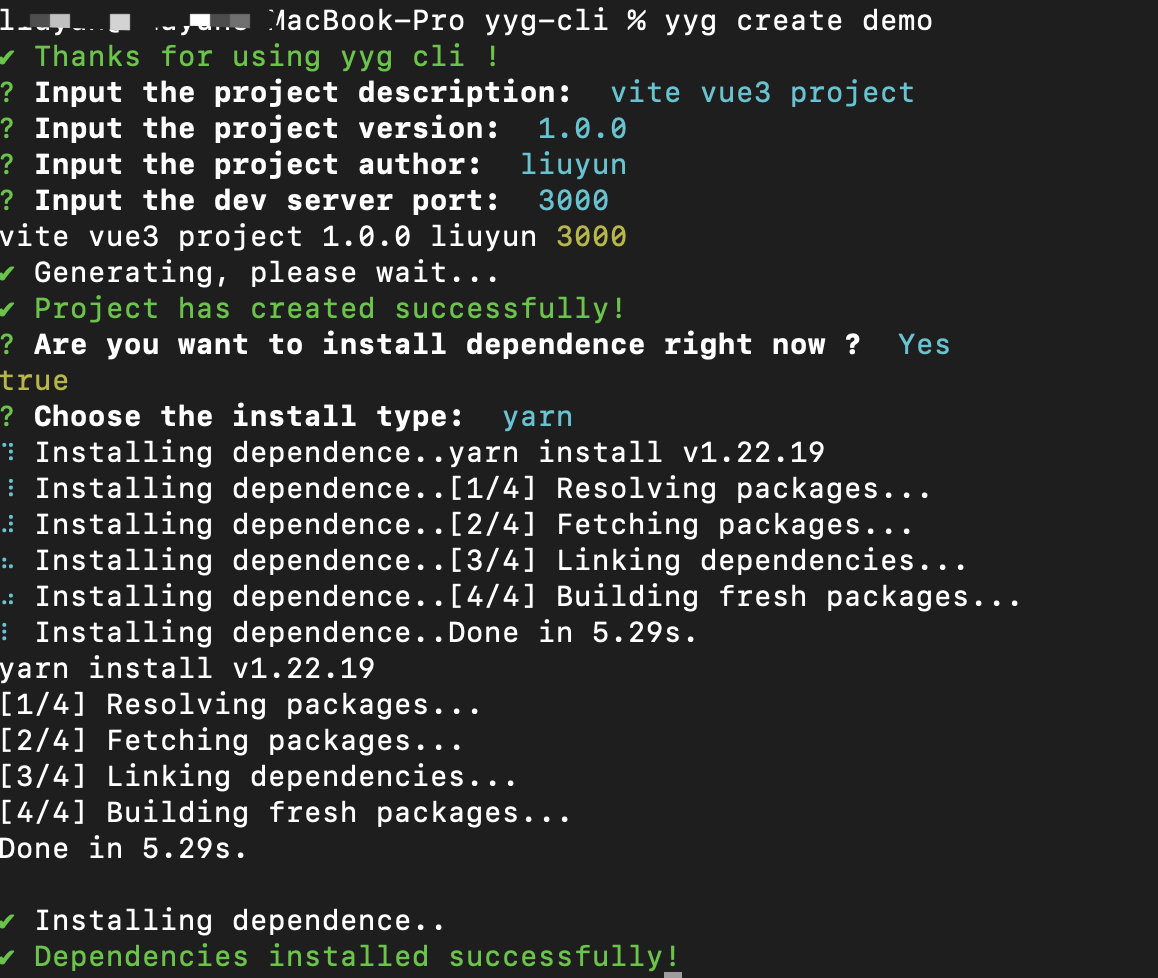
全域性安裝成功後,使用 yyg create 命令便可建立專案,如建立名為 demo 的專案:
yyg create demo
輸入該命令後,按照自己專案的需求輸入專案描述、版本號、作者、開發執行的埠號 (全部非必填,可以直接回車)。
然後詢問你是否要立即按照依賴,直接回車即可。最後選擇包管理工具,便開始自動安裝依賴。

依賴安裝完成,進入專案根目錄,yarn dev 啟動專案即可。
yyg-cli 幫大家節省了手動整合和設定的時間。後續會引入對 ant-d 、hero-admin-ui 等的支援,實現開箱即用,快速建立企業級中後臺專案的基礎框架。
感謝你閱讀本文,如果本文給了你一點點幫助或者啟發,還請三連支援一下,點贊、關注、收藏,作者會持續與大家分享更多幹貨