crane:字典項與關聯資料處理的新思路

前言
在我們日常開發中,經常會遇到一些煩人的資料關聯和轉換問題,比如典型的:
- 物件屬性中個有字典 id,需要獲取對應字典值並填充到物件中;
- 物件屬性中有個外來鍵,需要關聯查詢對應的資料庫表實體,並獲取其中的指定屬性填充到物件中;
- 物件屬性中有個列舉,需要將列舉中的指定屬性填充到物件中;
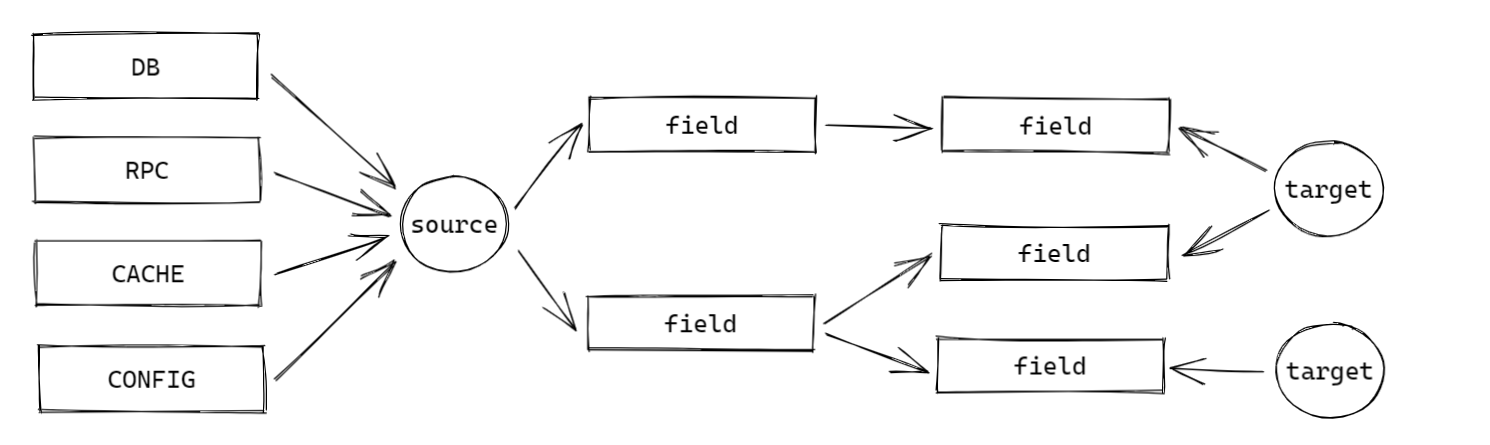
實際場景中這種聯查的需求可能遠遠不止這些,這個問題的核心有三點:
- 填充的資料來源是不確定的:可能是來自於 RPC 介面,可能是列舉類,也可能是資料庫裡的設定表,甚至是組態檔;
- 填充物件是不確定的:可能是普通的物件,但是也可能是 Collection 集合,或者 Map 集合,甚至可能是個 JsonNode,或者有一個巢狀結構;
- 填充的欄位的不確定的:同樣的資料來源,但是可能這個介面返回的物件只需要填其中的一個欄位,但是另一個介面需要填另外的兩個欄位;
基於上述三點,我們在日常場景中很容易遇到下圖的情況:
動態型別
有時候不可避免的會存在無法確定欄位型別的場景,比如典型的泛型:
public class ResultWrapper<T> {
    @Disassemble
    private T data;
}
在這種情況是無法直接確定 data 欄位的型別的,此時使用 @Disassemble 註解可以不在 value 或者 targetClass 上直接指定具體的型別,crane 將在執行操作時通過反射獲得 data 的實際型別,然後再通過指定的解析器去獲取該型別的對應設定。
5、通過類註解設定
上述介紹都是基於類屬性上的 @Assemble 和 @Disassemble 註解完成的,實際上 crane 也支援通過類上的 @Operations註解設定操作。
基本使用
比如,我們現有如下情況:
Child 繼承了 Parent,但是在使用 Child 範例時又需要根據 id 填充 userName 和 userAge,此時並不方便直接修改 Parent:
public class Parent {
    private String id;
    private String userName;
    private Integer userAge;
}

public class Child extends Parent {}
因此,我們允許在 Child 中如此設定:
@Operations(
    assembles = @Assemble(key = "id", container = UserContainer.class, props = {
        @prop(src = "name", ref = "userName"),
        @prop(src = "age", ref = "userAge")
    })
)
public class Child extends Parent {}
現在效果等同於在 Parent 類中直接註解:
public class Parent {
    @Assemble(container = UserContainer.class, props = {
        @prop(src = "name", ref = "userName"),
        @prop(src = "age", ref = "userAge"),
        @prop("user") // 將user物件直接對映到待處理物件的user欄位上
    })
    private String id;
    private String userName;
    private Integer userAge;
}
這個設定僅對 Child 有效,而不會影響到 Parent。
key欄位別名
由於設定允許通過繼承父類別或實現父介面獲得,因此有可能會出現 key 欄位名稱不一致的情況,比如:
現有設定介面 FooInterface,指定了一個以 id 為 key 欄位的裝配操作,但是別名允許為 userId 或 uid:
@Operations(
    assembles = @Assemble(key = "id", aliases = { "userId, uid" }, container = UserContainer.class, props = {
        @prop(src = "name", ref = "userName"),
        @prop(src = "age", ref = "userAge")
    })
)
public interface FooInterface
現有 Child 實現了該介面,但是該類中只有 userId 欄位而沒有 id 欄位,此時設定是照樣生效的:
public class Foo implements FooInterface {
    private Integer userId;
}
當一次操作中同時設定的 key 與多個別名,則將優先尋找 key 欄位,若不存在則再根據順序根據別名查詢至少一個真實存在的別名欄位。
設定繼承與繼承排除
@Operations 註解允許使用在普通類或者介面類上,並且允許通過實現與繼承的方式傳遞設定。
假如現在存在以下類繼承結構:
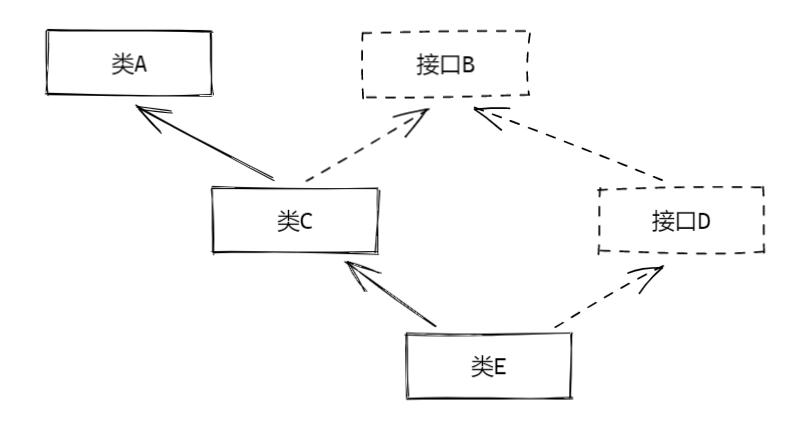
且上述兩個介面與三個類上全都存在 @Operations 註解,此時在預設情況下,我們可以分析以下類 E 的設定情況:
- 不做任何特殊設定,類 E 將繼承 A,B,C,D 上的全部註解設定;
- 若將 E 的
@Operations#enableExtend()屬性改為 false,則類 E 將不繼承任何父類別或實現的介面上的設定,僅保留類 E 上的設定; - 若在
@Operation#extendExcludes()設定了排除繼承,則:- 若排除介面 B,且類 E 上的
@Operations#enableExtend()屬性為 true,此時類 E 將繼承除介面 B 以外的所有設定,即獲得 A,C,D,E 的設定; - 若排除類 C,且類 E 上的
@Operations#enableExtend()屬性為 true,此時類 E 將不再繼承類 C 上及其繼承/實現樹上的設定,但是仍然可以通過介面 D 獲得介面 B 的設定,此時類 E 僅 B,D,E 三個類的設定; - 若類 C 上的
@Operations#enableExtend()屬性為 false,且類 E 上的@Operations#enableExtend()屬性為 true,則此時 E 將不會通過類 C 獲得 A 與 B 的設定,因為 C 並沒有繼承父類別和父介面的設定,此時 E 將擁有 B,C,D,E 四組設定;
- 若排除介面 B,且類 E 上的
6、分組填充
參照 Spring Validation 的分組校驗,crane 也提供了操作分組的功能,它允許以與 Validation 類似的方式,對裝配操作進行分組,然後在操作的時候僅處理指定分組中的操作,比如:
@Assemble(
    container = UserContainer.class,
    groups = { UserGroup.class, AdminGroup.class }, // 當指定分組為 UserGroup 或 AdminGroup 時填充 userName 欄位
    props = @prop(src = "name", ref = "userName")
)
@Assemble(
    container = UserContainer.class,
    groups = { AdminGroup.class },  // 僅當指定分組為 AdminGroup 時填充 role 欄位
    props = @prop(src = "role", ref = "role")
)
private Integer id;
然後可以在相關的操作入口中指定本次操作的分組即可。
該功能一個比較典型的應用場景是一個介面同時對內對外,但是有些敏感的資訊在對外的時候應該是不展示的,此時即可通過分組完成。
7、排序填充
裝配操作允許通過 spring 提供的 @Order 註解對裝配操作的執行順序進行排序,與 spring 排序規則一樣,value 越小越靠前。
對欄位設定排序
比如,現在我們有一個組合操作,即先根據 userId 獲取 deptId,然後再根據 deptId 獲取 empUsers:
public class UserVO {

    @Order(0)
    @Assemble(container = UserContainer.class, props = @Prop(src = "deptId", ref = "deptId"))
    private Integer userId;

    @Order(1)
    @Assemble(container = EmpContainer.class, props = @Prop(ref = "empUsers"))
    private Integer deptId;
    private List<User> empUsers;
}
按上述設定,根據 userId 填充 deptId 的操作將會優先執行,然後才會執行根據 deptId 填充 empUsers欄位。
對類設定排序
當使用類註解 @Operations 設定操作時,@Order 註解只能加在所設定的類上,同一個類上宣告的裝配操作優先順序都與該註解一致,也就說,使用 @Operations時,只支援不同類上的操作設定的排序,不支援同一類上的操作排序。
比如:
@Order(0)
@Operations(assembles = @Assemble(container = UserContainer.class, props = @Prop(src = "deptId", ref = "deptId")))
public interface AssembleDeptConfig {}

@Order(1)
@Operations(assembles = @Assemble(container = EmpContainer.class, props = @Prop(ref = "empUsers")))
public interface AssembleEmpConfig {}

@Operations(enableExtend = true)
public class UserVO implements AssembleEmpConfig, AssembleDeptConfig {
    private Integer userId;
    private Integer deptId;
    private List<User> empUsers;
}
這種情況下,AssembleDeptConfig 上的操作設定就會優先於 AssembleEmpConfig 執行。
8、資料來源預處理
crane 允許在通過 @Prop 註解設定欄位對映時,使用 @Prop#exp 和 @Prop#expType 設定 SpEL 表示式,然後利用表示式從容器中獲取的原始的資料來源進行預處理。
比如我們在欄位設定一章中提到過的內省容器。通過內省容器,我們可以獲取到待處理物件本身,然後我們先獲取待處理物件的userName欄位值,然後根據性別動態的將其替換為原值+「先生/女生」:
@Assemble(
    container = IntrospectContainer.class, props = @Prop(
        ref = "userName",
        exp = "sex == 1 ? #source.name + '先生' : #source.name + '女士'", // 根據性別,在name後追加「先生」或者「女士」
        expType = String.class // 表示式返回值為String型別
    )
)
private String sex;
private String name;
根據 sex欄位從容器中獲取的資料來源,將先經過表示式的處理,然後將返回指定型別的結果,這個結果將作為新的資料來源參與後續處理。
表示式上下文中預設註冊了以下變數,允許直接在表示式中參照:
#source:原始資料來源物件;#target:待處理物件;#key:key欄位的值;#src:@Prop#src指定的引數值;#ref:@Prop#ref指定的引數值;
若有需要,也可以自行註冊 ExpressionPreprocessingInterceptor.ContextFactory,在 SpEL 表示式上下文中註冊更多變數和方法。
9、自定義註解
crane 深度結合的 spring 的提供的元註解機制,使用者可以基於已有註解,自由的 diy 新註解以更進一步的簡化開發。
首先簡單的介紹一下 spring 的元註解機制。在 java 中,元註解指能用在註解上的註解,由於 java 的註解本身不支援繼承,因此 spring 藉助 AnnotationElementUtils 等工具類對 java 的元註解機制進行了擴充套件,實現了一套類似繼承的註解組合機制,即 A 註解用在了註解 B 上時,註解 B 也可以被認為是一個特殊的 A 註解。
在 crane 中,允許被這樣作為元註解使用的註解皆以 @MateAnnotation 標記。
假設現在存在有如下欄位設定:
@Assemble(container = UserContainer.class, props = {
    @prop(src = "name", ref = "userName"),
    @prop(src = "age", ref = "userAge")
})
private Integer id;
我們可以上述 @Assemble 設定作為元註解,建立一個 @AssembleUser 註解:
@Assemble(container = UserContainer.class, props = {
    @prop(src = "name", ref = "userName"),
    @prop(src = "age", ref = "userAge")
})
@Target({ElementType.FIELD, ElementType.ANNOTATION_TYPE})
@Retention(RetentionPolicy.RUNTIME)
@Documented
public @interface AssembleUser {}
然後將原本的設定替換為:
@AssembleUser
private Integer id;
即可實現與之前完全一樣的效果。
四、資料來源
在 crane 中,任何將能夠將 key 轉換為對應的資料來源的東西都可以作為容器,crane 提供了五個預設的容器實現,它們可以覆蓋絕大部分的場景下的資料來源:
- 鍵值對快取:對應容器
KeyValueContainer,允許根據 namesapce 和 key 註冊和獲取任何資料; - 列舉:對應容器
EnumDictContainer,允許向容器中註冊列舉類,然後通過指定的 namesapce 和 key 獲得對應的列舉範例; - 實體方法:對應容器
MethodContainer,允許通過註解簡單設定,將任意物件範例的方法作為資料來源,通過 namespace 和 key 直接呼叫方法獲取填充資料。適用於任何基於介面或本地方法的返回值進行填充的場景; - 內省容器:對應容器
BeanIntrospectContainer和KeyIntrospectContainer,允許直接將當前填充的物件作為資料來源。適用於一些欄位同步的場景;
接下來我們看看怎麼使用。
1、將鍵值對快取作為資料來源
鍵值對容器KeyValueContainer基於一個雙重 Map 集合實現,本質上是一個基於本地快取的資料來源。在使用前,我們需要在容器中註冊鍵值對,然後在欄位註解上通過 namespace 與 key 進行參照。
比如,現有一個很典型的性別字典項:
Map<Integer, Object> gender = new HashMap<>();
gender.put(0, "女");
gender.put(1, "男");
keyValueContainer.register("sex", gender);
然後再在待處理物件中參照:
@Assemble(
    container = keyValueContainer.class, // 指定使用鍵值對容器
    namespace = "sex", // namespace為上文指定的sex
    props = @Prop("sexName") // 從名稱空間sex中根據sex欄位值獲取對應的value,並填充到sexName欄位
)
private Integer sex;
private String sexName;
也可以使用 @AssembleKV 簡化寫法:
@AssembleKV(namespace = "sex",  props = @Prop("sexName"))
private Integer sex;
private String sexName;
2、將列舉作為資料來源
列舉容器EnumDictContainer用於處理列舉型別的資料來源。與鍵值對一樣,使用前我們需要先向容器註冊要使用的列舉。
註冊列舉
舉個例子,我們手頭有個 Gender 列舉:
@Data
@RequiredArgsConstructor
public enum Gender {
    MALE(1, "男"),
    FEMALE(0, "女");
    private final Integer id;
    private final String desc;
}
則可以按如下方法註冊:
// namespace為gender,並且以列舉項的id屬性作為key值
enumDictContainer.register(Gender.class, "gender", Gender::id);
// namespace為Gender類的非全限定名Gender,並且以列舉項的 Enum#name() 返回值作為key值
enumDictContainer.register(Gender.class);
基於註解註冊
當然,如果覺得手動指定 namespace 和 key 麻煩,也可以通過註解完成,現在我們為 Gender 列舉類新增註解:
@EnumDict.Item(typeName = "gender", itemNameProperty = "id") // 指定namespace為gender,然後以id的值作為key
@Data
@RequiredArgsConstructor
public enum Gender {
    MALE(1, "男"),
    FEMALE(0, "女");
    private final Integer id;
    private final String desc;
}
然後再在容器中註冊,就會自動根據類上的註解獲取 namespace 和列舉範例的 key 值了:
enumDictContainer.register(Gender.class);
使用
當我們將列舉註冊到列舉容器後,使用時僅需在 @Assemble註解中參照即可:
@Assemble(
    container = EnumDictContainer.class, // 指定使用列舉容器
    namespace = "gender", // namespace為上文指定的gender
    props = @Prop(src = "name", ref = "genderName") // 獲取Gender列舉中的name欄位值,並填充到genderName欄位
)
private Integer gender;
private String genderName;
註冊後的列舉會被解析為 BeanMap 並快取,我們可以像處理物件一樣簡單的通過屬性名獲取對應的值。
也可以用 @AssembleEnum 註解簡化寫法:
@AssembleEnum(namespace = "gender", props = @Prop(src = "name", ref = "genderName"))
private Integer gender;
private String genderName;
3、將實體方法作為資料來源
方法容器MethodContainer是基於 namespace 隔離,將各個類範例中的方法作為資料來源的容器。
在使用方法容器之前,我們需要先使用 @MethodSourceBean.Method註解作為資料來源的方法,然後再使用@MethodSourceBean註解該方法所在的類範例。
註冊方法
比如,我們需要將一個根據使用者 id 批次查詢使用者物件的介面方法作為資料來源:
@MethodSourceBean
public class UserService {
    // 該方法對應的名稱空間為user,然後指定返回值型別為User.class, key欄位為id
    @MethodSourceBean.Mehtod(namespace = "user", sourceType = User.class, sourceKey = "id")
    public List<User> getByIds(List<Integer> ids) {
        // 返回user物件集合
    }
}
當然,如果這個方法來自父類別,無法顯式的使用註解宣告資料來源方法,也允許通過類註解宣告:
@ContainerMethodBean(
    @ContainerMethodBean.Method(namespace = "user", name = "getByIds", sourceType = User.class, sourceKey = "id")
)
public class UserService extend BaseService<User> {}
當專案啟動時,crane 將從 Spring 容器中獲取被 @ContainerMethodBean註解的類,並獲取其中被註解的方法,並根據指定的 namespace 註冊到方法容器對應的名稱空間。
使用
當我們使用時,與其他容器保持一致:
@Assemble(
    container = MethodSourceContainer.class, // 指定使用鍵值對容器
    namespace = "user", // namespace為上文指定的user
    props = @Prop("userBean") // 從名稱空間user中獲取方法getByIds,然後將userId對應的user物件填充到userBean欄位中
)
private Integer userId;
private User userBean;
當然,也可以通過 @AssembleMethodSource 註解簡化寫法:
@MethodSource(namespace = "user", props = @Prop("userBean"))
private Integer userId;
private User userBean;
多對一
容器總是預設方法返回的集合中的物件與 key 欄位的值是一對一的,但是也可以調整為一對多。
比如我們現在有一批待處理的 Classes 物件,需要根據 Classes#id欄位批次獲取Student物件,然後根據Student#classesId欄位填充到對應的 Classes 物件中:
@MethodSourceBean.Mehtod(
    namespace = "student", sourceType = Student.class, sourceKey = "classesId",
    mappingType = MappingType.ONE_TO_MORE // 宣告待處理物件跟Student通過classesId構成一對多關係
)
public List<Student> listIds(List<Integer> classesIds) {
    // 查詢Student物件
}
然後在待處理物件中參照:
@Assemble(
    container = MethodSourceContainer.class,
    namespace = "student",
    props = @Prop("students")
)
private Integer classesId;
private List<Student> students;
4、將待處理物件本身作為資料來源
有些時候,我們會有一些欄位同步的需求,待處理物件內省容器 BeanIntrospectContainer 就是用來幹這件事的,不僅如此,它適用於任何需要對待處理物件本身進行處理的情況。
待處理物件內省容器BeanIntrospectContainer的資料來源就是待處理物件本身,它用於需要對待處理物件本身進行處理的情況。
比如簡單的同步一下欄位:
// 將物件中的name欄位的值同步到userName欄位上
@Assemble(container = BeanIntrospectContainer.class, props = @Prop("userName")
private String name;
private String userName;
也可以用於處理集合取值:
// 將物件中的users集合中全部name欄位的值同步到userNames欄位上
@Assemble(container = BeanIntrospectContainer.class, props = @Prop(src = "name", ref = "userNames"))
private List<User> users;
private List<String> userNames;
或者配合 SpEL 預處理資料來源的功能處理一些欄位:
@Assemble(
    container = BeanIntrospectContainer.class, props = @Prop(
        ref = "name",
        exp = "sex == 1 ? #source.name + '先生' : #source.name + '女士'", // 根據性別,在name後追加「先生」或者「女士」
        expType = String.class
    )
)
private String sex;
private String name;
也提供了 @AssembleBeanIntrospect 註解,效果等同於:
@Assemble(container = BeanIntrospectContainer.class)
5、將key值作為資料來源
待處理 key 欄位內省容器KeyIntrospectContainer 和 BeanIntrospectContainer 基本一致,主要的不同在於 KeyIntrospectContainer 的資料來源是待處理物件本此操作所對應的 key 欄位值。
除了跟 BeanIntrospectContainer 差不多的用法以外,由於操作的資料來源物件本身變為了 key 欄位的值,因此也有了一些特別的用處:
// 將Type列舉的desc欄位賦值給typeName欄位
@Assemble(container = KeyIntrospectContainer.class, props = @Prop(src = "desc", ref = "typeName"))
private TypeEnum type;
private String typeName;
如果是 JsonNode,還可以這樣:
// 使用type欄位對應列舉的desc欄位替換其原本的值
@Assemble(container = KeyIntrospectContainer.class, props = @Prop(src = "desc"))
private TypeEnum type;
預設提供了 @AssembleKeyIntrospect 註解,效果等同於
@Assemble(container = KeyIntrospectContainer.class)
五、切面
完成了資料來源和欄位的設定以後,就需要在程式碼中執行填充的操作。crane 總共提供了三個入口:
- 在方法上新增
@ProcessResult註解,然後通過 AOP 自動對方法返回值進行填充; - 在
ObjectMapper中註冊DynamicJsonNodeModule模組,然後使用該ObjectMapper範例序列號物件時自動填充; - 使用 crane 註冊到 spring 容器中的
OperateTemplate手動的呼叫;
第二種會在下一節介紹,而第三種沒啥特別的,這裡主要介紹一些基於切面的方法返回值自動填充。
使用
預設情況下,crane 會自動把切面註冊到 spring 容器中,因此使用時,若方法所在類的範例已經被 spring 容器管理,則只需要在方法上新增註解就行了:
// 自動填充返回的 Classroom 物件
@ProcessResult(Classroom.class)
public Classroom getClassroom(Boolean isHandler) {
    return new Classroom();
}
切面支援處理單個物件,一維物件陣列與一維的物件 Collection 集合。
表示式校驗
切面還允許根據 SpEL 表示式動態的判斷本次方法呼叫是否需要對返回值進行處理:
@ProcessResult(
    targetClass = Classroom.class
    condition = "!#result.isEmpty && !#isHandle" // 當返回值為空集合,且isHandle引數不為true時才處理返回值
)
public List<Classroom> getClassroom(Boolean isHandle) {
    return Collections.emptyList();
}
這裡的 SpEL 表示式中預設可以通過 #引數名 的方式參照入參,或者通過 #result 的方式獲取返回值。
自定義元件
此外,切面註解中還可以自行自定一些 crane 的元件和引數,包括且不侷限與分組,執行器等:
@ProcessResult(
    targetClass = Classroom.class,
    executor = UnorderedOperationExecutor.class,
    parser = BeanOperateConfigurationParser.class,
    groups = { DefaultGroup.class }
)
public List<Classroom> getClassroom(Boolean isHandler) {
    return Collections.emptyList();
}
不同的元件會產生不同的效果,比如 executor ,當指定為 AsyncUnorderedOperationExecutor.class 時 crane 會根據本次所有操作對應的容器的不同,非同步的執行填充,而指定為 SequentialOperationExecutor 時將支援按順序填充。
這裡更多詳細內容可以參考檔案。
六、Json支援
上述例子都以普通的 JavaBean 為例,實際上 crane 也支援直接處理 JsonNode。若要啟用 Json 支援,則需要引入 crane-jackson-implement 模組,其餘設定不需要調整。
<dependency>
    <groupId>top.xiajibagao</groupId>
    <artifactId>crane-jackson-implement</artifactId>
    <version>${last-version}</version>
</dependency>
crane-jackson-implement 版本與 crane-spring-boot-starter 版本一致,截止本文釋出時,版本號為 0.5.7。
1、設定
設定 ObjectMapper
引入模組後 crane 將會自動向 spring 容器中註冊必要的元件,包括 DynamicJsonNodeModule 模組,該模組是實現 JsonNode 填充的核心。使用者可以自行指定該模組要註冊到哪個 ObjectMapper 範例。
一般情況下,都會直接把該模組註冊到 spring-web 提供的那個 ObjectMapper 中,也就是為 Controller 新增了 @RestController 註解、或者為方法新增 @ResponseBody 註解後,Controller 中介面返回值自動序列化時使用的 ObjectMapper。
比如,我們現在已經引入了 spring-web 模組,則可以在設定類中設定:
@Configuration
public class ExampleCraneJacksonConfig {

    @Primary
    @Bean
    public ObjectMapper serializeObjectMapper(DynamicJsonNodeModule dynamicJsonNodeModule) {
        ObjectMapper objectMapper = new ObjectMapper();
        objectMapper.registerModule(dynamicJsonNodeModule); // 註冊動態json模組
        return objectMapper;
    }

}
設定欄位操作
針對 JsonNode 的設定會跟普通的 JavaBean 有點區別。我們以一個普通的 JavaBean 設定為例:
public class Foo {
    @Assemble(
        container = UserContainer.class,
        props = @prop(src = "name", ref = "userName")
    )
    private String id;
    private String userName;

    @Disassemble(Foo.class)
    private List<Foo> foos;
}
首先,需要為序列化時進行資料填充的類新增 @ProcessJacksonNode 註解:
@ProcessJacksonNode
public class Foo {
    ......
}
然後,在 @Assemble 和 @Disassemble 指定使用 Jackson 的操作者:
@Assemble(
    container = UserContainer.class,
    props = @prop(src = "name", ref = "userName"),
    assembler = JacksonAssembler.class
)
private String id;
private String userName;

@Disassemble(targetClass = Foo.class, , disassembler = JacksonDisassembler.class)
private List<Foo> foos;
至此物件序列化時的填充設定就全部完成了。
2、使用
當使用註冊了 DynamicJsonNodeModule 模組的 ObjectMapper 序列化物件時就會自動觸發填充。
假如 ObjectMapper 被用於 Controller 自動序列化,則 Controller 中介面的返回值就會自動填充。而當 ObjectMapper 單獨使用時,呼叫 valueToTree 方法,或者 writeValueAsString 方法都會觸發自動填充。
由於 JsonNode 的特殊性,相比普通的 JavaBean,它可以直接新增或替換物件的屬性值。
追加欄位
假如我們有如下待序列化的物件,該物件只有一個 id 欄位:
@ProcessJacksonNode
public class Foo {
    private String id;
}
我們可以根據 id 動態新增 name 和 age 欄位:
@ProcessJacksonNode
public class Foo {
    @Assemble(assembler = JacksonAssembler, container = UserContainer.class, props = {
        @prop(src = "name", ref = "userName"),
        @prop(src = "age", ref = "userAge")
    })
    private String id;
}
在序列化後得到如下 json 串:
{
    "id": 1,
    "userName": "foo",
    "userAge": 12
}
替換欄位
由於 JsonNode 本身相當於一個大 Map 集合,因此我們可以無視 Class 中的型別,直接替換指定欄位的值:
@ProcessJacksonNode
public class Foo {
    @Assemble(assembler = JacksonAssembler, container = KeyValueContainer.class, namespace = "sex")
    private Integer sex;
}
序列化後得到:
{
    "sex": "男"
}
同理,如果是資料來源容器中提供的資料來源是物件也可以直接替換為物件:
{
    "sex": {
        "id": 1,
        "name": "男"
    }
}
結語
crane 的功能和特性不止本文所描述的這些,它還支援藉助 reflectasm 庫將 JDK 原生的反射替換為位元組碼呼叫優化效能,還支援各種快取和基於組態檔的預載入等等.......
它算是作者日常開發中面對這種頻繁的資料關聯需求總結出的一個解決方案,它的原型目前已經在公司生成環境投入使用。實際上,crane 肯定是不能適用於所有場景的,但是如果有類似需要在後臺處理字典項、設定項或者需要關聯資料的需求,使用 crane 能大大的提高開發效率。
好吧不演了,這篇文章實際上就是菜雞作者鼓起勇氣推廣自己開源專案求使用求 start 的一篇軟文。crane 作為一個仍然還不完善的開源的專案,還需要更多人的使用與反饋,如果各位看官有興趣,可以去倉庫瞭解一下,點個 start,如果覺得有意思,或者有什麼自己的想法,也歡迎提出 issues 或者直接加群討論!
倉庫地址:https://gitee.com/CreateSequence/crane
檔案:https://gitee.com/CreateSequence/crane/wikis/pages