Python3,19行程式碼,我把她的照片寫入到Excel中,2022年伊始,她終於被我感動了。
1、引言
小屌絲:魚哥,新年快樂~ ~
小魚:新年快樂,小屌絲,雖然是元旦,但是也算是邁入新的一年了,也該有新的形象了。
小屌絲:魚哥,你說的沒錯啊,新的一年,我要用新的姿勢去追妹子。
小魚:… 怎麼三句不說妹子,你無話可說了??
小屌絲:妹子是我提升技術的動力!
小魚:… 好吧,只要你能提升技能,其他的都無所謂…
小屌絲:呦吼~~ 對了魚哥,我記得你有一篇博文,把文字寫在圖片裡。
小魚:對哦,不少小夥伴通過這個方式,讓自己的女友感動了。
小屌絲:那能不能把圖片寫在別的地方呢?
小魚:例如呢??
小屌絲:excel,word,PDF 等等…
小魚:…唉我去~~
小屌絲:嘿嘿~ ~ 來嘛 ~ ~

2、程式碼實戰
2.1 思路
我們今天要分享的,是把圖片寫入到excel中,
注意:
這裡說的,不是擷取一張圖片,貼上到excel;
而是通過畫素寫入到excel中。
我們來捋一下思路:
- 準備源圖片,目標excel;
- 通過Pillow 來讀圖片的取畫素(RGB);
- 通過openpyxl 向excel cell內填充十六進位制色值;
- 最後把轉換的RGB畫素直接寫入到excel中;
說到這裡,就們就來分步實現。
2.2 檔案准備
需要寫入而Excel的源圖片:

2.3 實戰
2.3.1 安裝
本次需要用到兩個模組: Pillow 和 openpyxl 。
老規矩, pip 方式安裝:
pip install Pillow
pip install openpyxl
其他方式安裝:
《Python3,選擇Python自動安裝第三方庫,從此跟pip說拜拜!!》
《Python3:我低調的只用一行程式碼,就匯入Python所有庫!!》
2.3.2 程式碼實戰
1、色值轉換
由於 圖片讀取的畫素是RGB值,而excel是十六進位制寫入,
所以需要定義一個RGB與十六進位制轉換的函數
# -*- coding:utf-8 -*-
# @Time   : 2022-01-03
# @Author : carl_DJ

'''
定義RGB 和十六進位制色值轉換函數
'''

def rgb_to_hex(rgb):
    rgb = rgb.split(',')
    color = ''
    #迴圈遍歷
    for i in rgb:
        num = int(i)
        color  += str(hex(num))[-2:].replace('x','0').upper()
    return  color
2、圖片轉換
此操作是逐行讀取圖片的 RGB 色值,再將 RGB 色值轉換為十六進位制色值填充到 Excel 的 cell 中。
# -*- coding:utf-8 -*-
# @Time   : 2022-01-03
# @Author : carl_DJ


'''
逐行讀取圖片中的RGB色值,再將RGB色值轉換十六進位制,填充到excel中
'''

def img_to_excel(img_path,excel_path):
    #讀取源圖片
    img_src = Image.open(img_path)
    #設定圖片寬高
    img_width = img_src.size[0]
    img_hight = img_src.size[1]

    #圖片載入
    str_strlist = img_src.load()
    #獲取當前的excel檔案
    wb = openpyxl.Workbook()
    #儲存檔案
    wb.save(excel_path)
    #開啟excel_path 下的excel檔案,並寫入資訊
    wb = openpyxl.load_workbook(excel_path)
    cell_width,cell_height = 1.0,1.0

    #設定excel的寫入頁
    sheet = wb['Sheet']

    #迴圈圖片的高與寬,並存入
    for w in range(img_width):
        for h in range(img_hight):
            data = str_strlist[w,h]
            color = str(data).replace("(","").replace(")","")
            color  = rgb_to_hex(color)

            #設定填充顏色為color
            fille = PatternFill("solid",fgColor = color)
            sheet.cell(h + 1,w + 1).fill = fille

    #迴圈遍歷row,讓其全部寫入
    for i in range(1,sheet.max_row + 1):
        sheet.row_dimensions[i].height = cell_height
    #迴圈遍歷column,讓其全部寫入
    for i in range(1,sheet.max_column + 1):
        sheet.column_dimensions[get_column_letter(i)].width = cell_width

    #儲存檔案
    wb.save(excel_path)
    #關閉
    img_src.close()
3、程式碼整合
# -*- coding:utf-8 -*-
# @Time   : 2022-01-03
# @Author : carl_DJ

import  openpyxl
from openpyxl.styles import PatternFill
from openpyxl.utils import  get_column_letter
from PIL import Image,ImageFont,ImageDraw,ImageColor


'''
色值轉換:
從圖片讀取的畫素塊色值是 RGB 值,
RGB 和十六進位制色值轉換。
'''

def rgb_to_hex(rgb):
    rgb = rgb.split(',')
    color = ''
    #迴圈遍歷
    for i in rgb:
        num = int(i)
        color  += str(hex(num))[-2:].replace('x','0').upper()
    return  color


'''
圖片轉換:
逐行讀取圖片中的RGB色值,再將RGB色值轉換十六進位制,填充到excel中
'''

def img_to_excel(img_path,excel_path):
    #讀取源圖片
    img_src = Image.open(img_path)
    #設定圖片寬高
    img_width = img_src.size[0]
    img_hight = img_src.size[1]

    #圖片載入
    str_strlist = img_src.load()
    #獲取當前的excel檔案
    wb = openpyxl.Workbook()
    #儲存檔案
    wb.save(excel_path)
    #開啟excel_path 下的excel檔案,並寫入資訊
    wb = openpyxl.load_workbook(excel_path)
    cell_width,cell_height = 1.0,1.0

    #設定excel的寫入頁
    sheet = wb['Sheet']

    #迴圈圖片的高與寬,並存入
    for w in range(img_width):
        for h in range(img_hight):
            data = str_strlist[w,h]
            color = str(data).replace("(","").replace(")","")
            color  = rgb_to_hex(color)

            #設定填充顏色為color
            fille = PatternFill("solid",fgColor = color)
            sheet.cell(h + 1,w + 1).fill = fille

    #迴圈遍歷row,讓其全部寫入
    for i in range(1,sheet.max_row + 1):
        sheet.row_dimensions[i].height = cell_height
    #迴圈遍歷column,讓其全部寫入
    for i in range(1,sheet.max_column + 1):
        sheet.column_dimensions[get_column_letter(i)].width = cell_width

    #儲存檔案
    wb.save(excel_path)
    #關閉
    img_src.close()


if __name__ == '__main__':
    #源圖片地址
    img_path = './queue.jgp'
    #儲存excel地址
    excel_path = './queue.xlsx'
    #執行
    img_to_excel(img_path, excel_path)
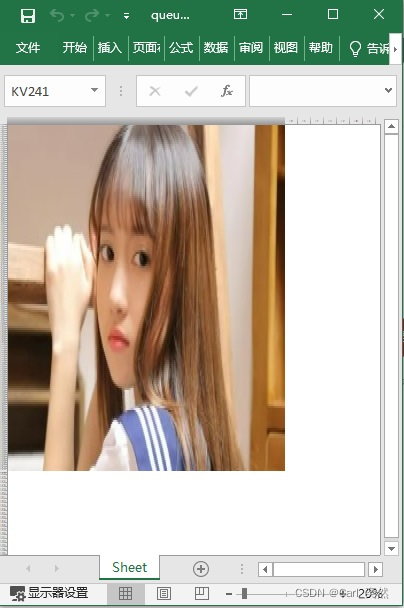
4、執行結果
3、總結
寫到這裡,今天的分享就差不多結束了。
因為今天也用到了Pillow,如果想快速入手,可以參照小魚的這篇博文《Python3,10行程式碼,我把情書寫在她的照片裡,她被我的才華征服了。》
這裡小魚提醒一下,
如果你的源圖片很大,執行完成後,開啟Excel會提示檔案損壞,
因為Excel的行數有限,導致無法全部寫完資料。
Excel報錯詳情:
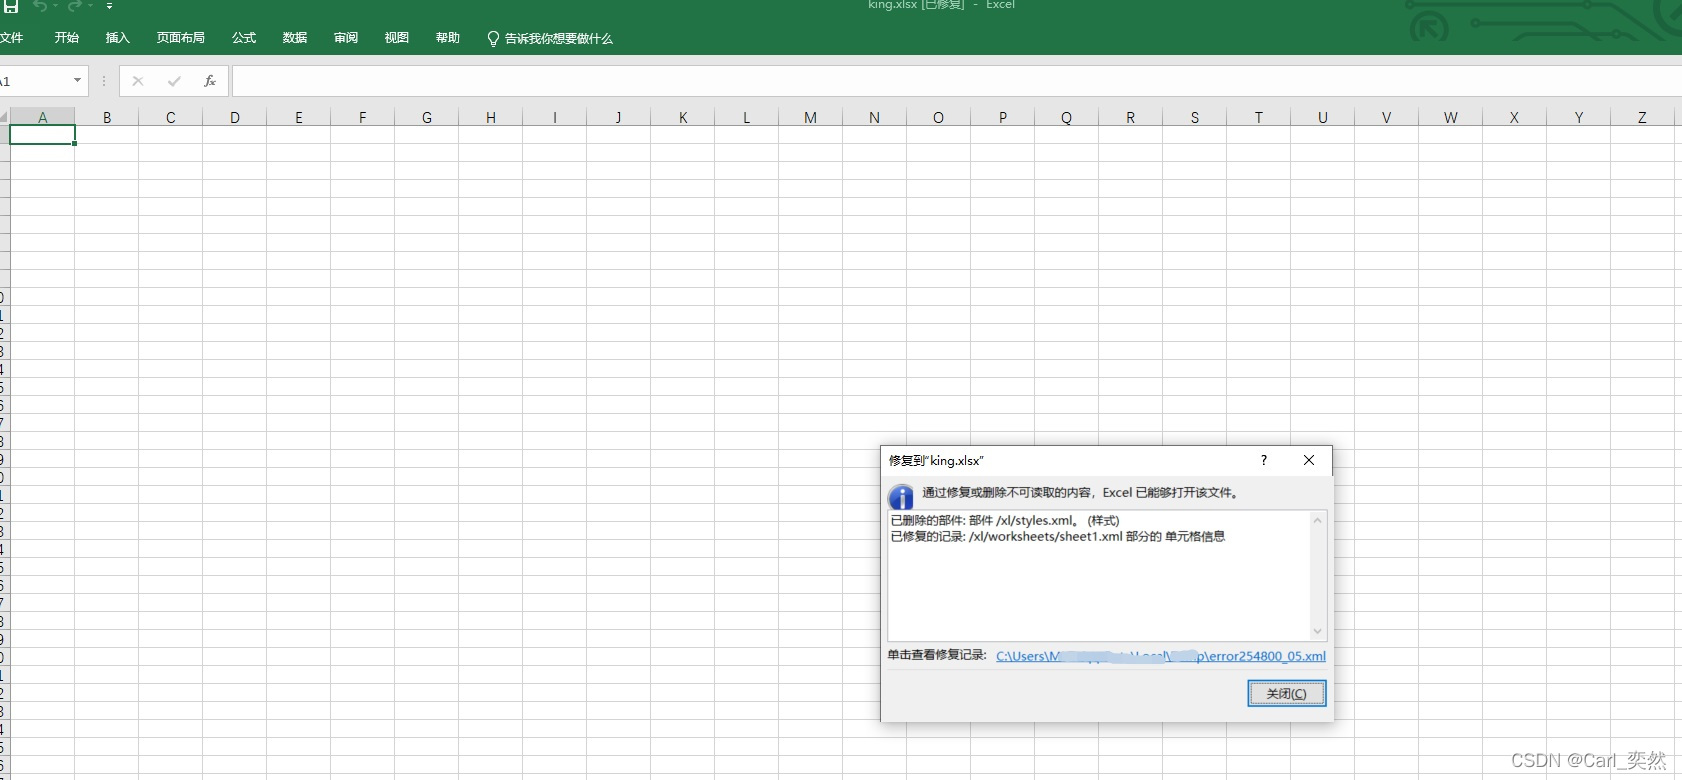
xml報錯詳情:
<?xml version="1.0" encoding="UTF-8" standalone="yes"?>
<recoveryLog xmlns="http://schemas.openxmlformats.org/spreadsheetml/2006/main"><logFileName>error254800_05.xml</logFileName><summary>在檔案「D:\Project\img\king.xlsx」中檢測到錯誤</summary><removedParts><removedPart>已刪除的部件: 部件 /xl/styles.xml。 (樣式)</removedPart></removedParts><repairedRecords><repairedRecord>已修復的記錄: /xl/worksheets/sheet1.xml 部分的 單元格資訊</repairedRecord></repairedRecords></recoveryLog>