基於Vue和Quasar的前端SPA專案crudapi後臺管理系統實戰之佈局選單巢狀路由(三)
基於Vue和Quasar的前端SPA專案實戰之佈局選單(三)
回顧
通過上一篇文章 基於Vue和Quasar的前端SPA專案實戰之使用者登入(二)的介紹,我們已經完成了登入頁面,今天主要介紹佈局選單的實現。
UI介面
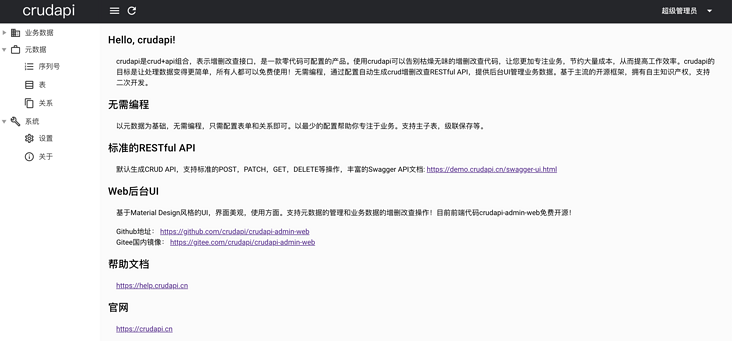
效果

首頁

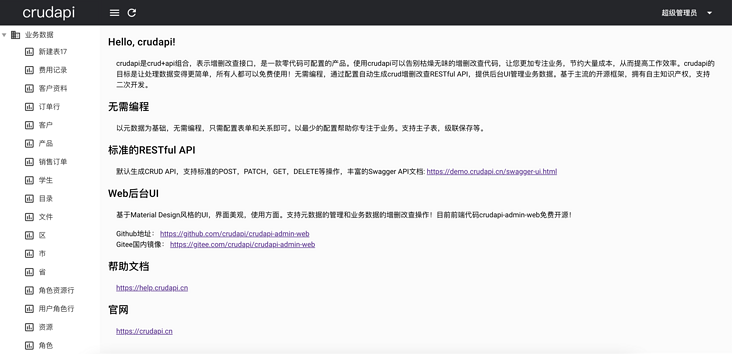
業務資料選單展開

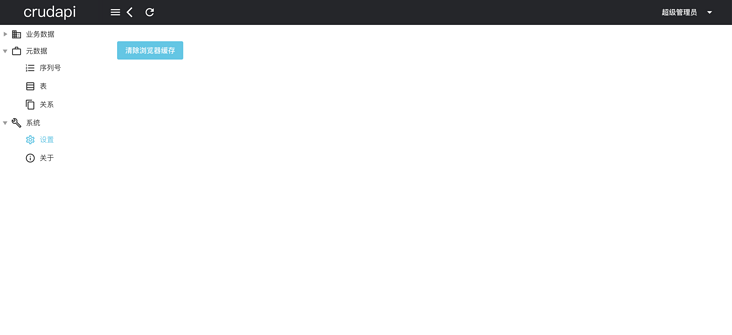
設定頁面
說明
佈局主頁分為三個部分,
- 最上面為導航欄,主要包括重新整理按鈕,後退按鈕,使用者資訊等內容。
- 左邊為選單,包括業務資料,後設資料,系統三個一級選單。業務資料選單的二級選單為表名稱,後設資料選單包括序列號、表、關係三個二級選單,系統選單包括設定和關於兩個二級選單。
- 右邊為頁面主體部分。
佈局
巢狀路由
通常由多層巢狀的元件組合而成。同樣地,URL 中各段動態路徑也按某種結構對應巢狀的各層元件,例如:
設定Setting頁面和關於About頁面切換的時候,導航和選單部分都不變,變化的是主體部分,可以通過巢狀路由實現。
/about                                /setting
+------------------+                  +-----------------+
| nav             |                   | nav             |
| +--------------+ |                  | +-------------+ |
| | About        | |  +------------>  | | Setting     | |
| |              | |                  | |             | |
| +--------------+ |                  | +-------------+ |
+------------------+                  +-----------------+
MainLayout
檔案為:src/layouts/MainLayout.vue
<q-page-container>
  <router-view />
</q-page-container>其中<router-view />對應上圖About和Setting部分。
定義路由
const routes = [
  {
    path: '/',
    component: () => import('layouts/MainLayout.vue'),
    children: [
      { path: '', component: () => import('pages/Index.vue') },
      {
        name: "about",
        path: "about",
        meta: { isAllowBack: true },
        component: () => import("pages/About.vue")
      },
      {
        name: "setting",
        path: "setting",
        meta: { isAllowBack: true },
        component: () => import("pages/Setting.vue")
      }
    ]
  }
其中,meta表示路由元資訊,isAllowBack欄位用於表示是否可以後退,在對應的component頁面渲染的時候通過this.$route.meta.isAllowBack獲取值,然後設定全域性Vuex狀態config/isAllowBack的值。
computed計算屬性
<q-btn
  v-show="isAllowBack === true"
  flat
  dense
  round
  @click="goBack"
  icon="arrow_back_ios"
  aria-label="Back"
>
</q-btn>

computed: {
  isAllowBack: {
    get() {
      return this.$store.state.config.isAllowBack;
    }
  }
}
MainLayout.vue中通過computed計算屬性isAllowBack繫結q-btn,這樣可以控制後退按鈕是否顯示。首頁不需要後退,設定頁面和關於頁面就需要後退。後退按鈕主要目的是適應不同的瀏覽器,不依賴瀏覽器的後退功能,比如H5頁面全螢幕或者嵌入到Cordova殼子裡面的時候就非常有用了。
選單
控制元件
<q-tree
  selected-color="primary"
  :nodes="allMenu"
  :selected.sync="selected"
  @update:selected="onMenuClickAction()"
  ref="qTreeProxy"
  node-key="labelKey"
  default-expand-all
  no-connectors
/>
選單用到了q-tree控制元件,選單的內容是包括固定部分和動態部分。
list: async function(page, rowsPerPage, search, query) {
  var res = await metadataTable.list(page, rowsPerPage, search, query);
  return res.data;
},
其中業務資料是根據表單列表動態顯示的,通過metadataTableService的list方法查詢表單,然後動態渲染。
const tables = await metadataTableService.list(1, 9999);
for (let i = 0; i < tables.length; i++) {
  let table = tables[i];
  this.businessMenu.children.push({
      label: table.caption,
      labelKey: this.getBussinessPath(table.name),
      icon: "insert_chart_outlined"
  });
}

this.allMenu.push(this.businessMenu);
this.allMenu.push(this.metadataMenu);
this.allMenu.push(this.systemMenu);

this.$refs.qTreeProxy.setExpanded("business", true);
this.$refs.qTreeProxy.setExpanded("metadata", true);
this.$refs.qTreeProxy.setExpanded("system", true);方法this.$refs.qTreeProxy.setExpanded可以控制選單展開。
小結
本文主要介紹了巢狀路由和選單功能,用到了router-view和q-tree,然後實現了設定頁面和關於頁面功能。其它選單對應的功能暫時為空,後續會從後設資料選單開始進一步介紹序列號功能。
demo演示
官網地址:https://crudapi.cn
測試地址:https://demo.crudapi.cn/crudapi/login
附原始碼地址
GitHub地址
https://github.com/crudapi/crudapi-admin-web
Gitee地址
https://gitee.com/crudapi/crudapi-admin-web
由於網路原因,GitHub可能速度慢,改成存取Gitee即可,程式碼同步更新。