python+unittest框架 UI自動化設計思路以及程式碼剖析,增加易用性
前言
學習UI自動化的同學都應該知道PO模式,PO共分為三層,分別是頁面定位層,頁面物件層,業務邏輯層。
po模式有以下幾個優點:
1.易讀性好
2.擴充套件性高
3.複用性強
4.維護性好
5.程式碼冗餘率低
前因:讓不會程式碼的同學也能編寫自動化
思考問題:市面上不乏有錄製回放,資料驅動的框架,為什麼還要自己封裝呢
解決問題:封裝能更加貼切自己公司的專案,能更好的進行擴充套件,而且更能展示自身的價值
這裡我就不具體講解selenium基礎方法的封裝了,和PO模式一樣的,沒有做很大的改動
原始碼:https://download.csdn.net/download/qq_36076898/15703276
一.用例設計(Excel)
1.Excel sheet設計

引數說明:用於生成測試資料,資料生成通過tool自動生成。後面會具體講解怎麼使用


定位:所有的元素定位。後面會具體講解怎麼使用

登入資訊設定:環境、賬號的設定。後面會具體講解怎麼使用

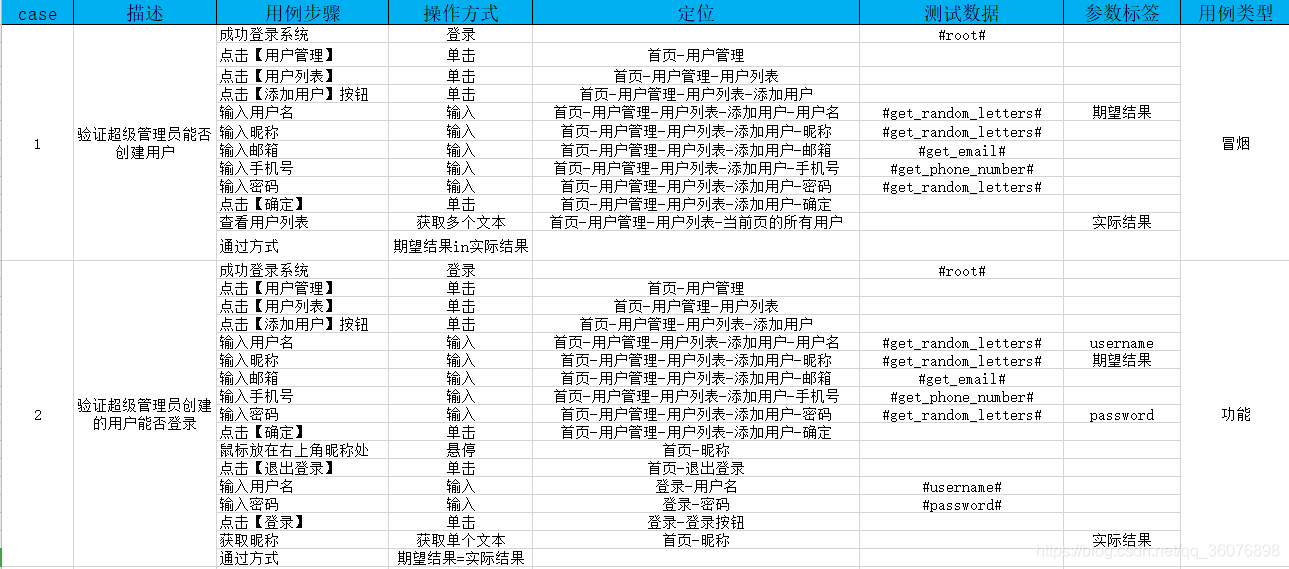
用例:測試用例,我這裡就只寫了個demo。後面會仔細剖析用例

二.程式碼封裝
1.封裝讀取【引數說明】sheet的程式碼
import random
import string
import time
import datetime


class Tool:

    @staticmethod
    def get_random_str(random_length=6):
        """
        生成一個指定長度的隨機字串,數位字母混合
        string.digits=0123456789
        string.ascii_letters=abcdefghigklmnopqrstuvwxyzABCDEFGHIJKLMNOPQRSTUVWXYZ
        """
        str_list = [random.choice(string.digits + string.ascii_letters) for i in range(random_length)]
        random_str = ''.join(str_list)
        return random_str

    @staticmethod
    def get_random_letters(random_length=6):
        """
        生成一個指定長度的隨機字串,純字母
        string.ascii_letters=abcdefghigklmnopqrstuvwxyzABCDEFGHIJKLMNOPQRSTUVWXYZ
        """
        str_list = [random.choice(string.ascii_letters) for i in range(random_length)]
        random_letters = ''.join(str_list)
        return random_letters

    @staticmethod
    def get_time_stamp(unit='s'):
        """
        獲取時間戳
        :param unit: 單位   s 秒,ms 毫秒
        :return:
        """
        data = time.time()
        if unit == 's':
            result = int(data)
        elif unit == 'ms':
            result = int(round(data * 1000))
        else:
            result = data

        return result

    @staticmethod
    def get_date():
        """
        獲取當前時間
        :return:
        """
        result = datetime.datetime.now().strftime('%Y-%m-%d %H:%M:%S')
        return result

    @staticmethod
    def get_phone_number(key=False):
        """
        隨機生成電話號碼
        :param key: 預設生成虛假手機號,True 生成真實手機號
        :return:
        """
        pre_list = ["130", "131", "132", "133", "134", "135", "136", "137", "138", "139",
                    "147", "150", "151", "152", "153", "155", "156", "157", "158", "159",
                    "186", "187", "188", "189"]
        if key:
            result = random.choice(pre_list) + "".join(random.choice("0123456789") for i in range(8))
        else:
            result = random.choice(pre_list) + "".join(random.choice("0123456789") * 4) + "".join(
                random.choice("0123456789") * 4)
        return result

    @staticmethod
    def get_email():
        """生成隨機郵箱"""
        # 用數位0-9 和字母a-z 生成隨機郵箱。
        list_sum = [i for i in range(10)] + ["a", "b", "c", "d", "e", "f", "g", "h", 'i', "j", "k",
                                             "l", "M", "n", "o", "p", "q", "r", "s", "t", "u", "v",
                                             "w", "x", "y", "z"]
        email_str = ""
        # email_suffix = ["@163.com", "@qq.com", "@gmail.com", "@mail.hk.com", "@yahoo.co.id", "mail.com"]
        email_suffix = ["@163.com", "@qq.com"]
        for i in range(10):
            a = str(random.choice(list_sum))
            email_str = email_str + a
        # 隨機拼接不同的郵箱字尾
        return email_str + random.choice(email_suffix)

    @staticmethod
    def get_parameter(data):
        """
        判斷某一條excel資料中書否存在引數,若存在直接替換掉
        :param data:
        :return:
        """
        value = data.replace('#', '')
        if 'get_time_stamp_ms' in value:
            test_data = getattr(Tool, value.replace('_ms', ''))('ms')
        elif 'get_time_stamp_s' in value:
            test_data = getattr(Tool, value.replace('_second', ''))()
        else:
            if hasattr(Tool, value):
                test_data = getattr(Tool, value)()
            else:
                test_data = value

        return test_data


if __name__ == '__main__':
    test = Tool()
    print(test.get_parameter('#get_time_stamp_second#'))
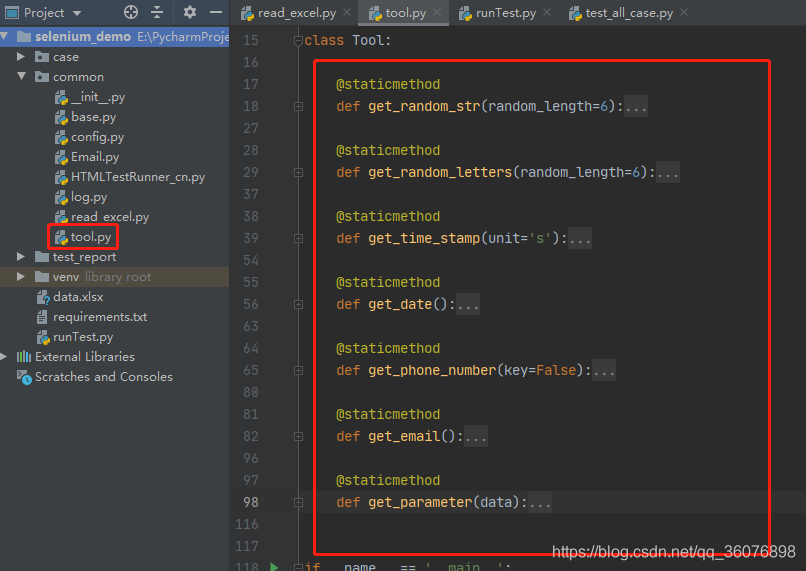
這裡主要講解下get_parameter()方法,其他方法都是生成資料的。get_parameter()方法處理用例中傳的引數,根據傳方法名生成想要的資料。例如:測過程中需要時間格式的資料,那麼在測試用例中就可以填寫:#get_date#
2.封裝讀取【定位】sheet的程式碼
import xlrd
from common.log import Log

log = Log()


class ReadExcel:

    def __init__(self, fileName):
        """
         new_data是最後返回的值
         config.project_path.replace('\\', '/') + "/data.xlsx"
        :param fileName: excel檔名路徑
        """
        self.fileName = fileName
        # 讀取excel資料夾
        self.book = xlrd.open_workbook(self.fileName)

    @staticmethod
    def data_type(test_type, test_value):
        """
        判斷從excel單元格中獲取的資料型別
        1 string(text), 2 number, 3 date, 4 boolean
        :param test_type: 型別
        :param test_value: 值
        :return:
        """
        if test_type == 1:
            """字串"""
            return test_value

        elif test_type == 2:
            if '.0' in str(test_value):
                """整數"""
                return int(test_value)
            else:
                """浮點"""
                return test_value

        elif test_type == 3:
            """日期"""
            date = xlrd.xldate_as_datetime(test_value, 0).strftime('%Y-%m-%d')
            return date

        elif test_type == 4:
            """布林型別"""
            if test_value == 1:
                return True
            elif test_value == 0:
                return False

    def stitching_element(self, sheet_name='定位'):
        """
        讀取excel,處理元素資料
        :param sheet_name:
        :return:
        """
        result = {}
        # 讀取excel
        sheet = self.book.sheet_by_name(sheet_name)
        row_value_one = sheet.row_values(0)  # 第一行
        # 總行數
        row_num = sheet.nrows
        for i in range(1, row_num):
            result[sheet.cell_value(i, row_value_one.index('功能'))] = sheet.cell_value(i, row_value_one.index('元素定位'))
        return result
結果如下:返回字典,【功能】作為key,【元素定位】作為vlaue
{'登入-使用者名稱': '//*[@placeholder="請輸入內容"]', '登入-密碼': '//*[@placeholder="請輸入密碼"]',
             '登入-登入按鈕': '//span[text()=" 登入 "]', '登入-錯誤提示': '//p[text()="使用者名稱或者密碼錯誤"]',
             '首頁-暱稱': '//*[@id="app"]/section/header/div[2]/span', '首頁-退出登入': '//li[text()="退出登入"]',
             '首頁-一級選單': '//li[@role="menuitem"]/div/span', '首頁-使用者管理': '//span[text()="使用者管理"]',
             '首頁-使用者管理-使用者列表': '//li/span[text()="使用者列表"]', '首頁-使用者管理-使用者列表-新增使用者': '//button/span[text()="新增使用者"]',
             '首頁-使用者管理-使用者列表-新增使用者-使用者名稱': '//label[text()="使用者名稱"]/following-sibling::div[1]/div/input',
             '首頁-使用者管理-使用者列表-新增使用者-暱稱': '//label[text()="暱稱"]/following-sibling::div[1]/div/input',
             '首頁-使用者管理-使用者列表-新增使用者-郵箱': '//label[text()="郵箱"]/following-sibling::div[1]/div/input',
             '首頁-使用者管理-使用者列表-新增使用者-手機號': '//label[text()="手機號"]/following-sibling::div[1]/div/input',
             '首頁-使用者管理-使用者列表-新增使用者-密碼': '//label[text()="密碼"]/following-sibling::div[1]/div/input',
             '首頁-使用者管理-使用者列表-新增使用者-確定': '//*[@id="app"]/section/section/main/div/div[4]/div/div[4]/div/div[3]/span/button[2]/span',
             '首頁-使用者管理-使用者列表-當前頁的所有使用者': '//tr/td[2]/div'}
3.封裝讀取【登入資訊設定】sheet的程式碼
import xlrd
from common import config
from common.log import Log

log = Log()


class ReadExcel:

    def __init__(self, fileName):
        """
         new_data是最後返回的值
         config.project_path.replace('\\', '/') + "/data.xlsx"
        :param fileName: excel檔名路徑
        """
        self.fileName = fileName
        # 讀取excel資料夾
        self.book = xlrd.open_workbook(self.fileName)

    @staticmethod
    def data_type(test_type, test_value):
        """
        判斷從excel單元格中獲取的資料型別
        1 string(text), 2 number, 3 date, 4 boolean
        :param test_type: 型別
        :param test_value: 值
        :return:
        """
        if test_type == 1:
            """字串"""
            return test_value

        elif test_type == 2:
            if '.0' in str(test_value):
                """整數"""
                return int(test_value)
            else:
                """浮點"""
                return test_value

        elif test_type == 3:
            """日期"""
            date = xlrd.xldate_as_datetime(test_value, 0).strftime('%Y-%m-%d')
            return date

        elif test_type == 4:
            """布林型別"""
            if test_value == 1:
                return True
            elif test_value == 0:
                return False

    def processing_environment(self, sheet_name='登入資訊設定'):
        """處理環境和賬號"""
        result = {}
        sheet = self.book.sheet_by_name(sheet_name)
        cell_values = sheet.merged_cells
        row_value_one = sheet.row_values(3)
        cell_range = []
        for cell_value in cell_values:
            for i in range(cell_value[0], cell_value[1]):
                for j in range(cell_value[2], cell_value[3]):
                    if '是' == sheet.cell_value(i, j):
                        cell_range.append(cell_value)
                        break
        result['url'] = sheet.cell_value(cell_range[0][0], row_value_one.index('url'))
        for i in range(cell_range[0][0], cell_range[0][1]):
            if i == cell_range[0][0]:
                result['account'] = {
                    "username": sheet.cell_value(i, row_value_one.index('使用者名稱')),
                    "nickname": sheet.cell_value(i, row_value_one.index('暱稱')),
                    "password": self.data_type(2, sheet.cell_value(i, row_value_one.index('密碼')))
                }
            result[sheet.cell_value(i, row_value_one.index('使用者名稱'))] = {
                "nickname": sheet.cell_value(i, row_value_one.index('暱稱')),
                "password": self.data_type(2, sheet.cell_value(i, row_value_one.index('密碼')))
            }
        result['username_text'] = sheet.cell_value(0, 1)
        result['password_text'] = sheet.cell_value(1, 1)
        result['login_button'] = sheet.cell_value(2, 1)
        return result
結果如下:
{
'url': 'http://120.26.48.198/#/login',
'account': {'username': 'test1', 'nickname': '唐雷', 'password': 123456},
'test1': {'nickname': '唐雷', 'password': 123456},
'root': {'nickname': '超級管理員', 'password': 123456},
'username_text': '登入-使用者名稱',
'password_text': '登入-密碼',
'login_button': '登入-登入按鈕'
}
4.封裝讀取【demo】(用例)sheet的程式碼
import xlrd
from common import config
from common.log import Log

log = Log()


class ReadExcel:

    def __init__(self, fileName):
        """
         new_data是最後返回的值
         config.project_path.replace('\\', '/') + "/data.xlsx"
        :param fileName: excel檔名路徑
        """
        self.fileName = fileName
        # 讀取excel資料夾
        self.book = xlrd.open_workbook(self.fileName)

    @staticmethod
    def data_type(test_type, test_value):
        """
        判斷從excel單元格中獲取的資料型別
        1 string(text), 2 number, 3 date, 4 boolean
        :param test_type: 型別
        :param test_value: 值
        :return:
        """
        if test_type == 1:
            """字串"""
            return test_value

        elif test_type == 2:
            if '.0' in str(test_value):
                """整數"""
                return int(test_value)
            else:
                """浮點"""
                return test_value

        elif test_type == 3:
            """日期"""
            date = xlrd.xldate_as_datetime(test_value, 0).strftime('%Y-%m-%d')
            return date

        elif test_type == 4:
            """布林型別"""
            if test_value == 1:
                return True
            elif test_value == 0:
                return False

    def stitching_data(self, case_type='冒煙'):
        """
        讀取excel,處理用例資料
        :return:
        """
        result = []
        # 獲取所有sheet
        sheets = self.book.sheet_names()
        for sheet_name in sheets:
            if sheet_name != '引數說明' and sheet_name != '定位' and sheet_name != '登入資訊設定':
                sheet = self.book.sheet_by_name(sheet_name)
                # 用例數量
                case_num_list = sheet.merged_cells[0:len(sheet.merged_cells) // 3]
                # 獲取第行列資料
                row_value_one = sheet.row_values(0)  # 第一行
                # 處理資料
                for i in case_num_list:
                    tag = sheet.cell_value(i[0], row_value_one.index('用例型別'))
                    if case_type == tag or case_type is True:
                        case = {'description': sheet.cell_value(i[0], row_value_one.index('描述')), 'tag': tag}
                        step = []
                        for j in range(i[0], i[1]):
                            step.append(
                                {'element': sheet.cell_value(j, row_value_one.index('定位')),
                                 'operate': sheet.cell_value(j, row_value_one.index('操作方式')),
                                 'data': sheet.cell_value(j, row_value_one.index('測試資料')),
                                 'result': sheet.cell_value(j, row_value_one.index('引數標籤'))
                                 })
                        case['step'] = step
                        result.append(case)
        return result
[
{'description': '驗證超級管理員能否建立使用者',
 'tag': '冒煙',
 'step': [
 		{'element': '', 'operate': '登入', 'data': '#root#', 'result': ''},
 		{'element': '首頁-使用者管理', 'operate': '單擊', 'data': '', 'result': ''},
 		{'element': '首頁-使用者管理-使用者列表', 'operate': '單擊', 'data': '', 'result': ''}, 		{'element': '首頁-使用者管理-使用者列表-新增使用者', 'operate': '單擊', 'data': '', 'result': ''}, {'element': '首頁-使用者管理-使用者列表-新增使用者-使用者名稱', 'operate': '輸入', 'data': '#get_random_letters#', 'result': '期望結果'},
 		{'element': '首頁-使用者管理-使用者列表-新增使用者-暱稱', 'operate': '輸入', 'data': '#get_random_letters#', 'result': ''},
 		{'element': '首頁-使用者管理-使用者列表-新增使用者-郵箱', 'operate': '輸入', 'data': '#get_email#', 'result': ''},
 		{'element': '首頁-使用者管理-使用者列表-新增使用者-手機號', 'operate': '輸入', 'data': '#get_phone_number#', 'result': ''},
 		{'element': '首頁-使用者管理-使用者列表-新增使用者-密碼', 'operate': '輸入', 'data': '#get_random_letters#', 'result': ''},
 		{'element': '首頁-使用者管理-使用者列表-新增使用者-確定', 'operate': '單擊', 'data': '', 'result': ''},
 		{'element': '首頁-使用者管理-使用者列表-當前頁的所有使用者', 'operate': '獲取多個文字', 'data': '', 'result': '實際結果'},
 		{'element': '', 'operate': '期望結果in實際結果', 'data': '', 'result': ''}]
 		 },

{'description': '驗證超級管理員能否建立使用者',
'tag': '冒煙',
'step': [
		{'element': '', 'operate': '登入', 'data': '#root#', 'result': ''},
		{'element': '首頁-使用者管理', 'operate': '單擊', 'data': '', 'result': ''},
		{'element': '首頁-使用者管理-使用者列表', 'operate': '單擊', 'data': '', 'result': ''},
		{'element': '首頁-使用者管理-使用者列表-新增使用者', 'operate': '單擊', 'data': '', 'result': ''},
		{'element': '首頁-使用者管理-使用者列表-新增使用者-使用者名稱', 'operate': '輸入', 'data': '#get_random_letters#', 'result': '期望結果'},
		{'element': '首頁-使用者管理-使用者列表-新增使用者-暱稱', 'operate': '輸入', 'data': '#get_random_letters#', 'result': ''},
		{'element': '首頁-使用者管理-使用者列表-新增使用者-郵箱', 'operate': '輸入', 'data': '#get_email#', 'result': ''},
		{'element': '首頁-使用者管理-使用者列表-新增使用者-手機號', 'operate': '輸入', 'data': '#get_phone_number#', 'result': ''},
		{'element': '首頁-使用者管理-使用者列表-新增使用者-密碼', 'operate': '輸入', 'data': '#get_random_letters#', 'result': ''},
		{'element': '首頁-使用者管理-使用者列表-新增使用者-確定', 'operate': '單擊', 'data': '', 'result': ''},
		{'element': '首頁-使用者管理-使用者列表-當前頁的所有使用者', 'operate': '獲取多個文字', 'data': '', 'result': '實際結果'},
		{'element': '', 'operate': '期望結果in實際結果', 'data': '', 'result': ''}
		]
		}
]
三.用例剖析以及設計思路講解

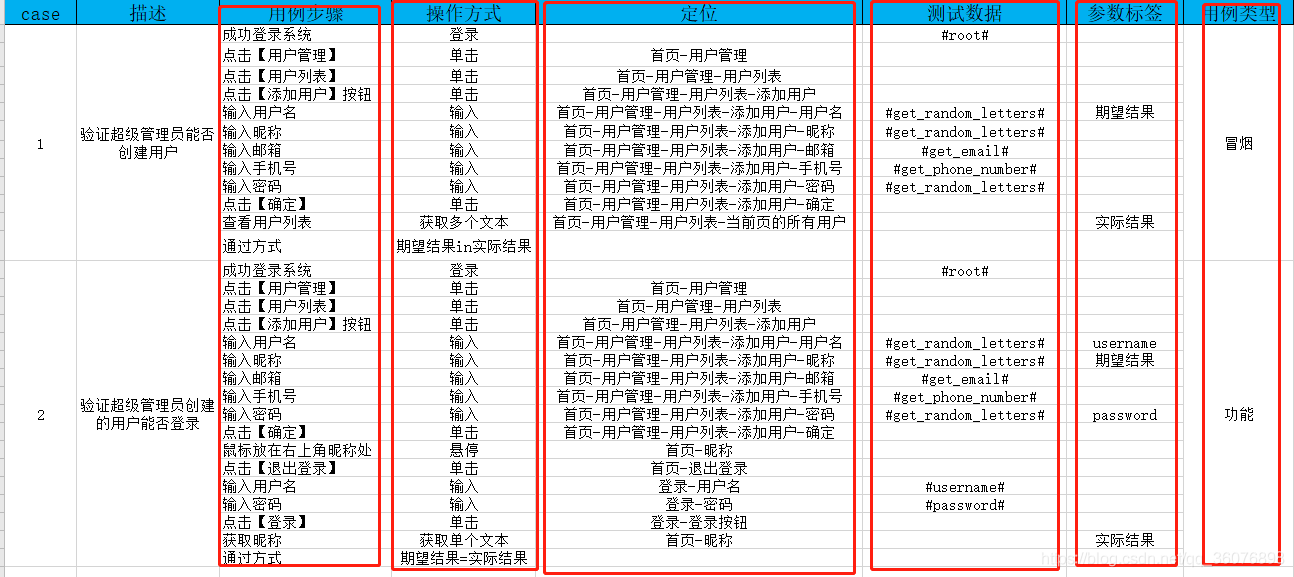
程式碼會自動遍歷獲取所有sheet,【引數說明】【定位】【登入資訊設定】除外,將所獲取到的用例進行資料組裝。

用例步驟:這個應該都會寫,具體到每一步做什麼。最後需要加一步這條用例通過的判斷標準即可
操作方式:對應步驟所作出的操作,比如:單擊、輸入等,主要說一下第一步和最後一步所對應的操作。第一步操作如果是【登入】,操作方式直接填【登入】(這裡登入有三步,輸入使用者名稱、輸入密碼、點選登入,我直接封裝在程式碼裡了,減少excel重複新增。如果有驗證碼,可以自行新增封裝);最後一步通過方式必須按照【期望結果in實際結果】此格式書寫,【期望結果in實際結果】代表期望結果在實際結果中,【期望結果=實際結果】代表期望結果等於實際結果
定位:根據【定位】sheet中【功能】寫
測試資料:某一步驟需要說明資料,直接填寫對應的方法即可,參考【引數說明】sheet;也可直接填寫【引數標籤】裡所需要的引數
引數標籤:主要使用者獲取期望結果、實際結果、後面步驟可能需要之前某個步驟的資料。
用例型別:方便執行指令碼的時候區分執行那類用例
import ddt
import unittest
from common.log import Log
from common.read_excel import ReadExcel
from common.base import Base
from common.tool import Tool
from runTest import run_parser

tool = Tool()
log = Log()
case_info = run_parser()
read_excel = ReadExcel(case_info['file_name'])
case = case_info['case']
login_info = read_excel.processing_environment()


@ddt.ddt
class TestAllCase(unittest.TestCase):

    @classmethod
    def setUpClass(cls) -> None:
        log.info('<------------------用例執行開始------------------>')

    def setUp(self) -> None:
        self.case_name = self._testMethodName  # 獲取執行當前用例的 方法名
        self.case = Base()
        log.info('--------開始{}用例--------'.format(self.case_name))

    def tearDown(self) -> None:
        self.case.quit()
        log.info('--------結束{}用例--------\n'.format(self.case_name))

    @classmethod
    def tearDownClass(cls) -> None:
        log.info('<------------------用例執行結束------------------>')

    @ddt.data(*case)
    def test_speed(self, data):
        log.info(data['description'])
        test_data = {}  # 測試過程中需要的資料
        desired_result = []  # 期望結果
        actual_result = []  # 實際結果
        for i in data['step']:
            if i['operate'] == '登入':
                # 登入
                self.case.open(login_info['url'])
                if i['data'] == '':
                    self.case.send_keys(element=login_info['username_text'],
                                        text=login_info['account']['username'])
                    self.case.send_keys(element=login_info['password_text'],
                                        text=login_info['account']['password'])
                else:
                    self.case.send_keys(element=login_info['username_text'],
                                        text=i['data'].replace('#', ''))
                    self.case.send_keys(element=login_info['password_text'],
                                        text=login_info[i['data'].replace('#', '')]['password'])
                self.case.click(element=login_info['login_button'])

            elif '期望結果' in i['operate'] or '實際結果' in i['operate']:
                # 斷言
                log.info("期望結果:{}".format(desired_result[0]))
                log.info("實際結果:{}".format(actual_result[0]))
                if '=' in i['operate']:
                    self.assertEqual(desired_result[0], actual_result[0])
                elif 'in' in i['operate']:
                    self.assertTrue(desired_result[0] in actual_result[0])

            else:
                # 其他操作
                if i['operate'] == '單擊':
                    self.case.click(element=i['element'])

                elif i['operate'] == '輸入':
                    input_data = tool.get_parameter(i['data'])
                    if input_data in test_data.keys():
                        self.case.send_keys(element=i['element'], text=test_data[input_data])
                    else:
                        self.case.send_keys(element=i['element'], text=input_data)
                        if i['result'] != '' and i['result'] != '期望結果':
                            # 將複用的引數加入
                            test_data[i['result']] = input_data
                        elif i['result'] == '期望結果':
                            # 將期望結果加入
                            desired_result.append(input_data)

                elif i['operate'] == '獲取多個文字':
                    actual_result.append(self.case.get_texts(element=i['element']))

                elif i['operate'] == '獲取單個文字':
                    actual_result.append(self.case.get_text(element=i['element']))

                elif i['operate'] == '懸停':
                    self.case.mouse_flight(element=i['element'])
四.批次執行生成報告
import sys
import unittest
import os

sys.path.append('../')
from common.log import Log
from common import config
from common.HTMLTestRunner_cn import HTMLTestRunner
from common.Email import SendMail
from common.read_excel import ReadExcel
import argparse

log = Log()
send_report_path = config.send_report_path
reportTitle = config.reportTitle
description = config.description


def run_parser():
    """引數執行"""
    parser = argparse.ArgumentParser(description='通過cmd傳入引數執行')
    parser.add_argument('-t', '--case', default=True, help='用例型別')
    parser.add_argument('-f', '--fileName', default=config.project_path.replace('\\', '/') + "/data.xlsx", help='用例型別')
    args_case = parser.parse_args()
    case_type = args_case.case
    file_name = args_case.fileName
    read_excel = ReadExcel(fileName=file_name)
    case_info = read_excel.stitching_data(case_type)
    return {'case': case_info, "file_name": file_name}


def add_case():
    """載入所有的測試用例"""
    # test_suite = unittest.defaultTestLoader.discover(start_dir=path, pattern=pattern, top_level_dir=None)
    test_cases = unittest.TestSuite()
    discover = unittest.defaultTestLoader.discover(start_dir=config.case_path, pattern='test*.py')
    for test_suite in discover:
        for test_case in test_suite:
            # 新增用例到test_cases
            test_cases.addTests(test_case)

    log.info('測試用例總數:{}'.format(test_cases._tests.__len__()))
    return test_cases


def run_html(test_suit):
    """執行測試用例,生成報告"""
    # 判斷儲存報告的路徑是否存在
    if os.path.exists(config.report_path) is False:
        os.makedirs(config.report_path)
    with open(send_report_path, 'wb') as f:
        runner = HTMLTestRunner(stream=f, title=reportTitle,
                                description=description,
                                verbosity=2, retry=1, save_last_try=True)
        runner.run(test_suit)
    SendMail().send()


def run():
    """執行"""
    # 執行命令:python runTest.py  -c 功能 -f excel檔案路徑
    cases = add_case()
    run_html(cases)


if __name__ == '__main__':
    run()
1.命令執行指定型別用例
python runTest.py -t 冒煙 -f C:\Users\admin\Desktop\data.xlsx
-t:用例型別
-f:excel路徑
上面命令含義:讀取C:\Users\admin\Desktop\data.xlsx用例,執行冒煙測試用例
2.命令所有型別用例
預設執行全部用例
python runTest.py -f C:\Users\admin\Desktop\data.xlsx
五.偵錯用例
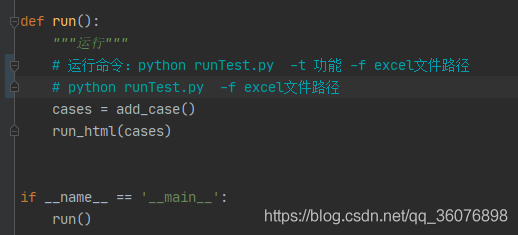
1.將用例裡的任務型別隨便寫一個關鍵字:test

2.將run檔案裡的程式碼作出相應修改

3.執行run()方法

後言
以上就是我的設計思路,如若有什麼問題歡迎給位留言!目前只封裝了幾個常見的操作,後面若需要其他操作的時候再封裝!