【圖文】使用 WSL + VSCode 搭建 ESP32/ESP32-S2 開發環境
文章目錄
什麼是 WSL ?
有了 WSL ,使用者既能使用 Windows 桌面環境,又能使用更強大的 Linux 終端工具
WSL(Windows Subsystem for Linux):WSL 是執行在 Windows 上的 GNU/Linux 環境,Linux 程式無需修改即可在 Windows 上執行,包括大多數命令列工具、實用程式和應用程式,沒有傳統虛擬機器器或雙引導設定的開銷。
只支援 Windows 10 Version 1903 或更高版本
WSL2 提升了檔案系統效能
WSL2 升級了 WSL 的軟體架構,支援在 Windows 上直接執行 ELF64 Linux 二進位制檔案。它的優點是提高了檔案系統效能(2-5 倍提升),以及增加整個系統呼叫的相容性。
| Feature | WSL1 | WSL 2 |
|---|---|---|
| 整合 Windows 和 Linux | ✅ | ✅ |
| 快速啟動 | ✅ | ✅ |
| 極小資源佔用 | ✅ | ✅ |
| 不干擾VMware和VirtualBox的執行 | ✅ | ✅ |
| 管理 VM | ❌ | ✅ |
| 完整的 Linux 核心 | ❌ | ✅ |
| 全系統呼叫相容性 | ❌ | ✅ |
| 跨作業系統檔案系統的效能 | ✅ | ❌ |
WSL 官方檔案:https://docs.microsoft.com/en-us/windows/wsl/
1. 啟用 WSL
方法 1:在啟用或關閉 Windows 功能中,勾選「適用於 Linux 的 Windows 子系統」 (Windows Subsystem for Linux),然後按照提示重新啟動電腦。
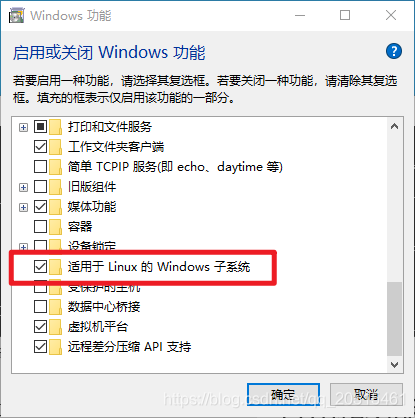
方法 2(推薦):可以通過命令列指令開啟,管理員模式進入 powershell ,然後執行:
dism.exe /online /enable-feature /featurename:Microsoft-Windows-Subsystem-Linux /all /norestart
有些電腦可能提示安裝 Linux kernel update package,下載安裝即可
如何切換 WSL 版本 ?
如果需要切換 WSL 版本,可通過命令列 wsl --set-version <distribution name> <versionNumber> 進行切換,例如將 Ubuntu-18.04 版本切換為 WSL2:
wsl --set-version Ubuntu-18.04 2
是否要切換取決於你的應用場景,如果需要使用 USB 和串列埠,可以暫時使用 WSL1,目前 WSL2 還不支援操作 USB 和串列埠(2020.09)。
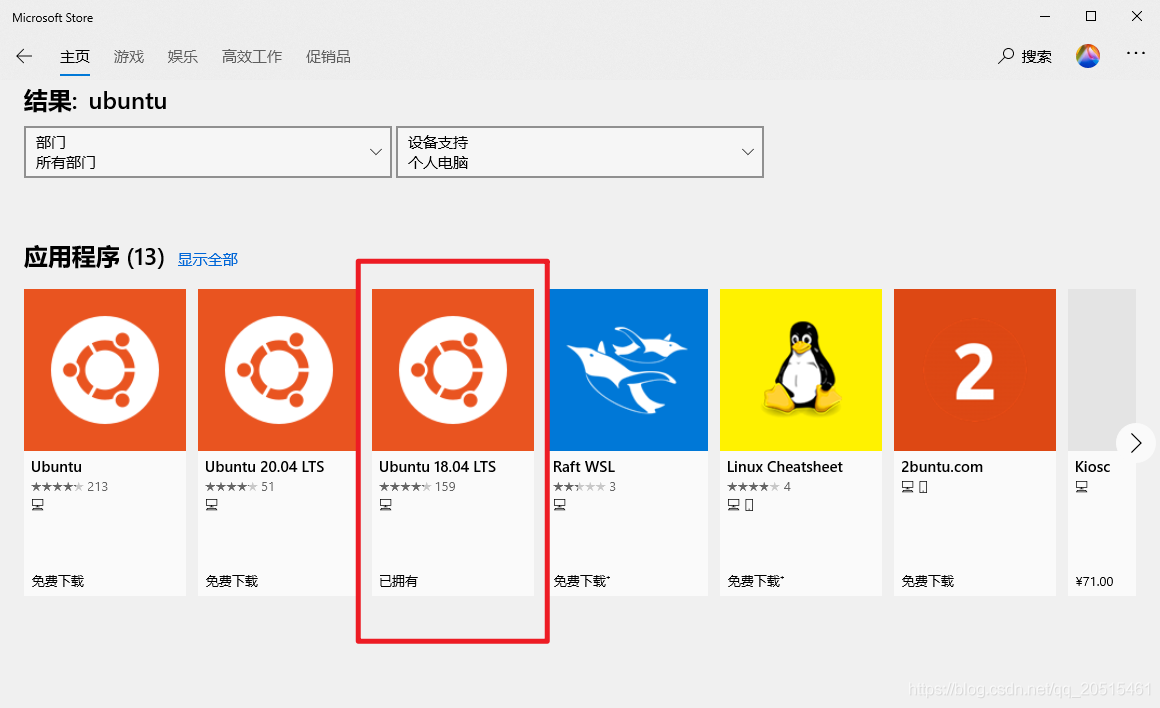
2. 選擇並安裝一個 Linux 發行版
這裡建議選擇 ubuntu 18.04,直接在 Microsoft 應用商店搜尋並安裝:
應用安裝好以後,可以直接執行:

預設只有終端,也可以手動安裝 Ubuntu 的圖形介面,但是並不建議。
3. 克隆 ESP-IDF 程式碼倉庫
方法 1:從 github 下載,可以直接克隆主倉庫和子倉庫:
git clone --recursive https://github.com/espressif/esp-idf.git
方法 2(推薦):從國內映象 gitee 下載,需要使用以下操作:
-
下載子倉庫重定向工具
esp-gitee-toolsgit clone https://gitee.com/EspressifSystems/esp-gitee-tools.git -
克隆主倉庫程式碼
git clone https://gitee.com/EspressifSystems/esp-idf.git -
克隆重定向後的子倉庫程式碼
cd esp-gitee-tools
export EGT_PATH=$(pwd)
cd .. cd esp-idf $EGT_PATH/submodule-update.sh
官方 gitee 操作指南,請參考:submodule-update
4. 安裝 ESP-IDF 工具鏈
-
將預設 python 切換為 python3 (可選步驟,推薦)
1.1 修改 ubuntu 源到國內映象:cd /etc/apt/ sudo cp sources.list sources.list.bak sudo vim sources.list刪除該檔案全部內容,貼上以下內容並儲存:
deb http://mirrors.aliyun.com/ubuntu/ bionic main restricted universe multiverse
deb http://mirrors.aliyun.com/ubuntu/ bionic-security main restricted universe multiverse
deb http://mirrors.aliyun.com/ubuntu/ bionic-updates main restricted universe multiverse
deb http://mirrors.aliyun.com/ubuntu/ bionic-proposed main restricted universe multiverse
deb http://mirrors.aliyun.com/ubuntu/ bionic-backports main restricted universe multiverse
deb-src http://mirrors.aliyun.com/ubuntu/ bionic main restricted universe multiverse
deb-src http://mirrors.aliyun.com/ubuntu/ bionic-security main restricted universe multiverse
deb-src http://mirrors.aliyun.com/ubuntu/ bionic-updates main restricted universe multiverse
deb-src http://mirrors.aliyun.com/ubuntu/ bionic-proposed main restricted universe multiverse
deb-src http://mirrors.aliyun.com/ubuntu/ bionic-backports main restricted universe multiverse
1.2 安裝 python3 :
sudo apt-get install python3 python3-pip python3-setuptools1.3 將 python 預設切換為 python3:
sudo update-alternatives --install /usr/bin/python python /usr/bin/python3 10 -
將 pip 源更換到國內映象(可選步驟,推薦)
方法 1 :pip 版本 >= 10.0.0,可以使用以下方式:
pip --version
pip config set global.index-url http://mirrors.aliyun.com/pypi/simple
pip config set global.trusted-host mirrors.aliyun.com
方法 2(通用):可以建立並修改組態檔
~/.pip/pip.conf:mkdir ~/.pip vim ~/.pip/pip.conf將下面內容新增到檔案並儲存:
[global] index-url = http://mirrors.aliyun.com/pypi/simple [install] trusted-host = mirrors.aliyun.com -
安裝依賴
在終端輸入以下指令,安裝依賴工具:
sudo apt-get install git wget flex bison gperf python python-pip python-setuptools cmake ninja-build ccache libffi-dev libssl-dev dfu-util進入 esp-idf 目錄,安裝 Python 依賴包:(該步驟可忽略,後續 install.sh 會預設安裝)
cd esp-idf pip3 install -r requirements.txt -
安裝編譯工具鏈
方法 1 :從預設路徑下載並安裝工具鏈
./install.sh方法 2(推薦) :從國內映象下載並安裝工具鏈,需要使用以下操作:
cd esp-gitee-tools
export EGT_PATH=$(pwd)
cd .. cd esp-idf $EGT_PATH/install.sh
5. 安裝 VSCode WSL 外掛
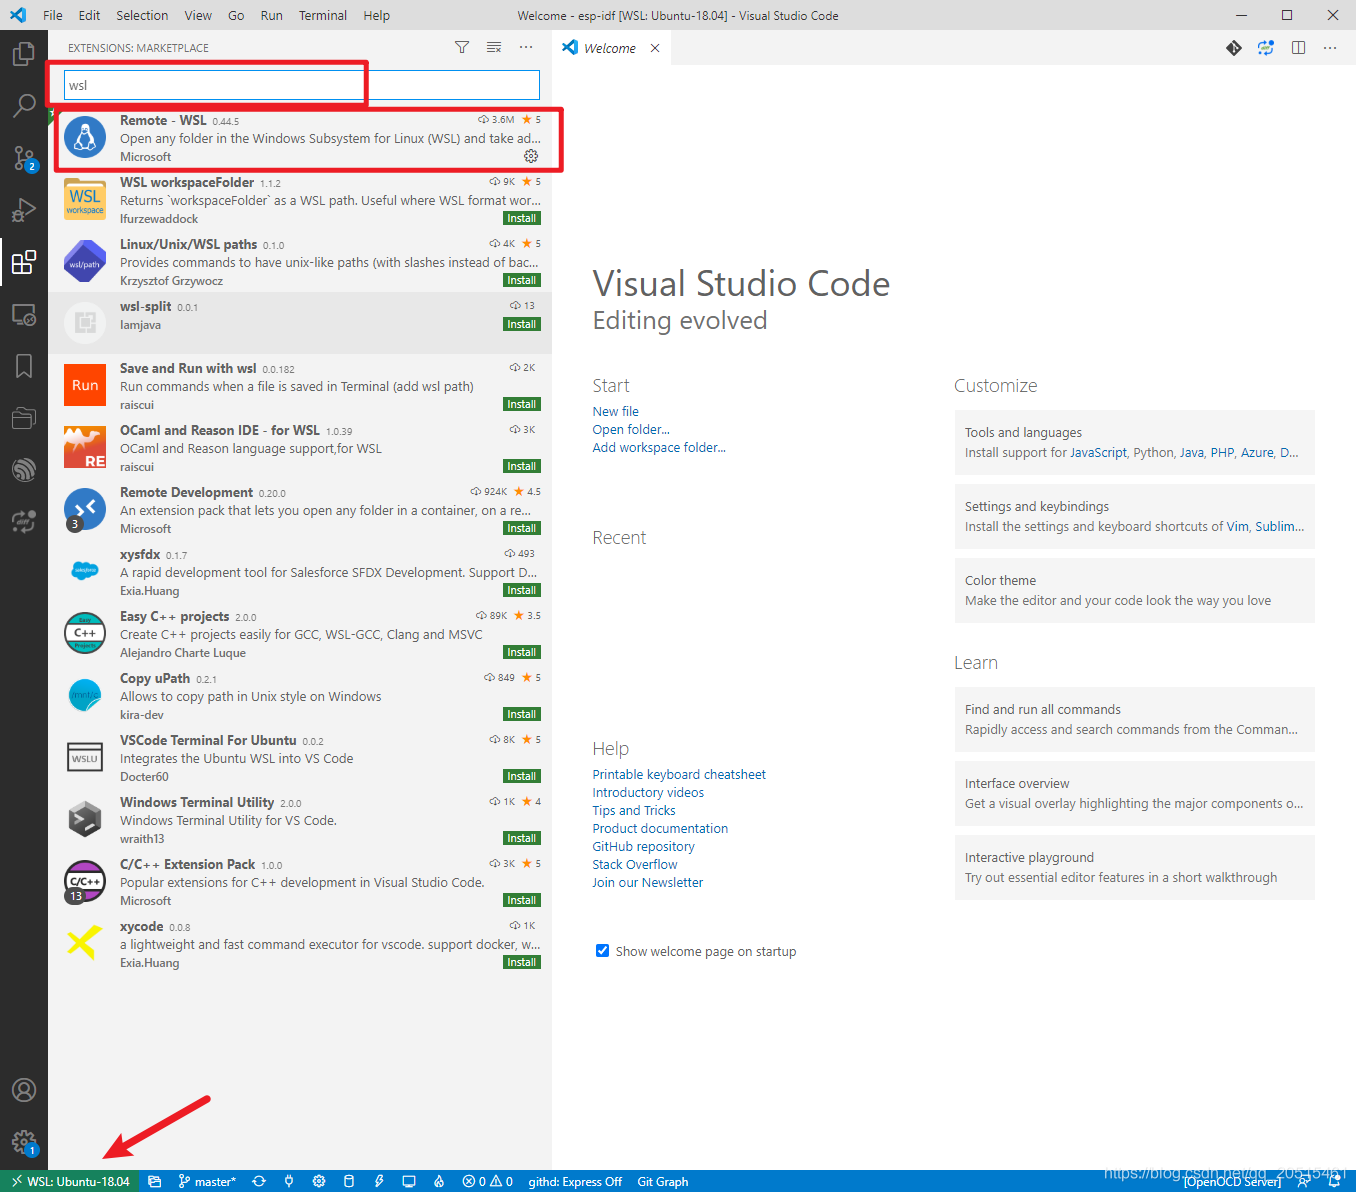
如果從 WSL 啟動 VSCode,一般會自動安裝外掛,之後就能直接在 VSCode 中使用 Linux 的終端編譯程式啦!!
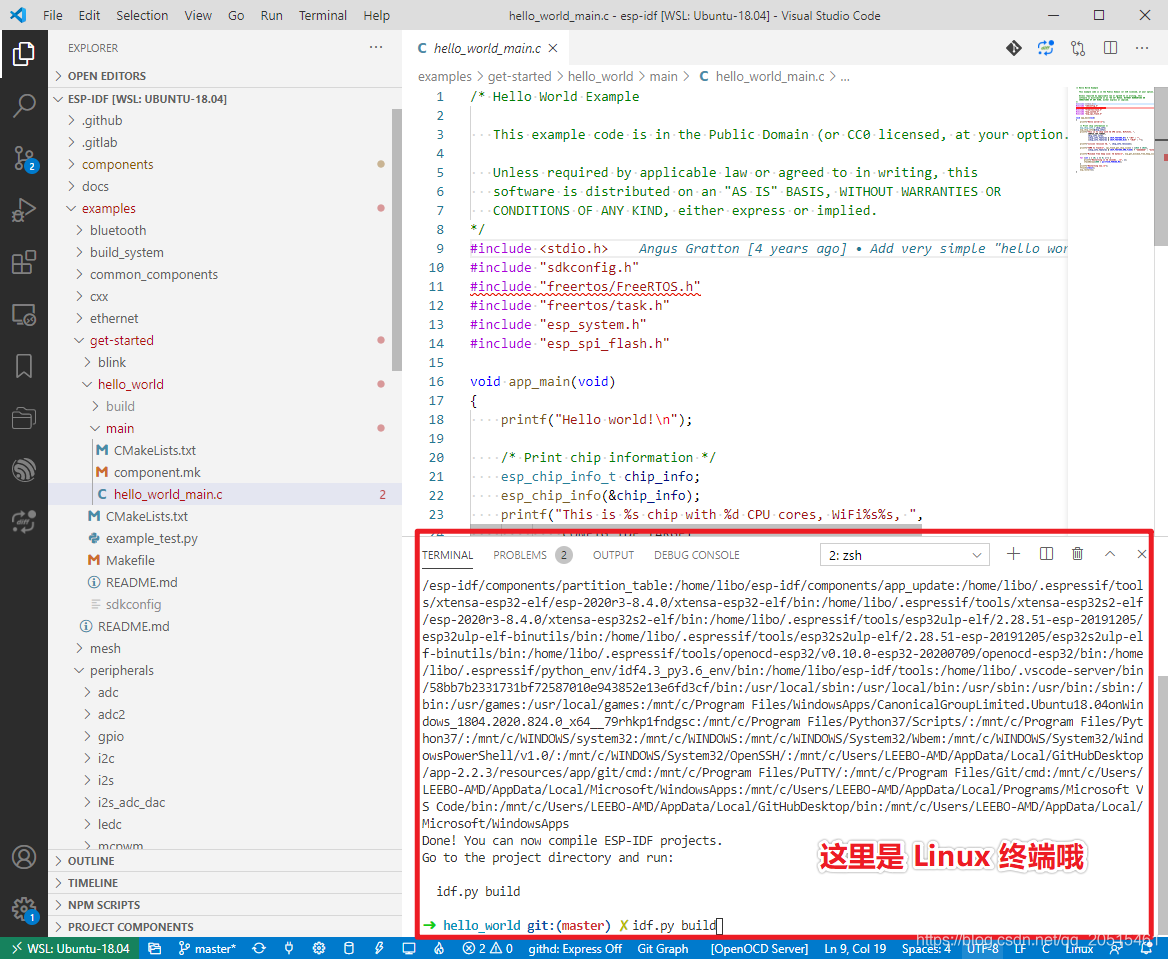
6. 編譯範例程式
新增環境變數:
. $HOME/esp-idf/export.sh
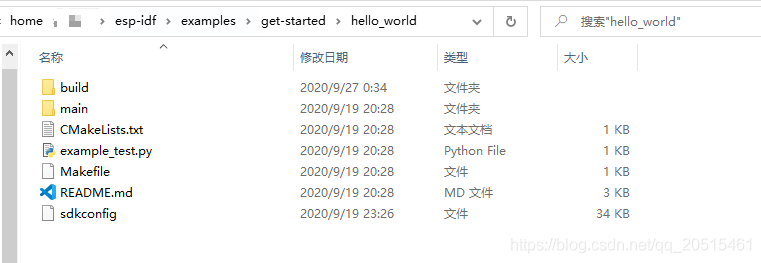
進入 helloworld 範例程式:
cd ~/esp-idf/examples/get-started/hello_world/
直接在終端輸入:
idf.py build

編譯成功!!
7. 下載程式
方法 1 : 直接在 WSL 終端只用 idf.py flash(目前僅限 WSL1)
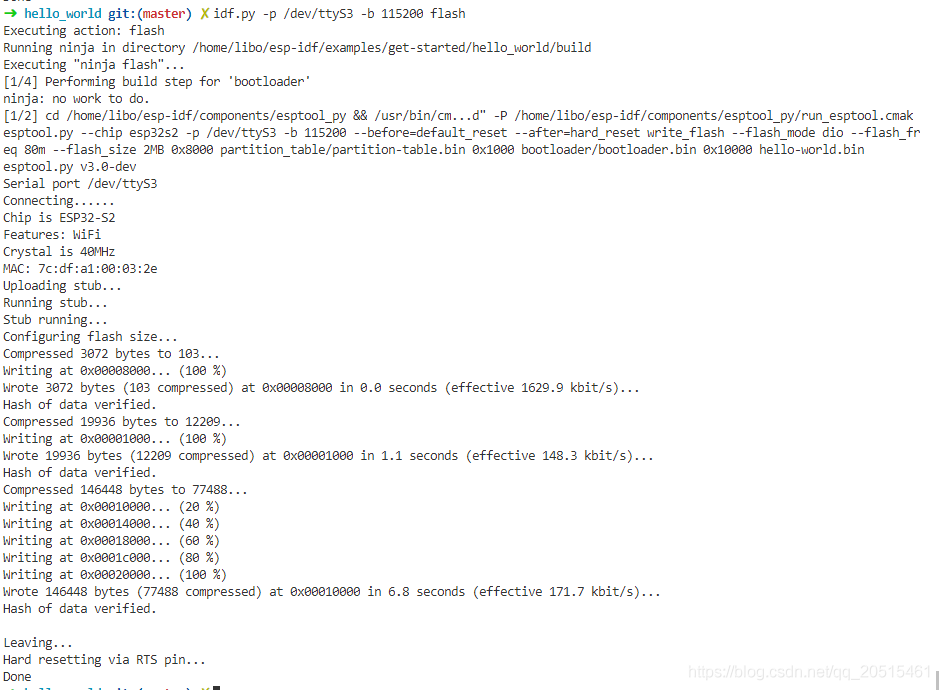
WSL1 可直接存取串列埠下載程式,需要注意的是,如果你的串列埠號在 Windows 上顯示為 COM3,那麼在 wsl 下載程式時,需要對應修改為 /dev/ttyS3,直接使用以下命令下載:
idf.py -p /dev/ttyS3 -b 115200 flash
終端顯示下載過程:
部分電腦可能遇到的問題:CP2102 USB 轉串列埠晶片導致不能下載的問題
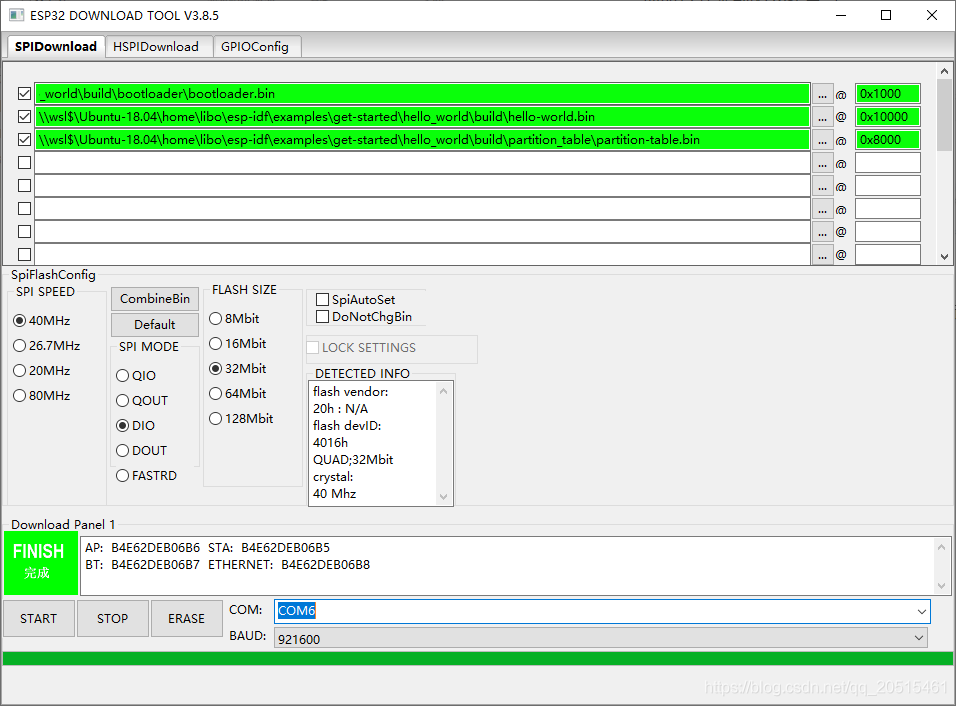
方法 2 : 使用 Flash Download Tools 下載 (WSL2 推薦使用)
注意:截止到 2020.09 月,WSL2 還不支援存取 usb 和 串列埠,Windows 燒錄工具下載:Flash Download Tools
在 wsl 終端輸入explorer.exe .,即可使用 Windows 上的檔案管理器開啟當前的 wsl 目錄
explorer.exe .
使用 Flash Download Tools 輸入 bin 的路徑和地址進行下載
8. Hello world !
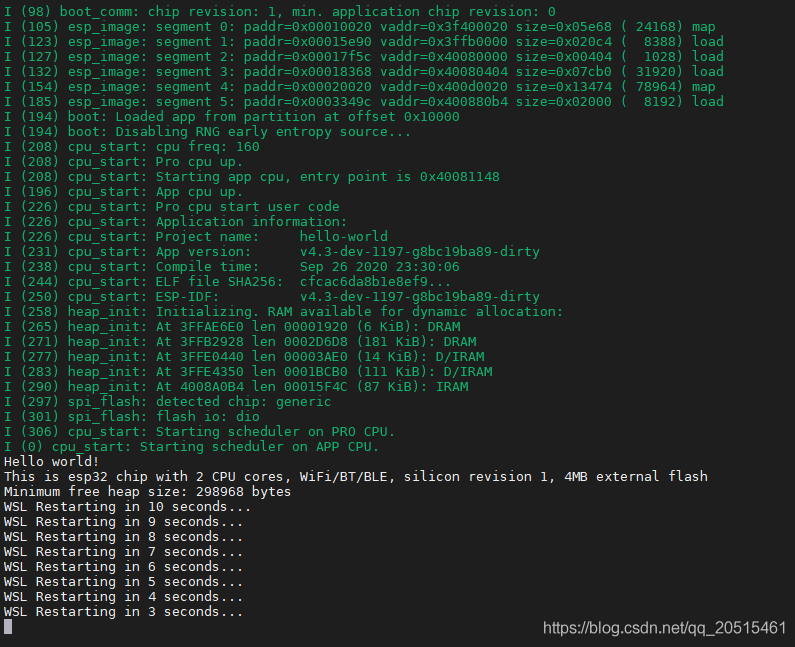
方法 1 : 直接在 WSL 終端只用 idf.py monitor(目前僅限 WSL1)
WSL1 可直接存取串列埠下載程式,需要注意的是,如果你的串列埠號在 Windows 上顯示為 COM3,那麼在 wsl 下載程式時,需要對應修改為 /dev/ttyS3,直接使用以下命令下載並列印:
idf.py -p /dev/ttyS3 -b 115200 monitor
方法 2(通用) : 使用任意 Windows 串列埠工具(WSL2 推薦使用)
設定埠號 COMX,波特率 115200,直接開啟即可顯示: