Android & Kotlin:Retrofit + Hilt 實現 看妹子app
2020-09-15 13:00:20
今天來學習一下android網路資料的存取,以及使用hilt dagger進行元件注入的實現。
0.效果展示

1. 依賴
使用到的技術棧:
- Android studio 4.01
- fragment
- Retrofit
- Lifecycle
- Kotlin Coroutines
- Hilt
- Room
- Navigation
- Glide
- Timber
完整dependencies如下:
dependencies {
    implementation fileTree(dir: 'libs', include: ['*.jar'])
    implementation"org.jetbrains.kotlin:kotlin-stdlib-jdk7:$kotlin_version"
    implementation 'androidx.appcompat:appcompat:1.2.0'
    implementation 'androidx.core:core-ktx:1.3.1'
    implementation 'androidx.constraintlayout:constraintlayout:2.0.1'
    testImplementation 'junit:junit:4.12'
    androidTestImplementation 'androidx.test:runner:1.3.0'
    androidTestImplementation 'androidx.test.espresso:espresso-core:3.3.0'

    // fragment
    implementation 'androidx.fragment:fragment-ktx:1.2.5'

    //Retrofit
    implementation 'com.squareup.retrofit2:retrofit:2.9.0'
    implementation 'com.squareup.retrofit2:converter-gson:2.9.0'

    //Lifecycle
    def lifecycle_version = "2.2.0"
    implementation "androidx.lifecycle:lifecycle-viewmodel-ktx:$lifecycle_version"
    implementation "androidx.lifecycle:lifecycle-livedata-ktx:$lifecycle_version"
    implementation "androidx.lifecycle:lifecycle-common-java8:$lifecycle_version"
    implementation "androidx.lifecycle:lifecycle-extensions:$lifecycle_version"
    //noinspection LifecycleAnnotationProcessorWithJava8
    kapt "androidx.lifecycle:lifecycle-compiler:$lifecycle_version"

    //Kotlin Coroutines
    def coroutines_android_version = '1.3.9'
    implementation "org.jetbrains.kotlinx:kotlinx-coroutines-core:$coroutines_android_version"
    implementation "org.jetbrains.kotlinx:kotlinx-coroutines-android:$coroutines_android_version"

    //Hilt 依賴注入
    implementation 'com.google.dagger:hilt-android:2.28.1-alpha'
    implementation "androidx.hilt:hilt-lifecycle-viewmodel:1.0.0-alpha02"
    kapt 'com.google.dagger:hilt-android-compiler:2.28.1-alpha'
    kapt "androidx.hilt:hilt-compiler:1.0.0-alpha02"

    //Room
    def room_version = "2.2.5"
    implementation "androidx.room:room-runtime:$room_version"
    implementation "androidx.room:room-ktx:$room_version"
    kapt "androidx.room:room-compiler:$room_version"

    //Navigation
    def nav_version = "2.3.0"
    implementation "androidx.navigation:navigation-fragment-ktx:$nav_version"
    implementation "androidx.navigation:navigation-ui-ktx:$nav_version"

    //Glide 圖片處理
    implementation 'com.github.bumptech.glide:glide:4.11.0'
    kapt 'com.github.bumptech.glide:compiler:4.11.0'

    //Timber
    implementation 'com.jakewharton.timber:timber:4.7.1'
}
2 主要實現
- 通過Navigation實現Fragment 之間資料傳遞
- Hilt 實現依賴注入
- 存取資料實現網路本地存取策略
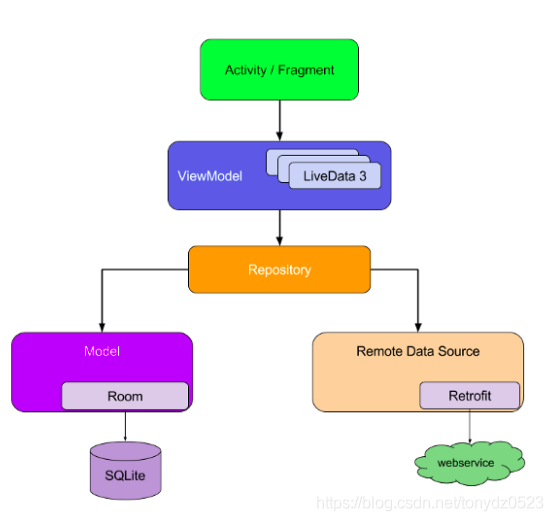
3. 資料服務
分為兩部分:
- 網路資料remote
- 本地資料local
沒有資料的話網路請求,並將資料放入android的sqlite資料庫,再次請求的時候檢視本地資料庫中是否存在資料如果存在的話就直接在本地獲取,如果不存在從網路獲取。
3.1 資料來源
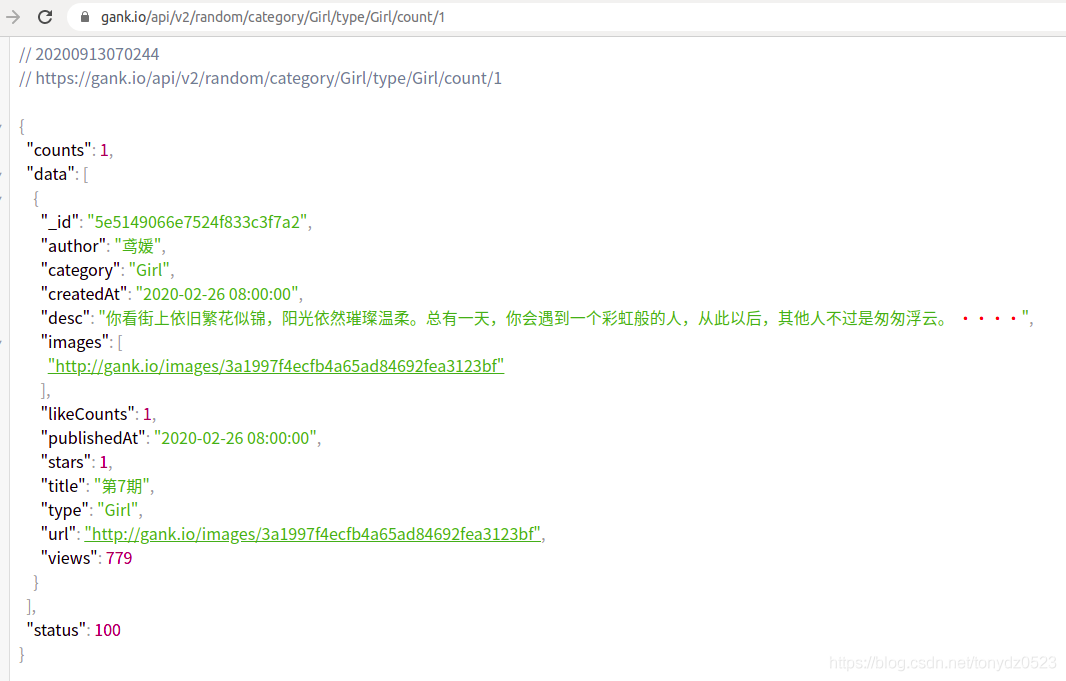
資料來源: 幹活集中營的api,api可以獲取一些技術乾貨,也有一些福利妹子圖片,本篇主要使用獲取妹子圖片這一部分
-
看一下api內容:
-
通過api內容寫entity檔案,獲取自己需要的欄位
/**
 * @author: ffzs
 * @Date: 2020/9/12 下午3:23
 */
@Entity(tableName = "image_data_table")
data class Image (
    @PrimaryKey
    val _id:String,
    val author:String,
    var url:String,
    val title:String,
    val desc:String,
    val likeCounts:Long,
    val views:Long,
)
- 同時建立一個接收類,我們只需要獲取response中的data:
/**
 * @author: ffzs
 * @Date: 20-9-12 下午8:15
 */

data class ImageList(
    val data:List<Image>
)
3.2 網路獲取資料
- 設定Retrofit

- api介面獲取20個小姐姐和一個小姐姐

- 獲取資料並進行封裝為Resource邏輯,Response中資料->Resource
- 由於獲取的圖片網址為http協定,需要換成https不然無法跳轉
protected suspend fun <T> getResult(call: suspend () -> Response<T>): Resource<T> {
    try {
        val response = call()
        if (response.isSuccessful) {
            val body = response.body()
            body as ImageList
            // 將api獲取的圖片資訊中http換為https不然無法完成跳轉
            body.data.map {
                it.url = it.url.replace("http://", "https://")
            }
            Timber.i(body.toString())
            return Resource.success(body)
        }
        return error(" ${response.code()} ${response.message()}")
    } catch (e: Exception) {
        return error(e.message ?: e.toString())
    }
}
3.3 本地資料獲取
本地使用Room完成對sqlite的操作,主要有功能實現如下:
- 網路獲取資料快取到本地, 需要進行插入處理
- 獲取資料優先本地快取中獲取,並通過views進行排序
/**
 * @author: ffzs
 * @Date: 2020/9/12 下午3:28
 */
@Dao
interface ImageDao {

    @Query("SELECT * FROM image_data_table ORDER BY views DESC")
    fun getAllImages() : LiveData<List<Image>>

    @Query("SELECT * FROM image_data_table WHERE _id = :id")
    fun getImage(id: String): LiveData<Image>

    @Insert(onConflict = OnConflictStrategy.REPLACE)
    suspend fun insertAll(image_data_table: List<Image>)

    @Insert(onConflict = OnConflictStrategy.REPLACE)
    suspend fun insert(image: Image)
}
- Room Database設定
- 要加上
fallbackToDestructiveMigration()不處理Migration的話升級版本會報錯
/**
 * @author: ffzs
 * @Date: 2020/9/12 下午3:27
 */

@Database(entities = [Image::class], version = 4)
abstract class ImageDatabase :RoomDatabase(){
    abstract val imageDao: ImageDao

    companion object {
        @Volatile private var instance: ImageDatabase? = null

        fun getDatabase(context: Context): ImageDatabase =
            instance ?: synchronized(this) { instance ?: getInstance(context).also { instance = it } }

        private fun getInstance(appContext: Context) =
            Room.databaseBuilder(appContext, ImageDatabase::class.java, "image_data_table")
                .fallbackToDestructiveMigration()
                .build()
    }
}
3.4 獲取資料
這裡編寫一個策略處理網路獲取和本地獲取的邏輯:
- 本地獲取成功,使用原生的,不成功網路獲取並儲存到本地
- 這裡傳入的是三個方法
fun <T, A> performGetOperation(databaseQuery: () -> LiveData<T>,
                               networkCall: suspend () -> Resource<A>,
                               saveCallResult: suspend (A) -> Unit): LiveData<Resource<T>> =
    liveData(Dispatchers.IO) {
        emit(Resource.loading())
        val source = databaseQuery.invoke().map { Resource.success(it) }
        emitSource(source)

        val responseStatus = networkCall.invoke()
        if (responseStatus.status == SUCCESS) {
            saveCallResult(responseStatus.data!!)

        } else if (responseStatus.status == ERROR) {
            emit(Resource.error(responseStatus.message!!))
            emitSource(source)
        }
    }
- 通過Repository統一編寫處理邏輯
fun getImages() = performGetOperation(
    databaseQuery = { localDataSource.getAllImages() },
    networkCall = { webDataSource.getImages() },
    saveCallResult = { localDataSource.insertAll(it.data) }
)
4. Hilt 依賴注入
兩部分:
- Hilt 啟動類
- Hilt 元件
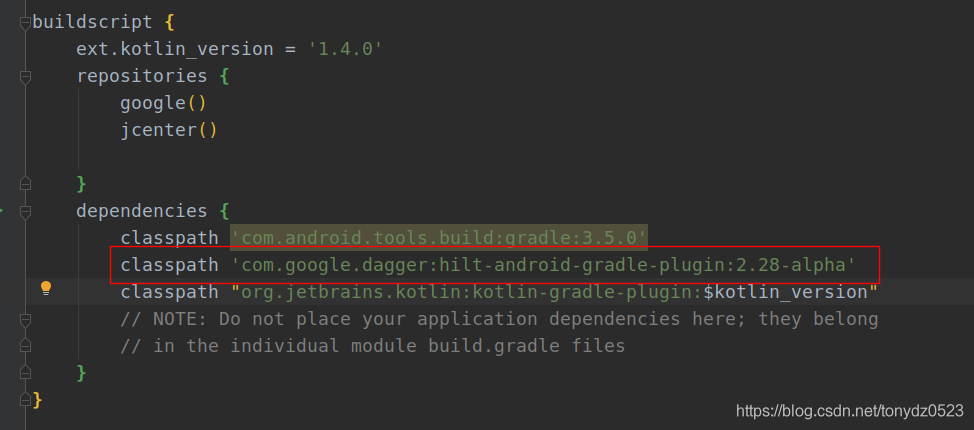
啟用外掛需要將classpath新增到依賴中
4.1 Hilt 啟動類
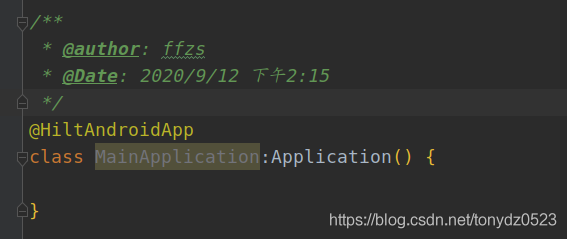
我們首先在根資料夾中建立一個從Application繼承的類,以對其進行註釋,以告知我們將在應用程式中使用Hilt。該類為Application類
當有了Application, 我們可以講其他Android類中的啟動成員注入,使用@AndroidEntryPoints註釋。
@AndroidEntryPoint在以下型別上使用:
- Activity
- Fragment
- View
- Service
- BroadcastReceiver

4.2 Hilt 元件注入
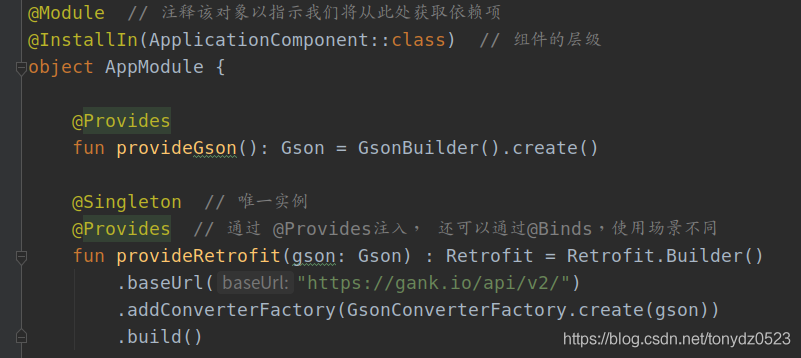
使用 @Provides 注入
您可以告知 Hilt 如何提供此型別的範例,方法是在 Hilt 模組內建立一個函數,並使用 @Provides 為該函數新增註釋。
帶有註釋的函數會向 Hilt 提供以下資訊:
- 函數返回型別會告知 Hilt 函數提供哪個型別的範例。
- 函數引數會告知 Hilt 相應型別的依賴項。
- 函數主體會告知 Hilt 如何提供相應型別的範例。每當需要提供該型別的範例時,Hilt 都會執行函數主體。
5. Fragment操作
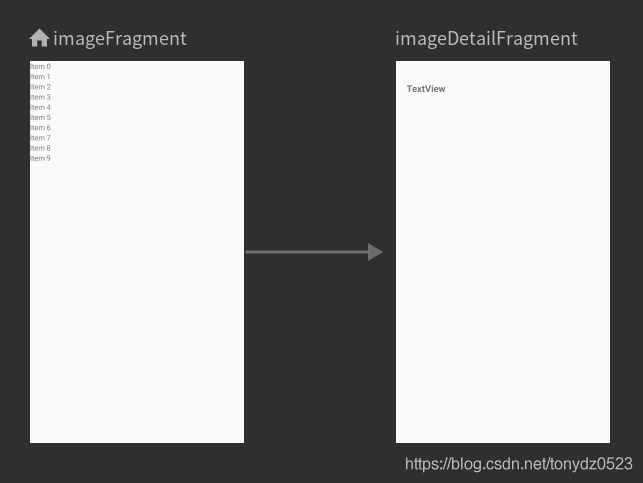
通過Fragment以及navigation完成介面的切換
5.1 src/main/res/navigation/nav_graph.xml:
- main中通過
FragmentContainerView繫結到navigation - navigation實現兩個介面的繫結
- 通過一個action進行切換
- 切換的同時將list中的id進行傳遞,detail中獲取id後存取資料庫獲取資料進行展示
<?xml version="1.0" encoding="utf-8"?>
<navigation xmlns:android="http://schemas.android.com/apk/res/android"
            xmlns:app="http://schemas.android.com/apk/res-auto"
            xmlns:tools="http://schemas.android.com/tools"
            android:id="@+id/nav_graph"
            app:startDestination="@id/imageFragment"
>

    <fragment
            android:id="@+id/imageFragment"
            android:name="com.ffzs.imageapp.ui.images.ImageFragment"
            android:label="Images"
            tools:layout="@layout/image_fragment" >
        <action
                android:id="@+id/action_imageFragment_to_imageDetailFragment"
                app:destination="@id/imageDetailFragment" />

    </fragment>
    <fragment
            android:id="@+id/imageDetailFragment"
            android:name="com.ffzs.imageapp.ui.imagesDetail.ImageDetailFragment"
            android:label="Image Detail"
            tools:layout="@layout/image_detail_fragment" />
</navigation>
5.2 點選後觸發onClickedImage
- 通過ImageViewHolder繼承View.OnClickListener,點選後觸發onClick

5.2 傳入id

5.3 獲取id

6.debug
6.1 @AndroidEntryPoint to have a value. Did you forget to apply the Gradle Plugin?

6.2 java.lang.IllegalStateException: A migration from 1 to 2 is necessary. Please provide a Migration in the builder or call fallbackToDestructiveMigration in the builder in which case Room will re-create all of the tables.
