在 Vue 中使用 TypeScript(以及 RealWorld使用)
在 Vue 中使用 TypeScript(以及 RealWorld使用)
學習原因
- 關於 TypeScript 相關資源和資訊越來越多
- 已經有越來越多的基於 JS 來寫的專案,使用 TS 來編寫。
- 框架
- npm 包
- TS 未來可能會成爲一個技能標配
- 語法
- 專案實戰經驗
建立支援 TypeScript 的 Vue 專案
- 通過 Vue CLI 建立 支援 TS 的 Vue 專案
- 在一個已有的 Vue 專案中設定 TypeScript 支援
通過 Vue CLI 建立
$ vue create vue-ts

? Please pick a preset: Manually select features

# 這一步把 TypeScript 勾選上即可,其它功能根據自己需要進行選擇
# CSS Pre-processors - CSS 前處理器(如:SCSS LESS)
? Check the features needed for your project: Babel, TS, Router, Vuex, Linter

# 選擇了 TS 後會詢問,是否使用 class 的語法風格定義元件(React中的定義方式)
# 如果你喜歡使用 class 的方式定義元件,則輸入 Yes,不喜歡的話就 No
? Use class-style component syntax? Yes

# 是否使用 Babel 編譯 TS 語法
# TypeScript 本身就有編譯功能,預設會把 JavaScript 程式碼轉換爲 ECMAScript 3 版本相容的程式碼
# 如果你需要現代模式、自動檢測 polyfill、轉換 JSX 語法等功能,則建議開啓這個選項
# 當選擇以後,TypeScript 本身只會把程式碼轉爲 ESNext,也就是最新版的 ECMAScript 規範
# 然後由 Babel 把 ECMAScript 轉換爲低版本 JavaScript,例如 ECMAScript 5,以及自動檢測 polyfill、轉換 JSX 等功能
# 說白了就是讓 TypeScript 轉換和 Babel 轉換相結合起來一起使用
? Use Babel alongside TypeScript (required for modern mode, auto-detected polyfills, transpiling JSX)? Yes

? Use history mode for router? (Requires proper server setup for index fallback in production) No

# 根據需要選擇 校驗風格
# TSLint(deprecated) 已經備註了不建議選擇
? Pick a linter / formatter config: Standard

# 選擇校驗的時機(程式碼儲存的時候,程式碼提交的時候)
# 建議都選上,更嚴謹
? Pick additional lint features: Lint on save, Lint and fix on commit

? Where do you prefer placing config for Babel, ESLint, etc.? In dedicated config files

? Save this as a preset for future projects? No
npm 包
{
  "dependencies": {
    // 這兩個是支援用class編寫元件的
    "vue-class-component": "^7.2.3",
    "vue-property-decorator": "^8.4.2",
  },
  "devDependencies": {
    // eslint 校驗TS程式碼規範,不建議使用 tslint
    "@typescript-eslint/eslint-plugin": "^2.33.0",
    "@typescript-eslint/parser": "^2.33.0",
    "@vue/eslint-config-typescript": "^5.0.2",
    // vue cli 幫助打包構建 .ts 檔案 的外掛
    "@vue/cli-plugin-typescript": "~4.5.0",
    // ts
    "typescript": "~3.9.3",
  },
}
TS 組態檔 tsconfig.json
通常情況下不需要對這些設定進行更改。
{
  // 設定選項
  "compilerOptions": {
    "target": "esnext",
    "module": "esnext",
    "strict": true,
    "jsx": "preserve",
    "importHelpers": true,
    "moduleResolution": "node",
    "experimentalDecorators": true,
    "skipLibCheck": true,
    "esModuleInterop": true,
    "allowSyntheticDefaultImports": true,
    "sourceMap": true,
    "baseUrl": ".",
    "types": [
      "webpack-env"
    ],
    "paths": {
      "@/*": [
        "src/*"
      ]
    },
    "lib": [
      "esnext",
      "dom",
      "dom.iterable",
      "scripthost"
    ]
  },
  // include 指定需要被編譯的檔案
  "include": [
    "src/**/*.ts",
    "src/**/*.tsx",
    "src/**/*.vue",
    "tests/**/*.ts",
    "tests/**/*.tsx"
  ],
  // exclude 排除不需要被編譯的檔案
  "exclude": [
    "node_modules"
  ]
}
ESLint 組態檔 .eslintrc.js
它預設用來校驗 JS 程式碼規範。
module.exports = {
  root: true,
  env: {
    node: true
  },
  extends: [
    'plugin:vue/essential',
    // 在vue中校驗standard風格程式碼規範
    '@vue/standard',
    // 在vue中校驗typescript風格程式碼規範
    '@vue/typescript/recommended'
  ],
  parserOptions: {
    ecmaVersion: 2020
  },
  rules: {
    'no-console': process.env.NODE_ENV === 'production' ? 'warn' : 'off',
    'no-debugger': process.env.NODE_ENV === 'production' ? 'warn' : 'off'
  }
}
src 原始碼
- .js 檔案都變爲了 .ts 檔案
- src 根目錄多了兩個 .d.ts 檔案(shims-tsx.d.ts、shims-vue.d.ts)
- shims-tsx.d.ts
- 主要是方便你使用在 ts 中使用 jsx 語法的,如果不使用 jsx 語法,可以無視
- shims-vue.d.ts
- 主要用於 TS 識別.vue 檔案,TS 預設並不支援匯入 vue 檔案,這個檔案告訴 TS 匯入.vue 檔案都按
VueConstructor<Vue>處理- 這樣設定可以實現快速跳轉到引入的檔案
- 但是這樣會衍生兩個問題
- 匯入vue檔案必須寫 .vue 後綴
- 就算匯入的 .vue 檔案路徑錯誤,靜態檢測也不會檢測到錯誤,滑鼠放到錯誤路徑上會看到全部指向
*.vue,正確的就會顯示真實路徑。
- 主要用於 TS 識別.vue 檔案,TS 預設並不支援匯入 vue 檔案,這個檔案告訴 TS 匯入.vue 檔案都按
- shims-tsx.d.ts
錯誤路徑:

正確路徑:

- components/HelloWorld.vue 單檔案元件中,使用了 ts 語法 編寫指令碼
- 並且使用了 class 的方式編寫(建立專案時選擇的)
<!-- lang="ts" 把script中的內容當作 TypeScript 對待 -->
<script lang="ts">
  // 通過這些成員,定義Vue元件
import { Component, Prop, Vue } from 'vue-property-decorator'

  // @ 是裝飾器語法,不建議用
@Component
export default class HelloWorld extends Vue {
  @Prop() private msg!: string;
}
</script>
已有的Vue專案中支援 TypeScript
使用 @Vue/cli 安裝 TypeScript 外掛:
vue add @vue/typescript
? Use class-style component syntax? Yes

? Use Babel alongside TypeScript (required for modern mode, auto-detected polyfills, transpiling JSX)? Yes

# 是否需要把所有 .js 檔案轉換爲 .ts 資源
# 不建議使用,轉換的過程會修改已有的 .js 資原始碼,可能會帶來問題,建議手動啓用 TypeScript 之後手動把 .js 處理爲 .ts
? Convert all .js files to .ts? No

# 是否允許編譯 .js 檔案模組,不建議開啓,既然選擇了 TypeScript,就最好全部更換爲 TypeScript,而不要兩者混搭,反而變得不倫不類
? Allow .js files to be compiled? No
安裝後項目中增加的內容和 Vue CLI 建立專案中增加的內容差不多。
定義元件的方式
常規方式 直接導出選項物件
在不支援 TS 的環境中:
<script>
export default {
  name: 'Foo',
  data() {
    return {}
  },
  created: 100
}
</script>
這種方式,只有在執行期間才知道定義的選項格式是否正確。
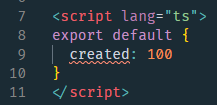
例如 程式碼中的 created 應該是一個函數型別,此時隨便定義一個數字,並不會提示錯誤。
指定使用 TS 指令碼後,TS 和 Vetur 外掛就會顯式智慧提示,created 型別錯誤
Options APIs 使用 Vue.extend / Vue.component 定義
在使用TS語法時,通過 Vue.extend / Vue.component (下面 下麪只以Vue.extend爲例)建立元件。
- 需要引入 Vue
import Vue from 'vue' - 內部定義的方式和常規方式一樣
<script lang="ts">
// Options APIs
import Vue from 'vue'
export default Vue.extend({
  name: 'Foo',
  data () {
    return {
      message: 'Hello world'
    }
  }
})
</script>
使用 Vue.extend 的原因
- 常規方式是直接導出一個物件。
- 此時 TypeScript 無法推斷出對應的型別
- 所以必須使用呼叫 Vue 方法的方式,宣告選項物件的型別,確保 TypeScript 能夠有正常的型別推斷
- 後面使用類的方式定義元件,通過繼承 Vue 建立 class,也是爲了向TS宣告類的型別
import Vue from 'vue'
const Component = Vue.extend({
  // 型別推斷已啓用
})

const Component = {
  // 這裏不會有型別推斷,
  // 因爲 TypeScript 不能確認這是 Vue 元件的選項
}
外掛智慧提示 & 編譯提示
// Foo.vue 範例程式碼1
<script lang="ts">
export default {
  created: 123 // created 應該是函數型別
}
</script>

// Foo.vue 範例程式碼2
<script lang="ts">
import Vue from 'vue'
export default Vue.extend({
  created: 123 // created 應該是函數型別
})
</script>
在 vscode 中如果安裝了外掛 vetur,就會在開發時,實時校驗並智慧提示型別錯誤。
.vue 後綴的檔案中,設定了 ts 指令碼型別(lang=「ts」),不使用 vue.extend 外掛也會進行型別推斷並提示,如 「常規方式」中的圖示。
而官方講的使用 Vue.extend 纔可以正確推斷型別,指的是編譯階段。
禁用外掛 vetur,就取消了編輯器的識別 .vue 檔案的程式碼高亮和型別推斷功能。
不論使用 範例1 還是 範例2 的程式碼,編輯器都不會提示 created 型別錯誤。
此時打包或編譯專案,區別就體現出來了:
- 範例程式碼1 會在 編譯到
src/router/index.ts檔案時,校驗到路由元件中使用了 Foo 元件,進而校驗到 Foo 元件中的 created 型別錯誤。- 結果定位到的是父級元件,需要主動繼續定位
- 當前專案是 Vue CLI 建立的,所以最終還是會被校驗出來。
- 如果是在已有專案中增加支援TS的情況,可能編譯階段就會因爲沒有在 Foo.vue 檔案中校驗出錯誤,導致編譯成功,這樣就只能在瀏覽頁面(也就是執行時)纔會在控制檯看到報錯。

- 範例程式碼2 會在編譯到
Foo.vue檔案時,立即校驗到錯誤。- 可以快速定位,在編譯時發現錯誤。

以上是爲了區分爲什麼要使用 Vue.extend 定義元件。
它的目的是可以在編譯階段正確推斷型別,而不用等到執行階段。
編輯器的vetur外掛也會進行推斷,容易混淆對這個目的的理解。
編輯器還有其他很多校驗錯誤,但是不影響編譯甚至執行的情況,這裏只需要知道,爲了使用TS的型別推斷功能,要使用 Vue.extend 或 下面 下麪基於 class 的定義方式就可以了。
.ts 檔案中使用型別推斷
編寫 Vue 元件不一定使用 .vue 格式的檔案,也可以使用 .js 或 .ts,最終導出一個建構函式或元件選項物件。
這可能也是要求使用 Vue.extend 的另一個解釋。
嘗試使用 .ts 檔案編寫元件,擺脫 vetur 的影響:
import Vue from 'vue'

const Bar = {
  name: 'Bar',
  render (h: any) {
    return h('div', 'hello bar')
  },
  created: 123
}

// export default Bar // 編譯到父元件時報錯

export default Vue.extend(Bar) // 編譯當前檔案時報錯
Class APIs 基於類的Vue元件定義
上面使用 Vue.extend 方法,元件內部採用原生的 vue 寫法。
如果您在宣告元件時更喜歡基於類的 API,則可以使用官方維護的 vue-class-component 裝飾器
官方並沒有表態哪種方式更高階,選擇只取決於編碼習慣(類似React)。
在 TypeScript 下,Vue 的元件可以使用一個繼承自 Vue 型別的子類表示。
- 需要引入 Vue
import Vue from 'vue'
- 需要引入 Component
import Component from 'vue-class-component'
- 導出的類繼承自 Vue
- 使用 @Component (類的裝飾器)註冊
- 裝飾器是一個函數,用於擴充套件類
- 可以呼叫它,接收的參數就是元件的選項物件
- 也可以不呼叫它,只用來宣告
- 如果不使用裝飾器標識,在chrome瀏覽器Vue外掛中看不到元件的選項資訊
- 裝飾器是一個函數,用於擴充套件類
- 可以在類的內部直接定義 data、 methods、 computed(使用getter/setter)、生命週期函數
- 其他特性例如 components、props、filters、directives 等,需要使用裝飾器參數傳入。
- 使用 class 風格的元件宣告方式,並沒有特別的好處,只是提供給開發者多種編碼風格的選擇性。
// Class APIs
import Vue from 'vue'
import Component from 'vue-class-component' // 官方庫

// props 使用,要先建立一個範例,然後讓元件繼承它
const FooProps = Vue.extend({
  props: {
    propMessage: String
  }
})

// 宣告並導出一個繼承自Vue的類
// 類名:元件的 name
// @Component 修飾符註明了此類爲一個 Vue 元件

// 不呼叫方式
// @Component
// export default class Foo extends Vue {
//   // ...
// }

// 呼叫方式
@Component({
  // 所有的元件選項都可以放在這裏
  // data、methods、computed、hooks 以外的選項必須在這裏定義
  // props 要使用範例繼承實現
  data () {
    return {
      count: 100
    }
  }
})
export default class Foo extends FooProps {
  // 在這裏可以直接宣告範例的data、methods、computed、hooks
  // 其他所有選項,需在裝飾器函數Component(options)中定義:components、props等

  // data:初始化 data 的成員
  msg = 'world'

  // 使用 prop 初始化的 data 的成員(注意props的定義方式)
  helloMsg = 'Hello, ' + this.propMessage

  // hooks:勾點函數
  mounted () {
    this.say()
  }

  // computed:通過get 和 set 將計算的屬性宣告爲類屬性存取器
  get computedMsg () {
    return 'computed ' + this.msg
  }

  // methods:直接定義方法
  say () {
    console.log('Hello ' + this.msg)
  }
}
vue-class-component 在使用 props 時稍顯麻煩,需要在外面建立定義了props的範例,然後讓元件繼承它。
可以使用 vue-property-decorator 的 @Prop 裝飾器更方便的在類內部定義。
裝飾器
裝飾器 使 ES 草案中的一個新特性,提供一中更好的面向切面變成(AOP)的體驗,不過這個草案最近(當前2020年)有可能發生重大調整,所以暫不推薦使用。
Class APIs + vue-property-decorator
vue-property-decorator 不是Vue 官方的庫,完全依賴於vue-class-component。
在 vue-class-component 的基礎上擴充套件,並且提供了很多裝飾器比如 @Prop和@Watch等,可以更方便的使用 class 的方式定義元件。
import { Vue, Component, Prop } from 'vue-property-decorator'

@Component
export default class Property extends Vue {
  @Prop(String) readonly text: string | undefined

  msg = 'This is ' + this.text
}
總結
推薦使用 Options APIs 方式。
- 上面幾種方式實現的結果都是一樣的。
- Vue 本身不強制使用 class 方式定義元件選項,使用 Options APIs 更簡單。
- class 方式定義的範例成員都在類的內部直接定義,Options APIs 中定義選項,是分類放置,看起來更清晰更集中
- 變數放在 data 中
- 方法放在 methods 中
- 計算屬性放在 computed 中
- 等
- class 的方式需要用到裝飾器(@Component)
- 裝飾器語法目前還不穩定,目前還沒有正式發版(當前2020年),草案變動也很大
- 所以,建議正式發版後使用,當前不建議使用裝飾器結合類的方式定義元件。
- 其實 Vue.js 3.0 早期是想要放棄 Class APIs 的,不過無奈想要相容,所以才保留下來了。
RealWorld
介紹
RealWorld 用於瞭解如何使用我們支援的任何前端技術(React,Vue等)和後端技術(Node,Go等)構建完全相同的案例(Medium.com,稱爲Conduit))。
它是個萬能案例,提供了頁面模板、免費的遵循相同的API規範的數據介面。
學習框架或技術後,通過實現 RealWorld 案例的實踐,加深對學習內容的瞭解。
使用方法
-
Fork our starter kit - Fork RealWorld 的入門模板
-
FRONTEND_INSTRUCTIONS - 前端使用說明
- 數據介面
- 介面基礎路徑: https://conduit.productionready.io/api
- 介面文件
- 路由
- 樣式
- 佈局 HTML 模板
- Header 頭部
- Footer 尾部
- 頁面 HTML 模板
- Home 首頁
- Login/Register 登錄註冊頁面
- Profile 使用者頁面
- Settings 設定頁面
- Create/Edit Article 建立編輯文章頁面
- Article 文章詳情頁面
- 數據介面
-
然後手動建立這些HTML模板的檔案,呼叫提供的介面,實現案例中的功能。
體驗 TypeScript
使用 RealWorld 模板進行初始設定
先將 RealWorld 的模板複製到頁面中:
- /public/indexhtml 中複製 Header 中的樣式引入 link
<!DOCTYPE html>
<html lang="en">
  <head>
    <meta charset="utf-8">
    <meta http-equiv="X-UA-Compatible" content="IE=edge">
    <meta name="viewport" content="width=device-width,initial-scale=1.0">
    <link rel="icon" href="<%= BASE_URL %>favicon.ico">
    <title><%= htmlWebpackPlugin.options.title %></title>

    <!-- RealWorld -->
    <!-- Import Ionicon icons & Google Fonts our Bootstrap theme relies on -->
    <link href="//code.ionicframework.com/ionicons/2.0.1/css/ionicons.min.css" rel="stylesheet" type="text/css">
    <link href="//fonts.googleapis.com/css?family=Titillium+Web:700|Source+Serif+Pro:400,700|Merriweather+Sans:400,700|Source+Sans+Pro:400,300,600,700,300italic,400italic,600italic,700italic" rel="stylesheet" type="text/css">
    <!-- Import the custom Bootstrap 4 theme from our hosted CDN -->
    <link rel="stylesheet" href="//demo.productionready.io/main.css">
  </head>
  <body>
    <noscript>
      <strong>We're sorry but <%= htmlWebpackPlugin.options.title %> doesn't work properly without JavaScript enabled. Please enable it to continue.</strong>
    </noscript>
    <div id="app"></div>
    <!-- built files will be auto injected -->
  </body>
</html>
- views 建立 layout/index.vue,內部定義佈局元件
- script 使用 ts 編寫
- 複製 Header 中的 nav 頭部導航欄
- 中間是子路由出口 router-view
- 複製 Footer 模板內容
<template>
<div>
<!-- 頭部導航欄 -->
<nav class="navbar navbar-light">
<div class="container">
<a class="navbar-brand" href="index.html">conduit</a>
<ul class="nav navbar-nav pull-xs-right">
<li class="nav-item">
<!-- Add "active" class when you're on that page" -->
<a class="nav-link active" href="">Home</a>
</li>
<li class="nav-item">
<a class="nav-link" href="">
<i class="ion-compose"></i> New Post
</a>
</li>
<li class="nav-item">
<a class="nav-link" href="">
<i class="ion-gear-a"></i> Settings
</a>
</li>
<li class="nav-item">
<a class="nav-link" href="">Sign up</a>
</li>
</ul>
</div>
</nav>
<!-- 子路由出口 -->
<router-view />
<!-- 底部內容 -->
<footer>
<div class="container">
<a href="/" class="logo-font">conduit</a>
<span class="attribution">
An interactive learning project from
<a href="https://thinkster.io">Thinkster</a>. Code & design
licensed under MIT.
</span>
</div>
</footer>
</div>
</template>
<script lang="ts">
import Vue from 'vue'
export default Vue.extend({
name: 'layout'
})
</script>
<style></style>
建立首頁、註冊/登錄頁,同layout類似。
清空 App.vue:
<template>
  <div id="app">
    <router-view/>
  </div>
</template>

<style></style>
修改路由設定:
import Vue from 'vue'
import VueRouter, { RouteConfig } from 'vue-router'

Vue.use(VueRouter)

const routes: Array<RouteConfig> = [
  {
    path: '/',
    component: () => import('@/views/layout/index.vue'),
    children: [
      {
        path: '', // 預設子路由
        name: 'home',
        component: () => import('@/views/home/index.vue')
      },
      {
        path: 'login',
        name: 'login',
        component: () => import('@/views/login/index.vue')
      }
    ]
  }
]

const router = new VueRouter({
  mode: 'history',
  base: process.env.BASE_URL,
  routes
})

export default router
現在可以執行檢視效果:npm run serve
vscode 自定義程式碼段
vscode 提供程式碼段快速建立模板。
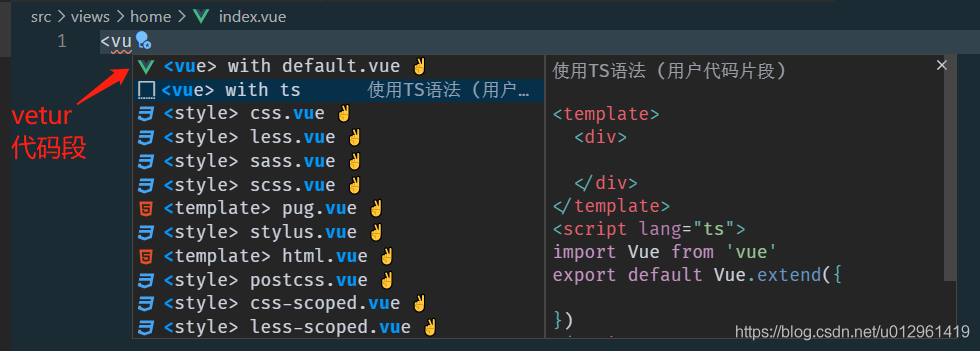
vetur 提供了vue的自定義程式碼段,但是當前使用TS,每次還要修改 script 標籤及內容。
建立使用 TS 的 Vue 模板程式碼段:
- F1 顯示所有命令,搜尋 snippets(偏好設定:設定使用者程式碼片段)
- 選擇對應的語言(Vue),打開了vue.json
{
  // [key]:程式碼段的名稱 - 每個程式碼段都在名稱下定義
	// prefix:字首 - 觸發程式碼段的入口,使用時輸入它會有智慧感知提示
	// body:正文 - 程式碼段的主體,需要設定的程式碼放在這裏
	//       字串之間換行使用\r\n換行符隔開
	//       多行語句也可以使用字串陣列方式
	//       注意:如果值裡包含特殊字元需要進行跳脫
	// $0:程式碼段插入後,遊標的所在位置
	// descrition:程式碼段描述 - 使用智慧感知時的描述

	".vue for ts": {
		"prefix": "<vue> with ts",
		"body": [
			"<template>",
			"  <div>",
			"    ${0}",
			"  </div>",
			"</template>",
			"<script lang=\"ts\">",
			"import Vue from 'vue'",
			"export default Vue.extend({",
			"\r",
			"})",
			"</script>",
			"\r",
			"<style></style>",
		],
		"description": "使用TS語法"
	}
}
使用 TS 實現案例的註冊功能
編寫請求方法
安裝HTTP請求依賴 npm i axios。
簡單封裝一下 axios:
// src/utils/request.ts
import axios from 'axios'

// 建立 axios 範例
const request = axios.create({
  // 介面基礎路徑
  baseURL: 'https://conduit.productionready.io/api'
})

export default request
封裝使用者認證相關介面請求介面的方法,這裏開始使用 TS:
一般情況下,使用者註冊方法介面的參數可以是介面的請求體(data),但是這樣就可以傳任何型別,包括不是介面期望接收的結構和型別。
這也是前後端聯調時經常發生的情況:介面傳參傳錯。
TypeScript 可以通過interface(介面)的方式定義數據型別。
- 介面定義數據型別,{}不是物件,而是介面的語法
- 介面名首字母大寫
- 介面的分隔符可以使用逗號或分號,也可以不使用分隔符
@typescript-eslint/member-delimiter-style校驗風格要求必須使用分隔符- 可以選擇在ESLint設定中關閉這條規則,或者編寫分割符
// src/api/auth.ts
/**
 * 使用者認證相關介面模組
 */
import request from '@/utils/request'

// 使用者註冊介面傳參
export interface User {
  user: {
    username: string
    email: string
    password: string
  }
}

// 使用者註冊
export const register = (data: User) => {
  request({
    method: 'POST',
    url: '/users',
    data: data
  })
}
效果:
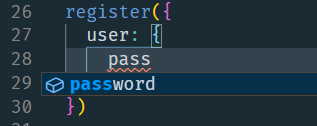
- 格式錯誤會智慧提示
- 輸入的時候會自動提示介面中定義的欄位

建議:
在第一次使用的地方定義 interface,也可以集中在一個檔案中定義。
提供介面的導出(export),方便其他地方使用
繼續擴充套件 register 的返回值。
一般情況,會將請求的介面直接返回,這樣開發的時候需要開發者自己瞭解返回的數據結構,頻繁的看介面文件,或檢視實際請求結果。
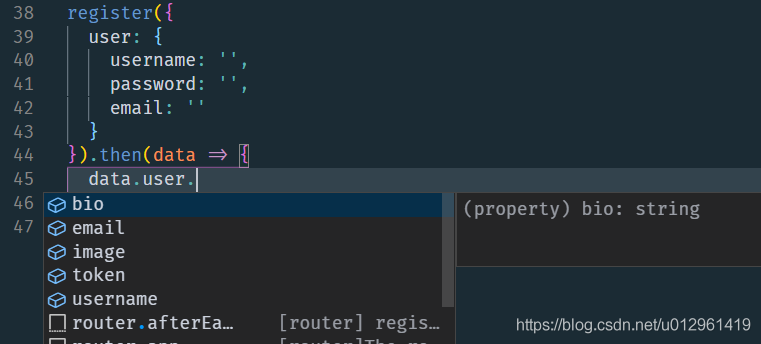
爲返回值新增型別宣告,這樣在使用時,就會有智慧提示,減少很多工作。
// src/api/auth.ts
/**
 * 使用者認證相關介面模組
 */
import request from '@/utils/request'

// 使用者註冊介面傳參
export interface User {
  user: {
    username: string
    email: string
    password: string
  }
}

// 使用者註冊介面返參
export interface RegisterData {
  user: {
    email: string
    token: string
    username: string
    bio: string
    image: string
  }
}

// 使用者註冊
export const register = async (data: User): Promise<RegisterData> => {
  const res = await request({
    method: 'POST',
    url: '/users',
    data: data
  })
  return res.data
}
注意:
- request 呼叫的是 axios ,它是非同步請求,所以要獲取 axios 請求結果並返回,需要使用 async/await
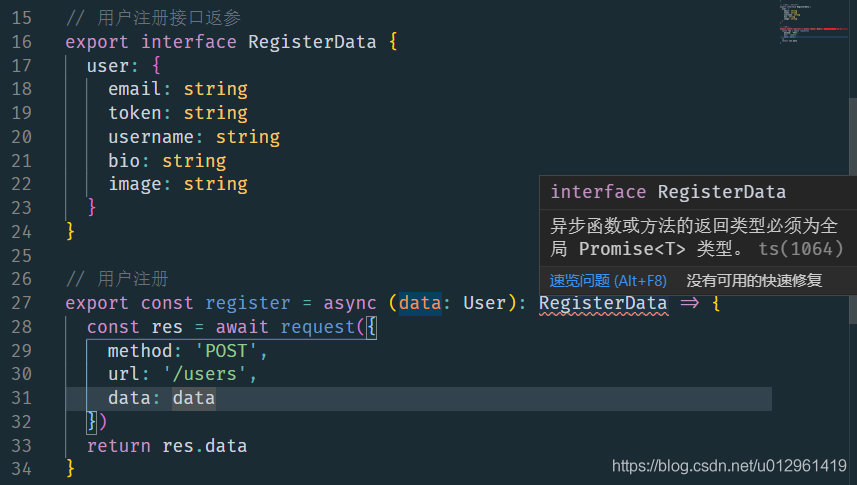
- 而 TypeScript 要求 async 非同步函數的返回型別必須是 Promise,當直接指定返回型別時會報錯
- 需要使用泛型,指定 Promise 型別的型別宣告
錯誤範例:
最終使用效果(智慧提示):
編寫表單事件
- data 中定義表單數據
- 系結表單的 submit 事件爲自定義方法 onSubmit
- 注意使用 prevent 阻止表單預設行爲
- 系結表單中的數據 v-model
- 匯入 register 方法
- 編寫 onSubmit 方法
<template>
  <div class="auth-page">
    <div class="container page">
      <div class="row">
        <div class="col-md-6 offset-md-3 col-xs-12">
          <h1 class="text-xs-center">Sign up</h1>
          <p class="text-xs-center">
            <a href="">Have an account?</a>
          </p>

          <ul class="error-messages">
            <li>That email is already taken</li>
          </ul>

          <form @submit.prevent="onSubmit">
            <fieldset class="form-group">
              <input
                v-model="user.username"
                class="form-control form-control-lg"
                type="text"
                placeholder="Your Name"
              />
            </fieldset>
            <fieldset class="form-group">
              <input
                v-model="user.email"
                class="form-control form-control-lg"
                type="text"
                placeholder="Email"
              />
            </fieldset>
            <fieldset class="form-group">
              <input
                v-model="user.password"
                class="form-control form-control-lg"
                type="password"
                placeholder="Password"
              />
            </fieldset>
            <button class="btn btn-lg btn-primary pull-xs-right">
              Sign up
            </button>
          </form>
        </div>
      </div>
    </div>
  </div>
</template>
<script lang="ts">
import Vue from 'vue'
import { register } from '@/api/auth.ts'
export default Vue.extend({
  name: 'login',
  data() {
    return {
      user: {
        username: 'aaasfgdfghfdaaaaa',
        email: '[email protected]',
        password: '1234abcd'
      }
    }
  },
  methods: {
    async onSubmit() {
      // 獲取表單數據
      // 表單驗證
      // 提交表單
      const data = await register({
        user: this.user
      })
      console.log(data)
      // 根據返回結果處理後續操作
      this.$router.push({
        name: 'home'
      })
    }
  }
})
</script>

<style></style>
RealWorld 註冊介面使用注意:
- 介面會校驗參數格式,校驗失敗會返回422。
- 使用過的參數值,會報
has already been taken,也會返回422,所以參數的值不妨寫的複雜點。