Spring面向切面程式設計AOP--3
1、Spring中AOP的術語和細節
1、概述
含義: 面向切面程式設計,通過預編譯方式和執行期間動態代理實現程式功能的統一維護的一種技術。
作用: 將日誌記錄,效能統計,安全控制,事務處理,例外處理等程式碼從業務邏輯程式碼中劃分出來,通過對這些行爲的分離,我們希望可以將它們獨立到非指導業務邏輯的方法中,進而改變這些行爲的時候不影響業務邏輯的程式碼。
2、需要用到的包
   <dependency>
  		<groupId>org.springframework</groupId>
  		<artifactId>spring-context</artifactId>
  		<version>5.0.6.RELEASE</version>
  	</dependency>
    <dependency>
  		<groupId>org.aspectj</groupId>
  		<artifactId>aspectjweaver</artifactId>
  		<version>1.8.7</version>
  	</dependency>
3、術語
JoinPoint(連線點):
被攔截到的點,連線業務和增強方法中的點,也就是service介面中的方法
PointCut(切入點):
對哪些JoinPoint進行攔截的定義。也就是service中被增強的方法(所有的切入點都是連線點),未被增強的只是連線點
Advice(通知/增強):
通知是指攔截到JoinPoint之後要做的事情,實質就是事務支援
通知的型別:
前置通知(invoke執行之前)、後置通知(invoke執行之後)、異常通知(catch中)、最終通知(finally中)、環繞通知(整個invoke方法在執行就是環繞通知。環繞通知中有明確的切入點方法呼叫)
Introduction(引介):
引介是一種特殊的通知在不修改類程式碼的前提下,Introduction可以在執行期爲類動態的新增一些方法或Field
Target(目標物件):
被代理物件
Weaving(織入):
是指把增強應用到目標物件來建立新的代理物件的過程。—代理後返回一個代理物件
Proxy(代理):
代理物件
Aspect(切面):
切入點和通知的結合—點點成面
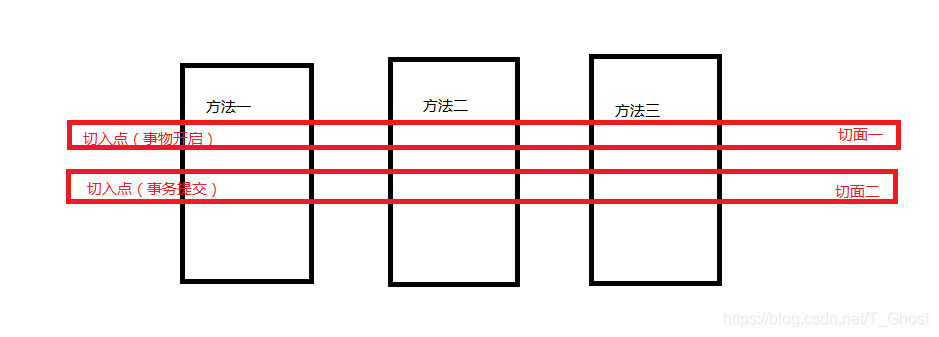
補充:
在AOP中切面就是與業務邏輯獨立,但又垂直存在於業務邏輯的程式碼結構中的通用功能組合;切面與業務邏輯相交的點就是切點;連線點就是把業務邏輯離散化後的關鍵節點;切點屬於連線點,是連線點的子集;Advice(增強)就是切面在切點上要執行的功能增加的具體操作;在切點上可以把要完成增強操作的目標物件(Target)連線到切面裡,這個連線的方式就叫織入。
4、需要明確的事:
1、開發階段
編寫核心業務程式碼
把公用程式碼抽取出來,製作成通知
組態檔中,宣告切入點和通知之間的關係
2、執行階段
Spring框架監控切入點方法的執行,一旦監控到切入點方法被執行,使用代理機制 機製。動態建立目標物件的代理物件,並作相應的代理。
2、Spring基於XML的AOP設定步驟
注意:在SSM中引入AOP時,需要將其設定在SpringMVC的組態檔中
1、xml中引入:
<?xml version="1.0" encoding="UTF-8"?>
<beans xmlns="http://www.springframework.org/schema/beans"
    xmlns:xsi="http://www.w3.org/2001/XMLSchema-instance"
    xmlns:aop="http://www.springframework.org/schema/aop"
    xsi:schemaLocation="http://www.springframework.org/schema/beans
        https://www.springframework.org/schema/beans/spring-beans.xsd
        http://www.springframework.org/schema/aop
        https://www.springframework.org/schema/aop/spring-aop.xsd">
</beans>
2、service引入
3、把通知bean引入
4、使用aop:config標籤表明開始aop設定
5、使用aop:aspect標籤表明設定切面
id:唯一標識
ref:指定通知bean的id
6、在aop:aspect標籤的內部使用對應的標籤設定通知型別
aop:before----前置通知
aop:after-returning ----後置通知
aop:after-throwing ----異常通知
aop:after ----最終通知
屬性:
a、method:用於指定通知方法
b、pointcut:用於指定切入點表達式(方法)
c、切入點表達式寫法:
**關鍵字:*execution(表達式)
表達式:
存取修飾符 返回值 包名.包名.包名.包名。。。類名.方法名(參數)
標準寫法:
public void com.dhcc.my.service.imp.AccountServiceImp.saveAccount()
全通配寫法:
1、存取修飾符可以省略
2、返回值可使用萬用字元,表示任意返回值
3、包名可以使用萬用字元,表示任意包 ,幾個包寫幾個
4、包名可以使用…來表示當前包及其子包
4、類名和方法名都可以使用*來實現
5、方法參數可用…來表示任意參數
如下:
- ….*(…)
開發中實際寫法爲指向業務層實現類的所有方法
通用化切入點表達式:
在aop:aspect標籤中設定,必須寫在切面之前,並在上述通知型別中中通過pointcut-ref引入
<aop:pointcut id="" expression=""/>
也可寫在aop:aspect外,可全域性參照
7、範例
組態檔
<?xml version="1.0" encoding="UTF-8"?>
<beans xmlns="http://www.springframework.org/schema/beans"
    xmlns:xsi="http://www.w3.org/2001/XMLSchema-instance"
    xmlns:aop="http://www.springframework.org/schema/aop"
    xsi:schemaLocation="http://www.springframework.org/schema/beans
        https://www.springframework.org/schema/beans/spring-beans.xsd
        http://www.springframework.org/schema/aop
        https://www.springframework.org/schema/aop/spring-aop.xsd">

    <!-- <context:component-scan base-package="com.my"></context:component-scan> -->
    <bean id="serviceMethods" class="com.my.test.ServiceMethods"></bean>
    <bean id="useAdvice" class="com.my.test.UseAdvice"></bean>

    <aop:config>
    	<aop:aspect id="useAdviceAspect" ref="useAdvice">
    		<aop:pointcut expression="execution(* com.my.test.ServiceMethods.method*(..))" id="serviceMethodPointCut"/>
    		<aop:before method="beforeAdvice" pointcut-ref="serviceMethodPointCut"/>
    		<aop:after-returning method="afterReturning" pointcut-ref="serviceMethodPointCut"/>
    		<aop:after-throwing method="afterThrowing" pointcut-ref="serviceMethodPointCut"/>
    		<aop:after method="after" pointcut-ref="serviceMethodPointCut"/>
    	</aop:aspect>
    </aop:config>
</beans>
Java程式碼
public class TestMain {
	public static void main(String[] args) {
		ApplicationContext app = new ClassPathXmlApplicationContext("bean.xml");
		ServiceMethods serviceM = (ServiceMethods) app.getBean("serviceMethods");
		serviceM.methodA();
		serviceM.methodB();
	}
}

class ServiceMethods {
	public void methodA() {
		System.out.println("A方法執行!");
	}

	public void methodB() {
		System.out.println("B方法執行!");
	}
}

class UseAdvice {

	public void beforeAdvice() {
		System.out.println("前置通知");
	}
	public void afterReturning() {
		System.out.println("後置通知");
	}
	public void afterThrowing() {
		System.out.println("異常通知");
	}
	public void after() {
		System.out.println("最終通知");
	}
}
3、基於註解的AOP設定
1、加入context名稱空間
<?xml version="1.0" encoding="UTF-8"?>
<beans xmlns="http://www.springframework.org/schema/beans"
    xmlns:xsi="http://www.w3.org/2001/XMLSchema-instance"
    xmlns:aop="http://www.springframework.org/schema/aop"
    xmlns:context="http://www.springframework.org/schema/context"
    xsi:schemaLocation="http://www.springframework.org/schema/beans
        https://www.springframework.org/schema/beans/spring-beans.xsd
        http://www.springframework.org/schema/aop
        https://www.springframework.org/schema/aop/spring-aop.xsd
        http://www.springframework.org/schema/context
        https://www.springframework.org/schema/context/spring-context.xsd">
</beans>
2、設定spring建立容器時掃描的包
<context:component-scan base-package="包"></context:component-scan>
3、設定spring開啓註解AOP的支援
<aop:aspectj-autoproxy></aop:aspectj-autoproxy>
4、@Aspect表示當前類是一個切面類
5、通知型別
@Before----前置通知
@AfterReturning----後置通知
@AfterThrowing—異常通知
@After----最終通知
@Around----環繞通知
6、切入點表達式
@Pointcut(「execution(…)」)
public void a(){} -----a指向切面方法集,在上述通知型別呼叫 如@Before(「a()」)
spring基於註解AOP通知型別有呼叫順序問題 環繞通知無問題
7、使用純註解的方式
@Configuration
@ComponentScan(basePackage=「包」)
@EnableAspectJAutoProxy----開啓spring對AspectJ的支援
8、範例
組態檔
<?xml version="1.0" encoding="UTF-8"?>
<beans xmlns="http://www.springframework.org/schema/beans"
    xmlns:xsi="http://www.w3.org/2001/XMLSchema-instance"
    xmlns:aop="http://www.springframework.org/schema/aop"
    xmlns:context="http://www.springframework.org/schema/context"
    xsi:schemaLocation="http://www.springframework.org/schema/beans
        https://www.springframework.org/schema/beans/spring-beans.xsd
        http://www.springframework.org/schema/aop
        https://www.springframework.org/schema/aop/spring-aop.xsd
        http://www.springframework.org/schema/context
        https://www.springframework.org/schema/context/spring-context.xsd">
    <!-- 設定Spring建立容器時掃描的包 -->
    <context:component-scan base-package="com.my"></context:component-scan>
    <!-- 設定spring開啓註解AOP的支援 -->
   	<aop:aspectj-autoproxy></aop:aspectj-autoproxy>
</beans>
Java程式碼
public class TestMain {
	public static void main(String[] args) {
		ApplicationContext app = new ClassPathXmlApplicationContext("bean.xml");
		ServiceMethods serviceM = (ServiceMethods) app.getBean("serviceMethods");
		serviceM.methodA();
		serviceM.methodB();
	}
}
//注入容器
@Service
class ServiceMethods {
	public void methodA() {
		System.out.println("A方法執行!");
	}

	public void methodB() {
		System.out.println("B方法執行!");
	}
}

@Component
//值定切面
@Aspect
class UseAdvice {
	//值定切點
	@Pointcut("execution(* com.my.test.ServiceMethods.method*(..))")
	private void executePoint() {}

	@Before(value = "executePoint()")
	public void beforeAdvice() {
		System.out.println("前置通知");
	}

	@AfterReturning(value="executePoint()")
	public void afterReturning() {
		System.out.println("後置通知");
	}

	@AfterThrowing(value="executePoint()")
	public void afterThrowing() {
		System.out.println("異常通知");
	}

	@After(value = "executePoint()")
	public void after() {
		System.out.println("最終通知");
	}
}
4、Spring中事物控制
1、概述
事務就是對一系列的數據庫操作進行統一的提交或回滾操作,比如說做一個轉賬功能,要更改帳戶兩邊的數據,這時候就必須要用事務才能 纔能算是嚴謹的做法。要麼成功,要麼失敗,保持數據一致性。如果中間有一個操作出現異常,那麼回滾之前的所有操作。
第一:JavaEE 體系進行分層開發,事務處理位於業務層,Spring 提供了分層設計業務層的事務處理解決方案。
第二:spring 框架爲我們提供了一組事務控制的介面。這組介面是在spring-tx-5.0.2.RELEASE.jar 中。
第三:spring 的事務控制都是基於 AOP 的,它既可以使用程式設計的方式實現,也可以使用設定的方式實現。我們學習的重點是使用設定的方式實現。
2、Spring中事務控制的API
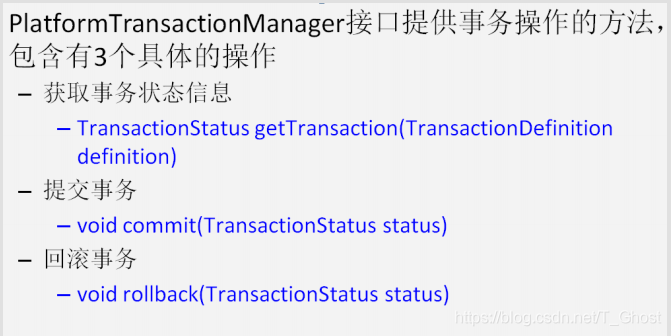
1、PlatformTransactionManager
此介面是 spring 的事務管理器,它裏面提供了我們常用的操作事務的方法,如下圖:
2、真正管理事務的物件
org.springframework.jdbc.datasource.DataSourceTransactionManager 使用 Spring JDBC 或 iBatis 進行持久化數據時使用
org.springframework.orm.hibernate5.HibernateTransactionManager 使用
Hibernate 版本進行持久化數據時使用
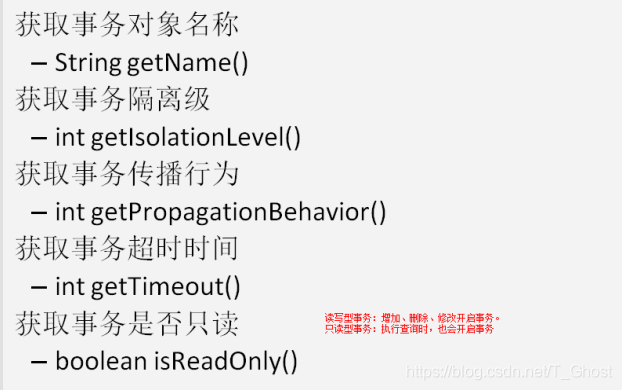
3、TransactionDefinition
它是事務的定義資訊物件,裏面有如下方法:
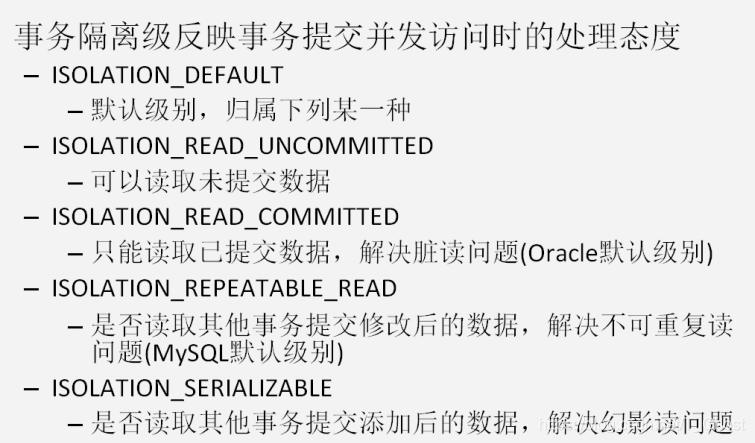
4、事務的隔離級別
5、事務的傳播行爲
REQUIRED:如果當前沒有事務,就新建一個事務,如果已經存在一個事務中,加入到這個事務中。一般的選擇(預設值)
SUPPORTS:支援當前事務,如果當前沒有事務,就以非事務方式執行(沒有事務)
MANDATORY:使用當前的事務,如果當前沒有事務,就拋出異常
REQUERS_NEW:新建事務,如果當前在事務中,把當前事務掛起。
NOT_SUPPORTED:以非事務方式執行操作,如果當前存在事務,就把當前事務掛起
NEVER:以非事務方式執行,如果當前存在事務,拋出異常
NESTED:如果當前存在事務,則在巢狀事務內執行。如果當前沒有事務,則執行 REQUIRED 類似的操作
6、超時時間
預設值是-1,沒有超時限制。如果有,以秒爲單位進行設定。
7、TransactionStatus
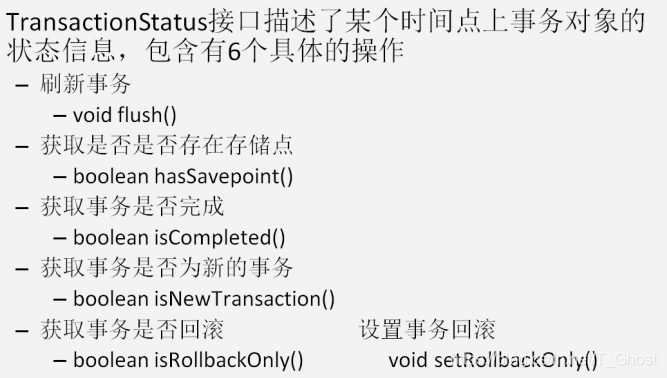
8、<tx:method />標籤的屬性
name:方法名的匹配模式,通知根據該模式尋找匹配的方法。該屬性可以使用asterisk (*)萬用字元
propagation:設定事務定義所用的傳播級別
isolation:設定事務的隔離級別
timeout:指定事務的超時(單位爲秒)
read-only:該屬性爲true指示事務是隻讀的(典型地,對於只執行查詢的事務你會將該屬性設爲true,如果出現了更新、插入或是刪除語句時只讀事務就會失敗)
no-rollback-for:以逗號分隔的異常類的列表,目標方法可以拋出這些異常而不會導致通知執行回滾
rollback-for:以逗號分隔的異常類的列表,當目標方法拋出這些異常時會導致通知執行回滾。預設情況下,該列表爲空,因此不在no-rollback-for列表中的任何執行時異常都會導致回滾
3、基於XML的宣告式事務控制(設定方式)
1、引入jar包
 <dependency>
        <groupId>org.springframework</groupId>
        <artifactId>spring-jdbc</artifactId>
        <version>5.1.2.RELEASE</version>
    </dependency>
    <dependency>
        <groupId>org.springframework</groupId>
        <artifactId>spring-tx</artifactId>
        <version>5.0.2.RELEASE</version>
     </dependency>
  	<dependency>
2、建立所需的類
public class TestMain {
	public static void main(String[] args) {
		ApplicationContext app = new ClassPathXmlApplicationContext("bean.xml");
		PersonServiceImpl p = (PersonServiceImpl) app.getBean("personServiceImpl");
		p.savePerson();
	}
}

class PersonDaoImpl extends JdbcDaoSupport{
	public void savePerson(String sql) {
		this.getJdbcTemplate().execute(sql);
	}
}

class PersonServiceImpl{

	private PersonDaoImpl personDao;

	public void setDao(PersonDaoImpl personDao) {
	    this.personDao = personDao;
	}

	public void savePerson() {
		personDao.savePerson("INSERT INTO test1 (ID,NAME ) VALUES(1,'xixi')");
	    int a=1/0;
	    personDao.savePerson("INSERT INTO test1 (ID,NAME ) VALUES(2,'xixi')");
	  }
}
3、組態檔
<?xml version="1.0" encoding="UTF-8"?>
<beans xmlns="http://www.springframework.org/schema/beans"
       xmlns:xsi="http://www.w3.org/2001/XMLSchema-instance" xmlns:aop="http://www.springframework.org/schema/aop"
       xmlns:tx="http://www.springframework.org/schema/tx" xmlns:context="http://www.springframework.org/schema/context"
       xmlns:mvc="http://www.springframework.org/schema/mvc" xmlns:task="http://www.springframework.org/schema/task"
       xsi:schemaLocation="
        http://www.springframework.org/schema/beans
        http://www.springframework.org/schema/beans/spring-beans-3.1.xsd
        http://www.springframework.org/schema/tx
        http://www.springframework.org/schema/tx/spring-tx-3.1.xsd
        http://www.springframework.org/schema/aop
        http://www.springframework.org/schema/aop/spring-aop-3.1.xsd
        http://www.springframework.org/schema/context
        http://www.springframework.org/schema/context/spring-context-3.1.xsd
        http://www.springframework.org/schema/mvc
        http://www.springframework.org/schema/mvc/spring-mvc-3.1.xsd
        http://www.springframework.org/schema/task
        http://www.springframework.org/schema/task/spring-task-3.1.xsd">


    <!-- 設定數據源 -->
    <bean id="dataSource" class="org.springframework.jdbc.datasource.DriverManagerDataSource">
    	<property name="driverClassName" value="com.mysql.jdbc.Driver"></property>
        <property name="url" value="jdbc:mysql://localhost:3306/my_test?serverTimezone=GMT%2B8"></property>
        <property name="username" value="root"></property>
        <property name="password" value="666666"></property>
    </bean>

  <bean id="personDaoImpl" class="com.my.test.PersonDaoImpl">
        <property name="dataSource">
            <ref bean="dataSource" />
        </property>

    </bean>

    <bean id="personServiceImpl" class="com.my.test.PersonServiceImpl">
        <property name="dao">
            <ref bean="personDaoImpl" />
        </property>
    </bean>


    <!-- 事務管理器 告訴spring容器要採用什麼樣的技術處理事務 -->
    <bean id="transactionManager"
        class="org.springframework.jdbc.datasource.DataSourceTransactionManager">
        <property name="dataSource">
            <ref bean="dataSource" />
        </property>
    </bean>


    <tx:advice id="tx" transaction-manager="transactionManager">

        <tx:attributes>
<!--告知事務處理的策略-->
            <tx:method name="save*" propagation="REQUIRED" isolation="DEFAULT"
                read-only="false" />
        </tx:attributes>
    </tx:advice>
    <aop:config>
        <aop:pointcut
            expression="execution(* com.my.test.PersonServiceImpl.*(..))"
            id="perform" />
        <aop:advisor advice-ref="tx" pointcut-ref="perform" />
    </aop:config>
</beans>
4、基於註解的設定方式
組態檔
<?xml version="1.0" encoding="UTF-8"?>
<beans xmlns="http://www.springframework.org/schema/beans"
       xmlns:xsi="http://www.w3.org/2001/XMLSchema-instance" xmlns:aop="http://www.springframework.org/schema/aop"
       xmlns:tx="http://www.springframework.org/schema/tx" xmlns:context="http://www.springframework.org/schema/context"
       xmlns:mvc="http://www.springframework.org/schema/mvc" xmlns:task="http://www.springframework.org/schema/task"
       xsi:schemaLocation="
        http://www.springframework.org/schema/beans
        http://www.springframework.org/schema/beans/spring-beans-3.1.xsd
        http://www.springframework.org/schema/tx
        http://www.springframework.org/schema/tx/spring-tx-3.1.xsd
        http://www.springframework.org/schema/aop
        http://www.springframework.org/schema/aop/spring-aop-3.1.xsd
        http://www.springframework.org/schema/context
        http://www.springframework.org/schema/context/spring-context-3.1.xsd
        http://www.springframework.org/schema/mvc
        http://www.springframework.org/schema/mvc/spring-mvc-3.1.xsd
        http://www.springframework.org/schema/task
        http://www.springframework.org/schema/task/spring-task-3.1.xsd">

    <!-- 設定spring建立容器時要掃描的包-->
    <context:component-scan base-package="com.my"></context:component-scan>


    <!-- 設定數據源 -->
    <bean id="dataSource" class="org.springframework.jdbc.datasource.DriverManagerDataSource">
    	<property name="driverClassName" value="com.mysql.jdbc.Driver"></property>
        <property name="url" value="jdbc:mysql://localhost:3306/my_test?serverTimezone=GMT%2B8"></property>
        <property name="username" value="root"></property>
        <property name="password" value="666666"></property>
    </bean>

    <!-- 設定JdbcTemplate-->
    <bean id="jdbcTemplate" class="org.springframework.jdbc.core.JdbcTemplate">
        <property name="dataSource" ref="dataSource"></property>
    </bean>


    <!-- 事務管理器 告訴spring容器要採用什麼樣的技術處理事務 -->
    <bean id="transactionManager"
        class="org.springframework.jdbc.datasource.DataSourceTransactionManager">
        <property name="dataSource">
            <ref bean="dataSource" />
        </property>
    </bean>


     <!-- 開啓spring對註解事務的支援-->
    <tx:annotation-driven transaction-manager="transactionManager"></tx:annotation-driven>

</beans>
Java程式碼
public class TestMain {
	public static void main(String[] args) {
		ApplicationContext app = new ClassPathXmlApplicationContext("bean.xml");
		A p = (A) app.getBean("a");
		p.sayA();
	}
}

@Service
@Transactional
class A{
	@Autowired
	private JdbcTemplate jdbcTemplate;

	@Transactional(propagation = Propagation.REQUIRED,isolation = Isolation.DEFAULT,readOnly = false)
	public void sayA() {
		jdbcTemplate.update("INSERT INTO test1 (ID,NAME ) VALUES(1,'xixi')");
		int i = 1/0;
		jdbcTemplate.update("INSERT INTO test1 (ID,NAME ) VALUES(2,'xixi1')");
	}
}